Publicité
Les langues disponibles
Les langues disponibles
Liens rapides
Publicité

Manuels Connexes pour Standard Horizon HX40E


Sommaire des Matières pour Standard Horizon HX40E
- Page 1 HX40E Émetteur-récepteur maritime VHF FM Manuel d'utilisation...
- Page 2 6.1.3 INFORMATION SUR LA DURÉE DE VIE DE BATTERIE ... 11 10. CONFIGURATION DE L'ATIS 6.2 INSTALLATION / DEPOSE DU CLIP ( HX40E seulement ) ....34 DE CEINTURE ... 11 10.1 PROGRAMMATION DES CODES ATIS ... 34 10.2 GROUPE CH ATIS ........35 7.
- Page 3 RÉFÉRENCE RAPIDE PTT ( Push-To-Talk ) Active l'émetteur quand on appuie dessus. ▲/▼ Appuyez sur pour modifier le canal d'utilisation. ◄/► Appuyez pour faire basculer les menus affichés vers la droite/gauche. Appuyez et maintenez enfoncé pour activer/désactiver (ON/OFF) l’émetteur- récepteur. ENT/MENU • Appuyez pour avoir accès au MENU. •...
- Page 4 Le personnel de soutien technique STANDARD HORIZON se tient derrière chaque produit vendu. Le personnel de soutien technique STANDARD HORIZON se tient derrière chaque produit vendu. Le HX40 est un émetteur-récepteur marin bidirectionnel portable ultra-compact submersible 6 watts (5 watts ) * .
- Page 5 2. PRÉCAUTIONS DE SÉCURITÉ Lisez attentivement les consignes de sécurité pour utiliser ce produit en toute sécurité. Yaesu n'est pas responsable de défaillances ou de problèmes causés par l'utilisation ou l'usage impropre de ce produit par l'acheteur ou par des tiers. En outre, Yaesu n'est pas responsable de dommages causés par l'utilisation de ce produit par l'acheteur ou par des tiers, sauf dans les cas où le versement de dommages a été demandé aux termes de la loi. Types et significations des avis Une situation dangereuse imminente qui, si elle n'est pas évitée, peut entraîner la mort ou de graves DANGER...
- Page 6 3. ENREGISTREMENT DE LA GARANTIE EN LIGNE Visitez www.standardhorizon.com - Le Coin des Propriétaires pour enregistrer le HX40 Marin VHF. NOTE : Il peut être utile de visiter le site STANDARD HORIZON régulièrement. Lors de l'introduction de nouveaux produits, des informations seront disponibles sur le site. 4. A PROPOS DE CETTE RADIO 4.1 A PROPOS DE LA BANDE VHF MARITIME Les fréquences radio utilisées dans la bande VHF marine sont comprises entre 156 et 158 MHz, avec des stations météo NOAA disponibles entre 161 et 163 MHz.
- Page 7 3. Signalez ensuite votre position en indiquant la latitude/longitude ou en fournissant un relèvement de position ou magnétique ( indiquer lequel ) par rapport à un amer identifiable tel qu'une aide à la navigation ou une caractéristique géographique comme une île ou l'entrée d'un port. Expliquez la nature de votre détresse ( naufrage, collision, échouage, incendie, crise cardiaque, blessure mettant en danger la vie d'une personne, etc.
- Page 8 4.5 CANAUX DE PASSERELLE 13 ET 67 Le canal 13 est utilisé sur les quais et les ponts, et par les navires manœuvrant dans le port. Sur ce canal, les messages doivent concerner exclusivement la navigation, par ex. le croisement et le passage dans des eaux réglementées. Le canal 67 est utilisé pour le trafic de navigation entre les navires.
- Page 9 Milieu-Atlantique Sea Tow Northern Chesapeake ( Md. ) - can. 28 Sea Tow Central Chesapeake ( Md. ) - can. 27 Sea Tow Hampton Roads ( Va. ) - can. 28 Caroline du Nord Sea Tow Wrightsville Beach - can. 28 Sea Tow Ocean Isle Beach - can.
- Page 10 5. ACCESSOIRES 5.1 LISTE DE COLISAGE Après avoir ouvert l'emballage contenant l'émetteur-récepteur, vérifiez qu'il contient les éléments suivants: Emetteur-récepteur HX40 Antenne * CAT460 SAD-23/SAD-11 * Adaptateur AC pour SBH-27 Câble DC avec prise d'allume-cigare 12 V E-DC-19A Socle de chargeur SBH-27 Clip de ceinture SHB-19...
- Page 11 6. DÉMARRAGE 6.1 BATTERIES ET CHARGEURS Si la radio n'a jamais été utilisée, ou si sa charge est épuisée, elle peut être chargée en branchant le socle de chargeur SBH-27 avec l'adaptateur AC SAD-23/SAD-11, voir la section "6.1.2 CHARGE DE LA BATTERIE". Si une alimentation de 12 Vcc est disponible, le câble DC E-DC-19A fourni avec la prise allume-cigare de 12 V peut être utilisé pour charger la batterie. Le SAD-23/SAD-11 et E-DC-19A chargeront une batterie intégrée complètement déchargée en 3 heures environ.
- Page 12 Entretien de la batterie Pour une utilisation correcte et sans danger de la batterie, veuillez observer les points suivants: Utilisez exclusivement des batteries homologuées par STANDARD HORIZON. N'inversez pas la polarité de la charge. Utilisez exclusivement le chargeur approprié. Toute altération du chargeur ou l'utilisation d'un chargeur différent peut endommager la batterie de façon permanente.
- Page 13 TV et radio à proximité immédiate, il est donc recommandé de ne pas l'utiliser à côté de ces appareils. Contactez le concessionnaire Standard Horizon ou le Service d'usine pour le remplacement de la batterie intégrée. Consultez la section "11.2 SERVICE D'USINE".
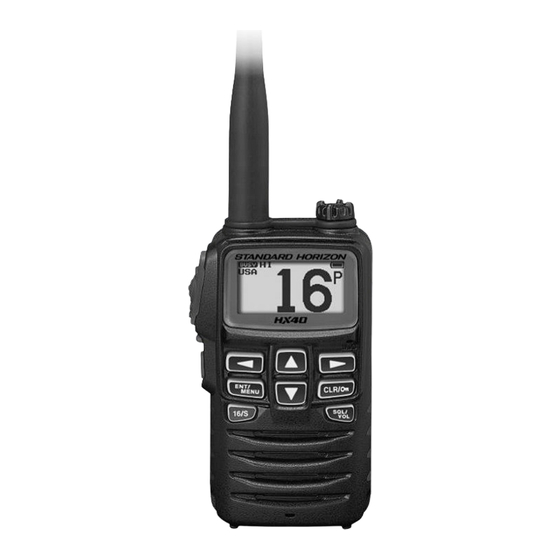
- Page 14 7. COMMANDES ET VOYANTS 7.1 COMMANDES ET INTERRUPTEURS NOTA Cette section décrit chaque commande de l'émetteur-récepteur. Pour des instructions d'utilisation détaillées, consultez la section "8. FONCTIONNEMENT DE BASE". Observez l'illustration ci-dessous pour identifier les emplacements des commandes, des interrupteurs et des branchements. ...
- Page 15 Microphone Le micro intérieur se trouve ici. Pendant l'émission, placez le microphone à environ 1/2 - 1 pouce ( 1,2 - 2,5 cm ) de votre bouche. Parlez lentement et distinctement dans le micro. Clavier Touche p ( UP ) Appuyez sur cette touche pour modifier le canal d'utilisation, le niveau de volume audio, ou le seuil du silencieux.
- Page 16 7.2 TÉMOINS DE L'ÉCRAN LCD ①② ⑤ ⑥ ⑦ ⑧ ③ ⑨ ④ ⑩ ⑪ ⑫ Les captages d'écran dans ce manuel sont décrits sur la version USA. Indicateur " " Ce témoin s'affiche pendant la transmission. Indicateur " " Ce témoin apparaît lorsqu'un signal est reçu ou que le réglage silencieux de la radio est désactivé.
- Page 17 Témoin de batterie : Batterie complètement chargée. : Puissance de batterie suffisante : Puissance de batterie insuffisante : Puissance de batterie faible. Chargez la batterie. : Chargez la batterie immédiatement Indicateur "P" S'affiche lorsque le canal est réglé comme canal prioritaire. Indicateur "D" Affiché lorsque la fonction double veille est activée en mode radio FM. Indicateur "T" Affiché lorsque la fonction triple veille est activée en mode radio FM. Affichage des canaux Le canal en service est affiché sur l'écran LCD dans les modes d'émission et de réception. Indicateur VOL Ce témoin indique le niveau sonore de la réception. Indicateur SQL Cet indicateur indique le niveau de réglage du squelch.
- Page 18 8. FONCTIONNEMENT DE BASE 8.1 COMMUNICATIONS INTERDITES La FCC interdit les communications suivantes : Faux messages de détresse ou d'urgence. Messages vers "n'importe quel navire" sauf en cas d'urgence et d'essais radio. Messages vers ou en provenance d'un navire à terre. Transmission terrestre. Obscène, indécent ou blasphématoire ( amende possible de 10 000 $ ) . 8.2 CONFIGURATION INITIALE 1. Pour installer l'antenne sur l'émetteur-récepteur, tenez l'extrémité inférieure de l'antenne, puis vissez-la sur le connecteur correspondant de l'émetteur-récepteur...
- Page 19 8.4.1 PUISSANCE D'ÉMISSION La puissance de sortie TX du HX40 est réglée à un niveau élevé ( 6 W ( 5 W ) * ) à la valeur par défaut, et l'indicateur "HI" est affiché en haut de l'écran. Pour modifier la puissance de sortie TX: 1. Appuyez sur la touche [◄] ou [►] pour afficher les touches de fonction. 2. Appuyez plusieurs fois sur la touche [◄] or [►] jusqu'à...
- Page 20 8.6 VERROUILLAGE DU CLAVIER Afin d'éviter des changements accidentels de canal, le clavier du HX40 peut être verrouillé. ] enfoncée pour verrouiller le clavier ( sauf les touches Maintenez la touche [CLR/ ] ) afin qu'elles ne soient pas modifiées accidentellement. PTT, [SQL/VOL] et [CLR/ "KEY LOCK" s'affiche sur la totalité de l’écran pour indiquer que les fonctions sont verrouillées.
- Page 21 Après l'arrêt du bip, l'écran de confirmation de réception d'alerte météo s'affiche. Appuyez sur n'importe quelle touche pour afficher un écran de confirmation. L'écran de confirmation vous demande si vous souhaitez passer sur le canal météo ou revenir au canal maritime. Appuyez sur [ENT/MENU] pour passer sur le canal météo, ou appuyez sur la touche [►] pour sélectionner la touche de fonction [NO], puis appuyez sur [ENT/MENU] pour revenir au canal maritime.
- Page 22 8.8.2 OPÉRATION sur un canal préréglé 1. Appuyez sur la touche [◄] ou [►] pour afficher les touches de fonction. 2. Appuyez plusieurs fois sur la touche [◄] ou [►] jusqu'à ce que la touche [P-SET] s'affiche en bas de l'écran LCD. Appuyez sur la touche [ENT/MENU], puis a p p u y e z s u r l a t o u c h e [ ▲ ] o u [ ▼ ] p o u r sélectionner le canal préattribué...
- Page 23 8.9 BALAYAGE Le HX40 permet d'effectuer deux types de balayage, le "balayage de mémoire" ou le "balayage prioritaire". Le "balayage de mémoire" balaye les canaux qui ont été programmés dans la mémoire de balayage ainsi que les canaux enregistrés dans la mémoire des canaux préréglés.
- Page 24 Canal préréglé « 0 » Canal préréglé « 0 » Canal balayage Canal balayage Canal préréglé « 5 » Canal préréglé « 5 » de mémoire de mémoire Canal préréglé « 4 » Canal préréglé « 1» Canal préréglé « 4 » Canal préréglé...
- Page 25 8.10 MULTIVEILLE ( VERS LE CANAL PRIORITAIRE ) La veille multiple sert à effectuer un balayage sur deux ou trois canaux pour les communications. m En veille double, un canal VHF normal et le canal prioritaire sont balayés en alternance. m En triple veille, un canal VHF normal, le canal prioritaire et le canal secondaire sont balayés en alternance.
- Page 26 8.10.2 Démarrage de la double veille 1. Appuyez deux fois sur la touche [SQL/VOL], puis appuyez sur la touche [▲] ou [▼] jusqu'à ce que le bruit de fond du silencieux disparaisse. 2. Appuyez sur la touche [▲] or [▼] pour sélectionner un canal sur lequel vous souhaitez effectuer la double veille. 3. Appuyez sur la touche [◄] ou [►] pour afficher les touches de fonction. 4. Appuyez plusieurs fois sur la touche [◄] ou [►] ou jusqu'à ce que la touche [DW] s'affiche en bas de l'écran LCD. Appuyez sur la touche [ENT/MENU]. La radio écoutera le canal prioritaire et le canal actif qui ont été sélectionnés à l'étape 2.
- Page 27 8.11 Écoute de la radio FM Le HX40 est prévu pour la réception de radiodiffusion FM. 1. A p p u y e z s u r l a t o u c h e [ ◄ ] o u [ ► ] p o u r sélectionner [RADIO], puis appuyez sur la touche [ENT/MENU].
- Page 28 Appuyez sur la touche [ ENT/MENU] pour enregistrer la première lettre du nom et passer à la lettre suivante vers la droite. Répétez les étapes 4 et 5 jusqu'à ce que le nom soit complet. Le nom peut être constitué de douze lettre maximum; si vous n'utilisez pas les douze lettres, appuyez sur la touche [ENT/MENU] pour passer aux espaces suivants. Cette méthode permet aussi d'entrer un espace vide dans le nom.
- Page 29 Affichage Fonction Enregistre ou supprime le canal de mémoire préréglé. PRESET Sélectionne la puissance de transmission. HI/MD/LO Active/désactive le balayage de double ou triple veille. DW/TW Ajoute ou supprime des canaux dans la mémoire de balayage de canal. MEMORY Active/désactive la fonction de balayage SCAN Pas de fonction.
- Page 30 9. MENU ( "SETUP" ) Le mode menu du HX40 permet de personnaliser la configuration de plusieurs paramètres de fonctionnement du HX40. Utilisez la procédure suivante pour activer et configurer les paramètres du mode Menu. Appuyez sur la menu touche [ENT/MENU] et maintenez-la enfoncée. 2. Appuyez sur la touche [▼] ou [▲] pour sélectionner l'option du menu souhaitée. 3. Appuyez sur la touche [▼] ou [▲] pour sélectionner le numéro de la touche à programmer, et ensuite appuyez sur la touche [ENT/MENU].
- Page 31 9.1.5 REPRISE DU BALAYAGE Cette fonction permet de sélectionner le temps d'attente du HX40 après la fin de la transmission, avant que la radio recommence à balayer les canaux. Le réglage par défaut est de 2 secondes. Appuyez et maintenez enfoncé [ ENT/MENU ] "CHANNEL SETUP" "SCAN RESUME" 2. A p p u y e z s u r l a t o u c h e [ ▲ ] o u [ ▼ ] p o u r sélectionner la durée désirée.
- Page 32 9.2 CONFIGURATION FM 9.2.1 AJOUTER Appuyez et maintenez enfoncé [ ENT/MENU ] "FM SETUP" "ADD". Appuyez sur la touche [ENT/MENU]. Appuyez sur la touche [▲] ou [▼] pour faire défiler les chiffres de la première position de la fréquence. Appuyez sur la touche [ENT/MENU] pour enregistrer le premier chiffre de la fréquence et passer à...
- Page 33 9.2.2 MODIFIER Cette sélection permet de modifier la fréquence et le nom de radiodiffusion FM. Appuyez et maintenez enfoncé [ ENT/MENU ] "FM SETUP" "EDIT". 2. A p p u y e z s u r l a t o u c h e [ ▼ ] o u [ ▲ ] p o u r sélectionner la mémoire à modifier, puisappuyez sur la touche [ENT/MENU].
- Page 34 9.3.2 ECONOMIE BATTERIE Cette fonction vous permet de modifier le réglage du mode économie de batterie. Appuyez et maintenez enfoncé [ ENT/MENU ] "CONFIG" "BATTERY SAVE". 2. A p p u y e z s u r l a t o u c h e [ ▲ ] o u [ ▼ ] p o u r sélectionner le paramètre désiré.
- Page 35 9.3.6 CONTRASTE Le contraste peut être réglé à 30 niveaux. Appuyez et maintenez enfoncé [ ENT/MENU ] "CONFIG" "CONTRAST" 2. A p p u y e z s u r l a t o u c h e [ ▲ ] o u [ ▼ ] p o u r sélectionner le canal désiré.
- Page 36 CONFIGURATION DE L'ATIS ( HX40E seulement ) Le HX40 supporte le système ATIS ( identification automatique de l'émetteur ) utilisé sur les cours d'eau intérieurs en Europe. Lorsqu'il est activé, le mode ATIS transmet un code ATIS unique chaque fois que le bouton PTT est relâché à la fin de la transmission. Les utilisateurs doivent s'adresser aux autorités maritimes de leur pays pour connaître les procédures d'obtention d'un code ATIS.
- Page 37 10.2 GROUPE CH ATIS Le HX40E peut activer ou de désactiver la fonction ATIS pour chaque groupe de canaux. Appuyez et maintenez enfoncé [ ENT/MENU ] "ATIS SETUP" "ATIS GROUP". A p p u y e z s u r l a t o u c h e [ ▲ ] o u [ ▼ ] p o u r sélectionner le groupe de canaux ( International,...
- Page 38 Ne codez pas le micro sauf si une antenne ou une charge fictive adéquate est reliée à l'émetteur-récepteur. Utilisez exclusivement des accessoires et des pièces de rechange homologuées par STANDARD HORIZON. 11.2 SERVICE D'USINE Dans l'éventualité peu probable où la radio ne fonctionne pas ou ait besoin d'être réparée, veuillez contacter l'un des centres suivants:...
- Page 39 B a t t e r i e i n t é g r é e C o n t a c t e z l e c o n c e s s i o n n a i r e n’apparait pas sur l’écran défectueuse. Standard Horizon. pendant la recharge d’une L’émetteur-récepteur n’est Placez correctement l’émetteur- batterie.
- Page 40 12. ATTRIBUTION DES CANAUX MARITIMES VHF 12.1 HX40 ( Version USA ) TABLEAU DES CANAUX MARITIMES VHF UTILISATION DES CANAUX 160.650 Correspondance publique (opérateur maritime ) 156.050 Opérations portuaires et Commercial. 1001 156.050 STM dans certaines zones 160.700 Correspondance publique (opérateur maritime ) 156.100 160.750 Correspondance publique (opérateur maritime ) 156.150...
- Page 41 TABLEAU DES CANAUX MARITIMES VHF UTILISATION DES CANAUX 157.100 161.700 Opérations portuaires, mouvement des navires Liaison des garde-côtes canadiens et transmissions d'informations de sécurité 157.100 maritime sur le canal 16 Liaison des garde-côtes américains et transmissions d'informations de sécurité 1022 157.100 maritime sur le canal 16 161.750 Correspondance publique (opérateur maritime ) 157.150 - - -...
- Page 42 TABLEAU DES CANAUX MARITIMES VHF UTILISATION DES CANAUX USA, Canada: Non commercial (plaisance ) , 156.575 International: Opérations portuaires et mouvement des navires Non commercial ( entre navires seulement ) 156.625 USA: Opérations portuaires, Canada: Pêche commerciale seulement, 156.675 International: Entre navires, Opérations portuaires et mouvement des navires USA: Opérations portuaires,...
- Page 43 12.2 HX40E UTILISATION DES CANAUX SIMPLEX/ ALIMENTATION TX ( MHz ) ( MHz ) Tous les pays DUPLEX FAIBLE Allemagne ( sauf l'Allemagne ) 156.050 160.650 DUPLEX – TÉLÉPHONE NAUTIK 156.100 160.700 DUPLEX – TÉLÉPHONE NAUTIK 156.150 160.750 DUPLEX –...
- Page 44 UTILISATION DES CANAUX SIMPLEX/ ALIMENTATION TX ( MHz ) ( MHz ) Tous les pays DUPLEX FAIBLE Allemagne ( sauf l'Allemagne ) 156.325 160.925 DUPLEX – INTL NAUTIK 156.375 SIMPLEX – PONT/PONT NAUTIK 156.425 SIMPLEX – NAVIRE-NAVIRE 156.475 SIMPLEX – PLAISANCE –...
- Page 45 13. SPÉCIFICATIONS Sauf indication contraire, les spécifications fonctionnelles sont nominales et sont sujettes à modification sans préavis. z GÉNÉRALITÉS TX: 156.025 MHz - 161.600 MHz Plages de fréquence: RX: 156.050MHz - 163.275MHz ( USA/International, y compris les canaux WX ) 25kHz Espacement des canaux: ±3 ppm ( -4°F à...
- Page 46 14. INFORMATIONS SUR LES LICENCES RADIO FCC ET CANADA Les radios Standard Horizon respectent les exigences de la commission de communication fédérale ( FCC ) et du Innovation, Science and Economic Development Canada ( ISED ) qui régissent le service radio maritime.
- Page 47 15. DÉCLARATION DE SÉCURITÉ CONCERNANT L'EXPOSITION AUX RF 15.1 INFORMATION SUR LA SÉCURITÉ Votre émetteur-récepteur por tatif sans fil contient un émetteur à faible puissance. Lorsque vous appuyez sur le bouton ( PTT ) , l'émetteur-récepteur envoie des signaux de radiofréquence ( RF ) . En août 1996, la Federal Communications Commission a adopté...
- Page 48 AVIS Les changements ou les modifications non autorisés de cet équipement peuvent annuler la conformité aux règles FCC. Tout changement ou modification doit être approuvée par écrit par STANDARD HORIZON, une division de YAESU USA. Cet appareil est conforme à la partie 15 des Règlements du FCC. SON UTILISATION EST SOUMISE AUX DEUX CONDITIONS SUIVANTES : ( 1 ) CET APPAREIL NE DOIT PAS CAUSER D'INTERFÉRENCES NUISIBLES, ( 2 ) CET APPAREIL DOIT ACCEPTER TOUTE INTERFÉRENCE REÇUE, Y COMPRIS...
- Page 49 Cet émetteur-récepteur radio ( identifier l'appareil par son numéro de certification ou son numéro de modèle s'il fait partie de la Catégorie II ) a été approuvé par Industrie Canada pour fonctionner avec les types d'antennes indiqués ci- dessous, ayant un gain maximal admissible et une impédance d'antenne requis pour chaque type d'antenne indiqué.
- Page 50 à votre pays. Procédures de garantie: 1. Pour trouver le Centre de service agréé STANDARD HORIZON dans votre pays/région, visitez www. standardhorizon.com. Contactez le Centre de service STANDARD HORIZON pour obtenir des instructions spécifiques de retour et d'expédition, ou contactez un concessionnaire/distributeur agréé STANDARD HORIZON...
- Page 51 Déclaration de conformité UE Nous soussignés, Yaesu Musen Co. Ltd de Tokyo, Japon, déclarons par la présente que cet équipement radio HX40E est pleinement conforme à la Directive européenne relative aux équipements radioélectriques 2014/53/UE. Le texte intégral de la Déclaration de conformité de ce produit est disponible sur http://www.yaesu.com/jp/red ATTENTION – Conditions d'utilisation L'émetteur-récepteur fonctionne sur des fréquences qui sont réglementées et qui ne doivent pas être utilisées sans autorisation dans les pays de l'UE indiqués dans...
- Page 52 Copyright 2018 Tous droits réservés. Aucune partie de ce manuel ne peut être reproduite sans l'autorisation de YAESU MUSEN CO., LTD. 1804-A *EM062N370*...
- Page 53 HX40 HX40E VHF FM Marine Transceiver Owner’s Manual...
- Page 54 6. GETTING STARTED ........9 9.4 ABOUT............ 33 6.1 BATTERIES AND CHARGERS ....9 10. ATIS SETUP ( HX40E only ) ......34 6.1.1 BATTERY SAFETY ......9 6.1.2 BATTERY CHARGING ...... 10 10.1 ATIS CODE PROGRAMMING ....34 6.1.3 BATTERY LIFE INFORMATION ..
- Page 55 QUICK REFERENCE PTT ( Push-To-Talk ) Activates the transmitter when pressed. ▲/▼ Press to change the operating channel. ◄/► Press to toggle the on-screen menus to right or left. Press and hold to turn the transceiver ON/OFF.
- Page 56 STANDARD HORIZON technical support per- sonnel stand behind every product sold. STANDARD HORIZON technical support personnel stand behind every product sold.
- Page 57 2. SAFETY PRECAUTIONS Be sure to read the safety precautions, and use this product safely. Yaesu is not liable for any failures or problems caused by the use or misuse of this product by the pur- chaser or any third party. Also, Yaesu is not liable for damages caused through the use of this product by the purchaser or any third party, except in cases where ordered to pay damages under the laws.
- Page 58 3. ONLINE WARRANTY REGISTRATION Please visit www.standardhorizon.com - Owner’s Corner to register the HX40 Marine VHF. NOTE: visiting the STANDARD HORIZON website from time to time may be beneficial. When new products are released, information will appear on the website.
- Page 59 2. Then repeat once: “Mayday, _____” ( your vessel’s name ) . 3. Now report your position in latitude/longitude, or by giving a true or mag- netic bearing ( state which ) to a well-known landmark such as a naviga- tion aid or geographic feature such as an island or harbor entry.
- Page 60 necessary to state your Call Sign with each transmission, only at the begin- ning and end of the contact. Remember to return to Channel 16 when not using another channel. Some radios automatically monitor Channel 16 even when set to other channels or when scanning.
- Page 61 To prevent water intrusion please make sure that the MIC/SP cap is properly sealed. NOTE If you find any cracks on the gasket, please contact Standard Horizon or your local dealer to purchase a replacement. 4.9 RADIO CARE...
- Page 62 5. ACCESSORIES 5.1 PACKING LIST When the package containing the transceiver is first opened, please check it for the following contents: Transceiver HX40 Antenna * CAT460 SAD-25/SAD-23 * AC Adaptor for SBH-27 DC Cable with 12 V Cigarette Lighter Plug E-DC-19A Charger Cradle SBH-27...
- Page 63 6. GETTING STARTED 6.1 BATTERIES AND CHARGERS If the radio has never been used, or its charge is depleted, it may be charged by connecting the SBH-27 Charger Cradle with the SAD-25/SAD-23 AC Adapter, see section “6.1.2 BATTERY CHARGING”. If 12V DC power is available, the supplied E-DC-19A DC Cable with 12 V Cigarette Lighter Plug may be used for charging the battery.
- Page 64 Do not reverse the charge polarity. Use only the proper charger. If this is tampered with or another charger is used, permanent damage may result. Use only a STANDARD HORIZON approved charger. The use of any other charger may cause permanent damage to the battery.
- Page 65 TV and radio reception in the immediate vicinity, so we do not recommended for use adjacent to such devices. Contact Standard Horizon dealer or Factory Service about the built-in battery replacement. Refer to the section “11.2 FACTORY SERVICE”.
- Page 66 7. CONTROLS AND INDICATORS 7.1 CONTROLS AND SWITCHES NOTE This section defines each control of the transceiver. For detailed operating instructions, refer to section “8. BASIC OPERATION”. Refer to the below illustration for the locations of the following controls, switches, and con- nections.
- Page 67 LCD Display The display shows the current operating conditions ( See the LCD indica- tors illustrated on page 14 ) . Microphone The internal microphone is located here. When transmitting, position the microphone about 1/2 to 1 inch ( 1.2 ~ 2.5 cm ) away from your mouth.
- Page 68 Secondary use: Press and hold this key to open the squelch, allowing you to monitor the operating channel. Press the key again to resume normal ( squelch con- trolled ) monitoring. 16/S Key Pressing this key immediately recalls channel 16 from any channel se- lection.
- Page 69 “DW” Indicator “DW”: Dual Watch is activated. “TW”: Tri-Watch is activated. TRANSMIT POWER Indicator “HI”: 6 W ( 5W ) “MD”: 2.5 W “LO”: 1 W * (5W TX required in Some Countries) “MEM” Indicator This indicator shows the channel is registered in the transceiver “Scan Memory”.
- Page 70 8. BASIC OPERATION 8.1 PROHIBITED COMMUNICATIONS The FCC prohibits the following communications: False distress or emergency messages. Messages to “any boat” except in emergencies and radio tests. Messages to or from a vessel on land. Transmission while on land. ...
- Page 71 8.4.1 TRANSMIT POWER The TX output power of the HX40 is set to high level ( 6 W ( 5 W ) * ) in factory default, and the “HI” indicator is displayed on the top part of the screen. To change the TX output power: 1.
- Page 72 8.6 KEYPAD LOCKING In order to prevent accidental channel change, the HX40’s keypad may be locked. ] key to lock the keypad ( except the PTT, [SQL/ Press and hold the [CLR/ ] keys ) so that they are not accidentally changed. “KEY VOL] and [CLR/ LOCK”...
- Page 73 After stopping the beep sound, the weather alert reception confirmation screen will appear. Press any key to display a confirmation screen. The confirmation screen will ask whether to move to the weather channel, or return to the marine channel. Press [ENT/MENU] to switch to the weather channel, or press the [►] key to se- lect the [NO] soft key, then press [ENT/MENU] to return to the marine channel.
- Page 74 8.8.2 OPERATION on a Preset Channel 1. Press the [◄] or [►] key to display the soft keys. 2. Press the [◄] or [►] key repeatedly, until the [P-SET] soft key is selected at the bot- tom of the LCD. 3.
- Page 75 8.9 SCANNING The HX40 provides two types of scanning, “Memory Scan” or “Priority Scan”. “Memory Scan” scans the channels that were programmed into Scan Mem- ory and also channels stored in the Preset Channel memory. “Priority Scan” is similar to the “Memory Scan” scan, however it scans the priority channel ( channel 16 ) and dual watches to channels programmed in memory scan and preset channel memory.
- Page 76 6. Press the [▲] or [▼] key to select “M-SCAN” or “P-SCAN”. 7. Press the [ENT/MENU] key to store the selected setting. 8. Press the [CLR/ ] key to return to radio operation. CH1001 CH1001 CH88 CH09 CH88 CH09 CH1078 CH12 CH1078 CH12...
- Page 77 4. Press the [ENT/MENU] key. “PRI SCAN” appears on the display. Scanning will proceed between the memory channels, the preset channels, and the priority channel. The priority channel will be scanned after each programmed channel. 5. To stop scanning, press the [16/S] or [CLR/ ] key.
- Page 78 8.10.2 Starting the Dual Watch 1. Press the [SQL/VOL] key twice, then press the [▲] or [▼] key until the background squelch noise disappears. 2. Press the [▲] or [▼] key to select a channel you wish to dual watch. 3.
- Page 79 8.11 Listening to the FM Radio The HX40 includes provision for FM broadcast reception. 1. Press the [◄] or [►] key to select the [RA- DIO], then press the [ENT/MENU] key. The FM broadcast coverage is 65.000 to 108.000 MHz ( 100 kHz step ) and utilizes Wide-FM mode.
- Page 80 5. Press the [ENT/MENU] key to store the first letter of the name and step to the next letter to the right. 6. Repeat steps 4 and 5 until the name is complete. The name can consist of up to twelve characters, and if you do not use all twelve characters, press the [ENT/MENU] key to move to the next spaces.
- Page 81 7. Press the [▲] or [▼] key to select a new function to be assigned to the soft key, and press the [ENT/MENU] soft key. Available functions are listed below. 8. Press the [CLR/ ] key to return to radio operation. Display Function Programs or deletes the preset memory channel.
- Page 82 9. MENU ( “SETUP” ) The HX40’s Menu Mode allows enables a number of the HX40 operating pa- rameters to be custom-configured. Use the following procedure to activate and set The Menu Mode parameters: 1. Press and hold the [ENT/MENU] key. 2.
- Page 83 9.1.5 SCAN RESUME This selection is used to select the time the HX40 waits after a transmission ends before the radio starts to scan channels again. The default setting is 2 seconds. Press and hold [ ENT/MENU ] “CHANNEL SETUP” “SCAN RESUME” 2.
- Page 84 9.2 FM SETUP 9.2.1 ADD Press and hold [ ENT/MENU ] “FM SETUP” “ADD” 2. Press the [ENT/MENU] key. 3. Press the [▲] or [▼] key to scroll through the first position numbers of the frequency. 4. Press the [ENT/MENU] key to store the first number in the frequency and step to the next position to the right.
- Page 85 9.2.2 EDIT This selection is used to edit the FM Broadcast frequency and name. Press and hold [ ENT/MENU ] “FM SETUP” “EDIT” 2. Press the [▲] or [▼] key to select the memory to be edited, then press the [ENT/ MENU] key.
- Page 86 9.3.2 BATTERY SAVE This function allows you to change the battery save mode setting. Press and hold [ ENT/MENU ] “CONFIG” “BATTERY SAVE” 2. Press the [▲] or [▼] key to select the de- sired setting. You can select one from “OFF”, “50%”, “70%”, “80%”, or “90%”.
- Page 87 3. Press the [ENT/MENU] key to store the new setting. 4. Press the [CLR/ ] key to return to radio operation. 9.3.6 CONTRAST The contrast may be adjusted in 30 levels. Press and hold [ ENT/MENU ] “CONFIG” “CONTRAST” 2.
- Page 88 ATIS SETUP ( HX40E only ) The HX40E supports the ATIS ( Automatic Transmitter Identification System ) used in Inland waterways in Europe. When enabled ATIS mode transmits a unique ATIS code each time the PTT switch is released at the end of a trans- mission.
- Page 89 10.2 ATIS CH GROUP The HX40E has the capability to turn on and off the ATIS feature for each channel group. Press and hold [ ENT/MENU ] “ATIS SETUP” “ATIS GROUP” 2. Press the [▲] or [▼] key to select the...
- Page 90 11. MAINTENANCE 11.1 GENERAL The inherent quality of the solid-state components in STANDARD HORIZON radios will provide many years of continuous use. Take the following precau- tions to prevent damage to the radio: Never key the microphone unless an antenna or suitable dummy load is connected to the transceiver.
- Page 91 Press the [▲] key until background Audio volume level is too low. noise outputs. Charge indicator does Defective built-in battery. Contact Standard Horizon dealer. not appear on the display The transceiver is not set transceiver onto when charging a battery.
- Page 92 12. VHF MARINE CHANNEL ASSIGNMENTS 12.1 HX40 ( USA Version ) VHF MARINE CHANNEL CHART CHANNEL USE 160.650 Public Correspondence ( Marine Operator ) 156.050 Port Operation and Commercial. 1001 156.050 VTS in selected areas 160.700 Public Correspondence ( Marine Operator ) 156.100 160.750 Public Correspondence ( Marine Operator ) 156.150...
- Page 93 VHF MARINE CHANNEL CHART CHANNEL USE 157.100 161.700 Port operation, ship movement US Coast Guard Liaison and Maritime Safety Information Broadcasts announced on chan- nel 16 (USA) 1022 157.100 Canadian Coast Guard Liaison and Maritime Safety Information Broadcasts announced on channel 16 (Canada) 161.750 Public Correspondence ( Marine Operator ) 157.150...
- Page 94 VHF MARINE CHANNEL CHART CHANNEL USE Non-commercial ( Inter-ship only ) 156.625 US: Port Operations, Canada: Commercial fishing only, 156.675 International: Inter-ship, Port operations and Ship movement US: Port Operations, Canada: Commercial fishing only, 156.725 International: Inter-ship, Port operations and Ship movement Port Operations ( Inter-ship only ) ( 1 W ) 156.775 Port Operations ( Inter-ship only ) ( 1 W )
- Page 95 12.2 HX40E CHANNEL USE TX ( MHz ) RX ( MHz ) SIMPLEX/DUPLEX LOW PWR All countries Germany ( except Germany ) 156.050 160.650 DUPLEX – TELEPHONE NAUTIK 156.100 160.700 DUPLEX – TELEPHONE NAUTIK 156.150 160.750 DUPLEX – TELEPHONE NAUTIK 156.200...
- Page 96 CHANNEL USE TX ( MHz ) RX ( MHz ) SIMPLEX/DUPLEX LOW PWR All countries Germany ( except Germany ) 156.575 SIMPLEX LOW* PLEASURE SHIP-PORT 156.625 SIMPLEX LOW* SHIP-SHIP 156.675 SIMPLEX – PORT OPR NAUTIK 156.725 SIMPLEX LOW* PORT OPR SHIP-PORT 156.775 SIMPLEX...
- Page 97 13. SPECIFICATIONS Performance specifications are nominal, unless otherwise indicated, and are subject to change without notice. Measurements * are in accordance with TIA/EIA-603 ( U.S.A. ) and EN301 178 ( EXP ) . (Except the FM Broadcast Receiver) z GENERAL Frequency Ranges .........
- Page 98 14. FCC AND CANADA RADIO LICENSE INFORMATION Standard Horizon radios comply with the Federal Communication Commis- sion ( FCC ) and the Innovation, Science and Economic Development Canada ( ISED ) requirements that regulate the Maritime Radio Service. 14.1 MARITIME STATION LICENSE An FCC ship station license is no longer required for any vessel traveling in U.S.
- Page 99 15. RF EXPOSURE SAFETY STATEMENT 15.1 SAFETY INFORMATION Your wireless handheld portable transceiver contains a low power transmitter. When the Push-to-Talk ( PTT ) button is pushed, the transceiver sends out radio frequency ( RF ) signals. In August 1996, the Federal Communications Commis- sion adopted RF exposure guidelines with safety levels for hand-held wireless devices.
- Page 100 Unauthorized changes or modifications to this equipment may void compliance with FCC Rules. Any change or modification must be approved in writing by STANDARD HORIZON, a division of YAESU USA. THIS DEVICE COMPLIES WITH PART 15 OF THE FCC RULES. OPERATION...
- Page 101 The applicant is responsible for providing proper instructions to the user of the radio device, and any usage restrictions, including limits of exposure durations. The user manual shall provide installation and operation instructions, as well as any special usage conditions, to ensure compliance with SAR and/or RF field strength limits.
- Page 102 Limited Warranty is valid only in the country/region where this product was originally purchased. On-line Warranty Registration: Thank you for buying STANDARD HORIZON products! We are confident your new radio will serve your needs for many years! Please register your product at www.standardhorizon.com - Owner’s Corner...
- Page 103 We, Yaesu Musen Co. Ltd of Tokyo, Japan, hereby declare that this radio equipment HX40E is in full compliance with EU Radio Equipment Directive 2014/53/EU. The full text of the Declaration of Conformity for this product is available to view at http://www.
- Page 104 Copyright 2018 YAESU MUSEN CO., LTD. All rights reserved. No portion of this manual may be reproduced without the permission of YAESU MUSEN CO., LTD. YAESU MUSEN CO., LTD. Tennozu Parkside Building 2-5-8 Higashi-Shinagawa, Shinagawa-ku, Tokyo 140-0002 Japan YAESU USA 1804S-BC-1 Printed in China 6125 Phyllis Drive, Cypress, CA 90630, U.S.A.
- Page 105 HX40E UKW/FM-Seefunkgerät Bedienungsanleitung...
- Page 106 ZURÜCKSETZEN ......... 33 ABOUT..............33 6.1.3 INFORMATIONEN ZUR BATTERIELEBENSDAUER ....11 10. ATIS-EINRICHTUNG ( nur HX40E ) ......34 ANBRINGEN/ENTFERNEN DES 10.1 PROGRAMMIERUNG DER ATIS-KENNUNG ..34 GÜRTELCLIPS ..... 11 10.2 ATIS CH GROUP (ATIS-KANALGRUPPE) ..35 7. REGLER UND ANZEIGEN .......... 12 11.
- Page 107 KURZANLEITUNG PTT ( Push-To-Talk ) Wenn gedrückt, wird das Funkgerät aktiviert. ▲/▼ Drücken, um den Betriebskanal zu wechseln. ◄/► Drücken, um die Bildschirmmenüs nach rechts oder links umzuschalten. Drücken und halten, um das Funkgerät ein-/auszuschalten. ...
- Page 108 1.1 EINFÜHRUNG Herzlichen Glückwunsch zum Kauf des HX40! Ganz gleich, ob dies Ihr erstes tragbares UKW- Seefunkgerät ist oder ob Sie bereits andere Geräte von STANDARD HORIZON besitzen – STANDARD HORIZON stellt hochwertige Funkgeräte her, die Ihnen Freude bereiten und selbst unter rauesten Bedingungen viele Jahre lang zuverlässig funktionieren.
- Page 109 2. SICHERHEITSMASSNAHMEN Sie müssen unbedingt die Sicherheitsmaßnahmen lesen, und dieses Produkt sicher benutzen. Yaesu übernimmt keine Haftung für Fehler oder Probleme, die durch den Gebrauch oder Missbrauch dieses Produkts durch den Käufer oder einen Dritten verursacht werden. Yaesu haftet ebenfalls nicht für Schäden, die durch Gebrauch dieses Produkts durch den Käufer oder einen Dritten verursacht werden, ausgenommen in Fällen, in denen Yaesu im Rahmen der Gesetze angeordnet wird, Schadensersatz zu zahlen.
- Page 110 3. ONLINE-GARANTIEREGISTRIERUNG Besuchen Sie bitte www.standardhorizon.com – Owner’s Corner, um das UKW-Seefunkgerät HX40 zu registrieren. HINWEIS: Ein regelmäßiger Besuch der STANDARD HORIZON-Website könnte von Vorteil sein. Wenn neue Produkte veröffentlicht werden, werden Informationen auf der Website bereitgestellt. 4. INFORMATIONEN ZUM RADIO INFORMATIONEN ÜBER DAS VHF/UKW-SEEFUNKBAND...
- Page 111 Erklären Sie die Art des Notfalls ( Schiff sinkt, Kollision, auf Grund gefahren, Feuer, Herzanfall, lebensbedrohliche Verletzung usw. ) . Nennen Sie die Art der Hilfe, die Sie benötigen ( Pumpen, medizinische Hilfe usw. ) . Geben Sie die Anzahl von Personen an Bord und den Zustand aller Verletzten an. Schätzen Sie die aktuelle Seetüchtigkeit und den aktuellen Zustand Ihres Schiffs.
- Page 112 4.5 BRÜCKENKANÄLE 13 UND 67 Kanal 13 wird an Kaianlagen, Schleusen, Brücken und von Fahrzeugen verwendet, die im Hafen manövrieren. Meldungen auf diesem Kanal dürfen nur die Navigation betreffen, wie Treffen und Vorbeifahren in eingeschränkten Gewässern. Kanal 67 wird für Navigationsverkehr zwischen Schiffen verwendet. Laut Vorschriften ist die Leistung auf diesen Kanälen normalerweise auf 1 Watt begrenzt.
- Page 113 Mittelatlantik Sea Tow Northern Chesapeake ( Md. ) – Kanal 28 Sea Tow Central Chesapeake ( Md. ) – Kanal 27 Sea Tow Hampton Roads ( Va. ) – Kanal 28 North Carolina Sea Tow Wrightsville Beach – Kanal 28 Sea Tow Ocean Isle Beach –...
- Page 114 5. ZUBEHÖR 5.1 LIEFERUMFANG Wenn der Karton, der das Funkgerät enthält, zum ersten Mal geöffnet wird, prüfen Sie bitte, ob folgende Teile im Lieferumfang enthalten sind: Funkgerät HX40 Antenne * CAT460 SAD-23/SAD-11 * AC-Adapter für SBH-27 DC-Kabel mit 12-V-Zigarettenanzünderstecker E-DC-19A Ladehalterung SBH-27 Gürtelclip...
- Page 115 6. ERSTE SCHRITTE 6.1 BATTERIEN UND LADEGERÄTE Wenn das Funkgerät zum ersten Mal benutzt wird oder entladen ist, kann es durch Anschluss an die Ladehalterung SBH-27 mit dem Netzadapter SAD-23/SAD-11 aufgeladen werden. Siehe dazu Abschnitt „6.1.2 AUFLADEN DER BATTERIE“. Wenn 12 V Gleichspannung verfügbar sind, kann das mitgelieferte DC-Kabel E-DC-19A mit 12-V-Zigarettenanzünderstecker zum Aufladen der Batterie verwendet werden.
- Page 116 Die Ladepolarität nicht umkehren. Verwenden Sie nur das vorgeschriebene Ladegerät. Wenn an diesem Eingriffe vorgenommen werden oder ein anderes Ladegerät verwendet wird, können dauerhafte Schäden auftreten. Verwenden Sie nur ein von STANDARD HORIZON zugelassenes Ladegerät. Die Verwendung eines anderen Ladegeräts kann die Batterie dauerhaft beschädigen. Batterierecycling ENTSORGEN SIE GEBRAUCHTE BATTERIEN NICHT IM NORMALEN HAUSMÜLL!
- Page 117 Rundfunkempfang in unmittelbarer Nähe verursachen kann, raten wir davon ab, sie in der Nähe solcher Geräte zu benutzen. Wenden Sie sich zum Austausch der eingebauten Batterie an den Standard Horizon Händler oder Kundendienst. Siehe dazu Abschnitt „11.2 KUNDENDIENST”. 6.1.3 INFORMATIONEN ZUR BATTERIELEBENSDAUER...
- Page 118 7. REGLER UND ANZEIGEN 7.1 BEDIENELEMENTE HINWEIS Dieser Abschnitt beschreibt jedes Bedienelement des Funkgeräts. Ausführlichere Bedienung- sanweisungen finden Sie in Abschnitt „8. BASISFUNKTIONEN”. Zur Position der folgenden Bedienelemente, Schalter und Anschlüsse siehe die nachstehende Abbildung. ...
- Page 119 Tastenfeld p Taste ( Nach oben ) Mit dieser Taste wird der Arbeitskanal, die Audiolautstärke und die Ansprechschwelle für die Rauschsperre (Squelch) geändert. Durch kurzes Drücken der Taste wird der Kanal ( oder die Lautstärke ) um eine Stufe erhöht. Durch Halten der Taste wird den Kanal ( oder die Lautstärke ) kontinuierlich erhöht.
- Page 120 7.2 LCD-ANZEIGEN ①② ⑤ ⑥ ⑦ ⑧ ③ ⑨ ④ ⑩ ⑪ ⑫ Die im vorliegenden Handbuch enthaltenen Bildschirmabbildungen sind in der US-Version beschrieben. “ ” Anzeige Diese Anzeige wird während der Übertragung gezeigt. “ ” Anzeige D i e s e A n z e i g e w i r d g e z e i g t , w e n n e i n S i g n a l e m p f a n g e n w i r d o d e r d i e Rauschunterdrückung des Funkgeräts ausgeschaltet ist.
- Page 121 Batterie-/Akku-Zustandsanzeige : Volle Batterieleistung : Ausreichende Batterieleistung : Niedrige Batterieleistung : Unzureichende Batterieleistung. Laden Sie die Batterie. : Batterie sofort laden Anzeige „P” Zeigt, wenn der Kanal als Prioritätskanal eingestellt ist. Anzeige „D“ Wird angezeigt, wenn die Zweikanalüberwachung im FM-Modus aktiviert ist. Anzeige „T“...
- Page 122 8. BASISFUNKTIONEN VERBOTENE KOMMUNIKATION Die FCC verbietet folgende Kommunikation: Falsche Not- oder Sicherheitsmeldungen. Meldungen an „jedes Boot“, außer in Notfällen oder bei Tests des Funkgeräts. Meldungen zu oder von einem Schiff an Land. Übertragung an Land ...
- Page 123 8.4.1 SENDELEISTUNG Die TX-Ausgangsleistung des HX40 ist werkseitig auf ein hohes Niveau ( 6 W ( 5 W ) * ) eingestellt und die Anzeige „HI“ erscheint oben auf dem Bildschirm. Um die TX-Ausgangsleistung zu ändern: Drücken Sie die Taste [◄] oder [►], um die Softkeys anzuzeigen. Drücken Sie wiederholt die Taste [◄] oder [►], bis [HI], [MD], oder [LO] im unteren Bereich des Bildschirms über einem Softkey ausgewählt ist.
- Page 124 8.6 SPERREN DES TASTENFELDS Um versehentliches Ändern des Kanals zu verhindern, kann das Tastenfeld des HX40 gesperrt werden. ] gedrückt, um das Tastenfeld zu sperren ( mit Ausnahme Halten Sie die Taste [CLR/ ] ) , sodass keine versehentlichen Änderungen der Tasten PTT, [SQL/VOL] und [CLR/ vorgenommen werden können.
- Page 125 N a c h S t o p p e n d e s P i e p t o n s w i r d d a s D i s p l ay z u r B e s t ä t i g u n g d e s Em p f a n g s vo n Wet t e r w a r n u n g e n angezeigt.
- Page 126 8.8.2 BETRIEB auf einem Festkanal Drücken Sie die Taste [◄] oder [►], um die Softkeys anzuzeigen. Drücken Sie wiederholt die Taste [◄] oder [►], bis unten am LCD der Softkey [P-SET] ausgewählt ist. Drücken Sie die Taste [ENT/MENU], und drücken Sie dann die Taste [▲] oder [▼], um den gewünschten Festkanal auszuwählen.
- Page 127 8.9 SUCHLAUF Das HX40 bietet zwei Sucherlaufarten, „Speichersuchlauf“ oder „Prioritätssuchlauf“. „Speichersuchlauf“ durchsucht die Kanäle, die in den Suchlaufspeicher programmiert wurden, sowie Kanäle, die im Festkanalspeicher gespeichert sind. „Prioritätssuchlauf“ ist ähnlich dem „Speichersuchlauf“, er durchsucht jedoch den Prioritätskanal ( Kanal 16 ) und führt die Dual- Watch-Funktion für Kanäle aus, die im Speichersuchlauf und Festkanalspeicher programmiert sind.
- Page 128 Festkanal 0 Festkanal 0 Festkanal 5 Festkanal 5 Speicherkanalsuchlauf Speicherkanalsuchlauf Festkanal 4 Festkanal 1 Festkanal 4 Festkanal 1 Prioritätskanal Festkanal 2 Festkanal 2 Speicherkanalsuchlauf Speicherkanalsuchlauf Festkanal 3 Festkanal 3 Speicherkanalsuchlauf Speicherkanalsuchlauf Speicherkanalsuchlauf Speicherkanalsuchlauf Speichersuchlauf ( M-SCAN ) Prioritätssuchlauf ( P-SCAN) 8.9.3 SUCHLAUFBETRIEB Speichersuchlauf ( M-SCAN ) Stellen Sie im Menü...
- Page 129 HINWEIS Der Prioritätskanal und der Unterkanal können von CH16 ( Grundeinstellung ) und CH9 ( Grun- deinstellung ) auf einen anderen Kanal geändert werden. Siehe Abschnitt „PRIORITY CH“ oder „SUB CH“ ( Einzelheiten 29 siehe Seite ) . 8.10.1 Einstellung des Multi-Watch-Betriebs Drücken und halten Sie die Taste [ENT/MENU].
- Page 130 8.10.2 Starten der Dual-Watch-Funktion Drücken Sie zweimal die Taste [SQL/VOL], und drücken Sie dann die Taste [▲] oder [▼], bis das Hintergrundrauschen verschwindet. Drücken Sie die Taste [▲] oder [▼], um einen Kanal für die Dual-Watch-Funktion auszuwählen. Drücken Sie die Taste [◄] oder [►], um die Softkeys anzuzeigen. Drücken Sie wiederholt die Taste [◄] oder [►], bis unten am LCD der Softkey [DW] ausgewählt ist.
- Page 131 8.11 FM-Radio hören Das HX40 ist für den FM-Rundfunkempfang vorgesehen. Drücken Sie die Taste [◄] oder [►], um [RADIO] auszuwählen, und drücken Sie dann die Taste [ENT/ MENU]. Der FM-Rundfunkbereich reicht von 65.000 bis 108.000 MHz ( Schritte von 100 kHz ) und nutzt den Wide-FM- Modus.
- Page 132 Drücken Sie die Taste [ENT/MENU], um den ersten Buchstaben des Namens zu speichern und zum nächsten Buchstaben nach rechts zu gehen. Schritt 4 und 5 wiederholen, bis der ganze Name eingegeben ist. Der Name kann aus bis zu zwölf Zeichen bestehen. Wenn Sie nicht alle zwölf Zeichen benutzen, drücken Sie die Taste [ENT/MENU], um zur nächsten Leerstelle zu gehen.
- Page 133 Drücken Sie die Taste [▲] oder [▼], um eine neue Funktion auszuwählen, die dem Softkey zugewiesen werden soll, und drücken Sie dann den Softkey [ENT/MENU]. Verfügbare Funktionen sind nachstehend aufgeführt. Drücken Sie die Taste [CLR/ ], um zum Funkbetrieb zurückzukehren. Anzeige Funktion Programmiert oder löscht den Festspeicherkanal.
- Page 134 9. MENÜ ( „SETUP“ ) Im Menümodus des HX40 können eine Reihe der Betriebsparameter des HX40 individuell konfiguriert werden. Die Parameter für den Menümodus über die folgenden Verfahren aktivieren und einstellen. Drücken und halten Sie die Taste [ENT/MENU]. Drücken Sie die Taste [▲] oder [▼], um die gewünschte Menüoption auszuwählen. Drücken Sie die Taste [▲] oder [▼], um die zu programmierende Tastennummer auszuwählen, und drücken Sie dann die Taste [ENT/MENU].
- Page 135 9.1.5 SCAN RESUME (SUCHLAUF FORTSETZEN) Hier können Sie wählen, wie lange nach dem Ende einer Übertragung das HX40 warten soll, bevor das Funkgerät erneut Kanäle absucht. Die Werkseinstellung ist 2 Sekunden. Drücken und halten Sie [ ENT/MENU ] „CHANNEL SETUP“ „SCAN RESUME“ Die Taste [▲] oder [▼] drücken, um die gewünschte Zeit auszuwählen.
- Page 136 9.2 FM SETUP 9.2.1 ADD Drücken und halten Sie [ ENT/MENU ] „FM SETUP“ „ADD“ Drücken Sie die Taste [ENT/MENU]. Die Taste [▲] oder [▼] drücken, um durch die ersten Positionsnummern der Frequenz zu blättern. Drücken Sie die Taste [ENT/MENU], um die erste Ziffer der Frequenz zu speichern und zur nächsten Position nach rechts zu gehen.
- Page 137 9.2.2 EDIT Diese Auswahl wird verwendet, um die FM-Rundfunkfrequenz und den Namen zu bearbeiten. Drücken und halten Sie [ ENT/MENU ] „FM SETUP“ „EDIT“ Drücken Sie die Taste [▲] oder [▼], um den zu bearbeitenden Speicher auszuwählen, und drücken Sie dann die Taste [ENT/MENU].
- Page 138 9.3.2 BATTERY SAVE Mit dieser Funktion können Sie die Einstellung des Batteriesparmodus verändern. Drücken und halten Sie [ ENT/MENU ] „CONFIG“ „BATTERY SAVE“ D r ü c k e n S i e d i e Ta s t e [ ▲ ] o d e r [ ▼ ] , u m d e n gewünschten Einstellung auszuwählen.
- Page 139 9.3.6 KONTRAST Der Kontrast kann in 30 Stufen eingestellt werden. Drücken und halten Sie [ ENT/MENU ] „CONFIG“ „CONTRAST“ D r ü c k e n S i e d i e Ta s t e [ ▲ ] o d e r [ ▼ ] , u m d i e gewünschte Lautstärke auszuwählen.
- Page 140 ATIS-EINRICHTUNG ( nur HX40E ) Das HX40E unterstützt die ATIS-Kennung ( Automatic Transmitter Identification System ), die in der Binnenschifffahrt in Europa verwendet wird. Wenn er aktiviert ist, sendet der ATIS-Modus eine eindeutige ATIS-Kennung, wenn der PTT-Schalter am Ende einer Übertragung losgelassen wird.
- Page 141 10.2 ATIS CH GROUP (ATIS-KANALGRUPPE) Das HX40E kann die ATIS-Funktion für jede Kanalgruppe ein- und ausschalten. Drücken und halten Sie [ ENT/MENU ] „ATIS SETUP“ „ATIS GROUP“ D r ü c k e n S i e d i e Ta s t e [ ▲ ] o d e r [ ▼ ] , u m d i e Kanalgruppe ( International, Kanadisch oder US- amerikanisch ) auszuwählen, deren Einstellung Sie...
- Page 142 Das Mikrofon nur betätigen, wenn eine Antenne oder eine geeignete Scheinlast an das Funkgerät angeschlossen ist. Verwenden Sie nur von STANDARD HORIZON zugelassenes Zubehör und Ersatzteile. 11.2 KUNDENDIENST Im unwahrscheinlichen Fall, dass das Funkgerät einen Defekt aufweist oder gewartet werden...
- Page 143 11.3 TABELLE ZUR FEHLERSUCHE UND -BEHEBUNG SYMPTOM MÖGLICHE URSACHE ABHILFE Die USA/INTL/ Ordnungsgemäße Geben Sie die Optionsnummer CAN-Betriebsarten Bedienung nicht aus „SETUP MENU“ – „CHANNEL funktionieren nicht. beachtet. SETUP“ – „CHANNEL GROUP“ Durch Drücken und Batteriespannung niedrig. Laden Sie die Batterie. Siehe 6.1.2 Halten der Lautstärke AUFLADEN DER BATTERIE im Taste [SQL/VOL] kann...
- Page 144 12. VHF/UKW-SEEFUNKKANALBELEGUNGEN 12.1 HX40 ( USA-Version ) VHF/UKW-SEEFUNKKANALTABELLE KANALNUTZUNG Öffentlicher Verkehr ( Vermittlungsstelle ) 156.050 160.650 Revier-/Hafenfunk und Fracht-/ 1001 156.050 Fahrgastschiffe VTS in ausgewählten Bereichen Öffentlicher Verkehr ( Vermittlungsstelle ) 156.100 160.700 Öffentlicher Verkehr ( Vermittlungsstelle ) 156.150 160.750 1003 156.150 Nur US-Regierung, Küstenwache...
- Page 145 VHF/UKW-SEEFUNKKANALTABELLE KANALNUTZUNG Revier-/Hafenfunk, Schiffslenkungsfunk 157.100 161.700 Kontakt mit der kanadischen Küstenwache und 157.100 Nachrichten zur Sicherheit auf See, bekannt gegeben auf Kanal 16 Kontakt mit der US-amerikanischen Küstenwache 1022 157.100 und Nachrichten zur Sicherheit auf See, bekannt gegeben auf Kanal 16 Öffentlicher Verkehr ( Vermittlungsstelle ) 157.150 161.750...
- Page 146 VHF/UKW-SEEFUNKKANALTABELLE KANALNUTZUNG Für DSC-Selektivruf reserviert (Digital Selective - - - 156.525 Calling) ( kein Sprechfunkverkehr ) USA, Kanada: Schiff-Schiff-Verkehr ( Sportboote ) , 156.575 International: Revier-/Hafenfunk und Schiffslenkungsfunk Schiff-Schiff-Verkehr ( Arbeitskanal Sportschiffe ) 156.625 US: Revier-/Hafenfunk Kanada: nur Fischereifahrzeuge 156.675 International: Schiff-Schiff, Revier-/Hafenfunk und Schiffslenkungsfunk...
- Page 147 12.2 HX40E KANALNUTZUNG SIMPLEX/ Alle Länder LOW PWR ( MHz ) ( MHz ) DUPLEX ( außer Deutschland Deutschland ) 156.050 160.650 DUPLEX – TELEFON NAUTIK 156.100 160.700 DUPLEX – TELEFON NAUTIK 156.150 160.750 DUPLEX – TELEFON NAUTIK 156.200 160.800 DUPLEX –...
- Page 148 KANALNUTZUNG SIMPLEX/ Alle Länder LOW PWR ( MHz ) ( MHz ) DUPLEX ( außer Deutschland Deutschland ) – 156.525 SIMPLEX – 156.575 SIMPLEX LOW* PLEASURE SHIP-PORT 156.625 SIMPLEX LOW* SHIP-SHIP 156.675 SIMPLEX – PORT OPR NAUTIK 156.725 SIMPLEX LOW* PORT OPR SHIP-PORT 156.775...
- Page 149 13. TECHNISCHE DATEN Leistungsdaten sind Nennwerte, wenn nicht anders angegeben, und können ohne Vorankündigung geändert werden. z ALLGEMEINES TX: 156.025MHz - 161.600MHz Frequenzbereiche: RX: 156.050MHz - 163.275MHz ( USA/internationale Kanäle einschließen WX- Kanäle ) 25kHz Kanalabstand: ±3ppm ( –4°F bis +140°F [-20°C bis +60°C] ) Frequenzstabilität: 16K0G3E Sendeart:...
- Page 150 14. INFORMATIONEN ZUR FCC UND ZUR FUNKLIZENZ IN KANADA Funkgeräte von Standard Horizon sind mit den Vorschriften der Federal Communication Commission ( FCC ) und der Innovation, Science and Economic Development Canada ( ISED ) für die Regulierung des Maritime Radio Service konform.
- Page 151 15. SICHERHEITSERKLÄRUNG ZUR HF-EXPOSITION 15.1 SICHERHEITSINFORMATION Ihr tragbares Hand-Funkgerät enthält einen Sender niedriger Leistung. Wenn die PTT ( Push-to-Talk ) -Taste gedrückt wird, sendet das Funkgerät Funkfrequenz- bzw. Hochfrequenzsignale ( HF ) . Im August 1996 führ te die Federal Communications Commission Richtlinien zur HF-Einwirkung mit Sicherheitsstufen für Handfunkgeräte ein.
- Page 152 16. FCC-HINWEIS HINWEIS Nicht genehmigte Änderungen an diesem Gerät können dazu führen, dass die Konformität mit den FCC-Vorschriften erlischt. Jede Änderung muss schriftlich von STANDARD HORIZON, einem Unternehmensbereich von YAESU USA, genehmigt werden. Dieses Gerät erfüllt Teil 15 der FCC-Regeln. Der Betrieb unterliegt den folgenden beiden Bedingungen: ( 1 dieses Gerät darf keine schädlichen Interferenzen verursachen und ( 2 ) dieses Gerät muss jede empfangene Interferenz annehmen, einschließlich einer Interferenz, die einen unerwünschten Vorgang verursachen kann.
- Page 153 Dieser Funksender ( Gerät nach Zertifizierungsnummer oder bei Category II Modellnummer identifizieren ) wurde von Industry Canada für den Betrieb mit den nachstehend aufgeführten Antennentypen mit der maximal zulässigen Verstärkung und der geforderten Antennenimpedanz für jeden angegebenen Antennentyp zugelassen. Auf dieser Liste nicht eingeschlossene Antennentypen haben eine größere Verstärkung als die maximal für diesen Typ angegebene Verstärkung und sind für die Verwendung mit diesem Gerät streng verboten.
- Page 154 Die beschränkte Garantie gilt nur in dem Land, in dem dieses Produkt ursprünglich erworben wurde. Online-Garantieregistrierung: Vielen Dank für den Kauf eines STANDARD HORIZON-Produkts! Wir sind uns sicher, dass Ihnen Ihr neues Funkgerät viele Jahre lang dienen wird! Bitte registrieren Sie Ihr Produkt unter www.standardhorizon.com - Owner’s Corner...
- Page 155 EU-Konformitätserklärung Wir, Yaesu Musen Co. Ltd of Tokyo, Japan, erklären hiermit, dass dieses Funkgerät HX40E die EU-Funkanlagen-Richtlinie 2014/53/EU vollständig erfüllt. Der volle Text der Konformitätserklärung für dieses Produkts steht zur Einsichtnahme unterhttp:// www.yaesu.com/jp/red zur Verfügung. ACHTUNG – Nutzungsbedingungen Dieses Funkgerät arbeitet auf regulierten Frequenzen, die in den EU-Ländern in dieser Tabelle nicht ohne...
- Page 156 Copyright 2018 Alle Rechte vorbehalten. Nachdruck oder Vervielfältigung dieser Anleitung, ob ganz oder teilweise,ist ohne ausdrückliche Genehmigung von YAESU MUSEN, CO., LTD., verboten. 1804-A *EM062N360*...