Table des Matières
Publicité
Les langues disponibles
Les langues disponibles
Liens rapides
Publicité
Chapitres
Table des Matières

Manuels Connexes pour Sportplus SP-MSP-008-P


Sommaire des Matières pour Sportplus SP-MSP-008-P
- Page 1 BEDIENUNGSANLEITUNG SIDE STEPPER OPERATING INSTRUCTIONS SIDE STEPPER BEDIENINGSHANDLEIDING ZIJSTEPPER INSTRUCTIONS D'UTILISATION MINI STEPPER SP-MSP-008-P SP-MSP-008-P-IM-INT.indb 1 26/2/15 3:06 pm...
-
Page 2: Table Des Matières
Sehr geehrte Kundin, sehr geehrter Kunde, Wir gratulieren Ihnen zu Ihrem neuen SportPlus Produkt und sind überzeugt, dass Sie mit diesem Produkt zufrieden sein werden. Um eine stets optimale Funktion und Leistungsbereitschaft Ihres Produktes zu gewährleisten, haben wir eine Bitte an Sie: • Bevor Sie das Produkt das erste Mal benutzen, lesen Sie sich bitte die folgende... -
Page 3: Technische Daten
Wenn das Produkt von einem Kind benutzt wird, lassen Sie es mit dem Produkt nicht unbeaufsichtigt. Nehmen Sie die entsprechenden Einstellungen am Produkt selber vor und beaufsichtigen Sie den Übungsablauf. • Achten Sie darauf, dass das Verpackungsmaterial nicht in Kinderhände gelangt. Es besteht Erstickungsgefahr! SP-MSP-008-P-IM-INT.indb 3 26/2/15 3:06 pm... - Page 4 Ersetzen Sie stets alle Batterien durch neue, verwenden Sie nicht alte und neue Batterien oder Batterien verschiedenen Typs gemeinsam! • Verwenden Sie vorzugsweise Alkali-Batterien, da diese von längerer Lebensdauer sind als herkömmliche Zink-Kohle-Batterien. • Ein Batteriewechsel wird notwendig, sobald die Anzeige schwächer wird oder vollständig verblasst. SP-MSP-008-P-IM-INT.indb 4 26/2/15 3:06 pm...
- Page 5 Sie sich, dass sämtliche Schrauben, Bolzen und Muttern richtig angebracht und festgezogen sind. • Legen Sie gegebenenfalls zum Schutz Ihres Fußbodens eine Schutzmatte (nicht im Lieferumfang enthalten) unter das Produkt, da nicht ausgeschlossen werden kann, dass z.B. Gummifüße spuren hinterlassen. SP-MSP-008-P-IM-INT.indb 5 26/2/15 3:06 pm...
-
Page 6: Montageanleitung
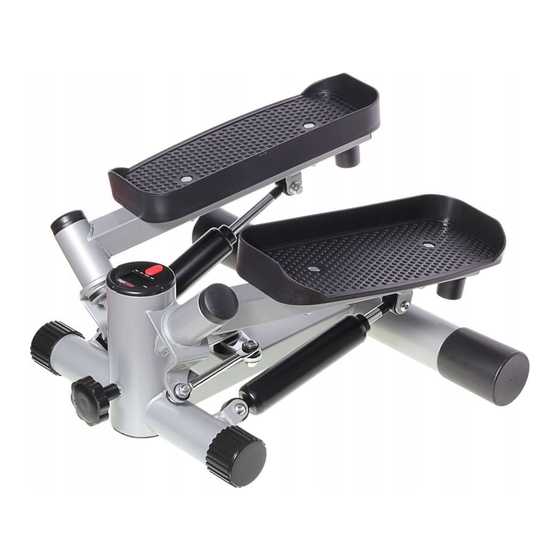
MONTAGEANLEITUNG Zugbänder Befestigungsösen Pedale Computer Stoßdämpfer Hinterer Drehknauf Stabilisator Der Side Stepper ist von uns so konstruiert worden, dass er leicht zusammenzu- bauen und zu benutzen ist. WICHTIG: Alle Teile auspacken und auf Schäden überprüfen. SP-MSP-008-P-IM-INT.indb 6 26/2/15 3:06 pm... - Page 7 Achten Sie dabei auf die Polarität (- ) und (+). Verbinden Sie das Sensorkabel mit dem Computer und setzen Sie den Computer in den vorderen Rahmen ein. Schritt 4: Setzen Sie den Drehknauf am vorderen Rahmen ein. SP-MSP-008-P-IM-INT.indb 7 26/2/15 3:06 pm...
-
Page 8: Bedienungsanleitung
BEMERKUNG! Ist die Steighöhe zu gering eingestellt, erhält der Computer kein korrektes Signal und zählt nicht! Hinweise zu den Zugbändern Verletzungsgefahr: Achten Sie darauf, dass Sie die Zugbänder nicht überdehnen, da diese sonst beschädigt werden und sogar reißen können. Dies kann schwere Verletzungen verursachen. SP-MSP-008-P-IM-INT.indb 8 26/2/15 3:06 pm... - Page 9 Beginnen Sie das Training im langsamen Tempo mit lockeren einfachen Steps, so dass Sie sich an die Bewegungsform des Side Steppers gewöhnen können. Hinweis: Das Ziel ist ein gleichmäßige und rhythmische Bewegung, versuchen Sie daher nicht, bis zu den Anschlägen unter jedem Pedal zu treten. SP-MSP-008-P-IM-INT.indb 9 26/2/15 3:06 pm...
- Page 10 Wert dauerhaft darzustellen, drücken Sie die Modustaste für diesen Wert. Selbstabschaltzeit (Auto Shut Off) Der Computer schaltet sich nach 4 Minuten ab, wenn in dieser Zeitspanne keine Signale an den Computer gesendet wurden. Als Signal werden Pedalbewegungen und das Drücken der Modustaste erkannt. SP-MSP-008-P-IM-INT.indb 10 26/2/15 3:06 pm...
-
Page 11: Trainingstipps
5 bis 10 Minuten sorgfältig auf. Die Stretchingübungen sind richtig ausgeführt, wenn Sie in dem entsprechenden Muskel eine angenehme Spannung spüren. • Geschwindigkeit spielt bei den Stretching-Übungen keine Rolle. Schnelle und ruckartige Bewegungen sind zu vermeiden. SP-MSP-008-P-IM-INT.indb 11 26/2/15 3:06 pm... - Page 12 Fuß nach hinten und ziehen Sie den rechten bzw. linken Fuß so nah wie möglich an Ihr Gesäß. Spüren Sie dabei eine angenehme Spannung in Ihrem vorderen Oberschenkel. Halten Sie diese Position wenn möglich 30 Sekunden und wiederholen Sie diese Übung 2 Mal pro Bein. SP-MSP-008-P-IM-INT.indb 12 26/2/15 3:06 pm...
- Page 13 Legen Sie beide Hände an die Wand, und stützen Sie sich mit Ihrem ganzen Körper ab. Stellen Sie abwechselnd das linke und das rechte Bein nach hinten. Dabei wird das hintere Bein gedehnt. Halten Sie diese Position möglichst 30-40 Sekunden. SP-MSP-008-P-IM-INT.indb 13 26/2/15 3:06 pm...
- Page 14 Beins gegen das Pedal einen Arm nach vorne bis auf Schulterhöhe heben. Wenn das andere Bein auf die Pedale drückt, den ausgestreck- ten Arm zurück in die Ausgangsposition bringen und gleichzeitig den anderen Arm auf Schulterhöhe heben. SP-MSP-008-P-IM-INT.indb 14 26/2/15 3:06 pm...
- Page 15 Druck des rechten oder linken Beins auf die Pedale beide Arme langsam bis auf Schulterhöhe heben. Wenn das andere Bein auf die Pedale drückt, die Arme langsam wieder in die Ausgangsposition brin- gen und wiederholen. SP-MSP-008-P-IM-INT.indb 15 26/2/15 3:06 pm...
-
Page 16: Wartung & Reinigung
Sie das Produkt erworben haben. Zu diesem Zweck empfehlen wir Ihnen, den Kaufbeleg sorgfältig aufzubewahren. Für weitere Fragen zum Aufbau und zur Anwendung Ihres SportPlus Produkts sowie zur Ersatzteilbestellung steht Ihnen unser Serviceteam selbstverständlich jederzeit zur Verfügung. SP-MSP-008-P-IM-INT.indb 16... -
Page 17: Reklamationen & Gewährleistungen
Anschrift. Die Kosten und die Gefahr des Verlustes für unaufgeforderte Zusen- dungen gehen zu Lasten des Absenders. Wir behalten uns vor, die Annahme unauf- geforderter Zusendungen zu verweigern oder entsprechende Waren an den Absender unfrei bzw. auf dessen Kosten zurückzusenden. SP-MSP-008-P-IM-INT.indb 17 26/2/15 3:06 pm... -
Page 18: Gewährleistungsbestimmungen
GEWÄHRLEISTUNGSBESTIMMUNGEN SportPlus versichert, dass das Produkt, auf das sich die Gewährleistung bezieht, aus qualitativ hochwertigen Materialien hergestellt und mit äußerster Sorgfalt überprüft wurde. Voraussetzung für die Gewährleistung ist die Bedienung und der ordentliche Aufbau ge- mäß Bedienungsanleitung. Durch unsachgemäße Nutzung und / oder unsachgemäßen Transport kann die Gewährleistung entfallen. - Page 19 Dear Customer, Congratulations for choosing a SportPlus product. We have every expectation that you will be fully satisfied with your new purchase. To guarantee optimal function of this product, please adhere to the following instructions: • Before using this product for the first time, please read the manual carefully! • The product has been designed with safety features. Nevertheless, please read the safety instructions carefully and use the equipment only as described in the manual to avoid hazards and personal injury.
-
Page 20: Technical Data
If you allow a child to use the product, do not leave it unattended during use. Make all necessary adjustments to the product yourself and supervise the child during exercise. • Keep packaging materials out of the reach of children. They pose a suffocation hazard! SP-MSP-008-P-IM-INT.indb 20 26/2/15 3:06 pm... - Page 21 Do not use old and new batteries or batteries of different types together! • Preferably use alkaline batteries, since they last longer than regular zinc-carbon batteries. • A battery replacement is necessary as soon as the display starts to fade or fades completely. SP-MSP-008-P-IM-INT.indb 21 26/2/15 3:06 pm...
-
Page 22: Information On Assembly
Make sure your work environment is hazard-free. For example, do not leave any tools lying around. Place the packaging materials somewhere where they will not pose any hazards during assembly. Packaging foil or plastic bags pose a suffocation hazard for children! • After assembling the product according to the instructions, make sure that all screws, bolts and nuts are installed correctly and tightened. • If necessary, lay out protective padding (not included) beneath the product to protect your floor as there is no guarantee that, for instance, the rubber feet will not leave marks behind. SP-MSP-008-P-IM-INT.indb 22 26/2/15 3:06 pm... -
Page 23: Assembly Instructions
ASSEMBLY INSTRUCTIONS Pull cables Fastening eyes Pedals Computer Shock absorber Rear stabilizer Turn knob The side stepper was designed to ensure simple assembly and use. IMPORTANT: Unpack all parts and check for damages. SP-MSP-008-P-IM-INT.indb 23 26/2/15 3:06 pm... - Page 24 Insert the two feet into the ends of the rear stabilizer. Fasten the feet with one screw each. Step 2: Fasten the pull cables to the fastening eyes in front of the pedals using the snap hooks. Step 3: Insert the battery in the back of the computer. Heed correct polarity (+ and -). Connect the sensor cable to the computer and insert the computer into the front frame. Step 4: Insert the turn knob into the front frame. SP-MSP-008-P-IM-INT.indb 24 26/2/15 3:06 pm...
-
Page 25: User Manual
Turn right to increase the stepping height. Turn left to decrease the stepping height. PLEASE NOTE! If the stepping height is set too low, the computer does not receive a correct signal and will not count! Information on the pull cables Risk of injury: Please be careful not to overstretch the pull cables as doing so causes damage and even poses a risk of tearing. This may result in serious injury. SP-MSP-008-P-IM-INT.indb 25 26/2/15 3:06 pm... - Page 26 The following table indicates how much force is necessary to stretch the pull cables to a certain length. Stretched length (cm) Force (N) The force is shown in N (=Newton). 10 N are equivalent to approx. 1 kg in earth's gravity. Mounting correctly: IMPORTANT: We recommend to beginners to place the device in a door frame or in front of a high-backed chair before mounting the side stepper the first time. The door frame or chair back can be used to help maintain your balance and correct posture. Brace yourself on the door frame or chair back BEFORE MOUNTING THE STEPPER, place one foot slowly on the pedal and push down until it reaches its deepest position. Now place the same foot in the middle of the pedal. Then place the other foot in the middle of the other pedal and slowly begin stepping with both legs. Continue stepping until you develop a feeling for your balance and the bidirectional sequence of motion on the side stepper. Mounting the stepper: Step 1: Stand behind the stepper. Place the complete sole of your left foot on the pedal and push it down all the way. Step 2: Place the complete sole of your right foot on the right pedal. Step 3: Begin exercising in a slow tempo with easy simple steps to become accustomed to the motion of the side stepper. Hint: Your goal is to achieve an even, rhythmic movement on the side stepper. Do not try to pedal all the way down with each step. SP-MSP-008-P-IM-INT.indb 26 26/2/15 3:06 pm...
- Page 27 USER MANUAL Time Number of steps Mode button IMPORTANT: The computer turns on automatically when it receives a signal. 5 values are displayed: • TMR: Shows your current training time in minutes and seconds and steps per minute. • REPS: Steps per minute (projected). • CAL: Calorie consumption (approximate value). • TTR: Shows all steps counted by computer. • TMR (blinkend): All displays are shown for a few seconds in sequence. Press the mode button to switch to the next value. The small arrow on the display points to the selected value imprinted beneath the display. Press the mode button for a value to display it permanently. Auto shut off The computer turns off automatically after 4 minutes if no signal is received in this period. Pedal movement and pressing the mode button are received as signals. SP-MSP-008-P-IM-INT.indb 27 26/2/15 3:06 pm...
-
Page 28: Training Tips
You are doing each stretching exercise correctly when you feel pleasant tension in the muscle you are stretching. • Speed is not a factor in stretching exercises. Avoid making quick, jerky movements while stretching. SP-MSP-008-P-IM-INT.indb 28 26/2/15 3:06 pm... - Page 29 You will feel pleasant tension in the front of your thigh. Hold this position for 30 seconds if possible and repeat the exercise twice for each leg. SP-MSP-008-P-IM-INT.indb 29 26/2/15 3:06 pm...
- Page 30 Sit on the ground and bring the heels of both your feet to- gether with your knees pointing out. Pull your feet as close as possible to your loins. Carefully push your knees downward. Hold this position for 30-40 seconds if possible. TOE TOUCHING Slowly bend your torso forward and try to touch your hands to your feet. Stretch as close to your toes as possible. Hold this position for 20-30 seconds if possible. HAMSTRING STRETCHES Sit on the ground and stretch out your right leg. Bend your left leg to place your foot against your right thigh. Now try to grasp your right foot with your right arm. Hold this position for 30-40 seconds if possible. CALF / ACHILLES TENDON EXERCISES Place both hands against the wall and brace your entire body. Alternately place your left and right leg back. You will feel tension in the calf of this leg. Hold this position for 30-40 seconds if possible. SP-MSP-008-P-IM-INT.indb 30 26/2/15 3:06 pm...
-
Page 31: Exercise Guide
While training, do not push the pedals to their end stop with each step. Instead shift your body weight accordingly before the pedals reach the end stop. Free swinging Easy cardiovascular training. Slowly begin swinging your arms at your sides, like when walking normally. Swing your arms higher to increase the intensity of training. Do not swing your arms higher until you have found a comfortable, easy rhythm. Deltoid muscle training Cardiovascular training that also trains and tones your shoulder muscles. While stepping, hold both arms bent at the elbows at your sides. With each step with your right or left leg on a pedal, raise an arm forward to shoulder height. When you step with the other foot on the pedal, return your outstretched arm to its original position while raising the other forward to shoulder height. SP-MSP-008-P-IM-INT.indb 31 26/2/15 3:06 pm... - Page 32 TRAINING TIPS Upright rowing Aids metabolism while simultaneously strengthening your shoulder and leg muscles. While stepping, hold both arms in front of your body and stretch downward while bending your arms slightly. With each step with your right or left leg on a pedal, raise your elbow to shoulder height and bring your hand beneath your chin. When you step with the other foot on the pedal, return your outstretched arm to its original position. Biceps training Cardiovascular training that also strengthens your biceps. While stepping, hold your arms at the front with your palms facing down. With each step with your right or left leg on a pedal, bend your elbows and raise both arms to your chest. When you step with the other foot on the pedal, return your arms to their original position. Lateral delta muscle training Aids metabolism while simultaneously strengthening your shoulder and leg muscles. While stepping, hold both arms slightly bent at the el- bows at your sides. With each step with your right or left leg on a pedal, slowly raise both arms to shoulder height. When you step with the other foot on the pedal, slowly return your arms to their original position and repeat. SP-MSP-008-P-IM-INT.indb 32 26/2/15 3:06 pm...
-
Page 33: Cleaning & Maintenance
Packaging materials are raw materials and can be recycled. Please sort packaging materials and dispose of them appropriately. Batteries do not belong in household waste! Battery retailers or local collection points have containers for the proper disposal of used batteries. Batteries do not belong in household waste! If you wish to dispose of the product, please do so in accordance with local regulations. Contact your local authority for information. In the case of a product defect, please directly contact your retailer at the place of purchase. For this purpose, it is recommended that you retain the sales receipt as proof of purchase. Our service team is naturally available at any time to assist you with additional questions regarding the assembly and use of your SportPlus product as well as ordering spare parts. SP-MSP-008-P-IM-INT.indb 33 26/2/15 3:06 pm... -
Page 34: Complaints & Warranty
**Call charges depend on your phone company/your contract and may vary depend- ing on your phone company. Please contact your network provider/phone company to enquire about current terms. Please have the following information at hand when you call. • User manual • Model number (located on the title page of this manual) • Description of accessory parts • Accessory number • Proof of purchase with purchase date Please note: Do not ship your product to our address without being prompted to do so by our service team. The costs and risk of loss for unsolicited shipments will be borne by the sender. We reserve the right to refuse to accept unsolicited shipments or to return the corre- sponding merchandise to the sender carriage forward, that is, at the sender’s expense. SP-MSP-008-P-IM-INT.indb 34 26/2/15 3:06 pm... -
Page 35: Warranty Terms
WARRANTY TERMS SportPlus guarantees that the product this warranty applies to was manufactured using high-quality materials and has been inspected with the utmost attention. The operation and assembly of the product according to the user manual is a precondi- tion of this warranty. The warranty can be voided due to improper use and/or improper transport of the product. The warranty period is two years beginning on the date of purchase. If the product you have purchased is defective, please contact our service team within 24 months from the date of purchase. Excluded from the warranty are: • Damage due to external force. • Interference, repairs or alterations by amateurs and by persons who have not been authorized by us. • Failure to observe the user manual. • If the afore-mentioned warranty terms are not met. • If the defect was caused by improper use or maintenance, neglect or accidents. • Wear and consumables – such as bearings and pads – are also excluded from the warranty. • This product is intended for private use only. There is no warranty for commercial use. SP-MSP-008-P-IM-INT.indb 35 26/2/15 3:06 pm... - Page 36 Geachte klant, geachte gebruiker, Gefeliciteerd met uw nieuwe SportPlus-product. We zijn ervan overtuigd dat u er veel plezier mee zult beleven. Om altijd de optimale functionaliteit en prestaties van uw product te garanderen, vragen we u om op het volgende te letten: • Lees deze bedieningshandleiding aandachtig voordat u het product voor het eerst...
-
Page 37: Technische Gegevens
Laat een kind nooit zonder toezicht het product gebruiken. Stel het product op gepaste wijze in en houd de gebruiker tijdens de oefening in het oog. • Let op dat verpakkingsmateriaal niet in kinderhanden terecht komt. Er bestaat gevaar op verstikking. SP-MSP-008-P-IM-INT.indb 37 26/2/15 3:06 pm... - Page 38 • Gebruik bij voorkeur alkalinebatterijen, omdat die een langere levensduur hebben dan traditionele zink-koolstofbatterijen. • De batterijen moeten vervangen worden wanneer de aanduiding zwakker wordt of helemaal verdwijnt. SP-MSP-008-P-IM-INT.indb 38 26/2/15 3:06 pm...
-
Page 39: Aanwijzingen Voor De Montage
• Leg indien nodig een beschermmat (niet bij het product inbegrepen) onder het product om de vloer te beschermen, omdat het mogelijk is dat bijvoorbeeld rubberen voetjes sporen achterlaten. SP-MSP-008-P-IM-INT.indb 39 26/2/15 3:06 pm... -
Page 40: Montagehandleiding
MONTAGEHANDLEIDING Trekbanden Bevestigingsogen Pedalen Computer Schokdemper Achterste Draaiknop stabilisator De zijstepper is zo ontworpen dat u hem eenvoudig kunt monteren en gebruiken. BELANGRIJK: Controleer bij het uitpakken alle onderdelen op eventuele beschadiging. SP-MSP-008-P-IM-INT.indb 40 26/2/15 3:06 pm... - Page 41 Plaats de batterij in de achterkant van de computer. Let daarbij op de juiste polariteit (-) en (+). Verbind de sensorkabel met de computer, en steek de computer op het voor- frame. Stap 4: Bevestig de draaiknop aan het voorframe. SP-MSP-008-P-IM-INT.indb 41 26/2/15 3:06 pm...
-
Page 42: Gebruiksaanwijzing
Opmerking over de trekbanden Risico op letsel: Let op dat u de trekbanden niet te ver uittrekt, omdat ze anders beschadigd raken en zelfs kunnen scheuren. Dat kan ernstig letsel veroorzaken. SP-MSP-008-P-IM-INT.indb 42 26/2/15 3:06 pm... - Page 43 Begin de training in een langzaam tempo met ontspannen, eenvoudige stappen, zodat u kunt wennen aan de bewegingsvorm van de zijstepper. Tip: Het doel is om gelijkmatig en ritmisch te bewegen. Probeer daarom niet om de pe- dalen telkens helemaal tot de aanslag in te duwen. SP-MSP-008-P-IM-INT.indb 43 26/2/15 3:06 pm...
- Page 44 Uitschakeltijd (automatische uitschakeling) De computer wordt automatisch uitgeschakeld als er 4 minuten lang geen signaal naar de computer verzonden wordt. Signalen zijn pedaalbewegingen en indrukken van de modustoets. SP-MSP-008-P-IM-INT.indb 44 26/2/15 3:06 pm...
-
Page 45: Tips Voor De Training
Neem ongeveer 5 tot 10 minuten tijd om elke spiergroep die u in de volgende training gaat gebruiken, zorgvuldig op te warmen. Stretchoefeningen worden correct uitgevoerd als u in de betreffende spier een aangename spanning voelt. • Snelheid is van geen belang bij stretchoefeningen. Vermijd snelle en schokkende bewegingen. SP-MSP-008-P-IM-INT.indb 45 26/2/15 3:06 pm... - Page 46 U moet daarbij een aange- name spanning voelen in de voorkant van uw bovenbeen. Houd deze houding voor zover u kunt 30 seconden vast, en herhaal de oefening 2 keer voor elk been. SP-MSP-008-P-IM-INT.indb 46 26/2/15 3:06 pm...
- Page 47 Zet om de beurt uw linker en uw rechter been naar achteren. Op deze manier rekt u de achterkant van uw been. Houd deze houding voor zover u kunt 30 tot 40 seconden vast. SP-MSP-008-P-IM-INT.indb 47 26/2/15 3:06 pm...
- Page 48 Wanneer u met het andere been op het pedaal drukt, brengt u de gestrekte arm terug naar de uitgangspositie en tilt u tegelijkertijd de andere arm op naar schouderhoogte. SP-MSP-008-P-IM-INT.indb 48 26/2/15 3:06 pm...
- Page 49 Wanneer u met het andere been op het pedaal drukt, brengt u de armen langzaam terug naar de uitgangs- positie. Herhaal deze beweging. SP-MSP-008-P-IM-INT.indb 49 26/2/15 3:06 pm...
-
Page 50: Onderhoud & Reiniging
We raden daarom aan het aankoop- bewijs zorgvuldig te bewaren. Ons serviceteam helpt u graag als u vragen hebt over de montage of het gebruik of als u vervangingsonderdelen wilt bestellen voor uw SportPlus- product. -
Page 51: Klachten En Garantie
We behouden ons het recht voor om ongevraagde zendingen te weigeren en de betreffende goederen op kosten van de afzender te retourneren. SP-MSP-008-P-IM-INT.indb 51 26/2/15 3:06 pm... -
Page 52: Garantiebepalingen
GARANTIEBEPALINGEN SportPlus garandeert dat het product waarvoor de garantie geldt, gefabriceerd is uit kwalitatief hoogwaardig materiaal en uiterst zorgvuldig gecontroleerd werd. De garantie geldt onder voorwaarde dat het product gebruikt wordt en behoorlijk gemon- teerd is volgens de bedieningshandleiding. Verkeerd gebruik en/of verkeerd transport kunnen leiden tot verlies van de garantie. - Page 53 Chère cliente, Cher client, Nous vous félicitons pour l'achat de votre nouveau produit SportPlus et sommes convaincus que vous en serez satisfait. Pour garantir un fonctionnement parfait et un rendement toujours plus optimal de votre produit, nous vous prions de : • Avant d’utiliser le produit pour la première fois, veuillez lire attentivement ce mode...
-
Page 54: Données Techniques
Effectuez les réglages correspondants sur le produit vous-même avant le déroulement des exercices et surveillez étroitement. • Veillez à tenir hors de portée des enfants tous les matériaux d'emballage. Il existe un risque d'asphyxie ! SP-MSP-008-P-IM-INT.indb 54 26/2/15 3:06 pm... - Page 55 ! • Utilisez en priorité des piles alcalines, car celles-ci ont une plus longue durée de vie que les piles en charbon et zinc courantes. • Un changement de piles devient nécessaire, dès que l'affichage est faible ou complètement estompé. SP-MSP-008-P-IM-INT.indb 55 26/2/15 3:06 pm...
-
Page 56: Instructions Pour Le Montage
Après que vous ayez monté le produit conformément aux instructions du mode d'emploi, assurez-vous que tous les vis, boulons et écrous soient bien installés et correctement serrés. • Installez éventuellement un tapis de protection (non compris dans le contenu de l'emballage) sous le produit, sur le sol, car il ne peut pas être exclu que le produit ne laisse pas de traces p. ex. avec les pieds en caoutchouc. SP-MSP-008-P-IM-INT.indb 56 26/2/15 3:06 pm... -
Page 57: Notice De Montage
NOTICE DE MONTAGE Cordes élastiques Œillet de fixation Pédale Ordinateur Amortisseur Stabilisateur Bouton rotatif arrière Le mini stepper est construit par nos soins de telle sorte qu'il soit facile à assembler et à utiliser. IMPORTANT : vérifiez toutes les pièces déballées et si des dommages existent. SP-MSP-008-P-IM-INT.indb 57 26/2/15 3:06 pm... - Page 58 Installez la pile au dos de l'ordinateur. Faites attention ici à la bonne polarité (- ) et (+) ! Raccordez le câble du capteur à l'ordinateur et installez l'ordinateur dans le cadre avant. 4e étape : Introduisez le bouton rotatif sur le cadre avant. SP-MSP-008-P-IM-INT.indb 58 26/2/15 3:06 pm...
-
Page 59: Mode D'emploi
! Instructions concernant les cordes élastiques Il existe un risque de blessures : Veillez à ne pas tirer trop fort sur les cordes élastiques car celles-ci peuvent être endommagés et même se déchirer par cette action. Cela peut aussi causer de graves blessures. SP-MSP-008-P-IM-INT.indb 59 26/2/15 3:06 pm... - Page 60 Placez le pied droit, sur toute sa surface plantaire, sur la pédale droite. 3e étape : Commencez l'entraînement à une vitesse lente avec des pas simples et souples de sorte que vous vous adaptiez à la forme du mouvement du mini stepper. Remarque : l'objectif est un mouvement régulier et rythmique ; n'essayez donc pas de forcer sur chaque pédale jusqu'à sa butée. SP-MSP-008-P-IM-INT.indb 60 26/2/15 3:06 pm...
- Page 61 Arrêt automatique (Auto Shut Off) L'ordinateur s'arrête après 4 minutes, si durant cette période, aucun signal n'a été envoyé à l'ordinateur. Comme signal, les mouvements des pédales et une pression de la touche de mode sont reconnus. SP-MSP-008-P-IM-INT.indb 61 26/2/15 3:06 pm...
-
Page 62: Conseils D'entraînement
L'échauffement de chaque groupe de muscles doit durer environ 5 à 10 minutes et être réalisé soigneusement permettant d'entrer dans l'entraînement dans de bonnes conditions. Les exercices de stretching sont effectués correctement, si vous sentez une tension agréable dans le muscle correspondant. • La vitesse ne joue aucun rôle dans les exercices de stretching. Les mouvements rapides et saccadés doivent être évités. SP-MSP-008-P-IM-INT.indb 62 26/2/15 3:06 pm... -
Page 63: Exercices Pour La Nuque
Tenez-vous d'une main à la paroi, saisissez votre pied et tirez- le vers l'arrière ; poussez le pied droit et ensuite le gauche en direction du fessier, et dans la mesure du possible, touchez la fesse. Sentez lors de cet exercice la tension agréable à l'avant de votre cuisse. Tenez cette position, si possible 30 secondes, puis répétez cet exercice 2 fois par jambe. SP-MSP-008-P-IM-INT.indb 63 26/2/15 3:06 pm... -
Page 64: Intérieur Des Cuisses
EXERCICE POUR LES MOLLETS/TENDONS D'ACHILLE Posez les deux mains sur la paroi et soutenez ainsi tout le corps. Placez en alternance la jambe droite puis la gauche vers l'arrière. La jambe se trouvant à l'arrière est étirée. Maintenez cette position si possible pendant 30 à 40 secondes. SP-MSP-008-P-IM-INT.indb 64 26/2/15 3:06 pm... -
Page 65: Guides D'exercices
Balancez donc les bras plus haut jusqu'à ce que vous ayez trouvé un rythme agréable et léger. Exercices pour les muscles deltoïdes Un entrainement cardio-vasculaire tout en tonifiant et formant les épaules. Pendant les steps, tenez les deux bras avec les cou- des pliés sur les côtés. Avec chaque pression de la jambe droite ou gauche contre la pédale, levez un bras vers l'avant jusqu'à hauteur d'épaule. Lorsque l'autre jambe appuie sur la pédale, remettez le bras étiré dans la position initiale et en même temps, levez l'autre bras à hauteur d'épaule. SP-MSP-008-P-IM-INT.indb 65 26/2/15 3:06 pm... - Page 66 Pendant les steps, tenez les bras avec les paumes vers l'avant vers le bas. Avec chaque pression de la jambe droite ou gauche sur la pédale, pliez les cou- des et les deux bras sur la poitrine. Lorsque l'autre jambe appuie sur la pédale, faites passer lentement vos bras à nouveau vers la position initiale. Exercices pour les muscles deltoïdes latéraux Renforcement du système cardio-vasculaire tout en effectuant un entraînement des jambes et des épaules. Pendant les steps, tenez les deux bras avec les coudes légèrement pliés sur les côtés. Avec chaque pression de la jambe droite ou gauche sur la pédale, levez les deux bras lentement jusqu'à hauteur d'épaule. Lorsque l'autre jambe appuie sur la pédale, faites revenir les bras à leurs positions initiales et répétez. SP-MSP-008-P-IM-INT.indb 66 26/2/15 3:06 pm...
-
Page 67: Entretien & Nettoyage
À cette fin, nous vous recommandons de conserver précieusement votre ticket de caisse. Pour des questions concernant l'assemblage et l'utilisation de votre produit SportPlus ainsi que pour la commande de pièces détachées, veuillez contacter notre équipe du service clientèle qui se tient toujours à votre disposition. -
Page 68: Réclamations Et Garanties
Heures d’ouverture : Du lundi au vendredi de 9 h 00 à 18 h 00 Service hotline : +33176361493** ou +49 (0)40 - 780 896 – 35** Adresse électronique : Service@SportPlus.org Site Internet : http://www.SportPlus.org **Les frais d’appel dépendent de votre opérateur/votre abonnement téléphonique et peuvent varier selon les opérateurs téléphoniques. Veuillez vous informer auprès de votre opérateur de réseau/votre opérateur téléphonique sur les conditions en vigueur. -
Page 69: Dispositions De La Garantie
• L‘usure et les matériaux utilisés tels que revêtement, coussins, etc. sont aussi exclus. • Le produit est seulement destiné à un usage privé. Aucune garantie n’est accordée lors d’une utilisation commerciale. SP-MSP-008-P-IM-INT.indb 69 26/2/15 3:06 pm... - Page 70 Bei technischen Fragen, Informationen zu unseren Produkten und für Ersatzteilbestellungen steht Ihnen unser Service-Team wie folgt zur Verfügung: Servicezeit: Montag bis Freitag von 9.00 bis 18.00 Uhr Servicehotline: 040-780896-35 (Nationales Festnetz, Gebühren providerabhängig) E-Mail: service@sportplus.org URL: http://www.sportplus.org Latupo GmbH Waterloohain 9 22769 Hamburg Germany SP-MSP-008-P-IM-INT.indb 70 26/2/15 3:06 pm...