Publicité
Les langues disponibles
Les langues disponibles
Liens rapides
Publicité
Chapitres

Manuels Connexes pour Rizzoli S


Sommaire des Matières pour Rizzoli S
- Page 1 Istruzioni d’uso • Gebrauchsanweisung Instructions • Manuel d’utilisation...
-
Page 3: Table Des Matières
ITALIANO Avvertenze pag. Installazione pag. pag. Manutenzione pag. Cosa fare se... pag. Dati tecnici pag. Garanzia pag. DEUTSCH Einfürung Montage Gebrauch Wartung Was tun, wenn... Technische Daten Garantie ENGLISH Warnings pag. Installation pag. pag. Maintenance pag. What to do if.. pag. - Page 4 Col tempo la Rizzoli ha continuato ad affinare che rendono indispensabile in ogni casa una le proprie cucine utilizzando tecnologie sem- cucina a legna.
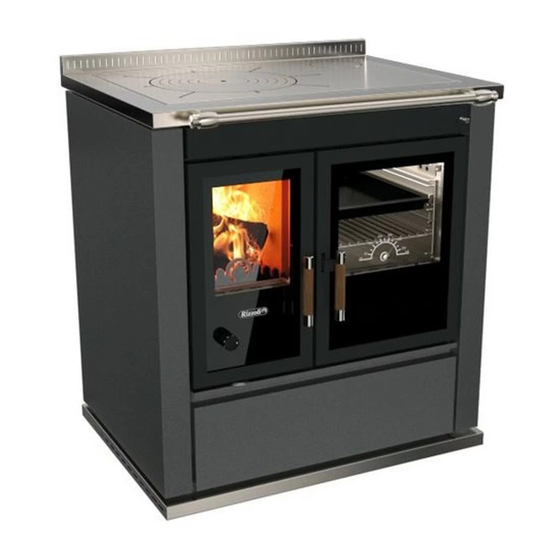
- Page 5 COMPONENTI DELLA CUCINA A LEGNA Figura 1 S 60 SF Telaio Camera di combustione Fianco Avviamento Porta della camera di combustione Manopola aria primaria Zoccolo Cassa legna Corrimano Piastra Porta del forno Forno S 60 CF S 80 SF...
- Page 6 Figura 2 Telaio S 80 Camera di combustione Fianco Avviamento Porta della camera di combustione Manopola aria primaria Zoccolo Cassa legna Corrimano Piastra Porta del forno Forno Archetto S 90 S 90 con Archetto...
-
Page 7: Altri Combustibili
• Porta accessori per cassa porta legna • Dispositivi per il collegamento dell’uscita CUCINE A LEGNA CON ARCHETTO Le cucine a legna S 60 SF e S 90 possono es- legna. La legna può essere immagazzinata sere realizzate nella variante con archetto ca- nell’apposito vano predisposto nello zoccolo. - Page 8 (ad esempio utilizzando una pia- Modello S 60 SF S 80 SF S 60 CF S 80 S 90 Lateralmente...
-
Page 9: Dimensioni E Forme Corrette Del Camino
ø canna fumaria ø canna fumaria Depressione Modello ø imbocco H < 4m (4m < H < 6m) (H > 6m) necessaria S 60 SF 130 mm 160 mm 150 mm 12 Pa S 80 SF 130 mm 160 mm 150 mm... -
Page 10: Corretto Allacciamento Al Camino
Figura 6 - Esempi di corretto e scorretto allacciamento alla canna fumaria PREDISPOSIZIONE DELL‘USCITA FUMI I modelli S 60 SF, S 80 SF e S 60 CF vengono I modelli S 80 e S 90 vengono forniti di serie forniti con l’uscita fumi superiore e posterio- con la predisposizione per l’uscita dei fumi... - Page 11 è piccolo Le cucine a legna serie S eventualmente o i serramenti sono ermetici. Il corretto af- possono anche essere collegate in modo da flusso di aria nel locale deve essere garan- prendere l’aria comburente direttamente...
- Page 12 Sono possibili altre soluzio- pavimento in corrispondenza dell’interno ni per il collegamento, ma vanno preventi- dello zoccolo, oppure a parete attraverso la vamente concordate con Rizzoli. parte posteriore della cucina secondo speci- Cucine standard Cucine con archetto...
- Page 13 1. Linea 2. Neutro 3. Terra PREDISPOSIZIONE DEL CORRIMANO I modelli S 80 e S 90 vengono forniti di serie destro e laterale sinistro). In alcuni casi può con il corrimano su tre lati (anteriore, laterale...
- Page 14 o più lati. Per effettuare questa operazione è la barra del corrimano dai portanti, sfilare i sufficiente un cacciavite a stella e utilizzare pomoli dei portanti e la curva del corrimano. l’apposita chiave a brugola e le viti fornite A questo punto occorre inserire il finale dove in dotazione con la cucina a legna.
-
Page 15: Inversione Dell'apertura Della Porta
I modelli S 60 CF, S 60 SF e S 80 SF sono do- viti apposite. A questo punto si toglie il finale tati del solo corrimano frontale. E’ possibile dal lato in cui si vuole aggiungere il corrima- richiedere gli accessori per aggiungere il cor- no e si inserisce la curva e quindi le restanti rimano su uno o entrambi i lati. - Page 16 Figura 21 - Corretta posizione delle rondelle bombate 2.10 MONTAGGIO FORNO ESTERNO (OPTIONAL) Per il modello S 80 SF è prevista la possibilità Prima del montaggio del forno è necessario di collegare all’apparecchio un forno esterno smontare la parte interna del forno stesso da posizionare sopra la cucina.
- Page 17 fissare il forno alla parete in modo che sia essere fissate a inserti o tasselli in grado di perfettamente orizzontale e che il tubo di sopportare alte temperature. collegamento sia perfettamente inserito. Se fosse necessario, in seguito, si potranno L’inserimento corretto deve garantire la te- smontare le tubazioni e accedere alla parte nuta dal passaggio di fumo e il giusto spazio interna del forno senza staccare il forno dalla...
-
Page 18: Prima Dell'uso
REGOLAZIONE ARIA SECONDARIA Sulle cucine a legna serie S l’aria secondaria va effettuata, se necessario, solamente in è fissa e impostata in modo da permettere fase di installazione. -
Page 19: Accensione E Funzionamento
Figura 24 - Regolazione aria secondaria ACCENSIONE E FUNZIONAMENTO Per accendere il fuoco potete utilizzare il fuoco questo si mantiene fino all’esauri- come combustibile legna ben secca spacca- mento del combustibile. ta molto sottile insieme ai prodotti specifici Per mantenere la fiamma occorre reinserire disponibili in commercio. -
Page 20: Chiave Per L'avviamento (S 60 Cf, S 80, S 90, S 80 Sf)
CHIAVE PER L’AVVIAMENTO (S 60 CF, S 80, S 90, S 80 SF) I modelli con forno, per consentire con mag- L’asta va estratta a cucina fredda e richiusa giore facilità l’accensione del fuoco a cami- quando la combustione è ben avviata. -
Page 21: Porta Accessori
26. gura 27. Nelle cucine a legna con archetto, l’interrut- VALVOLA PER L’ECCESSO DI VAPORE (S 60 CF, S 80, S 90) La cottura di pietanze in taluni casi può comportare la formazione di un eccesso di vapore all’... - Page 22 3.10 TEGLIA CON GUIDE SCORREVOLI (S 60 CF, S 80, S 90) Su tutte le cucine a legna con forno è in vole è presente solo in una sola posizione dotazione un sistema a guida scorrevole di all’interno del forno, ma questa può essere supporto per la teglia.
- Page 23 3.12 PORTATEGLIA (S 60 CF, S 80, S 90) In dotazione alla cucina a legna è presente presine o degli stracci. Il portateglia va ag- un dispositivo portateglia che permette di ganciato al bordo della teglia e utilizzato a estrarre la teglia dal forno caldo in tutta si- due mani.
-
Page 24: Pulizia Dei Vetri
S 80 e S 90 sono dotati di lendosi del raschietto eliminate i residui car- uno sportello pulizia al di sotto del forno. - Page 25 MANUTENZIONE DELL’IMPIANTO DI ILLUMINAZIONE (S 60 CF, S 80, S 90) ATTENZIONE! Prima di effettuare ogni operazione di manutenzione dell’im- pianto di illuminazione dovete togliere l’alimentazione all’impianto elettrico, accertarvi che effettivamente non ci sia tensione nell’impianto, che la cucina sia spenta, sia fredda e che la lampadina non sia stata accesa nei minuti precedenti.
- Page 26 La lampadina del forno è soggetta ad alte padina, inserire la nuova lampadina e infine temperature. Pur essendo specificamente riavvitare il coprilampada. Di tanto in tanto studiata per questo utilizzo è soggetta a è necessario effettuare la pulizia del vetro usura e rotture accidentali.
- Page 27 Figura 36 - Smontaggio tubo di raccordo del forno esterno 4.11 DILATAZIONE TERMICA Durante l’uso tutti i materiali della cucina a le deformazioni e anche delle rotture. Per legna sono soggetti a dilatazione e a piccoli questo vanno tenuti liberi e puliti gli spazi movimenti dovuti alle variazioni di tempera- che permettono la dilatazione sia all’interno tura.
- Page 28 5. COSA FARE SE... Problemi Effetti Possibili rimedi Malfunzionamento Combustione irregolare • Verificare che il regolatore dell’aria primaria sia Combustione incompleta aperto • Verificare che cenere e residui non ostru- Esce fumo dalla piastra iscano la griglia • Verificare che la griglia non sia Esce fumo da altre parti della cucina montata alla rovescia (la parte piana va in alto) •...
- Page 29 6. DATI TECNICI DATI TECNICI S Modello S 60 SF S 80 SF S 60 CF S 80 S 90 Peso 167 kg 200 kg 169 kg 190 kg 210 kg Potenza nominale 5,9 kW 12,5 kW 6,0 kW 9,0 kW...
- Page 30 3 mesi. Per le riparazioni cabile giudizio deciderà se la prestazione di ga- presso i Centri di Assistenza della ditta Rizzoli il ranzia debba essere fatta in loco oppure presso i cliente è tenuto a versare le spese di trasporto.
- Page 31 TRIBUNALE COMPETENTE Per qualsiasi controversia o contestazione sarà competente sempre e solo il foro di Trento. Avvertenza Rizzoli S.r.l. è costantemente impegnata nel migliorare i propri prodotti, per questo il contenuto del presente libretto di istruzioni può cambiare senza preavviso.
-
Page 32: Dichiarazione Di Prestazione
DICHIARAZIONE DI PRESTAZIONE Ai sensi dei regolamenti prodotti da costruzione n. 305/2011 Codice di identificazione unico del Prodotto-tipo S 60 SF Modello e/o n. serie (art. 11-4) S 60 SF Usi previsti del prodotto conformemente Cottura dei cibi alla relativa specifica tecnica armonizzata Riscaldamento domestico Nome o marchio registrato del fabbricante (art. - Page 33 Nome e indirizzo del mandatario Sistema di valutazione e verifica della costanza System 3 della prestazione (allegato 5) Laboratorio notificato Istituto di ricerche e collaudi M.Masini S.r.l. Via Moscova, 11 – I-20017 Rho (MI) Numero rapporto di prova 0009 - 2013 Specifica tecnica armonizzata...
- Page 34 DICHIARAZIONE DI PRESTAZIONE Ai sensi dei regolamenti prodotti da costruzione n. 305/2011 Codice di identificazione unico del Prodotto-tipo S 60 CF Modello e/o n. serie (art. 11-4) S 60 CF Usi previsti del prodotto conformemente Cottura dei cibi alla relativa specifica tecnica armonizzata Riscaldamento domestico Nome o marchio registrato del fabbricante (art.
- Page 35 Nome e indirizzo del mandatario Sistema di valutazione e verifica della costanza System 3 della prestazione (allegato 5) Laboratorio notificato KIWA Italia S.p.A. - Via Treviso, 32/34 I-31020 San Vendemiano (TV) Numero rapporto di prova 090901208 Specifica tecnica armonizzata EN 12815...
- Page 36 Nome e indirizzo del mandatario Sistema di valutazione e verifica della costanza System 3 della prestazione (allegato 5) Laboratorio notificato IMQ Primacontrol S.r.l. Via dell’Industria, 55 – Zoppè I-31020 San Vendemiano (TV) Numero rapporto di prova CPD-08-044 Specifica tecnica armonizzata...
-
Page 37: Avvertenze
Aerazione pag. Collegamenti elettrici (modelli con forno) pag. 11 Predisposizione del corrimano pag. 11 Inversione dell’apertura della porta (S 60 CF, S 60 SF, S 80 SF) pag. 13 2.10 Montaggio forno esterno (optional) pag. 14 2.11 Muratura interna pag. -
Page 38: Cosa Fare Se
Pulizia dei vetri pag. 22 Cassa porta legna pag. 22 Manutenzione e pulizia della piastra pag. 23 Manutenzione dell’impianto di illuminazione (S 60 CF, S 80, S 90) pag. 23 4.10 Smontaggio e manutenzione forno esterno (optional) pag. 24 4.11 Dilatazione termica pag. -
Page 40: Einführung
Holzherden im typischen Stil der angenehme Duft des aus unseren Wäldern Dolomitentäler begann. stammenden Holzes sind Argumente, die Mit der Zeit hat Rizzoli seine Produkte durch den Einsatz eines Holzherdes im privaten den Einsatz modernster und zukunftsori- Wohnbereich nicht nur interessant, son- entierter Technologien ständig verbessert,... -
Page 41: Herdbestandteile
HERDBESTANDTEILE Abb. 1 S 60 SF Herdrahmen Brennkammer Seitenwand Anheizklappe Feuerraumtür Primärluftregulierung Sockel Holzlade Herdstange Herdplatte Backofentür Backofen S 60 CF S 80 SF... - Page 42 Abb. 2 Herdrahmen S 80 Brennkammer Seitenwand Anheizklappe Feuerraumtür Primärluftregulierung Sockel Holzlade Herdstange Herdplatte Backofentür Backofen Rundbogen S 90 S 90 mit Rundbogen...
-
Page 43: Zubehör
• Rußkratzer (Modelle mit Backofen) • Vorrichtung für den Rauchabzugsanschluss HOLZHERDE MIT RUNDBOGEN Die Modelle S 60 SF und S 90 können mit Das Holz kann im Rundbogen gelagert wer- Sockel mit Rundbogen, passend zur Ausfüh- den. Achten Sie darauf, dass Sie beim Han- rung des Holzherdes, realisiert werden. -
Page 44: Montage
Wärmeaus- fähigen Boden aufgestellt werden. Falls dies dehnung der Materialien bei Temperatur- nicht der Fall ist, müssen entsprechende Vor- schwankungen zu ermöglichen. Modell S 60 SF S 80 SF S 60 CF S 80 S 90 Seitlich... -
Page 45: Richtige Abmessungen Und Formen Des Rauchabzugs
ø Rauchabzug ø Rauchabzug Empfohlener Modell H < 4m Rauchausgang (4m < H < 6m) (H > 6m) Förderdruck S 60 SF 130 mm 160 mm 150 mm 12 Pa S 80 SF 130 mm 160 mm 150 mm 12 Pa... -
Page 46: Korrekter Kaminanschluss
Abb. 6 - Beispiele für den falschen und richtigen Anschluss an den Rauchabzug RAUCHAUSGÄNGE Die Modelle S 60 SF, S 80 SF und S 60 CF Die Modelle S 80 und S 90 werden serien- werden mit Rauchausgang oben und hinten mäßig mit Rauchausgang oben und hinten... - Page 47 In diesem Fall muss im Raum stets für aus- im Aufstellungsraum zu garantieren. reichende Frischluftzufuhr gesorgt werden, Die Holzherde der Serie S sind auch für den hauptsächlich wenn dieser klein ist oder direkten Anschluss an einen externen Fri- wenn Fenster und Türen dicht schließen.
- Page 48 Bodenhöhe oder an der Rückwand des Her- sind eventuell möglich, jedoch nur nach vor- des, je nach Modell (siehe Tabelle und Abbil- heriger Absprache mit Rizzoli. ACHTUNG! Dunstabzugshauben oder Lüftungsanlagen im Aufstellungsraum können die Funktionstüchtigkeit des Herdes, bei fehlender, eigens dafür vorge- sehener Frischluftklappe oder bei unterdimensionierter dieser, beeinträchtigen.
-
Page 49: Elektrische Anschlüsse (Modelle Mit Backofen)
Stromversorgung sorgung: 1. Phase 2. Neutralleiter 3. Schutzleiter HERDSTANGE Die Modelle S 80 und S 90 werden serienmäßig rechts und seitlich links) geliefert. In einigen mit Herdstangen an drei Seiten (vorne, seitlich Fällen kann es nötig sein, dass diese auf einer... - Page 50 oder mehreren Seiten abmontiert werden und den Außenteil der Halterungen sowie den müssen. Hierfür verwenden Sie einfach einen Herdstangenbogen entfernen. Nun wird das Kreuzschlitz-Schraubendreher und den eigens Endstück an jener Stelle, an der sich der Herd- dazu bestimmten Inbusschlüssel sowie die im stangenbogen befand, eingesetzt, die Herd- Lieferumfang enthaltenen Schrauben.
-
Page 51: Türanschlag Wechseln (S 60 Cf, S 60 Sf, S 80 Sf)
Die Modelle S 60 CF, S 60 SF und S 80 SF sind befestigt die zwei Herdstangenhalterungen, nur mit einer Herdstange auf der Vorder- entfernt das Endstück auf der Seite, auf der seite ausgestattet. Auf Anfrage sind die Zu- man die Herdstange ergänzen möchte und behörteile für die Ergänzung der seitlichen... -
Page 52: Montage Des Zusätzlichen Backofens (Optional)
Abb. 21 - Korrekte Position der Unterlegscheiben 2.10 MONTAGE DES ZUSÄTZLICHEN BACKOFENS (OPTIONAL) Für das Modell S 80 SF besteht die Möglich- Vor der Montage des Backofens muss dessen keit zur Verbindung mit einem zusätzlichen Innenraum abmontiert werden (siehe Abb. - Page 53 Nun kann der Backofen an der Abb. 23). Die verwendeten Schrauben müs- Wand befestigt werden. Wichtig ist, dass er sen dem Gewicht des Backofens standhalten perfekt waagrecht ausgerichtet ist und dass und müssen mit hitzebeständigen Dübeln das Verbindungsrohr gut eingefügt wird.
-
Page 54: Gebrauch
Herd länger vom Holzherd erzeugte Wärme während des warm bleibt. SEKUNDÄRLUFTREGULIERUNG Die in den Herden der Serie S fix eingestellte In der Regel wird diese Regulierung, falls Sekundärluft ist so ausgelegt, dass eine op- notwendig, nur in der Installationsphase timale Verbrennung und die Sauberkeit des wie folgt vorgenommen: die Feuerraumtür... - Page 55 Abb. 24 - Regulierung der Sekundärluft ANHEIZEN UND BETRIEB Zum Anheizen verwenden Sie als Brennstoff abzug und den Witterungsbedingungen ab. gut getrocknetes, sehr dünnes Scheitholz Nachdem der Herd richtig angeheizt wurde, zusammen mit den im Handel erhältlichen bleibt das Feuer bis zum Abbrand des Heiz- speziellen Zündhilfen.
-
Page 56: Anheizklappe (S 60 Cf, S 80, S 90, S 80 Sf)
ANHEIZKLAPPE (S 60 CF, S 80, S 90, S 80 SF) Um das Anheizen bei kaltem Rauchabzug zu bei kaltem Herd herausgezogen und wieder erleichtern, sind die Herdmodelle mit Backo- geschlossen, sobald das Feuer gut brennt. fen mit einer durch ausziehbarem Hebel ge-... -
Page 57: Dampfableitungsventil (S 60 Cf, S 80, S 90)
Lichtschalter in der Mitte die Holzlade herausgezogen werden (siehe des oberen Sockelteils (siehe Abb. 27). DAMPFABLEITUNGSVENTIL (S 60 CF, S 80, S 90) Beim Backen oder Braten gewisser Speisen kann es manchmal zu übermäßiger Dampf- bildung im Inneren des Backofens kommen. -
Page 58: Backblech Auf Teleskopschienen (S 60 Cf, S 80, S 90)
3.10 BACKBLECH AUF TELESKOPSCHIENEN (S 60 CF, S 80, S 90) Alle Holzherde mit Backofen sind mit einem scher gestaltet wird, da beide Hände frei Teleskopschienensystem für den sicheren zum Bearbeiten und Entnehmen der Spei- und festen Halt des Backbleches ausgestat- sen sind. -
Page 59: Wartung
3.12 BACKBLECHHALTER (S 60 CF, S 80, S 90) Im Lieferumfang des Holzherdes steht ein los aus dem heißen Backofen genommen Backblechhalter zur Verfügung, anhand werden kann. Der Halter wird einfach am dessen - ohne Einsatz von Topflappen oder Rand des Backblechs angebracht und mit Tüchern - das Backblech sicher und problem-... -
Page 60: Verwendung Der Reinigungstür (S 80, S 90)
Rußkratzer können Sie die halb des Backofens entfernt werden kön- Rückstände entfernen und dann schließen nen, ist das Model S 60 CF mit einer heraus- Sie wieder. Eventuelle Risse im vorhandenen nehmbaren Reinigungsplatte ausgestattet, feuerfesten Mörtel in den Rauchgaszügen die sich im Backofen befindet. - Page 61 Rostflecken bilden. In Herdplatte nicht unterbunden wird. WARTUNG DER BACKOFENBELEUCHTUNG (S 60 CF, S 80, S 90) ACHTUNG! Bevor Sie mit den Wartungsarbeiten beginnen, unterbrechen Sie die Stromzufuhr und vergewissern Sie sich, dass keine Spannung mehr vorhan- den ist.
- Page 62 Die Glühlampe im Backofen ist hohen Tem- nehmen die Lampe heraus und ersetzen peraturen ausgesetzt. Auch wenn sie spezi- sie durch eine neue. Zum Schluss bringen ell für diesen Einsatz entwickelt wurde, ist Sie die Abdeckung wieder an. Von Zeit zu ihre Lebensdauer nicht uneingeschränkt.
- Page 63 Abb. 36 - Entfernung des Verbindungsrohrs des zusätzlichen Backofens 4.11 WÄRMEAUSDEHNUNG Während dem Betrieb des Holzherdes un- te Verformungsschäden und Rissbildungen terliegen alle Herdbauteile Ausdehnungs- hervorrufen. Achten Sie deshalb darauf, und kleinen Bewegungserscheinungen, die dass sowohl die externen wie auch internen durch Temperaturschwankungen hervorge- Dehnungsfugen des Holzherdes stets frei rufen werden.
- Page 64 5. WAS TUN, WENN... Probleme Anzeichen Mögliche Lösungen Funktionsstörung Unregelmäßige Verbrennung • Kontrollieren, ob der Primärluftregler offen ist • Unvollständige Verbrennung Kontrollieren, ob keine Asche und Verbrennungs- Rauch dringt aus der Herdplatte rückstände den Feuerrost verstopfen • Kontrol- Rauch dringt aus anderen Herdteilen lieren, ob der Feuerrost nicht verkehrt montiert wurde (der flache Teil gehört nach oben) •...
-
Page 65: Technische Daten
6. TECHNISCHE DATEN TECHNISCHE DATEN SERIE S Modell S 60 SF S 80 SF S 60 CF S 80 S 90 Gewicht 167 kg 200 kg 169 kg 190 kg 210 kg Nennwärmeleistung 5,9 kW 12,5 kW 6,0 kW 9,0 kW... -
Page 66: Garantie
Gerät beiliegenden Garantieschein (bitte Bei Inanspruchnahme von Garantieleistungen sorgfältig aufbewahren) vorweisen. GARANTIEBESTIMMUNGEN Die Firma Rizzoli behält sich das Recht vor, rem Werk vorzunehmen. Für Garantieleistun- nach ihrem freien Ermessen die zur Lösung gen an Ort und Stelle wird dem Kunden die zu des Garantiefalls am besten geeigneten Maß-... - Page 67 Käufers als zuständigen Gerichtsstand Firma Rizzoli das Recht vor, auch einen an- auszuwählen. Hinweis Die Firma Rizzoli GmbH ist stets um die Verbesserung seiner Erzeugnisse bemüht und behält sich deshalb das Recht vor, eventuelle Änderungen dieser Gebrauchsanweisung ohne Vorankündigung vorzunehmen.
- Page 68 LEISTUNGSERKLÄRUNG Gemäß der Bauproduktverordnung Nr. 305/2011 Nr. 4 Eindeutiger Identifikationscode des Produkttyps S 60 SF Modell und/oder Seriennr. (Art. 11-4) S 60 SF Vorgesehene Verwendung des Produkts in Kochen von Speisen Übereinstimmung mit der geltenden, harmonisierten Raumheizer technischen Spezifikation Name oder eingetragene Marke des Herstellers Rizzoli GmbH (Art.
- Page 69 Name und Adresse des autorisierten Stellvertreters System zur Bewertung und Überprüfung der System 3 Leistungsbeständigkeit (Anlage 5) Prüflabor Istituto di ricerche e collaudi M.Masini S.r.l. Via Moscova, 11 – I-20017 Rho (MI) Prüfbericht Nr. 0009 - 2013 Harmonisierte technische Spezifikation...
- Page 70 LEISTUNGSERKLÄRUNG Gemäß der Bauproduktverordnung Nr. 305/2011 Nr. 6 Eindeutiger Identifikationscode des Produkttyps S 60 CF Modell und/oder Seriennr. (Art. 11-4) S 60 CF Vorgesehene Verwendung des Produkts in Kochen von Speisen Übereinstimmung mit der geltenden, harmonisierten Raumheizer technischen Spezifikation Name oder eingetragene Marke des Herstellers Rizzoli GmbH (Art.
- Page 71 (Art. 11-5) Name und Adresse des autorisierten Stellvertreters System zur Bewertung und Überprüfung der System 3 Leistungsbeständigkeit (Anlage 5) Prüflabor KIWA Italia S.p.A. - Via Treviso, 32/34 I-31020 San Vendemiano (TV) Prüfbericht Nr. 090901208 Harmonisierte technische Spezifikation EN 12815 Wesentliche Merkmale...
- Page 72 (Art. 11-5) Name und Adresse des autorisierten Stellvertreters System zur Bewertung und Überprüfung der System 3 Leistungsbeständigkeit (Anlage 5) Prüflabor IMQ Primacontrol S.r.l. Via dell’Industria, 55 – Zoppè I-31020 San Vendemiano (TV) Prüfbericht Nr. CPD-08-044 Harmonisierte technische Spezifikation EN 12815...
- Page 73 Richtige Abmessungen und Formen des Rauchabzugs Korrekter Kaminanschluss Rauchausgänge Frischluftzufuhr Elektrische Anschlüsse (Modelle mit Backofen) Herdstange Türanschlag wechseln (S 60 CF, S 60 SF, S 80 SF) 2.10 Montage des zusätzlichen Backofens (optional) 2.11 Ausmauerung 2.12 Vor der ersten Inbetriebnahme GEBRAUCH Primärluftregulierung...
- Page 74 INHALTSVERZEICHNIS Reinigung der Sichtfenster Holzlade Reinigung und Pflege der Herdplatte Wartung der Backofenbeleuchtung (S 60 CF, S 80, S 90) 4.10 Abbau und Wartung des zusätzlichen Backofens (optional) 4.11 Wärmeausdehnung 4.12 Austausch von Herdbestandteilen WAS TUN, WENN... TECHNISCHE DATEN Technische Daten Serie S Einstellungen Nennwärmeleistung...
- Page 78 Year after year Rizzoli continued to refine its are the qualities that make wood fired cook- cookers using even more advanced technol- ers indispensable in every house.
- Page 79 PARTS OF THE WOOD FIRED COOKER Picture 1 S 60 SF Frame Combustion chamber Side Starting device Combustion chamber’s door Primary air hand grip Base Wood box Handrail Plate Oven’s door Oven S 60 CF S 80 SF...
- Page 80 Picture 2 Frame S 80 Combustion chamber Side Starting device Combustion chamber’s door Primary air hand grip Base Wood box Handrail Plate Oven’s door Oven Rustic bow S 90 S 90 with rustic...
-
Page 81: Accessories
• Devices for the connection of the exhaust-pipe WOOD FIRED COOKERS WITH RUSTIC BOW S 60 SF and S 90 wood fired cookers can be stored in the apposite vain predisposed in made with a rustic bow, with the same fin- the basement. - Page 82 1-2 mm to allow the dilatation of materials must make the necessary adjustments (for when the temperature varies. Model S 60 SF S 80 SF S 60 CF S 80 S 90 Sideways...
- Page 83 ø flue ø flue Necessary Model ø entrance H < 4m (4m < H < 6m) (H > 6m) depression S 60 SF 130 mm 160 mm 150 mm 12 Pa S 80 SF 130 mm 160 mm 150 mm...
- Page 84 Picture 6 - Examples of correct and incorrect chimney hood connection PREDISPOSITION OF THE EXHAUST-PIPE S 60 SF, S 80 SF and S 60 CF models are the other one. S 80 and S 90 models are endowed with the predisposition for ex-...
- Page 85 3 Pa in the place of installation. cycle of fresh air, in particular if the room is S range wood fired cookers can also be con- small and window and door frames are her- nected so that the comburent air comes di- metic.
- Page 86 Pictures 11 and 12 - Rear sight of the plinth of the wood fired cooker and specifies for the connection with the air intake through the plinth. The dark part represents the standard opening in which you an insert the pipe for the connection Dimensions ø Models S 60 SF S 60 SF whit rustic b. S 80 SF S 60 CF...
- Page 87 AC power AC power: 1.Line 2.Neutral 3.Earth HANDRAIL PREDISPOSITION S 80 and S 90 models are endowed with side). In some situations it may be necessary handrail on three sides (front, left side, right to remove the handrail from one or more...
- Page 88 sides. To make this operation, you need a pommels of the carryings and the bend of star screwdriver and the hex key with the the handrail. screws given together with the wood fired Now you must insert the final part where cooker.
- Page 89 The S 60 CF, S 60 SF and S 80 SF models are the special screws. Now, remove the final endowed only with the frontal handrail. It part from the side in which you want to add is possible to request the tools to add the the handrail and insert the bend and the handrail to one or each side.
- Page 90 Picture 21 - Correct position of the rounded washers 2.10 FIXING THE EXTERNAL OVEN (OPTIONAL) For S 80 SF model it is possible to connect move the internal part of the oven as indi- to the device an external oven to be placed cated in pictures 34 and 35, in order to be upon the wood fired cooker.
- Page 91 fectly inserted. The correct insertion must resist high temperatures. guarantee the holding of the fume conduct When necessary, later, you will be able to and the correct space inside the fume circuit remove the pipes and access to the internal of the oven.
-
Page 92: Primary Air Regulation
The regulation works on an automatic de- cooker warm for a longer time. SECONDARY AIR REGULATION On S cookers the secondary air is fixed and when necessary, only during the installation set so that the combustion is optimal and of the cooker. To make the regulation: open the glass of the fire door is clean. - Page 93 Picture 24 - Secondary air regulation LIGHTING AND WORKING To light the fire you can use well dried bro- tains till the exhaustion of the combustible. ken and thin wood together with the specif- To maintain the flame it is necessary to re- ic products available in commerce.
- Page 94 STARTING KEY (S 60 CF, S 80, S 90, S 80 SF) The models with oven, in order to allow an shall be reinserted in when the combustion easier lighting with cold chimneys, are en- is well under way. dowed with a starting key ruled by a rod, On the S 80 SF model there are two starting see picture 25.
- Page 95 26. In wood fired position, see picture 27. STEAM EXCESS VALVE (S 60 CF, S 80, S 90) Cooking meals sometimes may generate a steam excess inside the oven. For this rea- son on some models there is a valve that al- low to eject the steam in excess.
- Page 96 3.10 TELESCOPIC PULLOUT FOR BAKING PAN (S 60 CF, S 80, S 90) All the wood fired wood fired cookers with pullout is placed in a single position inside oven have a telescopic pullout for endowed the oven but this can be changed by moving baking pan system.
- Page 97 3.12 BAKING-PAN HOLDER (S 60 CF, S 80, S 90) The baking-pan holder allows to extract the der must be hooked to the baking-pan edge baking-pan in a safe way, with no need to and used with two hands. use rags or hot pads. The baking-pan hol- Picture 32 - Baking-pan holder 4.
- Page 98 To start the cleaning, open the door the combustion also from the less acces- unscrewing the fixing pommels, then use sible zones, the S 80 and S 90 models are the scraper to clean the carbon residuals: endowed with a cleaning door under the then, you can close the door.
- Page 99 In this case you have to wipe the MAINTENANCE OF THE LIGHT (S 60 CF, S 80, S 90) WARNING! Before starting any maintenance operation for the light, you must disconnect it from AC power and be sure that the wood fired cooker is not powered.
- Page 100 4.10 UNFIXING AND MAINTENANCE OF THE EXTERNAL OVEN (OPTIONAL) To clean the connection pipes and the inter- wall. To make this, the firs step is the remov- nal conducts of the external oven, it is pos- al of the oven door and of the other internal sible to unfix the oven itself.
-
Page 101: Thermal Expansion
4.12 REPLACEMENT OF THE PARTS Most of the wood fired cooker’s parts are wood fired cooker written on the warranty easy to remove with a simple screwdriver. In card or in the identity plate: this is located case of accessories or spare parts inquiry, do on the side of the wood box. -
Page 102: Possible Solutions
• Call the firemen Overheating The cooker overheats. Oven’s thermo- • Open the oven door meter is over 300°. Heating of oven The oven does not reach high •... -
Page 103: Technical Data S
6. TECHNICAL DATA TECHNICAL DATA S Model S 60 SF S 80 SF S 60 CF S 80 S 90 Weight 167 kg 200 kg 169 kg 190 kg 210 kg Nominal power 5,9 kW 12,5 kW 6,0 kW 9,0 kW... - Page 104 This device is the result all the quality controls and internal tests. of the pluridecennial experience of Rizzoli, Rizzoli also warrants that the device is work- who warrants a perfectly made product. ing, without imperfections due to building...
- Page 105 COMPETENT LAW COURT In case of controversy will be competent the law-court of Trento only. Note Rizzoli S.r.l. is constantly working to improve its products, for this reason the contents of this booklet may vary without notice.
- Page 106 DECLARATION OF PERFORMANCE (DoP) In accordance with building products regulations n. 305/2011 Product Type S 60 SF Type, batch or serial number (Art. 11-4) S 60 SF Intended use of the product in accordance with Meals cooking the relative harmonized technical specification Domestic heating Name or regist.
- Page 107 Name and Address of the manufacturer System of assessment and verification of constancy System 3 of performance (Attachment 5) Notified laboratory Istituto di ricerche e collaudi M.Masini S.r.l. Via Moscova, 11 – I-20017 Rho (MI) Test report no 0009 - 2013 Harmonized technical specification...
- Page 108 DECLARATION OF PERFORMANCE (DoP) In accordance with building products regulations n. 305/2011 Product Type S 60 CF Type, batch or serial number (Art. 11-4) S 60 CF Intended use of the product in accordance with Meals cooking the relative harmonized technical specification Domestic heating Name or regist.
- Page 109 Name and Address of the manufacturer System of assessment and verification of constancy System 3 of performance (Attachment 5) Notified laboratory KIWA Italia S.p.A. - Via Treviso, 32/34 I-31020 San Vendemiano (TV) Test report no 090901208 Harmonized technical specification EN 12815...
- Page 110 Name and Address of the manufacturer System of assessment and verification of constancy System 3 of performance (Attachment 5) Notified laboratory IMQ Primacontrol S.r.l. Via dell’Industria, 55 – Zoppè I-31020 San Vendemiano (TV) Test report no CPD-08-044 Harmonized technical specification...
-
Page 111: Warnings
Predisposition of the exhaust-pipe pag. Aeration pag. Electric connections (models with oven) pag. Handrail predisposition pag. Inversion of the door opening (S 60 CF, S 60 SF, S 80 SF) pag. 2.10 Fixing the external oven (optional) pag. 2.11 Internal walling pag. - Page 112 INDEX Cleaning of the glasses pag. Wood box pag. Plate cleaning and maintenance pag. Maintenance of the light (S 60 CF, S 80, S 90) pag. 4.10 Unfixing and maintenance of the external oven (optional) pag. 4.11 Thermal expansion pag.
- Page 114 • Après une longue période d’utilisation, peuvent être très chaudes. Veillez à ne pas contrôlez attentivement la vacuité de vous appuyer et à ne pas poser les mains l’installation, l’absence de bouchons de sur ces surfaces (châssis, plaque et portes).
- Page 115 COMPOSANTS DE LA CUISINIERE A BOIS Figure 1 S 60 SF Plan Chambre de combustion Flanc Clé de tirage Porte foyère Bouton de réglage d’admission d’air primaire Socle Tiroir à bois Main courante Plaque de cuisson Porte de four Four...
- Page 116 Figure 2 Plan S 80 Chambre de combustion Flanc Clé de tirage Porte foyère Bouton de réglage d’admission d’air primaire Socle Tiroir à bois Main courante Plaque de cuisson Porte de four Four Niche S 90 S 90 avec niche...
-
Page 117: Accessoires
• 1 raclette (pour modèles avec four) CUISINIERES A BOIS AVEC NICHE CINTREE Les cuisinières à bois S 60 SF et S 90 peuvent une niche cintrée dans laquelle le bois peut être réalisées dans la variante avec niche cin- être entreposé. -
Page 118: Generalites
70 cm Tableau 1 - Distances de sécurité à respecter des matériaux inflammables ou sensibles aux fortes températures. (1) en dessous du niveau du plan de la cuisinière, une distance de 2 cm est suffisante si un matériau isolant est interposé... -
Page 119: Dimensions Et Formes Du Conduit De Fumees
ø conduit de f. Tirage Modèle ø raccord H < 4m (4m < H < 6m) (H > 6m) nécessaire S 60 SF 130 mm 160 mm 150 mm 12 Pa S 80 SF 130 mm 160 mm 150 mm... -
Page 120: Raccordement Correct Au Conduit De Fumees
Figure 6 - Exemples de raccordements correct et incorrect au conduit de fumées PRE-EQUIPEMENT POUR SORTIE DE FUMEES Les modèle S 60 SF, S 80 SF et S 60 CF sont avec prédisposition pour sortie supérieure livré avec sortie de fumées supérieure et ou arrière, à... - Page 121 3 Pa dans le local d’installation. si celui-ci est exigu et que les ouvertures Les cuisinières de la Série S peuvent aussi sont hermétiques. Cette arrivée d’air frais être raccordées de manière à prélever l’air doit être permanente, surtout en présence...
- Page 122 D’autres solutions sont possibles pour le rac- dans le socle ou encore sur le mur d’ados à cordement selon accord préalable de Rizzoli. un emplacement variable selon les modèles Cuisinières standard Cuisinières avec niche...
-
Page 123: Raccordements Electriques (Modeles Avec Four)
électrique 1. Phase 2. Neutre 3. Terre PRE EQUIPEMENT DE LA MAIN COURANTE Les modèles S 80 et S 90 sont livrés en stan- retour gauche et retour droit.) Dans certains dard avec une main courante 3 côtés (face, cas, il peut être nécessaire de retirer tout ou... - Page 124 Pour ce faire, main courante de ses supports, retirer le(s) munissez-vous d’un tournevis cruciforme, de coulisseau(x) des supports et le(s) coude(s) de la clé allen et des vis fournis. Tout d’abord, la main courante. Sur les éléments restants, retirer l’embout simplement inséré...
-
Page 125: Inversion Du Sens D'ouverture De La Porte
2 vis présentes sur le bord du châssis vis de fixation. ATTENTION! Ne jamais suspendre d’objets inflammables sur la main courante (serpillières ou torchons par exemple). Ne jamais mettre le linge à sécher sur la main courante. INVERSION DU SENS D’OUVERTURE DE LA PORTE (S 60 CF, S 60 SF, S 80 SF) Sur les modèles S 60 CF, S 60 SF et S 80 SF,... -
Page 126: Installation Du Four Exterieur (Option)
Figure 21 - Position correcte des rondelles bombées 2.10 INSTALLATION DU FOUR EXTERIEUR (OPTION) Pour le modèle S 80 SF, est prévue la possibi- de démonter sa partie interne comme indi- lité d’installer un four extérieur à position- qué sur les figures 34 et 35, afin de pouvoir ner au dessus de la cuisinière. - Page 127 à ce qu’il soit parfaitement de niveau et que du four et doivent engagées dans des scel- le tuyau de raccordement soit bien emboîté lements ou chevilles résistant à des hautes et bien vertical. températures. L’emboîtement correct doit garantir l’étan- En cas de nécessité...
-
Page 128: Les Refractaires Du Foyer
Il est de ce crofissures. Celles-ci sont inhérentes au ma- fait tout naturel que, lors des premières uti- tériau et ne nuisent en rien à la sécurité et lisations se crée une condensation. au bon fonctionnement de la cuisinière. -
Page 129: Allumage Et Fonctionnement
Pour maintenir le feu, charger du bois dans merce. La combustion peut s’avérer difficile la chambre de combustion à intervalles dé- tant que le conduit ne s’est pas réchauffé. Le pendant de la quantité de combustible insé- temps nécessaire dépend du conduit et des ré... -
Page 130: Cle De Demarrage (S 60 Cf, S 80, S 90, S 80 Sf)
La manette conseillons de ne pas l’utiliser. ATTENTION! Dès que le feu a pris force et vigueur, refermer le volet de ma- nière à diriger les fumées dans le circuit et à réchauffer toutes les parties de la cuisinière. -
Page 131: Bouclier De Protection De Porte Foyere
à bois (voir figure de la niche (voir figure 27). SOUPAPE D’EXCES DE VAPEUR (S 60 CF, S 80, S 90) Dans certains cas, la cuisson d’aliments peut provoquer un excès de vapeur à l’intérieur du four. -
Page 132: Lechefrite Sur Glissieres Telescopiques
On obtient ainsi cessaire a bien été effectué. un plan de travail uniforme. Ne mettre en... -
Page 133: Nettoyage
3.12 POIGNEES DE LECHEFRITE (S 60 CF, S 80, S 90) En dotation avec les cuisinières dotées de torchons. Les poignées s’accrochent sur le four, est présent un dispositif de poignées rebord de la lèchefrite et s’utilisent à deux qui permet d’extraire la lèchefrite en toute mains. -
Page 134: Nettoyage Des Parties Vues
USAGE DE LA TRAPPE DE VISITE (S 80, S 90) Pour permettre l’enlèvement des résidus Lors du nettoyage, démonter la trappe en de combustion dans les zones les moins ac- dévissant les fixations; à l’aide de la raclette, cessibles, les modèles avec four sont dotés retirer les résidus, puis remettre en place et... -
Page 135: Entretien Et Nettoyage De La Plaque De Cuisson
été en contact gée, il sera nécessaire de frotter légèrement avec des éléments humides ou sales. Il est avec un abrasif très fin ou avec l’éponge bon de nettoyer la plaque lorsqu’elle est en- rugueuse fournie. Pour reconstituer le film core tiède afin d’éliminer toute trace d’hu-... -
Page 136: Demontage Et Entretien Du Four Exterieur
Utiliser dans ce cas une ampoule de mêmes hublot et le nettoyer des résidus consécutifs caractéristiques (ampoule halogène 25W aux vapeurs de cuisson. Après l’avoir soi- 240V 300°C culot G9). gneusement nettoyé et essuyé, le revisser à Pour remplacer l’ampoule, dévisser com- sa place. -
Page 137: Dilatation Thermique
4.12 REMPLACEMENT D’ELEMENTS La majeure partie des composants de nos veuillez toujours préciser le n° de série de cuisinières est aisément démontable à l’aide la cuisinière indiqué sur le bon de garantie d’un simple tournevis. En cas de commande ou sur la plaquette signalétique. - Page 138 • Vérifier que la grille foyère n’est pas obs- De la fumée sort par la plaque truée par un excès de cendres ou de résidus divers • De la fumée sort à d’autres endroits Vérifier que la grille foyère n’est pas posée à l’envers : de la cuisinière...
-
Page 139: Données Techniques S
6. DONNÉES TECHNIQUES DONNÉES TECHNIQUES S Modèle S 60 SF S 80 SF S 60 CF S 80 S 90 Poids 167 kg 200 kg 169 kg 190 kg 210 kg Puissance nominale 5,9 kW 12,5 kW 6,0 kW 9,0 kW... -
Page 140: Declaration De Construction Conforme Aux Règles De L'art
Les éléments reconnus défec- sitions en vigueur. Ce droit n’est pas du si tueux et échangés au titre de la garantie la cuisinière a été acquise depuis moins de restent la propriété de la société RIZZOLI. -
Page 141: Prestations Hors Garantie
Tribunal de TRENTO Avis La société Rizzoli s’emploie en permanence à l’amélioration de sa production. Dans ce but, elle se réserve le droit de modifier sans préavis les caractéristiques de ses modèles et le contenu de ce manuel. -
Page 142: Declaration De Prestation
Conforme Sécurité électrique La prestation des produits cités points 1 et 2 est conforme à la prestation déclarée citée point 8 La présente déclaration est placée sous la responsabilité exclusive du fabricant cité point 4 Cavalese, le 1 juillet 2013... - Page 143 Conforme Sécurité électrique La prestation des produits cités points 1 et 2 est conforme à la prestation déclarée citée point 8 La présente déclaration est placée sous la responsabilité exclusive du fabricant cité point 4 Cavalese, le 1 juillet 2013...
- Page 144 Sécurité électrique Conforme La prestation des produits cités points 1 et 2 est conforme à la prestation déclarée citée point 8 La présente déclaration est placée sous la responsabilité exclusive du fabricant cité point 4 Cavalese, le 1 juillet 2013...
- Page 145 Sécurité électrique Conforme La prestation des produits cités points 1 et 2 est conforme à la prestation déclarée citée point 8 La présente déclaration est placée sous la responsabilité exclusive du fabricant cité point 4 Cavalese, le 1 juillet 2013...
- Page 146 Sécurité électrique Conforme La prestation des produits cités points 1 et 2 est conforme à la prestation déclarée citée point 8 La présente déclaration est placée sous la responsabilité exclusive du fabricant cité point 4 Cavalese, le 1 juillet 2013...
- Page 147 Prise d’air pag. Raccordements électriques (modèles avec four) pag. Pré équipement de la main courante pag. Inversion du sens d’ouverture de la porte (S 60 CF, S 60 SF, S 80 SF) pag. 2.10 Installation du four extérieur (option) pag. 2.11 Les réfractaires du foyer...
- Page 148 Nettoyage des vitres pag. Tiroir a bois pag. Entretien et nettoyage de la plaque de cuisson pag. Entretien de l’éclairage du four (S 60 CF, S 80, S 90) pag. 4.10 Démontage et entretien du four extérieur (option) pag. 4.11 Dilatation thermique pag.
- Page 152 Rizzoli s.r.l. Zona Artigianale 1, Frazione San Lugano 39040 Trodena nel Parco Naturale (BZ) - Italia Tel. +39 0471 887551 - Fax +39 0471 887552 info@rizzolicucine.it - www.rizzolicucine.it...