Falcon Professional+ 110 Mode D'emploi
Masquer les pouces
Voir aussi pour Professional+ 110:
- Mode d'emploi (32 pages) ,
- Mode d'emploi & instructions d'installation (45 pages)
Table des Matières
Publicité
Les langues disponibles
Les langues disponibles
Liens rapides
Publicité
Chapitres
Table des Matières
Dépannage

Manuels Connexes pour Falcon Professional+ 110


Sommaire des Matières pour Falcon Professional+ 110
- Page 1 All manuals and user guides at all-guides.com � ������������ ArtNo.000-0012 Professional + logo 110 Dual Fuel with FSD 110 Mixte avec DSS User Guide & Installation & Service Instructions Mode d'emploi & Instructions d'installation & d'entretier ArtNo.000-0008 Falcon logo shaded U109772-05...
-
Page 2: Table Des Matières
All manuals and user guides at all-guides.com Contents Before you start... Cooker Overview The Griddle The Glide-out Grill The Ovens The Clock Tips on Cooking with the Timer General Oven Tips Oven Cooking Guide Oven shelves The Handyrack Main Oven Light The Browning Element Storage Cleaning your Cooker... -
Page 3: Before You Start
All manuals and user guides at all-guides.com Before you start... If you smell gas • DO NOT turn electric switches on or off. Thank you for buying the Professional cooker. It should give • DO NOT smoke you many years trouble-free cooking if installed and operated •... -
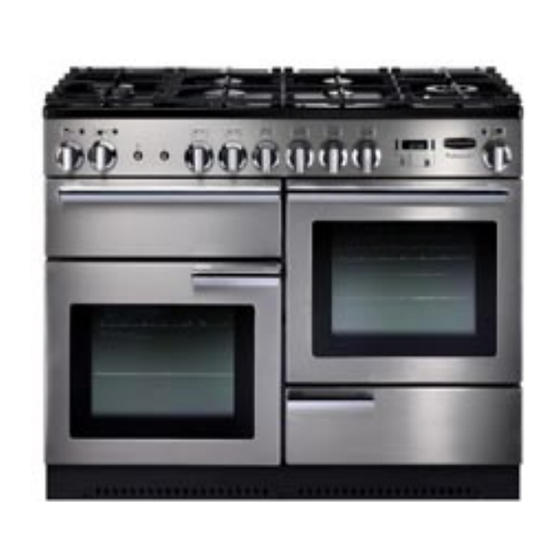
Page 4: Cooker Overview
All manuals and user guides at all-guides.com Cooker Overview Do not use aluminium foil to cover shelves, linings or the oven roof. Never heat unopened food containers. Pressure build up may make the containers burst and cause injury. Do not use unstable saucepans. - Page 5 All manuals and user guides at all-guides.com When the igniter button is pressed in, sparks will be made at every burner – this is normal. Do not attempt to disassemble or clean around any burner while another burner is on, otherwise an electric shock could result. To light a burner, press the igniter button, and push in and turn a knob to the high position indicated by the large flame symbol (...
-
Page 6: The Griddle
All manuals and user guides at all-guides.com ArtNo.311-0006 Correct wok sizes DO NOT put it crossways – it will not fit properly and will be unstable. DO NOT put it on the Wok burner on the left-hand Rapide burner – it is not designed to fit the end pan supports. -
Page 7: The Glide-Out Grill
All manuals and user guides at all-guides.com The Glide-out Grill The Ovens Open the door and pull the grill pan carriage forward using The clock must be set to the time of day before the right- the handle: hand oven will work. See the following section on ‘The Clock’... -
Page 8: The Clock
All manuals and user guides at all-guides.com The Clock The oven indicator light will glow until the oven has reached the temperature you selected. It will then cycle on and off during cooking: Setting the time of day ArtNo.270-0006 Proplus ArtNo.300-0004 2-button clock annotated oven control light �... - Page 9 All manuals and user guides at all-guides.com To stop the oven at a specific time of day Turn the Timer knob to the ( ) position. The display will show the current time of day plus the ‘cook time’ you just set. ...
-
Page 10: Tips On Cooking With The Timer
All manuals and user guides at all-guides.com Tips on Cooking with the Timer The oven is now locked, as is confirmed by the display showing the time of day alongside the key symbol: If you want to cook more than one dish, choose dishes that ArtNo.301-0013 2BC require approximately the same time. -
Page 11: Oven Cooking Guide
All manuals and user guides at all-guides.com Oven Cooking Guide The oven control settings and cooking times given in the table below are intended to be used only as a guide. Individual tastes may require the temperature to be altered to provide a preferred result. ArtNo.050-0007 Centre When baking in the right-hand fanned oven, use the minimum cooking time shown in the table. -
Page 12: Oven Shelves
All manuals and user guides at all-guides.com Oven shelves The Handyrack The maximum weight that can be held by the Handyrack is 5.5kg (12lb). It should only be used with the supplied roasting � tin, which is designed to fit the Handyrack. Any other vessel could be unstable. -
Page 13: Main Oven Light
All manuals and user guides at all-guides.com Main Oven Light Cleaning your Cooker Press the button to turn the light on: Essential Information Isolate the electricity supply before carrying out any thorough cleaning. Then allow the cooker to cool. Never use paint solvents, washing soda, caustic cleaners, ArtNo.320-0026 biological powders, bleach, chlorine based bleach cleaners, - Oven light... - Page 14 All manuals and user guides at all-guides.com The Wok Burner The Wok Cradle The Wok burner is a little more complicated but it can also be Recommended cleaning materials are hot soapy water, a taken apart for cleaning. moistened soap pad, cream cleaner or a nylon scourer. ArtNo.311-0014 Wok burner details Glide-out Grill �...
-
Page 15: Troubleshooting
All manuals and user guides at all-guides.com Removing the Oven Linings If you need to remove the side rails to facilitate the cleaning of the grill chamber, you can unhook them from the grill Some of the lining panels can be removed for cleaning. You chamber sides and wipe the sides clean with a soft cloth and will need to remove the shelves before removing the panels. - Page 16 All manuals and user guides at all-guides.com Food is cooking too slowly, too quickly, or Before removing the existing bulb, turn off the power burning. supply and ensure that the oven is cool. Open the oven Cooking times may differ from your previous door and remove the oven shelves.
-
Page 17: Installation
All manuals and user guides at all-guides.com INSTALLATION Check the appliance is electrically safe and gas sound when you have finished. Installation Provision of Ventilation This appliance is not connected to a combustion products evacuation device. Particular attention shall be given to the Dear Installer relevant requirements regarding ventilation. - Page 18 All manuals and user guides at all-guides.com INSTALLATION Check the appliance is electrically safe and gas sound when you have finished. Checking the parts You will need the following equipment to complete the cooker installation satisfactorily: 4 pan supports Levelling tool and Allen keys STABILITY BRACKET If the cooker is to be supplied with gas ArtNo.000-0002 Classic tools...
- Page 19 All manuals and user guides at all-guides.com INSTALLATION Check the appliance is electrically safe and gas sound when you have finished. Positioning the Cooker A clearance of 130mm is required if the cooker is near a corner of the kitchen to allow the oven doors to open. The The diagrams below show the minimum recommended actual opening of the doors is slightly less but this allows for distance from the cooker to nearby surfaces.
- Page 20 All manuals and user guides at all-guides.com INSTALLATION Check the appliance is electrically safe and gas sound when you have finished. Fit the levelling tool on the rectangular adjuster as shown below. ArtNo.010-0009 Pushing the cooker � �� ArtNo.010-0008 Lowering the front rollers Conversion to LP If the appliance is to be converted to LP gas do the conversion at this point.
- Page 21 All manuals and user guides at all-guides.com INSTALLATION Check the appliance is electrically safe and gas sound when you have finished. Fitting a stability bracket flexibility in the positioning of the bayonet and make moving the cooker easier. The hose should be fitted so that both inlet A stability bracket or chain (not supplied by with the cooker) and outlet connections are vertical so that the hose hangs should be fitted when the cooker is connected to a flexible...
- Page 22 All manuals and user guides at all-guides.com INSTALLATION Check the appliance is electrically safe and gas sound when you have finished. Electrical Connection Hotplate This appliance must be installed by a qualified electrician Check each burner in turn. Push in tap and turn to the large to comply with the relevant Institute of Electrical Engineers flame symbol.
-
Page 23: Conversion To Lp Gas
All manuals and user guides at all-guides.com INSTALLATION Check the appliance is electrically safe and gas sound when you have finished. Conversion to LP gas Clear the holes from the inner panel and pull the control panel forward: Check in the 'Technical Data' section at the back of the instructions that the cooker is convertible to the gas you want to use. -
Page 24: Servicing
All manuals and user guides at all-guides.com WARNING - SERVICING TO BE CARRIED OUT ONLY BY AN AUTHORISED PERSON Disconnect from electricity and gas before servicing. Check appliance is safe when you have finished. Servicing Taking care not to damage the burner electrodes, carefully lift the hotplate, from underneath disconnect the earth lead at the right-hand rear from the rear cross member and withdraw BEFORE SERVICING ANY GAS CARRYING... - Page 25 All manuals and user guides at all-guides.com WARNING - SERVICING TO BE CARRIED OUT ONLY BY AN AUTHORISED PERSON Disconnect from electricity and gas before servicing. Check appliance is safe when you have finished. Feed the thermostat capillary out of the oven. Disconnect 12.
- Page 26 All manuals and user guides at all-guides.com WARNING - SERVICING TO BE CARRIED OUT ONLY BY AN AUTHORISED PERSON Disconnect from electricity and gas before servicing. Check appliance is safe when you have finished. 16. To Change an Oven Door Seal 19.
- Page 27 All manuals and user guides at all-guides.com WARNING - SERVICING TO BE CARRIED OUT ONLY BY AN AUTHORISED PERSON Disconnect from electricity and gas before servicing. Check appliance is safe when you have finished. 22. To Remove the Left-Hand Oven Bottom and Top Elements Disconnect from the electricity supply.
-
Page 28: Circuit Diagram
All manuals and user guides at all-guides.com Circuit Diagram � � � � � � � � �� �� � �� � � � � � � � � � � �� �� �� � � �� �� �� �� �... -
Page 29: Technical Data
All manuals and user guides at all-guides.com Technical Data This cooker is category II2H3+ It is supplied set for group H natural gas. A conversion kit from NG to LP gas is packed with the cooker. INSTALLER: Please leave these instructions with the User. DATA BADGE LOCATION: Cooker back, serial number repeater badge below oven door opening. - Page 30 All manuals and user guides at all-guides.com Français Table des mastières Avant de commencer… Vue d’ensemble de la cuisinière Brûleurs de table de cuisson Plaque à griller Gril Coulissant Fours Horloge Conseils pour la cuisson avec minuterie Guide pour la cuisson au four Conseils généraux pour la cuisson au four Grilles de four Handyrack...
-
Page 31: Avant De Commencer
All manuals and user guides at all-guides.com Français Avant de commencer… • N’utilisez pas de flammes nues. • Coupez le gaz au compteur ou au niveau de la Nous vous remercions d’avoir acheté une cuisinière bouteille de gaz Professional +. Installée et utilisée correctement, cette •... -
Page 32: Vue D'ensemble De La Cuisinière
All manuals and user guides at all-guides.com Français Nettoyage Ne faites jamais fonctionner la cuisinière avec les Pour des raisons d’hygiène et de sécurité, la cuisinière doit mains mouillées. toujours être propre, afin de prévenir le risque d’incendie Ne recouvrez pas les grilles, les panneaux internes ... - Page 33 All manuals and user guides at all-guides.com Français Chaque brûleur est doté d’un dispositif de sécurité spécial qui Si la flamme d’un brûleur s’éteint, mettez le bouton de coupe l’alimentation en gaz en cas d’extinction de la flamme. commande sur la position Arrêt [Off] et attendez une minute avant de rallumer.
-
Page 34: Plaque À Griller
All manuals and user guides at all-guides.com Français Brûleur de Wok Le brûleur de Wok (coup de feu) est conçu pour fournir une chaleur uniforme sur une grande surface. Il est parfait pour les grandes poêles et la friture rapide à feu vif. ArtNo.311-0007 Wok stand close-up Vérifiez que le support spécial est stable et que le Wok est placé... -
Page 35: Gril Coulissant
All manuals and user guides at all-guides.com Français Gril Coulissant Veillez à ce qu’il y ait toujours suffisamment de place autour de la plaque à griller pour permettre l’échappement des gaz. N’utilisez jamais deux plaques à griller côte à côte : Ouvrez la porte du gril et tirez le support de la lèchefrite vers l’avant à... -
Page 36: Fours
All manuals and user guides at all-guides.com Français Fours Le voyant du four sera allumé jusqu’à ce que le four atteigne la température requise. Il s’allumera et s’éteindra pendant la cuisson : L’horloge doit être réglée sur l’heure pour que le four principal (four programmable gauche) puisse fonctionner. - Page 37 All manuals and user guides at all-guides.com Français Minuterie Mise en marche et arrêt du four droit avec minuterie Tournez le bouton Minuterie vers la droite jusqu’à la position minuterie ( ) – vous devrez entendre un déclic lorsqu’il est à Avant de régler la minuterie, choisissez le «...
-
Page 38: Conseils Pour La Cuisson Avec Minuterie
All manuals and user guides at all-guides.com Français Fonction de verrouillage �������������� ��� ������������ ��� ��� ���� � Après activation de la fonction de verrouillage, le four gauche peut fonctionner normalement, mais le four droit est verrouillé et ne s’allumera pas. Activation de la fonction de verrouillage Vérifiez que l’horloge est sur le mode manuel et annulez tout programme en cours. -
Page 39: Guide Pour La Cuisson Au Four
All manuals and user guides at all-guides.com Français Guide pour la cuisson au four Les températures du four et les temps de cuisson indiqués dans le tableau ci-contre sont fournis uniquement à titre indicatif. En fonction des goûts individuels, les températures devront peut-être être modifiées pour obtenir les résultats que vous recherchez. Lors de la cuisson dans le four ventilé... -
Page 40: Conseils Généraux Pour La Cuisson Au Four
All manuals and user guides at all-guides.com Français Conseils généraux pour la Le protège-grille doit être à l’arrière, et pointer vers le haut : cuisson au four Veillez à ce que les grilles soient toujours insérées à fond dans � le four. -
Page 41: Handyrack
All manuals and user guides at all-guides.com Français Handyrack Eclairage d'un four Le Handyrack peut supporter un poids maximum de 5,5 kg. Appuyez sur le bouton approprié pour allumer l’éclairage du Il ne doit être utilisé qu’avec le plat à rôtir fourni, qui est four particulier : spécialement conçu pour être utilisé... -
Page 42: Nettoyage De La Cuisinière
All manuals and user guides at all-guides.com Français Nettoyage de la cuisinière Brûleur de Wok Le brûleur de Wok est un peu plus complexe mais est aussi démontable à des fins de nettoyage. Informations importantes ArtNo.311-0014 Wok burner details Avant un nettoyage complet, mettez la cuisinière hors �... - Page 43 All manuals and user guides at all-guides.com Français Montez les deux chapeaux de brûleur, en vérifiant qu’ils sont placés correctement. Support spécial de Wok Il est recommandé d’utiliser de l’eau savonneuse chaude, un tampon récureur savonneux humide, un produit de nettoyage semi-liquide ou un tampon récureur en nylon pour le nettoyage.
-
Page 44: Dépannage
All manuals and user guides at all-guides.com Français Dépannage Fours Les fours sont dotés de panneaux amovibles à revêtement émaillé qui sont partiellement autonettoyants. Ceci Le ventilateur du four est bruyant. n’empêche pas complètement la formation de taches sur le Le bruit du ventilateur peut changer pendant le chauffage du revêtement, mais réduit le nettoyage manuel nécessaire. - Page 45 All manuals and user guides at all-guides.com Français Le four ne s’allume pas lorsqu’il est mis en marche manuellement. L’appareil est-il sous tension ? L’horloge est-elle éclairée ? Si ce n’est pas le cas, l’alimentation électrique est peut-être défectueuse. Le sectionneur de l’alimentation électrique de la ArtNo.324-0007 Unscrewing the bulb cover cuisinière est-il sur la position Marche ? L’heure a-t-elle été...
-
Page 46: Installation
All manuals and user guides at all-guides.com INSTALLATION Une fois le travail terminé, vérifiez que les alimentations de gaz et d’électricité sont correctement rebranchées. Installation REMARQUE : Un appareil utilisable avec du gaz de pétrole liquéfié (GPL) ne doit pas être installé dans une pièce ou un A l’intention de l’installateur espace intérieur souterrain, par exemple dans un sous- Avant de commencer l’installation, veuillez remplir la fiche... - Page 47 All manuals and user guides at all-guides.com INSTALLATION Une fois le travail terminé, vérifiez que les alimentations de gaz et d’électricité sont correctement rebranchées. Positionnement de la cuisinière Vous aurez aussi besoin des outils suivants : 1. Perceuse électrique Les schémas indiquent les cotes minimales recommandées entre la cuisinière et les surfaces adjacentes.
- Page 48 All manuals and user guides at all-guides.com INSTALLATION Une fois le travail terminé, vérifiez que les alimentations de gaz et d’électricité sont correctement rebranchées. et l’entretien. Si la cuisinière est près d’un coin de la cuisine, un dégagement de 130 mm est nécessaire pour permettre l’ouverture des portes de fours.
- Page 49 All manuals and user guides at all-guides.com INSTALLATION Une fois le travail terminé, vérifiez que les alimentations de gaz et d’électricité sont correctement rebranchées. Montage d’un dispositif stabilisateur Veillez à abaisser les DEUX GALETS ARRIERE. Il y a deux écrous de réglage, un pour chaque galet, aux coins avant inférieurs Montez une équerre ou une chaîne stabilisatrice (non fournie de la cuisinière.
- Page 50 All manuals and user guides at all-guides.com INSTALLATION Une fois le travail terminé, vérifiez que les alimentations de gaz et d’électricité sont correctement rebranchées. Raccordement de l’alimentation en gaz Essai de pression Doit être conforme aux normes appropriées. La pression de gaz peut être mesurée au niveau de l’injecteur de l’un des brûleurs centraux de la table de cuisson (non La cuisinière n’est pas fournie avec un tuyau flexible;...
- Page 51 All manuals and user guides at all-guides.com INSTALLATION Une fois le travail terminé, vérifiez que les alimentations de gaz et d’électricité sont correctement rebranchées. Raccordement électrique Contrôle de la table de cuisson Cet appareil doit être installé par un électricien qualifié, Contrôlez le fonctionnement de chaque brûleur (voir la conformément à...
-
Page 52: Modification Gaz De Pétrole Liquéfié Gpl
All manuals and user guides at all-guides.com AVERTISSEMENT – INTERVENTION D’ENTRETIEN NE DEVANT ÊTRE EFFECTUÉE QUE PAR UNE PERSONNE QUALIFIÉE Avant toute intervention d’entretien, débranchez les alimentations de gaz et d’électricité. Une fois le travail terminé, effectuez les contrôles de sécurité nécessaires. Modification Gaz de pétrole le panneau interne. -
Page 53: Entretien
All manuals and user guides at all-guides.com AVERTISSEMENT – INTERVENTION D’ENTRETIEN NE DEVANT ÊTRE EFFECTUÉE QUE PAR UNE PERSONNE QUALIFIÉE Avant toute intervention d’entretien, débranchez les alimentations de gaz et d’électricité. Une fois le travail terminé, effectuez les contrôles de sécurité nécessaires. Entretien AVANT TOUTE INTERVENTION D’ENTRETIEN SUR UN ... - Page 54 All manuals and user guides at all-guides.com AVERTISSEMENT – INTERVENTION D’ENTRETIEN NE DEVANT ÊTRE EFFECTUÉE QUE PAR UNE PERSONNE QUALIFIÉE Avant toute intervention d’entretien, débranchez les alimentations de gaz et d’électricité. Une fois le travail terminé, effectuez les contrôles de sécurité nécessaires. Pour détacher la minuterie de son support de montage, 10.
- Page 55 All manuals and user guides at all-guides.com AVERTISSEMENT – INTERVENTION D’ENTRETIEN NE DEVANT ÊTRE EFFECTUÉE QUE PAR UNE PERSONNE QUALIFIÉE Avant toute intervention d’entretien, débranchez les alimentations de gaz et d’électricité. Une fois le travail terminé, effectuez les contrôles de sécurité nécessaires. Soulevez le panneau de porte extérieur avec précaution.
- Page 56 All manuals and user guides at all-guides.com AVERTISSEMENT – INTERVENTION D’ENTRETIEN NE DEVANT ÊTRE EFFECTUÉE QUE PAR UNE PERSONNE QUALIFIÉE Avant toute intervention d’entretien, débranchez les alimentations de gaz et d’électricité. Une fois le travail terminé, effectuez les contrôles de sécurité nécessaires. 20.
-
Page 57: Schéma De Câblage
All manuals and user guides at all-guides.com Français Schéma de câblage � � � � � � � � �� �� � �� � � � � � � � � � � �� �� �� � �� � �� ��... -
Page 58: Fiche Technique
All manuals and user guides at all-guides.com Français Fiche technique Cette cuisinière est de catégorie II2H3+ Elle est fournie préréglée pour une utilisation avec du gaz naturel de type H. Un kit de modification permettant l’utilisation de gaz de pétrole liquéfié (GPL) est fourni avec la cuisinière. A L’INTENTION DE L’INSTALLATEUR : Veuillez remettre les présentes instructions à... - Page 59 All manuals and user guides at all-guides.com Français...
- Page 60 All manuals and user guides at all-guides.com ArtNo.000-0001 Aga address block...