
Manuels Connexes pour GMV F1

Sommaire des Matières pour GMV F1
- Page 1 T3010EN 30 10 - 1" 00 0 ½ - 00 30 10 00 0 - 1" - 00 ½ 30 10 - 1" 00 0 ½ - 00...
- Page 2 T3010EN MANUALE D'USO E MANUTENZIONE ORDINARIA CENTRALINA OLEODINAMICA T1 T2 T3 T4 F1 GL ZERO OPERATION AND MAINTENANCE MANUAL POWER UNIT 0E N - 1"½ - 00 MANUEL D'UTILISATION ET D'ENTRETIEN 30 10 - 1"½ 00 0 - 00 ORDINAIRE...
-
Page 3: Alcune Note Sul Manuale D'uso
ALCUNE NOTE IMPORTANT NOTES SUL MANUALE REGARDING THIS D’USO MANUAL Ricordare che il MANUALE This manual is developed in D’USO non è un accessorio support of your safety. It is an T3010EN della macchina ma è PARTE important tool and should be INTEGRANTE della centralina referenced both by Installing T1 T2 T3 T4... -
Page 4: Sur Le Manuel
REMARQUES REMARQUES REMARQUES REMARQUES REMARQUES EINIGE ALGUNAS NOTAS ALGUMAS NOTAS SUR LE MANUEL SUR LE MANUEL SUR LE MANUEL SUR LE MANUEL SUR LE MANUEL HINWEISE ZUM SOBRE EL MANUAL SOBRE O MANUAL D’UTILISA D’UTILISA D’UTILISA D’UTILISA D’UTILISATION TION TION TION TION HANDBUCH:... -
Page 5: Table Des Matières
PAGINA - PAGE - PAGE PARTE PART PARTIE CAPITOLO - SECTION - CHAPITRE INDICE CONTENTS SEITE - PAGINA - PAGINA T E I L PA R T E PA R T E K A P I T E L - C A P Í T U L O - C A P Í T U L O INFORMAZIONI INTRODUCTION INTRODUTTIVE... -
Page 6: Indice
INDEX INHALTSVERZEICHNIS INDICE INDICE INFORMATIONS HINWEISE INTRODUCCION INFORMAÇÕES PRÉALABLES ZUR ÜBERGABE INTRODUTIVAS LETTRE À LA LIVRAISON ÜBERGABE- BESTÄTIGUNG CERTIFICADO DE ENTREGA CERTIFICADO DE ENTREGA IDENTIFICATION DE LA MACHINE IDENTIFIZIERUNG DES AGGREGATS - IDENTIFICACION DE LA MAQUINA IDENTIFICAÇÃO MÁQUINA ET NUMÉRO DU MANUEL NUMMER DES HANDBUCHS Y NUMERO DEL MANUAL E NÚMERO DO MANUAL... -
Page 7: Informazioni Introduttive
PARTE 1 PART 1 INFORMAZIONI INTRODUCTORY INTRODUTTIVE INFORMATION LETTERA ALLA IMPORTANT CONSEGNA NOTE La centralina T3010EN è The T3010EN power unit is stata realizzata in conformità built in conformance to EN- alle Norme EN 81-2. 81-2 standard. Pertanto non presenta pericoli Therefore, it won’t pose any per l’operatore se usata danger if the instructions in... -
Page 8: Informations Préalables
PARTIE 1 TEIL 1 PARTE 1 PARTE 1 INFORMATIONS HINWEISE ZUR INTRODUCCION INFORMAÇÕES PRÉALABLES ÜBERGABE INTRODUTIVAS LETTRE ÜBERGABE- CERTIFICADO CERTIFICADO À LA LIVRAISON BESTÄTIGUNG DE ENTREGA DE ENTREGA La centrale T3010EN a été Das Aggregat T3010EN wurde im La central T3010EN ha sido A central T3010EN foi realizada réalisée en conformité... -
Page 9: Lettera Alla Consegna
PARTE 1 PART 1 LETTERA ALLA IMPORTANT CONSEGNA NOTE La centralina T3010EN è The T3010EN power unit is stata realizzata in conformità built in conformance to EN- alle Norme EN 81-2. 81-2 standard. Pertanto non presenta pericoli Therefore, it won’t pose any per l’operatore se usata danger if the instructions in secondo le istruzioni di questo... - Page 10 PARTIE 1 TEIL 1 PARTE 1 PARTE 1 LETTRE ÜBERGABE- CERTIFICADO CERTIFICADO À LA LIVRAISON BESTÄTIGUNG DE ENTREGA DE ENTREGA La centrale T3010EN a été Das Aggregat T3010EN wurde im La central T3010EN ha sido A central T3010EN foi realizada réalisée en conformité...
-
Page 11: Identificazione Macchina Enumero Manuale
IDENTIFICAZIONE MACHINE MACCHINA E NUMERO IDENTIFICATION AND MANUALE MANUAL NUMBERS 1.2.1 1.2.1 Per qualsiasi contatto con il For any contact with the costruttore o con i suoi centri manufacturer or technical di assistenza riguardanti la assistance regarding the centralina T3010EN citare T3010EN power unit, always sempre il tipo di centralina e il quote the power unit type and... -
Page 12: Garantie
IDENTIFICATION DE LA IDENTIFIZIERUNG DES IDENTIFICACION DE LA IDENTIFICAÇÃO DA MACHINE ET NUMÉRO AGGREGATS - NUMMER MAQUINA Y NUMERO MÁQUINA E NÚMERO DU MANUEL DES HANDBUCHS DEL MANUAL MANUAL 1.2.1 1.2.1 1.2.1 1.2.1 Pour tout entretien avec le Bei jeder Kontaktaufnahme mit dem Para cualquier contacto con el Para qualquer contacto com o constructeur ou avec ses centres... -
Page 13: Note Generali Alla Consegna
NOTE GENERALI ALLA GENERAL SHIPING CONSEGNA INFORMATION La centralina e le sue parti e/o The power unit, its parts and accessori possono essere or accessories will be shipped spedite su pallet e coperte da on a pallet covered with a un sacco protettivo o su pallet protective plastic bag and or a e coperte da una scatola di... -
Page 14: Remarques Généralesà La Livraison
REMARQUES GÉNÉRALES ALLGEMEINE HINWEISE NOTAS GENERALES A LA NOTAS GERAIS À À LA LIVRAISON ZUR ÜBERGABE ENTREGA ENTREGA La centrale et ses éléments et/ou Das Aggregat und seine Bestandteile La central y sus partes y /o A central e as suas partes e/ou accessoires peuvent être expédiés und/oder sein Zubehör werden auf accesorios pueden ser enviados... -
Page 15: Prescrizioni Di Sicurezza
PARTE 2 PART 2 PRESCRIZIONI SAFETY DI SICUREZZA PRESCRIPTIONS Durante la consultazione del In the operation and presente manuale d’uso e maintenance manual, and on manutenzione e sulla the power unit itself, you will centralina stessa, troverete find some symbols. These alcuni simboli;... -
Page 16: Conseils De Sécurité
PARTIE 2 TEIL 2 PARTE 2 PARTE 2 CONSEILS SICHERHEITS- PRESCRIPCIONES PRESCRIÇÕES DE SÉCURITÉ HINWEISE DE SEGURIDAD DE SEGURANÇA Dans le présent manuel In diesem Handbuch für die Montage, Durante la consulta del presente Durante a consulta do presente d’utilisation et d’entretien et sur la Bedienung und Wartung, sowie auf manual de uso y manutención y manual de utilização e sobre a... - Page 17 MANUTENTORE MAINTENANCE MECCANICO MECHANIC Tecnico qualificato in grado di A qualified person able to run condurre la centralina in the Power unit in normal condizioni normali e di conditions and able to adjust intervenire sugli organi mechanical parts, to perform meccanici per effettuare tutte necessary settings, and to le regolazioni, interventi di...
- Page 18 AGENT DE MAINTENANCE WARTUNGSTECHNIKER FÜR DEN CONSERVADOR CONSERVADOR MÉCANIQUE MECHANISCHEN TEIL MECÁNICO MECÂNICO Technicien qualifié en mesure de Qualifizierter Techniker der befähigt Técnico cualificado para Técnico qualificado em grau de conduire la centrale dans des ist, das Aggregat im normalen mantener la central en operar a central em condições conditions normales et d’intervenir...
- Page 19 2.13 2.13 Prima di qualsiasi intervento Before starting any cleaning di pulizia o manutenzione or maintenance work, the bisogna portare la centralina power unit should be at “ zero a “stato energetico zero”, energy state”. cioè: That is: Portare la cabina al piano move the cabin to the più...
- Page 20 2.13 2.13 2.13 2.13 Avant toute intervention de Vor jeder Wartung oder Reinigung der Antes de cualquier intervención Antes de qualquer intervenção nettoyage ou d’entretien, il Bauteile oder der Räume des Aufzugs de limpieza o mantenimiento es para limpeza ou conservação é convient d’amener la centrale à...
- Page 21 2.18 2.18 Non manomettere, Do not tamper with, deteriorare o nascondere le deteriorate or cover the etichette di avvertimento. warning signs. IF IT IN CASO DI DETERIORATES IT WILL BE DETERIORAMENTO O ILLEGIBLE, ASK FOR ILLEGGIBILITÀ REPLACEMENT RICHIEDERNE SUBITO IL IMMEDIATELY.
- Page 22 2.18 2.18 2.18 2.18 Ne pas altérer, détériorer ou Warnungsschilder dürfen nicht No dañar deteriorar o esconder Não violar, deteriorar ou esconder dissimuler les étiquettes beschädigt, entfernt oder abgedeckt las etiquetas de advertencia. as etiquetas das advertências. d’avertissement. werden. IM FALLE EINER EN CASO DE DETERIORO O EM CASO DE DETERIORAÇÃO EN CAS DE DÉTÉRIORATION...
- Page 23 2.24 2.24 In caso di sostituzione In case of replacement ask richiedere solo ricambi for original parts only. originali. 2.25 2.25 Per nessuna ragione Do not in any way lay against appoggiarsi o sedersi sulla or sit on the power unit. centralina.
-
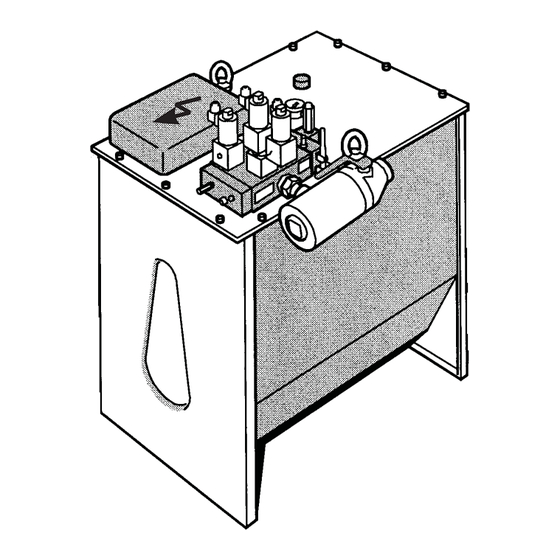
Page 24: Caractéristiques
2.24 2.24 2.24 2.24 En cas de remplacement, ne Verwenden Sie im Bedarfsfall nur En caso de sustituciones pedir Em caso de substituição pedir demander que des pièces Original- Ersatzteile. sólo recambios originales. apenas peças originais. d’origine. 2.25 2.25 2.25 2.25 Ne jamais s’appuyer ou s’asseoir Auf keinen Fall darf man sich auf das... - Page 25 PARTE 3 CARATTERISTICHE TECNICHE ITAL - 1"½ - 00 - 1"½ - 00 ITALY 3010 - 00 - 1"½ CENTRALINA U.M. ZERO PESO A SECCO BLOCCO VALVOLE A STANDARD 3010 EN 1”¼ 3010 EN 1”¼ 3010 EN 1”¼ BLOCCO VALVOLE A RICHIESTA GEV 1”¼...
-
Page 26: Caratteristiche Tecniche
PARTE 3 PART 3 CARATTERISTICHE TECHNICAL TECNICHE CHARACTERISTICS CENTRALINA POWER UNIT PESO A SECCO EMPTY WEIGHT INGOMBRO (A x B x H) DIMENSIONS 735x810x1090 735x910x1090 860x1060x1240 925x1310x1390 BLOCCO VALVOLE STANDARD STANDARD VALVE BLOCK 3010EN - 1”¼ 3010EN - 1”¼ 3010EN - 1”½ 3010EN - 2”... -
Page 27: Caractéristiques Techniques
PARTIE 3 TEIL 3 PARTE 3 PARTE 3 CARACTÉRISTIQUES TECHNISCHE CARACTERÍSTICAS CARACTERÍSTICAS TECHNIQUES DATEN TÉCNICAS TÉCNICAS CENTRALE AGGREGAT CENTRAL CENTRAL POIDS À SEC LEERGEWICHT PESO SIN ACEITE PESO EM VAZIO DIMENSIONS (A X B X H) ABMESSUNGEN MEDIDAS (A x B x H) DIMENSÕES (AxBxH) BLOC VANNES STANDARD STANDARD- STEUERBLOCK... -
Page 28: Movimentazione Emessa In Opera
PARTE 4 PART 4 4.1.1 MOVIMENTAZIONE TRANSPORTATION E MESSA IN OPERA INSTALLATION MOVIMENTAZIONE TRANSPORTING Le centraline vengono spedite The power units are shipped con imballi di diverse forme, a in packages of various forms, seconda della richiesta. depending on the requirement. 4.1.1 4.1.1 Munirsi di un mezzo di... - Page 29 PARTIE 4 TEIL 4 PARTE 4 PARTE 4 MANUTENTION AUFSTELLUNG MANIPULACIÓN MOVIMENTAÇÃO ET MISE Y PUESTA EN OEUVRE INBETRIEBNAHME EN MARCHA LIGAÇÕES MANUTENTION TRANSPORT MANIPULACIÓN MOVIMENTAÇÃO Les centrales sont expédiées sous Die Aggregate werden je nach Las centrales se envían con As centrais são enviadas com des emballages de différentes Bestellung mit unterschiedlichen...
- Page 30 4.1.8 4.1.8 Una volta che i piedini sono Once the feet are inserted, inseriti, depositarla e togliere put the unit down and remove le funi. Non togliere i golfari. the ropes. 4.1.9 4.1.9 Controllare che il tappo Check that the oil plug at the dell’olio sia in posizione e ben bottom is in position and chiuso.
- Page 31 4.1.8 4.1.8 4.1.8 4.1.8 Une fois que les isolations sont Nach dem Einfügen der Gummiunter- Una vez que los tacos de goma Uma vez que os tacos estejam insérés, la déposer et enlever les lagen wird das Aggregat abgesenkt están colocados, asentarla y inseridos, depositá-la no chão e retirar- élingues.
-
Page 32: Collegamento Dei Tubi Oleodinamici
4.1.13 4.1.13 Non disperdere l’imballo nell’- Do not dispose the packages ambiente ma rivolgersi alle to the environment. Advise agenzie di smaltimento rifiuti. waste management agencies. 4.1.14 4.1.14 AVVERTENZA WARNING In caso di ulteriori trasporti o If further moving is required, movimentazioni, ricordare di empty the power unit, mount svuotare la centralina, fissarla... - Page 33 4.1.13 4.1.13 4.1.13 4.1.13 Ne pas jeter l’emballage n’importe Die Verpackung darf nicht No tirar los embalajes al ambiente, Não despejar a embalagem no où, mais s’adresser aux entreprises weggeworfen werden, sondern muss entregarlos a una empresa de ambiente mas dirigir-se às de récupération des rebuts.
- Page 34 4.2.3 4.2.3 4.2.3 COLLEGAMENTO CON FLEXIBLE TUBE (HOSE) TUBO FLESSIBILE CONNECTION a - Togliere dal raccordo a - Remove the nut and the terminale del silenziatore la compression-fitting ring ghiera e l’anello tagliente. from the silencer joint. b - Assicurarsi che il raccordo b - Make sure that the terminale sia ben fissato silencer joint is tight.
- Page 35 4.2.3 4.2.3 4.2.3 4.2.3 RACCORDEMENT AVEC VERLEGUNG EINES CONEXIONADO CON TUBO LIGAÇÃO COM CONDUIT FLEXIBLE HYDRAULIKSCHLAUCHS FLEXIBLE TUBO FLEXÍVEL a - Ôter la bague et l’écrou du a - Überwurfmutter und Schneidring a - Quitar del rácord terminal del a - Retirar do racord terminal do raccord terminal du vom Anschluss am silenciador la tuerca y el...
-
Page 36: Riempimento Dell'olio
k - Tenendo il tubo contro il k - Being careful not to turn suo arresto ed evitando the tube, tighten the nut che esso ruoti, avvitare il ¾ of a rotation, for the dado di serraggio di 3/4 di compression-fitting ring to giro. - Page 37 k - En tenant le conduit contre k - Weiteres Einschrauben um eine k - Manteniendo el tubo contra k - Segurando o tubo contra o sa butée et en évitant que 3/4 Umdrehung, indem man das el fondo y evitando que gire ponto de encosto e evitando celui-ci ne tourne, visser Rohr gegen seinen Anschlag...
- Page 38 4.3.4 4.3.4 4.3.5 AVVERTENZA WARNING PER IL RIEMPIMENTO DEL USE CLEAN AND NEW OIL ONLY. SERBATOIO UTILIZZARE SOLO OLIO MAKE SURE THERE IS NO WATER IN NUOVO E PULITO. ASSICURARSI THE OIL. IF THERE IS WATER IN THE CHE NON SIA PRESENTE ACQUA OIL IT BECOMES DARK AND NELL’OLIO.
- Page 39 4.3.4 4.3.4 4.3.4 4.3.4 AVERTISSEMENT VORSICHT ADVERTENCIA ADVERTÊNCIA POUR LE REMPLISSAGE DU NUR NEUES UND SAUBERES ÖL ZUM PARA EL LLENADO DEL DEPÓSITO PARA O ENCHIMENTO DO RÉSERVOIR, UTILISER UNIQUEMENT DE BEFÜLLEN DES BEHÄLTERS VERWENDEN. UTILIZAR SOLO ACEITE NUEVO Y RESERVATÓRIO UTILIZAR SOMENTE L’HUILE NEUVE ET PROPRE.
- Page 40 4.3.14 4.3.14 4.3.14 Continuare con il riempimento Add more oil (maximum of del serbatoio fino ad un 15cm below the top edge). min.15 cm massimo di 15 centimetri sotto il bordo. 4.3.15 4.3.15 Togliere il connettore della Remove the connector of the valvola VML così...
- Page 41 4.3.14 4.3.14 4.3.14 4.3.14 Continuer à remplir le réservoir Weiteres Befüllen des Behälters bis Continuar con el llenado del Continuar com o enchimento do jusqu’à 15 centimètres du bord maximal 15 cm unterhalb der depósito hasta un máximo de 15 reservatório até...
-
Page 42: Collegamenti Elettrici
COLLEGAMENTI ELECTRICAL ELETTRICI CONNECTIONS Gli allacciamenti elettrici Electrical wiring is performed vengono eseguiti in questo in the following manner. modo: 4.4.1 4.4.1 L’allacciamento elettrico deve Electrical wiring should be essere effettuato esclusiva- performed by a qualified mente da un elettricista electrician, in accordance with qualificato e consultando lo the electrical schematics of... -
Page 43: Connexions Électriques
CONNEXIONS ELEKTRISCHE CONEXIONADOS LIGAÇÕES ÉLECTRIQUES ANSCHLÜSSE ELÉCTRICOS ELÉCTRICAS Les branchements électriques Die elektrischen Anschlüsse sind wie Los conexionados eléctricos se As ligações eléctricas devem ser s’effectuent de la manière folgt herzustellen: realizan de la siguiente manera: feitas do seguinte modo: suivante: 4.4.1 4.4.1... -
Page 44: Pannello Comandie Controlli
PARTE 5 PART 5 PANNELLO OPERATION VML VMD ISP PAM COMANDI E AND CONTROL CONTROLLI PANEL ML MAN La centralina non ha un The power unit does not have pannello comandi proprio ma its own control system. But it dipende dai comandi relies on the control of the dell’intero impianto. - Page 45 PARTIE 5 TEIL 5 PARTE 5 PARTE 5 PANNEAU DE BETÄTIGUNG CUADRO DE QUADRO DE COMMANDES ET MANIOBRA Y DE MANOBRA E DE CONTRÔLES AGGREGATS CONTROL CONTROLOS La centrale n’a pas son propre Das Aggregat hat keine eigene La central no tiene cuadro de A central não tem um painel de panneau de commandes;...
-
Page 46: Regolazione Della Massima Pressione - Valvola Di Sicurezza
NOTA NOTE Le distanze indicative da Approximate distances to be tenere fra il contatto di inizio maintained between slow decelerazione ed il contatto di down limit switch and floor piano, in funzione della (stop) limit switch as a velocità di cabina, sono function of car speed are illustrate in tabella: shown in this table. - Page 47 REMARQUE HINWEIS NOTA NOTA Les distances indicatives à Für die Abstände zwischen den Las distancias indicativas para As distâncias indicadas a ter prévoir entre le contact du début elektrischen Schaltern im Schacht, dejar entre el contacto de inicio entre o contacto de ínicio da de décélération et le contact die die Verzögerung einleiten bzw.
-
Page 48: Regolazione Dell'accelerazione
6.1.6 6.1.6 Chiudere il rubinetto della Close the ball valve. saracinesca (B) (la leva deve essere girata di traverso verso l’interno). 6.1.7 6.1.7 Avviare il motore (vedi manuale Start the motor. (See system di conduzione dell’impianto). manual) 6.1.8 6.1.8 Avvitare la vite di regolazione Tighten the adjusting screw 1 1 fino a leggere sul mano- until you read the relief... -
Page 49: Réglage De L'accélération
6.1.6 6.1.6 6.1.6 6.1.6 Fermer la vanne d’arrêt (B) (le Schliessen des Kugelabsperrhahns Cerrar la llave de paso (B) (la Fechar a torneira do silenciador levier doit être placé à la vertical). (B) im Pulsationsdämpfer. (Der Hebel palanca debe ser girada hacia el (B) (a alavanca deve ficar em muss um 90 Grad zum Aggregat hin interior). -
Page 50: Regolazione Della Velocità Di Livellamento (Bassa Velocità)
REGOLAZIONE DELLA ADJUSTING THE VELOCITÀ DI LEVELLING SPEED LIVELLAMENTO (bassa velocità) Per la regolazione della To adjust the leveling speed velocità di livellamento follow the instructions below. comportarsi secondo questa procedura: 6.3.1 6.3.1 NOTA NOTE LA VELOCITÀ DI LIVELLAMENTO THE LEVELING SPEED SHOULD BE DEVE ESSERE 1/5 ÷... - Page 51 RÉGLAGE EINSTELLUNG REGULACIÓN AFINAÇÃO DE LA VITESSE DER FEINFAHR- DE LA VELOCIDAD DA VELOCIDADE DE NIVELLEMENT GESCHWINDIGKEIT DE NIVELACIÓN DE NIVELAÇÃO (petite vitesse) (langsame Geschwindigkeit) (baja velocidad) (baixa velocidade) Pour le réglage de la vitesse de Für die Einstellung der Feinfahr- Para la regulación de la velocidad Para a afinação da velocidade de nivellement, suivre les instructions...
-
Page 52: Regolazione Della Velocità Di Discesa (Grande Velocità)
6.4.4 6.4.4 Avvitare la vite 8 fino a che si Tighten screw “8” until you sente che l’olio si scarica nella hear the oil returning to the centralina. power unit at this point loosen Nel momento in cui si avverte screw “8”... -
Page 53: Réglage De La Vitesse De Descente
6.4.4 6.4.4 6.4.4 6.4.4 Visser la vis 8 jusqu’à se que l’on Einstellschraube (8) während der Apretar el tornillo 8 hasta que se Apertar o parafuso 8 até se sentir que sente l’huile s’écouler dans la Aufwärtsfahrt hineindrehen, bis man oiga que el aceite retorna a la o óleo está... -
Page 54: Regolazione Della Decelerazione Di Salita Ediscesa
REGOLAZIONE DELLA ADJUSTING THE UP DECELERAZIONE DI AND DOWN SALITA E DISCESA DECCELERATION Per la regolazione della velocità di decelerazione di salita e discesa comportarsi secondo questa procedura: 6.6.1 6.6.1 NOTA NOTE SI OTTIENE LA MASSIMA DECELERA- MAXIMUM DECELERATION IS ZIONE CON LA VITE DI REGOLAZIONE OBTAINED WHEN THE DELLA DECELERAZIONE (3) TUTTA... - Page 55 RÉGLAGE DE LA EINSTELLUNG DER REGULACIÓN DE LA AFINAÇÃO DA DÉCÉLÉRATION EN VERZÖGERUNG AUF- UND DESACELERACIÓN EN DESACELERAÇÃO DE MONTÉE ET EN DESCENTE ABWÄRTS SUBIDA Y BAJADA SUBIDA E DESCIDA Pour le réglage de la vitesse de Für die Einstellung der Verzögerung Para la regulación de la Para a afinação da velocidade de décélération en montée et en...
-
Page 56: Regolazione Della Pressione Stelo Sulla Vsma
6.7.4 6.7.4 Chiamare la cabina al piano Move the car to the lowest più basso. floor. 6.7.5 6.7.5 NOTA NOTE QUANDO LA CABINA RAGGIUNGE LA WHEN THE ELEVATOR COMES TO VELOCITÀ DI DISCESA CORRISPON- ITS DOWN SPEED, THE RUPTURE DENTE ALLA PORTATA D’INTERVENTO, VALVE ON THE CYLINDER CLOSES LA VALVOLA DI BLOCCO SUL AND THE ELEVATOR STOPS. -
Page 57: Réglage De La Pression Du Piston Sur La Vsma
6.7.4 6.7.4 6.7.4 6.7.4 Appeler la cabine à l’étage le plus Einen Ruf der Kabine in die unterste Llamar a la cabina al piso más Chamar a cabina ao piso mais bas. Haltestelle tätigen, gemäss dem bajo. baixo. Handbuch für die Aufzugsanlage. 6.7.5 6.7.5 6.7.5... -
Page 58: Manovra Discesa Manuale
6.8.5 6.8.5 Verificare sul manometro Check the pressure gauge (MAN) che la pressione sia di reading to be around 5bar. If circa 5 bar. it is 5bar go to 6.8.7. Se è di 5 bar, passare al If it is less than 5bar go to punto 6.8.7, se è... -
Page 59: Réglage De La Soupape De Sécurité De La Pompe Manuelle
6.8.5 6.8.5 6.8.5 6.8.5 Vérifier sur le manomètre (MAN) Mittels des Manometers (MAN) ist zu Verificar en el manómetro (MAN) Verificar sobre o manómetro que la pression est d’environ 5 prüfen, ob der Druck etwa 5 bar que la presión sea de 5 bar (MAN) que a pressão seja cerca bar. -
Page 60: Conclusione
6.10.1 6.10.1 Svitare e togliere il cappuccio Remove the protective cover di protezione della vite di from the manual pump safety regolazione valvola di valve adjusting screw “10”. sicurezza pompa a mano (10). 6.10.2 6.10.2 Allentare il controdado della Loosen the lock nut. vite 10. - Page 61 6.10.1 6.10.1 6.10.1 6.10.1 Dévisser et ôter le capuchon de Lockern und Herausdrehen der Aflojar y quitar el tapón de Desaparafusar e retirar o capuz protection de la vis de réglage de Hutmutter für den Schutz der protección del tornillo de de protecção do parafuso de la soupape de sécurité...
-
Page 62: Avviamento
PARTE 7 PART 7 AVVIAMENTO START UP Poiché la centralina è una Since the power unit is a part parte dell’intero impianto, si of the entire system, for start rimanda, per l’avviamento, al up refer to the plant manual. relativo manuale di conduzione. -
Page 63: Nettoyage
PARTIE 7 TEIL 7 PARTE 7 PARTE 7 MISE EN MARCHE INBETRIEBNAHME ARRANQUE ARRANQUE Étant donné que la centrale est Da das Aggregat ein wesentlicher Ya que la central es una parte de Visto que a central é uma parte un composant de l’installation, Bestandteil des Aufzugs ist, wird la instalación completa. -
Page 64: Controlli Emanutenzione
10.1 10.1 Secondo le indicazioni del Bring the plant to a zero manuale di conduzione, energy state bothelectrically portare l’impianto a stato and hydraulically (refer to the energetico zero. plant manual). 10.2 10.2 Munirsi dell’olio indicato nella Note the amount of oil targa dell’olio (nel locale required, indicated on the oil macchina). -
Page 65: Contrôles Et Entretien
10.1 10.1 10.1 10.1 Selon les indications du manuel Gemäss der Betriebsanleitung des Según las indicaciones del Segundo as indicações do de conduite, amener l’installation Aufzugs die Anlage von der manual de uso, llevar la manual de funcionamento, pôr a électrique à... -
Page 66: Controlli Everifiche Periodiche Della Centralina
1 1.1 11.1 CONTROLLI E REGULAR CHECK UPS VERIFICHE OF THE POWER UNIT PERIODICHE DELLA (PREVENTIVE CENTRALINA MAINTENACE) Per evitare guasti e il cattivo To prevent break down and funzionamento della centralina malfunction of the power nit e dei suoi accessori, effettuare and its accessories perform periodicamente i controlli regular check ups according... - Page 67 11.1 11.1 1 1.1 1 1.1 CONTRÔLES ET PERIODISCHE CONTROLES Y CONTROLOS E VÉRIFICATIONS KONTROLLEN UND VERIFICACIONES VERIFICAÇÕES PÉRIODIQUES DE LA ÜBERPRÜFUNGEN DES PERIÓDICAS DE LA PERIÓDICAS DA CENTRALE AGGREGATS CENTRAL. CENTRAL Pour éviter les pannes et un Um Verschleiss oder schlechtes Para evitar averías y el mal Para evitar avarias e maus- mauvais fonctionnement de la...
- Page 68 11.1.6 11.1.6 ML MAN CONTROLLO DELLE PRESSIONI PRESSURE CONTOL ALLA MESSA IN OPERA E OGNI AT START UP AND ANNUALLY Check static and dynamic ANNO Procedere al controllo delle (working) pressure at the end of pressioni statiche e dinamiche installation. Check regularly for a installazione ultimata.
- Page 69 11.1.6 11.1.6 11.1.6 11.1.6 CONTRÔLE DES PRESSIONS KONTROLLE DES DRUCKS CONTROL DE LA PRESIÓN CONTROLO DAS PRESSÕES BEI DER INBETRIEBNAHME UND JÄHRLICH À LA MISE EN ROUTE ET CHAQUE EN LA PUESTA EN MARCHA Y QUANDO É POSTA EM Nach der Einstellung des Aggregats ANNÉE ANUALMENTE FUNCIONAMENTO PELA PRIMEIRA VEZ...
-
Page 70: Prova Impianto Adue Volte La Pressione Statica
1 1.2 11.2 ML MAN PROVA IMPIANTO A TESTING THE PLANT DUE VOLTE LA AT TWICE THE PRESSIONE STATICA STATEC PRESSURE Per eseguire correttamente To correctly carry out this test questa prova, comportarsi nel follow these instructions: seguente modo: 11.2.1 11.2.1 Chiudere il rubinetto di Close the pressure gauge... -
Page 71: Essai De L'installationà Deux Fois La Pression Statique
11.2 11.2 1 1.2 1 1.2 ESSAI DE L’INSTALLATION DRUCKPROBE BEI PRUEBA DE LA INSTALACIÓN ENSAIO DA INSTALAÇÃO À DEUX FOIS LA ZWEIFACHEM STATISCHEN A DOS VECES LA A DUAS VEZES A PRESSION STATIQUE DRUCK PRESIÓN ESTÁTICA PRESSÃO ESTÁTICA Pour exécuter correctement cet Um diese Prüfung richtig Para realizar correctamente esta Para efectuar correctamente este... -
Page 72: Smaltimento
11.2.15 11.2.15 Aprire il rubinetto del Open the pressure gauge manometro 6. shut off“6”. 11.2.16 11.2.16 Aprire la saracinesca B. Open the ball valve. 11.2.17 11.2.17 Richiudere il rubinetto del Close the pressure gauge manometro 6. shut off “6”. 11.2.18 11.2.18 La prova impianto a due volte The twice the static pressure... -
Page 73: Élimination
11.2.15 11.2.15 11.2.15 11.2.15 Ouvrir le robinet du manomètre 6. Öffnen des Manometer- Abrir la llave del manómetro 6. Abrir a torneira do manómetro 6. Absperrhahns (6). 11.2.16 11.2.16 11.2.16 11.2.16 Ouvrir la vanne B. Öffnen des Kugel- Absperrhahns (B) Abrir la llave de paso B. - Page 74 NOTA NOTE I GUASTI ED I RELATIVI INTERVENTI THE PROBLEMS AND THE INDICATI DI SEGUITO RIGUARDANO CORRESPONDING REPAIRS ARE ESCLUSIVAMENTE LA CENTRALINA. FOR THE POWER UNIT IN IN CASO DI GUASTI DEVE ESSERE PARTICULAR. IN CASE OF BREAK COMUNQUE VERIFICATO TUTTO DOWN THE WHOLE SYSTEM L’IMPIANTO SHOULD BE CHECKED.
- Page 75 REMARQUE HINWEIS NOTA NOTA LES PANNES ET LES INTERVENTIONS DIE NACHFOLGEND AUFGEFÜHRTEN FEHLER LAS AVERÍAS Y LAS RELATIVAS AS AVARIAS E AS INTERVENÇÕES RELATIVES INDIQUÉES CI-DESSOUS, UND IHRE BEHEBUNG BETREFFEN INTERVENCIONES INDICADAS A RELATIVAS QUE VÊM INDICADAS DE CONCERNENT EXCLUSIVEMENT LA AUSSCHLIESSLICH DAS AGGREGAT.
- Page 76 12.2 12.2 GUASTO: PROBLEM: Perdite di olio dal Oil leak. distributore. 12.2.1 12.2.1 DISPOSITIVO: DEVICE: Dadi di tenuta Holding nuts RIPARAZIONE: REPAIR: Verificare il corretto serraggio Check for proper tightness dei dadi di tenuta ed il loro and if the nuts are in good buono stato.
- Page 77 12.2 12.2 12.2 12.2 PANNE: MANGEL: AVERIA: AVARIA: Fuite d’huile du distributeur Ölaustritt am Steuerblock Perdida de aceite en el Perdas de óleo do distribuidor distribuidor 12.2.1 12.2.1 12.2.1 12.2.1 DISPOSITIF: FEHLERHAFTES TEIL: DISPOSITIVO: DISPOSITIVO: Écrous d’étanchéité Dichtmuttern Tuercas de cierre Porcas de retenção RÉPARATION: REPARATUR:...
- Page 78 12.5 12.5 GUASTO: PROBLEM: La velocità della cabina in The down speed is slower discesa è più lenta rispetto than the up speed. alla velocità di salita. 12.5.1 12.5.1 DISPOSITIVO: DEVICE: RIPARAZIONE: REPAIR: Controllare il bilanciamento Check the pressure balance del distributore regolando la on the valve by regulating vite #8.
- Page 79 12.5 12.5 12.5 12.5 PANNE: MANGEL: AVERIA: AVARIA: La vitesse de la cabine en Die Geschwindigkeit des Fahrkorbs La velocidad de la cabina en A velocidade da cabina em descente est plus lente par bei Abwärtsfahrt ist langsamer als bajada es más lenta respecto a descida é...
- Page 80 12.7 12.7 GUASTO: PROBLEM: L’impianto funziona solo in The elevator run at leveling velocità di livellamento sia speed only both in up and in salita che in discesa. down directions. 12.7.1 12.7.1 DISPOSITIVO: DEVICE: RIPARAZIONE: REPAIR: Controllare che l’elettrovalvola Check if the valve works funzioni anche in modo manually.
- Page 81 12.7 12.7 12.7 12.7 PANNE: MANGEL: AVERIA: AVARIA: L’installation fonctionne Der Fahrkorb fährt sowohl aufwärts La instalación funciona sólo en A instalação funciona só em seulement en vitesse de als auch abwärts immer nur mit der la velocidad de nivelación tanto velocidade de nivelação seja nivellement soit en montée, kleinen Geschwindigkeit.
- Page 82 GMV S.p.A - Sede legale e amministrativa: Via Don Gnocchi, 10 - 20016 Pero (MI) - ITALIA Tel. +39-0233930.1 - Fax +39-023390379 - E-Mail: Info@gmv.it...