
Manuels Connexes pour Stryker MV3 Bariatric Bed


Sommaire des Matières pour Stryker MV3 Bariatric Bed
- Page 1 M M V V 3 3 ® ® B B a a r r i i a a t t r r i i c c B B e e d d O O p p e e r r a a t t i i o o n n s s M M a a n n u u a a l l 5900 5900-009-001 Rev F.1 2020/09...
- Page 3 Caution Warning; electricity Fuse rating Do not drill Hydraulic oil pressure Pinch/crush hazard Non-ionizing radiation Catalogue number Serial number European medical device CE mark 2797 Authorized representative in the European Community For US Patents see www.stryker.com/patents Manufacturer 5900-009-001 Rev F.1...
- Page 4 Safe working load Mass of equipment with safe working load Maximum patient weight NAWI Class IIII Adult patient biometrics Alternating current Direct current Duty cycle of product ≤2m ≥18m Unit provides terminal for connection of a potential equalization conductor. The potential equalization conductor provides direct connection between the unit and potential equalization busbar of the electrical installation.
- Page 5 T T a a b b l l e e o o f f C C o o n n t t e e n n t t s s Warning/Caution/Note Definition ........................3 Summary of safety precautions .......................3 Introduction ..............................6 Product description ..........................6 Indications for use ..........................6 Clinical benefits............................6...
- Page 6 Preventive maintenance ..........................45 EMC information ............................47 5900-009-001 Rev F.1...
- Page 7 This product is equipped with a hospital-grade plug for protection against electric shock hazard. • Always use a Stryker supplied interface cable. Use of any other cable may cause the product to not function as intended, which may result in patient or user injury.
- Page 8 • Do not apply the brakes to slow or stop the product while it is in motion. • Always unplug the power cord before you transport the product. • Always release the brakes before you transport the product. Do not transport the product with the brakes applied. •...
- Page 9 • Do not use the patient helper as a push or pull device. • Do not use the oxygen bottle holder as a push or pull device. • Do not use the IV pole as a push or pull device. •...
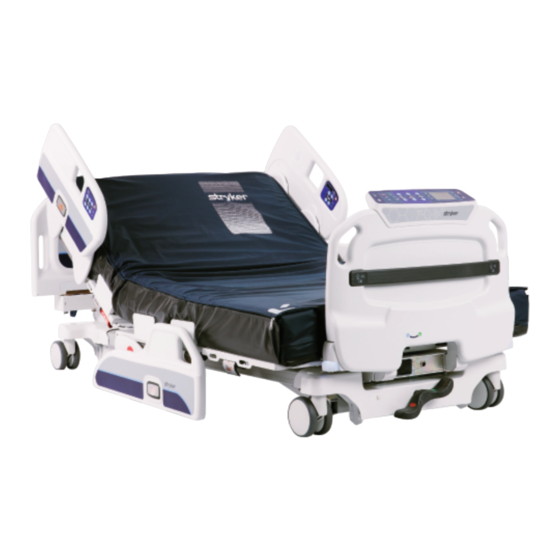
- Page 10 P P r r o o d d u u c c t t d d e e s s c c r r i i p p t t i i o o n n The Stryker model 5900 M M V V 3 3 ® bariatric hospital bed is an AC-powered adjustable hospital bed designed to be utilized with a patient support surface matching the deck size of the bed frame.
- Page 11 S S p p e e c c i i f f i i c c a a t t i i o o n n s s W W A A R R N N I I N N G G - - Always use Stryker approved mattresses that have been tested for compatibility with the product frame to avoid the risk of patient entrapment.
- Page 12 120 VAC, 60 Hz, 6A Battery voltage 12 VDC (x2) (Stryker part number: 5900280025) N N o o t t e e - - Always replace with Stryker approved batteries. Duty cycle 2 minutes ON, 18 minutes OFF Application environments...
- Page 13 P P r r o o d d u u c c t t i i l l l l u u s s t t r r a a t t i i o o n n F F i i g g u u r r e e 1 1 – – M M o o d d e e l l 5 5 9 9 0 0 0 0 M M V V 3 3 b b a a r r i i a a t t r r i i c c b b e e d d 120/230 VAC hospital grade GFCI outlet Mattress deck expansion handle Brake/steer pedal...
- Page 14 Competent authority of the European Member State where the user and/or patient is established. To view your operations or maintenance manual online, see https://techweb.stryker.com/. Have the serial number (A) of your Stryker product available when calling Stryker Customer Service or Technical Support. Include the serial number in all written communication.
- Page 15 F F i i g g u u r r e e 3 3 – – S S e e r r i i a a l l n n u u m m b b e e r r l l o o c c a a t t i i o o n n - - o o p p e e r r a a t t o o r r v v i i e e w w 5900-009-001 Rev F.1...
- Page 16 S S e e t t t t i i n n g g u u p p n n u u r r s s e e c c a a l l l l c c o o m m m m u u n n i i c c a a t t i i o o n n W W A A R R N N I I N N G G - - Always use a Stryker supplied interface cable. Use of any other cable may cause the product to not function as intended, which may result in patient or user injury.
- Page 17 • M M V V 3 3 is equipped with inputs that accept either a DB-37 or 1/4” jack nurse call cable. To setup nurse call communication: 1. Plug the interface cable into the 37-pin connector or 1/4” jack in the litter frame at the head end of the product (A) (Figure 4) and into the applicable connection (patient station, head wall, or docker station).
- Page 18 O O p p e e r r a a t t i i o o n n P P l l u u g g g g i i n n g g o o r r u u n n p p l l u u g g g g i i n n g g t t h h e e p p r r o o d d u u c c t t W W A A R R N N I I N N G G •...
- Page 19 S S t t o o r r i i n n g g t t h h e e p p o o w w e e r r c c o o r r d d W W A A R R N N I I N N G G •...
- Page 20 6. Raise and lock the siderails in the full up position (see Raising the siderails (page 21)). 7. Release the brakes (see Applying or releasing the brakes (page 16)). 8. Push the product from the headboard or footboard. A A p p p p l l y y i i n n g g o o r r r r e e l l e e a a s s i i n n g g t t h h e e b b r r a a k k e e s s W W A A R R N N I I N N G G •...
- Page 21 N N o o t t e e - - To move the product in any direction, including laterally, release the steer lock pedal. F F i i g g u u r r e e 9 9 – – R R e e l l e e a a s s i i n n g g s s t t e e e e r r l l o o c c k k / / n n e e u u t t r r a a l l p p o o s s i i t t i i o o n n F F i i g g u u r r e e 8 8 –...
- Page 22 F F i i g g u u r r e e 1 1 0 0 – – A A c c t t i i v v a a t t i i n n g g t t h h e e C C P P R R r r e e l l e e a a s s e e E E x x p p a a n n d d i i n n g g o o r r r r e e t t r r a a c c t t i i n n g g t t h h e e l l i i t t t t e e r r C C A A U U T T I I O O N N •...
- Page 23 F F i i g g u u r r e e 1 1 1 1 – – D D e e c c k k l l e e v v e e r r l l o o c c a a t t i i o o n n s s 2.
- Page 24 R R e e m m o o v v i i n n g g o o r r r r e e p p l l a a c c i i n n g g t t h h e e h h e e a a d d b b o o a a r r d d W W A A R R N N I I N N G G •...
- Page 25 F F i i g g u u r r e e 1 1 3 3 – – R R e e p p l l a a c c i i n n g g t t h h e e h h e e a a d d b b o o a a r r d d R R e e m m o o v v i i n n g g o o r r r r e e p p l l a a c c i i n n g g t t h h e e f f o o o o t t b b o o a a r r d d You can remove the footboard for patient accessibility and cleaning.
- Page 26 • To raise the siderail to the highest position, grasp and rotate the siderail upward from either the lowest position or intermediate position (Figure 15). F F i i g g u u r r e e 1 1 5 5 – – S S i i d d e e r r a a i i l l h h i i g g h h e e s s t t p p o o s s i i t t i i o o n n •...
- Page 27 • Always make sure that cables, wires, and tubing from other equipment are routed so that they are not pinched by parts of the product. N N o o t t e e - - Do not use siderails as a patient restraint device. To lower the siderail to the intermediate position, press the release button and rotate the siderail forward until it stops at the intermediate position (Figure 16).
- Page 28 F F i i g g u u r r e e 1 1 8 8 – – R R e e s s t t r r a a i i n n t t s s t t r r a a p p t t i i e e - - i i n n l l o o c c a a t t i i o o n n s s S S e e c c u u r r i i n n g g a a F F o o l l e e y y b b a a g g t t o o t t h h e e F F o o l l e e y y b b a a g g h h o o o o k k N N o o t t e e •...
- Page 29 F F i i g g u u r r e e 1 1 9 9 – – F F o o l l e e y y b b a a g g h h o o o o k k A A c c t t i i v v a a t t i i n n g g n n u u r r s s e e c c a a l l l l c c o o m m m m u u n n i i c c a a t t i i o o n n Nurse call allows the patient or healthcare professional to send a signal to the nurse station for assistance.
- Page 30 C C A A U U T T I I O O N N - - Always make sure that the product is clear of obstacles before you use motion functions. Foot up Raises the foot section Foot down Lowers the foot section Knee Gatch up Raises the knee Gatch Knee Gatch down...
- Page 31 • Always make sure that cables, wires, and tubing from other equipment are routed so that they are not pinched by parts of the product. C C A A U U T T I I O O N N - - Always make sure that the product is clear of obstacles before you use motion functions. Healthcare professionals must instruct patients how to operate the patient control panel.
-
Page 32: Reverse Trendelenburg
• Always make sure that cables, wires, and tubing from other equipment are routed so that they are not pinched by parts of the product. C C A A U U T T I I O O N N - - Always make sure that the product is clear of obstacles before you use motion functions. Places the product into the CPR position Places the product into the Trendelenburg position (head down with foot Trendelenburg... - Page 33 Lockouts can lock out motion control input from the operator control panel and patient control panel. N N o o t t e e • The corresponding lock LED illuminates when you lock a motion control. • Bed exit, scale, and nurse call features are still available. For m m a a s s t t e e r r l l o o c c k k o o u u t t , press all three lock buttons (A, B, C) at the same time to lock all button functions on the operator control panel, patient control panel, and footboard control panel.
- Page 34 F F o o o o t t b b o o a a r r d d c c o o n n t t r r o o l l p p a a n n e e l l - - m m e e n n u u c c o o n n t t r r o o l l s s Displays menu functions Screen N N o o t t e e - - The screen is not a touchscreen display.
- Page 35 F F o o o o t t b b o o a a r r d d c c o o n n t t r r o o l l p p a a n n e e l l - - h h o o m m e e d d i i s s p p l l a a y y The home display is the default screen of the footboard control panel.
- Page 36 F F o o o o t t b b o o a a r r d d c c o o n n t t r r o o l l p p a a n n e e l l - - s s c c a a l l e e Press to weigh the pa t and add an entry...
- Page 37 W W e e i i g g h h i i n n g g a a p p a a t t i i e e n n t t W W A A R R N N I I N N G G •...
- Page 38 F F o o o o t t b b o o a a r r d d c c o o n n t t r r o o l l p p a a n n e e l l - - B B e e d d e e x x i i t t Press to arm/disarm the bed exit alarm Alarm State...
- Page 39 P P a a u u s s i i n n g g b b e e d d e e x x i i t t While armed, you may pause bed exit to allow the patient to exit the product for set periods of time. To pause bed exit: 1.
- Page 40 P P a a g g e e o o n n e e P P a a g g e e t t w w o o F F i i g g u u r r e e 2 2 0 0 – – S S e e t t t t i i n n g g s s d d i i s s p p l l a a y y S S e e t t t t i i n n g g s s f f u u n n c c t t i i o o n n Night light Press √...
- Page 41 • Minute 4. Use the up and down arrow buttons to highlight each option and press E E n n t t e e r r to set. 5. Highlight P P r r e e s s s s √ √ t t o o s s e e t t and press E E n n t t e e r r to set the product clock. 5900-009-001 Rev F.1...
- Page 42 A A c c c c e e s s s s o o r r i i e e s s a a n n d d p p a a r r t t s s These accessories and parts may be available for use with your product. Confirm availability for your configuration or region.
- Page 43 F F i i g g u u r r e e 2 2 1 1 – – T T w w o o - - s s t t a a g g e e I I V V p p o o l l e e A A t t t t a a c c h h i i n n g g o o r r r r e e m m o o v v i i n n g g t t h h e e p p a a t t i i e e n n t t h h e e l l p p e e r r ( ( o o p p t t i i o o n n ) ) W W A A R R N N I I N N G G - - Always use two people to attach or remove the patient helper.
- Page 44 F F i i g g u u r r e e 2 2 2 2 – – A A t t t t a a c c h h i i n n g g o o r r r r e e m m o o v v i i n n g g t t h h e e p p a a t t i i e e n n t t h h e e l l p p e e r r Reverse steps to remove the patient helper.
- Page 45 F F i i g g u u r r e e 2 2 3 3 – – A A d d j j u u s s t t i i n n g g t t h h e e p p a a t t i i e e n n t t h h e e l l p p e e r r A A t t t t a a c c h h i i n n g g t t h h e e o o x x y y g g e e n n b b o o t t t t l l e e h h o o l l d d e e r r C C A A U U T T I I O O N N •...
- Page 46 For United States only. Confirm availability for your configuration or region. Call Stryker Customer Service: 1-800-327- 0770. Stryker’s preferred wipes (2060-000-001 6'' x 10'' or 2060-000-002 9'' x 12'') include the following active ingredients: • n-Alkyl (60% C14, 30% C16, 5% C12, 5% C18) dimethyl benzyl ammonium chloride - 0.154% •...
- Page 47 C C l l e e a a n n i i n n g g C C A A U U T T I I O O N N • Do not clean, disinfect, service, or perform maintenance while the product is in use. •...
- Page 48 D D i i s s i i n n f f e e c c t t i i n n g g C C A A U U T T I I O O N N • Do not clean, disinfect, service, or perform maintenance while the product is in use. •...
- Page 49 Remove the product from service before you perform the preventive maintenance inspection. Check all items listed during annual preventive maintenance for all Stryker Medical products. You may need to perform preventive maintenance checks more often based on your level of product usage. Service only by qualified personnel.
- Page 50 Nurse call functions Auxiliary outlets function (test ground fault interrupter) Replace battery assembly (5900280025) (one year expected service life) Set clock to local date and time Product serial number: Completed by: Date: 5900-009-001 Rev F.1...
- Page 51 E E M M C C i i n n f f o o r r m m a a t t i i o o n n W W A A R R N N I I N N G G •...
- Page 52 G G u u i i d d a a n n c c e e a a n n d d m m a a n n u u f f a a c c t t u u r r e e r r ’ ’ s s d d e e c c l l a a r r a a t t i i o o n n - - e e l l e e c c t t r r o o m m a a g g n n e e t t i i c c i i m m m m u u n n i i t t y y Floors should be wood, concrete, or ceramic tile.
- Page 53 Portable and mobile RF communications equipment should follow the guidance in the table titled “Recommended separation distances between portable and mobile RF communication equipment and the 5900 M M V V 3 3 Bariatric bed.” If the mobile service is not listed in the table, the recommended separation distance should be...
-
Page 54: Bluetooth
R R e e c c o o m m m m e e n n d d e e d d s s e e p p a a r r a a t t i i o o n n d d i i s s t t a a n n c c e e s s b b e e t t w w e e e e n n p p o o r r t t a a b b l l e e a a n n d d m m o o b b i i l l e e R R F F c c o o m m m m u u n n i i c c a a t t i i o o n n e e q q u u i i p p m m e e n n t t a a n n d d t t h h e e 5 5 9 9 0 0 0 0 M M V V 3 3 B B a a r r i i a a t t r r i i c c b b e e d d The 5900 M M V V 3 3 Bariatric bed is intended for use in an electromagnetic environment in which radiated RF disturbances are controlled. - Page 55 L L i i t t b b a a r r i i a a t t r r i i q q u u e e M M V V 3 3 ® ® M M a a n n u u e e l l d d ' ' u u t t i i l l i i s s a a t t i i o o n n 5900 5900-009-001 Rev F.1 2020/09...
- Page 57 Calibre des fusibles Ne pas percer Pression d’huile hydraulique Danger de pincement/écrasement Rayonnement non ionisant Numéro de référence Numéro de série Dispositif médical européen Marquage CE Mandataire établi dans la Communauté européenne Pour les brevets américains, consulter www.stryker.com/patents Fabricant 5900-009-001 Rev F.1...
- Page 58 Charge maximale admissible Poids de l’équipement avec charge maximale admissible Poids maximal du patient NAWI Classe IIII Biométrie des patients adultes Courant alternatif Courant continu Cycle opératoire du produit ≤2m ≥18m L’unité est munie d’une borne de connexion pour régulateur de tension. Le régulateur de tension fournit une connexion directe entre l’unité...
- Page 59 T T a a b b l l e e d d e e s s m m a a t t i i è è r r e e s s Définition de « Avertissement », « Mise en garde » et « Remarque » ..............3 Résumé...
- Page 60 Entretien préventif............................46 Informations de CEM ..........................48 5900-009-001 Rev F.1...
- Page 61 • Ne pas utiliser ce produit en santé comportementale, en pédiatrie ou à domicile. • Ne pas utiliser ce produit dans un environnement riche en oxygène. • Toujours utiliser des matelas approuvés par Stryker dont la compatibilité a été testée avec le châssis du produit afin d’éviter un risque de coincement du patient.
- Page 62 • Toujours tenir les membres, mains, doigts et autres parties du corps à l’écart des mécanismes et des interstices. • Toujours s’assurer qu’il n’y a pas d’obstacle à proximité du produit. En cas de collision du lit avec un obstacle, le patient, l’opérateur ou toute personne à...
- Page 63 M M I I S S E E E E N N G G A A R R D D E E • L’utilisation incorrecte du produit est susceptible de causer des blessures au patient ou à l’opérateur. Utiliser le produit uniquement de la manière décrite dans ce manuel.
-
Page 64: Bénéfices Cliniques
D D e e s s c c r r i i p p t t i i o o n n d d u u p p r r o o d d u u i i t t Le lit bariatrique M M V V 3 3 ® modèle 5900 de Stryker est un lit d'hôpital ajustable alimenté par secteur conçu pour être utilisé... -
Page 65: Barrières Rangées
A A V V E E R R T T I I S S S S E E M M E E N N T T - - Toujours utiliser des matelas approuvés par Stryker dont la compatibilité a été testée... - Page 66 R R e e m m a a r r q q u u e e - - Fermeté minimale du matelas : Indice de fermeté ILD à 50 % - minimum de 108 livres-force Stryker se réserve le droit de modifier ces caractéristiques sans préavis.
-
Page 67: Pédale De Frein/Direction
I I l l l l u u s s t t r r a a t t i i o o n n d d u u p p r r o o d d u u i i t t F F i i g g u u r r e e 1 1 –... - Page 68 Pour consulter votre mode d'emploi ou votre manuel d'entretien en ligne, consulter https://techweb.stryker.com/. Avoir le numéro de série (A) du produit Stryker à disposition avant d’appeler le service clientèle ou le support technique de Stryker. Inclure le numéro de série dans toutes les communications écrites.
- Page 69 F F i i g g u u r r e e 3 3 – – E E m m p p l l a a c c e e m m e e n n t t d d u u n n u u m m é é r r o o d d e e s s é é r r i i e e - - v v u u e e d d e e l l ’ ’ o o p p é é r r a a t t e e u u r r 5900-009-001 Rev F.1...
- Page 70 I I n n s s t t a a l l l l a a t t i i o o n n A A V V E E R R T T I I S S S S E E M M E E N N T T - - Toujours brancher le produit à une prise murale mise à la terre, de qualité hôpitaux. La fiabilité de la mise à...
- Page 71 A A V V E E R R T T I I S S S S E E M M E E N N T T - - Toujours utiliser un câble d'interface fourni par Stryker. L'utilisation de tout autre câble...
- Page 72 F F o o n n c c t t i i o o n n n n e e m m e e n n t t B B r r a a n n c c h h e e m m e e n n t t e e t t d d é é b b r r a a n n c c h h e e m m e e n n t t d d u u p p r r o o d d u u i i t t A A V V E E R R T T I I S S S S E E M M E E N N T T •...
- Page 73 R R e e m m a a r r q q u u e e • Les DEL A A l l i i m m e e n n t t a a t t i i o o n n (K) et B B a a t t t t e e r r i i e e (J) sur le panneau de commande du pied de lit ( Panneau de commande du pied de lit - commandes du menu (page 31)) s’allument lorsque le produit est branché...
- Page 74 F F i i g g u u r r e e 5 5 – – R R a a n n g g e e m m e e n n t t d d u u c c o o r r d d o o n n d d ’ ’ a a l l i i m m e e n n t t a a t t i i o o n n T T r r a a n n s s p p o o r r t t d d u u p p r r o o d d u u i i t t A A V V E E R R T T I I S S S S E E M M E E N N T T •...
- Page 75 E E n n c c l l e e n n c c h h e e m m e e n n t t o o u u d d é é s s e e n n c c l l e e n n c c h h e e m m e e n n t t d d e e s s f f r r e e i i n n s s A A V V E E R R T T I I S S S S E E M M E E N N T T •...
- Page 76 F F i i g g u u r r e e 9 9 – – D D é é s s e e n n c c l l e e n n c c h h e e m m e e n n t t d d u u v v e e r r r r o o u u d d e e d d i i r r e e c c t t i i o o n n / / p p o o s s i i t t i i o o n n n n e e u u t t r r e e F F i i g g u u r r e e 8 8 –...
- Page 77 F F i i g g u u r r e e 1 1 0 0 – – A A c c t t i i v v a a t t i i o o n n d d u u d d é é b b r r a a y y a a g g e e p p o o u u r r p p o o s s i i t t i i o o n n d d ’ ’ u u r r g g e e n n c c e e R R C C P P A A u u g g m m e e n n t t e e r r o o u u r r é...
- Page 78 F F i i g g u u r r e e 1 1 1 1 – – E E m m p p l l a a c c e e m m e e n n t t s s d d e e s s p p o o i i g g n n é é e e s s d d e e l l a a p p l l a a t t e e - - f f o o r r m m e e 2.
- Page 79 R R e e t t r r a a i i t t o o u u r r e e m m i i s s e e e e n n p p l l a a c c e e d d e e l l a a t t ê ê t t e e d d e e l l i i t t A A V V E E R R T T I I S S S S E E M M E E N N T T •...
- Page 80 F F i i g g u u r r e e 1 1 3 3 – – R R e e m m i i s s e e e e n n p p l l a a c c e e d d e e l l a a t t ê ê t t e e d d e e l l i i t t R R e e t t r r a a i i t t o o u u r r e e m m i i s s e e e e n n p p l l a a c c e e d d u u p p i i e e d d d d e e l l i i t t Il est possible de retirer le pied de lit pour faciliter l’accès du patient et le nettoyage.
- Page 81 • Pour relever la barrière à la position la plus élevée, saisir la barrière et la faire pivoter vers le haut à partir de la position la plus basse ou intermédiaire (Figure 15). F F i i g g u u r r e e 1 1 5 5 – – P P o o s s i i t t i i o o n n l l a a p p l l u u s s é é l l e e v v é é e e d d e e l l a a b b a a r r r r i i è è r r e e •...
- Page 82 • Toujours s'assurer d’acheminer les câbles, les cordons et les tubulures d’autres équipements de sorte à ne pas les coincer dans certaines parties du produit. R R e e m m a a r r q q u u e e - - Ne pas utiliser les barrières comme dispositif de retenue du patient. Pour abaisser la barrière en position intermédiaire, appuyer sur le bouton de déblocage et faire pivoter la barrière en avant jusqu'à...
- Page 83 F F i i g g u u r r e e 1 1 8 8 – – E E m m p p l l a a c c e e m m e e n n t t d d e e s s p p o o i i n n t t s s d d ’ ’ a a r r r r i i m m a a g g e e d d e e s s s s a a n n g g l l e e s s d d e e r r e e t t e e n n u u e e F F i i x x a a t t i i o o n n d d ’...
- Page 84 F F i i g g u u r r e e 1 1 9 9 – – C C r r o o c c h h e e t t p p o o u u r r p p o o c c h h e e u u r r i i n n a a i i r r e e A A c c t t i i v v a a t t i i o o n n d d e e l l a a f f o o n n c c t t i i o o n n d d e e c c o o m m m m u u n n i i c c a a t t i i o o n n a a p p p p e e l l i i n n f f i i r r m m i i e e r r L'appel infirmier permet au patient ou au professionnel de santé...
- Page 85 • Toujours s'assurer d’acheminer les câbles, les cordons et les tubulures d’autres équipements de sorte à ne pas les coincer dans certaines parties du produit. M M I I S S E E E E N N G G A A R R D D E E - - Toujours s'assurer de dégager tous les obstacles avant d’utiliser les fonctions de déplacement du produit.
- Page 86 P P a a n n n n e e a a u u d d e e c c o o m m m m a a n n d d e e d d u u p p a a t t i i e e n n t t ( ( b b a a r r r r i i è è r r e e i i n n t t e e r r n n e e ) ) A A V V E E R R T T I I S S S S E E M M E E N N T T •...
-
Page 87: Affichage Du Minuteur (J, Droite Du Patient/I, Gauche Du Patient)
Affichage du minuteur (J, droite du patient/I, gauche Indique la valeur du minuteur du patient) S’allume quand la fonction de déplacement est DEL Verrouillé verrouillée P P a a n n n n e e a a u u d d e e c c o o m m m m a a n n d d e e d d u u p p i i e e d d d d e e l l i i t t - - c c o o m m m m a a n n d d e e s s d d u u l l i i t t A A V V E E R R T T I I S S S S E E M M E E N N T T •... - Page 88 Élévation du relève-jambes Élève le relève-jambes Abaissement du relève-jambes Abaisse le relève-jambes P P a a n n n n e e a a u u d d e e c c o o m m m m a a n n d d e e d d u u p p i i e e d d d d e e l l i i t t - - v v e e r r r r o o u u i i l l l l a a g g e e s s A A V V E E R R T T I I S S S S E E M M E E N N T T •...
- Page 89 • Ne pas verrouiller les fonctions du panneau de commande à partir du pied de lit si l’utilisateur souhaite accéder à ces fonctions après le retrait du pied de lit. P P a a n n n n e e a a u u d d e e c c o o m m m m a a n n d d e e d d u u p p i i e e d d d d e e l l i i t t - - c c o o m m m m a a n n d d e e s s d d u u m m e e n n u u Affiche les fonctions de menu Écran R R e e m m a a r r q q u u e e - - L’écran n’est pas tactile.
-
Page 90: Del D'alimentation
S'allume quand le produit est branché sur une prise DEL d'alimentation S'allume quand les freins sont enclenchés et clignote lorsqu’ils sont DEL des freins désenclenchés P P a a n n n n e e a a u u d d e e c c o o m m m m a a n n d d e e d d u u p p i i e e d d d d e e l l i i t t - - a a f f f f i i c c h h a a g g e e d d e e l l ’ ’ a a c c c c u u e e i i l l L’affichage d’accueil est l’écran par défaut sur le panneau de commande du pied de lit. -
Page 91: Changer L'équipement
S’allume en bleu quand le relève-buste 30°+ est activé Relève-buste 30°+ S'allume en rouge quand i i B B e e d d est activé et que le relève-buste ne se trouve pas à 30°+ P P a a n n n n e e a a u u d d e e c c o o m m m m a a n n d d e e d d u u p p i i e e d d d d e e l l i i t t - - s s y y s s t t è è m m e e d d e e p p e e s s é é e e Press to weigh the pa t and add an entry... - Page 92 P P o o u u r r p p e e s s e e r r u u n n p p a a t t i i e e n n t t A A V V E E R R T T I I S S S S E E M M E E N N T T •...
- Page 93 P P a a n n n n e e a a u u d d e e c c o o m m m m a a n n d d e e d d u u p p i i e e d d d d e e l l i i t t - - d d é é t t e e c c t t i i o o n n d d e e s s o o r r t t i i e e d d e e l l i i t t Press to arm/disarm the bed exit alarm Alarm State...
-
Page 94: Position Des Barrières
Si les conditions de réglage sélectionnées pour la détection de sortie de lit sont changées : Un signal de priorité de détection de sortie de lit est envoyé (voir Mise en route de la fonction de communication appel • infirmier (page 13)) •... -
Page 95: Entretien
i i B B e e d d Active ou désactive i i B B e e d d L L a a m m p p e e i i B B e e d d Change l’intensité de la DEL i i B B e e d d sur le pied de lit et le pare-choc P P a a n n n n e e a a u u d d e e c c o o m m m m a a n n d d e e d d u u p p i i e e d d d d e e l l i i t t - - p p a a r r a a m m è... - Page 96 R R é é g g l l a a g g e e d d e e l l ’ ’ h h o o r r l l o o g g e e Pour changer l’horloge du produit : 1.
- Page 97 A A c c c c e e s s s s o o i i r r e e s s e e t t p p i i è è c c e e s s Les accessoires et pièces suivants peuvent être disponibles pour le produit. Confirmer la disponibilité en fonction de la configuration du produit ou du pays.
- Page 98 F F i i g g u u r r e e 2 2 1 1 – – S S u u p p p p o o r r t t d d e e p p e e r r f f u u s s i i o o n n e e n n d d e e u u x x p p a a r r t t i i e e s s F F i i x x a a t t i i o o n n o o u u r r e e t t r r a a i i t t d d u u l l è...
- Page 99 F F i i g g u u r r e e 2 2 2 2 – – F F i i x x a a t t i i o o n n o o u u r r e e t t r r a a i i t t d d u u l l è è v v e e - - p p a a t t i i e e n n t t Répéter les étapes dans le sens inverse pour retirer le lève-patient.
- Page 100 F F i i g g u u r r e e 2 2 3 3 – – R R é é g g l l a a g g e e d d u u l l è è v v e e - - p p a a t t i i e e n n t t F F i i x x a a t t i i o o n n d d u u s s u u p p p p o o r r t t p p o o u u r r b b o o u u t t e e i i l l l l e e d d ' ' o o x x y y g g è...
- Page 101 Destiné aux États-Unis uniquement. Confirmer la disponibilité en fonction de la configuration du produit ou du pays. Contacter le service clientèle de Stryker : +1-800-327-0770. Les lingettes recommandées par Stryker (2060-000-001 6” x 10” (15,2 cm x 25,4 cm) ou 2060-000-002 9” x 12” (22,9 cm x 30,5 cm)) contiennent les principes actifs suivants : •...
- Page 102 N N e e t t t t o o y y a a g g e e M M I I S S E E E E N N G G A A R R D D E E •...
- Page 103 D D é é s s i i n n f f e e c c t t i i o o n n M M I I S S E E E E N N G G A A R R D D E E •...
- Page 104 Mettre le produit hors service avant d’effectuer les vérifications de maintenance préventive. Vérifier tous les éléments mentionnés pendant l’entretien préventif annuel pour tous les produits Stryker Medical. Il peut être nécessaire d’effectuer les vérifications d’entretien préventif plus fréquemment en fonction du degré d’utilisation du produit. Toute réparation doit être effectuée exclusivement par du personnel qualifié.
- Page 105 Fonctionnement correct de tous les déplacements Fonctionnement correct de l’appel infirmier Fonctionnement correct des sorties auxiliaires (tester le différentiel) Remplacer le bloc-batteries (5900280025) (durée de vie utile prévue d’un an) Régler l’horloge sur l’heure et la date locales Numéro de série du produit : Effectué...
- Page 106 I I n n f f o o r r m m a a t t i i o o n n s s d d e e C C E E M M A A V V E E R R T T I I S S S S E E M M E E N N T T •...
- Page 107 D D i i r r e e c c t t i i v v e e s s e e t t d d é é c c l l a a r r a a t t i i o o n n d d u u f f a a b b r r i i c c a a n n t t – – I I m m m m u u n n i i t t é é é é l l e e c c t t r r o o m m a a g g n n é é t t i i q q u u e e Le lit bariatrique M M V V 3 3 5900 peut être utilisé...
-
Page 108: Champ Magnétique À La Fréquence Du Réseau (50/60 Hz) 30 A/M 30 A/M
D D i i r r e e c c t t i i v v e e s s e e t t d d é é c c l l a a r r a a t t i i o o n n d d u u f f a a b b r r i i c c a a n n t t – – I I m m m m u u n n i i t t é é é é l l e e c c t t r r o o m m a a g g n n é é t t i i q q u u e e Les niveaux des champs magnétiques à... - Page 109 Les équipements de communication RF portables et mobiles doivent respecter les indications du tableau intitulé « Distances de séparation recommandées entre les équipements de communication RF portables et mobiles et le lit bariatrique M M V V 3 3 5900. » Si le service mobile ne figure pas dans le tableau, la distance de séparation...
- Page 110 Les intensités de champ des émetteurs fixes, tels que les stations de base pour les radiotéléphones (cellulaires/sans fil) et les radios mobiles terrestres, la radio amateur, la radiodiffusion AM et FM, et la diffusion télévisuelle, ne peuvent pas être prévues théoriquement avec exactitude. Pour évaluer l’environnement électromagnétique dû aux émetteurs RF fixes, il convient d’envisager un relevé...
- Page 112 Stryker Medical 3800 E. Centre Avenue Portage, MI 49002 5900-009-001 Rev F.1 2020/09 WCR: AA.4...