Table des Matières
Publicité
Les langues disponibles
Les langues disponibles
Liens rapides
Publicité
Chapitres
Table des Matières

Manuels Connexes pour Stryker GoBed II MedSurg Bed FL28C


Sommaire des Matières pour Stryker GoBed II MedSurg Bed FL28C
- Page 1 GoBed II MedSurg Bed ® GoBed II Lit MedSurg ® Model FL28C / Modèle FL28C Operations Manual Guide d’utilisation For Parts or Technical Assistance: USA: 1-800-327-0770 2011/11 B.4 280C-009-001 REV B www.stryker.com...
-
Page 3: Table Des Matières
Bed Extender with Scale - FA64173 . . . . . . . . . . . . . . . . . . . . . . . . . . . . . . . . . . . . . . . . . . . . . . . . . . . . . . . . . .1-38 www.stryker.com 280C-009-001 REV B... - Page 4 GoBed II MedSurg Bed Quick Reference Guide . . . . . . . . . . . . . . . . . . . . . . . . . . . . . . . . . . . . . . . . . . . . . . . . .1-65 280C-009-001 REV B www.stryker.com...
-
Page 5: Symbols And Definitions
(WEEE), this symbol indicates that the product must not be disposed of as unsorted municipal waste, but should be collected separately . Refer to your local distributor for return and/or collection systems available in your country . Return To Table of Contents www.stryker.com 280C-009-001 REV B... - Page 6 . Note This provides special information to make maintenance easier or important instructions clearer . Return To Table of Contents 280C-009-001 REV B www.stryker.com...
-
Page 7: Intended Use Of Product
Recommended Mattress Size 35 x 84” (89 x 213 cm) Mattress Maximum Thickness 6” (15,24 cm) Minimum/Maximum Bed Height 14 1/2” to 29” (36,8 to 73,7 cm) Fowler Angle 0° to 59° Return To Table of Contents www.stryker.com 280C-009-001 REV B... -
Page 8: Environmental Conditions
240Vac, 50-60Hz, 2 . 7 A -Two 250Vac, 6 .3A Fuses Duty Cycle Stryker reserves the right to change specifications without notice. Specifications listed are approximate and may vary slightly from unit to unit or by power supply fluctuations . -
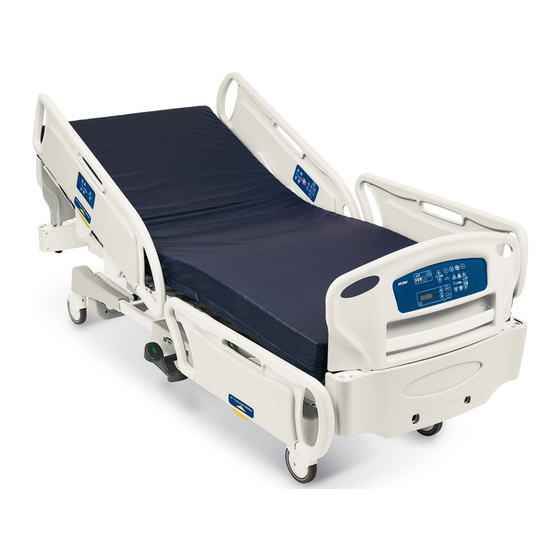
Page 9: Product Illustration
Connector CPR Release Auxiliary Outlet Foley Bag Hooks Siderail Outer Control Panel QE71-0299 Ground Chain Brake/Steer Pedal Emergency Crank Openings Steer Wheel Siderail Board Push/ Release Lever Pull Handle Figure 1.9 Return To Table of Contents www.stryker.com 280C-009-001 REV B... -
Page 10: Standard Features
• Bed extender and pad (with and without scale option) • Removable I . V . poles • Fixed I . V . pole • Traction sleeves and adapters Return To Table of Contents 280C-009-001 REV B www.stryker.com... -
Page 11: Safety Tips And Guidelines
• To reduce risk of injury, ensure the sleep surface is horizontal and in the lowest position with the siderails fully raised and locked when moving the bed with a patient in it . Return To Table of Contents www.stryker.com 280C-009-001 REV B... - Page 12 Mixing foot boards could result in unpredictable bed operation . • When servicing use only identical replacement parts provided by Stryker . • Make sure that the ground chain is in place, intact and it’s touching the floor (see Figure 1 .9, page 1-7) .
- Page 13 • SOME CLEANING PRODUCTS ARE CORROSIVE IN NATURE AND MAY CAUSE DAMAGE TO THE PRODUCT IF USED IMPROPERLY . If the products suggested above are used to clean Stryker patient care equipment, measures must be taken to insure the bed is wiped with a damp cloth soaked in clean water and thoroughly dried following cleaning .
-
Page 14: Setup Procedures
II MedSurg Bed, Model FL28C is working properly before it is put into service . The following list will help ensure that each part of the bed is checked . • Perform a full visual inspection of the bed . If there are any damages, please contact your local Stryker Medical representative . -
Page 15: Powering The Bed
To engage the wheel brakes, fully depress the side of the pedal identified by the red arrow labeled “BRAKE” . To disengage the wheel brakes, toggle the pedal to the neutral position . Return To Table of Contents www.stryker.com 280C-009-001 REV B 1-13... -
Page 16: Foley Bag Hook Usage
The bed may be equipped with an optional photoelectric night light to illuminate the floor area around the bed . The night light turns on as the room lights dim . Return To Table of Contents 1-14 280C-009-001 REV B www.stryker.com... -
Page 17: Cpr Emergency Release
Use only hospital grade electric equipment consuming 5A or less with the auxiliary power outlet (optional) . The use of standard electric equipment may bring the current leakage to an unacceptable level for hospital equipment . Return To Table of Contents www.stryker.com 280C-009-001 REV B 1-15... -
Page 18: Positioning Siderails
(see D1, D2 and D3, “Foot Board Control Panel Guide” page 1-18) before removing the foot board . WARNING Do not put anything under the bed . Return To Table of Contents 1-16 280C-009-001 REV B www.stryker.com... -
Page 19: Head Siderail Function Guide
Inner Control Panel (Patient’s Left) Figure 2.13B A: Press to raise Gatch C: Press to raise Fowler B: Press to lower Gatch D: Press to lower Fowler G: Press to activate Nurse Call (optional) Return To Table of Contents www.stryker.com 280C-009-001 REV B 1-17... -
Page 20: Foot Board Control Panel Guide
Press to obtain the desired reverse Trendelenburg (head up, foot down) position . To return the sleep surface to the horizontal position, simply use the bed Hi-Lo controls to either raise or lower the sleep surface to its limits . Return To Table of Contents 1-18 280C-009-001 REV B www.stryker.com... -
Page 21: Scale System Control Panel Guide (Optional)
• Should the message “No Scale Found” appear on the screen during the normal course of operation of the scale, press the enter key . Data will reappear on the screen and the current operation will resume . If the message remains, contact Technical Support . Return To Table of Contents www.stryker.com 280C-009-001 REV B 1-19... - Page 22 XXX .X lb G/L XX .X To access the patient’s weight variation anytime, go to the Gain or Loss menu through the Menu Up/Down controls once the scale is activated . Return To Table of Contents 1-20 280C-009-001 REV B www.stryker.com...
- Page 23 • Select the weight unit using the Menu Up or Down control and press ENTER . The system will return to the Scale mode with the weight displayed in the unit chosen . Return To Table of Contents www.stryker.com 280C-009-001 REV B 1-21...
-
Page 24: Bed Exit System (Optional)
• If the bed is not equipped with the scale system, remove the patient from the bed; change the equipment and zero the system (see ¨Zeroing the System¨ on page 1-23) . The Bed Exit system may be activated once the patient returns to the bed . Return To Table of Contents 1-22 280C-009-001 REV B www.stryker.com... -
Page 25: Bed Exit System With Multi-Zone Control (Optional)
• Press and hold the ARM/DISARM key (K) until the larger zone LED (left LED) begins to flash, then release the control (do not touch the bed while the LED flashes) . When the zone LED turns off, the system is zeroed . Return To Table of Contents www.stryker.com 280C-009-001 REV B 1-23... - Page 26 • If the bed is not equipped with the scale system, remove the patient from the bed; change the equipment and zero the system (see ¨Zeroing the System¨ on page 1-23) . The Bed Exit system may be activated once the patient returns to the bed . Return To Table of Contents 1-24 280C-009-001 REV B www.stryker.com...
- Page 27 Notes Return To Table of Contents www.stryker.com 280C-009-001 REV B 1-25...
-
Page 28: Optional Accessories
Fixed Two Stage I . V . Pole, Foldable FA64171 See page 1-42 Fixed Three Stage I . V . Pole, Foldable FA64170 See page 1-44 FA64188 FA64189 Traction Adapters See page 1-46 FA64190 FA64191 Return To Table of Contents 1-26 280C-009-001 REV B www.stryker.com... - Page 29 Insert the cable into the wire holder (B) to prevent the cable from pulling out of the receptacle . Attach the pendant control to the bed sheets using the clip . OPERATION Speaker/Microphone for Nurse Call On/Off switch and Volume adjustment Nurse Call button TV On/Off button Return To Table of Contents www.stryker.com 280C-009-001 REV B 1-27...
- Page 30 Attach the pendant control to the bed sheets using the clip . OPERATION Speaker/Microphone for Nurse Call On/Off switch and Volume adjustment Nurse Call button Room Light On/Off button Reading Light On/Off button TV On/Off button Return To Table of Contents 1-28 280C-009-001 REV B www.stryker.com...
- Page 31 Hook the pendant control on to the siderail . OPERATION Raise head section Lower head section Raise bed Lower bed Raise foot section Lower foot section Lock ring Cable connector Return To Table of Contents www.stryker.com 280C-009-001 REV B 1-29...
- Page 32 Tighten the connector lock ring . Hook the pendant control on to the siderail . OPERATION Raise head section Lower head section Raise foot section Lower foot section Lock ring Cable connector Return To Table of Contents 1-30 280C-009-001 REV B www.stryker.com...
- Page 33 . Note: Secure the monitor to the tray using the Velcro strap . WARNING The maximum load capacity of the tray is 40 lb (18 kg) . Lock pin Return To Table of Contents www.stryker.com 280C-009-001 REV B 1-31...
- Page 34 To adjust the trapeze (H) height, shorten or lengthen the strap (J) . If you must detach the strap to free the trapeze, ensure the strap is properly reinserted in the fastener . Return To Table of Contents 1-32 280C-009-001 REV B www.stryker.com...
- Page 35 . WARNING The overhead trapeze should not be used when in the storage position . This may result in injury to the patient or damage to the equipment . Return To Table of Contents www.stryker.com 280C-009-001 REV B 1-33...
-
Page 36: Emergency Crank Handle - Fohmau
Insert the crank into the appropriate aperture located at the foot end of the bed and follow the icon indications to adjust as desired . Remove the cranks after use and store it at the head end of the bed . Return To Table of Contents 1-34 280C-009-001 REV B www.stryker.com... - Page 37 . When using a half bed-length tent type, ensure that the siderails are outside the oxygen tent and that the tent does not extend below the mattress support level . Return To Table of Contents www.stryker.com 280C-009-001 REV B 1-35...
- Page 38 Unplug the bed from the wall socket . Remove the foot board . Configuration with 80” Mattress Configuration with 84” Mattress Support Note the position of the foot assembled end mattress retainer . Return To Table of Contents 1-36 280C-009-001 REV B www.stryker.com...
- Page 39 Insert the foot board into the mounting sockets on the bed extender . Verify proper operation of the unit before returning it to service . WARNING The bed extender must be removed before using the emergency crank (optional) . Return To Table of Contents www.stryker.com 280C-009-001 REV B 1-37...
- Page 40 Before installing the extender, adjustments must be made depending on the length of mattress being used: Configuration with 80” Mattress Configuration with 84” Mattress Support Note the position of the foot assembled end mattress retainer . Return To Table of Contents 1-38 280C-009-001 REV B www.stryker.com...
- Page 41 Insert the foot board into the mounting sockets on the bed extender . Verify proper operation of the unit before returning it to service . WARNING The bed extender must be removed before using the emergency crank (optional) . Return To Table of Contents www.stryker.com 280C-009-001 REV B 1-39...
- Page 42 Hang the I . V . bags . Tightening Sleeve WARNING The weight of the I . V . bags must not exceed 11 lb (5 kg) per hook . Return To Table of Contents 1-40 280C-009-001 REV B www.stryker.com...
- Page 43 Hang the I . V . bags . WARNING The weight of the I . V . bags must not exceed 11 lb (5 kg) per hook . Return To Table of Contents www.stryker.com 280C-009-001 REV B 1-41...
- Page 44 To store the I . V . pole, turn the latch (G) clockwise until the telescoping section (E) lowers . Lift up on the pole to remove it from the receptacle . Fold the pole down and store it on the bracket . Return To Table of Contents 1-42 280C-009-001 REV B www.stryker.com...
- Page 45 Insert the rollers (G) on each bracket and secure using the new hexagonal bolts (I) and nuts (K) . Note: When tightening the nuts, make sure that there is enough room for the rollers to spin freely. Return To Table of Contents www.stryker.com 280C-009-001 REV B 1-43...
- Page 46 . Turn the latch (K) clockwise to lower the first section . Lift the pole to remove it from the receptacle . Fold the pole down and store it on the bracket . Return To Table of Contents 1-44 280C-009-001 REV B www.stryker.com...
- Page 47 Insert the rollers (G) on each bracket and secure using the new hexagonal bolts (I) and nuts (K) . Note: When tightening the nuts, make sure that there is enough room for the rollers to spin freely. Return To Table of Contents www.stryker.com 280C-009-001 REV B 1-45...
-
Page 48: Traction Adapters
Note: The bolt is coated with “Scotch Grip” . The coating becomes less effective once the bolt is tightened and removed thereafter . Replace the bolt if the traction adapter is removed and reinstalled on another bed . Return To Table of Contents 1-46 280C-009-001 REV B www.stryker.com... - Page 49 Notes Return To Table of Contents www.stryker.com 280C-009-001 REV B 1-47...
- Page 50 SOME CLEANING PRODUCTS ARE CORROSIVE IN NATURE AND MAY CAUSE DAMAGE TO THE PRODUCT IF USED IMPROPERLY . If the products suggested above are used to clean Stryker patient care equipment, measures must be taken to insure the bed is wiped with a damp cloth soaked in clean water and thoroughly dried following cleaning . Failure to properly rinse and dry the bed will leave a corrosive residue on the surface of the bed, possibly causing premature corrosion of critical components .
-
Page 51: Preventative Maintenance
_____ Make sure that the ground chain is in place, intact and it’s touching the floor (see Figure 1 .9, page 1-7) . _____ Check labels as specified in the Operations and Maintenance manuals for legibility, proper adherence and integrity . Bed Serial Number: Completed by: _______________________________________ Date: _________________ Return To Table of Contents www.stryker.com 280C-009-001 REV B 1-49... - Page 52 Notes Return To Table of Contents 1-50 280C-009-001 REV B www.stryker.com...
-
Page 53: Recycling Passport
Recycling Passport OL280005 (Reference Only) Item Recycling/Material Code Important Information QDF28-0265 Circuit Board QDF5095 Buzzer Return To Table of Contents www.stryker.com 280C-009-001 REV B 1-51... - Page 54 Recycling Passport OL280120 (Reference Only) Item Recycling/Material Code Important Information 28-0769L Motor 28-0770 Motor 25-0768 Motor QDF23-0315) Circuit Board Return To Table of Contents 1-52 280C-009-001 REV B www.stryker.com...
- Page 55 Recycling Passport OL280121 (Reference Only) Item Recycling/Material Code Important Information 28-0769L Motor 28-0770 Motor 25-0768 Motor QP23-0315 Circuit Board QDF14-1160) Transformer Return To Table of Contents www.stryker.com 280C-009-001 REV B 1-53...
- Page 56 Recycling Passport OL250029 (Reference Only) Item Recycling/Material Code Important Information QDF9025 Circuit Breaker Return To Table of Contents 1-54 280C-009-001 REV B www.stryker.com...
- Page 57 Recycling Passport OL280097, OL280098, OL280100 (Reference Only) Item Recycling/Material Code Important Information QDF20-0126 Circuit Board Return To Table of Contents www.stryker.com 280C-009-001 REV B 1-55...
- Page 58 Recycling Passport OL280035, OL280101, OL280102 (Reference Only) Item Recycling/Material Code Important Information QDF20-0121 Circuit Board Return To Table of Contents 1-56 280C-009-001 REV B www.stryker.com...
- Page 59 Recycling Passport OP280001, OP280002, OP280003 (Reference Only) Item Recycling/Material Code Important Information QDF28-0266 Circuit Board Return To Table of Contents www.stryker.com 280C-009-001 REV B 1-57...
-
Page 60: Emc Information
IEC 61000-4-8 characteristic typical location in a typical commercial and/or hospital environment . Note: U is the a .c . mains voltage prior to applications of the test level . Return To Table of Contents 1-58 280C-009-001 REV B www.stryker.com... - Page 61 At 80 MHz and 800 MHz, the separation distance for the higher frequency range applies . Note 2 These guidelines may not apply in all situations . Electromagnetic propagation is affected by absorption and reflection from structures, objects and people . Return To Table of Contents www.stryker.com 280C-009-001 REV B 1-59...
- Page 62 GoBed ® II MedSurg Bed, Model FL28C . Over the frequency range 150 kHz to 80 MHz, field strengths are less than 3 V/m . Return To Table of Contents 1-60 280C-009-001 REV B www.stryker.com...
-
Page 63: Guidance And Manufacturer's Declaration - Electromagnetic Emissions
CISPR 11 supply network that supplies buildings used for domestic purposes . Harmonic Emissions Class A IEC 61000-3-2 Voltage Fluctuations Flicker Emissions Complies IEC 61000-3-3 Return To Table of Contents www.stryker.com 280C-009-001 REV B 1-61... -
Page 64: To Obtain Parts And Service
. Stryker’s obligation under this warranty is expressly limited to supplying replacement parts and labor for, or replacing, at its option, any product which is, in the sole discretion of Stryker, found to be defective . If requested by Stryker, products or parts for which a warranty claim is made shall be returned prepaid to the factory . -
Page 65: Service Contract Programs
Stryker authorized parts used Service during regular business hours (8−5) * Does not include maintenance due to abuse or for any disposable items . Stryker reserves the right to change options without notice . Stryker Medical also offers personalized service contracts . -
Page 67: Gobed Ii Medsurg Bed - Fl28
GoBed II MedSurg Bed - FL28 The GoBed® II MedSurg Bed, Model FL28 offers a high level of security, intuitive operation and enhanced mobility that allows you to support varying types of patient populations with ease and efficiency . WARNING: Always unplug the bed power cord from the power source before moving the bed . - Page 68 GoBed II MedSurg Bed - FL28 Cardiac Chair Press and hold the cardiac chair button (located on the footboard) until the bed reaches the seated position . Note: The fowler and knee gatch will move simultaneously while transitioning to the seated position.
- Page 70 Rallonge de lit sans balance - FA64164 . . . . . . . . . . . . . . . . . . . . . . . . . . . . . . . . . . . . . . . . . . . . . . . . . . 2-35 www.stryker.com 280C-009-001 REV B...
- Page 71 Lit MedSurg GoBed II - FL28 . . . . . . . . . . . . . . . . . . . . . . . . . . . . . . . . . . . . . . . . . . . . . . . . . . . . . . . . . . . . . 2-61 280C-009-001 REV B www.stryker.com...
-
Page 72: Symboles Et Définitions
électroniques, ce symbole indique que le produit ne doit pas être disposé comme un rebut municipal non trié, mais devrait être recueilli séparément . Référez-vous à votre distributeur régional pour le retour et / ou les systèmes de collection disponibles dans votre pays . Retour à la table de matières www.stryker.com 280C-009-001 REV B... -
Page 73: Défintion De « Avertissement », « Attention » Et « Remarque
à prendre afin d’assurer l’utilisation sécuritaire et efficace de l’équipement et d’éviter les dommages qui pourraient découler de son utilisation ou d’une mauvaise utilisation . Remarque Il s’agit de renseignements spécifiques destinés à faciliter l’entretien ou à clarifier des instructions importantes . Retour à la table de matières 280C-009-001 REV B www.stryker.com... -
Page 74: Utilisation De Produit
UTILISATION DE PRODUIT Le GoBed II de Stryker est un lit d’hôpital ajustable, alimenté par courant alternatif, conçu pour positionner les patients durant leurs procédures médicales, leurs thérapies et leur rétablissement dans un milieu hospitalier . Ce lit est aussi conçu pour transporter le patient entre les baies et les salles de procédure, procurer une sécurité... -
Page 75: Caractéristiques Techniques (Suite)
240 V c .a ., 50 – 60 Hz, 2,7 A - Deux fusibles 6,3 A, 250 V c .a . Cycle d’utilisation 10 % Stryker se réserve le droit de modifier ces caractéristiques sans préavis. Les caractéristiques techniques indiquées sont approximatives et susceptibles de varier légèrement d’un lit à l’autre ou en fonction des fluctuations de l’alimentation électrique . -
Page 76: Illustration Du Produit
QE71-0299 Chaîne antistatique Pédale frein Ouvertures de la / direction Roue manivelle d’urgence Levier de directionnelle Poignée de déverrouillage déplacement du côté de lit du lit Figure 1.9 Retour à la table de matières www.stryker.com 280C-009-001 REV B... -
Page 77: Caractéristiques Standard
• Support de bouteille à oxygène • Rallonge de lit et coussin (avec ou sans l’option balance) • Tiges à soluté amovibles • Tiges à soluté fixes • Adaptateurs pour cadre de traction Retour à la table de matières 280C-009-001 REV B www.stryker.com... -
Page 78: Consignes Et Conseils De Sécurité
. Lorsqu’une tente à oxygène mi-longueur du lit est utilisée, s’assurer que les côtés de lit sont à l’extérieur de la tente et que cette dernière ne s’étend pas au-dessous du niveau du sommier . Retour à la table de matières www.stryker.com 280C-009-001 REV B... - Page 79 Il est de la responsabilité du personnel médical de déterminer dans quelle mesure et à quels emplacements les courroies de contention doivent être utilisées . Stryker ne contrôlant, en aucune manière, ni le type, ni l’utilisation des courroies de contention sur ses produits, se dégage de toute responsabilité et il en revient à l’utilisateur d’en faire bon usage en fonction du patient qui y est alité...
- Page 80 LE PRODUIT SI LE MODE D’EMPLOI N’EST PAS RESPECTÉ. Si les produits suggérés ci-dessus sont utilisés pour nettoyer les lits Stryker, prendre les mesures appropriées pour s’assurer que le lit est essuyé avec un linge humide trempé dans de l’eau propre et complètement séché après le nettoyage . Un rinçage et un séchage inadéquats laisseront à...
-
Page 81: Procédures D'installation
• Effectuer une inspection visuelle complète du lit . S’il y a un quelconque dommage, veuillez communiquer avec votre distributeur local de Stryker Médical . • Installer les panneaux de tête et de pied sur le lit . Insérer lentement le panneau de pied jusqu’au fond en vous assurant que le connecteur du panneau est bien inséré... -
Page 82: Mise Sous Tension Du Lit
Pour engager les freins enfoncer complètement le côté de la pédale identifiée par une flèche rouge et le mot « Frein » . Pour désengager les freins ramener la pédale à la position neutre . Retour à la table de matières www.stryker.com 280C-009-001 REV B 2-13... -
Page 83: Déplacement Du Lit
à quels emplacements les courroies de contention doivent être utilisées . Stryker ne contrôlant, en aucune manière, ni le type, ni l’utilisation des courroies de contention sur ses produits, se dégage de toute responsabilité et il en revient à l’utilisateur d’en faire bon usage en fonction du patient qui y est alité... -
Page 84: Mise En Position Rcr
Utiliser uniquement des appareils de qualité hôpital ne consommant que cinq (5) ampères ou moins avec la prise électrique auxiliaire (en option) . L’utilisation d’appareils électriques autres que ceux ceux-ci risque d’augmenter le courant de fuite à un niveau inacceptable pour un appareil médical . Retour à la table de matières www.stryker.com 280C-009-001 REV B 2-15... -
Page 85: Utilisation Des Côtés De Lit
(voir D1, D2 et D3, « Guide du panneau de contrôle de pied de lit », à la page 2-18) avant de retirer le panneau de pied . AVERTISSEMENT Ne rien mettre sous le lit . Retour à la table de matières 2-16 280C-009-001 REV B www.stryker.com... -
Page 86: Guide Des Fonctions Des Côtés De Lit De Tête
B : Appuyer pour baisser la section de cuisse . D : Appuyer pour baisser la section de tête . G : Appuyer pour activer l’appel infirmier (en option) . Retour à la table de matières www.stryker.com 280C-009-001 REV B 2-17... -
Page 87: Guide Des Fonctions Du Panneau De Contrôle De Pied
Appuyer pour obtenir la position Trendelenburg inversé voulue (tête en haut, pied en bas) . Afin de remettre le sommier en position horizontale, utiliser les commandes d’élévation du lit du lit pour lever ou abaisser le sommier jusqu’à sa limite . Retour à la table de matières 2-18 280C-009-001 REV B www.stryker.com... -
Page 88: Guide Du Panneau De Contrôle Du Système De Pesée (En Option)
• La balance ne fonctionne pas lorsque le lit est incliné à un angle supérieur à 12° en position Trendelenburg ou Trendelenburg inversé . L’écran ACL affiche un message d’avertissement et l’angle actuel du lit, mais pas le poids du patient . Retour à la table de matières www.stryker.com 280C-009-001 REV B 2-19... -
Page 89: Système De Pesée (En Option)
Pour accéder en tout temps à la variation de poids du patient, aller au menu Gain or Loss (Gain ou perte) à l’aide des flèches vers le haut et vers le bas de Menu une fois la balance activée . Retour à la table de matières 2-20 280C-009-001 REV B www.stryker.com... -
Page 90: Système De Pesée (En Option) (Suite)
• Sélectionner le poids de l’unité à l’aide de la flèche vers le haut ou vers le bas de Menu puis appuyer sur ENTER (Entrée) . Le système retourne au mode Scale (Balance) et affiche le poids selon l’unité de poids sélectionnée . Retour à la table de matières www.stryker.com 280C-009-001 REV B 2-21... -
Page 91: Système De Détection De Sortie De Lit (En Option)
(voir « Remise à zéro du système », à la page 2-22) . Le système de sortie de lit peut être activé dès que le patient retourne au lit . Retour à la table de matières 2-22 280C-009-001 REV B www.stryker.com... -
Page 92: Système De Sortie De Lit Avec Commande Multizone (En Option)
(DEL de gauche) clignote, puis relâcher la commande (ne pas toucher au lit lorsque la DEL clignote) . Lorsque la DEL de la zone s’éteint, le système est remis à zéro . Retour à la table de matières www.stryker.com 280C-009-001 REV B 2-23... -
Page 93: Système De Sortie De Lit Avec Commande Multizone (En Option) (Suite)
(voir « Remise à zéro du système », à la page 2-22) . Le système de sortie de lit peut être activé dès que le patient retourne au lit . Retour à la table de matières 2-24 280C-009-001 REV B www.stryker.com... -
Page 94: Accessoires Offerts En Option
Voir à la page 2-41 Tige à soluté à trois étages fixe, pliable FA64170 Voir à la page 2-42 FA64188 FA64189 Adaptateurs pour cadre de traction Voir à la page 2-43 FA64190 FA64191 Retour à la table de matières www.stryker.com 280C-009-001 REV B 2-25... -
Page 95: Télécommande Deux Fonctions Gen Iii - Fa64136
Attacher la télécommande aux draps du lit à l’aide de l’agrafe . FONCTIONNEMENT Micro/Haut-parleur de l’appel infirmier Interrupteur marche / arrêt et réglage du volume Bouton de l’appel infirmier Bouton marche / arrêt du téléviseur Retour à la table de matières 2-26 280C-009-001 REV B www.stryker.com... -
Page 96: Télécommande Quatre Fonctions Gen Iii - Fa64137
Interrupteur marche / arrêt et réglage du volume Bouton marche / arrêt de Bouton de l’appel infirmier l’éclairage de la chambre Bouton marche / arrêt de la liseuse Bouton marche / arrêt du téléviseur Retour à la table de matières www.stryker.com 280C-009-001 REV B 2-27... -
Page 97: Télécommande À Trois Fonctions - Fa64141
Lève la section de tête Abaisse la section de tête Lève le lit Abaisse le lit Lève la section de pied Abaisse la section de pied Bague de retenue Connecteur de câble Retour à la table de matières 2-28 280C-009-001 REV B www.stryker.com... -
Page 98: Télécommande À Deux Fonctions - Fa64142
Accrocher la télécommande sur un côté de lit . FONCTIONNEMENT Lève la section de tête Abaisse la section de tête Lève la section de pied Abaisse la section de pied Bague de retenue Connecteur de câble Retour à la table de matières www.stryker.com 280C-009-001 REV B 2-29... -
Page 99: Support À Moniteur - Fa64163
Remarque : Fixer solidement le moniteur au plateau à l’aide de la courroie de Velcro . AVERTISSEMENT La plateau peut soutenir une capacité de charge maximale de 18 kg (40 lb) . Goupille de sécurité Retour à la table de matières 2-30 280C-009-001 REV B www.stryker.com... -
Page 100: Trapèze De Lit - Fa64148L
Pour régler la hauteur du trapèze (H), raccourcir ou rallonger la courroie (J) . Si la courroie doit être détachée afin de libérer le trapèze, s’assurer qu’elle soit réinsérée correctement dans la fixation . Retour à la table de matières www.stryker.com 280C-009-001 REV B 2-31... -
Page 101: Fonctionnement (Suite)
Le trapèze de lit ne doit pas être utilisé lorsqu’il est en position de rangement . Cela peut causer des blessures au patient ou des dommages au matériel . Retour à la table de matières 2-32 280C-009-001 REV B www.stryker.com... -
Page 102: Manivelle D'urgence - Fohmau
Insérer la manivelle dans l’ouverture appropriée située au pied du lit et suivre les indications de l’icône pour régler selon le besoin . Retirer la manivelle après son utilisation et la ranger à la tête du lit . Retour à la table de matières www.stryker.com 280C-009-001 REV B 2-33... -
Page 103: Support De Bouteille À Oxygène - Fa64169
à l’extérieur de la tente et que cette dernière ne s’étend pas au-dessous du niveau du sommier . Retour à la table de matières 2-34 280C-009-001 REV B www.stryker.com... -
Page 104: Rallonge De Lit Sans Balance - Fa64164
Configuration avec un matelas de 2 mètres Configuration avec un matelas de 2,14 mètres Prendre en note la position de la tige de retenue du Support assemblé matelas du côté pied . Retour à la table de matières www.stryker.com 280C-009-001 REV B 2-35... - Page 105 Vérifier le bon fonctionnement de l’unité avant de la remettre en service . AVERTISSEMENT La rallonge du lit doit être retirée avant l’utilisation de la manivelle d’urgence (en option) . Retour à la table de matières 2-36 280C-009-001 REV B www.stryker.com...
-
Page 106: Rallonge De Lit Avec Balance - Fa64173
Configuration avec un matelas de 2 mètres Configuration avec un matelas de 2,14 mètres Prendre en note la position de la tige de retenue du matelas du côté pied . Support assemblé Retour à la table de matières www.stryker.com 280C-009-001 REV B 2-37... - Page 107 Vérifier le bon fonctionnement de l’unité avant de la remettre en service . AVERTISSEMENT La rallonge du lit doit être retirée avant l’utilisation de la manivelle d’urgence (en option) . Retour à la table de matières 2-38 280C-009-001 REV B www.stryker.com...
-
Page 108: Tige À Soluté Amovible, 1,27 Cm (1/2 Po) - Fdtsh
• Resserrer la bague de verrouillage . Accrocher les sacs à soluté . Manchon de serrage AVERTISSEMENT Le poids des sacs à soluté ne doit pas dépasser 5 kg (11 lb) . Retour à la table de matières www.stryker.com 280C-009-001 REV B 2-39... -
Page 109: Tige À Soluté Amovible, 2,54 Cm (1 Po) - Fa61002-G
• Resserrer la bague de verrouillage . Accrocher les sacs à soluté . AVERTISSEMENT Le poids des sacs à soluté ne doit pas dépasser 5 kg (11 lb) . Retour à la table de matières 2-40 280C-009-001 REV B www.stryker.com... -
Page 110: Tige À Soluté À Deux Étages Fixe, Pliable - Fa64171
(E) descende . Lever la tige pour la retirer de son logement . Replier la tige en deux et la ranger sur le support . Retour à la table de matières www.stryker.com 280C-009-001 REV B 2-41... -
Page 111: Tige À Soluté À Trois Étages Fixe, Pliable - Fa64170
. Tourner le loquet (K) dans le sens horaire pour abaisser la première section . Lever la tige pour la retirer de son logement . Replier la tige en deux et la ranger sur le support . Retour à la table de matières 2-42 280C-009-001 REV B www.stryker.com... -
Page 112: Adaptateurs Pour Cadre De Traction
Remarque : Le boulon est recouvert de « Scotch Grip » . L’enduit perd de son efficacité dès que le boulon est resserré et retiré par la suite . Remplacer le boulon si l’adaptateur de traction est retiré et réinstallé sur un autre lit . Retour à la table de matières www.stryker.com 280C-009-001 REV B 2-43... -
Page 113: Entretien Préventif
_____ Vérifier les étiquettes comme spécifié dans les opérations et les manuels d’entretien pour la lisibilité, une bonne adhérence et intégrité . Numéro de série du lit : Vérification réalisée par : _____________________________________ Date : _________________ Retour à la table de matières 2-44 280C-009-001 REV B www.stryker.com... -
Page 114: Nettoyage
PRODUIT SI LE MODE D’EMPLOI N’EST PAS RESPECTÉ. Si les produits suggérés ci-dessus sont utilisés pour nettoyer les lits Stryker, prendre les mesures appropriées pour s’assurer que le lit est essuyé avec un linge humide trempé dans de l’eau propre et complètement séché après le nettoyage . Un rinçage et un séchage inadéquats laisseront à la surface du lit un résidu corrosif susceptible d’entraîner la corrosion prématurée de composants essentiels . -
Page 115: Recyclabilité
Recyclabilité OL280005 (pour référence uniquement) Article Code de recyclage / matériel Information importante Qté QDF28-0265 Carte de circuits imprimés QDF5095 Avertisseur Retour à la table de matières 2-46 280C-009-001 REV B www.stryker.com... - Page 116 Recyclabilité OL280120 (pour référence uniquement) Article Code de recyclage / matériel Information importante Qté 28-0769L Moteur 28-0770 Moteur 25-0768 Moteur QDF23-0315 Carte de circuits imprimés Retour à la table de matières www.stryker.com 280C-009-001 REV B 2-47...
- Page 117 Recyclabilité OL280121 (pour référence uniquement) Article Code de recyclage / matériel Information importante Qté 28-0769L Moteur 28-0770 Moteur 25-0768 Moteur QP23-0315 Carte de circuits imprimés QDF14-1160 Transformateur Retour à la table de matières 2-48 280C-009-001 REV B www.stryker.com...
- Page 118 Recyclabilité OL250029 (pour référence uniquement) Article Code de recyclage / matériel Information importante Qté QDF9025 Disjoncteur Retour à la table de matières www.stryker.com 280C-009-001 REV B 2-49...
- Page 119 Recyclabilité OL280097, OL280098, OL280100 (pour référence uniquement) Article Code de recyclage / matériel Information importante Qté QDF20-0126 Carte de circuits imprimés Retour à la table de matières 2-50 280C-009-001 REV B www.stryker.com...
- Page 120 Recyclabilité OL280035, OL280101, OL280102 (pour référence uniquement) Article Code de recyclage / matériel Information importante Qté QDF20-0121 Carte de circuits imprimés Retour à la table de matières www.stryker.com 280C-009-001 REV B 2-51...
- Page 121 Recyclabilité OP280001, OP280002, OP280003 (pour référence uniquement) Article Code de recyclage / matériel Information importante Qté QDF28-0266 Carte de circuits imprimés Retour à la table de matières 2-52 280C-009-001 REV B www.stryker.com...
-
Page 122: Informations Cem
/ ou hospitalier type . Remarque : Ut représente la tension du secteur (c .a .) avant l’application du niveau d’essai . Retour à la table de matières www.stryker.com 280C-009-001 REV B 2-53... - Page 123 Remarque 2 Ces directives peuvent ne pas convenir à toutes les situations . La propagation électromagnétique est affectée par l’absorption et la réflexion des structures, objets et personnes . Retour à la table de matières 2-54 280C-009-001 REV B www.stryker.com...
- Page 124 GoBed ® II MedSurg, modèle FL28C . Dans la gamme de fréquences de 150 kHz à 80 MHz, les intensités de champ sont inférieures à 3 V/m . Retour à la table de matières www.stryker.com 280C-009-001 REV B 2-55...
- Page 125 électrique public à basse tension qui alimente les bâtiments utilisés à des fins résidentielles . Émissions harmoniques Classe A IEC 61000-3-2 Fluctuations de tension Émissions de scintillement Conforme IEC 61000-3-3 Retour à la table de matières 2-56 280C-009-001 REV B www.stryker.com...
-
Page 126: Garantie
FL28C, sera exempt de vices matériels et de fabrication pendant une période de un (1) an à compter de la date de livraison . L’obligation de Stryker en vertu de la présente garantie se limite expressément, au gré de la société, à... -
Page 127: Programmes De Contrats D'entretien
Service aux heures ouvrables normales (8h00 à 17h00) * N’inclut pas les dommages en raison d’un usage abusif et les éléments jetables . Stryker se réserve le droit de modifier ces options sans préavis . Stryker Medical propose également des contrats d’entretien personnalisés . -
Page 130: Lit Medsurg Gobed Ii - Fl28
Lit MedSurg GoBed II - FL28 Le lit MedSurg GoBed® II, modèle FL28, offre un haut niveau de sécurité, un fonctionnement intuitif et une mobilité étendue qui vous permettent d’accueillir différents types de patient avec aisance et efficacité . WARNING: Débranchez toujours le cordon d’alimentation du lit avant de déplacer le lit . -
Page 131: Système De Pesée
Lit MedSurg GoBed II - FL28 Chaise cardiaque Appuyer et maintenir enfoncé le bouton chaise cardiaque (situé sur le panneau de pied) jusqu’à ce que le lit atteigne la position assise . Remarque : les sections de tête et de cuisse se déplaceront simultanément pendant processus de transition vers... - Page 133 ÉTATS-UNIS49002 CANADASTRYKER CANADA 45 INNOVATION DRIVE HAMILTON, ONTARIO CANADAL9H 7L8 Manufactured For European Representative UNITED STATES Stryker France Stryker Medical ZAC Satolas Green Pusignan 3800 E. Centre Ave., Av. De Satolas Green Portage, Michigan USA 69881 MEYZIEU Cedex 49002 France...