Table des Matières
Publicité
Les langues disponibles
Les langues disponibles
Liens rapides
Publicité
Chapitres
Table des Matières

Manuels Connexes pour Storch PowerCoat


Sommaire des Matières pour Storch PowerCoat
- Page 1 Akku-Airless-Handpistole PowerCoat Airless-accuhandpistool PowerCoat Pistolet manuel airless sans fil PowerCoat Spruzzatore airless con accumulatore PowerCoat Battery-powered Airless PowerCoat Spray Gun Akku-Airless Ruční pistole PowerCoat...
-
Page 2: Table Des Matières
Vielen Dank für Ihr Vertrauen zu STORCH. Mit dem Kauf haben Sie sich für ein Qualitäts-Produkt entschieden. Haben Sie trotzdem Anregungen zur Verbesserung oder aber vielleicht einmal ein Problem, so freuen wir uns sehr, von Ihnen zu hören. Bitte sprechen Sie mit Ihrem Außendienst-Mitarbeiter oder in dringenden Fällen auch mit uns direkt. -
Page 3: Warnhinweise
Warnhinweise BRAND- UND EXPLOSIONSGEFAHR Entflammbare Lösungsmitteldämpfe im Arbeitsbereich können explodieren oder sich entzünden. So verrin- gern Sie die Brand- und Explosionsgefahr: Das Spritzgeräte erzeugt Funken. Keine entflammbaren Flüssigkeiten spritzen oder das Gerät mit diesen spülen. Nur Materialien mit einem Flammpunkt über 38° C oder wasserbasierte Materialien verwenden. Der Spritzbereich muss stets gut belüftet sein. - Page 4 GEFAHR DURCH EINDRINGEN DES MATERIALS IN DIE HAUT (weiter) Das eingeschaltete oder unter Druck stehende Gerät darf nicht unbeaufsichtigt gelassen werden. Wird das Gerät nicht verwendet, schalten Sie es aus und führen Sie die Druckentlastung zum Abschalten des Geräts durch. Untersuchen Sie die Teile auf Zeichen von Beschädigung.
- Page 5 GEFAHR VON ELEKTROSCHOCK, FEUER UND EXPLOSION DURCH DAS LADEGERÄT Eine falsche Bdienung oder Verwendung kann zu Elektroschock, Feuer und Explosionen führen. Es dürfen nur 18-Volt-Lithium-Ionenakkus von STORCH aufgeladen werden; andere Akkus können bersten. Das Gerät nur in trockener Umgebung einsetzen. Das Gerät keinem Wasser oder Regen aussetzen.
-
Page 6: Geräteübersicht
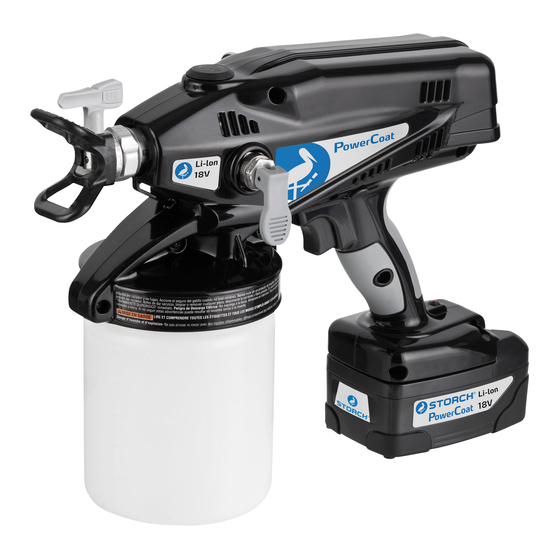
Geräteübersicht Akku-Handpistole Materialbehälter (1 Liter) Aufhängehaken Entlüftungs-/Entlastungsventil Reparaturzugang-Auslassventil Lithium-ionen-Akkuladegerät Düse mit Düsenhalter Einsatz für Materialbehälter (5 Stück) (enthält 211, 411, 515) Schulterriemen Düsenfilter (*Linksgewinde) Lithium ionen-Akku (2 Stück) Ansaugrohr zum Spritzen von Decken und Wän- Entriegelungstaste für Akku Akkustatusleuchte Ansusaugrohr zum Spritzen von Böden Abzug Diffuser für feine Oberflächen mit Aufbewah- Abzugssicherung... -
Page 7: Druckentlastung
Druckentlastung Düsenposition Führen Sie nach dem Beenden der Spritzarbeiten sowie Vor dem Einstellen der Spritzdüsenposition muss stets vor dem Reinigen, Überprüfen, Warten oder Transportie- eine Druckentlastung durchgeführt werden. ren von Geräten die Schritte im Abschnitt Druckentla- stung aus. Spitze vorn Spitze hinten (Spritzposition) (Reinigungsposition) -
Page 8: Aufladen Des Akkus
Batterien länger als eine Woche im Ladegerät zu sollten aber vor dem ersten Einsatz komplett aufgeladen lassen. werden. 1. Schieben Sie den Akku wie abgebildet in das Ladegerät Es dürfen ausschließlich nur Original STORCH-Akkus ver- (das Licht leuchtet innerhalb von 5 Sekunden auf). wendet werden. Ladegerät-Statusleuchten Anzeige Beschreibung Grün leuchtend... -
Page 9: Ansaugrohr
Ansaugrohr Dieses Spritzgerät wird mit zwei verschiedenen Ansaugrohren ausgestattet. Standardansaugrohr Beim Spritzen von Decken sollte der Einlass des Ansaug- zum Spritzen von Decken und rohres der Rückseite des Materialbehälters (dem Abzug) Wänden: Beim Spritzen von Wänden das Ansaugrohr zugewandt sein. nach vorne drehen. -
Page 10: Inbetriebnahme
Inbetriebnahme Nur wasserbasierende Materialien und lösemittelbesierende Materialien mit einem Flammpunkt über 38° C verwenden. Keine Materialien verwenden, auf deren Verpackung sich der Hinweis „ENTZÜNDLICH“ befindet. Für weitere Informationen zum Material bitten Sie den Hersteller oder den Fachhändler um das Materialsicherheitsda- tenblatt. - Page 11 5. Wenn das Gerät ausgespült ist verriegeln Sie die 6. Schrauben Sie den Materialbehälter ab. Abzugssperre und bringen das Entlüftungs- / Entlastungs- ventil in die Aufwärtsposition, um den Druck zu entlasten. 7. Lösen Sie die Abzugssperre, bringen Sie das Entlüf- tungs- / Entlastungsventil in die Abwärtsposition, halten Sie das Spritzgerät knapp über den Materialbehälter und betätigen Sie den Abzug, um Flüssigkeit aus der Pumpe...
-
Page 12: Anbringen Der Düse Und Düsenschutzkappe
Anbringen des Schulterriemens 1. Bringen Sie die Metallöse an der Rückseite des Spritz- 2. Führen Sie das Klettband durch die vordere Halterung geräts an. des Spritzgeräts und durch das Metalldreieck und befesti- gen Sie es am Riemen. Anbringen der Düse und des Düsenhalters mit Schutzkappe Anwendungstabelle Wendedüse 211, 411 Wendedüse 315, 515, 517... -
Page 13: Spritztechniken
3. Schrauben Sie die Düsehalterung mit Düse auf das Die Düse ist fest an der Düsenhalterung befestigt. Sie Spritzgerät. Ziehen Sie die Mutter handfest an, bis sie darf nicht entfernt werden, da dies zu Beschädigungen vollständig auf dem Spritzgerät aufgeschraubt ist. führt. -
Page 14: Beseitigung Von Düsenstopfern
Beseitigung von Düsenstopfern 1. Um die Düse von Verstopfungen zu befreien, verriegeln 2. Drehen Sie die Düsenspitze in die Reinigungsposition Sie die Abzugssperre und ziehen Sie das Entlastungsventil (Spitze hinten) in die Aufwärtsposition, um den Druck zu entlasten. 3. Richten Sie das Spritzgerät in einen leeren Behälter, 4. -
Page 15: Reinigen
Wechseln Sie zu einem alternativen Material.Der Spritzbereich muss stets gut belüftet sein. Der Spritzbereich sollte stets mit ausreichend Frischluft versorgt sein. Verarbeitung lösemittel basierender Beschichtungsstoffe mit der Akku-Airless Handpistole PowerCoat Bitte beachten Sie bei der Reinigung des Gerätes nach der Verarbeitung lösemittel basierender Beschichtungsstoffe: 1. - Page 16 7. Entleeren Sie den Becher umweltgerecht und wieder- holen den Vorgang von 1 - 7, bis sauberes Wasser oder Lösemittel austritt. 8. Lösen Sie die Abzugssperre, drehen Sie die Düse in die 9. Schalten Sie das Entlüftungs- / Entlastungsventil Reinigungsposition um und betätigen Sie den Abzug ca. 5 nach unten in die Spritzposition.
-
Page 17: Äußere Reinigung Des Spritzgeräts
Äußere Reinigung des Spritzgerätes Wischen Sie Farbe mit einem weichen, mit Wasser oder Spülflüssigkeit befeuchteten Tuch vom Gehäuse des Spritzge- rätes. Düsen: Die Düsen müssen in bestimmten Abständen je nach Verschleiß ausgetauscht werden, dieses ist abhängig von den Materialeigenschaften. Spritzen Sie nicht mit einer abgenutzten Düse. Siehe Fehlersuche ab Seite 21. Lagerung HINWEIS: Verwenden Sie CorroCheck um ein Einfrieren und Rosten interner Pumpenbauteile zu verhindern. -
Page 18: Ersatzteilliste
Ersatzteileliste Pos. Teile-Nr. Beschreibung Pos. Teile-Nr. Beschreibung 69 75 21 Spritzgerät, Ersatz- (ohne Düse, 69 75 26 Düsenfilter (Satz, 3er Packung) Akku, Ansaugrohr und Material- 69 75 27 Spezialansaugrohr mit Sieb und behälter) O-Ringen (zum Spritzen von 69 75 20 Becher-Einsatz, Ersatz- (10 St.) Böden) 69 75 23... -
Page 19: Auslassventil
Reparatursatz Auslassventil HINWEIS: Vor allen Reparaturarbeiten an einer Pumpe muss das Verfahren zum Spülen des Spritzgeräts durchgeführt werden, siehe Seite 17. Ausbau 1. Verriegeln Sie die Abzugssperre und bringen Sie das 2. Entnehmen Sie den Akku. Entlastungsventil in die Aufwärtsposition, um den Druck zu entlasten. -
Page 20: Telefon: +49 (0)2 02
Einlassventil Ausbau 1. Verriegeln Sie die Abzugssperre und bringen Sie das 2. Entfernen Sie den Materialbehälter und das Ansaug- Entlastungsventil in die Aufwärtsposition, um den Druck rohr. zu entlasten. 3. Drehen Sie das Spritzgerät auf den Kopf, lösen und 4. Befreien Sie das Einlassgehäuse so weit wie möglich entfernen mit einem Steckschlüssel das Einlassventilge- von überschüssigem Material. -
Page 21: Fehlersuche
Stab, um zu überprüfen, ob es sich frei auf und ab werden. Dies könnte das Gerät beschädigen. bewegt. Fehlersuche HINWEIS: Bevor das Spritzgerät zu einem zugelassenen Service-Stützpunkt der Fa. STORCH gebracht wird, sollten sämtliche Punkte überprüft werden, die in der Fehlersuchtabelle angeführt sind. Problem Ursache Lösung Spritzgerät macht kein... - Page 22 Problem Ursache Lösung Das Spritzgerät macht ein Das Spritzgerät wurde zu stark geneigt, Achten Sie darauf, dass der Behälter Geräusch, aber beim Betä- und das Saugrohr hat den Kontakt zum mit Material gefüllt ist. Neigen Sie tigen des Abzugs tritt kein Material verloren.
- Page 23 Spritzbilddiagnose Problem Ursache Lösung Das Spritzbild hat Streifen. Der Diffusor wurde bei Verwendung eines Achten Sie darauf, ein geeignetes ungeeigneten Materials installiert. Material zu verwenden. Siehe „Aus- wahltabelle“ für drehbare Düsen, Seite Der Diffusor ist teilweise verstopft. Reinigen Sie den Diffusor für feine Oberflächen oder wechseln Sie ihn aus.
-
Page 24: Technische Daten
Verwendung des Geräts. Verschleißteile (Düsen, Filter, Dichtungen) fallen nicht unter derartige Ansprüche. Sämtliche Ansprüche erlöschen durch den Einbau von Teilen fremder Herkunft, bei unsachgemäßer Handhabung und Lagerung sowie bei offensichtlicher Nichtbeachtung der Betriebsanleitung. Durchführung von Reparaturen Sämtliche Reparaturen dürfen ausschließlich durch unser Werk oder von STORCH autorisierten Service-Stationen durchgeführt werden. -
Page 25: Eg-Konformitätserklärung
EG-Konformitätserklärung Name / Anschrift des Ausstellers: STORCH Malerwerkzeuge & Profigeräte GmbH Platz der Republik 6-8 D - 42107 Wuppertal Hiermit erklären wir, dass das nachstehend genannte Gerät aufgrund dessen Konzipierung und Bauart sowie in der von uns in Verkehr gebrachten Ausführung den einschlägigen, grundlegenden Sicherheits- und Gesundheitsanforde- rungen der EG-Richtlinien entspricht. - Page 26 Hartelijk dank voor uw vertrouwen in STORCH. Met deze aankoop hebt u voor een kwaliteitsproduct gekozen. Als u desondanks een tip voor verbeteringen hebt of wellicht ooit een probleem ondervindt, dan horen wij graag van u. Neem contact op met de medewerker buitendienst of in dringende gevallen rechtstreeks met ons.
- Page 27 Waarschuwingen BRAND- EN EXPLOSIEGEVAAR Ontvlambare oplosmiddeldampen op de werkplek kunnen exploderen of ontbranden. Zo reduceert u het gevaar van brand- en explosiegevaar: Het spuitapparaat produceert vonken. Geen ontvlambare vloeistoffen spuiten of het apparaat hiermee reini- gen/spoelen. Alleen materialen met een vlampunt boven 38° C of watergebaseerde materialen gebruiken. Het spuitgebied moet altijd goed worden geventileerd.
- Page 28 GEVAAR DOOR BINNENDRINGEN VAN HET MATERIAAL IN DE HUID (vervolg) Het ingeschakelde en onder druk staande apparaat mag niet zonder toezicht worden achtergelaten. Als het apparaat niet wordt gebruikt, schakel het dan uit de laat de druk af om het het apparaat uit te schakelen. Onderzoek de delen op tekenen van beschadiging.
- Page 29 GEVAAR VAN ELEKTRISCHE SCHOKKEN, BRAND EN EXPLOSIE DOOR DE LADER Verkeerde bediening of gebruik kan tot elektrische schokken, brand en explosies leiden. Er mogen alleen 18-Volt Lithium-Ionen accu's van STORCH worden opgeladen; andere accu's kunnen barsten. Gebruik het apparaat alleen in droge omgevingen. Stel het apparaat niet aan water of regen bloot.
-
Page 30: Apparaatoverzicht
Apparaatoverzicht Accuhandpistool materiaalreservoir (1 liter) Ophanghaak ontluchting/afvoerventiel Reparatietoegang uitlaatventiel Lithium-ionen acculader Sproeikop met sproeikophouder Inzet voor materiaalreservoir (5 stuks) (bevat 211, 411, 515) Schouderriem Sproeikopfilter (*links schroefdraad) Lithium ionen-accu (2 stuks) Aanzuigbuis voor spuiten van plafonds en wan- Ontgrendelingsknop voor accu Accu-statuslampje Aanzuigbuis voor spuiten van vloeren Trekker... -
Page 31: Drukontlasting
Drukontlasting sproeikoppositie Voer de stappen in het hoofdstuk Drukontlasting uit na Voor het instellen van de sproeikoppositie moet er altijd het beëindigen van de spuitwerkzaamheden en voor het eerst een drukontlasting worden uitgevoerd. reinigen, controleren, onderhouden of transporteren van apparaten. Punt voor Punt achter (spuitpositie) -
Page 32: De Accu Opladen
1. Schuif de accu zoals afgebeeld in de lader Er mogen uitsluitend originele STORCH-accu's worden (het lampje gaat binnen 5 seconden branden). gebruikt. Statuslampjes van de lader... -
Page 33: Aanzuigbuis
Aanzuigbuis Dit spuitapparaat beschikt over twee verschillende aanzuigbuizen. Standaard aanzuigbuis Bij spuiten van plafond moet de inlaat van de aanzuigbuis voor spuiten van plafonds naar de achterkant van het materiaalreservoir (de trekker) en wanden: bij spuiten van wanden de aanzuigbuis naar zijn gericht. -
Page 34: Het Apparaat In Gebruik Nemen
Het apparaat in gebruik nemen Alleen watergebaseerde materialen en oplosmiddelgebaseerde materialen met een vlampunt boven 38° C gebruiken. Geen materialen gebruiken waarbij op de verpakking de aanduiding "ONTVLAMBAAR“ staat. Voor meer informatie over het materiaal neemt u contact op met de fabrikant of vakhandelaar voor het materiaal-veilig- heidsinformatieblad. - Page 35 5. Wanneer het apparaat is uitgespoeld, vergrendelt u de 6. Verwijder het materiaalreservoir. trekkerblokkering en zet u het ontluchting/afvoerventiel in de bovenste positie om de druk af te laten. 7. Maak de trekkerblokkering los, zet het ontluchting/ afvoerventiel in de onderste positie, houd het apparaat vlak boven het materiaalreservoir en haal de trekker over om de vloeistof uit de pomp te laten.
-
Page 36: De Sproeikop En Sproeikopbeschermkap Plaatsen
De schouderriem aanbrengen 1. Breng het metalen oogje aan de achterkant van het 2. Voer de band door de voorste houder van het apparaat apparaat aan. en door het metalen driehoekje en bevestig hem aan de riem. De sproeikop en de sproeikophouder met beschermkap plaatsen Toepassingstabel Draaibare sproeikop 211, 411 Draaibare sproeikop 315, 515, 517... -
Page 37: Spuittechnieken
3. Schroef de houder met de sproeikop op het apparaat. De sproeikop is vast op de houder bevestigd. De kop mag Draai de moer handvast aan totdat deze volledig op het niet worden verwijderd, dit leidt tot beschadigingen. apparaat is geschroefd. Spuittechniek Oefen de spuittechnieken op een stuk karton voordat u de originele vlakken bewerkt. -
Page 38: Sproeikopverstoppingen Oplossen
Sproeikopverstoppingen oplossen 1. Om verstoppingen in de sproeikop te verwijderen, ver- 2. Draai de punt van de sproeikop in de reinigingspositie grendelt u de trekkerblokkering en zet het ontluchting/ (punt achter) afvoerventiel in de bovenste positie om de druk af te laten. -
Page 39: Reinigen
Kies voor een ander materiaal; het spuitgebied moet altijd goed worden geventileerd. Er dient voldoende frisse lucht aanwezig te zijn. Verwerking van oplosmiddelgebaseerde materialen met het accu-airless handpistool PowerCoat: Houd bij de reiniging van het apparaat na verwerking van oplosmiddelgebaseerde materialen rekening met het volgende: 1. - Page 40 7. Gooi de inhoud van de beker conform de voorschriften weg en herhaal de procedure van 1 - 7 tot er schoon water of oplosmiddel uit het apparaat komt. 8. Maak de trekkerblokkering los, draai de sproeikop in de 9. Zet het ontluchting/afvoerventiel naar beneden in de reinigingspositie en houd de trekker ca.
-
Page 41: Externe Reiniging Van Het Spuitapparaat
Externe reiniging van het spuitapparaat Veeg de verf met een zachte, met water of spoelvloeistof bevochtigde doek van de behuizing van het apparaat. Sproeikoppen: De sproeikoppen moeten in bepaalde intervallen afhankelijk van slijtage worden vervangen; dit is afhankelijk van de materiaaleigenschappen. -
Page 42: Lijst Met Vervangende Onderdelen
Lijst met vervangende onderdelen Pos. Onderde- Beschrijving Pos. Onderde- Beschrijving elnr. elnr. 69 75 21 Spuitapparaat, vervanging- (zon- 69 75 26 Sproeikopfilter (set, per 3 ver- der sproeikop, accu, aanzuigbuis pakt) en materiaalreservoir) 69 75 27 Speciale aanzuigbuis met zeef 69 75 20 Beker-inzet, vervanging- (10 st.) en O-ringen (voor spuiten van... -
Page 43: Kostenloses Bestell-Fax: 08 00. 7 86
Reparatieset Uitlaatventiel TIP: Voor alle reparaties aan een pomp moet de procedure voor het spoelen van het spuitapparaat worden uitgevoerd, zie pagina 17. Uitbouwen 1. Vergrendel de trekkerblokkering en zet het afvoerventiel 2. Verwijder de accu. in de bovenste positie om de druk af te laten. 3. -
Page 44: Kostenlose Bestell-Hotline: 08 00. 7 86
Inlaatventiel Uitbouwen 1. Vergrendel de trekkerblokkering en zet het afvoerventiel 2. Verwijder het materiaalreservoir en de aanzuigbuis. in de bovenste positie om de druk af te laten. 3. Zet het spuitapparaat op zijn kop, maak met een 4. Verwijder zoveel mogelijk materiaal uit de inlaatbehu- steeksleutel de behuizing van het inlaatventiel, het inlaat- izing. -
Page 45: Fouten Opsporen
Hierdoor kan het apparaat beschadigd raken. Fouten opsporen TIP: Voordat het spuitapparaat naar een geautoriseerd servicepunt van STORCH wordt gebracht, moet alle in de storingta- bel vermelde punten worden gecontroleerd. Probleem Oorzaak Oplossing Spuitapparaat maakt geen Trekkerblokkering is vergrendeld. - Page 46 Probleem Oorzaak Oplossing Het spuitapparaat maak Het spuitapparaat is te schuin gehouden en Controleer of het reservoir met materi- een geluid, maar bij gebruik de aanzuigbuis heeft het contact met het aal is gevuld. Houd het reservoir niet te van de trekker komt er geen materiaal verloren.
-
Page 47: Kostenlose Service-Hotline: 08 00. 7 86
Spuitbeeld-diagnose Probleem Oorzaak Oplossing Het spuitbeeld vertoont stre- De diffusor is bij gebruik van ongeschikt Zorg ervoor dat u geschikt materiaal pen. materiaal geïnstalleerd. gebruikt. Zie de selectietabel voor draaibare sproeikopen, pagina 36 De diffusor is deels verstopt. Reinig de diffusor voor fijne oppervlakken of vervang deze. -
Page 48: Technische Gegevens
(sproeikoppen, filters, dichtingen) gelden deze aanspraken niet. Alle claimrechten vervallen bij inbouw van onderdelen van andere fabrikanten, bij ondeskundig gebruik en opslag en bij het niet in acht nemen van deze gebruiksaanwijzing. Reparaties uitvoeren Reparaties mogen uitsluitend door onze fabriek of door STORCH geautoriseerde servicestations worden uitgevoerd. -
Page 49: Eg-Conformiteitverklaring
EG-conformiteitverklaring Naam / adres van de ondertekenaar: STORCH Malerwerkzeuge & Profigeräte GmbH Platz der Republik 6-8 D - 42107 Wuppertal Wij verklaren hiermee: DAT HET HIERONDER VERMELDE APPARAAT OP BASIS VAN DE ONTWIKKELING EN HET BOU- WTYPE EN IN DE DOOR ONS IN OMLOOP GEBRACHTE UITVOERING AAN DE GELDENDE VEILIG- HEIDS- EN GEZONDHEIDSEISEN VAN DE EG-RICHTLIJNEN VOLDOET. - Page 50 Nous vous remercions de la confiance que vous témoignez à STORCH. Avec cet achat vous avez opté pour un produit de qualité. Si vous avez malgré tout des suggestions pour l'amélioration ou si vous deviez rencontrer un problème, nous sommes avec plaisir à...
-
Page 51: Avertissements
Avertissements RISQUE D'INCENDIE ET D'EXPLOSION Les vapeurs de solvant inflammables dans la zone de travail peuvent exploser ou s'enflammer facilement. Méthode de réduction du risque d'incendie et d'explosion : Les appareils d'application génèrent des étincelles. Ne pas pulvériser de fluides inflammables ou rincer l'appareil avec de tels fluides. - Page 52 DANGER DE PENETRATION DU MATERIAU DANS LA PEAU (suite) Ne pas laisser l'appareil en service ou sous pression sans supervision. Si l'appareil n'est pas utilisé, le mettre hors service et procéder à une décompression. Examiner les pièces pour détecter des signes d'endommagement. Remplacer toutes les pièces endomma- gées.
- Page 53 Un maniement ou une utilisation incorrects peuvent avoir pour conséquence un choc électrique, un incendie et des explosions. Charger exclusivement des batteries Lithium-ions de 18 Volt STORCH, d'autres batteries peuvent éclater. Utiliser l'appareil exclusivement dans un environnement sec. Ne pas soumettre l'appareil à la pluie ou à...
-
Page 54: Vue D'ensemble De L'appareil
Vue d'ensemble de l'appareil Pistolet manuel sans fil Réservoir de matériau (1 litre) Crochet d'accrochage Vanne de purge/décompression Accès de réparation - Soupape de sortie Chargeur Lithium-ions Buse avec support de buse Insert pour le réservoir de matériau (5 pièces) (contient 211, 411, 515) Sangle d'épaule Filtre à... -
Page 55: Décompression
Décompression Position de la buse Exécuter les étapes de la section Décompression après Avant de régler la position de la buse de pulvérisation, avoir terminé le travail de pulvérisation ainsi qu'avant toujours procéder à une décompression. le nettoyage, le contrôle, l'entretien ou le transport de l'appareil. -
Page 56: Chargement De La Batterie
1. Pousser la batterie de la manière représentée dans le chargeur. Utiliser exclusivement des pièces de rechange d'origine (la lampe s'allume dans les 5 secondes). STORCH ! Lampes d'état du chargeur Affichage Description Allumé en vert La batterie est totalement chargée. Utiliser la batterie ou la laisser dans le chargeur. -
Page 57: Tube D'aspiration
Tube d'aspiration Cet appareil d'application est équipé de deux tubes d'aspiration différents. Tube d'aspiration standard Lors de la pulvérisation des plafonds, l'entrée du tube pour la pulvérisation d'aspiration doit être orientée vers le côté arrière du réser- des plafonds et des murs : tourner le tube d'aspiration voir de matériau (de la gâchette). -
Page 58: Mise En Service
Mise en service Utiliser exclusivement des matériaux sur base aqueuse et sur base de solvant avec un point de flamme supérieur à 38° C. Ne pas utiliser de matériaux dont l'emballage comporte la mention « INFLAMMABLE». Pour de plus amples informations concernant le matériau, demander la fiche technique de sécurité du matériau au revendeur ou au fabricant. -
Page 59: Matériaux
5. Lorsque l'appareil est rincé, bloquer la gâchette et met- 6. Dévisser le réservoir de matériau. tre la vanne de purge/décompression dans la position vers le haut pour éliminer la pression. 7. Débloquer le blocage de gâchette, amener la vanne de purge/de décompression dans la position inférieure, main- tenir l'appareil d'application un peut au-dessus du réservoir de matériau et actionner la gâchette pour laisser le fluide... -
Page 60: Mise En Place De La Sangle D'épaule
Mise en place de la sangle d'épaule 1. Mettre l'oeillet métallique en place au dos de l'appareil 2. Passer la bande velcro à travers le support avant de d'application. l'appareil d'application et à travers le triangle métallique et la fixer sur la sangle. Amener la buse et le support de buse avec le capuchon de protection Tableau d'application Buse déflectrice 211, 411... -
Page 61: Déroulement Du Mouvement
3. Visser le support de buse avec la buse sur l'appareil La buse est fixée sur le support de buse. Il ne faut pas la d'application. Serrer l'écrou à la main jusqu'à ce qu'il soit retirer car cela provoque des endommagements. complètement vissé... -
Page 62: Elimination Des Colmatages De Buse
Elimination des colmatages de buse 1. Pour libérer la buse des colmatages, bloquer la gâchette 2. Tourner la pointe de la buse dans la position de netto- et tirer la vanne de décompression dans la position vers le yage (pointe en arrière) haut pour décompresser. -
Page 63: Nettoyage De L'appareil D'application
être alimentée avec suffisamment d'air frais. Application de produits de revêtement à base de solvants avec le pistolet Airless PowerCoat sans fil: Point à observer lors du nettoyage de l‘appareil après l‘application de produits de revêtement à base de solvants : 1. - Page 64 7. Vider le goder dans le respect de l'environnement et renouveler la procédure des étapes 1 à 7 jusqu'á ce qu'il sorte du solvant ou de l'eau propre. 8. Déverrouiller le blocage de gâchette, tourner la buse 9. Mettre ensuite la vanne de purge / décompression vers dans la position de nettoyage et actionner la gâchette le bas dans la position de pulvérisation.
-
Page 65: Nettoyage Extérieur De L'appareil D'application
Nettoyage extérieur de l'appareil d'application Essuyer la peinture du logement de l'appareil d'application avec un chiffon doux humidifié avec de l'eau ou du déter- gent. Buses : Les buses doivent être remplacées à intervalles réguliers en fonction de l'usure, laquelle dépend des propriétés du maté- riau. -
Page 66: Nomenclature De Pièces De Rechange
Nomenclature de pièces de rechange Pos. No. des Description Pos. No. des Description pièces pièces 69 75 21 appareil d'application, remplace- 69 75 26 Filtre de buse (jeu, pack de 3) ment (sans buse, batterie, tube 69 75 27 Tube d'aspiration spécial avec d'aspiration et réservoir de maté- trémie et joints toriques (pour riau) -
Page 67: Soupape De Sortie
Jeu de réparation Soupape de sortie REMARQUE : avant tous les travaux de réparation sur une pompe, il faut exécuter la procédure pour le lavage de l'appareil d'application, voir page 17. Démontage 1. Bloquer la gâchette et mettre la vanne de décompressi- 2. -
Page 68: Soupape D'entrée
Soupape d'entrée Démontage 1. Bloquer la gâchette et mettre la vanne de décompressi- 2. Retirer le réservoir de matériau et le tube d'aspiration. on dans la position vers le haut pour éliminer la pression. 3. Tourner l'appareil d'application sur la tête, desserrer le 4. -
Page 69: Recherche De Panne
Cela pourrait endommager l'appareil. le bas. Recherche de panne REMARQUE : Avant de mener l'appareil d'application à une station de service agréée de la Sté. STORCH, contrôler tous les points qui sont répertoriés dans le tableau de recherche d'erreur. Problème Cause... -
Page 70: Diagnostic De Trace De Pulvérisation
Problème Cause Solution L'appareil d'application fait L'appareil d'application a été incliné trop Veiller que le réservoir soit rempli de un bruit mais aucun matériau fortement et le tube d'aspiration a perdu le matériau. Ne pas incliner le réservoir ne sort à l'actionnement de la contact avec le matériau. - Page 71 Diagnostic de trace de pulvérisation Problème Cause Solution La trace de pulvérisation pré- Le diffuseur a été installé lors de Veiller à utiliser un matériau approprié. sente des stries. l'utilisation d'un matériau inapproprié. Voir la « grille de sélection » pour les buses rotatives, page 60 Le diffuseur est partiellement bouché.
-
Page 72: Caractéristiques Techniques
Toutes les droits sont supprimés par le montage de pièces d'origine étrangère, en cas de manipulation et d'entreposage incorrects ainsi qu'en cas de non-respect évident des instructions de service. Exécution de réparations Toutes les réparations doivent exclusivement être réalisées par notre usine ou par des stations de SAV autorisées par STORCH. -
Page 73: Déclaration De Conformité Ce
Déclaration de conformité CE Nom / adresse de l'émetteur: STORCH Malerwerkzeuge & Profigeräte GmbH Platz der Republik 6-8 D - 42107 Wuppertal Nous déclarons par la présente : QUE L'APPAREIL DESIGNÉ CI-DESSOUS SATISFAIT DE PAR SA CONCEPTION ET SA STRUCTURE AINSI QUE PAR LE MODELE QUE NOUS METTONS EN VENTE AUX EXIGENCES DE BASE RELATIVES A LA SECURITE ET LA SANTE DES DIRECTIVES CE SUR LES MACHINES EN VIGUEUR. - Page 74 Grazie per la fiducia accordata a STORCH. Con l'acquisto del presente utensile avete scelto un prodotto di qualità. Se comunque avete dei suggerimenti volti a migliorare la nostra offerta o se doveste incontrare qualche difficoltà, non esitate a rivolgervi a noi.
-
Page 75: Avvertenze
Avvertenze PERICOLO DI INCENDIO E DI ESPLOSIONE Vapori di solventi infiammabili nell'area di lavoro possono esplodere o infiammarsi. Ecco come ridurre il peri- colo di incendio e di esplosione: Lo spruzzatore crea delle scintille. Non spruzzare delle sostanze liquide infiammabili e non lavare l'attrezzo con tali sostanze. - Page 76 PERICOLO DOVUTO ALLA PENETRAZIONE DELLA SOSTANZA NELLA CUTE (continua) L'attrezzo accesso o che si trova sotto pressione non può essere lasciato incustodito. Se non si utilizza l'attrezzo, si consiglia di spegnerlo e di eseguire una decompressione dell'attrezzo al fine dello spegnimento dello stesso.
- Page 77 AL DISPOSITIVO DI CARICAMENTO Un impiego o utilizzo errato possono essere la causa di scosse elettriche, incendi ed esplosioni. Vanno caricati solo accumulatori agli ioni di litio di 18 Volt della ditta STORCH; accumulatori di altro tipo possono scoppiare. Utilizzare l'attrezzo solo in ambienti asciutti. Non esporre l'attrezzo ad acqua oppure pioggia.
-
Page 78: Panoramica Dell'apparecchio
Panoramica dell'apparecchio Spruzzatore con accumulatore Serbatoio delle sostanze (1 litro) Gancio di sospensione Valvola di decompressione / di alleggerimento Accesso riparazione - valvola di scarico Dispositivo di caricamento dell'accumulatore agli ioni di litio. Ugello con supporto per ugello (contiene 211, 411, 515) Inserto per il serbatoio delle sostanze (5 pezzi) Filtro ugello (*filettatura sinistrosa) Cinghietta da spalla... -
Page 79: Decompressione
Decompressione Posizione ugello Dopo aver concluso l'impiego dell'attrezzo nonché prima Prima di impostare la posizione degli ugelli dello spruzza- di procedere alla sua pulitura, al suo controllo, alla manu- tore, eseguire la decompressione. tenzione o al trasporto, eseguire il procedimento illustrato nella sezione dedicata alla Decompressione. -
Page 80: Caricare L'accumulatore
50 % e prima del suo primo impiego, esso va carica- settimana nel dispositivo di caricamento. to completamente. 1. Inserire l'accumulatore nel dispositivo di caricamento Vanno utilizzati esclusivamente accumulatori STORCH come illustrato (la spia si accende entro 5 secondi). originali. Spie di stato del dispositivo di caricamento... -
Page 81: Tubo Di Aspirazione
Tubo di aspirazione Il presente spruzzatore è dotato di due diversi tubi di aspirazione. Tubo di aspirazione standard Utilizzando lo spruzzatore per il soffitto, l'entrata del tubo per soffitto e pareti: di aspirazione dovrebbe essere rivolta sul lato posteriore nel caso di pareti, girare il tubo di aspirazione in avanti. del serbatoio della sostanza (il grilletto). -
Page 82: Messa In Funzione
Messa in funzione Utilizzare solo sostanze basate su acqua e sostanze solventi con un punto di infiammabilità superiore ai 38° C. Non uti- lizzare delle sostanze sul cui imballaggio vi è l'indicazione "INFIAMMABILE". Per ulteriori informazioni riguardanti le sostanze, rivolgersi al produttore o commerciante specializzato per avere la scheda di sicurezza inerente alla sostanza. - Page 83 5. Una volta pulito l'attrezzo, azionare il blocco grilletto e 6. Svitare il serbatoio delle sostanze. portare la valvola di decompressione / di alleggerimento nella posizione UP, per alleggerire la pressione. 7. Togliere il blocco grilletto, portare la valvola di decom- pressione / di alleggerimento nella posizione DOWN, tenere lo spruzzatore poco sopra il serbatoio delle sostan- ze e azionare il grilletto, per far fuoriuscire il liquido dalla...
-
Page 84: Applicare L'ugello E La Protezione Dell'ugello
Applicare la cinghietta da spalla 1. Applicare l'occhiello di metallo sulla parte posteriore 2. Fare passare il nastro attraverso il supporto anteriore dello spruzzatore. dello spruzzatore e attraverso il triangolo di metallo e fis- sarlo alla cinghietta. Applicare l'ugello e il supporto ugello con protezione Tabella applicazione Ugello invertibile 211, 411 Ugello invertibile 315, 515, 517... -
Page 85: Tecniche Di Spruzzo
3. Avvitare il supporto ugello con ugello sullo spruzzatore. L'ugello è fissato al supporto ugello. Esso non va rimosso, Serrare il dado con le mani fino a che sia avvitato comple- dato che ciò causerebbe dei danneggiamenti. tamente sullo spruzzatore. Tecnica di spruzzo Esercitate le tecniche di spruzzo ad es. -
Page 86: Eliminare L'intasamento Degli Ugelli
Eliminare l'intasamento degli ugelli 1. Per eliminare l'intasamento dall'ugello, azionare il bloc- 2. Girare la punta dell'ugello nella posizione di lavaggio co grilletto e portare la valvola di alleggerimento nella (punta dietro) posizione UP, per alleggerire la pressione. 3. Puntare lo spruzzatore verso un serbatoio vuoto, toglie- 4. -
Page 87: Pulire
Nell'area in cui viene utilizzato lo spruzzatore vi deve essere sempre area fresca a sufficienza. Lavorazione di materiali da rivestimento a base di solvente con la pistola Airless PowerCoat a batteria: Si prega di osservare le seguenti informazioni importanti per la pulizia dell‘apparecchio dopo la lavorazione di materiali da rivestimento a base di solventi: 1. - Page 88 7. Svuotare il contenitore nel rispetto dell'ambiente e ripetere il procedimento descritto da 1 a 7, fino a che fuo- riesce dell'acqua pulita o del solvente dallo spruzzatore. 8. Togliere il blocco grilletto, portare l'ugello nella posizi- 9. Portare la valvola di decompressione / di alleggeri- one di lavaggio e azionare il grilletto per ca.
-
Page 89: Pulitura Delle Parti Esterne Dello Spruzzatore
Pulitura delle parti esterne dello spruzzatore Servirsi di un panno morbido, inumidito con acqua o liquido detergente per rimuovere delle macchie di colore dall'alloggiamento dello spruzzatore. Ugelli: Gli ugelli vanno sostituiti ad intervalli regolari in base al logorio, cosa che dipende anche dalle caratteristiche delle sostanze impiegate. -
Page 90: Elenco Dei Pezzi Di Ricambio
Elenco pezzi di ricambio Pos. Numero Descrizione Pos. Numero Descrizione pezzi pezzi 69 75 21 Spruzzatore, ricambio (senza 69 75 26 Filtro ugello (Kit, 3 pezzi) ugello, accumulatore, tubo di 69 75 27 Tubo di aspirazione speciale con aspirazione e serbatoio sostanze) setaccio e guarnizioni circolari 69 75 20 Inserto contenitore, contenitore... -
Page 91: Kit Di Riparazione
Kit di riparazione Valvola di scarico AVVERTENZA: Prima di ogni intervento di riparazione che riguarda la pompa, va eseguito il procedimento di lavaggio dello spruzza- tore, si veda pagina 17. Smontaggio 1. Azionare il blocco grilletto e portare la valvola di alleg- 2. -
Page 92: Valvola Di Ammissione
Valvola di ammissione Smontaggio 1. Azionare il blocco grilletto e portare la valvola di alleg- 2. Rimuovere il serbatoio delle sostanze e tubo di aspira- gerimento nella posizione UP, per alleggerire la pressione. zione. 3. Ribaltare lo spruzzatore, allentare e rimuovere con una 4. -
Page 93: Rivelazione Di Guasti
Rivelazione di guasti AVVERTENZA: Prima di portare lo spruzzatore da un punto di servizio clienti autorizzato da STORCH, vanno controllati tutti i punti riportati nella tabella di rilevazione guasti. Problema... - Page 94 Problema Causa Soluzione Lo spruzzatore emette dei Lo spruzzatore è stato inclinato troppo e il Assicurare che il serbatoio sia pieno con rumori, ma azionando il gril- tubo di aspirazione ha perso il contatto con la sostanza da spruzzo. Non inclinare letto non fuoriesce alcuna la sostanza.
- Page 95 Diagnosi del risultato della lavorazione a spruzzo Problema Causa Soluzione Il risultato della lavorazione Il diffusore è stato utilizzato con una Assicurare l'utilizzo di sostanze idonee. a spruzzo manifesta delle sostanza non idonea. Si veda "Tabella di selezione" per ugelli strisce.
-
Page 96: Dati Tecnici
Tutti i diritti decadono se si aggiungono delle componenti estranei, in caso di impiego e immagazzinaggio non appropriato nonché in caso di palese non osservanza delle istruzioni di uso. Esecuzione di riparazioni Ogni intervento di riparazione va eseguito esclusivamente nei nostri stabilimenti o presso una service-station autoriz- zata STORCH. -
Page 97: Dichiarazione Di Conformità Ce
Dichiarazione di conformità CE Nome / indirizzo dell'espositore: STORCH Malerwerkzeuge & Profigeräte GmbH Platz der Republik 6-8 D - 42107 Wuppertal Con la presente la società dichiara che: L'UTENSILE MENZIONATO DI SEGUITO CORRISPONDE, TENENDO CONTO DELLA SUA PROGETTA- ZIONE E TIPOLOGIA NONCHE' CONSIDERATO COME MODELLO DA NOI COMMERCIALIZZATO, AI REQUISITI FONDAMENTALI IN TERMINI DI SICUREZZA E TUTELA DELLA SALUTE DELLE RELATIVE DIRETTIVE DELL'UNIONE EUROPEA. - Page 98 Thank you for your confidence in STORCH. You have chosen a quality product with this purchase. If you would like to suggest an improvement, or experience a problem with your product, please do not hesitate to contact us. Please speak to your area representative or in urgent cases you can contact us directly.
-
Page 99: Cautions
Cautions RISK OF FIRE AND EXPLOSION Flammable liquid solvent fumes in the work area may explode or ignite. Proceed as follows to reduce fire and explosion danger: The spray device creates sparks. Do not use flammable fluids or spray the device with these. Only use water-based materials or materials featuring a flash point over 38°C. - Page 100 DANGER DUE TO PENETRATION OF MATERIAL INTO SKIN (continue) An active or pressurized device may not be left unsupervised. If the device is not being used, switch it off and sepressurize the device to shut it down. Examine the parts for signals of damage. Replace all damaged parts. The system can produce up to 137 bar.
- Page 101 Incorrect operation or use may cause electrical shock, fire, and explosions. Only 18V lithium-ion batteries provided by STORCH may be charged; other batteries may burst. Only use the device in a dry environment. Do not expose the device to water or rain.
-
Page 102: Tool Overview
Tool overview Battery-powered spray gun Material hopper (1 Liter) Hanging hooks Ventilation/discharge valve Repair access for discharge valve Lithium-ion battery charger Nozzle and nozzle holder Insert for material hopper (5 pieces) (contains 211, 411, 515) Shoulder strap Nozzle filter (*counter-clockwise threading) Lithium-ion battery (2 pieces) Intake tube for rpaying ceilings and walls Unlock button for battery... -
Page 103: Pressure Relief
Depressurization Nozzle position After spray work is finished and prior to cleaning, che- Prior to setting the spray nozzle position, always depres- cking, maintenance, or transport of the device, carry out surize the device. all steps described in the 'depressurization' section. Tip in front Tip in rear (spray position) -
Page 104: Charging The Battery
1. Place the battery into the charging device as indicated (the light till glow within 5 seconds). Only original STORCH abtteries may be used. Charging device status lamps Display Description Glowing green Battery completely charged. -
Page 105: Inlet Pipe
Inlet pipe This spray device features two different intake pipes. Standard intake pipe When spraying ceilings, the intake tube's inlet should be for spraying ceilings and turned toward the rear of the material hopper (the trig- walls: when spraying walls, turn the intake pipe to the ger). -
Page 106: Initial Operation
Initial operation Only use water-based materials and solvent-based materials featuring a flash point over 38°C. Do not use materials that exhibit the warning "FLAMMABLE" on their packaging. For more information about the material, please ask the manufacturer concerning the corresponding material datasheet. Spraying certain materials may produce static electricity that could place the user at risk of electric shock. - Page 107 5. If the pistol has been rinsed, lock the trigger safety lock 6. Unscrew the material hopper. and place the ventilation/discharge valve in the upwards position (UP) to discharge the pressure. 7. Release the trigger safety lock, place the ventilation/ discharge valve into the downwards position, hold the spray device close above the material hopper, and then press the trigger to discharge the fluid from the pump.
-
Page 108: Attaching The Shoulder Strap
Attaching the shoulder strap 1. Place the metal eyelet on the rear side of the spray 2. Insert the velcro strap through the front mount on the device. spray device and through the metal triangle, then attach the strap. Attaching the nozzle and the nozzle holder with protective cap Table of uses Reversible nozzle 211, 411 Reversible nozzle 315, 515, 517... -
Page 109: Spraying Techniques
3. Screw the nozzle mount and nozzle onto the spray The nozzle is attached firmly on the nozzle mount. It may device. Tighten the nut manually until it is screwed onto not be removed, since this could cause damage. the spray device completely. Spray technique Practice spray technique on a piece of cardboard prior to coating the intended surface. -
Page 110: Clearing Nozzle Blockages
Clearing nozzle blockages 1. To free the nozzle of clogging, lock the trigger safe- 2. Turn the nozzle tip into the cleaning position (to ty lock and place the ventilation/discharge valve in the towards rear) upwards position to discharge the pressure. 3. -
Page 111: Cleaning
The spray area should always be supplied with sufficient fresh air. Processing of solvent-based coating materials with the battery powered airless PowerCoat spray gun. When cleaning the device after processing solvent-based coating materials, please note the following: 1. - Page 112 7. Empty the cup in line with environmental regulations and repeat the process from 1 - 7 until clean water or sol- vent is released. 8. Release the trigger safety lock, turn the nozzler to 9. After, switch the ventilation/discharge valve down- the cleaning position, and pull the trigger for approx.
-
Page 113: External Cleaning Of Spray Device
External cleaning of spray device Wipe paint off the spray device's housing with a soft, water or solvent-dampened cloth. Nozzles: The nozzles must be exchanged at regular intervals depending on wear and tear; this depends on the properties of the material used. -
Page 114: Replacement Parts List
Replacement parts list Pos. Ref. Description Pos. Ref. Description 69 75 21 Spray device, replacement (wit- 69 75 26 Nozzle filter (set, 3-piece pack) hout nozzle, battery, inlet pipe, 69 75 27 Special intake pipe with sieve and material hopper) and O-rings (for spraying floors) 69 75 20 Cup insert, replacement (10 pc.) -
Page 115: Discharge Valve
Repair kit Discharge valve NOTE: Prior to all pump repair work, carry out the rinse procedure for the spray device; see page 17. Disassembly 1. Activate the trigger safety lock and place the ventila- 2. Remove the battery. tion/discharge valve in the upwards position to discharge the pressure. -
Page 116: Intake Valve
Intake valve Disassembly 1. Activate the trigger safety lock and place the ventila- 2. Remove the material hopper and the intake pipe. tion/discharge valve in the upwards position to discharge the pressure. 3. Place the spray device on its head, loosen and remove 4. -
Page 117: Troubleshooting
The intake valve may NOT be tightened too much. This able to move freely up and down. may cause damage to the device. Troubleshooting NOTE: Prior to taking the device to a STORCH service technician, check all of the points indicated in the troubleshooting table. Problem Cause Solution The spray device doesn't The trigger safety lock is active. -
Page 118: Spray Pattern Diagnosis
Problem Cause Solution The spray device makes The spray device has been angled to Ensure that the container is filled with noise, but material does not severely and the intake pipe has lost material. Do not angle the hopper to come out when the trigger is contact with the material. - Page 119 Spray pattern diagnosis Problem Cause Solution The spray pattern exhibits The diffusor has been installed for an unsu- Ensure that a suitable material is being stripes. itable material. used. See "Selection table for rotating nozzles", page 36 The diffusor is partially clogged. Clean the diffusor for fine surfaces or replace it.
-
Page 120: Technical Specifications
Wear parts (nozzles, filters, seals) are not covered by such claims. Fitting third party parts, improper use and sto- rage, and obvious failure to observe the operating instructions will void your warranty. Repairs All repairs must be conducted on our premises or by an authorised STORCH service centre. -
Page 121: Ec Declaration Of Conformity
EC Declaration of Conformity Name / Address of issuer: STORCH Malerwerkzeuge & Profigeräte GmbH Platz der Republik 6 - 8 D - 42107 Wuppertal We herewith declare: THAT THE FOLLOWING MACHINE COMPLIES WITH THE APPROPRIATE BASIC SAFETY AND HEALTH REQUIREMENTS OF THE EC DIRECTIVE BASED ON ITS DESIGN AND TYPE, AS BROUGHT INTO CIR- CULATION BY US. - Page 122 Děkujeme Vám za důvěru ve firmu STORCH. S nákupem výrobku jste se rozhodli pro kvalitní produkt. Pokud přesto máte podněty na zlepšení nebo možná nějaký problém, velmi rádi o Vás uslyšíme. Promluvte si s příslušným externím spolupracovníkem naší firmy nebo se v naléhavých případech obracejte přímo na nás.
-
Page 123: Varovné Pokyny
Varovné pokyny NEBEZPEČÍ POŽÁRU A VÝBUCHU Zápalné výpary rozpouštědel mohou v pracovní oblasti explodovat nebo se vznítit. Tak zmenšíte nebezpečí požáru a výbuchu. Stříkací přístroj vytváří jiskry. Nestříkejte žádné zápalné kapaliny nebo s nimi přístroj nevyplachujte. Používejte pouze materiály s bodem vzplanutí více než 38° C nebo materiály na bázi vody. Oblast stříkání... - Page 124 NEBEZPEČÍ PRONIKNUTÍ MATERIÁLU DO POKOŽKY (dále) Zapnutý přístroj nebo přístroj pod tlakem nesmí být ponechán bez dohledu. Pokud se přístroj nepoužívá, vypněte ho a proveďte tlakové odlehčení k vypnutí přístroje. Zkontrolujte díly ohledně známky poškození. Vyměňte všechny poškozené díly. Tento systém může vytvořit tlak až 137 barů. Nepřenášejte přístroj s prstem na spoušti, Před uvedením přístroje do provozu zkontrolujte, zda jsou všechny přípoje pevné.
- Page 125 Chybná obsluha nebo chybné používání nabíjecího zařízení může vést k elektrickému šoku, požáru a výbu- chu. Nabíjet se smějí pouze 18-ti voltové lithium ionové akumulátory od firmy STORCH; jiné akumulátory mohou explodovat. Přístroj používejte pouze v suchém prostředí. Přístroj nevystavujte vodě ani dešti.
-
Page 126: Přehled Přístroje
Přehled přístroje Akumulátorová ruční pistole Nádoba na materiál (1 litr) Závěsný hák Odvzdušňovací / odlehčovací ventil Přístup pro opravy - vypouštěcí ventil Nabíjecí zařízení lithium ionových akumulátorů Tryska s držákem trysky Vložka do nádoby na materiál (5 kusů) (obsahuje 211, 411, 515) Ramenní... -
Page 127: Tlakové Odlehčení
Tlakové odlehčení Poloha trysek Po ukončení stříkání a také před čištěním, kontrolou, Před nastavováním polohy stříkacích trysek musí být údržbou nebo přepravováním přístroje proveďte kroky v vždy provedeno tlakové odlehčení. oddílu tlakové odlehčení. Špička vpředu Špička vzadu (poloha ke stříkání) (poloha k čištění) Zablokujte blokování... -
Page 128: Zobrazován Status Stříkacího Přístroje
1. Vsuňte akumulátor do nabíjecího zařízení jak je zobra- zeno Smějí být používány výhradně pouze originální aku- (světlo se rozsvítí během 5 sekund). mulátory firmy STORCH. Nabíjecí zařízení - světla zobrazujcí status Zobrazení Popis Svítí zeleně Akumulátor je úplně nabitý. Použijte akumulátor nebo ho nechte v nabíjecím zařízení. -
Page 129: Sací Trubka
Sací trubka Tento stříkací přístroj se dodává vybavený dvěma sacími tryskami. Standardní sací trubka Při stříkání stropů by měl být přívod sací trubky obrácen k ke stříkání stropů a stěn: Při zadní straně nádoby na materiál (ke spoušti). stříkání stěn otočte sací trubku dopředu. Speciální... -
Page 130: Uvedení Do Provozu
Uvedení do provozu Používejte pouze materiály na bázi vody a materiály na bázi rozpouštědel s bodem vzplanutí více než 38° C. Nepoužívejte žádné materiály, na jejichž obalu se nachází upozornění „ZÁPALNÝ“. Ohledně dalších informací k materiálu si vyžádejte u výrobce nebo specializovaného obchodníka bezpečnostní list k materiálu. - Page 131 5. Když je přístroj vypláchnutý, zablokujte blokování 6. Odšroubujte nádobu na materiál. spouště a dejte odvzdušňovací / odlehčovací ventil do polohy nahoru, abyste odlehčili tlak. 7. Uvolněte blokování spouště, dejte odvzdušňovací / odlehčovací ventil do polohy dolů, držte stříkací přístroj těsně...
-
Page 132: Namontování Trysky A Krytky K Ochraně Trysky
Namontování ramenního popruhu 1. Namontujte kovová očka na zadní straně stříkacího 2. Veďte upínací pásku skrz přední držák stříkacího přístroje. přístroje a skrz kovový trojúhelník a připevněte ji na popruhu. Namontování trysky a držáku trysky s ochrannou krytkou Tabulka k výběru trysek Otočná... -
Page 133: Technika Stříkání
3. Našroubujte držák trysky s tryskou na stříkací přístroj. Tryska je pevně připevněná na držák trysky. Nesmí být Matici pevně dotáhněte rukou, až je úplně našroubovaná odstraněna, protože to vede k poškození. na stříkací přístroj. Technika stříkání Vyzkoušejte si techniky stříkání např. na kartónu, dříve než budete stříkat na originální plochu. 25 cm silně... -
Page 134: Odstranění Ucpání Trysky
Odstranění ucpání trysky 1. Abyste trysku uvolnili od ucpání, zablokujte blokování 2. Otočte špičku trysky do polohy k čištění (špička doza- spouště a zatáhněte odlehčovací ventil do polohy nahoru, abyste odlehčili tlak. 3. Nasměrujte stříkací přístroj do prázdné nádoby, 4. Zablokujte blokování spouště. Dejte odvzdušňovací / odblokujte blokování... -
Page 135: Čištění
Oblast stříkání musí být vždy dobře větraná. Oblast stříkání by měla být vždy zásobována dostatečným množstvím čerstvého vzduchu. Zpracování nátěrových látek na bázi rozpouštědel s Akku-Airless Ruční pistolí PowerCoat. Při čištění přístroje po zpracování nátěrových látek na bázi rozpouštědel vezměte prosím v úvahu: 1. - Page 136 7. Nádobu vyprázdněte v souladu s ochranou životního prostředí a opakujte postup 1 - 7 tak dlouho, až vytéká čistá voda nebo rozpouštědlo. 8. Uvolněte blokování spouště, otočte trysku do polo- 9. Přepněte odvzdušňovací / odlehčovací ventil dolů do hy k čištění a stiskněte blokování spouště po dobu cca 5 stříkací...
-
Page 137: Čištění Stříkacího Přístroje Z Vnější Strany
Čištění stříkacího přístroje z vnější strany Otřete barvu z krytu stříkacího přístroje měkkým hadříkem, navlhčeným vodou nebo vyplachovací kapalinou. Trysky: Trysky musí být vyměněny v určitých intervalech podle opotřebení, to závisí na vlastnostech materiálu. Nestříkejte s opotřebovanou tryskou. Viz hledání chyb od strany 21. Skladování... -
Page 138: Seznam Náhradních Dílů
Seznam náhradních dílů Pol. Číslo Popis Pol. Číslo Popis součástky součástky 69 75 21 Stříkací přístroj, náhradní (bez 69 75 26 Filtr trysky (sada, balení po 3) trysky, akumulátoru, sací trubky 69 75 27 Speciální sací trubka se sítkem a a nádoby na materiál) O-kroužky (ke stříkání... -
Page 139: Vypouštěcí Ventil
Sada na opravy Vypouštěcí ventil UPOZORNĚNÍ: Před prováděním prací na opravě čerpadla musí být proveden postup k vyplachování stříkacího přístroje, viz strana 17. Demontáž 1 Zablokujte blokování spouště a dejte odlehčovací ventil 2. Vyjměte akumulátor. do polohy nahoru, abyste odlehčili tlak. 3. -
Page 140: Přívodní Ventil
Přívodní ventil Demontáž 1 Zablokujte blokování spouště a dejte odlehčovací ventil 2. Odstraňte nádobu na materiál a sací trubku. do polohy nahoru, abyste odlehčili tlak. 3. Otočte stříkací přístroj na hlavu, nástrčným klíčem 4. Uvolněte přívodní kryt od přebytečného materiálu tak uvolněte a odstraňte kryt přívodního ventilu, přívodní... -
Page 141: Hledání Chyb
To by mohlo přístroj poškodit. Hledání chyb UPOZORNĚNÍ: Než bude stříkací přístroj dán do autorizovaného servisu firmy STORCH, měly by být zkontrolovány veškeré body, kte- ré jsou uvedeny v tabulce hledání chyb. Problém Příčina Řešení... - Page 142 Problém Příčina Řešení Stříkací přístroj vydává zvuk, Stříkací přístroj byl příliš silně nakloněn, a Dbejte na to, aby nádoba byla ale při stisknutí spouště nevy- sací trubka ztratila kontakt s materiálem. naplněna materiálem. Nádobu příliš téká žádný materiál. nenaklánějte. Odvzdušněte čerpadlo. Viz „Doplňování...
- Page 143 Diagnóza vzhledu stříkání Problém Příčina Řešení Vzhled stříkání má pruhy. Difuzér byl nainstalován při použití nevhod- Dbejte na to, abyste používali vhodný ného materiálu. materiál. Viz „Tabulka k výběru trysek" pro otočné trysky, strana 60 Difuzér je částečně ucpaný. Vyčistěte difuzér pro jemné povrchy nebo ho vyměňte.
-
Page 144: Technické Údaje
účelem. Díly podléhající opotřebení nespadají do takovýchto nároků. Veškeré nároky zanikají zamontováním dílů cizího původu, při nepřiměřeném zacházení a skladování a také při zřejmém nedodržování provozního návodu. Provádění oprav Veškeré opravy smějí být prováděny výhradně naším závodem nebo servisními stanicemi autorizovanými firmou STORCH. -
Page 145: Prohlášení O Shodě Es
Prohlášení o shodě ES Název / adresa výstavce: STORCH Malerwerkzeuge & Profigeräte GmbH Platz der Republik 6-8 D - 42107 Wuppertal Tímto prohlašujeme: ŽE NÁSLEDNĚ UVEDENÝ PŘÍSTROJ NA ZÁKLADĚ SVÉ KONCIPACE A DRUHU KONSTRUKCE A TAKÉ V PROVEDENÍ NÁMI UVEDENÉM DO PROVOZU ODPOVÍDÁ PŘÍSLUŠNÝM ZÁKLADNÍM BEZPEČNOSTNÍM POŽADAVKŮM A POŽADAVKŮM K OCHRANĚ... - Page 148 Art.-Nr. Bezeichnung N. art. Denominazione 69 75 00 PowerCoat 69 75 00 PowerCoat 69 75 08 Ersatz-Akku 69 75 08 Accumulatore di ricambio 69 75 15 Materialbehälter 1,5 l 69 75 15 Serbatoio di materiale 1,5 l 69 75 22 Bechereinsatz Düsen:...