Table des Matières
Publicité
Les langues disponibles
Les langues disponibles
Liens rapides
Publicité
Table des Matières

Manuels Connexes pour Malossi VESPower


Sommaire des Matières pour Malossi VESPower
- Page 1 VESPower...
-
Page 3: Istruzioni Di Montaggio
• Lavare accuratamente tutto il • Pulire accuratamente tutta la veicolo e in modo particolare la zona interna al carter motore Sul piatto statore Malossi sono zona del motore su cui si andrà dal lato dell’accensione presenti 3 tacche: ad operare. - Page 4 (Fig. 4) (Fig. 3, part. • Collegare il cavo giallo del • Allacciare il faston femmina del cablaggio Malossi al cavo giallo cablaggio Malossi al cavo verde del volano (lato dx). dello spegnimento del cablaggi • Smontare il regolatore originale originale (Fig.
- Page 5 • Posizionare il regolatore Art. 5516953 - 5516956 • Collegare i 2 cavi VIOLA Malossi, fissando l’occhiello del dell’impianto originale dotati Versioni originali CON batteria cablaggio originale e l’occhiello di faston femmina ai faston e con PARKING con luci accese...
- Page 6 Il cavo giallo del volano può (Fig 6, part. 16). essere utilizzato per poter • Allacciare il faston femmina del essere allacciato al kit ricarica cablaggio Malossi al cavo verde batteria (Art. 5515703) fornito dello spegnimento dei cablaggi separatamente. originale (Fig 6, part.
-
Page 7: Collegamenti Elettrici
• Montare la ventola cablaggio (Fig. 8, part. 28). (Fig. 7, part. 19) inserendo • Allacciare i cavi provenienti l’oring (Fig. 7, part. 20) dal telaio con quelli del nell’apposita cava. cablaggio Malossi rispettando... -
Page 8: Caratteristiche Tecniche
(Fig. 12) Malossi ai faston femmina secondarie booster di Sul piatto statore Malossi sono del volano, rispettando raff reddamento avanzate presenti 3 tacche : scrupolosamente i colori (profilo ventola, distribuzione (Fig. - Page 9 Garanzia e suggerimenti che vorrà Consulta le condizioni relative eventualmente farci pervenire. alla garanzia sul nostro sito La Malossi si commiata e coglie malossistore.com. l’occasione per complimentarsi Prodotti riservati ulteriormente con Lei ed esclusivamente alle augurarle un Buon Divertimento.
- Page 10 (Fig. 1, part. 3) • Remove the original stator. On the Malossi base plate you’ll Assembly instructions • Thoroughly clean and wipe the find three notches: • Thoroughly wash the whole...
- Page 11 (Fig. 4) coming out of the transducer • Connect the yellow cable to the Malossi wiring of the Malossi wiring to the (Fig. 3, part. flywheel yellow cable (right • Connect the female faston of side). the Malossi wiring to the green •...
- Page 12 • Place the Malossi regulator by Art. 5516953 - 5516956 female faston to the male fixing the eyelet of the original fastons of the yellow and Original models WITH battery wiring and the small eyelet of green cables, previously and PARKING with lights on...
- Page 13 Flywheel, starter ring gear cables. • Connect the female faston of and fan assembly the Malossi wiring to the green The flywheel yellow cable can be Assemble the above elements turn off cable of the original connected to the battery charger...
-
Page 14: Electrical Connections
(Fig. 10). Ignition timing (Fig. 12) Electrical connections • Connect the remaining cables On the Malossi base plate you’ll • Mount the bracket supplied with male faston of the Malossi find three notches : in the kit using the provided wiring to the flywheel female silent-blocks. - Page 15 As optional you can get the send us. So goodbye from us all additional flywheel masses, at Malossi, and please accept our which allow to adapt the ignition compliments. Have Fun. GOOD to the own vehicle according to LUCK and …...
- Page 16 the updating matters contained therein. Warranty Look up warranty terms in our website malossistore.com. These products are reserved solely for races in locations reserved for those purposes and in accordance with the regulations issued by the competent authorities for sports events.
- Page 17 (éclairage, recharge, batterie, les encoches de référence etc.). (Fig. 1, part. 3) • Démontez le stator d’origine. Sur le plateau stator Malossi il y Notice de montage • Nettoyez soigneusement toute a 3 encoches: • Lavez soigneusement tout le la partie interne du carter véhicule et en particulier la...
-
Page 18: Montage Kit Câblage Batterie
Dans le cas Art. 5516953 - 5516956 • Raccordez les câbles venant du contraire, éliminez les causes. cadre à ceux du volant Malossi Modèles d’origine SANS en respectant le schéma PARKING • Montez le ventilateur en suivant: employant les 4 vis Allen et les •... - Page 19 • Positionnez le régulateur Art. 5516953 - 5516956 • Connectez les deux câbles Malossi, en fixant l’œillet du VIOLET avec les faston femelles Modèles d’origine AVEC batterie cabale d’origine et le petit des câbles d’origine aux faston et avec PARKING avec phares œillet du câble noir sous la vis...
-
Page 20: Montage Kit Câblage Batterie - Côté Droit
(Fig. 7, part. 26) dans le volant • Raccordez les câbles venant du Montage kit câblage (Fig. 7, part. 23) comme cadre à ceux du volant Malossi batterie - Côté droit (Fig. 6) montré. en respectant le schéma • Montez le transducteur sur suivant: •... - Page 21 • Connectez les restants câbles • Montez l’étrier fourni dans le avec faston mâle du câblage kit en utilisant les silentblock Malossi aux faston femelle (inclus dans le kit). du volant, en respectant • Montez transducteur et soigneusement les couleurs régulateur sur l’étrier, comme...
-
Page 22: Pour Tous Les Véhicules Mise En Phase De L'allumage (Fig. 12)
érents: l’allumage (Fig. 12) • Ventilateur en matériau • Art. 1715715 (Pour TOUS les Sur le plateau stator Malossi il y a plastique rouge avec ailettes VESPower SAUF Art. 5516956 3 encoches. secondaires booster de et Art. 5517175) refroidissement avancées... -
Page 23: Garantie
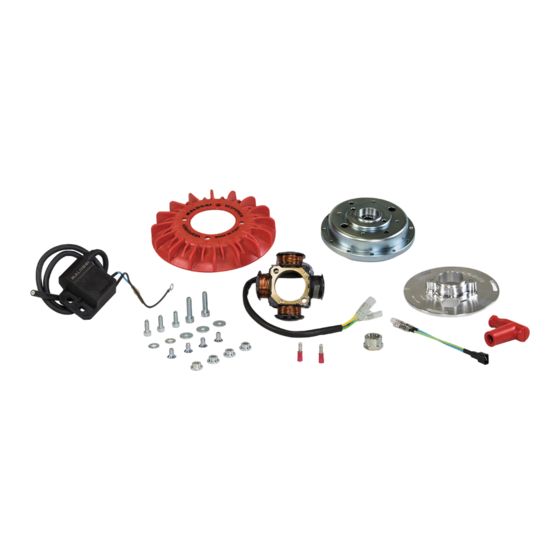
Bon Divertissement. conformément aux dispositions BONNE CHANCE et…à la des autorités sportives prochaine! compétentes. Nous déclinons Les descriptions reportées dans toute responsabilité en cas cette publication n’engagent d’utilisation abusive. à rien. Malossi se réserve le droit d’apporter toutes les... - Page 24 • Trasduttore • Ventola • Volano • Flangia supporto • Transducer • Fan • Flywheel statore • Transducteur • Ventilateur • Volant • Stator support flange • Regolatore • Bride de support • Regulator stator • Régulateur • Cablaggi • Staff a •...
- Page 25 Fig. 1...
- Page 26 Fig. 2...
- Page 27 Fig. 3...
- Page 28 Fig. 4...
- Page 29 Fig. 5...
- Page 30 Fig. 6...
- Page 31 Fig. 7...
- Page 32 Fig. 8 Fig. 9...
- Page 33 Fig. 10 Fig. 11...
- Page 34 Fig. 12...
- Page 35 Schema elettrico / Electrical diagram / Schéma électrique VESPA PX 125 - 150 - 200 5516953 5516956 5517175 5518177 Modulo CDI / CDI module / Module CDI STOP Generatore HV / HV generator / Générateur HV...
- Page 36 Schema elettrico / Electrical diagram / Schéma électrique 5515703 LIGHTS LIGHTS...
- Page 37 Schema elettrico / Electrical diagram / Schéma électrique VESPA GL 150 5518177 LIGHTS STOP LIGHTS...
- Page 38 VESPOWER Accensione Ignition Allumage Our Ignitions - Controllers Univers 04/2021 - 7318177...