Table des Matières
Publicité
Liens rapides
Publicité
Table des Matières
Dépannage

Manuels Connexes pour Miller ICE-40C


Sommaire des Matières pour Miller ICE-40C
- Page 1 OM-1593 176877U 2018-08 Processes Air Plasma Cutting and Gouging Description Plasma Cutting Torch ICE Torches ICE-40C ICE-50C ICE-55C ICE-80CX, ICE-80T, ICE-80TM ICE-100T, ICE-100TM File: Plasma Cutters For product information, Owner’s Manual translations, and more, visit www.MillerWelds.com...
- Page 2 We know you don’t have time to do it any other way. That’s why when Niels Miller first started building arc welders in 1929, he made sure his products offered long-lasting value and superior quality.
-
Page 3: Table Des Matières
TABLE OF CONTENTS SECTION 1 − SAFETY PRECAUTIONS - READ BEFORE USING ....... . . 1-1. -
Page 5: Section 1 − Safety Precautions - Read Before Using
SECTION 1 − SAFETY PRECAUTIONS - READ BEFORE USING pom_2018−01 Protect yourself and others from injury — read, follow, and save these important safety precautions and operating instructions. 1-1. Symbol Usage DANGER! − Indicates a hazardous situation which, if Indicates special instructions. not avoided, will result in death or serious injury. - Page 6 FUMES AND GASES can be hazardous ELECTRIC SHOCK can kill. Cutting produces fumes and gases. Breathing SIGNIFICANT DC VOLTAGE exists in these fumes and gases can be hazardous to inverter power sources AFTER the re- your health. moval of input power. Keep your head out of the fumes.
-
Page 7: Additional Symbols For Installation, Operation, And Maintenance
1-3. Additional Symbols For Installation, Operation, And Maintenance FALLING EQUIPMENT can injure. HOT PARTS can burn. D Use lifting eye to lift unit only, NOT running D Do not touch hot parts bare handed. gear, gas cylinders, or any other accessories. D Allow cooling period before working on D Use correct procedures and equipment of ade- equipment. -
Page 8: California Proposition 65 Warnings
1-4. California Proposition 65 Warnings WARNING: This product can expose you to chemicals in- cluding lead, which are known to the state of California to cause cancer and birth defects or other reproductive harm. For more information, go to www.P65Warnings.ca.gov . 1-5. -
Page 9: Section 2 − Consignes De Sécurité − Lire Avant Utilisation
SECTION 2 − CONSIGNES DE SÉCURITÉ − LIRE AVANT UTILISATION pom_2018−01_fre Pour écarter les risques de blessure pour vous−même et pour autrui — lire, appliquer et ranger en lieu sûr ces consignes relatives aux précautions de sécurité et au mode opératoire. 2-1. - Page 10 D Ne touchez pas aux pièces électriques sous tension. Risque de blessure en cas D Portez des gants isolants et des vêtements de protection secs et D’EXPLOSION DES PIÈCES. sans trous. D Mise sous tension, toute pièce défectueuse D Isolez−vous de la pièce à couper et du sol en utilisant des housses des sources d’alimentation de l’inverseur peut ou des tapis assez grands afin d’éviter tout contact physique avec exploser ou faire exploser d’autres pièces.
- Page 11 corps comporte des vêtements sans huile comme par ex. des LES FUMÉES ET LES GAZ peuvent gants de cuir, une chemise solide, des pantalons sans revers, des être dangereux. chaussures hautes et une casquette. Le coupage produit des vapeurs et des gaz. D Ne pointez pas le chalumeau en direction de votre corps ni de la Respirer ces vapeurs et ces gaz peut être pièce à...
-
Page 12: Dangers Supplémentaires En Relation Avec L'installation, Le Fonctionnement Et La Maintenance
2-3. Dangers supplémentaires en relation avec l’installation, le fonctionnement et la maintenance PIÈCES CHAUDES peuvent Danger D’EXPLOSION provoquer des brûlures. D’HYDROGÈNE. D Ne pas toucher des parties chaudes à mains D Lors du coupage d’aluminium sous l’eau ou avec de l’eau touchant le dessous de l’alumi- nues. -
Page 13: Proposition Californienne 65 Avertissements
D Demander seulement à des personnes qualifiées familiarisées LE COUPAGE Ã L’ARC peut causer avec des équipements électroniques de faire fonctionner des interférence. l’installation. D L’utilisateur est tenu de faire corriger rapidement par un électricien D L’énergie électromagnétique peut gêner le qualifié... -
Page 14: Section 3 − Specifications
SECTION 3 − SPECIFICATIONS 3-1. Specifications For Air-Cooled Torches For Plasma Arc Cutting (PAC) Torch Model Rated Output Cable Length Air Flow Max. Cutting Capacity (Air Or Nitrogen (Mild Steel) Plasma Gas) 40 A 40 A, 50% duty cycle 25 ft (7.6 m) 6 CFM (170 L/min) 1/2 in. -
Page 15: Section 4 − Installation
SECTION 4 − INSTALLATION 4-1. Installing 40 Ampere Torch And Work Cable Tools Needed: 5/16, 3/8 in 803 386 / 803 385 If torch or work cable needs to be removed back of strain relief. Strain Relief or replaced, proceed as follows: Remove nut, located inside of unit, from Slide torch cable, connector, and plugs back of strain relief. -
Page 16: Installing 50 Ampere, 55 Ampere Or 80 Ampere Torch And Using Trigger Safety Lock
4-2. Installing 50 Ampere, 55 Ampere or 80 Ampere Torch And Using Trigger Safety Lock The 50 ampere torch is shown in the illustrations below. The procedure for the 55 ampere and 80 ampere torches is iden- tical. The 55 ampere torch can be used on a 50 ampere model power source. -
Page 17: Installing 80 Ampere Or 100 Ampere T/Tm Torch
4-3. Installing 80 Ampere Or 100 Ampere T/TM Torch Turn off power source and disconnect input power. Torch Connector Quick Connect Collar Nipple Receptacle Securing Pin To connect torch: Push torch connector onto receptacle and quick connect until collar secures nipple. Rotate securing lock connector to unit. -
Page 18: Section 5 − Operation
SECTION 5 − OPERATION 5-1. Sequence Of Operation NOTICE − Having pilot arc turn On and Off repeatedly, Inspect shield cup, tip, and electrode for wear be- such as during the cutting of chain fence, will shorten tip, fore cutting or whenever cutting speed has been electrode and torch life. -
Page 19: Section 6 − Maintenance And Troubleshooting
SECTION 6 − MAINTENANCE AND TROUBLESHOOTING 6-1. Routine Maintenance Turn Off power source 25 ampere torch is shown. Mainte- and disconnect input nance schedule for 50 and 80 ampere power plug before torches is the same. maintaining. n = Check Z = Change ~ = Clean l = Replace... - Page 20 6-3. Checking/Replacing Retaining Cup, Tip, And Electrode For 40, 50, And 55 Ampere Torches Inspect shield cup, tip, and electrode for wear before cutting or whenever cutting speed has been significantly reduced. Do not operate torch without a tip or electrode in place. Be sure to use genuine replacement parts. NOTICE −...
-
Page 21: Checking/Replacing Retaining Cup, Tip, And Electrode For 80 Ampere And 100 Ampere Torch
6-4. Checking/Replacing Retaining Cup, Tip, And Electrode For 80 Ampere And 100 Ampere Torch Inspect shield cup, tip, and electrode for wear before cutting or whenever cutting speed has been significantly reduced. Do not operate torch with- out a tip or electrode in place. Be sure to use genuine replacement parts. NOTICE −... -
Page 22: Troubleshooting
6-5. Troubleshooting Trouble Remedy Power source Cup trouble light On; no Tighten cup onto torch and reset Power (see Section 6-2). cutting output. Check torch connections on power source. See power source Owner’s Manual. Sparks come out top of cut, or cut is not Torch travel speed too fast;... -
Page 23: Section 7 − Parts List
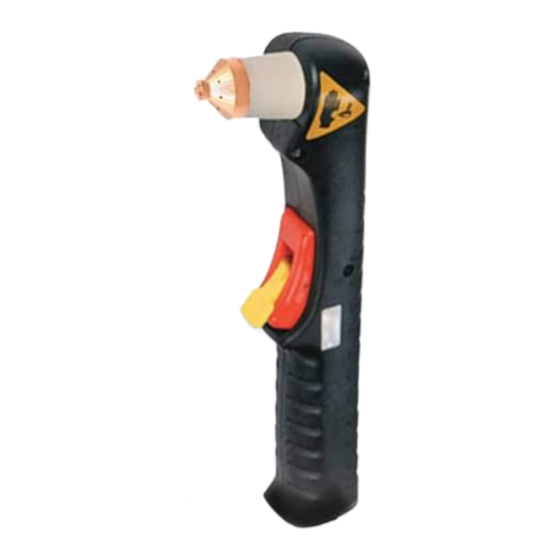
192050 192203 204332 192047 NOTE: Gouging Set air pressure to 75 PSI for cutting or 55 PSI for gouging. For extended tip use, set Amperage control to 35. Ref. 207686-A Figure 7-2. Consumable Parts For ICE-40C OM-1593 Page 19... - Page 24 See Figure 7-4 for additional consumable parts. Figure 7-3. Torch, ICE-50C Item Dia. Part Mkgs. Description Quantity Figure 7-3. Torch, ICE-50C ... . . 183427 Handle Assy, Complete ..........
- Page 25 See Figure 7-6 for additional consumable parts. Figure 7-5. Torch, ICE-55C Item Dia. Part Mkgs. Description Quantity Figure 7-5. Torch, ICE-55C ... . . 183427 Handle Assy, Complete ..........
- Page 26 See Figure 7-8 for additional consumable parts. Figure 7-7. Torch, ICE-80CX Item Dia. Part Mkgs. Description Quantity Figure 7-7. Torch, ICE-80CX ... . . 215594 Handle W/Screws ........... .
- Page 27 Standard Cutting Retaining Electrode Swirl Ring O-Ring Drag Shield 212 730 212 733 212 725 212 724 212 734 212 735 Shield Apply silicone grease (169 231) 212 732 (Machine before installing. Cutting) ICE-80CX Retaining Drag Shield CONSUMABLES 212 730 212 733 212 726 CAUTION...
- Page 28 See Figure 7-11 for additional consumable parts. 804 035-A Figure 7-9. Torch, ICE-80T Item Dia. Part Mkgs. Description Quantity Figure 7-9. Torch, ICE-80T ... . . 215594 Handle W/Screws ........... .
- Page 29 See Figure 7-11 for additional consumable parts. 804 036-A Figure 7-10. Torch, ICE-80TM Item Dia. Part Mkgs. Description Quantity Figure 7-10. Torch, ICE-80TM ... . . 215607 Sleeve, Torch Position .
- Page 30 Standard Cutting Retaining Drag Shield Electrode Swirl Ring O-Ring 212 730 212 733 212 726 212 724 212 734 212 735 Shield Apply silicone grease (169 231) 212 732 (Machine before installing. Cutting) ICE-80T Retaining Drag Shield CONSUMABLES 212 730 212 733 212 725 CAUTION...
- Page 31 See Figure 7-13 for additional consumable parts. 804 035-A Figure 7-12. Torch, ICE-100T Item Dia. Part Mkgs. Description Quantity Figure 7-12. Torch, ICE-100T ... . . 215594 Handle W/Screws ........... .
- Page 32 CAUTION FAILURE TO RE- PLACE WORN TIP OR ELECTRODE Drag Shield Retaining Cap Electrode Swirl Ring WILL RUIN TORCH AND VOID WARRANTY. Turn off power before checking torch parts. Check before each 212 730 212 733 212 725 use and hourly during operation.
- Page 33 See Figure 7-15 for additional consumable parts. 804 036-A Figure 7-14. Torch, ICE-100TM Item Dia. Part Mkgs. Description Quantity Figure 7-14. Torch, ICE-100TM ... . . 215607 Sleeve, Torch Position .
- Page 34 CAUTION Shield Sense Tab* Retaining Cap Electrode Swirl Ring FAILURE TO RE- PLACE WORN TIP OR ELECTRODE WILL RUIN TORCH AND VOID 212732 212733 212725 WARRANTY. Turn off power before 226763 checking torch parts. Check before each use and hourly during operation.
- Page 35 Effective January 1, 2018 (Equipment with a serial number preface of MJ or newer) This limited warranty supersedes all previous Miller warranties and is exclusive with no other guarantees or warranties expressed or implied. Warranty Questions? LIMITED WARRANTY − Subject to the terms and conditions below, 6 Months —...
-
Page 36: For Service
Contact the Delivering Carrier to: File a claim for loss or damage during shipment. For assistance in filing or settling claims, contact your distributor and/or equipment manufacturer’s Transportation Department. © ORIGINAL INSTRUCTIONS − PRINTED IN USA 2018 Miller Electric Mfg. LLC 2018−01...