Publicité
Liens rapides
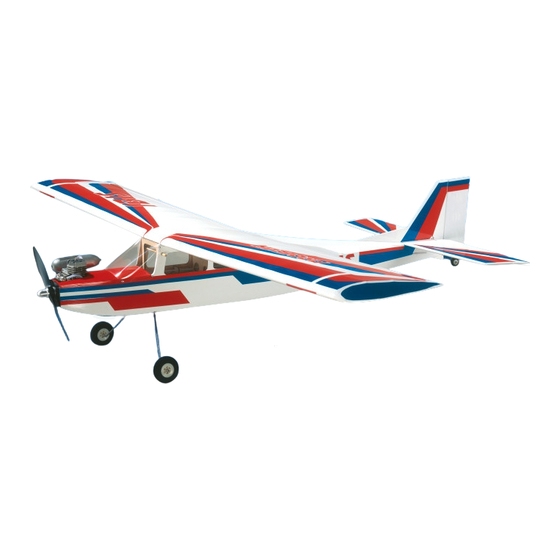
IBIS 46
T0403
INSTRUCTION MANUAL • GEBRUIKSAANWIJZING • ANLEITUNG • INSTRUCTIONS DE MONTAGE
2
45,9 dm
WARNING !
This R/C kit and the model you
will build is not a toy.
LET OP !
Deze bouwdoos van een
radiobestuurd vliegtuig is geen
speelgoed.
2050 g.
ACHTUNG !
Ein Dieser Bausatz
ferngesteuertes Modell
ist kein Spielzeug.
ATTENTION !
Ce planeur R/C à assembler n'est
pas un jouet.
Publicité

Manuels Connexes pour protech IBIS 46


Sommaire des Matières pour protech IBIS 46
- Page 1 IBIS 46 T0403 INSTRUCTION MANUAL • GEBRUIKSAANWIJZING • ANLEITUNG • INSTRUCTIONS DE MONTAGE 45,9 dm WARNING ! This R/C kit and the model you will build is not a toy. LET OP ! Deze bouwdoos van een radiobestuurd vliegtuig is geen speelgoed.
- Page 2 Specifi cations / Specifi caties Technische Daten / Spécifi cations Lengte: 1200 mm Length: 1200 mm Länge: 1200 mm Longueur: 1200 mm Spanwijdte: 1700 mm Wing span: 1700 mm Spannweite: 1700 mm Envergure: 1700 mm Vleugelopp.: 45,9 dm Wing area: 45,9 dm Tragfl...
- Page 3 Tools & items / Gereedschap & benodigdheden Werkzeuge und alle Notwendigkeiten / Outils et équipements MICRO RECEIVER 7-CH FM 4X STANDARD SERVO .46 SIZE ENGINE PROTECH std servo #B305 PROTECH #M1046 14gr Weight: SX-46 ABC BB ENGINE 2 ball bearings...
- Page 4 Important Safety Notes. Be sure to read right through the instructions covering assembly and operation of your model before you at tempt to operate it for the fi rst time. You are the only person who is responsible for the safe operation of your radio-con trol led model. Young people should only be permitted to build and fl y these mod els under the instruction and su per vi sion of an adult who is aware of the hazards involved in this activity.
- Page 5 Wichtige Sicherheitshinweise Vor dem Versuch der ersten Inbetriebnahme muß die gesamte Betriebs- und Montageanleitung sorgfältig gelesen werden. Sie allein sind verantwortlich für den sicheren Betrieb Ihres RC-Flugmodells. Bei Jugendlichen muß der Bau und Betrieb von einem Erwachsenen, der mit den Gegebenheiten und möglichen Gefahren eines RC-Flugmodells vertraut ist, verantwortlich überwacht werden.
- Page 6 Installing the ailerons / Montage van de rolroeren Montierung des Querrudern / Montage des ailerons Fig. 1 Fig. 2 Fig. 3 Fig. 5 Fig. 6 Insert the ailerons in the wing. Plaats de rolroeren in de vleugel Schieben Sie der Querruder in Inserez l'aileron dans le panneau Put a little bit of cyanoacrylate on en doe een beetje cyano lijm op...
- Page 7 Assembling the wings / Samenstellen van de vleugel Zusammenstellen des Flugelfl ächen / Assemblage des ailes Fig. 4 Fig. 5 Fig. 6 Fig. 22 Fig. 21 Fig. 7 Fig. 22 Apply wood glue into the holes of Fig. 21 Doe een beetje houtlijm in de ga- Bringen Sie ein wenig Holz-Klebe- Appliquez de la colle à...
- Page 8 Placing the aileron servo / Plaatsen van de rolroerservo Monteren des Querruderservo / Montage de servo d'ailerons Fig. 8 Fig. 9 Fig. 10 Fig. 22 Fig. 21 Fig. 11 Fig. 12 Fig. 22 Fig. 21 Screw the links onto the pushrod, Schroef de kwiklinks op de Konnektieren Sie den Gabelkopf Vissez les chapes sur les com-...
- Page 9 Mounting the stabiliser / Monteren van het hoogteroer / Montierung von Höhenleitwerk / Montage du stabilisateur Fig. 13 Fig. 14 Fig. 15 Fig. 26 Fig. 28 Fig. 18 Fig. 17 Fig. 16 Fig. 27 Fig. 30 Fig. 41 Fig. 19 Fig.
- Page 10 Installing the vertical fi n / Montage van het richtingsroer Montierung des Seitenruders / Montage de la dérive Fig. 23 Fig. 21 Fig. 22 Fig. 34 Fig. 35 Fig. 36 Fig. 24 Fig. 37 Fig. 38 Fig. 39 Fig. 26 90°...
- Page 11 Installing the control horns / Montage van de roerhoornen Montierung von die Hörner / Installation des guignols Fig. 27 Fig. 28 Fig. 29 Fig. 32 Fig. 30 Fig. 31 Fig. 33 Fig. 34 Fig. 35 Connect the metal pushrod to the Draai de stuurstang in het plastic Konnektieren Sie den Gabelkopf Assemblez la commande en...
- Page 12 Installing the servos & pushrods / Monteren van de servo's en stuurstangen Montieren von Servos und Gestängen / Montage des servos et des tringles de commandes Fig. 36 Fig. 37 Fig. 38 Install the servos with their silent Installeer de servo's met hun Bringen Sie die Servos mit ihren Installez les servos avec leurs blocks.
- Page 13 Assembling the landing gear / Samenstellen van het landingsgestel / Zusammenbau des Fahrgestells / Installation du train d'atterrissage Fig. 43 Fig. 44 Fig. 45 Fig. 46 Fig. 47 Fig. 48 Slide the support of the landing Schuif de steunen van het lan- Schieben Sie die Unterstützung Insérez les 2 jambes du train dans gear in the fuselage.
- Page 14 Installing the steering rod to the carburettor / Monteren van de stuurstang op de carburator Das Rohr zum Vergaser anbringen / Installation de la commande de carburateur Fig. 52 Fig. 53 Use the holes in the fuselage to Gebruik de gaatjes in de romp Schieben Sie das Rohr durch den Utilisez les trous de passage pour fi...
- Page 15 Fig. 61 Fig. 60 Fig. 59 Push rod + tube Installeer de gasservo en sluit de Install the throttle servo and slide Montieren Sie den Gas Servo, Installez le servo de gaz dans le stuurstang van het gaskanaal aan the control rod in the tube. Fix it schieben Sie das Rohr durch fuselage et introduisez la com- op de carburator en de servo.
- Page 16 Final assembly / Finale montage Endmontierung / Installation fi nal Fig. 65 Fig. 66 Fig. 67 Fig. 68 Fig. 69 Fig. 70 Fig. 71 Fig. 72 Fig. 73 Fig. 74 Fig. 75 Fig. 76 Use the supplied screws to fi x the Gebruik de meegeleverde schroef- Montieren Sie den Deckel Fig.
- Page 17 Installing the receiver and the battery / Installeren van de ontvanger en de batterij Anbringen des Emfängers und des Akkus / Installation du récepteur et de l'accu Fit the receiver in the fuselage and Plaats de ontvanger in de romp Passen Sie den Empfänger im Installez et protégez le récep- protect it with some foam.
- Page 18 Adjustments / Afregelingen Justage / Réglages The correct adjustment of your Het afregelen van uw vliegtuig is Die korrekte Justage Ihres Les réglages de votre avion sont aircraft is very important. Check zeer belangrijk. Kijk goed na of Flugzeuges ist sehr wichtig. très importants, contrôlez que alle stuurbevelen juist zijn.
- Page 19 Adjustments / Afregelingen Justage / Réglages Correct Juist Korrekt Correct 75-80 mm If the nose of the plane drops, begin by moving the battery towards the rear of the model if this is still not enough to get the model level then you must put a small amount of lead on the rear of the fuselage ( make sure the lead is securely fi...
- Page 20 All you need is inside … our PROTECH CATALOG (300pages FULL COLOUR) Ask your local R/C model shop ® is a registered trademark PROTECH Lammerdries Oost 23B • B-2250 Olen Tel.: +32 (0)14 25 92 83 • Fax: +32 (0)14 25 92 89...