Medela Symphony Mode D'emploi
Masquer les pouces
Voir aussi pour Symphony:
- Mode d'emploi (196 pages) ,
- Instructions de démarrage rapide (2 pages) ,
- Guide de démarrage rapide (2 pages)
Table des Matières
Publicité
Les langues disponibles
Les langues disponibles
Liens rapides
Publicité
Chapitres
Table des Matières
Dépannage

Manuels Connexes pour Medela Symphony


Sommaire des Matières pour Medela Symphony
- Page 1 Symphony ® EN Instructions for use – hospital use | DE Gebrauchsanweisung – für die Verwendung im Krankenhaus | FR Mode d’emploi – Usage en milieu hospitalier | IT Istruzioni per l’uso – Uso ospedaliero | NL Gebruiksaanwijzing – voor gebruik in ziekenhuizen...
- Page 2 Für Mütter, die nur das Beste für sich und ihr Baby wollen. Medela vous remercie d’avoir choisi un tire-lait Symphony. Le lait maternel est ce qu’il y a de plus naturel pour les nouveau-nés, mais dans certaines situations, l’allaitement au sein n’est pas possible. Voilà plus de 50 ans que Medela s’est donné...
- Page 3 04–49 50–95 96–141 142–187 188–233...
-
Page 4: Table Des Matières
Table of contents 1. Intended use / population / contraindication 2. Meaning of symbols 3. Important safety information 4. Product description 5. Cleaning 6. Preparing for pumping 7. Expression 8. Storing and thawing breast milk 9. Troubleshooting and error codes 10. -
Page 5: Intended Use / Population / Contraindication
The MAINTAIN program is designed to build and maintain milk production with the 2-Phase Expression technology. In some cases, the Symphony breast pump is provided with the Standard program card to generate the pump suction patterns. This program is designed to build and maintain milk production with 2-Phase Expression technology. -
Page 6: Meaning Of Symbols
2. Meaning of symbols The warning symbol identifies all instructions that are important for safety. Failure to observe these instructions can lead to injury to the user or damage to the breast pump. There are several warning symbols/word combinations. The symbol/word combinations stand for: Warning Note... - Page 7 Vacuum level indicator, stimulation phase – Standard program card and Symphony PLUS program card (MAINTAIN program) Vacuum level indicator, expression phase – Standard program card and Symphony PLUS program card (MAINTAIN program) Vacuum level indicator – Symphony PLUS program card (INITIATE program)
-
Page 8: Important Safety Information
Microwaving can also change the composition of breast milk. I Use only the power cord that comes with the Symphony breast pump. Make sure the voltage of the power cord is compatible with the power source. - Page 9 Virus (HIV): pumping breast milk will not reduce or remove the risk of transmitting the virus to the baby through breast milk. I Inspect all components of the Symphony breast pump as well as all parts of the pump set(s) before each use.
- Page 10 Never drop or insert any object into any opening or tubing. l Do not use outdoors. l Supervision is necessary when the Symphony breast pump is used in the vicinity of children. l Portable and mobile radio frequency communications equipment can affect the Symphony breast pump.
- Page 11 I Never put the breast pump unit in water or in a steriliser, as this can cause permanent damage to the breast pump. I Do not use the Medela Symphony pump sets with a non-compatible breast pump. I Do not use the pump sets for any other purpose than expressing breast milk.
-
Page 12: Product Description
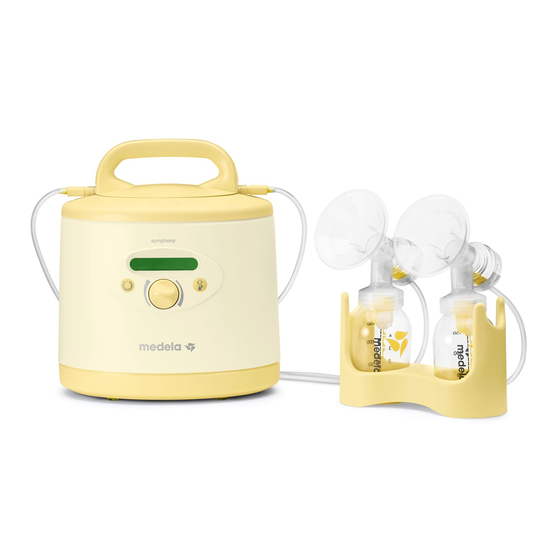
INITIATE program with Medela’s initiation technology and the MAINTAIN program with the 2-Phase Expression technology. It is possible that the Symphony Standard program card is installed in your Symphony breast pump. This program card contains the Standard 2.0 program with 2-Phase Expression technology. - Page 13 4.2 Symphony hospital breast pump – Product parts* LCD display On/off Let-down button button Vacuum adjustment knob Bottle holder Card and cord protector Socket for car connection cable Power cord symphony ® Bottle holder Symphony PLUS program card SAMPLE – Not for clinical use...
- Page 14 4. Product description 4.3 Reusable pump set – Product parts* 1x PersonalFit™ breast shield 1x PersonalFit™ connector 1x valve head 2 x valve membrane 1x breast milk bottle (150 mL) 1x silicone tubing (105 cm) 1x membrane cap 1x protective membrane 1x protective 1x disc 1x lid with opening...
- Page 15 4.4 Disposable pump set – Product parts* 1x breast shield 1x connector 1x membrane cap 1x membrane 1x PVC tubing 1x protective membrane colostrum disposable disposable disposable container bottle 80 mL bottle 150 mL bottle 250 mL 35 mL * See chapter 11 for ordering information...
-
Page 16: Cleaning
I Surface disinfectant agents for medical devices will not cause mechanical damage to the Symphony. I Follow the instructions provided by the supplier of the surface disinfectant agent. I Provide personal protection for operators in accordance with the supplier’s... - Page 17 12. The listed automated reprocessing procedures are tested, validated and recommended by Medela. In the case of automated cleaning, an internal validation of the preferred procedure by the hospital is necessary, too. In the event of conflicting national...
- Page 18 5. Cleaning 5.2 Cleaning pump sets – Overview Disposable bottles and disposable pump sets (breast shield, connector, membrane, PVC tubing, membrane cap, protective membrane) Single-use pump set and One-day pump sets single-use bottles Before first use No cleaning needed No cleaning needed I Manual cleaning (§5.4) After every Note: Tubing, membrane cap...
- Page 19 If there is milk, condensation or visible residues in the tubing, the tubing must be disposed of and replaced. Medela recommends that the tubing is disposed of and replaced after max. 6 months. If required by national, regional or in-house regulations.
- Page 20 5. Cleaning 5.3 Disposable single-use pump Warning sets and bottles – Cleaning l The sterile single-use pump set is a single-use product and may not be reused The sterile pump set and disposable or reprocessed. bottles (sterile and Ready-to-Use) l The one-day pump set is a single-user are single-use products that may product.
- Page 21 5.4 Disposable one-day pump set – Cleaning Check whether there is milk in the Rinse the breast shield, the connector and tubing. If so, replace the pump set. If the white valve with cold, clear drinking- not, disassemble the pump set into quality water (approx.
- Page 22 Replace damaged or worn parts. To avoid damage, do not apply external pressure. l Medela does not define a maximum number of uses appropriate for a re- Drying / storage usable pump set or its individual parts, with exception of the tubing.
- Page 23 Medela recommends and colouring (5–15% anionic tenside, that the tubing is disposed of and nonionic tenside, pH neutral). Rinse the replaced after max. 6 months.
- Page 24 If there is no milk, condensation or visible residues in the tubing, there is no need for automated cleaning and disinfection or sterilisation. Medela recommends that the tubing is disposed of and replaced after max. 6 months. If there is milk, condensation or visible...
- Page 25 Storage 93 °C Put the clean parts in a clean storage bag or a clean environment. It is important that all residual moisture dries. Do not store parts in an airtight container/bag. For cleaning of the tubing see chapter 5.7. Clean and disinfect the remaining parts in a mechanical washer-disinfector.
-
Page 26: Preparing For Pumping
6. Preparing for pumping 6.1 Installation of the program Warning card l Only use the power cord that comes with the Symphony. l Make sure the voltage of the power cord is compatible with the power source. Info Optional for pump with battery:... -
Page 27: Installation Of The Card And Cord Protector (Optional)
6.2 Installation of the card and cord protector (optional) Push the card and cord protector Insert the cord into the card and cord protector in a loop around over the guide rail on the back until the pin. it stops and tighten the screw. ➙... -
Page 28: Assembling The Reusable Pump Set
Dry your hands with a fresh towel or a single-use paper towel. Note l Use Medela original accessories only. l The disposable pump set does not need Open the packaging of the dispos- cleaning prior to first use. - Page 29 Screw a disposable bottle onto the Check that the transparent cap at the connector. Choose a bottle that suits other end of the tubing is covered with your needs. Sizes available are 35, 80, the protective membrane. If not, place the 150 and 250 mL.
-
Page 30: Connecting The Pump Set To The Pump Housing
The lid keeps the membrane cap pushed down to prevent a loss of vacuum that could occur if the membrane cap came off. Screw a Medela bottle onto the connector. Choose a size that suits your needs. 6.6 Connecting the pump set... - Page 31 Insert the tubing into the Place the membrane with the round corresponding opening in the side up onto a flat surface. Push the connector. cap into the membrane until it engages. Insert the tubing adapter into the opening in the membrane cap. Position the membrane cap at the end of the Close the lid.
-
Page 32: Expression
7. Expression 7.1 Selecting the breast shield A correctly fitted breast shield avoids compression of any milk ducts during √ pumping to ensure optimal breast emptying and maximum milk output. To verify whether the breast shield has a correct fit: 1. -
Page 33: Selecting The Right Program
I Throughout the first five days. If milk production. production has not started after five days, ➙ It is possible that the Symphony Stan- change to the MAINTAIN program. dard program card is installed on your Symphony breast pump. The Standard... - Page 34 7. Expression 7. Expression Note l Always disconnect the Symphony from the power source after expression. Info l The program stores the last vacuum setting in the stimulation phase. l for the MAINTAIN program: Set the comfort vacuum (see chapter Press the “Let-down”...
-
Page 35: Operation: Maintain Program
7.4 Operation: MAINTAIN program Program complete Press the On/off button to switch on The INITIATE program runs automatically for the breast pump. The MAINTAIN program 15 minutes with stimulation, expression and will automatically start with the stimulation pause phases. An acoustic signal indicates phase after pressing the On/off button. - Page 36 7. Expression 7. Expression 7. Expression Note l Always disconnect the Symphony from the power source after expression. Info l The program stores the last vacuum setting in the stimulation phase. l for the Standard program: Continue pumping until the breast Press the “Let-down”...
-
Page 37: Operation: Standard Program
Set the comfort vacuum for the Continue pumping until the breast feels expression phase (see chapter 7.6). well drained and soft all over (Medela rec- The bars on the display show the ommends a pumping time of at least vacuum level. The more bars, the 15 minutes). -
Page 38: Set Comfort Vacuum
Note fort. Then rotate to the left to reduce l Always disconnect the Symphony from the vacuum until it is comfortable. the power source after expression. Info l Do not kink the tubing during expression. -
Page 39: Expression By Single Pumping
7.7 Expression by single pumping Prepare one pump set for expression. Place the breast shield on the breast so that Place the membrane cap at the end of the nipple is properly centred in the tunnel. the tubing onto the membrane in the Hold the breast shield onto the breast with pump housing (see also chapter 6.6). -
Page 40: Expression By Double Pumping
Note Prepare two pump sets for expression. First place the membrane cap at the l Always disconnect the Symphony from end of tubing one onto the membrane the power source after expression. in the pump housing (see chapter 6.6). - Page 41 Place the breast shield of one pump set on Switch on the breast pump with the first breast so that the nipple is properly Proceed with the program selection centred in the tunnel. Hold the breast shield (see chapter 7.2). onto the breast with the thumb and index finger.
-
Page 42: Storing And Thawing Breast Milk
I With the Calesca* bottle warmer, it is possible to warm breast milk in a gentle way. Note: These storing and thawing breast milk guidelines are a recommendation. National and hospital internal guidelines and standards may deviate. *More information at www.medela.com... -
Page 43: Troubleshooting And Error Codes
9. Troubleshooting and error codes 9.1 Troubleshooting Problem Solution Check whether mains power/battery is available. If the motor Check that the device is switched on. is not running Check whether program card is inserted correctly in the card compart- ment on the back of the breast pump. Assemble the pump set in accordance with the instructions in chapter 6.4 or 6.5. - Page 44 Potential issues Actions - Check if the correct program card Program card is not a Symphony card is being used Program card is incorrectly inserted - Check that card is positioned correctly...
-
Page 45: Warranty And Maintenance / Disposal
Because of the method of construction used, Medela does not expect electrical safety to be affected at any time during the life of the product – provided that it is used properly in accordance with the intended use as well as these instructions for use, and that the device is serviced and repaired at authorized service centre. - Page 46 10. Warranty and maintenance / disposal Disposal The Symphony breast pump is made of metals and plastics and should be disposed of in accordance with the European directives 2002/95/EC and 2002/96/EC. Additional, local guidelines must also be observed. With the AC/DC versions, the electronic com- ponents and the rechargeable battery must be disposed of separately, in accordance with the local regulations.
-
Page 47: Accessories List
Symphony Standard program card Greek 800.0553 Symphony Standard program card Hungarian Symphony Standard program card Czech 800.0554 * Articles may not be available in all countries. For further information about Medela products, visit www.medela.com and look for location finders in your country. - Page 48 008.0178 Symphony One-Day Pump Set, PersonalFit breast shield size XL (30 mm) 008.0179 Symphony and Lactina One-Day Pump Set, PersonalFit breast shield size M (24 mm) 008.0180 Symphony and Lactina One-Day Pump Set, PersonalFit breast shield size L (27 mm) 008.0181...
- Page 49 Symphony card and cord protector 928.1017 Car connection cable for Symphony 600.0387 Test vacuum meter * Articles may not be available in all countries. For further information about Medela products, visit www.medela.com and look for location finders in your country.
- Page 50 Inhaltsverzeichnis 1. Verwendungszweck / Zielgruppe / Kontraindikationen 2. Bedeutung der Symbole 3. Wichtige Sicherheitshinweise 4. Produktbeschreibung 5. Reinigung 6. Vorbereitung des Abpumpens 7. Abpumpen 8. Aufbewahren und Auftauen von Muttermilch 9. Fehlerbehebung und Fehlercodes 10. Garantie und Wartung / Entsorgung 11.
-
Page 51: Verwendungszweck/Zielgruppe/Kontraindikationen
Kontraindikationen Für die Milchpumpe Symphony* gibt es keine bekannten Kontraindiktionen. Produktbeschreibung Die Milchpumpe Symphony für mehrere Benutzerinnen verfügt über die Symphony PLUS Programmkarte, mit der verschiedene Pumpprogramme abgerufen werden können. Die Programmkarte enthält zwei Pumpprogramme. Das Ziel des INITIAL-Programms ist die Anregung der Milchproduktion mit der Initiierungstechnologie von Medela. Mit dem Programm ERHALT wird die Milchproduktion mit der 2-Phase Expression Technologie... -
Page 52: Bedeutung Der Symbole
2. Bedeutung der Symbole Das Warnsymbol kennzeichnet alle für die Sicherheit wichtigen Anweisungen. Nichtbeachtung kann zu Verletzungen (der Benutzerin) oder Schäden an der Milchpumpe führen. Es gibt eine Reihe von Kombinationen aus Warnsymbolen und Worten. Die Kombinationen aus Symbol und Wort bedeuten: Hinweis Achtung Kann zu Sachschäden führen. - Page 53 Dieses Symbol weist auf die Möglichkeit zum Öffnen der Abdeckung der Netz- buchse hin. Ein-/Aus-Taste Let-down-Taste Vakuumeinstellungsknopf Symbole auf dem Display Vakuumlevelanzeige, Stimulationsphase – Standard-Programmkarte und Symphony PLUS Programmkarte (ERHALT-Programm) Vakuumlevelanzeige, Abpumpphase – Standard-Programmkarte und Symphony PLUS Programmkarte (ERHALT-Programm) Vakuumlevelanzeige – Symphony PLUS Programmkarte (INITIAL-Programm)
-
Page 54: Wichtige Sicherheitshinweise
Verwenden Sie die Milchpumpe Symphony nicht beim Baden oder Duschen. l Greifen Sie niemals nach einem ins Wasser gefallenen elektrischen Gerät! Ziehen Sie sofort den Netzstecker aus der Steckdose. l Trennen Sie die Milchpumpe Symphony nach der Verwendung immer sofort von der Stromversorgung. WARNUNG: Zur Vermeidung von Feuer, Stromschlägen oder schweren Verbrennungen:... - Page 55 Das Abpumpen der Muttermilch reduziert oder vermeidet nicht das Risiko einer Übertragung des Virus an das Baby über die Muttermilch. I Überprüfen Sie vor jedem Gebrauch alle Teile der Milchpumpe Symphony sowie alle Teile des/r Pumpsets. l Verwenden Sie niemals Geräte, Komponenten oder Teile, die beschädigt sind.
- Page 56 Stecken Sie keine Objekte in eine Öffnung der Pumpe oder in den Schlauch oder lassen Sie nichts hineinfallen. l Verwenden Sie das Gerät nicht im Freien. l Bei Verwendung der Milchpumpe Symphony in der Nähe von Kindern ist eine entsprechende Beaufsichtigung notwendig. l Tragbare und mobile Radiofrequenz-Kommunikationsgeräte können die Milchpumpe Symphony beeinflussen.
- Page 57 I Legen Sie die Milchpumpe nie in Wasser oder in einen Sterilisator, da dies dauerhafte Schäden an der Milchpumpe verursachen kann. I Verwenden Sie die Medela Symphony Pumpsets nicht mit einer nicht-kompatiblen Milchpumpe. I Verwenden Sie die Pumpsets nicht für einen anderen Zweck als das Abpumpen von Milch.
-
Page 58: Produktbeschreibung
Standard. Diese Programmkarte enthält das Standard 2.0 Programm mit der 2-Phase Expression Technologie. Benötigtes Zubehör* Die Milchpumpe Symphony muss mit den Pumpsets und Milchflaschen von Medela verwendet werden. Die Pumpsets und Flaschen gibt es als Mehrweg- und Einweg-Produkte. Mehrweg-Produkte: I Symphony Multibox für den Einsatz im Krankenhaus (20 Mehrweg-Pumpsets mit Brusthauben in den Größen M, L oder XL). - Page 59 4.2 Milchpumpe Symphony für den Einsatz im Krankenhaus – Zubehör* LCD-Anzeige Ein-/ Let-down-Taste Aus- Vakuumeinstellungsknopf Taste Flaschenhalter Karten- und Kabelschutz Anschluss für Autokabel Netzkabel symphony ® Flaschenhalter Symphony PLUS Programmkarte SAMPLE – Not for clinical use English Symphony PLUS program card for use with the Symphony breastpump * Bestellinformationen für Zubehör sind Kapitel 11 zu entnehmen...
- Page 60 4. Produktbeschreibung 4.3 Mehrweg-Pumpset – Bestandteile* 1x PersonalFit™ Brusthaube 1x PersonalFit™ Verbindungsstück 1x Ventilkopf 2x Ventilmembran 1x Muttermilchflasche (150 ml) 1x Silikonschlauch (105 cm) 1x Membrankappe 1x Schutzmembran 1x Schutzhaube 1x Deckeleinlage 1x Deckel mit Öffnung * Bestellinformationen sind Kapitel 11 zu entnehmen...
- Page 61 4.4 Einweg-Pumpset – Bestandteile* 1x Brusthaube 1x Verbindungsstück 1x Membrankappe 1x Membran 1x PVC-Schlauch 1x Schutzmembran Kolostrumbe- Einweg-Flasche Einweg-Flasche Einweg-Flasche hälter 35 ml 80 ml 150 ml 250 ml * Bestellinformationen sind Kapitel 11 zu entnehmen...
-
Page 62: Reinigung
Richtlinien des Krankenhauses enthalten. I Flächendesinfektionsmittel für medizinische Geräte verursachen keine mechanischen Schäden an der Symphony. I Befolgen Sie die Anweisungen des Anbieters des Flächendesinfektionsmittels. I Sorgen Sie für den Schutz der Zur Reinigung der Milchpumpe die Betreiber gemäß... - Page 63 Dies sind allgemeine Anweisungen. Länderspezifische Vorschriften und Richtlinien finden Sie in Kapitel 12. Die aufgeführten automatisierten Aufbe- reitungsverfahren wurden von Medela getes- tet, geprüft und empfohlen. Bei automati- scher Reinigung ist außerdem eine interne Validierung des vom Krankenhaus bevorzugten Verfahrens notwendig. Bei Zur Desinfektion die Pumpe mit gegensätzlichen nationalen Reinigungs-...
- Page 64 5. Reinigung 5.2 Reinigung von Pumpsets – Übersicht Einwegflaschen und Einweg-Pumpsets (Brusthaube, Verbindungsstück, Membran, PVC-Schlauch, Membrankappe, Schutzmembran) Einweg-Pumpset und Eintagespumpset Einweg-Flaschen Vor dem ersten Keine Reinigung nötig Keine Reinigung nötig Gebrauch I Manuelle Reinigung (§ 5.4) Nach jeder Hinweis: Schlauch, Membrankappe Nach der Verwendung entsorgen (§...
- Page 65 Solange das Pumpset bei der Mutter bleibt. Bei Milch, Kondensation oder sichtbaren Rückständen im Schlauch muss der Schlauch entsorgt und ersetzt werden. Medela empfiehlt, den Schlauch nach max. 6 Monaten zu entsorgen und zu ersetzen. Falls erforderlich gemäß nationalen, regionalen oder internen Richtlinien.
- Page 66 5. Reinigung 5.3 Einweg-Pumpsets und Achtung Flaschen – Reinigung l Das sterile Einweg-Pumpset ist ein Produkt zur einmaligen Benutzung und darf nicht Das sterile Pumpset und die wiederverwendet oder aufbereitet werden. Einweg-Flaschen (steril und Ready-to- l Das Eintagespumpset ist nur für die Use) sind Produkte zur einmaligen Benutzung durch eine Person vorgesehen.
- Page 67 5.4 Einweg-Eintagespumpset – Reinigung Überprüfen Sie, ob sich Milch im Schlauch Die Brusthaube, das Verbindungsstück und die befindet. Wenn ja, muss das Pumpset ersetzt weiße Ventilmembran mit kaltem, klarem Was- werden. Falls nein, zerlegen Sie das Pumpset ser in Trinkwasserqualität (ca. 20 °C) abspülen, in seine Einzelteile (Brusthaube, Verbindungs- um Proteine zu entfernen.
- Page 68 Teile. Legen Sie die Teile nicht übereinander. Teile müssen ersetzt werden. Üben Sie keinen äußeren Druck darauf aus, um Schäden zu vermeiden. I Medela setzt keine maximale Anzahl von Verwendungen für ein Mehrweg-Pumpset oder dessen Einzelteile fest, mit Ausnahme Trocknen/Aufbewahren des Schlauchs.
- Page 69 Fett abzuwaschen. Desinfektionsmittel, die keine Zusatzstoffe Verwenden Sie ein handelsübliches enthalten und ohne Rückstände trocknen. Reinigungsmittel, vorzugsweise ohne Medela empfiehlt, den Schlauch nach künstliche Duft- und Farbstoffe (5–15 % max. 6 Monaten zu entsorgen und zu anionische Tenside, nichtionische ersetzen.
- Page 70 Falls sich keine Milch, Kondensation oder sichtbaren Rückstände im Schlauch befinden, ist die automatische Reinigung und Desinfektion oder Sterilisation nicht nötig. Medela empfiehlt, den Schlauch nach max. 6 Monaten zu entsorgen und zu ersetzen. Falls noch nicht geschehen, zerlegen Sie das Mehrweg-Pumpset in seine...
- Page 71 Aufbewahrung 93 °C Legen Sie die trockenen Teile in einen sauberen Aufbewahrungsbeutel oder an einen sauberen Ort. Es ist wichtig, dass alle feuchten Stellen trocknen. Bewahren Sie die Teile nicht in einem luftdichten Behälter/Beutel auf. Weitere Informationen zur Reinigung des Schlauchs finden Sie in Kapitel 5.7.
-
Page 72: Vorbereitung Des Abpumpens
6. Vorbereitung des Abpumpens 6.1 Installation der Achtung Programmkarte l Bitte verwenden Sie ausschließlich das mit der Milchpumpe Symphony gelieferte Netzkabel. l Stellen Sie sicher, dass die Spannung des Netzkabels mit der Stromquelle kompatibel ist. Info Optional bei Pumpe mit Akku:... - Page 73 6.2 Anbringen des Karten- und Kabelschutzes (optional) Karten- und Kabelschutz über Füh- Kabel in einer Schlaufe um den Stift im Karten- und Kabelschutz rungsschiene bis zum Anschlag in einlegen. Rückseite schieben und Schraube ➙ Stellen Sie sicher, dass genug arretieren. Spielraum zum Einstecken des Kabels vorhanden ist.
- Page 74 Trocknen Sie Ihre Hände mit einem frischen Handtuch oder einem Einweg-Papierhandtuch. Hinweis l Verwenden Sie nur Originalzubehör von Medela. Öffnen Sie die Verpackung des l Das Einweg-Pumpset muss vor dem Einweg-Pumpsets. Stecken Sie das ersten Gebrauch nicht gereinigt werden. Verbindungsstück auf die Brusthaube.
- Page 75 Schrauben Sie die Einweg-Flasche Vergewissern Sie sich, dass die durchsichtige auf das Verbindungsstück. Wählen Sie Kappe am anderen Schlauchende von der eine Flasche, die Ihren Bedürfnissen Schutzmembran bedeckt ist. Legen Sie entspricht. Die verfügbaren Größen andernfalls die Membran mit der runden sind: 35, 80, 150 oder 250 ml.
- Page 76 Wählen Sie eine Größe, die Ihren Bedürfnissen entspricht. 6.6 Verbinden Sie das Pumpset mit dem Pumpgehäuse Öffnen Sie den Deckel der Milch- pumpe. ➙ Drücken Sie den ovalen Knopf auf dem Oberteil der Milchpumpe Symphony und heben Sie den Griff an.
- Page 77 Stecken Sie den Schlauch in Legen Sie die Membran mit der runden die entsprechende Öffnung Seite nach oben auf eine flache Unterlage. im Verbindungsstück. Drücken Sie die Kappe in die Membran, bis sie einrastet. Stecken Sie den Schlauch- adapter in die Öffnung der Membrankappe. Setzen Sie die Membrankappe fest und Schließen Sie den Deckel.
-
Page 78: Abpumpen
7. Abpumpen 7.1 Auswahl der Brusthaube Eine korrekt sitzende Brusthaube verhindert das Abdrücken der Milchgänge während dem √ Abpumpen und ermöglicht so ein optimales Entleeren der Brust und maximale Effizienz. Um zu überprüfen, ob die Brusthaube richtig sitzt: 1. Zentrieren Sie die Brustwarze im Brust- haubentunnel. -
Page 79: Auswahl Des Richtigen Programms
7.2 Auswahl des richtigen Programms* Die Milchpumpe Symphony PLUS ist mit der Wenn die Symphony PLUS Karte installiert Symphony PLUS Programmkarte versehen, ist: die über zwei Pumpprogramme verfügt. Verwenden Sie das INITIAL-Programm Das Ziel des INITIAL-Programms ist die gleich nach der Geburt: Initiierung der Milchproduktion. - Page 80 7. Abpumpen 7. Abpumpen Hinweis l Trennen Sie die Milchpumpe Symphony nach dem Abpumpen immer von der Stromquelle. Info l Das Programm speichert die letzte Vakuum- Einstellung in der Stimulationsphase. l Für das ERHALT-Programm: Stellen Sie das Komfort-Vakuum ein Drücken Sie die „Let-down“-Taste , um (siehe Kapitel 7.6).
-
Page 81: Betrieb: Erhalt-Programm
7.4 Betrieb: ERHALT-Programm Programm beendet Drücken Sie die Ein-/Aus-Taste, um die Das INITIAL-Programm läuft automatisch Milchpumpe einzuschalten. Das ERHALT- 15 Minuten mit Stimulations-, Abpump- Programm startet automatisch mit der und Pausenphasen. Bei Programmende Stimulationsphase nach Drücken der Ein-/ ertönt ein akustisches Signal. Das Display Aus-Taste. - Page 82 7. Abpumpen 7. Abpumpen 7. Abpumpen Hinweis l Trennen Sie die Milchpumpe Symphony nach dem Abpumpen immer von der Stromquelle. Info l Das Programm speichert die letzte Vakuum- Einstellung in der Stimulationsphase. l Für das Standard-Programm: Pumpen Sie so lange, bis sich die Drücken Sie die „Let-down“-Taste...
-
Page 83: Betrieb: Standard-Programm
Pumpen Sie so lange, bis sich die Brust Abpumpphase ein (siehe Kapitel 7.6). gut entleert und überall weich anfühlt Die Balken auf dem Display zeigen die (Medela empfiehlt eine Pumpzeit von Vakuumstufe an. Je mehr Balken, desto mindestens 15 Minuten). Schalten Sie höher das Vakuum. -
Page 84: Einstellen Des Komfort-Vakuums
Vakuum zu erhöhen, Hinweis bis es leicht unangenehm wird. Drehen Sie den Knopf dann nach l Trennen Sie die Milchpumpe Symphony links, um das Vakuum zu reduzieren, nach dem Abpumpen immer von der bis es angenehm ist. - Page 85 7.7 Milchentnahme durch einseitiges Abpumpen Bereiten Sie ein Pumpset für Setzen Sie die Brusthaube auf die Brust das Abpumpen vor. Platzieren auf, so dass die Brustwarze gut zentriert Sie die Membrankappe am im Tunnel liegt. Halten Sie die Brusthaube Schlauchende auf die Membran mit Daumen und Zeigefinger an die Brust.
-
Page 86: Beidseitiges Abpumpen
Trocknen Sie Ihre Hände mit einem frischen Handtuch oder einem Einweg-Papierhandtuch. Hinweis Bereiten Sie zwei Pumpsets für das l Trennen Sie die Milchpumpe Symphony Abpumpen vor. Platzieren Sie zuerst nach dem Abpumpen immer von der die Membrankappe am Ende des Stromquelle. - Page 87 Setzen Sie die Brusthaube des einen Milchpumpe mit einschalten. Pumpsets auf die erste Brust auf, so dass Weiter mit der Programmauswahl die Brustwarze gut zentriert im Tunnel liegt. (siehe Kapitel 7.2). Halten Sie die Brusthaube mit Daumen und Zeigefinger an die Brust. Stützen Sie die Brust mit der Handfläche.
-
Page 88: Aufbewahren Und Auftauen Von Muttermilch
Fett mit der Milch zu vermischen. Schütteln oder rühren Sie die Milch nicht. I Mit dem Flaschenwärmer Calesca* können Sie die Muttermilch schonend erwärmen. Hinweis Diese Regeln für das Aufbewahren und Auftauen von Muttermilch stellen eine Empfehlung dar. Staatliche und krankenhausinterne Richtlinien können davon abweichen. *Weitere Informationen unter www.medela.com... -
Page 89: Fehlerbehebung Und Fehlercodes
9. Fehlerbehebung und Fehlercodes 9.1 Fehlerbehebung Problem Lösung Kontrollieren Sie, ob Netzstrom/Akku vorhanden ist. Kontrollieren Sie, ob das Gerät eingeschaltet ist. Motor läuft nicht Vergewissern Sie sich, dass die Programmkarte auf der Rückseite der Milchpumpe richtig eingesteckt ist. Pumpset nach Anleitung gemäß Kapitel 6.4 bzw. 6.5 zusammensetzen. Vergewissern Sie sich, dass alle Anschlüsse des Pumpsets und der Milchpumpe korrekt miteinander verbunden sind. - Page 90 - Stellen Sie sicher, dass das Netzkabel auf Akku schwach Signal (ab dem Hinweis verbleiben der Rückseite der Pumpe eingesteckt ist. 15 Minuten Pumpzeit) - Wenden Sie sich an Ihren Medela Motorüber- Motor zieht zu viel Strom lastung Gebietsleiter oder den Medela Service.
-
Page 91: Garantie Und Wartung / Entsorgung
Die Technik der Milchpumpe Symphony von Medela wurde durch unabhängige Prüfstellen im Hinblick auf die Einhaltung der Norm EN/IEC 60601-1 überprüft. Kopien der betreffen- den Zertifikate sind auf Anfrage erhältlich. Aufgrund der Bauart des Gerätes geht Medela davon aus, dass die elektrische Sicherheit über die gesamten Lebensdauer des Gerätes hinweg zu keinem Zeitpunkt beeinträchtigt sein wird –... -
Page 92: Entsorgung
Richtlinien müssen ebenfalls eingehalten werden. Bei den AC/DC-Versionen müssen die elektrischen Bestandteile und der wiederaufladbare Akku gemäß den lokalen Vorschriften separat entsorgt werden. Bitte stellen Sie sicher, dass Sie die Milchpumpe Symphony und die Zubehörteile gemäß Ihren lokalen Richtlinien entsorgen. -
Page 93: Zubehörliste
Symphony Standard-Programmkarte Spanisch Symphony Standard-Programmkarte Portugiesisch 800.0551 800.0552 Symphony Standard-Programmkarte Griechisch 800.0553 Symphony Standard-Programmkarte Ungarisch Symphony Standard-Programmkarte Tschechisch 800.0554 * Manche Artikel sind möglicherweise nicht in allen Ländern verfügbar. Weitere Informationen über Produkte von Medela finden Sie unter www.medela.com, über die länderspezifische Händlersuche. - Page 94 Eintages-Symphony-Pumpset, PersonalFit Brusthaube Größe L (27 mm) 008.0178 Eintages-Symphony-Pumpset, PersonalFit Brusthaube Größe XL (30 mm) 008.0179 Symphony und Lactina Eintagespumpset, PersonalFit Brusthaube Größe M (24 mm) 008.0180 Symphony und Lactina Eintagespumpset, PersonalFit Brusthaube Größe L (27 mm) 008.0181 Symphony und Lactina Eintagespumpset, PersonalFit Brusthaube Größe XL (30 mm) Mehrweg-Pumpsets Art.-Nr.
-
Page 95: Sonstiges Zubehör
Symphony Hartschalenkoffer ohne Gurt 600.0816 Symphony Karten- und Kabelschutz 928.1017 Symphony Kabelanschluss fürs Auto 600.0387 Test-Vakuummeter * Manche Artikel sind möglicherweise nicht in allen Ländern verfügbar. Weitere Informationen über Produkte von Medela finden Sie unter www.medela.com, über die länderspezifische Händlersuche. - Page 96 Table des matières 1. Utilisation prévue/Public concerné/Contre-indications 2. Signification des symboles 3. Informations de sécurité importantes 4. Description du produit 5. Nettoyage 6. Préparation à la séance d’expression 7. Expression 8. Conservation et décongélation du lait maternel 9. Résolution des problèmes et codes d’erreurs 10.
-
Page 97: Utilisation Prévue/Public Concerné/Contre-Indications
à la technologie 2-Phase Expression. Dans certains cas, le tire-lait Symphony est fourni avec la carte de programmation Standard qui génère les schémas de succion du tire-lait. Ce programme a été conçu pour démarrer et maintenir une production de lait grâce à... -
Page 98: Signification Des Symboles
2. Signification des symboles Les symboles d'avertissement renvoient à des instructions importantes en matière de sécurité. Le non-respect de ces instructions peut provoquer des blessures aux utilisatrices ou endommager le tire-lait. Il existe plusieurs symboles d'avertissement/expressions. Le symbole/l'expression signifie : Avertissement Remarque Peut engendrer des blessures graves Peut endommager le matériel. -
Page 99: Symboles Présents À L'écran
Standard et carte de programmation Symphony PLUS (programme MAINTAIN) Indicateur du niveau de vide, phase d'expression – Carte de programmation Standard et carte de programmation Symphony PLUS (programme MAINTAIN) Indicateur du niveau de vide – Carte de programmation Symphony PLUS (programme INITIATE) -
Page 100: Informations De Sécurité Importantes
I Ne stockez pas et ne placez pas cet appareil à un endroit d'où il risque de chuter ou d'être tiré dans une baignoire ou un lavabo. l N'utilisez pas le tire-lait Symphony en prenant un bain ou une douche. l Ne saisissez jamais un appareil électrique qui est tombé dans l'eau. Débranchez-le immédiatement. - Page 101 (SIDA) : exprimer le lait maternel ne réduit pas et n'élimine pas le risque de transmission du virus au bébé par le lait maternel. I Examinez tous les composants du tire-lait Symphony et toutes les pièces du ou des set(s) pour tire-lait avant chaque utilisation.
-
Page 102: Précautions
I Ne modifiez pas les pièces du tire-lait ou du set pour tire-lait. l N'utilisez pas le tire-lait Symphony pendant votre sommeil ou en cas de forte somnolence. I N'utilisez pas le tire-lait Symphony en conduisant un véhicule à moteur. - Page 103 I Ne placez jamais le tire-lait dans l'eau ou dans un stérilisateur, car cela l'endommagerait définitivement. I N'utilisez pas les sets pour tire-lait Medela Symphony avec un tire-lait incompatible. I N'utilisez pas les sets pour tire-lait à d'autres fins que l'expression du lait maternel.
-
Page 104: Description Du Produit
I Symphony Hospital Multibox (20 sets réutilisables pour tire-lait ; M, L ou XL). Produits à usage unique : Les produits Medela à usage unique sont destinés à un usage unique ou limité à un jour dans les hôpitaux et ne nécessitent pas de nettoyage préalable. - Page 105 4.2 Tire-lait Symphony pour hôpital : pièces de l'appareil* Afficheur LCD Bouton Bouton d'écoulement marche/arrêt Bouton de réglage du niveau de vide Porte-biberon Protection de la carte et du cordon Fiche de connexion pour câble allume-cigare Câble d'alimentation symphony ® Porte-biberon...
- Page 106 4. Description du produit 4.3 Set réutilisable pour tire-lait : pièces détachées* 1 téterelle PersonalFit™ 1 raccord PersonalFit™ 1 valve 2 membranes 1 biberon pour lait de valve maternel (150 ml) 1 tuyau en silicone (105 cm) 1 capsule 1 membrane de protection 1 couvercle 1 disque 1 bague pour biberon...
-
Page 107: Set À Usage Unique Pour Tire-Lait : Pièces Détachées
4.4 Set à usage unique pour tire-lait : pièces détachées* 1 téterelle 1 raccord 1 capsule 1 membrane 1 tube PVC 1 membrane de protection Contenant biberon à biberon à biberon à pour colostrum usage unique usage unique usage unique de 35 ml de 80 ml de 150 ml de 250 ml... -
Page 108: Nettoyage
à patients multiples. I Les produits désinfectants de surface n'endommagent pas la mécanique du tire-lait Symphony. I Respectez les instructions du fournisseur de produits désinfectants pour surfaces. I Assurez la protection individuelle des opérateurs conformément aux... -
Page 109: Nettoyage Des Sets Pour Tire-Lait : Présentation
Pour connaître les réglementa- tions et les recommandations propres à chaque pays, consultez le chapitre 12. Medela a procédé à des essais avant de valider et de recommander les procédures de retraitement automatisées qui y figurent. En cas de nettoyage automatique, l'hôpital doit également valider en interne... - Page 110 5. Nettoyage 5.2 Nettoyage des sets pour tire-lait : présentation Biberons à usage unique et sets à usage unique pour tire-lait (téterelle, raccord, membrane, tubulure PVC, capsule, membrane de protection) Set à usage unique pour tire-lait et biberons Sets pour tire-lait One-Day à usage unique Avant une première...
- Page 111 En cas de présence de lait, de condensation ou de résidus visibles dans la tubulure, la tubulure doit être jetée et remplacée. Medela recommande que la tubulure soit jetée et remplacée après maximum six mois. Si la réglementation nationale, régionale ou interne l'exige.
-
Page 112: Sets À Usage Unique Pour Tire-Lait Et Biberons À Usage Unique - Nettoyage
5. Nettoyage 5.3 Sets à usage unique pour Avertissement tire-lait et biberons à usage unique - Nettoyage l Le set pour tire-lait à usage unique stérile est un produit à usage unique qui ne doit pas être Le set pour tire-lait stérile et les biberons à réutilisé... -
Page 113: Set Pour Tire-Lait À Usage Unique One-Day - Nettoyage
5.4 Set pour tire-lait à usage unique One-Day - Nettoyage Vérifiez s'il y a du lait dans la tubulure. Si Rincez la téterelle, le raccord et la valve blanche oui, remplacez le set pour tire-lait. Sinon, à l'eau claire, potable et froide (environ 20 °C) afin démontez le set pour tire-lait en pièces d'éliminer les protéines. -
Page 114: Set Réutilisable Pour Tire-Lait - Nettoyage Manuel
à un endroit propre. Il est important pour définir la fin de vie de l'appareil. Medela que toute l'humidité résiduelle sèche. recommande que la tubulure en silicone soit Ne stockez pas les pièces dans un jetée et remplacée après maximum six mois. - Page 115 à base d'alcool ne du commerce, de préférence sans parfum contenant aucun additif et laissez sécher ni colorant artificiel (5 à 15% d'agents sans laisser aucun résidu. Medela tensioactifs anioniques, non ioniques, recommande que la tubulure soit jetée de pH neutre). Rincez les pièces à l'eau et remplacée après maximum six mois.
-
Page 116: Set Réutilisable Pour Tire-Lait - Nettoyage Et Désinfection Automatisés
à un nettoyage et à une désinfection automatisés, ni à une stérilisation. Medela recommande que la tubulure soit jetée et remplacée après maximum six mois. En cas de présence de traces de lait, de Si ce n'est pas encore fait, démontez... -
Page 117: Set Réutilisable Pour Tire-Lait - Stérilisation
Conservation 93 °C Placez toutes les pièces propres dans un sachet de rangement propre ou à un endroit propre. Il est important que toute l'humidité résiduelle sèche. Ne stockez pas les pièces dans un conteneur ou un sachet hermétique. Pour le nettoyage de la tubulure, consultez le chapitre 5.7. -
Page 118: Préparation À La Séance D'expression
6.1 Installation de la carte Avertissement de programmation l Utilisez exclusivement le cordon d'alimentation fourni avec le tire-lait Symphony. l Assurez-vous que la tension du cordon d'alimentation est compatible avec celle du secteur. Info Pour les modèles de tire-lait avec batterie : La carte de programmation doit être... -
Page 119: Installation De La Protection De La Carte Et Du Cordon (Facultatif)
6.2 Installation de la protection de la carte et du cordon (facultatif) Introduisez le cordon dans la carte Poussez la protection de la carte et du et dans la protection de la carte et cordon sur la glissière située à l'arrière jusqu'au blocage, puis serrez la vis. du cordon en formant une boucle autour de la vis. -
Page 120: Assemblage Du Set Réutilisable Pour Tire-Lait
Séchez-vous les mains à l'aide d'une serviette parfaitement propre ou d'un essuie-tout à usage unique. Remarque l Utilisez uniquement des accessoires Medela d'origine. Ouvrez l'emballage du set à usage l Il n'est pas nécessaire de nettoyer le set à usage unique pour tire-lait avant la première unique pour tire-lait. - Page 121 Vissez un biberon à usage unique sur le Vérifiez que la capsule transparente à l'autre raccord. Choisissez un biberon répondant extrémité de la tubulure est couverte par la aux besoins. Capacités disponibles : membrane de protection. Dans le cas contraire, 35 ml, 80 ml, 150 ml et 250 ml. Enfoncez placez la membrane avec la partie arrondie l'extrémité...
-
Page 122: Raccorder Le Tire-Lait À Son Boîtier
Vissez un biberon Medela sur le raccord. Choisissez une taille répondant à vos besoins. 6.6 Raccorder le tire-lait à son boîtier Ouvrez le couvercle du tire-lait. ➙ Appuyez sur le bouton ovale situé sur le tire-lait Symphony et levez la poignée. - Page 123 Introduisez l'embout du tuyau Placez la membrane avec la partie arrondie dans l'orifice prévu à cet effet vers le haut sur une surface plate. Poussez sur le connecteur. la capsule dans la membrane jusqu'à ce qu'elle s'y emboîte. Connectez l'embout du tuyau à la capsule. Fixez solidement la capsule située à...
-
Page 124: Expression
7. Expression 7.1 Sélection de la téterelle Une téterelle à la bonne taille évite la compression de canaux galactophores pendant √ l’expression ; ainsi le sein est vidé de façon optimale, avec une efficacité maximale. Pour vérifier si la téterelle s'adapte correctement : 1. -
Page 125: Sélection Du Programme Adéquat
7.2 Sélection du programme adéquat* Le tire-lait Symphony est doté de la carte de Lorsque la carte Symphony PLUS est installée : programmation Symphony PLUS qui contient Utilisez le programme INITIATE dès deux programmes d'expression. L'objectif du la naissance : programme INITIATE est d'initier la production I Jusqu’à... - Page 126 7. Expression 7. Expression Remarque l Déconnectez toujours le tire-lait Symphony de la source d'alimentation après l'expression. Info l Le programme enregistre le dernier réglage de niveau de vide appliqué lors de la phase de stimulation. Réglage du niveau de vide de confort l Concernant le programme MAINTAIN :...
-
Page 127: Fonctionnement : Programme Maintain
7.4 Fonctionnement : Programme MAINTAIN Appuyez sur le bouton on/off pour Le programme INITIATE s'active mettre en marche le tire-lait. Le programme automatiquement pendant 15 minutes MAINTAIN va automatiquement commencer et comprend des phases de stimulation, par la phase de stimulation après que vous d'expression et de pause. - Page 128 7. Expression 7. Expression 7. Expression Remarque l Déconnectez toujours le tire-lait Symphony de la source d'alimentation après l'expression. Info l Le programme enregistre le dernier réglage de niveau de vide appliqué lors de la phase de stimulation. Continuez l'expression jusqu'à ce que l Concernant le programme Standard :...
-
Page 129: Opération : Programme Standard
(voir sentiez que votre sein est bien drainé et le chapitre 7.6). Les points sur l'écran souple (Medela recommande une expression indiquent le niveau de vide. Plus il d'au moins 15 minutes). Éteignez le tire-lait a de points, plus le niveau de vide en appuyant sur le bouton on/off... -
Page 130: Réglage Du Niveau De Vide Confortable
Remarque augmenter le niveau de vide jusqu'à ce que vous ressentiez une légère gêne. l Déconnectez toujours le tire-lait Symphony de Tournez-le ensuite vers la gauche pour la source d'alimentation après l'expression. réduire légèrement le niveau de vide jusqu'à... -
Page 131: Expression Simple
7.7 Expression simple Préparez un set pour tire-lait pour l'ex- Placez la téterelle sur le sein de sorte que pression. Placez la capsule sur l'extrémité le mamelon soit correctement centré dans de la tubulure sur la membrane dans son l'embout. Maintenez la téterelle sur le sein boîtier (voir également le chapitre 6.6). -
Page 132: Expression Double
à usage unique. Remarque Préparez deux sets pour tire-lait pour l'expression. Placez d'abord la capsule l Déconnectez toujours le tire-lait Symphony de sur l'extrémité de la première tubulure la source d'alimentation après l'expression. sur la membrane dans son boîtier (voir également le chapitre 6.6). - Page 133 Activez le tire-lait avec Placez la téterelle d'un set pour tire-lait sur un Sélectionnez le programme sein de sorte que le mamelon soit correctement (voir le chapitre 7.2). centré dans l'embout. Maintenez la téterelle sur le sein à l'aide du pouce et de l'index. Soutenez le sein avec la paume de la main.
-
Page 134: Conservation Et Décongélation Du Lait Maternel
I Le chauffe-biberon Calesca* permet de réchauffer progressivement le lait maternel. Remarque Ces règles de conservation et de décongélation du lait maternel sont des recommandations. Les règles et normes nationales et internes aux hôpitaux peuvent être différentes. * Pour plus d'informations, consultez le site www.medela.com. -
Page 135: Résolution Des Problèmes Et Codes D'erreurs
9. Résolution des problèmes et codes d'erreurs 9.1 Résolution des problèmes Problème Solution Assurez-vous que la source d'alimentation secteur/la batterie est opérationnelle. Non-fonctionnement Vérifiez que l'appareil est allumé. du moteur Vérifiez si la carte de programmation est insérée correctement dans son logement à... - Page 136 - Vérifiez que le cordon d'alimentation Batterie faible les 20 secondes (il reste 15 minutes est branché à l'arrière du tire-lait d'expression à compter du début de l'indication). - Contactez le représentant Medela local Surcharge Le moteur consomme trop de courant moteur si cette erreur se répète Défaillance éventuelle dans - Contactez le représentant Medela local...
-
Page 137: Garantie Et Entretien/Mise Au Rebut
être exécutés que par un technicien agréé Medela. La conception du tire-lait Symphony de Medela a été vérifiée par des organismes de contrôle indépendants et répond à la norme EN/CEI 60601-1. Des copies des certificats de conformité... -
Page 138: Mise Au Rebut
10. Garantie et entretien/mise au rebut Mise au rebut Le tire-lait Symphony est constitué de métal et de plastique et doit être mis au rebut conformément aux directives européennes 2002/95/CE et 2002/96/CE. Respectez également les instructions complémentaires locales. Sur les modèles CA/CC, les composants électroniques et la batterie rechargeable doivent être mis au rebut séparément, conformément... -
Page 139: Liste Des Accessoires
Carte de programmation Symphony Standard - tchèque 800.0554 * Tous les articles ne sont pas vendus dans tous les pays. Pour plus de détails concernant les produits Medela, consultez le site www.medela.com et effectuez une recherche sur le site de votre pays. -
Page 140: Sets À Usage Unique Pour Tire-Lait Et Biberons À Usage Unique
Sets réutilisables pour tire-lait Réf. article Produit 800.0557 Set réutilisable pour tire-lait Symphony sous sachet en polyéthylène, téterelle taille M (24 mm) 200.1141 Set réutilisable pour tire-lait Symphony sous sachet en polyéthylène, téterelle taille L (27 mm) 200.1143 Set réutilisable pour tire-lait Symphony sous sachet en polyéthylène, téterelle taille XL (30 mm) -
Page 141: Autres Accessoires
Câble allume-cigare pour Symphony 600.0387 Vacuomètre d'essai * Tous les articles ne sont pas vendus dans tous les pays. Pour plus de détails concernant les produits Medela, consultez le site www.medela.com et effectuez une recherche sur le site de votre pays. - Page 142 Indice 1. Uso previsto/ Destinatari/Controindicazioni 2. Significato dei simboli 3. Informazioni importanti per la sicurezza 4. Descrizione del prodotto 5. Pulizia 6. Preparazione all’estrazione del latte 7. Estrazione 8. Conservazione e scongelamento del latte materno 9. Risoluzione dei problemi e codici di errore 10.
-
Page 143: Uso Previsto/Destinatari/Controindicazioni
(MANTENIMENTO) è progettato per sviluppare e mantenere la produzione di latte grazie alla tecnologia 2-Phase Expression. In alcuni casi il tiralatte Symphony è dotato invece della scheda di programma Standard, che genera schemi di suzione per l'estrazione. Questo programma è progettato per sviluppare e mantenere la produzione di latte grazie alla tecnologia 2-Phase Expression. -
Page 144: Significato Dei Simboli
2. Significato dei simboli Il simbolo di avvertenza identifica tutte le istruzioni importanti per la sicurezza. La mancata osservanza di tali istruzioni può comportare lesioni alle persone o danni al tiralatte. Vi sono diverse combinazioni di simboli/termini di avvertenza. Le combinazioni di simbolo/termine indicano: Note Avvertenza... - Page 145 Indicatore livello di vuoto, fase di stimolazione – Scheda di programma Standard e scheda di programma Symphony PLUS (programma MAINTAIN) Indicatore livello di vuoto, fase di estrazione – Scheda di programma Standard e scheda di programma Symphony PLUS (programma MAINTAIN) Indicatore livello di vuoto – Scheda di programma Symphony PLUS (programma INITIATE)
-
Page 146: Importanti Informazioni Di Sicurezza
Staccare sempre il tiralatte Symphony subito dopo l'uso. AVVERTENZA: per evitare incendi, folgorazioni o ustioni gravi: l Il tiralatte Symphony non è resistente al calore: tenere lontano da radiatori e fiamme libere. l Non esporre l'unità motore alla luce diretta del sole. - Page 147 I Controllare tutti i componenti del tiralatte Symphony e del/i set per tiralatte prima di ogni utilizzo. l Non utilizzare mai dispositivi, parti o componenti danneggiati.
- Page 148 Non utilizzare accessori non consigliati da Medela, in quanto potrebbero causare pericoli. l Non modificare nessun componente del tiralatte o del set per tiralatte. l Non utilizzare il tiralatte Symphony quando si dorme o si è troppo assonnati. l Non utilizzare il tiralatte Symphony durante la guida di un autoveicolo.
- Page 149 I Non mettere mai il tiralatte in acqua o in uno sterilizzatore poiché il dispositivo subirebbe un danno permanente. I Non utilizzare i set per tiralatte Symphony Medela con un tiralatte non compatibile. I Non utilizzare i set per tiralatte per un uso diverso dall'estrazione di latte materno.
-
Page 150: Descrizione Del Prodotto
Questa scheda di programma contiene il programma Standard 2.0 con tecnologia 2-Phase Expression. Accessori necessari* Il tiralatte Symphony deve essere adoperato con i set per tiralatte e le bottiglie per latte Medela. I set per tiralatte e le bottiglie sono disponibili in confezioni sia riutilizzabili che ad utilizzo limitato. -
Page 151: Tiralatte Symphony Per Uso Ospedaliero - Componenti Del Prodotto
4.2 Tiralatte Symphony per uso ospedaliero – Componenti del prodotto* Display LCD Tasto Tasto di erogazione ON/OFF Manopola di regolazione vuoto Porta bottiglia Protezione della scheda e del cavo Presa per il cavo di collegamento all'automobile Cavo di alimentazione symphony ®... -
Page 152: Set Per Tiralatte Riutilizzabile - Componenti Del Prodotto
4. Descrizione del prodotto 4.3 Set per tiralatte riutilizzabile – Componenti del prodotto* 1 coppa per il seno PersonalFit™ 1 connettore PersonalFit™ 1 testa della valvola 2 membrane della 1 bottiglia per latte valvola (150 ml) 1 tubicino in silicone (105 cm) 1 coperchio della 1 membrana protettiva... - Page 153 4.4 Set per tiralatte ad utilizzo limitato – Componenti del prodotto* 1 coppa per il seno 1 connettore 1 coperchio della membrana 1 membrana 1 tubicino in PVC 1 membrana protettiva contenitore bottiglia bottiglia bottiglia per colostro monouso monouso monouso da 35 ml da 80 ml da 150 ml...
-
Page 154: Pulizia
I Gli agenti disinfettanti di superficie per dispositivi medici non provocano danni meccanici al tiralatte Symphony. I Seguire le istruzioni del fornitore di agenti disinfettanti di superficie. I Fornire la protezione individuale agli operatori in conformità... - Page 155 12. Le procedure di rigenerazione automatizzata in elenco sono testate, convalidate e raccomandate da Medela. In caso di pulizia automatizzata, è necessaria anche la convalida interna della procedura preferita dall’ospedale. Per disinfettare il tiralatte, utilizzare...
-
Page 156: Prima Del Primo Utilizzo
5. Pulizia 5.2 Pulizia dei set per tiralatte – Panoramica Bottiglie ad utilizzo limitato e set per tiralatte monouso ad utilizzo limitato (coppa per il seno, connettore, membrana, tubicino in PVC, coperchio della membrana, membrana protettiva) Set monouso per tiralatte Set giornalieri per tiralatte e bottiglie monouso One-Day... - Page 157 In caso di presenza di latte, condensa o residui visibili nel tubicino, questo deve essere smaltito e sostituito. Medela raccomanda lo smaltimento e la sostituzione del tubicino dopo un massimo di 6 mesi. Se richiesto dalle norme nazionali, regionali o interne alla struttura.
- Page 158 5. Pulizia 5.3 Set per tiralatte monouso e Avvertenza bottiglie monouso – Pulizia l Il set per tiralatte monouso sterile è un prodotto monouso e non deve essere Il set per tiralatte sterile e le bottiglie riutilizzato o rigenerato. monouso (sterili e Ready-to-Use) l Il set giornaliero per tiralatte è...
- Page 159 5.4 Set giornaliero per tiralatte One-Day – Pulizia Verificare se nel tubicino è presente Risciacquare la coppa per il seno, il latte. In questo caso, sostituire il set connettore e la valvola bianca con per tiralatte. Diversamente, smontare acqua potabile pulita fredda (20 °C il set per tiralatte nei suoi singoli circa) per rimuovere le proteine.
- Page 160 Per evitare danni, non applicare Controllare l'eventuale danneggia- pressione esterna. mento dei componenti. Sostituire l Medela non indica il numero massimo di i componenti danneggiati o logorati. utilizzi per un set per tiralatte riutilizzabile o per i suoi singoli componenti, ad eccezione del tubicino.
- Page 161 Utilizzare un comune detersivo per contengono additivi e asciugare stoviglie, preferibilmente senza profumi completamente. Medela raccomanda e coloranti artificiali (5–15% tensioattivi lo smaltimento e la sostituzione del anionici, tensioattivi non ionici, pH tubicino dopo un massimo di 6 mesi.
- Page 162 Se non vi è alcun residuo visibile oppure condensa o latte nel tubicino, non è necessario effettuare la pulizia e la disinfezione automatizzate né sterilizzarlo. Medela raccomanda lo smaltimento e la sostituzione del tubicino dopo un massimo di 6 mesi. Diversamente, smontare il set per...
- Page 163 Conservazione 93 °C Riporre i componenti puliti in una borsa di conservazione pulita o in un ambiente pulito. È importante far asciugare tutta l'umidità residua. Non conservare i componenti in contenitori/borse a chiusura ermetica. Per la pulizia del tubicino, vedere il capi- tolo 5.7.
-
Page 164: Preparazione All'estrazione Del Latte
6. Preparazione all'estrazione del latte 6.1 Installazione della scheda Avvertenza di programma l Usare solo il cavo di alimentazione fornito con Symphony. l Assicurarsi che la tensione del cavo di alimentazione sia compatibile con quella di rete. Informazioni Facoltativo per l'apparecchio a batteria:... -
Page 165: Funzionamento A Corrente
6.2 Installazione della scheda e della protezione del cavo (opzionale) Spingere la protezione della scheda Inserire il cavo nella protezione della e del cavo sulla guida posta sul retro scheda e del cavo a forma di anello fino al fermo, poi stringere la vite. intorno al perno. - Page 166 Note l Utilizzare esclusivamente accessori origi- nali Medela. Aprire la confezione del set per l Il set per tiralatte monouso non necessita tiralatte monouso. Spingere il di pulizia prima del primo utilizzo.
- Page 167 Avvitare una bottiglia monouso al Verificare che il coperchio trasparente connettore. Scegliere una bottiglia che si all'altra estremità del tubicino sia coperto adatti alle esigenze individuali. Le misure dalla membrana protettiva. In caso disponibili sono 35, 80, 150 e 250 ml. contrario, posizionare la membrana con Spingere l'estremità...
-
Page 168: Collegare Il Set Per Tiralatte All'incavo Dell'apparecchio
Avvitare una bottiglia Medela al connettore. Scegliere una misura che si adatti alle esigenze individuali. 6.6 Collegare il set per tiralatte all'incavo dell'apparecchio Aprire il tappo del tiralatte. ➙ Premere il pulsante ovale sulla parte superiore di Symphony e sollevare l'impugnatura. - Page 169 Inserire il tubicino nell'apposita Posizionare la membrana con il lato apertura del connettore. arrotondato verso l'alto su una superficie piana. Spingere il coperchio sulla membrana fino all'inserimento. Inserire l'adattatore del tubicino nell'apertura nel coperchio della membrana. Posizionare saldamente il coperchio della Chiudere il tappo del tiralatte.
-
Page 170: Estrazione
7. Estrazione 7.1 Scelta della coppa per il seno Una coppa per il seno correttamente dimensionata impedisce la compressione √ dei dotti lattiferi durante l'estrazione, assicurando un ottimale svuotamento del seno e il massimo flusso di latte. Per verificare che la coppa per il seno aderisca correttamente: 1. -
Page 171: Selezione Del Programma Corretto
7.2 Selezione del programma corretto* Il tiralatte Symphony include la scheda di pro- Quando è installata la scheda Symphony gramma Symphony PLUS, la quale contiene PLUS: due programmi di estrazione. L'obiettivo del Utilizzare il programma INITIATE subito programma INITIATE (INIZIAZIONE) è quello di dopo il parto: far avviare la produzione di latte. - Page 172 7. Estrazione 7. Estrazione Note l Scollegare sempre Symphony dall'alimen- tazione di rete al termine dell'estrazione. Informazioni l Il programma memorizza l'ultima impostazione di vuoto nella fase di stimolazione. l Per il programma MAINTAIN: Impostare il proprio "vuoto premere il tasto di "erogazione" per confortevole"...
- Page 173 7.4 Funzionamento: Programma MAINTAIN Progr completato Premere il tasto ON/OFF Il programma INITIATE funziona accendere il tiralatte. Dopo aver premuto automaticamente per 15 minuti, il tasto ON/OFF, il programma MAINTAIN attraversando le fasi di stimolazione, si avvierà passando automaticamente estrazione e pausa. Un segnale acustico alla fase di stimolazione.
- Page 174 Se il tiralatte viene tenuto in funzione per 30 minuti senza alcuna modifica delle impostazioni (ad esempio, regolazione del vuoto), Symphony si spegne automaticamente. Dopo due minuti il tiralatte passerà automaticamente alla fase di estrazione.
-
Page 175: Funzionamento: Programma Standard
(vedere capitolo 7.6). Le barre (Medela suggerisce un tempo di estrazione mostrate sul display indicano il livello di almeno 15 minuti). Spegnere il tiralatte di vuoto. Una maggiore quantità di premendo il tasto ON/OFF barre equivale a un vuoto maggiore. - Page 176 Ruotare Note prima verso destra, per aumentare il vuoto fino ad avvertire un leggero l Scollegare sempre Symphony disagio. Quindi ruotare verso sinistra dall'alimentazione di rete al termine per ridurre il vuoto fino a raggiungere dell'estrazione.
-
Page 177: Estrazione Singola
7.7 Estrazione singola Preparare un set per tiralatte per Posizionare la coppa sul seno in modo l’estrazione. Posizionare il coperchio tale che il capezzolo si trovi correttamente della membrana all’estremità del al centro del condotto. Trattenere la coppa tubicino sulla membrana nell’incavo sul seno con il pollice e l'indice. -
Page 178: Estrazione Doppia
Note Preparare due set per tiralatte per l’estrazione. Posizionare prima il co- l Scollegare sempre Symphony perchio della membrana all’estremità dall'alimentazione di rete al termine del tubicino sulla membrana nell’inca- dell'estrazione. - Page 179 Posizionare la coppa di un set per tiralatte Accendere il tiralatte con su un seno in modo tale che il capezzolo si Procedere con la selezione del trovi correttamente al centro del condotto. programma (vedere capitolo 7.2). Trattenere la coppa sul seno con il pollice e l'indice.
-
Page 180: Conservazione E Scongelamento Del Latte Materno
I Con lo scaldabiberon Calesca*, è possibile scaldare delicatamente il latte materno. Note Le presenti linee guida per la conservazione e lo scongelamento del latte materno sono semplicemente consigli. Possono differire dalle linee guida e dagli standard interni dell'ospedale. *Ulteriori informazioni sul sito www.medela.com... -
Page 181: Risoluzione Dei Problemi E Codici Di Errore
9. Risoluzione dei problemi e codici di errore 9.1 Risoluzione dei problemi Problema Soluzione Verificare che sia presente l'alimentazione di rete/la batteria. Se il motore non Verificare che il dispositivo sia acceso. funziona Verificare che la scheda di programma sia inserita correttamente nell'apposito scomparto sul retro del tiralatte. - Page 182 è di 15 minuti a partire dall'inizio del segnale). Il motore richiede una quantità - Contattare il rappresentante Medela locale Sovraccarico del motore di corrente eccessiva se il problema si verifica ripetutamente. Probabile guasto all'elettronica...
-
Page 183: Garanzia E Manutenzione/Smaltimento
Medela ivi indicate. Il manuale di assistenza, gli schemi elettrici e le descrizioni sono disponibili su richiesta. Medela ritiene che i test di produzione finali sostituiscano i test sul dispositivo in loco prima della messa in servizio. -
Page 184: Smaltimento
10. Garanzia e manutenzione/smaltimento Smaltimento Il tiralatte Symphony è composto di materie plastiche e metalli e pertanto deve essere smaltito conformemente alle direttive europee 2002/95/CE e 2002/96/CE. È inoltre necessario rispettare anche eventuali ulteriori linee guida locali. Nelle versioni CA/CC i componenti elettronici e la batteria ricaricabile devono essere smaltiti separatamente,... -
Page 185: Elenco Accessori
800.0553 Scheda di programma Symphony Standard Ungherese Scheda di programma Symphony Standard Ceco 800.0554 * Gli articoli possono non essere disponibili in tutti i paesi. Per ulteriori informazioni sui prodotti Medela e per trovare i rivenditori più vicini, visitare il sito www.medela.com. - Page 186 Codice art. Prodotto 800.0557 Set per tiralatte riutilizzabile Symphony in sacchetto di polietilene, coppa per il seno misura M (24 mm) Set per tiralatte riutilizzabile Symphony in sacchetto di polietilene, coppa per il seno misura L (27 mm) 200.1141 200.1143...
-
Page 187: Altri Accessori
Scheda e protezione del cavo Symphony 928.1017 Cavo per collegamento all'automobile per Symphony 600.0387 Vacuometro di prova * Gli articoli possono non essere disponibili in tutti i paesi. Per ulteriori informazioni sui prodotti Medela e per trovare i rivenditori più vicini, visitare il sito www.medela.com. - Page 188 Inhoudsopgave 1. Beoogd gebruik / populatie / contra-indicatie 2. Betekenis van de symbolen 3. Belangrijke veiligheidsinformatie 4. Productomschrijving 5. Reiniging 6. Voorbereidingen voor het afkolven 7. Afkolven 8. Moedermelk bewaren en ontdooien 9. Problemen oplossen en foutcodes 10. Garantie en onderhoud / afvalverwijdering 11.
-
Page 189: Beoogd Gebruik / Populatie / Contra-Indicatie
2-Phase Expression-technologie. Het kan zijn dat de Symphony borstkolf is voorzien van de Standard-programmakaart om de zuigpatronen te genereren. Dit programma is bedoeld om de melkproductie te stimuleren en op gang te houden met de 2-Phase Expression-technologie. -
Page 190: Betekenis Van De Symbolen
2. Betekenis van de symbolen Het waarschuwingssymbool geeft belangrijke veiligheidsinstructies aan. Als die instructies niet in acht worden genomen, kan dat letsel bij de gebruiker of schade aan de borstkolf veroorzaken. Er zijn verschillende combinaties van symbolen/meldingen. De combinaties van symbolen/meldingen staan voor: Opmerking Waarschuwing Kan leiden tot materiële schade. - Page 191 Dit symbool geeft de aanwijzing om de klep van het stopcontact te openen. Aan/uit-knop Druppeltoets Vacuüm-instelknop Symbolen op de display Vacuümniveau-indicator, stimulatiefase – Standard-programmakaart en Symphony PLUS-programmakaart (MAINTAIN-programma) Vacuümniveau-indicator, afkolffase – Standard-programmakaart en Symphony PLUS-programmakaart (MAINTAIN-programma) Vacuümniveau-indicator – Symphony PLUS-programmakaart (INITIATE-programma)
-
Page 192: Belangrijke Veiligheidsinformatie
Pak een elektrisch apparaat dat in het water is gevallen niet vast. Trek onmiddellijk de stekker uit het stopcontact. l Trek onmiddellijk na gebruik van de Symphony borstkolf de stekker uit het stopcontact. WAARSCHUWING: Om vuur, elektrocutie of ernstige brandwonden te voorkomen: l De Symphony borstkolf is niet hittebestendig: weghouden van radiatoren en open vuur. - Page 193 I Inspecteer alle onderdelen van de Symphony borstkolf en de onderdelen van de afkolfset(s) voor elk gebruik. l Gebruik nooit een apparaat, componenten of onderdelen die beschadigd zijn.
- Page 194 Steek nooit een voorwerp in enige opening of slang en laat er geen voorwerp in vallen. l Niet buiten gebruiken. l Er is toezicht vereist als de Symphony borstkolf in de buurt van kinderen wordt gebruikt. l De radiofrequenties van mobiele communicatieapparatuur kunnen een negatieve invloed hebben op de Symphony borstkolf.
- Page 195 I Dompel de borstkolf nooit onder in water of in een sterilisator omdat dit permanente schade aan de borstkolf kan veroorzaken. I Gebruik de Medela Symphony afkolfsets niet met een niet-compatibele borstkolf. I Gebruik de afkolfsets niet voor andere doeleinden dan het afkolven van moedermelk.
-
Page 196: Productomschrijving
De afkolfsets en flessen zijn verkrijgbaar als herbruikbare of als disposable producten. Herbruikbare producten: I Symphony multibox voor ziekenhuizen (20 herbruikbare afkolfsets in de maat M, L of XL). Disposable producten: De disposable producten van Medela zijn bedoeld voor eenmalig gebruik of gebruik voor één dag in een ziekenhuisomgeving en hoeven voor het eerste gebruik niet te worden gereinigd. - Page 197 4.2 Symphony borstkolf voor gebruik in ziekenhuizen – Productonderdelen* Lcd-scherm Aan/ Druppeltoets uit-knop Vacuüm-instelknop Fleshouder Kaart- en snoerbescherming Contact voor autokabel Netsnoer symphony ® Fleshouder Programmakaart Symphony PLUS SAMPLE – Not for clinical use English Symphony PLUS program card for use with the Symphony breastpump...
- Page 198 4. Productomschrijving 4.3 Herbruikbare afkolfset – Productonderdelen* 1x PersonalFit™ borstschild 1x PersonalFit™ connector 1x vacuümklep 2x membraan van 1x moedermelkflesje de vacuümklep (150 ml) 1x silicone slang (105 cm) 1x membraankap 1x beschermend membraan 1x beschermdop 1x dekselinleg 1x deksel met opening * Zie hoofdstuk 11 voor bestelinformatie...
- Page 199 4.4 Disposable afkolfset – Productonderdelen* 1x borstschild 1x connector 1x membraankap 1x membraan 1x pvc-slang 1x beschermend membraan colostrumcon- disposable disposable disposable tainer 35 ml flesje 80 ml flesje 150 ml flesje 250 ml * Zie hoofdstuk 11 voor bestelinformatie...
-
Page 200: Reiniging
I Oppervlakteontsmettingsmiddelen voor medische apparaten veroorzaken geen mechanische schade aan de Symphony. I Volg de instructies van de leverancier van de oppervlakteontsmettings- Om de borstkolf te reinigen, veegt middelen. u de behuizing van de borstkolf af... - Page 201 (niet voorrang op de aanbevelingen van Medela. natte) doek die is geïmpregneerd met een oppervlakteontsmettingsmiddel voor medische apparaten. Medela...
- Page 202 5. Reiniging 5.2 Afkolfsets reinigen – Overzicht Disposable flessen en disposable afkolfsets (Borstschild, connector, membraan, pvc-slang, membraankap, beschermend membraan) Afkolfset voor eenmalig gebruik en flessen voor Afkolfsets voor één dag eenmalig gebruik Vóór het eerste Geen reiniging vereist Geen reiniging vereist gebruik I Handmatige reiniging (§5.4) Let op: de slang, de membraankap...
- Page 203 Als er zich melk, condensatie of zichtbare resten in de slang bevinden, moet de slang weggeworpen en vervangen worden. Medela adviseert om de slang na max. 6 maanden weg te werpen en te vervangen. Indien vereist door nationale, regionale of interne voorschriften.
- Page 204 5. Reiniging 5.3 Disposable afkolfsets en Waarschuwing flessen voor eenmalig gebruik – Reiniging l De steriele afkolfset voor eenmalig gebruik is een product voor eenmalig gebruik en mag niet opnieuw worden gebruikt of opnieuw De steriele afkolfset en disposable worden klaargemaakt voor gebruik. flessen (steriel en Ready-to-Use) zijn l De afkolfset voor één dag is een product producten voor eenmalig gebruik die...
- Page 205 5.4 Disposable afkolfset voor één dag – Reiniging Controleer of er melk in de slang zit. Spoel het borstschild, de connector en het Vervang de afkolfset als dit het geval witte ventiel met koud, schoon water van is. Als dat niet het geval is, haalt drinkkwaliteit (circa 20 °C) om eiwitten te u de afkolfset uit elkaar tot losse verwijderen.
- Page 206 Om beschadiging te voorkomen, dient beschadigde of versleten onderdelen. u er geen externe druk op uit te oefenen. l Medela heeft geen voorschrift over hoeveel keer een herbruikbare afkolfset of de losse onderdelen maximaal mogen worden gebruikt, met uitzondering van de slang.
- Page 207 Medela adviseert (5–15% anionisch tenside, niet-ionisch om de slang na max. 6 maanden tenside, pH-neutraal). Spoel de weg te werpen en te vervangen.
- Page 208 Medela adviseert om de slang na max. 6 maanden weg te werpen en te vervangen. Als dat nog niet is gebeurd, haalt u de...
- Page 209 Bewaren 93 °C Bewaar de schone onderdelen in een schone bewaarzak of in een schone omgeving. Het is belangrijk dat alle achtergebleven vocht opdroogt. Bewaar de onderdelen niet in een luchtdichte verpakking/zak. Zie hoofdstuk 5.7 voor meer informatie over het reinigen van de slang. Reinig en desinfecteer de overige onderdelen in een mechanische was- en desinfecteermachi- ne.
-
Page 210: Voorbereidingen Voor Het Afkolven
6. Voorbereidingen voor het afkolven 6.1 Plaatsing van de Waarschuwing programmakaart l Gebruik uitsluitend het netsnoer dat bij de Symphony is geleverd. l Vergewis u ervan dat het voltage van het netsnoer overeenkomt met het voltage ter plaatse. Info Optioneel voor borstkolf met batterij: De programmakaart moet in l De geïntegreerde batterij moet na... -
Page 211: Plaatsing Van De Kaart- En Snoerbescherming (Optioneel)
6.2 Plaatsing van de kaart- en snoerbescherming (optioneel) Druk de kaart- en snoerbescherming Steek het netsnoer in de kaart- en snoerbescherming in een lus rond zover mogelijk over de geleiderail de pin. op de achterkant en schroef vast. ➙ Zorg ervoor dat er genoeg spe- ling is om het snoer in te steken. -
Page 212: De Herbruikbare Afkolfset In Elkaar Zetten
Droog uw handen af met een schone, ongebruikte handdoek of een papieren handdoek voor eenmalig gebruik. Opmerking l Gebruik alleen originele accessoires van Medela. l De disposable afkolfset hoeft niet te Open de verpakking van de worden gereinigd voor het eerste gebruik. disposable afkolfset. Druk de l De herbruikbare afkolfset dient connector op het borstschild. - Page 213 Schroef een disposable fles op de Controleer of het beschermende membraan connector. Kies een fles die bij uw zich op de transparante kap aan het andere behoeften past. Verkrijgbaar in de uiteinde van de slang bevindt. Is dit niet maten 35, 80, 150 en 250 ml. het geval, dan plaatst u het membraan Druk het open uiteinde van de slang met de ronde kant omhoog op een vlakke...
- Page 214 Het deksel duwt de membraankap omlaag om te voorkomen dat verlies van vacuüm optreedt ingeval de membraankap los zou raken. Schroef een fles van Medela op de connector. Kies een maat die bij uw behoeften past. 6.6 De afkolfset op de borstkolf- behuizing aansluiten Open het deksel van de borstkolf.
- Page 215 Steek de slang in de Plaats het membraan met de bolle kant corresponderende opening omhoog op een vlakke ondergrond. van de connector. Druk de kap in het membraan totdat hij vastklikt. Steek de adapter van de slang in de opening in de membraankap. Sluit het deksel.
-
Page 216: Afkolven
7. Afkolven 7.1 Het borstschild kiezen Een goed passend borstschild voorkomt het samendrukken van melkkanalen tijdens het √ afkolven, zodat de borst zo leeg mogelijk wordt en de hoeveelheid afgekolfde melk maximaal is. U kunt als volgt controleren of het borstschild goed past: 1. -
Page 217: Het Juiste Programma Kiezen
I Gedurende de eerste vijf dagen. Als de op gang te houden. melkproductie na vijf dagen niet op gang ➙ Het is mogelijk dat de Symphony Stan- is gekomen, schakelt u over op dard-programmakaart in uw Symphony het MAINTAIN-programma. - Page 218 7. Afkolven 7. Afkolven Opmerking l Trek de stekker van de Symphony na het afkolven altijd direct uit het stopcontact. Info l Het programma slaat de laatste vacuüm- instelling in de stimulatiefase op. l voor het MAINTAIN-programma: Druk op de druppeltoets...
-
Page 219: Bediening: Maintain-Programma
7.4 Bediening: MAINTAIN-programma Programma gedaan Druk de aan/uit-knop in om Het INITIATE-programma loopt automatisch de borstkolf in te schakelen. Het gedurende 15 minuten met stimulatie-, MAINTAIN-programma begint afkolf- en pauzefasen. Een akoestisch automatisch met de stimulatiefase signaal geeft het einde van het programma na het indrukken van de aan/uit-knop. - Page 220 7. Afkolven 7. Afkolven 7. Afkolven Opmerking l Trek de stekker van de Symphony na het afkolven altijd direct uit het stopcontact. Info l Het programma slaat de laatste vacuüm- instelling in de stimulatiefase op. l voor het Standard-programma: Druk op de druppeltoets...
-
Page 221: Bediening: Standard-Programma
Stel het maximaal comfortabel Ga door met afkolven totdat de borst vacuüm voor de afkolffase in leeg en zacht aanvoelt (Medela (zie hoofdstuk 7.6). adviseert een afkolftijd van minstens De balkjes op de display geven 15 minuten). -
Page 222: Maximaal Comfortabel Vacuüm Instellen
Verhoog Opmerking eerst het vacuüm door de knop naar rechts te draaien tot het l Trek de stekker van de Symphony na het enigszins oncomfortabel aanvoelt. afkolven altijd direct uit het stopcontact. Draai vervolgens naar links om het vacuüm te verlagen tot het... -
Page 223: Enkel Afkolven
7.7 Enkel afkolven Zet één afkolfset klaar om af te Plaats het borstschild op de borst met de kolven. Plaats de membraankap tepel in het midden van de schacht. Houd aan het uiteinde van de slang op het het borstschild met de duim en wijsvinger membraan in de behuizing van de op de borst. -
Page 224: Dubbel Afkolven
Opmerking Zet twee afkolfsets klaar om af te kolven. Plaats eerst de membraankap l Trek de stekker van de Symphony na het aan het uiteinde van de eerste slang afkolven altijd direct uit het stopcontact. op het membraan in de behuizing van de borstkolf (zie hoofdstuk 6.6). - Page 225 Schakel de borstkolf in met Plaats het borstschild van de eerste Ga verder met de programmakeuze afkolfset op de eerste borst met de tepel (zie hoofdstuk 7.2). in het midden van de schacht. Houd het borstschild met de duim en wijsvinger op de borst.
-
Page 226: Moedermelk Bewaren En Ontdooien
I Met behulp van de flessenwarmer Calesca* is het mogelijk moedermelk geleidelijk te verwarmen. Opmerking Deze richtlijnen voor bewaren en ontdooien van moedermelk zijn aanbevelingen. Nationale en interne ziekenhuisrichtlijnen en -normen kunnen hiervan afwijken. *Meer informatie vindt u op www.medela.com... -
Page 227: Problemen Oplossen En Foutcodes
9. Problemen oplossen en foutcodes 9.1 Problemen oplossen Probleem Oplossing Controleer of er netvoeding/batterijspanning beschikbaar is. Controleer of het apparaat aangezet is. De motor loopt niet Controleer of de programmakaart correct in het kaartcompartiment aan de achterkant van de borstkolf is ingebracht. Zet de afkolfset in elkaar volgens de aanwijzingen in hoofdstuk 6.4 of 6.5. - Page 228 Mogelijke problemen Acties Programmakaart is geen - Controleer of de juiste programmakaart Symphony kaart wordt gebruikt Programmakaart is niet Ongeldige - Controleer of de kaart correct is geplaatst correct geplaatst...
-
Page 229: Garantie En Onderhoud / Afvalverwijdering
Medela. De onderhoudshandleiding, bedradingsschema's en omschrijvingen zijn op aanvraag verkrijgbaar bij Medela. Medela is van mening dat door de eindtesten in het productieproces, het ter plaatste testen van het apparaat voor het in gebruik wordt genomen niet meer nodig is. - Page 230 10. Garantie en onderhoud / afvalverwijdering Afvalverwijdering De Symphony borstkolf is gemaakt van metalen en kunststoffen en moet worden verwijderd in overeenstemming met de Europese richtlijnen 2002/95/EG en 2002/96/EG. Bovendien moeten de lokale voorschriften in acht worden genomen. Bij de AC/DC-versies moeten de elektronische componenten en de oplaadbare batterij apart worden verwijderd, conform de lokale regelgeving.
-
Page 231: Lijst Van Accessoires
Programmakaart Symphony Standard Grieks 800.0553 Programmakaart Symphony Standard Hongaars Programmakaart Symphony Standard Tsjechisch 800.0554 * Mogelijk zijn de artikelen niet in alle landen verkrijgbaar. Meer informatie over producten van Medela en verkooppunten in uw land, kunt u vinden op www.medela.com... - Page 232 008.0178 Symphony afkolfset voor één dag, PersonalFit borstschild maat XL (30 mm) 008.0179 Symphony en Lactina afkolfset voor één dag, PersonalFit borstschild maat M (24 mm) 008.0180 Symphony en Lactina afkolfset voor één dag, PersonalFit borstschild maat L (27 mm) 008.0181...
-
Page 233: Andere Accessoires
Koffer voor Symphony zonder riem 600.0816 Symphony kaart- en snoerbescherming 928.1017 Autokabel voor Symphony 600.0387 Testvacuümmeter * Mogelijk zijn de artikelen niet in alle landen verkrijgbaar. Meer informatie over producten van Medela en verkooppunten in uw land, kunt u vinden op www.medela.com... - Page 234 12. Cleaning – country-specific regulations The process of reprocessing reusable pump sets, excluding silicone tubing, after use as described in chapters 5.7, 5.8 and 5.9 can differ from the practice in your country. For an overview of the country-specific regulations and guidelines used in hospitals, see the table below.
- Page 235 Disinfec- Auto- Manual tion in Sterili- mated Country Remarks cleaning washer- sation cleaning disinfector (§ 5.7) (§ 5.9) (§ 5.8) (§ 5.8) France (CCLIN) √ ( clean √ Manual cleaning with directly sterilisation after use) CCLIN = Centre de Coordination de Lutte contre les Infections Nosocomiales France (CCLIN) Disinfection in washer- √...
- Page 236 12. Cleaning – country-specific regulations Disinfec- Auto- Manual tion in Sterili- mated Country Remarks cleaning washer- sation cleaning disinfector (§ 5.7) (§ 5.9) (§ 5.8) (§ 5.8) The reusable pump set is a single The Netherlands √* √* √ user product. Perform a pre-clean on the spot Philippines √**...
-
Page 237: Emc / Technical Description
13. EMC / technical description 13. EMC / technical description The Symphony breast pump is EMC-tested in conformity with the requirements of IEC 60601-1-2:2007 and 60601-1-2:2014 4th Edition according to clause 7 and 8.9. The Symphony breast pump needs special precautions regarding EMC (Electromagnetic Compatibility) and needs to be installed and put into service according to the EMC infor- mation provided in these instructions for use. - Page 238 IEC 60601-1-2:2014 4th Edition, Table 1) Electromagnetic emissions The Symphony electric breast pump is intended for use in the electromagnetic environment specified below. The customer or the user of the Symphony electric breast pump should ensure that it is used in such an environment. Compli- Emission tests Electromagnetic environment –...
-
Page 239: Electromagnetic Immunity
Electromagnetic immunity The Symphony electric breast pump is intended for use in the electromagnetic environment specified below. The customer or the user of the Symphony electric breast pump should ensure that it is used in such an environment. IEC 60601... - Page 240 Electromagnetic Compatibility (EMC, IEC 60601-1-2:2007, Table 4) Electromagnetic immunity The Symphony electric breast pump is intended for use in the electromagnetic environment specified below. The customer or the user of the Symphony electric breast pump should ensure that it is used in such an environment. Com-...
- Page 241 RF transmitters, an electromagnetic site survey should be considered. If the measured field strength in the location in which the Symphony electric breast pump is used exceeds the applicable RF compliance level above, the Symphony electric breast pump should be observed to verify normal operation.
- Page 242 Recommended separation distances between portable and mobile RF communications equipment and the Symphony electric breast pump The Symphony electric breast pump is intended for use in an electromagnetic environment in which radiated RF disturbances are controlled. The customer or the user of the Symphony electric breast...
-
Page 243: Technical Specifications
14. Technical specifications Operation vacuum (approx.) Betrieb Vakuum (ungefährer Wert) Utilisation force d’aspiration (env.) Funzionamento vuoto (circa) Bediening vacuüm (ca.) –50 ... –250 mmHg –7 ... –33 kPa Transport / Storage 45 ... 120 cpm Transport / Lagerung Transport/stockage 100 – 240 V ~ Trasporto/Conservazione 50 / 60 Hz Vervoer/opslag... - Page 244 Phone +61 3 9552 8600 +61 3 9552 8699 Italy Medela LLC contact@medela.com.au Medela Italia Srl a socio unico 1101 Corporate Drive www.medela.com.au Via Turrini, 13-15 - Loc. Bargellino McHenry, IL 60050 40012 Calderara di Reno (BO) France Italy...