
Manuels Connexes pour Agilent Technologies MS120 G2571-64000


Sommaire des Matières pour Agilent Technologies MS120 G2571-64000
- Page 1 MS120 Single Stage Rotary Vane Pumps (G2571-64000) Model: G2571-64000 Manuale di Istruzioni Bedienungshandbuch Notice de Mode D’Emploi User Manual X3702-90000 (A) 12/2019...
- Page 2 Use, duplication or disclosure of Software is subject to The material contained in this Agilent Technologies’ standard © Agilent Technologies, Inc. 2019 document is provided “as is,” and is commercial license terms, and non- subject to being changed, without...
- Page 3 MS120 Single Stage Rotary Vane Pumps MS120 Single Stage Rotary Vane Pumps MS120 Single Stage Rotary Vane Pumps (G2571-64000) User Manual / X3702-90000 (A) 3/188...
- Page 4 MS120 Single Stage Rotary Vane Pumps MS120 Single Stage Rotary Vane Pumps (G2571-64000) User Manual / X3702-90000 (A) 4/188...
-
Page 5: Table Des Matières
Contents Contents Istruzioni per l’uso 9 Informazioni Generali Prescrizioni di sicurezza 14 Immagazzinamento, trasporto e movimentazione 18 Preparazione per l’installazione 23 Uso 30 Manutenzione 35 Lubrificanti 43 Messa fuori servizio 43 Ritorno per riparazione 44 Inconvenienti e rimedi Smaltimento Gebrauchsanleitung 47 Allgemeine Hinweise Sicherheitsvorschriften 53 Einlagerung, Transport und Bewegung... - Page 6 Contents Schmiermittel Stilllegung 82 Rücksendung zur Reparatur 83 Fehler und ihre Behebung Entsorgung 85 Mode d’emploi Indications générales Prescriptions de sécurité 92 Stockage, transport et manutention 96 Préparation pour l'installation Utilisation 108 Entretien Lubrifiants 122 Mise hors service Retour pour une réparation 123 Problèmes et solutions 124 Mise au rebut Instructions for Use 127...
- Page 7 Contents Use 146 Maintenance Lubricants 159 Decommissioning Return to Agilent Troubleshooting 161 Disposal Technical Information 163 Section I Technical Description Vacuum Seals 165 Technical Data 166 Section II Connection to the Electric Supply 171 Starting and Running the Pump 172 Stopping the Pump 173 Safety Rules 173 Warning Notes 174...
- Page 8 Contents MS120 Single Stage Rotary Vane Pumps (G2571-64000) User Manual / X3702-90000 (A) 8/188...
-
Page 9: Istruzioni Per L'uso
MS120 Single Stage Rotary Vane Pumps (G2571-64000) User Manual Istruzioni per l’uso Informazioni Generali 11 Simboli usati 13 Prescrizioni di sicurezza Immagazzinamento, trasporto e movimentazione 18 Immagazzinamento 18 Sollevamento 18 Disimballaggio 20 Preparazione per l’installazione 23 Accessori forniti con la pompa Assemblaggio 23 Ubicazione Collegamento alla macchina utilizzatrice 26... - Page 10 Istruzioni per l’uso Consigli per l’utilizzo Zavorratore (Gas-ballast) Aspirazione vapor acqueo Manutenzione Sostituzione olio lubrificante 37 Sostituzione elementi disoleatori 39 Manutenzione ordinaria 41 Accessori ordinabili Come ordinare i ricambi 42 Lubrificanti Messa fuori servizio Ritorno per riparazione 44 Inconvenienti e rimedi 45 Smaltimento MS120 Single Stage Rotary Vane Pumps (G2571-64000) User Manual / X3702-90000 (A) 10/188...
-
Page 11: Informazioni Generali
Istruzioni per l’uso Informazioni Generali Informazioni Generali Questa apparecchiatura è destinata ad uso professionale. L'utilizzatore deve leggere attentamente il presente manuale di istruzioni ed ogni altra informazione addizionale fornita dalla Agilent prima dell'utilizzo dell'apparecchiatura. La Agilent si ritiene sollevata da eventuali responsabilità dovute all'inosservanza totale o parziale delle istruzioni, ad uso improprio da parte di personale non addestrato, ad interventi non autorizzati o ad uso contrario alle normative nazionali specifiche. - Page 12 Istruzioni per l’uso Informazioni Generali Le MS120 Single Stage Rotary Vane Pumps sono delle pompe rotative monostadio a palette, a tenuta in bagno d'olio, azionate da motore elettrico pilotato da inverter. Queste pompe da alto vuoto sono adatte esclusivamente al pompaggio di aria e piccole quantità di vapor d’acqua.
-
Page 13: Simboli Usati
Istruzioni per l’uso Informazioni Generali I messaggi di attenzione sono visualizzati prima di procedure che, se non ATTENZIONE! osservate, potrebbero causare danni all’apparecchiatura. Le note contengono informazioni importanti estrapolate dal testo. NOTA Simboli usati I seguenti simboli sono utilizzati in modo coerente in tutte le illustrazioni: Simboli Descrizione... -
Page 14: Prescrizioni Di Sicurezza
Istruzioni per l’uso Prescrizioni di sicurezza Prescrizioni di sicurezza AVVERTENZA! Nonostante le precauzioni prese in fase di progetto, esistono elementi di rischio che si presentano durante le operazioni che si eseguono in fase di uso e manutenzione. AVVERTENZA! SUPERFICI CALDE. Durante le operazioni di manutenzione si toccano superfici che possono superare la temperatura di 80 °C. - Page 15 Istruzioni per l’uso Prescrizioni di sicurezza AVVERTENZA! EMISSIONI DI SOSTANZE NOCIVE L’aria di scarico della pompa contiene tracce di nebbie d’olio (residuo max. 2PPM/ peso equivalenti a 2,4 mg/m ). Verificare la compatibilità con l’ambiente di lavoro. Garantire un corretto ricambio d’aria oppure portare lo scarico della pompa all’esterno.
- Page 16 Istruzioni per l’uso Prescrizioni di sicurezza AVVERTENZA! PERICOLO GENERATO DA PRESSIONE Il serbatoio della pompa è pressurizzato. Non aprire e non dimenticare aperti i tappi di carico o scarico durante il funzionamento. AVVERTENZA! Escludere sempre l'alimentazione della pompa prima di compiere operazioni di manutenzione.
- Page 17 Istruzioni per l’uso Prescrizioni di sicurezza AVVERTENZA! PERICOLO DI INCENDIO L’utilizzo della pompa per impieghi non previsti o proibiti da questo manuale, oppure la mancanza di una corretta manutenzione, possono provocare anomalie di funzionamento con rischio di surriscaldamento e incendio. In caso di incendio non usare acqua per spegnere le fiamme.
-
Page 18: Immagazzinamento, Trasporto E Movimentazione
Istruzioni per l’uso Immagazzinamento, trasporto e movimentazione Immagazzinamento, trasporto e movimentazione Immagazzinamento Le pompe devono essere trasportate senza olio. Durante il trasporto e l'immagazzinamento delle pompe non devono essere superate le seguenti condizioni ambientali: temperatura: da -20 °C a 70 °C ▪... - Page 19 Istruzioni per l’uso Immagazzinamento, trasporto e movimentazione Figura 2 Pompa imballata Figura 3 Pompa MS120 Single Stage Rotary Vane Pumps (G2571-64000) User Manual / X3702-90000 (A) 19/188...
-
Page 20: Disimballaggio
Istruzioni per l’uso Immagazzinamento, trasporto e movimentazione Disimballaggio La pompa viene fornita in un imballo protettivo speciale; se si presentano segni di danni, che potrebbero essersi verificati durante il trasporto, contattare il Contact Center. Durante l'operazione di disimballaggio, prestare particolare attenzione a non lasciar cadere la pompa e a non sottoporla ad urti o vibrazioni. - Page 21 Istruzioni per l’uso Immagazzinamento, trasporto e movimentazione Rimuovere le n. 8 viti che chiudono le staffette, quindi rimuovere le n.4 staffette. Figura 5 Sbloccare i freni di arresto delle ruote. Fissare la rampa di discesa con n.1 vite come mostrato nella figura. Figura 6 MS120 Single Stage Rotary Vane Pumps (G2571-64000) User Manual / X3702-90000 (A) 21/188...
- Page 22 Istruzioni per l’uso Immagazzinamento, trasporto e movimentazione Spingere la pompa posteriormente per farla scivolare giù dal pallet. Figura 7 MS120 Single Stage Rotary Vane Pumps (G2571-64000) User Manual / X3702-90000 (A) 22/188...
-
Page 23: Preparazione Per L'installazione
Istruzioni per l’uso Preparazione per l’installazione Preparazione per l’installazione Accessori forniti con la pompa La pompa viene consegnata completa dei seguenti accessori necessari alla messa in servizio e alla manutenzione ordinaria: ▪ Bottiglia olio Imbuto carico olio ▪ Raccordo carico olio ▪... -
Page 24: Ubicazione
Istruzioni per l’uso Preparazione per l’installazione Figura 8 Ubicazione AVVERTENZA! La pompa; deve essere bloccata agendo sui freni posti sulle ruote di appoggio, • su un piano orizzontale. deve essere accessibile per una corretta e facile manutenzione • rispettando le distanze minime da eventuali ingombri (vedere figura seguente). - Page 25 Istruzioni per l’uso Preparazione per l’installazione Tab. 2 Minima Distanza Quota Dimensione 150 mm 200 mm 150 mm 500 mm Figura 9 MS120 Single Stage Rotary Vane Pumps (G2571-64000) User Manual / X3702-90000 (A) 25/188...
-
Page 26: Collegamento Alla Macchina Utilizzatrice
Istruzioni per l’uso Preparazione per l’installazione La pompa non deve essere installata all’esterno e deve sempre essere protetta ATTENZIONE! dagli agenti atmosferici. Evitare che l’aria calda proveniente dallo scarico o dalle ventole di raffreddamento possa creare disagio al personale. Non installare la pompa in una zona con polvere o altri materiali che potrebbero intasare o coprire rapidamente le superfici di raffreddamento. -
Page 27: Convogliamento Aria Di Scarico
Istruzioni per l’uso Preparazione per l’installazione Figura 10 Convogliamento aria di scarico Nel caso di un insufficente ricambio d’aria nel locale pompa è possibile convogliare l’aria di scarico in altri ambienti o all’esterno. Utilizzare tubazioni di diametro uguale alla bocca di scarico del serbatoio per una lunghezza massima di 15 m. -
Page 28: Collegamento Elettrico
Istruzioni per l’uso Preparazione per l’installazione Non inserire rubinetti in questa tubazione. Non ostruire l’uscita. ATTENZIONE! Questo simbolo identifica l’attacco allo scarico. NOTA Collegamento elettrico Verificare la tensione e la frequenza di rete con i dati riportati sulla targhetta della pompa. Assicurarsi dell’efficienza dell’impianto di messa a terra. - Page 29 Istruzioni per l’uso Preparazione per l’installazione Figura 11 MS120 Single Stage Rotary Vane Pumps (G2571-64000) User Manual / X3702-90000 (A) 29/188...
-
Page 30: Uso
L’aspirazione di altri tipi di gas o di vapori deve essere preventivamente dichiarata alla Agilent Technologies che rilascerà la conformità all’impiego specifico. Sono adatte per l’evacuazione di sistemi chiusi o per funzionare ad un vuoto costante compreso nel seguente campo: 0,07 - 15 mbar (assoluti). -
Page 31: Protezioni
Istruzioni per l’uso AVVERTENZA! È proibito utilizzare lo scarico della pompa per creare pressioni anche limitate. AVVERTENZA! È proibito installare la pompa in un ambiente potenzialmente esplosivo. Protezioni AVVERTENZA! Nei casi di impiego in cui l’arresto o un guasto della pompa per vuoto possa causare danni a persone o cose, devono essere previste delle misure di sicurezza nell’impianto. -
Page 32: Tabella Limiti Operativi
Istruzioni per l’uso Tabella limiti operativi TENSIONE D’INGRESSO (V) STATO DEL CONTROLLER < 180 Guasto all’alimentazione (Errore di Sottotensione/Sovratensione – Win205 bit5 = 1) 180 – 200 In funzione (prestazioni ridotte) 200 – 264 In funzione (prestazioni complete) > 264 Guasto all’alimentazione (Errore di Sottotensione/Sovratensione –... -
Page 33: Consigli Per L'utilizzo
Istruzioni per l’uso È importante che il livello dell’olio rimanga tra i valori MIN e MAX visualizzati NOTA dall’indicatore di livello posto sul lato della pompa. Eseguire il primo riempimento attraverso il tappo (E) sino alla metà dell’indicatore di livello (F) e richiudere il tappo (E) (vedere figura seguente). -
Page 34: Zavorratore (Gas-Ballast)
Istruzioni per l’uso AVVERTENZA! La pompa non è progettata per lavorare a pressione atmosferica. È consigliabile non superare i 5 avviamenti/ora. Zavorratore (Gas-ballast) La pompa MS120 è dotata di Zavorratore (Gas Ballast) e di una valvola manuale che permette il suo inserimento (I) o l’esclusione(O). La pressione limite della pompa varia in funzione di questa scelta. -
Page 35: Manutenzione
Istruzioni per l’uso Manutenzione Alla fine del ciclo di lavoro, nel caso di presenza di condensa ▪ nell’olio lubrificante, lasciare funzionare la pompa a vuoto massimo per almeno trenta minuti con lo zavorratore aperto. Effettuare questa operazione prima di fermi macchina prolungati; ▪... - Page 36 Istruzioni per l’uso Manutenzione AVVERTENZA! Escludere sempre l'alimentazione della pompa prima di compiere operazioni di manutenzione. Apporre specifici cartelli di avvertenza: APPARECCHIATURA IN MANUTENZIONE - NON INSERIRE L'ALIMENTAZIONE, in corrispondenza dell'interruttore di alimentazione. Al termine ripristinare i dispositivi di sicurezza. La tabella mostra tutti gli interventi periodici necessari per mantenere in perfetta efficienza la pompa.
-
Page 37: Sostituzione Olio Lubrificante
Istruzioni per l’uso Manutenzione Sostituzione olio lubrificante E' raccomandato di attendere 1 ora e 30 minuti dopo lo spegnimento della pompa per effettuare l'operazione di sostituzione dell'olio lubrificante per permettere alla temperatura della pompa e dell'olio di raffreddarsi sufficientemente. AVVERTENZA! Utilizzare guanti protettivi per evitare scottature. - Page 38 Istruzioni per l’uso Manutenzione Avvitando il tubo scarico olio (pos. A1) sullo scarico (G) il lubrificante comincerà ad uscire. Si raccomanda di inclinare la pompa in avanti sollevando la parte posteriore della pompa di almeno 40 mm per garantire la fuoriuscita completa del lubrificante, ricordarsi di frenare le ruote per evitare che la pompa possa cadere.
-
Page 39: Sostituzione Elementi Disoleatori
Istruzioni per l’uso Manutenzione posizionare l’imbuto in dotazione (A3), procedere quindi al nuovo riempimento (Vedi “Messa in servizio” e “Lubrificanti”). Figura 16 Sostituzione elementi disoleatori Elementi disoleatori molto sporchi possono causare un sensibile aumento di temperatura della pompa e in casi estremi autocombustione dell’olio lubrificante. - Page 40 Istruzioni per l’uso Manutenzione togliere il coperchio serbatoio (pos. B1) svitando le relative viti (pos. B2), estrarre e sostituire l’elemento disoleatore (pos. B4) e i relativi O.R. (pos. B5), rimontare il coperchio di scarico (pos. B1), se necessario sostituire la guarnizione (pos. B3), rimontare il coperchio del cover (pos.C1).
-
Page 41: Manutenzione Ordinaria
Istruzioni per l’uso Manutenzione Manutenzione ordinaria I ricambi necessari alla manutenzione ordinaria sono riportati nella tabella seguente. Usare solo ricambi originali. Per l’ordinazione riportare il Part Number indicato. Tab. 4 Ricambi per la manutenzione Part Number Descrizione X3760-64005 Rotary Vane Fluid AVF 60 Gold 1lt X3702-68201 MS 120 Exhaust Filter Cartridge MS120 Single Stage Rotary Vane Pumps (G2571-64000) User Manual / X3702-90000 (A) 41/188... -
Page 42: Accessori Ordinabili
Istruzioni per l’uso Manutenzione Accessori ordinabili Tab. 5 Accessori ordinabili Part Number Descrizione X3701-63001 MS 120 Noise Abatement System X3760-64005 Rotary Vane Fluid AVF 60 Gold 1lt X3702-64001 Power Cord USA Plug-IEC320 15A X3760-64006 Power Cord UE Plug-IEC320 15A 9699883 Serial cable and A-PLUS X3702-68001 MS 120 Remote I/O Adapter Cable... -
Page 43: Lubrificanti
Tab. 6 Lubrificanti Temperatura ambiente Viscosità Olio Agilent Technologies 12 – 35 °C ISO 53 AVF 60 Gold Nel caso di cambio della tipologia di lubrificante, è necessario procedere ad un lavaggio della pompa facendola funzionare a vuoto massimo per almeno 5 minuti. -
Page 44: Ritorno Per Riparazione
Istruzioni per l’uso Ritorno per riparazione Ritorno per riparazione Prima di restituire la pompa a Agilent per qualsiasi scopo, deve essere emesso NOTA un numero di autorizzazione al reso. Si prega di utilizzare la "Health and Safety Certification" alla fine di questo manuale di istruzioni per richiedere il numero di RMA dal Contact Center Agilent locale. -
Page 45: Inconvenienti E Rimedi
Istruzioni per l’uso Inconvenienti e rimedi Inconvenienti e rimedi In caso di calo delle prestazioni, rumori anomali o intervento della protezione del NOTA motore, contattare il Contact Center Agilent. Tab. 7 Inconvenienti e rimedi INCONVENIENTI CAUSA SOLUZIONE Perdite nelle tubazioni in aspirazione o sulla Eliminare le perdite macchina utilizzatrice Mancanza di lubrificazione... -
Page 46: Smaltimento
Istruzioni per l’uso Smaltimento Smaltimento Significato del logo "WEEE" presente sulle etichette. Il simbolo qui sotto riportato è applicato in ottemperanza alla direttiva CE denominata "WEEE". Questo simbolo (valido solo per i paesi della Comunità Europea) indica che il prodotto sul quale è applicato, NON deve essere smaltito insieme ai comuni rifiuti domestici o industriali, ma deve essere avviato ad un sistema di raccolta differenziata. -
Page 47: Gebrauchsanleitung
MS120 Single Stage Rotary Vane Pumps (G2571-64000) User Manual Gebrauchsanleitung Allgemeine Hinweise 49 Verwendete Symbole Sicherheitsvorschriften Einlagerung, Transport und Bewegung Einlagerung Anheben Auspacken Vorbereitung für die Installation 62 Mitgeliefertes Zubehör 62 Zusammenbau Lage Anschluss an die Maschine 65 Umleitung der Abgasluft Elektrische Anschlüsse 67 Betrieb Vorgesehene Verwendung 69... - Page 48 Gebrauchsanleitung Gas-ballast Ansaugung von Wasserdampf Wartung Ersetzung des Schmieröls Ersetzung der Ölreinigungselemente 78 Routinewartung Bestellbares Zubehör So bestellen Sie Ersatzteile 81 Schmiermittel Stilllegung Rücksendung zur Reparatur Fehler und ihre Behebung 84 Entsorgung MS120 Single Stage Rotary Vane Pumps (G2571-64000) User Manual / X3702-90000 (A) 48/188...
-
Page 49: Allgemeine Hinweise
Gebrauchsanleitung Allgemeine Hinweise Allgemeine Hinweise Das Gerät ist für den professionellen Gebrauch bestimmt. Das Bedienungspersonal muss das vorliegende Handbuch und alle zusätzlichen Informationen von Agilent aufmerksam lesen, bevor das Gerät in Betrieb genommen wird. Agilent übernimt keinerlei Verantwortung für Schäden, die durch die vollständige oder partielle Nichtbeachtung der Instruktionen entstanden sind, durch unsachgemäße Bedienung durch nicht geschultes Personal, durch nicht autorisierte Eingriffe oder durch eine Verwendung, die den vor... - Page 50 Gebrauchsanleitung Allgemeine Hinweise Abbildung 1 Typenschild Die Pumpe Modell MS120 Single Stage Rotary Vane Pump ist eine Einstadium-Rotationsflügelpumpe im Ölbad, die von einem Elektromotor inverter angetrieben. Die Pumpe Modell MS120 Single Stage Rotary Vane Pump ist eine Einstadium-Rotationsflügelpumpe im Ölbad, die von einem durch einen Inverter gesteuerten Elektromotor angetrieben wird.
- Page 51 Gebrauchsanleitung Allgemeine Hinweise In den folgenden Abschnitten finden Sie alle Informationen, die nötig sind, um die Sicherheit während des Betriebs zu gewährleisten. Detaillierte Informationen finden Sie im Anhang “Technical Information”. Dieses Handbuch verwendet folgende Symbole: WARNUNG! Diese Warnung weist auf gefährliche Arbeitsschritte hin, die bei unsachgemäßer Durchfüh-rung das Risiko von Personenschäden bergen.
-
Page 52: Verwendete Symbole
Gebrauchsanleitung Allgemeine Hinweise Verwendete Symbole Folgende Symbole wurden durchgängig in allen Illustrationen verwendet: Symbole Beschreibung Symbole Beschreibung Heiße Oberfläche “Gefahr von Elektrische Verbrennungen beim Sicherheit Berühren der heißen Teile” Emission von schädlichen Brandgefahr Substanzen Nicht in die Umwelt Betriebshandbuch gelangen lassen lesen Anschluss an die Anschluss an den... -
Page 53: Sicherheitsvorschriften
Gebrauchsanleitung Sicherheitsvorschriften Sicherheitsvorschriften WARNUNG! Trotz allen in der Planungsphase ergriffenen Vorsichtsmaßnahmen sind Betrieb und Wartung noch mit einigen Risikofaktoren behaftet. WARNUNG! HEISSE OBERFLÄCHEN. Bei den Wartungsarbeiten müssen Oberflächen berührt werden, deren Temperatur über 80 °C betragen kann. Schützen Sie sich angemessen, um Verbrennungen durch versehentlichen Kontakt zu vermeiden. - Page 54 Gebrauchsanleitung Sicherheitsvorschriften WARNUNG! EMISSIONEN SCHÄDLICHER SUBSTANZEN Die aus der Pumpe austretende Luft enthält Spuren von Ölnebel (max. 2 PPM, entsprechend einem Gewicht von 2,4 mg/m ). Vergewissern Sie sich, dass das mit den Umständen der Arbeitsumgebung vereinbar ist. Sorgen Sie für einen geeigneten Luftaustausch oder leiten Sie die aus der Pumpe austretende Luft nach außen.
- Page 55 Gebrauchsanleitung Sicherheitsvorschriften WARNUNG! GEFAHR DURCH DRUCK Der Tank der Pumpe steht unter Druck. Öffnen Sie die Deckel zum Laden und Entladen nicht während des Betriebs und lassen Sie sie nicht versehentlich unverschlossen. WARNUNG! Klemmen Sie die Pumpe immer von der Versorgung ab, bevor Sie Wartungsarbeiten durchführen.
- Page 56 Gebrauchsanleitung Sicherheitsvorschriften WARNUNG! BRANDGEFAHR Die Verwendung der Pumpte für andere als die in diesem Handbuch genannten oder für verbotene Zwecke sowie eine nicht ausreichende Wartung können zu Funktionsstörungen führen und bergen die Gefahr von Überhitzung und Brand. Verwenden Sie im Brandfall kein Wasser zum Löchen.
-
Page 57: Einlagerung, Transport Und Bewegung
Gebrauchsanleitung Einlagerung, Transport und Bewegung Einlagerung, Transport und Bewegung Einlagerung Die Pumpe muss ohne Öl transportiert werden. Bei Transport und Einlagerung der Pumpe müssen folgende Bedingungen eingehalten werden: Temperatur: -20°C bis 70 °C ▪ ▪ relative Luftfeuchtigkeit: 0 bis 95 % (nicht kondensierend). Anheben Die Ausrichtung der verpackten Komponenten muss den Abbildungen auf der Außenseite der Verpackung entsprechen. - Page 58 Gebrauchsanleitung Einlagerung, Transport und Bewegung Abbildung 2 Verpackte Pumpe Abbildung 3 Pumpe MS120 Single Stage Rotary Vane Pumps (G2571-64000) User Manual / X3702-90000 (A) 58/188...
-
Page 59: Auspacken
Gebrauchsanleitung Einlagerung, Transport und Bewegung Auspacken Die Pumpe wird in einer speziellen Schutzverpackung geliefert. Wenn diese Spuren von Beschädigungen aufweist, die beim Transport aufgetreten sein könnten, wenden Sie sich an das Contact Center. Achten Sie beim Auspacken vor allem darauf, dass die Pumpe nicht herunterfällt und keinen Stößen oder Vibrationen ausgesetzt wird. - Page 60 Gebrauchsanleitung Einlagerung, Transport und Bewegung Entfernung der 8 Schrauben, die die Bügel halten, dann Entfernung der 4 Bügel. Abbildung 5 Entblocken der Radbremsen. Befestigung der Abfahrtrampe mit einer Schraube, wie in der Abbildung gezeigt. Abbildung 6 MS120 Single Stage Rotary Vane Pumps (G2571-64000) User Manual / X3702-90000 (A) 60/188...
- Page 61 Gebrauchsanleitung Einlagerung, Transport und Bewegung Pumpe rückwärts schieben, damit sie von der Palette rollt. Abbildung 7 MS120 Single Stage Rotary Vane Pumps (G2571-64000) User Manual / X3702-90000 (A) 61/188...
-
Page 62: Vorbereitung Für Die Installation
Gebrauchsanleitung Vorbereitung für die Installation Vorbereitung für die Installation Mitgeliefertes Zubehör Die Pumpe wird mit folgendem Zubehör geliefert, das für die Inbetriebnahme und die planmäßige Wartung gebraucht wird: ▪ Ölflasche Trichter für das Öl ▪ Anschluss zum Auffüllen des Öls ▪... -
Page 63: Lage
Gebrauchsanleitung Vorbereitung für die Installation Abbildung 8 Lage WARNUNG! Die Pumpe: muss blockiert werden. Stellen Sie dazu die Bremsen an den Rädern • fest, wenn die Pumpe auf einer horizontalen Ebene steht. muss für eine korrekte und problemlose Wartung zugänglich sein, •... - Page 64 Gebrauchsanleitung Vorbereitung für die Installation Tab. 2 Mindestabstand Wert Abmessung 150 mm 200 mm 150 mm 500 mm Abbildung 9 MS120 Single Stage Rotary Vane Pumps (G2571-64000) User Manual / X3702-90000 (A) 64/188...
-
Page 65: Anschluss An Die Maschine
Gebrauchsanleitung Vorbereitung für die Installation Die Pumpe darf nicht außen installiert werden. Sie muss immer vor VORSICHT! atmosphärischen Einflüssen geschützt werden. Die heiße Luft aus dem Ausgang oder aus den Lüfterrädern kann zu Belästigungen des Personals führen. Installieren Sie die Pumpe nicht in Bereichen, in denen sich Staub oder andere Materialien in der Luft befinden. -
Page 66: Umleitung Der Abgasluft
Gebrauchsanleitung Vorbereitung für die Installation Abbildung 10 Umleitung der Abgasluft Wenn der Luftaustausch im Pumpenraum unzureichend ist, kann die austretende Luft in andere Räume oder nach außen geleitet werden. Verwenden Sie Leitungen, die den gleichen Durchmesser haben wie der Ausgang des Tanks bei maximaler Länge von 15 m. Wenn die Leitungen länger sind, vergrößern Sie den Durchmesser. -
Page 67: Elektrische Anschlüsse
Gebrauchsanleitung Vorbereitung für die Installation Stecken Sie diese Leitung nicht auf Hähne. Blockieren Sie den Ausgang nicht. VORSICHT! Dieses Symbol kennzeichnet den Anschluss an den Ausgang. HINWEIS Elektrische Anschlüsse Vergewissern Sie sich, dass Spannung und Frequenz des Netzanschlusses mit den Daten auf dem Typenschild der Pumpe übereinstimmen. - Page 68 Gebrauchsanleitung Vorbereitung für die Installation Abbildung 11 MS120 Single Stage Rotary Vane Pumps (G2571-64000) User Manual / X3702-90000 (A) 68/188...
-
Page 69: Betrieb
Gebrauchsanleitung Betrieb Betrieb Vorgesehene Verwendung Die in diesem Handbuch beschriebenen Vakuumpumpen können nur Luft und kleine Mengen Wasserdampf ansaugen. Die Ansaugung anderer Arten von Gas oder Dämpfen muss zuvor der Firma Agilent Technologies gemeldet werden, die dann die entsprechende Verwendung genehmigt. Diese Pumpen eignen sich für das Leerpumpen geschlossener Systeme oder für ein konstantes Vakuum im Bereich zwischen 0,07 und 15 mbar (absolut). -
Page 70: Schutz
Gebrauchsanleitung Betrieb WARNUNG! Der Ausgang der Pumpe darf nicht zum Aufbau von Druck verwendet werden, auch nicht wenn es sich um geringen Druck handelt. WARNUNG! Es ist verboten, die Pumpe in einem Raum zu installieren, in dem Explosionsgefahr herrscht. Schutz WARNUNG! Bei Verwendungen, bei denen ein Defekt oder ein Schaden an der Vakuumpumpe zu Personen- oder Sachschäden führen könnte, müssen an der... -
Page 71: Tabelle Mit Betriebs-Grenzwerten
Gebrauchsanleitung Betrieb Tabelle mit Betriebs-Grenzwerten EINGANGS-SPANNUNG (V) STATUS DES CONTROLLERS < 180 Schaden an der Versorgung (Fehler wegen zu geringer oder zu hoher Spannung – Win205 bit5 = 1) 180 – 200 in Betrieb (verringerte Leistung) 200 – 264 in Betrieb (volle Leistung) >... -
Page 72: Tipps Für Den Betrieb
Gebrauchsanleitung Betrieb Der Ölpegel muss immer zwischen den Werten MIN und MAX bleiben, die an HINWEIS der Seite der Pumpe angezeigt sind. Nehmen Sie die erste Füllung über den Stöpsel (E) vor. Füllen Sie bis zur Hälfte der Pegelanzeige (F) auf und schließen Sie den Stöpsel (E) (siehe Abbildung unten). -
Page 73: Gas-Ballast
Gebrauchsanleitung Betrieb WARNUNG! Die Pumpe wurde nicht entwickelt, um mit atmosphärischem Druck zu arbeiten. Es wird geraten, fünf Einschaltungen pro Stunde nicht zu überschreiten. Gas-ballast Die Pumpe MS120 ist mit einem Gas-Ballast und mit einem manuellen Ventil ausgestattet, das ihre Einschaltung (I) und Abschaltung (0) erlaubt. -
Page 74: Wartung
Gebrauchsanleitung Wartung Ansaugung von Wasserdampf Bei der Ansaugung von Wasserdampf raten wir folgendes: Vor der Ansaugung von Dämpfen sollte die Pumpe auf ▪ Betriebstemperatur gebracht werden. Lassen Sie sie dazu eine halbe Stunde lang bei maximalem Vakuum laufen. Wenn nach dem Betrienszyklus Kondenswasser im Schmieröl ▪... - Page 75 Gebrauchsanleitung Wartung WARNUNG! Wenn die Pumpe nach dem Betrieb gewartet werden soll, muss sie erst abkühlen, da die Temperatur an der Außenfläche auf über 80°C steigen kann. WARNUNG! Klemmen Sie die Pumpe immer von der Versorgung ab, bevor Sie Wartungsarbeiten durchführen. Stellen Sie beim Stromversorgungsschalter Warnschilder auf: GERÄT WIRD GEWARTET –...
-
Page 76: Ersetzung Des Schmieröls
Gebrauchsanleitung Wartung Tab. 3 Wartungseingriffe Wartungsintervall Beschreibung des Eingriffs Geeignetes Personal 24 Stunden / täglich Kontrolle des Ölstands vor dem Start. Bedienungspersonal 100 Stunden / wöchentlich Reinigung der Oberfläche der Pumpe mit einem Bedienungspersonal weichen Tuch. Eventuell kann ein neutrales Reinigungsmittel verwendet werden. - Page 77 Gebrauchsanleitung Wartung Abbildung 14 Nachdem Sie den Schlauch zum Ablassen des Öls (A1) auf den Ausgang (G) gesetzt haben, beginnt das Schmieröl auszulaufen. Es wird empfohlen, die Pumpe nach vorne zu kippen, indem Sie die Rückseite der Pumpe um mindestens 40 mm, damit sichergestellt ist, dass das gesamte Öl abläuft.
-
Page 78: Ersetzung Der Ölreinigungselemente
Gebrauchsanleitung Wartung Wenn sich im Öl viele Verschmutzungen oder Wasser befinden, reinigen Sie die Pumpe, indem Sie sie bei maximalem Vakuum für etwa fünf Minuten laufen lassen. Verwenden Sie dafür soviel Öl, dass gerade der als Minimalstand angezeigte Pegel erreicht wird. Lassen Sie das Öl erneut ab. - Page 79 Gebrauchsanleitung Wartung Der maximal zulässige Druck im Tank beträgt 0,6 bar, gemessen bei maximalem Durchsatz (wenn die Pumpe mit Ansaugung bei atmosphärischem Druck arbeitet). Der Druck kann durch einen Manometer (optional) gemessen werden, der mit der Öffnung zum Einfüllen des Öls verbunden wird (Abbildung 14, E). Wenn der Manometer verwendet wird, prüfen Sie die Kartusche bei heißer Pumpe auf Verstopfung.
-
Page 80: Routinewartung
Gebrauchsanleitung Wartung Routinewartung Die Routinewartung finden Sie in der folgenden Tabelle. Verwenden Sie nur Original-Ersatzteile. Bei der Bestellung geben Sie bitte die Ersatzteilnummer an. Tab. 4 Ersatzteile für die Wartung Ersatzteilnummer Beschreibung X3760-64005 Rotary Vane Fluid AVF 60 Gold 1lt X3702-68201 MS 120 Exhaust Filter Cartridge MS120 Single Stage Rotary Vane Pumps (G2571-64000) User Manual / X3702-90000 (A) 80/188... -
Page 81: Bestellbares Zubehör
Gebrauchsanleitung Wartung Bestellbares Zubehör Tab. 5 Bestellbares Zubehör Ersatzteilnummer Beschreibung X3701-63001 MS 120 Noise Abatement System X3760-64005 Rotary Vane Fluid AVF 60 Gold 1lt X3702-64001 Power Cord USA Plug-IEC320 15A X3760-64006 Power Cord UE Plug-IEC320 15A 9699883 Serial cable and A-PLUS X3702-68001 MS 120 Remote I/O Adapter Cable So bestellen Sie Ersatzteile... -
Page 82: Schmiermittel
Pumpe empfohlenen Öle. Tab. 6 Schmiermittel Umgebungstemperatur Viskosität Öl von Agilent Technologies 12 – 35 °C ISO 53 AVF 60 Gold Wenn auf einen anderen Typ von Schmiermittel gewechselt werden soll, muss die Pumpe gereinigt werden. Lassen Sie sie dazu für mindestens fünf Minuten bei maximalem Vakuum laufen. -
Page 83: Rücksendung Zur Reparatur
Gebrauchsanleitung Rücksendung zur Reparatur Rücksendung zur Reparatur Vor der Rücksendung der Pumpe an Agilent für alle Zwecke muss eine HINWEIS Rückgaberechtnummer ausgegeben werden. Bitte nutzen Sie die "Health and Safety Certification" am Ende dieser Bedienungsanleitung, um die RMA- Nummer bei Ihrem regionalen Agilent Contact Center oder Vertriebsbüro anzufordern. -
Page 84: Fehler Und Ihre Behebung
Gebrauchsanleitung Fehler und ihre Behebung Fehler und ihre Behebung Bei Leistungsabfall, anormale Geräuschentwicklung oder Motorschutzeingriff HINWEIS wenden Sie sich bitte an das Agilent Contact Center. Tab. 7 Fehler und ihre Behebung FEHLER URSACHE LÖSUNG Undichte Stellen in den Ansaugleitungen Undichte Stellen beseitigen oder an der Maschine keine Schmierung Prüfen Sie Pegel und... -
Page 85: Entsorgung
Gebrauchsanleitung Entsorgung Entsorgung Bedeutung des "WEEE" Logos auf den Etiketten. Das folgende Symbol ist in Übereinstimmung mit der EU-Richtlinie WEEE (Waste Electrical and Electronic Equipment) angebracht. Dieses Symbol (nur in den EU-Ländern gültig) zeigt an, dass das betreffende Produkt nicht zusammen mit Haushaltsmüll entsorgt werden darf sondern einem speziellen Sammelsystem zugeführt werden muss. - Page 86 Gebrauchsanleitung Entsorgung MS120 Single Stage Rotary Vane Pumps (G2571-64000) User Manual / X3702-90000 (A) 86/188...
- Page 87 MS120 Single Stage Rotary Vane Pumps (G2571-64000) User Manual Mode d’emploi Indications générales 89 Symboles utilisés 91 Prescriptions de sécurité Stockage, transport et manutention 96 Stockage Levage Déballage Préparation pour l'installation 101 Accessoires fournis avec la pompe 101 Assemblage 101 Positionnement Raccordement à...
- Page 88 Mode d’emploi Aspiration de vapeur d'eau 113 Entretien Remplacement de l'huile lubrifiante 115 Remplacement des éléments déshuileurs 118 Entretien de routine Accessoires à commander 121 Comment commander les pièces de rechange 121 Lubrifiants Mise hors service 122 Retour pour une réparation 123 Problèmes et solutions 124 Mise au rebut MS120 Single Stage Rotary Vane Pumps (G2571-64000) User Manual / X3702-90000 (A) 88/188...
-
Page 89: Indications Générales
Mode d’emploi Indications générales Indications générales Cet appareil est destiné à un usage industriel. Utilisateur doit lire attentivement ce manuel d'instruction et tout autre information supplémentaire fournie par la société Agilent avant l'utilisation de l'appareil. La société Agilent décline toute responsabilité éventuelle en cas de non-observation totale ou partielle des instructions, d'usage impropre de la part d'un personnel non formé, d'interventions non- autorisées ou d'un usage contraire aux réglementations nationales... - Page 90 Mode d’emploi Indications générales Les MS120 Single Stage Rotary Vane Pumps sont des pompes rotatives à simple étage à palettes, étanches à bain d'huile, actionnées par un moteur électrique commandé par inverter. Ces pompes à vide poussé sont exclusivement indiquées pour le pompage de l'air et de petites quantités de vapeur d'eau.
-
Page 91: Symboles Utilisés
Mode d’emploi Indications générales Les messages d'attention apparaissent avant certaines procédures dont le non- ATTENTION! respect pourrait endommager sérieusement l'appareil. Les notes contiennent des renseignements importants, isolés du texte. NOTE Symboles utilisés Les symboles suivants sont utilisés dans les différentes illustrations: Symboles Description Symboles... -
Page 92: Prescriptions De Sécurité
Mode d’emploi Prescriptions de sécurité Prescriptions de sécurité AVERTISSEMENT! Malgré les précautions prises en phase de projet, il existe des éléments de risque qui se présentent durant les opérations effectuées durant l'utilisation et l'entretien. AVERTISSEMENT! SURFACES CHAUDES. Durant les opérations d'entretien, on touche des surfaces dont la température peut dépasser 80°C. - Page 93 Mode d’emploi Prescriptions de sécurité AVERTISSEMENT! ÉMISSIONS DE SUBSTANCES NOCIVES L'air d'extraction de la pompe contient des traces de brouillards d'huile (résidu max. 2PPM/ poids équivalant à 2,4 mg/m ). Vérifier la compatibilité avec le milieu de travail. Garantir un renouvellement correct de l'air ou amener l'évacuation de la pompe à...
- Page 94 Mode d’emploi Prescriptions de sécurité AVERTISSEMENT! DANGER GÉNÉRÉ PAR LA PRESSION Le réservoir de la pompe est pressurisé. Ne pas ouvrir et ne pas oublier de fermer les bouchons de remplissage et de vidange durant le fonctionnement. AVERTISSEMENT! Toujours exclure l'alimentation de la pompe avant d'effectuer des opérations d'entretien.
- Page 95 Mode d’emploi Prescriptions de sécurité AVERTISSEMENT! DANGER D'INCENDIE L'utilisation de la pompe pour des usages non prévus ou interdits dans ce manuel ou un entretien incorrect peuvent provoquer des anomalies de fonctionnement et générer un risque de surchauffe et d'incendie. Ne pas éteindre les flammes avec de l'eau en cas d'incendie.
-
Page 96: Stockage, Transport Et Manutention
Mode d’emploi Stockage, transport et manutention Stockage, transport et manutention Stockage Les pompes doivent être transportées sans huile. Respecter les conditions ambiantes suivantes durant le transport et le stockage: température : de -20 °C à 70 °C ▪ humidité relative : 0 – 95 % (non condensante). ▪... - Page 97 Mode d’emploi Stockage, transport et manutention Figure 2 Pompe emballée Figure 3 Pompe MS120 Single Stage Rotary Vane Pumps (G2571-64000) User Manual/X3702-90000 (A) 97/188...
-
Page 98: Déballage
Mode d’emploi Stockage, transport et manutention Déballage La pompe est fournie dans un emballage de protection spécial ; en cas de dommages dus au transport, contacter contacter avec le “Contact Center”. Durant l'opération de déballage, faire particulièrement attention à ne pas laisser tomber la pompe et à... - Page 99 Mode d’emploi Stockage, transport et manutention Extraire les 8 vis qui ferment les étriers, puis enlever ces derniers. Figure 5 Débloquer les freins d'arrêt des roues. Fixer la rampe de descente avec 1 vis d'après la figure. Figure 6 MS120 Single Stage Rotary Vane Pumps (G2571-64000) User Manual/X3702-90000 (A) 99/188...
- Page 100 Mode d’emploi Stockage, transport et manutention Pousser la pompe par l'arrière pour la faire glisser et la descendre de la palette. Figure 7 MS120 Single Stage Rotary Vane Pumps (G2571-64000) User Manual/X3702-90000 (A) 100/188...
-
Page 101: Préparation Pour L'installation
Mode d’emploi Préparation pour l'installation Préparation pour l'installation Accessoires fournis avec la pompe La pompe est livrée avec les accessoires suivants nécessaires pour la mise en service et l'entretien ordinaire: ▪ Bouteille d'huile Entonnoir pour le remplissage en huile ▪ Raccord pour le remplissage en huile ▪... -
Page 102: Positionnement
Mode d’emploi Préparation pour l'installation Figure 8 Positionnement AVERTISSEMENT! La pompe; doit être bloquée au moyen des freins situés sur les roues d'appui, • sur un plan horizontal. doit être accessible pour un entretien correct et aisé en respectant • les distances minimales par rapport aux encombrements éventuels (voir la figure suivante). - Page 103 Mode d’emploi Préparation pour l'installation Tab. 2 Distance minimale Cote Dimension 150 mm 200 mm 150 mm 500 mm Figure 9 MS120 Single Stage Rotary Vane Pumps (G2571-64000) User Manual/X3702-90000 (A) 103/188...
-
Page 104: Raccordement À La Machine Utilisatrice
Mode d’emploi Préparation pour l'installation La pompe ne pas être installée à l'extérieur et elle doit toujours être protégée ATTENTION! contre les agents atmosphériques. Éviter que l'air chaud provenant de l'évacuation ou des ventilateurs de refroidissement ne gênent le personnel. Ne pas installer la pompe dans une zone où... -
Page 105: Acheminement De L'air D'extraction
Mode d’emploi Préparation pour l'installation Figure 10 Acheminement de l'air d'extraction En cas de renouvellement insuffisant de l'air dans le local de la pompe, on peut acheminer l'air d'extraction vers d'autres locaux ou à l'extérieur. Utiliser des conduites du diamètre de la bouche d'évacuation du réservoir et d'une longueur maximale de 15 m. -
Page 106: Raccordement Électrique
Mode d’emploi Préparation pour l'installation Ne pas installer de robinets sur cette conduite. Ne pas obstruer la sortie. ATTENTION! Ce symbole identifie le raccord d'évacuation. NOTE Raccordement électrique Vérifier la tension et la fréquence de réseau avec les données indiquées sur la plaque de la pompe. S'assurer que le circuit de mise à... - Page 107 Mode d’emploi Préparation pour l'installation Figure 11 MS120 Single Stage Rotary Vane Pumps (G2571-64000) User Manual/X3702-90000 (A) 107/188...
-
Page 108: Utilisation
L'aspiration d'autres types de gaz ou de vapeurs doit être préalablement déclarée à la société Agilent Technologies qui délivrera au besoin la conformité à l'usage spécifique. Elles sont indiquées pour l'évacuation de systèmes fermés ou pour fonctionner avec un vide constant compris dans le champ suivant : 0,07 - 15 mbar (absolus). -
Page 109: Protections
Mode d’emploi Utilisation AVERTISSEMENT! Il est interdit d'utiliser l'évacuation de la pompe pour créer des pressions même limitées. AVERTISSEMENT! Il est interdit d'utiliser la pompe dans des milieux potentiellement explosifs. Protections AVERTISSEMENT! Prévoir des mesures de sécurité sur l'installation lorsque l'arrêt ou une défaillance de la pompe à... -
Page 110: Tableau Des Limites Opératoires
Mode d’emploi Utilisation Tableau des limites opératoires TENSION D'ENTRÉ (V) ÉTAT DU CONTROLLER < 180 Défaut d'alimentation (Erreur de Sous- tension/Surtension – Win205 bit5 = 1) 180 – 200 En fonction (performances réduites) 200 – 264 En fonction (performances complètes) >... -
Page 111: Conseils D'utilisation
Mode d’emploi Utilisation Il est important que le niveau d'huile se stabilise entre les valeurs MIN et MAX NOTE affichées par l'indicateur de niveau situé sur le côté de la pompe. Procéder au premier remplissage à travers le bouchon (E) jusqu'à la moitié... -
Page 112: Dispositif De Lest (Gas-Ballast)
Mode d’emploi Utilisation AVERTISSEMENT! La pompe n'a pas été conçue pour fonctionner à la pression atmosphérique. On conseille de ne pas dépasser 5 démarrages/heure. Dispositif de lest (Gas-ballast) La pompe MS120 est équipée d'un dispositif de lest (Gas Ballast) et d'une vanne manuelle qui permet son activation (I) ou son exclusion (O). -
Page 113: Aspiration De Vapeur D'eau
Mode d’emploi Utilisation Aspiration de vapeur d'eau Si l'on aspire de la vapeur d'eau, on conseil: d'aspirer d'abord les vapeurs, d'amener la température de la ▪ pompa à plein régime, en la faisant fonctionner pendant 30 minutes au vide maximum. au terme du cycle de fonctionnement, en présence de ▪... -
Page 114: Entretien
Mode d’emploi Entretien Entretien Le personnel préposée à l'utilisation et à l'entretien de la pompe doit être bien formé et posséder une connaissance approfondie des normes de prévention des accidents. Outre les prescriptions indiquées ci-après, consulter le paragraphe “Prescriptions de sécurité”. AVERTISSEMENT! Avant toute intervention, introduire de l'air par le raccord d'aspiration. -
Page 115: Remplacement De L'huile Lubrifiante
Mode d’emploi Entretien Dans ces cas, seule l'expérience directe peut suggérer les intervalles d'entretien corrects. L'huile usée et les pièces de rechange remplacées doivent être considérées comme des déchets spéciaux et gérées conformément à la réglementation en vigueur dans le pays d'utilisation. - Page 116 Mode d’emploi Entretien D'après la Figure 14, dévisser le bouchon de remplissage (E) et le bouchon de vidange d'huile (G) uniquement après avoir positionné sous le réservoir un récipient indiqué (au niveau de la forme et des dimensions) afin de récupérer toute l'huile de la pompe (voir Figure 15).
- Page 117 Mode d’emploi Entretien Figure 15 Si l'huile contient de grandes quantités de substances polluantes ou si l'on relève la présence d'eau, procéder à un lavage de la pompe en la faisant fonctionner au vide maximum pendant au moins 5 minutes. Pour cette opération, utiliser une quantité...
-
Page 118: Remplacement Des Éléments Déshuileurs
Mode d’emploi Entretien Figure 16 Remplacement des éléments déshuileurs Des éléments déshuileurs très encrasséspeuvent provoquer une augmentation sensible de la température de la pompe et dans des cas extrêmes, une autocombustion de l'huile lubrifiante. La pression maximale admise dans le réservoir est de 0,6 bars mesurée au débit maximum (quand l'aspiration fonctionne à... - Page 119 Mode d’emploi Entretien extraire et remplacer l'élément déshuileur (rep. B4) et les joints toriques correspondants (rep. B5), remonter le couvercle de vidange (rep. B1), au besoin, remplacer le joint (rep. B3), remonter le couvercle du cover (rep. C1). Figure 17 MS120 Single Stage Rotary Vane Pumps (G2571-64000) User Manual/X3702-90000 (A) 119/188...
-
Page 120: Entretien De Routine
Mode d’emploi Entretien Entretien de routine Les pièces de rechange nécessaires pour l'entretien de routine sont indiquées dans le tableau suivant. Utiliser exclusivement des pièces de rechange originales. Au moment de la commande, indiquer le Part Number fourni. Tab. 4 Pièces de rechange pour l'entretien Part Number Description... -
Page 121: Accessoires À Commander
Mode d’emploi Entretien Accessoires à commander Tab. 5 Accessoires à commander Part Number Description X3701-63001 MS 120 Noise Abatement System X3760-64005 Rotary Vane Fluid AVF 60 Gold 1lt X3702-64001 Power Cord USA Plug-IEC320 15A X3760-64006 Power Cord UE Plug-IEC320 15A 9699883 Serial cable and A-PLUS X3702-68001... -
Page 122: Lubrifiants
Tab. 6 Lubrifiants Température ambiante Viscosité Huile Agilent Technologies 12 – 35 °C ISO 53 AVF 60 Gold Lorsqu'on change de type de lubrifiant, il faut procéder à un lavage de la pompe en la faisant fonctionner au vide maximum pendant au moins 5 minutes. -
Page 123: Retour Pour Une Réparation
Mode d’emploi Retour pour une réparation Retour pour une réparation Avant de renvoyer la pompe à Agilent à toute fin, un numéro d’autorisation de NOTE retour doit être délivré. Veuillez utiliser la “Health and Safety Certification" à la fin de ce manuel d’instructions pour demander le numéro RMA auprès de votre Contact Center régional Agilent ou de votre bureau de vente. -
Page 124: Problèmes Et Solutions
Mode d’emploi Problèmes et solutions Problèmes et solutions En cas de détérioration des performances, de niveau de bruit anormal ou de NOTE intervention de la protection du moteur, veuillez prendre contact avec Agilent Contact Center. Tab. 7 Problèmes et solutions PROBLÈMES CAUSE SOLUTION... -
Page 125: Mise Au Rebut
Mode d’emploi Mise au rebut Mise au rebut Signification du logo "WEEE" figurant sur les étiquettes. Le symbole ci-dessous est appliqué conformément à la directive CE nommée "WEEE". Ce symbole (uniquement valide pour les pays de la Communauté européenne) indique que le produit sur lequel il est appliqué NE doit PAS être mis au rebut avec les ordures ménagères ou les déchets industriels ordinaires, mais passer par un système de collecte sélective. - Page 126 Mode d’emploi Mise au rebut MS120 Single Stage Rotary Vane Pumps (G2571-64000) User Manual/X3702-90000 (A) 126/188...
-
Page 127: Instructions For Use
MS120 Single Stage Rotary Vane Pumps (G2571-64000) User Manual Instructions for Use General Information Symbols used 131 Safety rules Storage, transport and handling 135 Storage Lifting Unpacking Preparation for Installation 140 Accessories supplied with the pump 140 Assembly Location Connection to the machine 142 Discharge air pipe line installation Electrical connection Expected use 146... - Page 128 Instructions for Use Water vapor intake 150 Maintenance Oil change Exhaust filters replacement155 Ordinary maintenance 157 Accessories can be ordered 158 How to order spare parts Lubricants Decommissioning 159 Return to Agilent 160 Troubleshooting 161 Disposal MS120 Single Stage Rotary Vane Pumps (G2571-64000) User Manual/X3702-90000 (A) 128/188...
-
Page 129: General Information
Instructions for Use General Information General Information This equipment is destined for use by professionals. The user should read this instruction manual and any other additional information supplied by Agilent before operating the equipment. Agilent will not be held responsible for any events occurring due to non-compliance, even partial, with these instructions, improper use by untrained persons, non-authorized interference with the equipment or any action contrary to that provided for by specific national standards. - Page 130 These high vacuum pumps are suitable for pumping air and small quantity of water vapor only. Pumping of other types of gas or vapors must be declared in advance to Agilent Technologies that will give the conformity to the specific use.
-
Page 131: Symbols Used
Instructions for Use General Information The caution messages are displayed before procedures which, if not followed, CAUTION! could cause damage to the equipment. The notes contain important information taken from the text. NOTE Symbols used The following symbols are used consistently throughout in all illustration: Symbols Description... -
Page 132: Safety Rules
Instructions for Use Safety rules Safety rules WARNING! Despite of all the precautions adopted when designing the equipment, there are some risk elements that arise during operation and servicing. WARNING! HOT SURFACES. The pump surfaces may exceed the temperature of 80°C. Adopt the necessary safeguards to avoid burns due to chance contact.. - Page 133 Instructions for Use Safety rules CAUTION! DO NOT DISPOSE INTO THE ENVIRONMENT Used discharged oil from the pump must be disposed in accordance with the regulations in force in the Country of use. WARNING! HAZARD CAUSED BY VACUUM Any contact with parts under vacuum can cause injuries. Avoid any contact with the pump inlet port during the pump operation.
- Page 134 Instructions for Use Safety rules WARNING! ELECTRIC SAFETY Some components of the electric equipment are electrically charged during operation. Any contact may cause serious injuries to persons or objects. WARNING! FIRE HAZARD The use of the pump in situations unforeseen or not recommended by this manual, as well as lack of correct maintenance, may create high risks for overheating or fire.
-
Page 135: Storage, Transport And Handling
Instructions for Use Storage, transport and handling Storage, transport and handling Storage The pumps must be stored or transported without oil. When transporting and storing the pumps, the following environmental requirements should not be exceeded: temperature: from -20 °C to 70 °C ▪... - Page 136 Instructions for Use Storage, transport and handling Figure 2 Pump packaged Figure 3 Pump only MS120 Single Stage Rotary Vane Pumps (G2571-64000) User Manual/X3702-90000 (A) 136/188...
-
Page 137: Unpacking
Instructions for Use Storage, transport and handling Unpacking The pump is supplied in a special protective packing. If this shows signs of damage which may have occurred during transport, contact Contact Center. When unpacking the pump, be sure not to drop it and avoid any kind of sudden impact or shock vibration to it. - Page 138 Instructions for Use Storage, transport and handling Remove 8 screws which close the clamps and then remove 4 clamps. Figure 5 Unlock the brakes of the wheels. Fasten the drop ramp with one screw as shown in the following figure. Figure 6 MS120 Single Stage Rotary Vane Pumps (G2571-64000) User Manual/X3702-90000 (A) 138/188...
- Page 139 Instructions for Use Storage, transport and handling Push the pump behind to let it slide down from the pallet. Figure 7 MS120 Single Stage Rotary Vane Pumps (G2571-64000) User Manual/X3702-90000 (A) 139/188...
-
Page 140: Preparation For Installation
Instructions for Use Preparation for Installation Preparation for Installation Accessories supplied with the pump The pump is delivered with the following accessories required for commissioning and maintenance: ▪ Oil Tank Funnel load oil ▪ Connection load oil ▪ Oil drain pipe ▪... -
Page 141: Location
Instructions for Use Preparation for Installation Figure 8 Location WARNING! The pump; may be blocked from movement by engaging the brakes on the • wheels, on a horizontal plane. must be accessible for correct and easy maintenance, by respecting • the minimum distances from possible obstructions (see following figure). -
Page 142: Connection To The Machine
Instructions for Use Preparation for Installation Tab. 2 Minimum distance Quote Dimension 150 mm 200 mm 150 mm 500 mm Figure 9 The pump must not be installed outdoors and must always be protected from the CAUTION! weather. Avoid warm air coming from the exhaust or the cooling fans causing discomfort to the personnel. -
Page 143: Discharge Air Pipe Line Installation
Instructions for Use Preparation for Installation Pipe weights and expansions, if any, must not rest on the pump. It is advisable to make the final connection to the pump inlet port with flexible pipes or fittings. It is important that all the pipes and the different fittings are tight. Very long or small diameter pipes decrease the pump performances. -
Page 144: Electrical Connection
Instructions for Use Preparation for Installation For longer pipes increase pipe diameter. Pipe weights must not rest on the pump. In the final length use flexible pipes or pipe fittings. WARNING! This pipe must be descending, to avoid the condensate going back to the tank. Do not connect ball valves to this pipeline. - Page 145 Instructions for Use Preparation for Installation WARNING! Make sure the power switch is set to off (0) in order to avoid unintended initialization of the pump. Perform the electrical connection by inserting the plug of the power cord into the outlet of the pump and block it with the supplied spring (see following figure).
-
Page 146: Use
These vacuum pumps have been designed to handle air and small quantity of water vapor only. Handling of other types of gas or vapors must be declared in advance to Agilent Technologies that will give the conformity to the specific use. -
Page 147: Protections
Instructions for Use WARNING! It is forbidden to install the pump in a potentially explosive environment. Protections WARNING! In case of applications where the pump stop or failure can cause damages to people or things, safety measures for the system must be adopted. Operating limits table INPUT VOLTAGE (V) CONTROLLER STATUS... -
Page 148: Installation
Instructions for Use Installation Do not install or use the pump in an environment exposed to atmospheric agents (rain, snow, ice), dust, aggressive gases, or in explosive environments or those with a high fire risk. During operation, the following environmental conditions must be respected: ▪... -
Page 149: Tips For Using
Instructions for Use Figure 12 Start the pump and take it to the maximum vacuum level for at least 2 minutes. Stop the pump, check again the oil level and add the lacking oil, if necessary, in order to get the correct oil level. Tips for using When the room temperature is lower than 18°C, it is a good practice to let the pump operate at the ultimate pressure (Inlet port closed,... -
Page 150: Water Vapor Intake
Instructions for Use The limit pressure of the pump depends on this selection. For a correct use, please refer to paragraph “Water vapor suction”. ≤ =0,2 mbar ≤ =0,07 mbar Gas ballast Gas ballast Figure 13 Water vapor intake In order to pump down any water vapor, the following operations are recommended: ▪... -
Page 151: Maintenance
Instructions for Use Maintenance Maintenance Personnel responsible for pump operation and maintenance must be well-trained and must be aware of the accident prevention rules. In addition to the requirements listed below, please refer to the paragraph “Safety rules”. WARNING! Introduce air through the inlet port before every maintenance operation. WARNING! If you have to perform maintenance on the pump after a considerable time in operation, leave it to cool as temperature of the outer surface may be in... - Page 152 Instructions for Use Maintenance For such cases, only direct experience can indicate the correct service frequency needed. The exhausted oil and the replaced spare parts must be considered as special waste products and handled according to the local regulations in the Country of use. MS120 Single Stage Rotary Vane Pumps (G2571-64000) User Manual/X3702-90000 (A) 152/188...
-
Page 153: Oil Change
Instructions for Use Maintenance Tab. 3 Service operations Servicing frequency Description of the operation Authorized personnel 24 Hours/every day Check oil level before starting. Operator 100 Hours / every week Clean with soft cloth surfaces of the pump. If Operator necessary, you can use a neutral detergent. - Page 154 Instructions for Use Maintenance Figure 14 Screwing the oil drain pipe on the discharge (G), the lubricant will start to drain. It is recommended to tilt the pump forwards by raising the back 40 mm to ensure the complete draining of the lubricant, remember to brake the wheels to prevent the pump from falling.
-
Page 155: Exhaust Filters Replacement155
Instructions for Use Maintenance If the oil is polluted or if some water is in the oil, clean the pump by letting it run with a suitable quantity of oil (up to the minimum level shown on the tank) at maximum vacuum level for at least 5 minutes. Drain the oil again. - Page 156 Instructions for Use Maintenance Maximum allowed pressure in the tank is 0.6 bar measured at the maximum capacity (when the pump is working with the inlet open to atmospheric pressure). If a pressure gauge (optional) has been fitted to the oil filling hole (Figure 14) check the exhaust filter blockage with the pump warm.
-
Page 157: Ordinary Maintenance
Instructions for Use Maintenance Ordinary maintenance The spares necessary for the ordinary maintenance are shown in the table below. Use only genuine spare parts. When placing the order, please specify the P/N. Tab. 4 Normal servicing Spares Part Number Description X3760-64005 Rotary Vane Fluid AVF 60 Gold 1lt X3702-68201... -
Page 158: Accessories Can Be Ordered
Instructions for Use Maintenance Accessories can be ordered Tab. 5 Accessories can be ordered Part Number Description X3701-63001 MS 120 Noise Abatement System X3760-64005 Rotary Vane Fluid AVF 60 Gold 1lt X3702-64001 Power Cord USA Plug-IEC320 15A X3760-64006 Power Cord UE Plug-IEC320 15A 9699883 Serial cable and A-PLUS X3702-68001... -
Page 159: Lubricants
Tab. 6 Lubricants Ambient temperature Viscosity Agilent Technologies oil 12 – 35 °C ISO 53 AVF 60 Gold In case of change of the type of lubricant, it is necessary to proceed with a pump by letting it run at maximum vacuum for at least 5 minutes. -
Page 160: Return To Agilent
Instructions for Use Return to Agilent Return to Agilent Before returning the pump to Agilent for any purposes, a return authorization NOTE number must be issued. Please use the “Health and Safety Certification” at the end of this instruction manual to request the RMA number from your regional Agilent Contact Center or sales office. -
Page 161: Troubleshooting
Instructions for Use Troubleshooting Troubleshooting In case of drop in performance, anomalous noise or motor protection tripping, NOTE please get in contact with Agilent Contact Center. Tab. 7 Troubleshooting TROUBLE CAUSE REMEDY Inlet pipes or machine are leaking Identify leaking point and seal it No lubrication Check oil level and oil... -
Page 162: Disposal
Instructions for Use Disposal Disposal Meaning of the "WEEE" logo found in labels The following symbol is applied in accordance with the EC WEEE (Waste Electrical and Electronic Equipment) Directive. This symbol (valid only in countries of the European Community) indicates that the product it applies to must NOT be disposed of together with ordinary domestic or industrial waste but must be sent to a differentiated waste collection system. -
Page 163: Technical Information
Technical Information Technical Information Section I Technical Description 164 Vacuum Seals Technical Data Dimensions Section II Connection to the Electric Supply 171 Starting and Running the Pump Stopping the Pump Safety Rules Warning Notes Caution Notes User Interface Input/Output Communications J1 –... -
Page 164: Section I
These vacuum pumps are suitable for pumping only air and small quantity of water vapor only. Pumping of other types of gas or vapors must be declared in advance to Agilent Technologies that will give the conformity to the specific use. -
Page 165: Vacuum Seals
Technical Information Vacuum Seals The pump is equipped with a special anti-suckback device which automatically isolates the vacuum system when the pump stops. This avoids rises in pressure or oil flow in the vacuum system while air is allowed back into the stator chambers. The air entering the pump after the anti-suckback device has closed prevents the oil in the casing from filling the stator chambers. -
Page 166: Technical Data
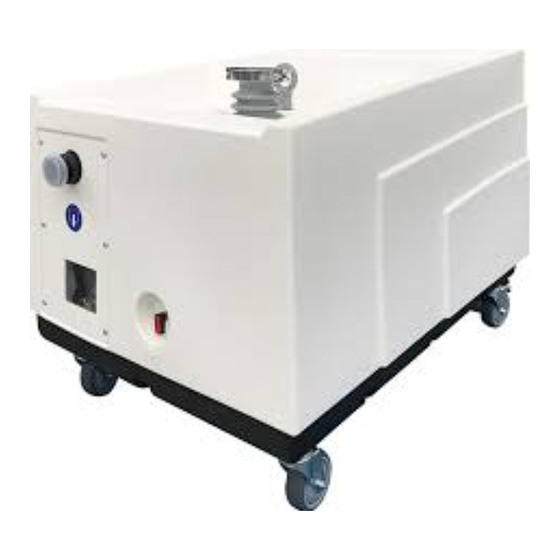
Technical Information Technical Data Technical Data The following table lists the main technical data of the MS120 Single Stage Rotary Vane Pumps. TECHNICAL DATA UNITS VALUE Nominal speed* (at 1500 rpm) Effective capacity at 5 mbar abs. (3.75 Torr) ≥ 120 ≥... - Page 167 Technical Information Technical Data TECHNICAL DATA UNITS VALUE Inlet flange ISO KF DN40 ISO KF NW40 Outlet flange ISO KF DN25 ISO KF NW25 Main Dimensions: width length height Oil capacity Gal US 0.47 Type lubricating fluid AVF 60 Gold Total weight IP Value Installation category...
-
Page 168: Dimensions
Technical Information Technical Data Dimensions The following figure shows the pumps layout and dimensions: Figure 19 MS120 Single Stage Rotary Vane Pumps dimensions MS120 Single Stage Rotary Vane Pumps (G2571-64000) User Manual/X3702-90000 (A) 168/188... - Page 169 Technical Information Technical Data Figure 20 MS120 Single Stage Rotary Vane Pumps layout Identification of components Reference (Figure 20) Component Inlet Exhaust Cooling air inlet Cooling air outlet Oil filling plug Oil level sight glass Oil drain (with extension) Pump name plate Lifting eyebolt Gas ballast valve (ON-OFF) Swivel caster with brake...
- Page 170 Technical Information Technical Data Reference (Figure 20) Component Mains ON-OFF Switch Status Led Fuse Serial port MS120 Single Stage Rotary Vane Pumps (G2571-64000) User Manual/X3702-90000 (A) 170/188...
-
Page 171: Connection To The Electric Supply
Technical Information Section II Section II Connection to the Electric Supply It is recommended to connect the pump to the power supply through a dedicated CAUTION! safety switch on the main electrical panel of the installation, or in proximity of the power supply connection point. -
Page 172: Starting And Running The Pump
Technical Information Starting and Running the Pump Starting and Running the Pump The pump can be operated in REMOTE mode through the Remote I/O signals or in SERIAL mode through the RS232 or RS485 Serial communication. The defult configuration is REMOTE mode. To allow the pump starting you have to wire properly the START pins by NOTE connecting the mating connector provided with the pump or by connecting pin 7... -
Page 173: Stopping The Pump
Technical Information Stopping the Pump Stopping the Pump There are no special procedures for switching the pump off; it needs only to be disconnected from the electric power by means of the bipolar switch. When the pump is stopped, the anti-suckback device makes it possible to maintain vacuum in the vessel connected on the inlet flange of the pump if the tank is hermetically sealed. -
Page 174: Warning Notes
Technical Information Warning Notes Warning Notes Death may result from contact with high voltages. Always take extreme care and observe the accident prevention regulations in force. Always disconnect the power supply to the pump before maintenance work. Place a special warning signs over the power supply breaker switch: MACHINE UNDERGOING MAINTENANCE - DO NOT POWER ON. - Page 175 Technical Information Warning Notes Do not wear any objects that may become entangled in the mechanisms and/or act as conductors (chains, bracelets, etc.). Ensure that the tools to be used are in perfect working condition and have insulating grips, where necessary. Check that the insulating material of the cables and that the conductors of the test equipment do not show any signs of damage.
-
Page 176: Caution Notes
Technical Information Caution Notes Caution Notes Before putting the pump back into operation after a breakdown, inspect it and check carefully for any other signs of damage. Use only tools that are in perfect working order and specially designed for the job; use of inappropriate or ineffective tools may cause serious damage. -
Page 177: User Interface
Technical Information User Interface User Interface Figure 21 Use the Retention Spring to secure the mains cable into the IEC320 socket. NOTE MS120 Single Stage Rotary Vane Pumps (G2571-64000) User Manual/X3702-90000 (A) 177/188... -
Page 178: Input/Output Communications
Technical Information User Interface Input/Output Communications J1 – I/O: Remote I/O signals + Serial communication The connector J1 (D-SUB 9 pins Female connector type) hosts both Remote I/O signals and RS232/485 communication ports. The RS232 communication port has standard pin out. It can be used with a standard of the shelf RS232 cable. - Page 179 Technical Information User Interface Interlock/Status: N.O. Solid State Relay contact – It is closed as ▪ soon as the rotational frequency exceed the threshold defined with Win102 (plus histeresys defined by Win105 as % of Win102). START/STOP: If the inverter is managed by remote signals, it ▪...
-
Page 180: Serial Communication Connection Examples
Technical Information User Interface Serial Communication Connection Examples Figure 24 Figure 25 The communication port mating connector is supplied with the unit. MS120 Single Stage Rotary Vane Pumps (G2571-64000) User Manual/X3702-90000 (A) 180/188... -
Page 181: How To Connect The I/O Port To An External Cable
Technical Information User Interface See the host computer's instruction manual for further details on serial port connections. How to connect the I/O port to an external cable The following picture shows the right procedure to connect a cable to the I/O port connector. A shielded cable of 30 m maximum length has to be utilized for both serial and I/O port connection. -
Page 182: Serial Communication Protocol
Technical Information User Interface Figure 26 Serial Communication Protocol Both RS-232 and RS-485 interfaces are available on the J1 I/O connector. Communication Format ▪ 8 data bit no parity ▪ 1 stop bit ▪ MS120 Single Stage Rotary Vane Pumps (G2571-64000) User Manual/X3702-90000 (A) 182/188... -
Page 183: Communication Protocol183
Technical Information User Interface baud rate: 600/1200/2400/4800/9600/19200/38400 ▪ programmable Communication Protocol The communication protocol is a MASTER/SLAVE type where: Host = MASTER ▪ ▪ Controller = SLAVE The communication is performed in the following way: the host (MASTER) send a MESSAGE + CRC to the controller (SLAVE);... - Page 184 Technical Information User Interface Data Type Field Length Valid Characters Logic (L) ‘0’ = OFF ‘1’ = ON Numeric (N) ‘-‘, ‘.’, ‘0’ . . . ‘9’ right justified with ‘0’ Alphanumeric (A) from blank to ‘_’ (ASCII) ▪ <ETX> (End of transmission) = 0x03 <CRC>...
-
Page 185: Examples
Technical Information User Interface Type Length Value Description Out of Range 1 byte (0x34) the value expressed during a write command is out of the range value of the specified window Win Disabled 1 byte (0x35) the specified window is Read Only or temporarily disabled (for example you can’t write the Soft Start when the Pump is running) -
Page 186: Window Meanings
Technical Information User Interface Command: READ PUMP STATUS Source: PC Destination: Pump (with address = 3) ADDR WINDOW Source: Pump (with address = 3 in stop status) Destination: PC ADDR WINDOW DATA (STATUS) Window Meanings The following table describes the windows available to the user. The columns R/W indicates if the window is read-only (R) or if it can also be modified (RW). - Page 187 Technical Information User Interface TYPE DESCRIPTION ERROR CODE: [bit field] Bit 7: Rotor locked Bit 6: Short Circuit Bit 5: Vline Under/Over Voltage Bit 4: Motor Overtemp Bit 3: Line Fault Bit 2: Controller Overtemp Bit 1: Vdc BUS Under Voltage Bit 0: Over Current CONTROLLLER POWER OUTPUT HEATSINK TEMPERATURE [°C] CONTROLLER TEMPERATURE [°C] Controller inlet air temperature...
-
Page 188: Pump Status
Technical Information User Interface Pump Status The Pump Status indicates the operating status of the pump. The possible Status are the following: Stop = the pump is waiting for a START command ▪ Ramp = the pump has been started and is increasing the ▪...