
Manuels Connexes pour Arjohuntleigh ENTERPRISE E8000X


Sommaire des Matières pour Arjohuntleigh ENTERPRISE E8000X
- Page 1 ENTERPRISE E8000X (E8X) Instructions for Use Notice d'utilisation ...with people in mind 746-585-CA- • 1 /2017...
- Page 2 Design Policy and Copyright ® and ™ are trademarks belonging to the ArjoHuntleigh group of companies unless otherwise stated. © ArjoHuntleigh 2016. As our policy is one of continuous improvement, we reserve the right to modify designs without prior notice. The content of this publication may not be copied...
-
Page 3: Table Des Matières
Contents Warnings, Cautions and Notes ............General Warnings ................. 5 1. Introduction ..............7 Product overview ................9 2. Clinical Applications ..........10 Intended use ................10 Indications ................... 10 Contra-indications ............... 11 3. Installation ..............12 Electricity supply ................. 13 Underbed light ................ -
Page 4: Warnings, Cautions And Notes
Warnings, Cautions and Notes Indicates possible hazards in procedures or conditions WARNING which, if not correctly followed, could result in death, injury or other serious adverse reactions. Indicates possible hazards in procedures or conditions Caution which, if not correctly followed, could result in equipment damage or failure. -
Page 5: General Warnings
Unauthorised modifications or repairs to this product may affect its safety and will invalidate any warranty. ArjoHuntleigh accepts no liability for any incident, accident or reduction in performance that may occur as a result of such repairs or modifications. - Page 6 WARNING Where risk assessment indicates that a patient is at high risk of entrapment owing to their medical condition or other circumstances, and where there is no medical benefit from their being left in a contoured position, place the mattress platform in the flat position when the patient is unattended.
-
Page 7: Introduction
1. Introduction These instructions contain information for the installation, use ® and maintenance of the ArjoHuntleigh Enterprise 8000X acute care hospital bed. These beds have multiple functions to provide the optimum nursing position for both patient and caregiver. Standard features: •... - Page 8 The model number and serial number can be found on the specification label; this is located on the bed frame below the head board. HUNTLEIGH HEAL THCARE LT D Duty 10% 2min/20min 250kg WEDNESBUR Y W EST MIDLANDS UK Made In S/No.
-
Page 9: Product Overview
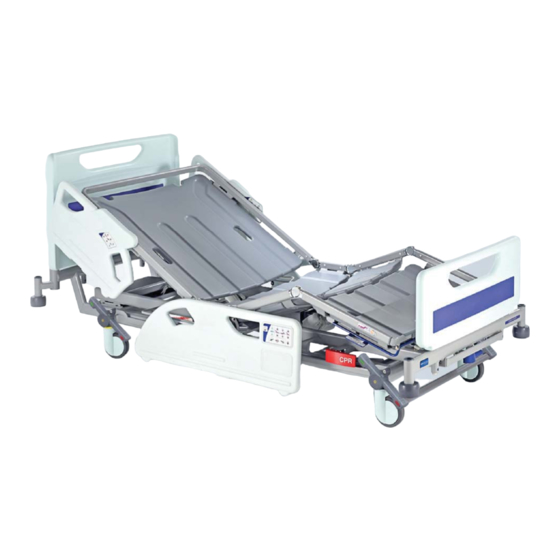
Product overview A. Head board O. Brake pedal / bar B. Head end side rail P. Accessory socket C. Caregiver controls Q. Extension catch bar D. Backrest section R. CPR release handle E. Foot end side rail S. 5th Wheel F. -
Page 10: Clinical Applications
2. Clinical Applications WARNING To ensure the patient can use the bed safely, their age and condition should be assessed by a clinically qualified person. The use of head down tilt (Trendelenburg) or foot down tilt (reverse Trendelenburg) may be contraindicated for certain medical conditions. - Page 11 Contra- The bed is not suitable for use in the following situations: indications • A domestic area, i.e. home healthcare (*Application Environment 4). • Outpatient care (*Application Environment 5). * Application Environments are defined in IEC 60601-2-52. The bed is not suitable for patients under 40kg in weight. The maximum recommended patient weight is 185kg.
-
Page 12: Installation
3. Installation The following chapter describes how to install the bed. WARNING If the power supply cord or plug is damaged, the complete assembly must be replaced by authorised service personnel. Do not remove the fitted plug, or use a rewireable plug or adapter. Make sure the power supply cord is not stretched, kinked or crushed. -
Page 13: Electricity Supply
Electricity Connect the mains plug to a suitable socket outlet. Make sure supply the plug is easily accessible so it can be disconnected quickly in an emergency. Power supply cord and potential equalisation terminal When the bed is connected to the electricity supply, an indicator will light on the Attendant Control Panel (see page 34). -
Page 14: Mattresses
Mattresses WARNING Always use a mattress of the correct size and type. Incompatible mattresses can create hazards. Entrapment hazards may exist when using a very soft mattress, even if it is the correct size. The maximum recommended mattress thickness for use with side rails is 18cm. - Page 15 • For more information on suitable mattresses and mattress replacements, contact your local ArjoHuntleigh office or approved distributor. A list of ArjoHuntleigh offices can be found at the back of this manual.
-
Page 16: Operation
4. Operation The following chapter describes how to operate the bed. WARNING Operate the brake pedals with your feet while wearing suitable shoes. Do not operate the pedals with your hands. Brakes and steering The pedals have three positions as shown below: •... -
Page 17: Foot Pedal For Adjustment Of Bed Height (Optional)
Brake pedals (1) are fitted at the head end of the bed. These Head end brake pedals operate in the same way as the foot end pedals. Head end brake pedal Foot Pedal for Adjustment of Bed Height (Optional) Bed height can be adjusted from bed control panels and from the foot pedal located near the foot end of the bed. -
Page 18: How To Use The 5Th Wheel (Optional)
How to use the 5th Wheel (Optional) The 5th wheel provides improved mobility and steering. Activate 5th Wheel: 1. Step down on the head end of the 5th wheel activation pedal (A). (See Fig. 1) The 5th wheel (B) will lower until it has contact with the floor. 2. -
Page 19: Side Rails
Side rails WARNING The clinically qualified person responsible should consider the age, size and condition of the patient before allowing the use of side rails. Side rails are not intended to restrain patients who make a deliberate attempt to exit the bed. Ensure that the mattress is suitable for use with side rails - see Mattresses and side rails on page 15. - Page 20 To lower the side rail: Hold either side rail handle (1). Pull the blue release lever (2) and lower the side rail (3), holding the side rail until it is completely lowered. The side rail folds down below the mattress platform. Side rail operation The head end and foot end side rails operate in the same way.
-
Page 21: Cpr Backrest Release
CPR backrest release Manual CPR release handles are located below the calf section on either side of the bed. If the patient suffers a cardiac arrest, pull the CPR release handle (1). This will lower the backrest (2) to enable cardio- pulmonary resuscitation to be carried out. -
Page 22: X-Ray Cassette Tray (Optional)
X-ray cassette tray (Optional) The X-ray cassette tray allows thoracic X-ray photography with the backrest at any angle and without the patient moving from the bed. WARNING Position the mattress platform at an ergonomic height to allow easy loading and removal of X-ray cassettes. Return the X-ray cassette tray to its closed position below the backrest before raising or lowering the backrest. - Page 23 Release the knob to hold the tray in the fully open position (3). Position the X-ray cassette (4) on the tray with its bottom edge against the lip at the foot end of the tray. Positioning the X-ray cassette Pull the knob and slide the tray underneath the backrest. The red moulding on the top of the X-Ray sitting tool indicates the top right hand corner of the X-Ray cassette.
-
Page 24: Bed Length Adjustment
Bed length adjustment The length of the bed is adjustable to three set positions. These are typically used as follows: Short, for manoeuvring the bed in confined spaces Standard length, for normal use Extended, to accommodate very tall patients WARNING Install a suitable foam mattress extension (squab) at the head end when the bed is extended. - Page 25 To extend the mattress platform: Lift the blue extension catch bar (1). Hold the middle of the end crossbar (2) and pull out the mattress platform to the required position. Release the catch bar. Extending the mattress platform WARNING After extending the mattress platform make sure the calf extension sheet is clipped over the end of the mattress platform frame.
-
Page 26: Bedstripper (Linen Shelf) (Optional)
Bedstripper (linen shelf) (Optional) The bedstripper is used for supporting clean linen when the bed sheets are being changed. Pull out the bedstripper from its closed position below the foot board. After use, push the bedstripper back to its closed position. Bedstripper (linen shelf) Caution The safe working load of the bedstripper is 20kg. -
Page 27: Lifting Pole And Accessory Sockets
Lifting pole and accessory sockets Lifting pole sockets (1) are located at the head end of the mattress platform. Sockets to support compatible accessories are located at the head end (2) and foot end (3) of the bed. Lifting pole and accessory sockets (head end) Accessory sockets (foot end) -
Page 28: Drainage Bag Rails
Drainage bag rails Rails (1) to support drainage bags, etc. are located below the thigh and backrest sections on either side of the bed. The bed may also be fitted with DIN accessory rails (2). Drainage bag rails and DIN rail Caution The maximum weight that can be safely supported by each drainage bag rail and DIN rail is 5kg. -
Page 29: Head And Foot Boards
Head and The head and foot boards can be easily lifted off the bed for foot boards access to the patient. The head and foot boards can each be fitted with locking catches (1) to prevent accidental removal. To unlock a board: pull out the catches (2) and rotate them a quarter-turn (3);... -
Page 30: Adjusting The Mattress Platform
Adjusting the mattress platform WARNING The controls require only a single press to activate. To prevent unwanted movement of the mattress platform, avoid leaning against the side rails and keep equipment on and around the bed clear of the controls. Controls for use by the patient and caregiver are built into the head end side rails. -
Page 31: Patient Controls
Patient The patient controls are located on the inside panel of both controls head end side rails. Patient controls (patient’s left hand side) WARNING The patient should be shown how to use these controls by the caregiver. Caregiver The caregiver controls are located on the outside panel of both controls head end side rails. - Page 32 These buttons raise and lower the thigh section. Thigh section When the thigh section is first raised from the flat position, the calf section will be in the Fowler position (angled downwards). To change the calf section to the vascular (horizontal) position, refer to the section Adjusting the calf position on page 37.
-
Page 33: Patient Handset (Optional)
Patient The controls on this handset operate in the same way as those handset on the side rails (see page 32). (Optional) WARNING Store the handset on the side rail using the clip on the back; this will help to prevent accidental operation of the controls. The patient should be shown how to use the handset by the caregiver. -
Page 34: Attendant Control Panel (Acp)
Attendant Control Panel (ACP) Attendant Control Panels are located on the outside panels of both foot end side rails. The ACP on the left side and right side of the bed have different button layouts. Additionally, an ACP can be mounted at the foot-end of the bed, either clipped onto the foot board or using an ACP holder (ENT-ACC11) in an accessory socket. - Page 35 These buttons raise and lower the thigh section. Thigh section When the thigh section is first raised from the flat position, the calf section will be in the Fowler position (angled downwards). To change the calf section to the vascular (horizontal) position, refer to the section Adjusting the calf position on page 37.
-
Page 36: Function Lockout
Function lockout Function lockout can be used to prevent operation of the controls, e.g. when inadvertent movement of the mattress platform could injure the patient. To lock (prevent) or unlock (allow) functions: Press the Function Lock button. The indicator above the button will light. -
Page 37: Adjusting The Calf Position
Adjusting the calf position When the thigh section is raised, the calf section can be manually changed to the vascular (horizontal) position. Hold the side of the calf section frame. Lift the calf section upwards (1) until it latches (2). Changing from Fowler position (left) to vascular To return the calf section to the Fowler position: Use the caregiver controls or ACP to lower the thigh section to... -
Page 38: Backup Battery
Backup battery Caution To ensure the battery is kept fully charged and prevent damage to the battery, the bed should be connected to the electricity supply at all times during normal use. The battery is intended for short term use only. Its life will be reduced if it is used to power the bed for long periods. -
Page 39: Duty Cycle Lockout
To recharge the battery, connect the bed to the electricity Recharging the backup battery supply. Allow at least eight hours to recharge the battery when it is completely discharged. While the battery is recharging, the ACP battery indicator lights yellow. The indicator will go out when the battery is fully charged. -
Page 40: Product Care
5. Product Care WARNING Disconnect the bed from the electricity supply before starting any cleaning or maintenance activity. The bed will still operate on battery power if the function has not been locked on the ACP. Mattress platform sections The four mattress platform sections (backrest, seat, thigh and calf) can be removed by pulling them upwards off the mattress platform frame. -
Page 41: Decontamination
(NaDCC) as a disinfectant because it is effective, stable and has a fairly neutral pH. Many other disinfectants are used in healthcare facilities, and it is not possible for ArjoHuntleigh to test each one to determine whether it may affect the appearance or performance of the bed. - Page 42 used with care and in accordance with the manufacturer’s instructions. Caution Do not use abrasive compounds or pads, or phenol-based disinfectants. Do not use jet stream cleaning or wash tunnels. Do not remove grease from the actuator pistons.
-
Page 43: Preventive Maintenance
Check that the patient controls, caregiver controls and Attendant Control Panels operate correctly Check the mattress for damage and fluid ingress Examine the lifting pole, strap and handle If the result of any of these tests is unsatisfactory, contact ArjoHuntleigh or an approved service agent. - Page 44 WARNING The procedures below must be carried out by suitably trained and qualified personnel. Failure to do so may result in injury or an unsafe product. Actions to be done by qualified personnel Yearly Check that the bedstripper (linen shelf) remains in its closed position when maximum foot down tilt is applied Check that the bed operates correctly using the backup battery...
- Page 45 If the bed fails a second time, contact ArjoHuntleigh or an approved service agent. To maintain best performance, the backup battery should be replaced every four years by an approved service agent.
-
Page 46: Troubleshooting
Troubleshooting If the equipment fails to operate correctly, the table below suggests some simple checks and corrective actions. If these steps fail to resolve the problem, contact ArjoHuntleigh or an approved service agent. Symptom Possible Cause Action Check the power supply... -
Page 47: Fault Indications
The bed’s control software indicates problems in the electrical system by means of flashing indicators on the Attendant Control Panel (ACP). If you experience any of the indications below, contact ArjoHuntleigh or an approved service agent. Indication Possible cause Height actuator fault... -
Page 48: Accessories And Cables
6. Accessories and Cables Recommended accessories for the bed are shown in the table below. Note that some items may not be available in all countries. Accessory Product code Lifting pole with strap and handle ENT-ACC01 IV pole ENT-ACC02 IV pole steel hooks ENT-ACC02 SH Angled IV pole ENT-ACC04... -
Page 49: Technical Data
7. Technical Data General Safe working load 250kg Maximum patient weight 185kg Product weight (approx.) 150kg Audible noise 50dB approx. Operating conditions Temperature 10°C to 40°C Relative humidity 20% to 90% at 30°C, non-condensing Atmospheric pressure 700hPa to 1060hPa Electrical data Power input 1.6A max. - Page 50 Dimensions (subject to normal manufacturing tolerances Overall length Head end board Head end board on mattress base platform Position 1 (Short) 219cm 224cm Position 2 (Standard) 230cm 235cm Position 3 (Extended) 242cm 247cm In-bed length Position 1 (Short) 192cm Position 2 (Standard) 203cm Position 3 (Extended) 215cm...
- Page 51 To minimise these hazards, contact ArjoHuntleigh for information on correct disposal. Transport and storage Handle with care. Do not drop. Avoid shock or violent impact.
- Page 52 Symbols (continued) Type B applied part Applied parts are considered to be: Upper frame section, Bed controls, Safety Sides, Head and Foot Boards Manufacturer / date of manufacture Complies with the European Medical Device Directive 93/42/EEC Serial number Model number Waste Electrical and Electronic Equipment (WEEE) - do not dispose of this product in general household or commercial waste...
-
Page 53: Warranty And Service
8. Warranty and Service ArjoHuntleigh standard terms and conditions apply to all sales; a copy is available on request. These contain full details of warranty terms and do not limit the statutory rights of the consumer. For service, maintenance and any questions regarding this product, please contact your local ArjoHuntleigh office or approved distributor. -
Page 54: Electromagnetic Compatibility
9. Electromagnetic Compatibility The bed is intended for use in the electromagnetic environment specified in the tables below. The customer or the user of the bed should ensure that it is used in such an environment. Failing to ensure that these tables are properly followed may result in the product not working properly. - Page 55 Guidance and manufacturer’s declaration – electromagnetic immunity The bed is intended for use in the electromagnetic environment specified below. The customer or the user of the bed should assure that it is used in such an environment. IEC 60601 Compliance Electromagnetic environment - Immunity test test level...
- Page 56 Guidance and manufacturer’s declaration – electromagnetic immunity The bed is intended for use in the electromagnetic environment specified below. The customer or the user of the bed should assure that it is used in such an environment. IEC 60601 test Compliance Electromagnetic environment - Immunity test...
- Page 57 Recommended separation distances between portable and mobile RF communications equipment and the bed The bed is intended for use in an electromagnetic environment in which radiated RF disturbances are controlled. The customer or the user of the bed can help prevent electromagnetic interference by maintaining a minimum distance between portable and mobile RF communications equipment (transmitters) and the bed as recommended below, according to the maximum output power of the communications equipment.
- Page 58 ENTERPRISE E8000X (E8X) Notice d'utilisation ...with people in mind 746-585-FR-10 • 12/2017...
- Page 59 Politique conceptuelle et droits d'auteur ® et ™ indiquent des marques de commerce appartenant au groupe de sociétés ArjoHuntleigh sauf mention contraire. © ArjoHuntleigh 2016. Notre objectif est de poursuivre le développement de nos produits. Nous nous réservons donc le droit d'en modifier la conception sans préavis. Il est interdit de copier, dans son intégralité...
- Page 60 Table des matières Avertissements, mises en garde et remarques ......4 Avertissements généraux .............. 5 1. Introduction ..............7 Vue d'ensemble ................9 2. Applications cliniques ..........10 Utilisation prévue ................. 10 Indications ................... 10 Contre-indications ............... 11 3. Installation ..............12 Alimentation électrique ..............
-
Page 61: Avertissements, Mises En Garde Et Remarques
Avertissements, mises en garde et remarques Signale des dangers potentiels liés à des procédures ou conditions qui, si elles ne sont AVERTISSEMENT pas suivies à la lettre, peuvent provoquer la mort, des blessures ou d'autres effets indésirables graves. Signale des dangers potentiels liés à des procédures ou conditions qui, si elles ne sont Mise en garde pas suivies à... -
Page 62: Avertissements Généraux
Des modifications ou des réparations non autorisées de ce produit peuvent compromettre la sécurité et rendre caduque toute garantie. ArjoHuntleigh décline toute responsabilité en cas d'incident, d'accident ou de baisse de performance résultant de telles modifications ou réparations. - Page 63 AVERTISSEMENT Si l'évaluation des risques indique qu'un patient présente un risque élevé de piégeage lié à sa maladie ou à d'autres circonstances, et si laisser ce patient en position assise n'apporte aucun avantage médical, placer le sommier en position horizontale et désactiver les commandes lorsque le patient n'est pas surveillé.
-
Page 64: Introduction
à l'utilisation et à la maintenance de la gamme ® de lits hospitaliers pour soins intensifs Enterprise 8000X d'ArjoHuntleigh. Ces lits comportent de multiples fonctions, afin de fournir tant au patient qu'au personnel soignant une position optimale pour les soins. Caractéristiques standard : •... - Page 65 On peut trouver le numéro de modèle et le numéro de série sur l'étiquette de spécification apposée sur le cadre du lit, sous le repose-tête. HUNTLEIGH HEAL THCARE LT D Duty 10% 2min/20min 250kg WEDNESBUR Y W EST MIDLANDS UK Made In S/No.
-
Page 66: Vue D'ensemble
Vue d'ensemble A. Panneau de tête N. Poignée de verrouillage d'extension B. Barrière latérale côté tête O. Pédale/barre de frein C. Commandes infirmier P. Emplacement pour accessoire D. Section dossier Q. Barre d'arrêt d'extension E. Barrière latérale côté pied R. Poignée de commande CPR F. -
Page 67: Applications Cliniques
2. Applications cliniques AVERTISSEMENT Un professionnel médical doit évaluer l'âge et l'état du patient afin d'assurer une utilisation sûre du lit. L'utilisation du décubitus déclive (Trendelenburg) ou proclive (Trendelenburg inversé) peut être contre-indiquée pour certaines pathologies. Le recours à la fonction d'inclinaison doit se faire exclusivement sous la supervision d'un professionnel médical, après une évaluation de l'état du patient. - Page 68 Contre- Le lit n'est pas destiné à être utilisé dans les situations indications suivantes : • Un lieu résidentiel, par ex. pour les soins à domicile (*Environnement d'application 4). • Des soins de consultation externe (*Environnement d'application 5). * Les environnements d'application sont définis dans la norme CEI 60601-2-52.
-
Page 69: Installation
3. Installation Le chapitre suivant décrit la manière d'installer le lit. AVERTISSEMENT Si la fiche ou le cordon d'alimentation est endommagé, le dispositif complet doit être remplacé par du personnel agréé. Ne retirez pas la fiche fixée et n'utilisez pas d'adaptateur ou de fiche pouvant être rebranchée. -
Page 70: Alimentation Électrique
Alimentation Relier la fiche d'alimentation électrique à une prise de courant électrique appropriée. S'assurer que la fiche électrique est facilement accessible et peut être débranchée rapidement en cas d'urgence. Cordon d'alimentation électrique et borne d'équipotentialité Quand le lit est branché sur l'alimentation électrique, un témoin s'allume sur le panneau de commande soignant (voir page 34). -
Page 71: Matelas
Matelas AVERTISSEMENT Utilisez toujours un matelas de type et de dimensions appropriés. Les matelas non compatibles peuvent exposer à des risques. Des matelas très mous, même de taille correcte, peuvent entraîner un risque de piégeage. En cas d'utilisation de barrières de lit, l'épaisseur maximum recommandée pour le matelas est de 18 cm. - Page 72 L'utilisateur doit valider la conformité à cette norme en cas d'utilisation d'autres matelas. • Pour de plus amples informations sur les matelas adéquats, contacter ArjoHuntleigh ou un distributeur agréé. Une liste des bureaux ArjoHuntleigh se trouve au dos du présent manuel.
-
Page 73: Fonctionnement
4. Fonctionnement Le chapitre suivant décrit la manière d'utiliser le lit. AVERTISSEMENT Actionner les pédales de frein avec les pieds en portant des chaussures adéquates. Ne pas actionner les pédales manuellement. Freins et roue directionnelle Les pédales de frein comptent trois positions : •... -
Page 74: Pédale Pour Le Réglage De La Hauteur Du Lit (En Option)
Des pédales de frein (1) sont installées à la tête du lit. Celles-ci Pédales de frein côté tête fonctionnent de la même manière que les pédales côté pieds. Pédales de frein côté tête Pédale pour le réglage de la hauteur du lit (en option) La hauteur du lit peut être réglée à... -
Page 75: Utilisation De La 5E Roue (En Option)
Utilisation de la 5 roue (en option) La 5 roue améliore la mobilité et la direction. Activer la 5 roue : 1. Appuyer sur le côté tête de la pédale d'activation de la 5 roue (A). (Voir fig. 1) La 5 roue (B) descend jusqu'à... -
Page 76: Demi-Barrières Latérales
Demi-barrières latérales AVERTISSEMENT Il incombe au professionnel de santé responsable de décider d'utiliser ou non des barrières de lit sur la base de l'âge, de la taille et de l'état du patient. Les barrières de lit ne sont pas conçues pour empêcher la sortie délibérée du lit par un patient. - Page 77 Pour abaisser la barrière latérale : Tenir la poignée de l'une ou l'autre des barrières latérales (1). Tirer le levier bleu de dégagement (2) et abaisser la barrière latérale (3) tout en la retenant jusqu'à ce qu'elle soit complètement rabattue. La barrière latérale se replie sous le sommier.
-
Page 78: Commande Cpr Du Dossier
Commande CPR du dossier Les poignées de libération manuelle pour CPR sont situées sous la section jambes, de chaque côté du lit. En cas d'arrêt cardiaque du patient, tirer la poignée de commande de la CPR (1). Cela abaissera le dossier (2) afin de pouvoir effectuer la réanimation cardiopulmonaire. -
Page 79: Porte-Cassette Radiographique (En Option)
Porte-cassette radiographique (en option) Le porte-cassette radiographique permet d'effectuer des radiographies thoraciques avec le relève-buste à n'importe quel angle et sans que le patient ne bouge du lit. AVERTISSEMENT Positionner le sommier à une hauteur ergonomique pour permettre un chargement et un retrait aisés des cassettes radiographiques. Remettre le porte-cassette radiographique en position fermée sous le relève-buste avant de relever ou d'abaisser ce dernier. - Page 80 Relâcher le bouton pour garder le porte-cassette en position complètement ouverte (3). Placer la cassette radiographique (4) sur le porte-cassette en plaçant son bord inférieur contre le bord intérieur du porte-cassette. Placement de la cassette radiographique Tirer le bouton et faire glisser le porte-cassette sous le relève-buste.
-
Page 81: Réglage De La Longueur Du Lit
Réglage de la longueur du lit La longueur du lit est réglable en trois positions. Ces dernières s'utilisent habituellement comme suit : Courte, pour manœuvrer le lit dans des espaces confinés Standard, pour une utilisation normale Avec extension, pour une adaptation aux patients de très grande taille AVERTISSEMENT Installer une extension de matelas mousse adéquate (coussin) côté... - Page 82 Pour allonger le sommier : Lever la barre d'arrêt d'extension bleue (1). Tenir le milieu de la barre transversale d'extrémité (2) et tirer le sommier jusqu'à la position requise. Relâcher la barre d'arrêt. Allongement du sommier AVERTISSEMENT Après l'allongement du sommier, s'assurer que la plaque d'extension de la section jambes est fixée sur l'extrémité...
-
Page 83: Porte-Couverture (En Option)
Porte-couverture (en option) Le porte-couverture permet de poser du linge propre lors du changement des draps du lit. Tirer le porte-couverture de sa position fermée sous le panneau de pieds. Après utilisation, repousser le porte-couverture en position fermée. Porte-couverture Mise en garde La capacité... -
Page 84: Potence Et Supports Pour Accessoires
Potence et supports pour accessoires Les supports de la potence (1) se situent côté tête du sommier. Les supports destinés à soutenir les accessoires compatibles se situent côté tête (2) et côté pieds (3) du lit. Potence et supports pour accessoires (côté tête) Supports pour accessoires (côté... -
Page 85: Rails Porte-Sac De Drainage
Rails porte-sac de drainage Des rails (1) pour supporter des sacs de drainage, etc. se trouvent sous les sections cuisses et dossier de chaque côté du lit. Le lit peut également être équipé de rails DIN pour accessoires (2). Rails porte-sac de drainage et rail DIN Mise en garde Le poids maximum admissible pour chaque rail porte-sac de drainage et chaque rail DIN est de 5 kg. - Page 86 Panneaux de Les panneaux de tête et de pieds peuvent être aisément tête et de retirés du lit afin d'accéder au patient. pieds Les panneaux de tête et de pieds peuvent tous les deux être équipés de loquets de blocage (1) afin de prévenir tout détachement accidentel.
-
Page 87: Réglage Du Sommier
Réglage du sommier AVERTISSEMENT Il suffit d'appuyer une fois sur les commandes pour les activer. Pour empêcher tout déplacement involontaire du sommier, éviter de s'appuyer contre les barrières latérales et éloigner des commandes l'équipement sur et autour du lit. Les commandes destinées au patient et au personnel soignant sont intégrées aux barrières latérales côté... -
Page 88: Commandes Du Patient
Commandes Les commandes du patient se trouvent sur le panneau du patient intérieur des deux barrières latérales côté tête. Commandes du patient (à la gauche du patient) AVERTISSEMENT Le personnel soignant doit montrer le fonctionnement de ces commandes au patient. Commandes Les commandes du personnel soignant se trouvent sur le infirmier... - Page 89 Ces boutons servent à élever et abaisser la section cuisses. Section cuisses Lorsque la section cuisses est d'abord relevée depuis la position horizontale, la section jambes se retrouve dans la position de Fowler (inclinée vers le bas). Pour faire passer la section jambes en position vasculaire (horizontale), se référer à...
-
Page 90: Télécommande Patient (En Option)
Télécomman Les commandes figurant sur cette télécommande fonctionnent de patient (en de la même manière que celles des barrières latérales (voir page 32). option) AVERTISSEMENT Ranger la télécommande sur la barrière de lit au moyen de l'attache au dos, afin de réduire le risque d'activation accidentelle des commandes. -
Page 91: Panneau De Commande Soignant
Panneau de commande soignant Les panneaux de commande soignant se trouvent sur les panneaux extérieurs des deux barrières latérales côté pieds. Les panneaux de commande soignant à gauche et à droite du lit ont des dispositions différentes des boutons. Par ailleurs, un panneau de commande soignant (ACP) peut être installé... - Page 92 Ces boutons servent à élever et abaisser la section cuisses. Section cuisses Lorsque la section cuisses est d'abord relevée depuis la position horizontale, la section jambes se retrouve dans la position de Fowler (inclinée vers le bas). Pour faire passer la section jambes en position vasculaire (horizontale), se référer à...
-
Page 93: Verrouillage De Fonctions
Verrouillage de fonctions Le verrouillage de fonctions peut être utilisé pour empêcher toute utilisation des commandes, par exemple lorsqu'un mouvement accidentel du sommier est susceptible de blesser le patient. Pour verrouiller (empêcher) ou déverrouiller (autoriser) les fonctions : Appuyer sur le bouton de verrouillage des fonctions. Le voyant au-dessus du bouton s'allume. -
Page 94: Réglage De La Position Des Jambes
Réglage de la position des jambes Lorsque la section cuisses est relevée, la section jambes peut être réglée manuellement jusqu'à la position vasculaire (horizontale). Tenir le côté du cadre de la section jambes. Lever la section jambes (1) jusqu'à ce qu'elle se verrouille (2). De la position de Fowler (gauche) à... -
Page 95: Batterie De Secours
Batterie de secours Mise en garde Afin que la batterie reste pleinement chargée et ne subisse aucun dommage, le lit doit être continuellement branché à l'alimentation électrique pendant son utilisation normale. La batterie est conçue pour une utilisation à court terme uniquement. Toute utilisation prolongée entraînerait une réduction de sa durée de vie. -
Page 96: Verrouillage Du Cycle Nominal
Pour recharger la batterie, brancher le lit sur l'alimentation Chargement de la batterie de électrique. Si elle est complètement à plat, recharger la batterie secours pendant au moins huit heures. Lors du chargement de la batterie, le voyant de batterie du panneau de commande est jaune. -
Page 97: Et Instructions D'entretien
5. et instructions d'entretien AVERTISSEMENT Débrancher le lit de l'alimentation électrique avant toute opération de nettoyage ou de maintenance. Le lit continue à fonctionner à l'aide de la batterie si la fonction n'a pas été verrouillée sur le panneau de commande soignant. Sections du sommier Les quatre sections de sommier (relève-buste, siège, cuisses et mollets) peuvent être retirées du sommier par un mouvement... -
Page 98: Décontamination
Beaucoup d'autres désinfectants sont utilisés dans les établissements de soins, mais ArjoHuntleigh n'est pas en mesure de les tester tous afin de déterminer s'ils risquent d'affecter l'apparence ou les performances du lit. - Page 99 Si les protocoles d'un établissement requièrent l'utilisation d'un désinfectant différent du DCCNa (par exemple de l'eau de Javel diluée ou du peroxyde d'hydrogène), cet autre produit doit être employé avec précaution et conformément aux instructions du fabricant. Mise en garde Ne pas utiliser de tampons abrasifs ou de composés abrasifs, ni de désinfectants à...
-
Page 100: Maintenance Préventive
Contrôle du matelas pour vérifier l'absence de dommage et d'infiltration de liquide Examen de la potence, de la sangle et de la poignée Si le résultat de l'un de ces tests se révèle non satisfaisant, contacter ArjoHuntleigh ou un technicien de service agréé. - Page 101 AVERTISSEMENT Les procédures ci-après doivent être effectuées par du personnel formé et qualifié. Le non-respect de ces exigences peut entraîner des blessures ou réduire la sécurité du produit. Tous les Actions incombant à du personnel qualifié Vérifier que le porte-couverture reste en position fermée lors de l'application du décubitus proclive maximal Vérifier que le lit fonctionne correctement avec la batterie de...
- Page 102 Si le lit échoue une deuxième fois, contacter ArjoHuntleigh ou un technicien de service agréé. La batterie de secours doit être remplacée tous les quatre ans par un technicien de service agréé...
-
Page 103: Dépistage Des Anomalies
Dépistage des anomalies Si l'équipement ne fonctionne pas correctement, le tableau ci-dessous suggère quelques contrôles simples et mesures correctives. Si le problème persiste, contacter ArjoHuntleigh ou un technicien de service agréé. Symptôme Cause possible Action Vérifier que le cordon d'alimentation est branché... -
Page 104: Indications De Défaillance
Le logiciel de commande du lit signale des problèmes dans le système électrique au moyen de voyants clignotants situés sur le panneau de commande soignant. Si une des indications ci-dessous se produit, contacter ArjoHuntleigh ou un technicien de service agréé. Indications... -
Page 105: Accessoires Et Câbles
6. Accessoires et câbles Le tableau ci-dessous répertorie les accessoires recommandés pour le lit. Remarque : il est possible que certains articles ne soient pas disponibles dans tous les pays. Accessoire Code produit Potence avec sangle et poignée ENT-ACC01 Tige porte-sérum ENT-ACC02 Crochets pour potence pour intraveineuse ENT-ACC02 SH... -
Page 106: Données Techniques
7. Données techniques Généralités Capacité maximale admissible 250 kg Poids maximal du patient 185 kg Poids du produit (approximatif) 150 kg Bruit audible environ 50 dB Conditions de fonctionnement Température 10 °C à 40 °C 20% à 90% à 30 °C, Humidité... - Page 107 Dimensions (soumises aux tolérances de fabrication normales Panneau côté Châssis du Longueur hors tout tête solidaire du panneau côté sommier tête Position 1 (courte) 219 cm 224 cm Position 2 (standard) 230 cm 235 cm Position 3 (avec extension) 242 cm 247 cm Longueur intérieure du lit Position 1 (courte)
- Page 108 La mise au rebut incorrecte de cet équipement et de ses composants, en particulier des ressorts pneumatiques, des vérins, des batteries et autres appareils électriques, risque de produire des substances dangereuses pour l'environnement. Pour minimiser ces risques, contactez ArjoHuntleigh pour en savoir plus sur la mise au rebut appropriée. Transport et stockage Manipulez le produit avec soin.
- Page 109 Symboles (suite) Partie appliquée de type B Sont considérés comme parties appliquées : la section supérieure du cadre, les commandes du lit, les barrières latérales, les panneaux de tête et de pieds Fabricant/date de fabrication Conforme à la directive 93/42/CEE relative aux appareils médicaux Numéro de série Numéro de modèle...
-
Page 110: Garantie Et Service
Pour toute question relative notamment à l'utilisation ou à la maintenance de ce produit, contacter ArjoHuntleigh ou un distributeur agréé. Une liste des bureaux ArjoHuntleigh se trouve au dos du présent manuel. -
Page 111: Compatibilité Électromagnétique
9. Compatibilité électromagnétique Le lit est conçu pour une utilisation dans l'environnement électromagnétique indiqué dans les tableaux ci-dessous. Le client ou l'utilisateur du lit doit garantir son utilisation dans un tel environnement. Le non-respect de ces tableaux pourrait entraîner un dysfonctionnement du produit. Les équipements de communication RF portables et mobiles peuvent affecter l'utilisation normale du lit E8000X. - Page 112 Recommandations et déclarations du fabricant – immunité électromagnétique Le lit est conçu pour une utilisation dans l'environnement électromagnétique indiqué ci-dessous. L'acheteur ou l'utilisateur du lit doit s'assurer que l'appareil est utilisé dans le genre d'environnement indiqué. Essais Niveau de test Niveau de Environnement électromagnétique d'immunité...
- Page 113 Recommandations et déclarations du fabricant – immunité électromagnétique Le lit est conçu pour une utilisation dans l'environnement électromagnétique indiqué ci-dessous. L'acheteur ou l'utilisateur du lit doit s'assurer que l'appareil est utilisé dans le genre d'environnement indiqué. Essais Niveau de test Niveau de Environnement électromagnétique d'immunité...
- Page 114 Distances de sécurité recommandées entre le lit et les équipements de communication RF portables et mobiles Le lit est destiné à être utilisé dans un environnement électromagnétique où les perturbations RF rayonnées sont contrôlées. L'acheteur ou l'utilisateur du lit peut empêcher les interférences électromagnétiques en maintenant une distance minimale entre le lit et les équipements de communication RF portables et mobiles (émetteurs) telle qu'elle est prescrite ci-dessous, selon la puissance d'émission maximale des équipements de communication.
- Page 115 AUSTRALIA FRANCE POLSKA ArjoHuntleigh Pty Ltd ArjoHuntleigh SAS ArjoHuntleigh Polska Sp. z o.o. 78, Forsyth Street 2 Avenue Alcide de Gasperi ul. Ks Piotra Wawrzyniaka 2 O’Connor CS 70133 PL-62-052 KOMORNIKI (Pozna ) AU-6163 Western Australia FR-59436 RONCQ CEDEX Tel: +48 61 662 15 50 Tel: +61 89337 4111 Tél: +33 (0) 3 20 28 13 13...
- Page 116 Hans Michelsensgatan 10 211 20 Malmö, Sweden www.arjohuntleigh.com ArjoHuntleigh is a world-leading provider of integrated products and solutions that improve the lives of patients and residents with reduced mobility. We help healthcare facilities deliver wellness and effective everyday care, early mobilisation, safe patient handling, venous thromboembolism prevention, pressure injury prevention, hygiene routines, bariatric care and diagnostics.