Table des Matières
Publicité
Les langues disponibles
Les langues disponibles
Liens rapides
Publicité
Chapitres
Table des Matières
Dépannage

Manuels Connexes pour Medela Lactina Select


Sommaire des Matières pour Medela Lactina Select
- Page 1 Lactina ® EN Instructions for use – home use | DE Gebrauchsanweisung – für den Heimgebrauch FR Mode d’emploi – Usage à domicile | IT Istruzioni per l’uso – Uso domestico NL Gebruiksaanwijzing – voor thuisgebruik EFFICIENCY...
- Page 2 Grazie per aver scelto il tiralatte Lactina. Il latte materno è la scelta naturale per il tuo bambino, ma in alcuni casi non è possibile allattare al seno. Da oltre 50 anni Medela è impegnata ad aiutare madri e bambini che si trovano in questa situazione. In stretta cooperazione con gli esperti di allattamento al seno, Medela, uno dei leader del mercato, ha condotto ricerche volte a sviluppare tiralatte che soddisfino pienamente le esigenze delle mamme che allattano.
- Page 3 04–31 32–59 60–87 88–115 116–143...
-
Page 4: Table Des Matières
Table of Contents 1. Intended use / Population – Contraindication 2. Meaning of symbols 3. Important safety information 4. Product description 5. Cleaning 5.1 Before using for the first time and after every use 5.2 Before using for the first time and once a day 5.3 Cleaning the breastpump and case 5.4 Disinfecting the breastpump 6. -
Page 5: Intended Use / Population - Contraindication
1. Intended use / Population – Contraindication The intended use and indications of breastpumps Breastpumps are intended to be used by lactating women in the hospital or home environment for expressing breastmilk. Breastpumps are indicated to alleviate the symptoms of engorgement by expressing milk. In case of mastitis breastpumps support the healing process by removing breastmilk from the affected breast. -
Page 6: Meaning Of Symbols
2. Meaning of symbols The warning symbol identifies all instructions that are important for safety. Failure to observe these instructions can lead to injury or damage to the breastpump. When used in conjunction with the following words, the warning symbol stands for: Warning Can lead to serious injury or death. -
Page 7: Symbols On The Device
This symbol indicates that the packaging contains products intended to come in contact with food according to regulation 1935/2004. This symbol indicates unique GSI Global Trade Item Numbers (GTIN). Symbols on the device This symbol indicates to follow instructions for use. This symbol indicates the compliance with the essential requirements of the Council Directive 93/42/EEC of 14 June 1993 concerning 0123... -
Page 8: Important Safety Information
3. Important safety information Failure to follow these instructions/safety information can lead to danger from the device. Subject to technical changes. Device Danger of electrocution! Keep the device dry! Never immerse in water or other liquids! The Lactina breastpump is not heat-resistant: keep away from radiators and open flames. - Page 9 Use the Lactina breastpump only for its intended use as described in this manual. Never operate an electrical device if it has a damaged power cord, if it is not working properly, if it has been dropped or damaged, or dropped into water. Do not use the Lactina breastpump while bathing or showering.
-
Page 10: Product Description
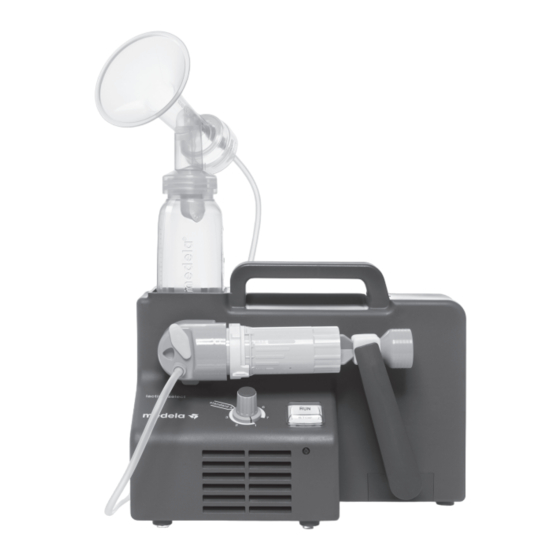
Lactina breastpump. The pump set is the QR code on page 30. suitable for expression by using the Lactina Select or Lactina Electric Plus. The pump set must only be used by one mother; use by more than one mother could pose a health risk. - Page 11 800.0809 Only Lactina Select The Lactina Select has an additional knob for adjusting the pump speed between 40 and 60 cycles per minute. Select a fast pumping rhythm to stimulate the milk flow. Reduce the speed when the milk begins to flow.
-
Page 12: Cleaning
Follow the instructions on page 28 if there is condensation or milk in the tubing. * Medela recommends to clean all parts of the pump set (incl. piston/cylinder, etc.) before used for the first time as shown in Chapter 5.2. - Page 13 Clean all parts with plenty Rinse all parts with cold, of warm water and basic dish- clear water (approx. 20 °C). washer agent (approx. 30 °C). Dry with a clean cloth or If you clean the individual parts leave to dry on a clean cloth. of the pump set in the dish- washer, place them on the top rack or in the cutlery section.
-
Page 14: Before Using For The First Time And Once A Day
Unplug the breastpump before cleaning. l Do not spray or pour liquid directly onto the pump. * Medela recommends to clean all parts of the pump set (incl. piston /cylinder, etc.) before used for the first time as shown in Chapter 5.2. -
Page 15: Cleaning The Breastpump And Case
(not wet) cloth. disinfecting agent may be used. Water and basic dishwasher agent or non-abrasive detergent * Accessories available for order can be found on page 30. may be used. For more information please refer to www.medela.com... -
Page 16: Preparing For Pumping
Note l Use Medela original accessories only. l Check pump set components for wear or damage before use. Carefully push the membrane onto the valve head until it engages. - Page 17 Push the valve head and Push the breastshield onto membrane onto the connector. the connector. Position valve head laterally. Insert the tubing into Slide the piston into the cylinder. the corresponding opening in the connector.
- Page 18 6. Preparing for pumping Warning l for step 12 (chapter 6.1): Use only the power cord that comes with Lactina. l Make sure the voltage of the power cord is compatible with the power source. Screw the piston/cylinder firmly into the cylinder holder. Push the piston into the rubber clamp on the pump arm until it engages.
- Page 19 Rotate the cylinder holder Insert the cylinder holder incl. until the pin sits in the slot piston/cylinder vertically into on the Lactina. the opening on the front of the Lactina. Plug the power cord into Insert adapter end of tubing the mains socket.
-
Page 20: Expression
This can lead to blockage of the milk ducts and engorgement. l for step 1 (chapter 7.2): Select a fast pumping rhythm on the Lactina Select to start the milk flow. Reduce the speed when the milk begins Set the vacuum regulator ring to to flow. -
Page 21: Expression
Hold the breastshield onto your Place the breastshield on your breast with your thumb and index breast so that your nipple is finger. Support your breast with properly centred in the tunnel. the palm of your hand. 7.2 Expression Set vacuum comfort: twist down Switch on the breastpump with the vacuum regulator ring and increase the vacuum until it is... -
Page 22: Preparing For Hands-Free Expression With The Easy Expression Bustier
7. Expression Caution l Contact your midwife or breastfeed- ing and lactation consultant if you can express only minimal or no milk or if expression is painful. Note l Always disconnect the Lactina from the Switch off the breastpump power source after expression. with Info 7.3 Preparing for handsfree... - Page 23 Bustier such assembled pump sets to the that your nipples are prop- breastshields. erly centred in the tunnel of the breastshields. *The Easy Expression Bustier is available in 4 sizes. See page 30. For more information please go to www.medela.com...
-
Page 24: Preparing For Double Pumping
Place l for step 2 (chapter 7.4): the breastshield on the breast as de- The Lactina Select has an additional scribed in chapter 7.1, step 2 and 3. knob for adjusting the pumping speed. Select a fast pumping rhythm to stimu- late the milk flow. - Page 25 Set the vacuum regulator ring Place the second breastshield on to minimum. Switch on the the breast so that the nipple breastpump with is properly centred in the tunnel. Twist down the vacuum regulator ring Set the vacuum regulator ring and increase the vacuum until it is slightly to minimum and place the uncomfortable.
-
Page 26: Storing And Thawing Breastmilk
Alternatively, you can hold the bottle or “Pump & Save” bag under warm water (max. 37 °C). I Gently swirl the bottle or “Pump & Save” bag to mix any fat that has separated. Avoid shaking or stirring the milk. *More information at www.medela.com... -
Page 27: Feeding Breastmilk
You can find detailed informa- tion about Calma on the Medela website (www.medela.com). As a result of its comprehensive research work, Medela is one of the first compa- Supporting nies in the world to incorporate babies’ babies feeding behavior breastfeeding behaviour into its 2-Phase Expression and Calma innovations. -
Page 28: Troubleshooting
10. Troubleshooting Problem Solution If the motor Check whether mains power/battery is available. is not running Check that the device is switched on. Assemble the pump set in accordance with the instructions in chapter 6. Express in accordance with chapter 7. Make sure that the breastshield forms a complete seal around the breast. -
Page 29: Warranty And Maintenance / Disposal
EN / IEC 60601-1 standard. Copies of such certificates may be obtained on request. Because of the method of construction used, Medela does not expect electrical safety to be affected at any time during the life of the product – provided that it is used pro- perly in accordance with the intended use. -
Page 30: Complete Care During Breastfeeding Time
Easy Expression Bustier white XL 008.0040 QuickClean bag More information about all Medela products are available on our web site www.medela.com. * If the result of expression is unsatisfactory or expression is painful, contact your lactation consultant or health care practitioner. - Page 32 Inhaltsverzeichnis 1. Verwendungszweck/Zielgruppe – Kontraindikationen 2. Bedeutung der Symbole 3. Wichtige Sicherheitshinweise 4. Produktbeschreibung 5. Reinigung 5.1 Vor Erstgebrauch und nach jedem Gebrauch 5.2 Vor Erstgebrauch und einmal täglich 5.3 Reinigung der Milchpumpe und des Koffers 5.4 Desinfektion der Milchpumpe 6.
-
Page 33: Verwendungszweck/Zielgruppe - Kontraindikationen
1. Verwendungszweck/Zielgruppe – Kontraindikationen Verwendungszweck und Indikationen für Milchpumpen Milchpumpen dienen dazu, dass stillende Frauen im Krankenhaus oder zu Hause Muttermilch abpumpen können. Milchpumpen sind zudem indiziert, Symptome eines Milchstaus durch Entleeren der Brust zu lindern. Auch im Falle einer Brustdrüsen- entzündung (Mastitis) unterstützen Milchpumpen den Heilungsprozess durch Entleeren der Milch aus der betroffenen Brust. -
Page 34: Bedeutung Der Symbole
2. Bedeutung der Symbole Das Warnsymbol kennzeichnet alle für die Sicherheit wichtigen Anweisungen. Nichtbeachtung kann zu Verletzungen oder Schäden an der Milchpumpe führen. In Verbindung mit den folgenden Signalwörtern steht das Warnsymbol für: Achtung Kann zu schweren Verletzungen oder zum Tod führen. Vorsicht Kann zu leichten Verletzungen führen. -
Page 35: Symbole Auf Dem Gerät
Dieses Symbol zeigt an, dass die Verpackung gemäss Verordnung 1935/2004 Produkte enthält, die dazu bestimmt sind, mit Lebensmitteln in Berührung zu kommen. Dieses Symbol gibt die weltweit eindeutige Identifikationsnummer GTIN (GS1 Global Trade Item Number) an. Symbole auf dem Gerät Dieses Symbol weist darauf hin, dass die Gebrauchsanweisung zu befolgen ist. -
Page 36: Wichtige Sicherheitshinweise
3. Wichtige Sicherheitshinweise Bei Missachtung dieser Anleitung/Sicherheitshinweise können Gefährdungen durch das Gerät entstehen. Technische Änderungen bleiben vorbehalten. Gerät Lebensgefahr durch Stromschlag! Bitte halten Sie das Gerät trocken! Tauchen Sie es niemals in Wasser oder andere Flüssigkeiten! Die Milchpumpe Lactina ist nicht hitzebeständig: Halten Sie das Gerät von Heizkörpern und offenem Feuer fern. - Page 37 Verwendung Benutzen Sie die Milchpumpe Lactina ausschließlich für den in dieser Gebrauchsanweisung beschriebenen Verwendungszweck. Nehmen Sie ein elektrisches Gerät niemals in Betrieb, wenn das Netzkabel beschädigt ist, wenn es nicht korrekt funktioniert oder wenn es heruntergefallen, beschädigt oder ins Wasser gefallen ist. Verwenden Sie die Milchpumpe Lactina nicht beim Baden oder Duschen.
-
Page 38: Produktbeschreibung
Sie auf www.medela.com/personalfit. Sie zur Lactina Milchpumpe. Das Pumpset eignet sich können auch den QR-Code auf Seite 58 scannen. zum Abpumpen mit der Lactina Select oder Lactina Electric Plus. Das Pumpset darf nur von einer Mutter verwendet werden; die Benutzung durch mehrere Mütter kann ein Gesundheitsrisiko darstellen. - Page 39 800.0809 Nur Lactina Select Die Milchpumpe Lactina Select verfügt über einen zusätzlichen Knopf zu Einstellung der Pumpgeschwindigkeit im Bereich von 40 bis 60 Zyklen pro Minute. Wählen Sie einen schnellen Pumprhythmus, um den Milchfluss zu stimulieren. Verringern Sie die Geschwindigkeit, wenn Milch zu fließen beginnt.
-
Page 40: Reinigung
Abpumpen auf Kondensation und/oder Milchreste. Bei Kondensation oder Milch im Schlauch befolgen Sie bitte die Anweisungen auf Seite 56. * Medela empfiehlt, alle Teile des Alle Teile mit kaltem, sauberem Pumpsets (einschließlich Kolben/ Wasser (circa 20 °C) während Zylinder etc.) vor der ersten Benutzung 10 bis 15 Sekunden nachspülen. - Page 41 Reinigen Sie alle Teile mit viel Spülen Sie alle Teile mit kaltem, warmem Wasser (circa 30 °C), sauberem Wasser (circa 20 °C) ab. dem ein handelsübliches Spülmittel zugesetzt ist. oder Trocknen Sie die Teile mit Reinigen Sie die Einzelteile im einem sauberen Tuch ab oberen Gitter oder im Besteckfach oder lassen Sie sie auf einem...
-
Page 42: Vor Erstgebrauch Und Einmal Täglich
Netzstecker. l Keine Flüssigkeit direkt auf die Pumpe sprühen oder schütten. Trocknen Sie die Teile mit * Medela empfiehlt, alle Teile des Pumpsets einem sauberen Tuch ab (einschließlich Kolben/Zylinder etc.) vor der oder lassen Sie sie auf einem ersten Benutzung gemäß der Anleitung sauberen Tuch trocknen. -
Page 43: Reinigung Der Milchpumpe Und Des Koffers
(nicht nassen) Tuch ab. Auch (keinesfalls nassem) Tuch abwischen. Desinfektionsmittel auf Alkoholbasis Es können Wasser mit einem handels- können verwendet werden. üblichen Spülmittel oder nicht scheuernde Reinigungsmittel verwendet werden. * Bestellbares Zubehör finden Sie auf Seite 58. Weitere Informationen unter www.medela.com... -
Page 44: Vorbereitung Des Abpumpens
Minute) mit Wasser und Seife, bevor Brust, gereinigte Pumpenteile sowie das gereinigte Pumpset angefasst werden. Hinweis l Verwenden Sie nur Originalzubehör von Medela. l Überprüfen Sie die Teile des Pumpsets vor Gebrauch auf Abnutzung / Beschädigung. Stecken Sie die Membrane sorgfältig auf den Ventilkopf, bis sie einrastet. - Page 45 Stecken Sie den Ventilkopf Stecken Sie die Brusthaube mit Membrane auf auf das Verbindungsstück. das Verbindungsstück. Positionieren Sie den Ventilkopf seitlich. Stecken Sie den Schlauch in die Schieben Sie den Kolben entsprechende Anschlussöffnung in den Zylinder. im Verbindungsstück.
- Page 46 6. Vorbereitung des Abpumpens Achtung l zu Schritt 12 (Kapitel 6.1): Bitte verwenden Sie ausschließlich das mit der Milchpumpe Lactina gelieferte Netzkabel. l Stellen Sie sicher, dass die Spannung des Netzkabels mit der Stromquelle kompatibel ist. Schrauben Sie den Kolben/Zylinder fest in den Zylinderhalter.
- Page 47 Drehen Sie den Zylinderhalter, Stecken Sie den Zylinderhalter bis der Dorn fest im Schlitz inkl. Kolben/Zylinder senkrecht der Milchpumpe Lactina sitzt. in die Öffnung auf der Vorderseite der Milchpumpe Lactina. Stecken Sie das Netzkabel Stecken Sie den Schlauchadapter in eine Netzsteckdose ein. in die Öffnung des Zylinderhalters.
-
Page 48: Abpumpen
Pumpset nicht an der Flasche halten. Dies kann zum Abdrücken der Milchkanäle und zu Milchstau führen. l zu Schritt 1 (Kapitel 7.2): Wählen Sie bei Lactina Select einen schnellen Pumprhythmus, um den Stellen Sie den Vakuum-Einstellring Milchfluss auszulösen. Verringern auf Minimum. -
Page 49: Abpumpen
Halten Sie die Brusthaube mit Setzen Sie die Brusthaube Daumen und Zeigefinger an die auf die Brust auf, so dass Brust. Stützen Sie die Brust die Brustwarze gut zentriert mit der Handfläche. im Tunnel liegt. 7.2 Abpumpen Schalten Sie die Milchpumpe Stellen Sie das Komfort-Vakuum ein: ein. -
Page 50: Vorbereitung Für Das Freihändige Abpumpen Mit Dem Easy-Expression-Bustier
7. Abpumpen Vorsicht l Kontaktieren Sie Ihre Still- und Laktationsberaterin oder Hebamme, wenn Sie keine oder nur wenig Milch abpumpen können oder wenn das Abpumpen schmerzhaft ist. Hinweis Schalten Sie die Milchpumpe l Trennen Sie die Milchpumpe Lactina aus. nach dem Abpumpen immer von der Stromquelle. - Page 51 Bustier so an die Brust an, befestigen Sie das zusammengesetzte dass die Brustwarze im Tunnel Pumpenset an der Brusthaube. der Brusthaube gut zentriert ist. *Das Easy Expression-Bustier ist in 4 Größen erhältlich. Siehe Seite 58. Weitere Informationen unter www.medela.com...
-
Page 52: Vorbereitung Für Das Beidseitige Abpumpen
Zylinderhalters. Setzen l zu Schritt 2 (Kapitel 7.4): Sie die Brusthaube auf die Brust Die Lactina Select verfügt über einen auf, wie in Kapitel 7.1, Schritt zusätzlichen Knopf zur Einstellung der 2 und 3, beschrieben. - Page 53 Stellen Sie den Vakuum-Einstellring Setzen Sie die zweite Brusthaube auf Minimum. Schalten Sie die so auf die Brust auf, dass die Milchpumpe mit ein. Brustwarze gut zentriert im Tunnel liegt. Drehen Sie den Vakuum-Einstellring nach unten und Stellen Sie den Vakuum-Einstellring auf erhöhen Sie das Vakuum, bis es leicht unangenehm Minimum und setzen Sie die Brusthau- ist.
-
Page 54: Aufbewahren Und Auftauen Der Muttermilch
„Pump & Save“-Beutel auch unter warmes Wasser (max. 37 °C) halten. I Schwenken Sie die Milchflasche oder den „Pump & Save“-Beutel sanft, um abgesetztes Fett mit der Milch zu vermischen. Schütteln oder rühren Sie die Milch nicht. *Weitere Informationen unter www.medela.com... -
Page 55: Füttern Von Muttermilch
Füttern von Muttermilch. wieder zur Brust. Detaillierte Informationen über Calma finden Sie auf der Medela-Website (www.medela.de). Dank umfassender Forschungsarbeit hat Medela als weltweit eines der ersten Unterstützt das Unternehmen das Trinkverhalten von Babys Saugverhalten des Babys an der Mutterbrust in die Innovationen 2-Phase Expression und Calma einfließen... -
Page 56: Fehlerbehebung
10. Fehlerbehebung Problem Lösung Motor läuft Kontrollieren Sie, ob Netzstrom/Akku vorhanden ist. nicht Kontrollieren Sie, ob das Gerät eingeschaltet ist. Setzen Sie das Pumpset nach Anleitung gemäß Kapitel 6 zusammen. Abpumpen gemäß Kapitel 7. Stellen Sie sicher, dass die Brusthaube die Brust rundum gut abdichtet. -
Page 57: Garantie Und Wartung/Entsorgung
Hinblick auf die Einhaltung der Norm EN / IEC 60601-1 überprüft. Kopien der betreffenden Zertifikate sind auf Anfrage erhältlich. Aufgrund der Bauart des Gerätes geht Medela davon aus, dass die elektrische Sicherheit über die gesamten Lebensdauer des Gerätes hinweg zu keinem Zeitpunkt beeinträchtigt sein wird –... -
Page 58: Rundum Versorgt In Der Stillzeit
12. Rundum versorgt in der Stillzeit Das folgende Zubehör zur Milchpumpe Lactina kann über Medela-Verkaufsstellen unter Angabe der Artikelbezeichnung oder der Artikel-Nummer bezogen werden. Artikelnummer Produkt 008.0327* PersonalFit Brusthaube S (21 mm): DE / FR / IT 008.0337* PersonalFit Brusthaube S (21 mm): EN / NL / FR 008.0328*... - Page 59 Pflege & Schutz Abpumpen der Brust Evidenzbasierte Forschung Fortbildung Erfahrung Service Innovation Fachpersonal Auffangen & Füttern Aufbewahren Transportieren & Reinigen...
- Page 60 Table des matières 1. Utilisation prévue/Public concerné – Contreindications 2. Signification des symboles 3. Informations de sécurité importantes 4. Description du produit 5. Nettoyage 5.1 Avant la première utilisation et après chaque utilisation 5.2 Avant la première utilisation et une fois par jour 5.3 Nettoyage du tire-lait et de la valise 5.4 Désinfection du tire-lait 6.
-
Page 61: Utilisation Prévue/Public Concerné - Contreindications
1. Utilisation prévue/Public concerné – Contreindications Utilisation prévue et indications pour les tirelait Les tire-lait sont conçus pour être utilisés par des femmes allaitantes, à l’hôpital ou à domicile, en vue d’exprimer le lait maternel. Ils aident à atténuer les symptômes d’engorgement en permettant d’exprimer le lait des seins. -
Page 62: Signification Des Symboles
2. Signification des symboles Les symboles d’avertissement renvoient à des instructions importantes en matière de sécurité. Le non-respect de ces instructions peut provoquer des blessures ou endommager le tire-lait. Le symbole d’avertissement peut avoir différentes significations s’il est associé à l’un des termes ci-après : Avertissement Peut engendrer des blessures graves ou la mort. -
Page 63: Symboles Présents Sur L'appareil
Ce symbole indique que l’emballage contient des produits destinés à entrer en contact avec des denrées alimentaires conformément au règle- ment N° 1935/2004. Ce symbole fait référence aux codes articles internationaux (GTIN) GSI uniques. Symboles présents sur l’appareil Ce symbole indique qu’il est impératif de suivre le mode d’emploi. Ce symbole indique la conformité... -
Page 64: Informations De Sécurité Importantes
3. Informations de sécurité importantes Le non-respect de ces instructions/informations de sécurité peut rendre l’appareil dangereux. Sous réserve de modifications techniques. Produit Risque d’électrocution ! Conservez l’appareil au sec. Ne l’immergez jamais dans de l’eau ou dans d’autres liquides. Le tire-lait Lactina n’est pas thermorésistant : maintenez-le à distance des radiateurs et flammes nues. -
Page 65: Utilisation
Utilisation N’utilisez le tire-lait Lactina que pour l’usage auquel il est destiné, conformément à la description de ce manuel. Ne vous servez en aucun cas d’un appareil électrique si le câble d’alimentation est en mauvais état ou si l’appareil ne fonctionne pas correctement, est endommagé... -
Page 66: Description Du Produit
Lactina. Il est conçu le code QR de la page 86. pour une expression avec le tire-lait Lactina Select ou Lactina Electric Plus. Il ne doit être utilisé que par une seule mère ; en effet, son utilisation par plusieurs femmes pourrait entraîner un risque de contamination. -
Page 67: Accessoires Complémentaires
800.0809 Lactina Select uniquement Le modèle Lactina Select est muni d’un bouton supplémentaire permettant de régler la vitesse d’aspiration (entre 40 et 60 cycles par minute). Choisissez un rythme d’aspiration rapide afin de stimuler l’écoulement de lait. Lorsque celui-ci commence à s’écouler, réduisez la vitesse. -
Page 68: Nettoyage
Si de la condensation ou du lait sont présents, suivez les instructions de la page 84. * Medela recommande de laver toutes les pièces du set d’accessoire pour tire- Rincez toutes les pièces lait (incluant piston/cylindre etc...) avant à... - Page 69 Nettoyez abondamment Rincez-les à l’eau claire toutes les pièces à l’eau (environ 20 °C). chaude avec du produit vaisselle (à environ 30 °C). Séchez les pièces avec un Si vous lavez les différentes chiffon propre ou laissez-les pièces du set pour tire-lait au sécher sur un chiffon propre.
-
Page 70: Avant La Première Utilisation Et Une Fois Par Jour
Débranchez le tire-lait avant de le nettoyer. l Ne vaporisez pas et ne versez pas de liquide directement sur le tire-lait. * Medela préconise de nettoyer l’ensemble des pièces du set pour tire-lait (piston/ Séchez les pièces avec un cylindre compris, notamment) avant la chiffon propre ou laissez-les première utilisation, conformément aux... -
Page 71: Nettoyage Du Tire-Lait Et De La Valise
à base d’alcool. bien un détergent non abrasif. * Les accessoires disponibles à la vente sont indiqués à la page 86. Pour plus d’informations, consultez le site www.medela.fr. -
Page 72: Préparation À La Séance D'expression
Remarque l N’utilisez que des accessoires Medela originaux. l Avant utilisation, vérifiez que les Poussez doucement composants du set pour tire-lait ne la membrane sur la valve jusqu présentent aucun signe d’usure ou... - Page 73 Poussez la valve et la membrane Enfoncez la téterelle sur sur le connecteur. le connecteur. Positionnez latéralement la valve. Introduisez l’embout du tuyau dans Glissez le piston dans le cylindre. l’orifice prévu à cet effet sur le connecteur.
- Page 74 6. Préparation à la séance d’expression Avertissement l Pour l’étape 12 (section 6.1) : Utilisez exclusivement le câble d’alimentation fourni avec le tire-lait Lactina. l Assurez-vous que la tension du câble d’alimentation est compatible avec celle de la source de courant. Vissez le piston/cylindre solidement sur le support de cylindre.
- Page 75 Faites pivoter le support Insérez le support de cylindre de cylindre jusqu’à ce que vissé au piston/cylindre la languette vienne bien se loger verticalement dans l’orifice dans la fente du tire-lait Lactina. situé à l’avant du tire-lait. Branchez le câble d’alimentation Insérez l’embout du tuyau dans sur la prise électrique.
-
Page 76: Expression
1 (section 7.2) : Choisissez un rythme d’aspiration rapide Réglez la bague de régulation sur le tire-lait Lactina Select afin de l’aspiration au minimum. Le modèle de démarrer l’écoulement de lait. Lorsque Lactina Select est muni d’un bouton celui-ci commence à... -
Page 77: Expression
Maintenez la téterelle sur le sein Placez la téterelle sur le sein à l’aide de votre pouce et de votre de manière à centrer index. Soutenez votre sein avec correctement le mamelon la paume de votre main. dans l’embout. 7.2 Expression Allumez le tire-lait en appuyant sur Réglage de l’aspiration de confort : tournez la bague de régulation d’aspiration vers... -
Page 78: Préparation De L'expression En Mains Libres Avec Le Bustier Easy Expression
7. Expression Mise en garde l Contactez un professionnel de l’allaitement, par exemple une sage-femme ou une consultante en lactation, si vous n’exprimez que très peu de lait ou n’en exprimez pas du tout ou si l’expression s’avère douloureuse. Remarque Éteignez le tire-lait en appuyant l Déconnectez toujours le tire-lait Lactina de la source d’alimentation après l’expression. - Page 79 Attachez la fermeture éclair sous le bustier de manière et connectez vos accessoires à centrer vos mamelons dans aux téterelles. les embouts. *Le bustier Easy Expression est proposé en 4 tailles. Reportez-vous à la page 86. Pour plus d’informations, consultez le site www.medela.fr.
-
Page 80: Préparation De L'expression Double
Positionnez la téterelle sur le sein en l Pour l’étape 2 (section 7.4) : suivant la procédure figurant dans la Le modèle Lactina Select est muni d’un section 7.1 (étapes 2 et 3). bouton supplémentaire permettant de régler la vitesse d’aspiration. Choisissez un 7.5 Expression manuelle avec... - Page 81 Réglez la bague de régulation de Placez l’autre téterelle sur le sein de l’aspiration au minimum. Allumez le telle sorte que le mamelon soit bien tire-lait en appuyant sur centré dans l’embout. Réglez la bague de régulation Tournez la bague de régulation de l’aspiration de l’aspiration au minimum et vers le bas et augmentez la force d’aspiration positionnez la téterelle sur le sein...
-
Page 82: Conservation Et Décongélation Du Lait Maternel
« Pump & Save » sous l’eau tiède (37 °C max.). I Secouez délicatement le biberon ou le sachet « Pump & Save » en vue d’homogénéiser les corps gras. Évitez de secouer vigoureusement le lait. *Pour plus d’informations, consultez le site www.medela.fr. -
Page 83: Alimentation Au Lait Maternel
à l’allaitement au sein. unique conçue pour le lait maternel. Vous trouverez des informations détaillées sur Calma sur le site Web Les études poussées menées par Medela de Medela (www.medela.fr). lui ont permis de devenir l’une des premières entreprises au monde à intégrer le mécanisme de succion des bébés allaités... -
Page 84: Résolution Des Problèmes
10. Résolution des problèmes Problème Solution Assurez-vous que la source d’alimentation secteur/la batterie Nonfonctionnement est opérationnelle. du moteur Vérifiez que l’appareil est allumé. Assemblez le set pour tire-lait selon les instructions détaillées dans le chapitre 6. Exprimez votre lait en vous référant aux instructions du chapitre 7. -
Page 85: Garantie Et Entretien/Mise Au Rebut
être exécutés que par des sites Medela agréés. La conception technique du tire-lait Lactina de Medela a été vérifiée par des organismes de contrôle indépendants et répond à la norme EN/CEI 60601-1. -
Page 86: Une Gamme Complète Pour L'allaitement Maternel
12. Une gamme complète pour l’allaitement maternel Pour obtenir les accessoires suivants du tire-lait Lactina auprès des distributeurs Medela, il vous suffit de préciser le nom ou la référence du produit. Réf. article Produit 008.0327* Téterelle PersonalFit taille S (21 mm) : DE / FR / IT 008.0337*... - Page 87 Exprimer le lait Soigner les mamelons Recherche factuelle Formation Expertise Service Innovation Professionnels Reccueillir Nourrir bébé le lait Transporter et nettoyer...
- Page 88 Indice 1. Uso previsto/A chi è destinato Controindicazioni 2. Significato dei simboli 3. Importanti informazioni di sicurezza 4. Descrizione del prodotto 5. Pulizia 5.1 Prima del primo impiego e dopo ciascun utilizzo 5.2 Prima del primo impiego e una volta al giorno 5.3 Pulizia del tiralatte e della custodia 5.4 Disinfezione del tiralatte 6.
-
Page 89: Uso Previsto/A Chi È Destinato - Controindicazioni
1. Uso previsto/A chi è destinato – Controindicazioni Uso previsto e indicazioni dei tiralatte I tiralatte sono destinati alle donne che allattano in ospedale o a casa estraendo dal seno il latte materno. I tiralatte sono indicati per alleviare i sintomi di ingorgo durante l’estrazione del latte materno. -
Page 90: Significato Dei Simboli
2. Significato dei simboli Il simbolo di avvertenza identifica tutte le istruzioni importanti per la sicurezza. La mancata osservanza di tali istruzioni può comportare lesioni alle persone o danni al tiralatte. Abbinato ai seguenti termini, il simbolo di avvertenza assume i significati descritti di seguito. Avvertenza Può... -
Page 91: Simboli Sul Dispositivo
Questo simbolo indica che la confezione contiene prodotti destinati a venire a contatto con alimenti secondo il regolamento 1935/2004. Questo simbolo indica il codice univoco GSI Global Trade Item Number (GTIN). Simboli sul dispositivo Questo simbolo indica di seguire le istruzioni per l’uso. Questo simbolo indica la conformità... -
Page 92: Importanti Informazioni Di Sicurezza
3. Importanti informazioni di sicurezza La mancata osservanza di queste istruzioni/informazioni di sicurezza può portare a situazioni di pericolo causate dal dispositivo. Con riserva di modifiche tecniche. Dispositivo Pericolo di folgorazione! Mantenere asciutto il dispositivo! Non immergere mai in acqua o altri liquidi! Il tiralatte Lactina non è... - Page 93 Usare il tiralatte Lactina solo per l’uso previsto, descritto nel presente manuale. Non usare mai un apparecchio elettrico se ha un cavo di alimentazione danneggiato, se non funziona correttamente, se è caduto o danneggiato o se è caduto in acqua. Non utilizzare il tiralatte Lactina durante il bagno o la doccia.
-
Page 94: Descrizione Del Prodotto
Lactina. Il set per tiralatte o mediante la scansione del codice QR a pagina 114. è idoneo all’estrazione con Lactina Select o Lactina Electric Plus. Il set per tiralatte deve essere utilizzato da un’unica madre; l’uso da parte di più madri può... - Page 95 Solo Lactina Select Il modello Lactina Select dispone di una manopola aggiuntiva per regolare la velocità del tiralatte tra i 40 e i 60 cicli al minuto. Selezionare un ritmo di aspirazione veloce per stimolare il flusso del latte. Ridurre la velocità quando il latte inizia a fluire.
-
Page 96: Pulizia
Seguire le istruzioni a pagina 112 in caso di presenza di condensa o residui di latte nel tubicino. * Medela raccomanda di pulire tutti i componenti del set per tiralatte (inclusi Risciacquare tutti i componenti pistone/cilindro ecc.) prima del primo... - Page 97 Pulire tutti i componenti con Risciacquare tutti i componenti con abbondante acqua tiepida acqua pulita fredda (20 °C circa). e un comune detergente per stoviglie (30 °C circa). oppure Asciugare con un panno pulito Se i singoli componenti del o lasciare asciugare su un set per tiralatte sono lavati panno pulito.
-
Page 98: Prima Del Primo Impiego E Una Volta Al Giorno
Per l’operazione 1 (paragrafo 5.3): scollegare il tiralatte prima della pulizia. l Non spruzzare o versare liquidi direttamente sul tiralatte. * Medela raccomanda di pulire tutti i componenti del set per tiralatte (inclusi pistone/cilindro ecc.) prima del primo Asciugare con un panno pulito impiego, come illustrato al paragrafo 5.2. -
Page 99: Pulizia Del Tiralatte E Della Custodia
(non bagnato) disinfettanti a base di alcool. pulito. Possono essere utilizzati detersivi per stoviglie o detergenti * Gli accessori disponibili su ordinazione sono reperibili a pagina 114. non abrasivi con acqua. Per ulteriori informazioni fare riferimento al sito www.medela.it... -
Page 100: Preparazione All'estrazione Del Latte
Nota l Utilizzare esclusivamente accessori originali Medela. l Controllare l’eventuale usura o danneggiamento dei componenti del Spingere con cautela la set per tiralatte prima dell’uso. - Page 101 Inserire la testa della valvola Inserire la coppa per e la membrana nel connettore. il seno nel connettore. Posizionare la testa della valvola lateralmente. Inserire il tubicino nell’apposita Inserire il pistone nel cilindro. apertura del connettore.
- Page 102 6. Preparazione all’estrazione del latte Avvertenza l Per l’operazione 12 (paragrafo 6.1): usare solo il cavo di alimentazione fornito con Lactina. l Assicurarsi che la tensione del cavo di alimentazione sia compatibile con quella di rete. Avvitare saldamente il pistone/ cilindro nel porta cilindro.
- Page 103 Ruotare il porta cilindro finché Inserire il porta cilindro inclusi il perno non si innesta nella pistone/cilindro verticalmente scanalatura di Lactina. nell’apertura situata nella parte anteriore di Lactina. Collegare il cavo di alimentazione Inserire l’adattatore che si trova alla presa di corrente. all’estremità...
-
Page 104: Estrazione
Per l’operazione 1 (paragrafo 7.2): selezionare un ritmo di aspirazione rapido su Lactina Select per avviare il flusso del Impostare l’anello di regolazione latte. Ridurre la velocità quando il latte vuoto al minimo. -
Page 105: Estrazione
Tenere la coppa sul seno con Posizionare la coppa sul seno il pollice e l’indice. Sostenere in modo tale che il capezzolo il seno con il palmo della mano. si trovi correttamente al centro del condotto. 7.2 Estrazione Impostare „il proprio vuoto confortevole“: Accendere il tiralatte con ruotare verso il basso l’anello di regolazione vuoto e aumentare il vuoto fino a quando... -
Page 106: Preparazione All'estrazione A Mani Libere Con Il Bustino Easy Expression
7. Estrazione Attenzione l Consultare il proprio consulente per l’allattamento o l’ostetrica se la quantità di latte estratta è minima o nulla oppure se l’estrazione risulta dolorosa. Nota l Scollegare sempre Lactina dall’alimenta- Spegnere il tiralatte con zione di rete al termine dell’estrazione. Informazioni 7.3 Preparazione all’estrazione a mani libere con il bustino... - Page 107 *Il bustino Easy Expression è disponibile in 4 taglie. Vedere pagina 114. Per ulteriori informazioni, visitare www.medela.it...
-
Page 108: Preparazione All'estrazione Doppia
Posizionare la coppa sul l Per l’operazione 2 (paragrafo 7.4): seno come descritto al paragrafo 7.1, Lactina Select presenta una manopola operazioni 2 e 3. aggiuntiva per regolare la velocità di aspirazione. Selezionare un ritmo di aspirazione veloce per stimolare il flusso 7.5 Aspirazione manuale... - Page 109 Impostare l’anello di regolazione Posizionare la seconda coppa sul vuoto al minimo. Accendere seno in modo che il capezzolo il tiralatte con sia correttamente centrato nel condotto. Ruotare verso il basso l’anello di regolazione Impostare l’anello di regolazione vuoto e aumentare il vuoto fino a quando diventa vuoto al minimo e posizionare la leggermente sgradevole.
-
Page 110: Conservazione E Scongelamento Del Latte Materno
In alternativa, è possibile tenere la bottiglia o la sacca „Pump & Save“ sotto l’acqua calda (max. 37 °C). I Far roteare delicatamente la bottiglia o la sacca „Pump & Save“ per miscelare il grasso eventualmente separato. Evitare di scuotere o mescolare il latte. *Ulteriori informazioni sul sito www.medela.it... -
Page 111: Alimentazione Con Latte Materno
Sul sito web di Medela (www.medela.it) sono disponibili informazioni dettagliate su Calma. A seguito dell’ampio lavoro di ricerca svolto, Medela è una delle prime aziende al mondo a tenere conto del comportamento A supporto dei neonati durante l’allattamento al del comportamento... -
Page 112: Risoluzione Dei Problemi
10. Risoluzione dei problemi Problema Soluzione Se il motore Verificare se sia presente l’alimentazione di rete/la batteria. non funziona Verificare che il dispositivo sia acceso. Assemblare il set per tiralatte secondo le istruzioni fornite al capitolo 6. Estrarre secondo quanto indicato al capitolo 7. Assicurarsi che la coppa per il seno aderisca completamente al seno. -
Page 113: Garanzia E Manutenzione/Smaltimento
I controlli di routine, la manutenzione e la sostituzione della batteria possono essere svolti esclusivamente in siti autorizzati Medela. L’ingegnerizzazione del tiralatte Medela Lactina è stata verificata da istituti di ricerca indipendenti per accertarne la conformità alla norma EN/IEC 60601-1. Copie dei suddetti certificati sono disponibili su richiesta. -
Page 114: Cura Completa Durante L'allattamento Al Seno
Bustino Easy Expression bianco, taglia XL 008.0040 Sacca QuickClean Ulteriori informazioni su tutti i prodotti Medela sono disponibili sul nostro sito web www.medela.it. * Se il risultato dell’estrazione non è soddisfacente o se l’estrazione è dolorosa, contattare il consulente per l’allattamento o l’operatore sanitario. - Page 115 Cura del seno Estrazione del latte materno Ricerca basata sull’evidenza Competenza Educazione Assistenza Innovazione Mondo professionale Somministrazione Raccolta e conservazione del latte materno Gestione del latte materno...
- Page 116 Inhoudsopgave 1. Beoogd gebruik/populatie – contraindicatie 2. Betekenis van de symbolen 3. Belangrijke veiligheidsinformatie 4. Productomschrijving 5. Reiniging 5.1 Voorafgaand aan het eerste gebruik en na elk gebruik 5.2 Voorafgaand aan het eerste gebruik en daarna eenmaal per dag 5.3 Reiniging van borstkolf en koffer 5.4 De borstkolf desinfecteren 6.
-
Page 117: Beoogd Gebruik/Populatie - Contraindicatie
1. Beoogd gebruik /populatie – contraindicatie Het beoogde gebruik en indicaties van borstkolven Borstkolven zijn bedoeld voor gebruik door lacterende moeders, thuis of in het ziekenhuis. Borstkolven worden geïndiceerd om de symptomen van stuwing middels het afkolven van moedermelk te verzachten. In geval van mastitis ondersteunen borstkolven het genezingsproces door moedermelk uit de aangedane borst te kolven. -
Page 118: Betekenis Van De Symbolen
2. Betekenis van de symbolen Het waarschuwingssymbool geeft belangrijke veiligheidsinstructies aan. Als die instructies niet in acht worden genomen, kan dat letsel of schade aan de borstkolf veroorzaken. Indien het waarschuwingssymbool wordt gebruikt in combinatie met de volgende woorden, staat het voor: Waarschuwing Kan leiden tot ernstig letsel of de dood. -
Page 119: Symbolen Op Het Apparaat
Dit symbool geeft aan dat de verpakking produkten bevat die goedgekeurd zijn om in contact te komen met levensmiddelen conform EG-verordening 1935/2004. Dit symbool verwijst naar de unieke GSI-identificatie van handelseenheden (GTIN) (barcodes). Symbolen op het apparaat Dit symbool wil zeggen dat de gebruiksaanwijzing gevolgd moet worden. Dit symbool geeft de conformiteit aan met de essentiële eisen van de Richtlijn 93/42/EEC van de Raad van 14 juni 1993 betreffende medische 0123... -
Page 120: Belangrijke Veiligheidsinformatie
3. Belangrijke veiligheidsinformatie Als deze aanwijzingen/veiligheidsinformatie niet worden opgevolgd, kan een veilig gebruik van het apparaat niet worden gegarandeerd. Technische wijzigingen voorbehouden. Apparaat Gevaar voor elektrocutie! Apparaat droog houden! Nooit in water of in andere vloeistoffen dompelen! De Lactina borstkolf is niet hittebestendig: weghouden van radiatoren en open vuur. Stel de motoreenheid niet bloot aan direct zonlicht. - Page 121 Gebruik Gebruik de Lactina borstkolf alleen voor het doel waarvoor hij bestemd is, zoals beschreven in deze gebruiksaanwijzing. Gebruik een elektrisch apparaat niet als het netsnoer beschadigd is, als het niet goed werkt, als het gevallen of beschadigd is of als het in water is gevallen.
-
Page 122: Productomschrijving
Lactina. De afkolfset is geschikt voor is te vinden op www.medela.com/personalfit afkolven met behulp van de Lactina Select of de Lactina of scan de QR-code op pagina 142. Electric Plus. De afkolfset mag maar door één moeder worden gebruikt;... -
Page 123: Ideale Accessoires
Alleen bij de Lactina Select De Lactina Select heeft een extra knop om de pompsnelheid te regelen tussen 40 en 60 cycli per minuut. Kies een snel kolfritme om de melkstroom te stimuleren. Verlaag de snelheid als de melk begint te stromen. -
Page 124: Reiniging
Volg de instructies op pagina 140 als zich in de slang condensatie of melk bevindt. * Medela adviseert alle delen van de afkolfset (incl. zuiger/cilinder enz.) voorafgaand aan het eerste gebruik te reinigen zoals vermeld Spoel alle onderdelen 10 tot in hoofdstuk 5.2. - Page 125 Maak alle delen schoon met veel Spoel alle onderdelen in koud, warm water en een standaard schoon water van circa 20 °C afwasmiddel (ongeveer 30 °C). Droog de onderdelen af met een Als u de afzonderlijke onderdelen schone doek of leg ze op een van de afkolfset in de vaatwasser schone doek om te drogen.
-
Page 126: Voorafgaand Aan Het Eerste Gebruik En Daarna Eenmaal Per Dag
Spuit of giet geen vloeistof direct op de pomp. * Medela adviseert alle delen van de afkolfset (incl. zuiger/cilinder enz.) Droog de onderdelen af met een voorafgaand aan het eerste gebruik te schone doek of leg ze op een reinigen zoals vermeld in hoofdstuk 5.2. -
Page 127: Reiniging Van Borstkolf En Koffer
De kolf en koffer afvegen met een natte) doek. U mag een alcoholhoudend schone, vochtige (niet natte) doek. desinfectiemiddel gebruiken. U mag water met een standaard afwasmiddel of niet-schurend * Leverbare accessoires zijn vermeld op pagina 142. wasmiddel gebruiken. Meer informatie vindt u op www.medela.com... -
Page 128: Voorbereidingen Voor Het Afkolven
Opmerking l Gebruik alleen originele accessoires van Medela. l Controleer voor gebruik de onderdelen van de afkolfset op slijtage en beschadiging. Druk het membraan voorzichtig op de vacuümklep totdat het gekoppeld is. - Page 129 Duw de combinatie vacuümklep/ Druk het borstschild op de membraan op de connector. connector. Positioneer de vacuümklep zijdelings. Steek de slang in de Schuif de zuiger in de cilinder. corresponderende opening van de connector.
- Page 130 6. Voorbereidingen voor het afkolven Waarschuwing l Bij stap 12 (hoofdstuk 6.1): Gebruik uitsluitend het netsnoer dat bij de Lactina is geleverd. l Vergewis u ervan dat het voltage van het netsnoer overeenkomt met het voltage ter plaatse. Schroef de zuiger/cilinder vast in de cilinderhouder.
- Page 131 Draai de pin van de cilinderhouder in Steek de cilinderhouder incl. de corresponderende opening zuiger/cilinder verticaal in op de Lactina. de opening aan de voorkant van de Lactina. Sluit het netsnoer aan op het Steek het adaptereinde van stopcontact. de slang in de opening van de cilinderhouder.
-
Page 132: Afkolven
Dit kan leiden tot een blokkade van de melkkanalen en tot stuwing. l Bij stap 1 (hoofdstuk 7.2): Kies op de Lactina Select een snel kolfritme om de melkstroom op gang te Zet de vacuüminstelring op minimaal brengen. Verlaag de snelheid als de melk niveau. -
Page 133: Afkolven
Houd het borstschild met uw duim Plaats het borstschild op en wijsvinger op de borst. Ondersteun uw borst met de tepel in het de borst met de palm van uw hand. midden van de schacht. 7.2 Afkolven Vacuüm comfort instellen: draai de Schakel de borstkolf in met vacuüminstelring omlaag en verhoog het vacuüm totdat het enigszins... -
Page 134: Voorbereidingen Voor Handsfree Afkolven Met De Easy Expression Bustier
7. Afkolven Waarschuwing l Raadpleeg uw verloskundige of borstvoedingsdeskundige/lactatiekundige als u slechts een minimale hoeveelheid of geen melk kunt afkolven of als het afkolven pijnlijk is. Opmerking Schakel de borstkolf uit met l Haal de stekker van de Lactina na het afkolven altijd direct uit het stopcontact. - Page 135 *De Easy Expression Bustier is leverbaar in 4 maten. Zie pagina 142. Meer informatie vindt u op www.medela.com.
-
Page 136: Voorbereiding Voor Dubbel Afkolven
Plaats het borstschild op l Bij stap 2 (hoofdstuk 7.4): de borst zoals omschreven in hoofdstuk De Lactina Select heeft een extra knop 7.1, stappen 2 en 3. om de afkolfsnelheid aan te passen. Kies een snel kolfritme om de melkstroom te stimuleren. - Page 137 Zet de vacuüminstelring Plaats het tweede borstschild op minimaal niveau. Schakel op de borst zodanig dat de tepel de borstkolf in met zich centraal in de schacht bevindt. Draai de vacuüminstelring omlaag en Zet de vacuüminstelring op minimaal verhoog het vacuüm totdat het enigszins niveau en plaats het borstschild oncomfortabel is.
-
Page 138: Moedermelk Bewaren En Ontdooien
(max. 37 °C) te plaatsen. I Het flesje of de „Pump & Save“ zak behoedzaam heen en weer bewegen om eventueel gescheiden vet door de melk te mengen. Schudden en roeren van de melk vermijden. *Meer informatie vindt u op www.medela.nl of op www.medela.be... -
Page 139: Moedermelk Voeden
9. Moedermelk voeden Info Medela adviseert om voor het voeden Calma te gebruiken. Met Calma l kan uw baby in zijn eigen ritme drinken, pauzeren en ademen; l stroomt de melk als er een vacuüm is gecreëerd; l blijft uw baby’s natuurlijke drinktechniek Calma –... -
Page 140: Problemen Oplossen
10. Problemen oplossen Probleem Oplossing Controleer of er netvoeding/batterijspanning beschikbaar is. De motor loopt niet Controleer of het apparaat aangezet is. Zet de afkolfset in elkaar volgens de aanwijzingen in hoofdstuk 6. Kolven zoals vermeld in hoofdstuk 7. Zorg ervoor dat het borstschild de borst rondom luchtdicht afsluit. -
Page 141: Garantie En Onderhoud / Afvalverwijdering
Lactina borstkolf in overeenstemming is met de norm EN/IEC 60601-1. Een kopie van de desbetreffende certificaten worden op verzoek uitgereikt. Vanwege de toegepaste constructie, verwacht Medela niet dat de elektrische veiligheid op enig moment tijdens de levenscyclus van het product wordt aangetast, mits het apparaat correct en overeenkomstig het beoogde gebruik wordt gebruikt. -
Page 142: Volledige Verzorging Tijdens De Borstvoedingsperiode
008.0040 QuickClean zak Meer informatie over alle producten van Medela vindt u op onze website www.medela.com. * Als het resultaat van het afkolven onbevredigend is of als het afkolven pijnlijk is, raadpleeg dan uw lactatiekundige of uw medisch ondersteuner. Wellicht kan een andere maat PersonalFit borstschild meer comfort bieden en het afkolven helpen bevorderen. - Page 143 Kolven Borstverzorging Research Based onderzoek Voorlichting Expertise Service Innovatie Deskundigen Opvangen Voeden Omgaan met moedermelk...
-
Page 144: Technical Specifications
(ca.) Bediening °C –100 ... –240 mmHg –13.33 ... –32 kPa Transport / Storage Lactina Electric Plus 50 cpm Transport/Lagerung Lactina Select 40–60 cpm Transport/stockage Trasporto/conservazione 100 – 240 V ~ Transport/opslag °C 50 / 60 Hz 50 VA... - Page 146 Notes...
- Page 148 40012 Calderara di Reno (BO) United Kingdom Italy Phone +44 161 776 0400 Phone + 39 051 72 76 88 Australia +44 161 776 0444 Medela Australia Pty Ltd, + 39 051 72 76 89 info@medela.co.uk Medical Technology info@medela.it www.medela.co.uk www.medela.it...