Table des Matières
Publicité
Les langues disponibles
Les langues disponibles
Liens rapides
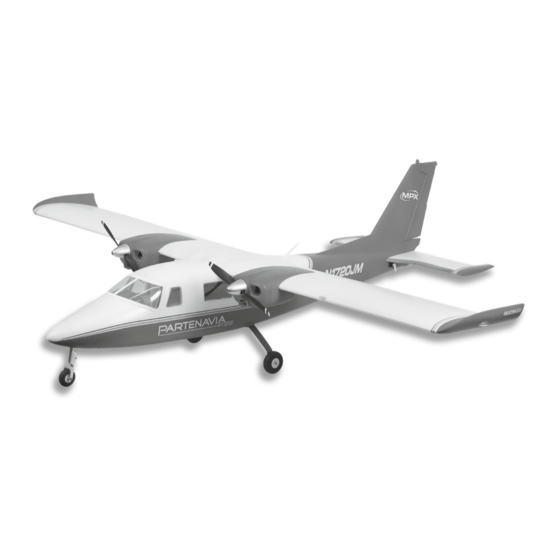
Gesamtlänge / Overall Length / Longueur hors tout: 1066mm
Spannweite / Wingspan / Envergure: 1400mm
Sicherheitshinweise
DE
Lieferumfang, Technische Daten
Conseils de sécurité
FR
Liste de colisage, Caractéristiques
Erhältliche Varianten
Available versions
Version disponible
© Copyright by MULTIPLEX Modellsport GmbH & Co. KG 2021
2 - 3
4 - 5
6 - 8
9 - 10
11
12 - 13
26 - 27
28 - 29
30 - 32
33 - 34
35
36 - 37
#1-02488
Safety information
EN
Product Packing List, Specifications
14 - 15
16 - 17
18 - 20
21 - 22
23
24 - 25
Publicité
Table des Matières
Dépannage

Manuels Connexes pour Multiplex PARTENAVIA P.68


Sommaire des Matières pour Multiplex PARTENAVIA P.68
-
Page 1: Table Des Matières
Instructions de montage 30 - 32 Test des gouvernes de commande 33 - 34 Résolution des problèmes Pièces de rechanges 36 - 37 Erhältliche Varianten Available versions #1-02488 Version disponible © Copyright by MULTIPLEX Modellsport GmbH & Co. KG 2021... - Page 2 Sicherheitsaspekte betrieben wird, besteht immer ein Restrisiko. WERDEN. ERSTICKUNGSGEFAHR! Eine Haftpflichtversicherung (Modellflugzeug mit Antrieb) ist daher Die Multiplex Modellsport GmbH & Co. KG ist nicht haftungspflichtig für obligatorisch. Falls Sie Mitglied in einem Verein oder Verband sind, Verluste, Beschädigungen und Folgeschäden jeder Art, die aufgrund können Sie ggf.
- Page 3 Sicherheitshinweise für MULTIPLEX-Flugmodelle drückliche Erlaubnis der Multiplex Modellsport GmbH & Co. KG • Feuergefahr durch Fehlfunktion der Elektronik: Akkus sind sicher aufzubewahren. Sicherheitshinweise der Elektronikkomponenten im (in schriftlicher Form) - auch nicht auszugsweise in Print- oder Modell, des Akkus und des Ladegeräts sind zu beachten. Elektronik elektronischen Medien reproduziert und / oder veröffentlicht...
- Page 4 Navigationslichter, sowie die funktionierenden Landeklappen, sind ebenfalls Features, die dem Modell einen besonderen Charme verleihen. Die neue Partenavia P68 von Multiplex mit 1400mm Spannweite ist ein vorbildähnlicher Nachbau für fortgeschrittene Modellpiloten. Durch Der geräumige Akkuschacht nimmt 3S-Akkus mit 2200 - 5000 mAh auf, die beiden gegenläufigen, bürstenlosen Motoren vom Typ ROXXY BL...
- Page 5 Technische Daten Leichter, stabiler EPO-Schaum, ABS, Servos: MS-12015 DIGI, MS-12022 MG DIGI Baustoff: technische Kunststoffe Flugdauer: 6 - 15 Minuten Spannweite: 1400mm / 55” LED-Lichter: Lande- bzw. Navigationlichter Gesamtlänge: 1066mm / 42” 5: Gas, Quer, Klappen, Kanäle: Flächenbelastung: 64,6 g/dm² Bugradlenkung / Seite, Höhe Tragflächeninhalt: 34 dm²...
-
Page 6: Bauanleitung
Bauanleitung Einbau des Hauptfahrwerks M3x10mm Hauptfahrwerk in die Mulde auf der Unterseite des Rumpfes legen. Fahrwerksverkleidung darüber legen, mit Schrauben 3.0 x 10mm festschrauben. Einbau des Höhenleitwerks M3x26mm 1. Höhenleitwerk wie abgebildet in die Aussparung hinten am Rumpf 2. Beiliegendes Gestänge mit dem Ruderhorn bzw. dem Servohebel einschieben, mit Schrauben 3.0 x 26mm festschrauben. - Page 7 Bauanleitung Einbau der Tragfläche M3x10mm 1. Tragflächenholm durch den Rumpf schieben. 3. Tragfläche mit den beiliegenden Schrauben 3.0 x 10mm festschrauben. 2. Beide Tragflächenhälften auf den Holm fädeln, dabei Servokabel bzw. Motorkabel einstecken. Einbau der Spinner bzw. der Luftschrauben M3x10mm 1.
- Page 8 Einbau der Ruderhörner Sicherstellen, dass alle Servos genau mittig stehen, anschliessend die Folgende Abbildungen zeigen die empfohlenen Einstellungen für die Gestänge wie abgebildet einbauen bzw. einstellen. Ruderhörner und Gestänge für den ersten Flug. Hebelbohrungen für Landeklappengestänge Hebelbohrungen für Höhenrudergestänge � �...
-
Page 9: Ruderprüfungen
Ausschlagrichtung müssen richtig sein. AC H T U N G : S IC H ER H EIT IS T DA S O B ER S T E GEBOT! Firma Multiplex empfiehlt ausdrücklich, dass ein Reichweiten- Bitte die Lufschraube(n) entfernen, bevor die Antriebe geprüft test der Anlage vor jedem Flug durchgeführt wird! - Page 10 Dual Rates (herabgesetzte Ruderausschläge) Querruder Landeklappen Höhenruder Seitenruder Bemerkung: wenn die Landeklappen nach unten ausschlagen, hebt sich der Bug des Modells. Um schöne Landungen zu erzielen müssen also etwas Tiefe zugeschaltet werden. Bei vollem Landeklappenausschlag reicht etwa 1mm Tiefe, bzw. 2mm Tiefe bei reduziertem Klappenausschlag. Querruder Höhenruder Seitenruder...
-
Page 11: Fehlerbehebung
Fehlerbehebung Problem Möglicher Grund Lösung - Motorregler falsch eingestellt - Regler laut Anleitung einstellen Flugmodell reagiert nicht auf Gas, reagiert - Gas ausgeschaltet am Sender - Gas am Sender freischalten aber auf andere Geber - Motorkabel nicht eingesteckt - Kabel prüfen, ggfs. reparieren - Luftschraube lose bzw. -
Page 12: Bedienungsanleitung Motorregler
Bedienungsanleitung bürstenloser Motorregler Wir bedanken uns bei Ihnen, dass Sie unseren elektronischen Motorregler die Verwendung, das Versagen oder die Fehlfunktion des Produktes (ESC) gekauft haben. Hochleistungsantriebe für ferngesteuerte usw. werden abgelehnt. Wir haften nicht für persönliche Verletzung, Flugmodelle sind sehr gefährlich. Bitte lesen Sie diese Anleitung sorgfältig Sachbeschädigungen oder Folgebeschädigungen, die auf unser Produkt durch. - Page 13 Bedienungsanleitung bürstenloser Motorregler Fehlerbehebung Problem Möglicher Grund Lösung - Verbinding prüfen Nach dem Einschalten funktioniert der Motor nicht. - Die Verbindung zwischen Akku und Keine Töne Regler ist falsch - Stecker / Buchse ersetzen Nach dem Einschalten funktioniert der Motor nicht. Es ertönen wiederholt “pieps-pieps-, pieps-pieps-, pieps- - Eingangsspannung ist anormal, zu hoch - Spannung des Akkus prüfen...
- Page 14 If you are a member of a group or association, you might be able to take out the appropriate insurance there. Multiplex Modellsport GmbH & Co. KG is not liable for loss, damage and consequential damage of any kind caused by incorrect operation,...
- Page 15 This model is not made of Styrofoam™! Therefore, adhesions using white glue, polyurethane or epoxy are not possible. These glues only stick MULTIPLEX model kits are subjected to constant material inspection superficially and may peel off in severe cases. Only use cyanoacrylate/ during production.
- Page 16 Clear glass-like wind shield makes it possible to use FPV in the canopy for better visual The Multiplex Partenavia is a scale replica of the Vulcanair Aircraft experience. Moreover, the vigorous red color scheme adds high visibility...
- Page 17 Specifications Lightweight yet strong EPO, Servos: MS-12015 DIGI, MS-12022 MG DIGI Material: ABS engineering plastics Flying Duration: 6 - 15 minutes Wingspan: 1400mm / 55” LED lights: Landing and navigation lights Overall Length: 1066mm / 42” 5CH-throttle, aileron, flap, Channels: Wing Load: 64.6 g/dm²...
-
Page 18: Assembly Instructions
Assembly instructions Main Landing Gear Installation M3x10mm Fit the main landing gear into the slot of the bottom and use landing gear cover & supplied screws to secure it. Horizontal Stabilizer Installation M3x26mm 1. Place the horizontal stabilizer into the slot of the tail as shown and fix 2. - Page 19 Assembly instructions Main Wing Installation M3x10mm 1. Insert the wing spar into the slots of the fuselage. 3. Fix the main wing with supplied screws. 2. Install two wing halves onto the fuselage through the wing spar as shown, connect the servo wires and power cords accordingly. Spinner and Propeller Installation M3x10mm 1.
- Page 20 Control Horns Installation Make sure all servos are in their central position and adjust the linkages The following pictures show the default factory settings for the control to the indicated positions. horns and linkages recommended for use for initial flight. Hole reference for flap servo linkage Hole reference for elevator servo linkage �...
-
Page 21: Control Surface Testing
Note: SAFETY FIRST!! Please remove the propeller (where Multiplex strongly recommends you also perform a full range applicable) before carrying out any pre-flight maintenance to test prior to each flight! the power system to prevent potential injury from unintended propeller operation. - Page 22 Dual Rate Setting Aileron Flap Elevator Rudder Note: When flaps are released, the aircraft will be heading up, so mixed elevator control is required for good landings. It requires 1mm height lower for high dual-rate flap and 2mm lower for low dual-rate flap. Aileron Elevator Rudder...
-
Page 23: Trouble Shooting
Trouble Shooting Problem Possible Cause Solution - Calibrate ESC according to manual - ESC not calibrated Aircraft not responding to the throttle but - activate throttle on radio - throttle deactivated on radio responding to other controls - check motor wires and connect/repair as - motor wire disconnected required - Tighten and/or Replace damaged parts... -
Page 24: User Manual Speed Controller
User Manual of Brushless Speed Controller Thanks for purchasing our Electronic Speed Controller (ESC). High power Any claims arising from the operating, failure or malfunctioning etc. will system for RC model is very dangerous, please read this manual carefully. be denied. We assume no liability for personal injury, property damage or In that we have no control over the correct use, installation, application, or consequential damages resulting from our product or our workmanship. - Page 25 User Manual of Brushless Speed Controller Trouble Shooting Trouble Possible Reason Action - Check the power connection After power on, motor does not work, no sound is - The connection between battery pack emitted and ESC is not correct - Replace the connector After power on, motor does not work, such an alert tone is emitted: “beep-beep-, beep-beep-,beep- - Input voltage is abnormal, too high or...
- Page 26 RISQUE D’ÉTOUFFEMENT ! Raison pour laquelle vous devez obligatoirement souscrire une assurance Multiplex Modellsport GmbH & Co. KG décline toute responsabilité en cas responsabilité civile (aéromodélisme motorisé). Si vous êtes membre de perte, dommages et dommages consécutifs de toute nature, dus à une d’un club ou d’une fédération, vous pourrez éventuellement y souscrire...
- Page 27 Multiplex Modellsport GmbH & Co. KG. La reproduction et / ou la publication, même partielle, des Conseils de sécurité pour les kits de construction MULTIPLEX Familiarisez-vous avec le kit d’assemblage ! Les kits d’assemblages MULTIPLEX sont soumis pendant la production Ce modèle n’est pas réalisé...
- Page 28 3S 2200-5000mAh qui offrent de grandes performances et de longs temps de vol. La verrière transparente permet Le nouveau Partenavia d‘une envergure de 1400mm de Multiplex est d‘utiliser le FPV pour une meilleure visualisation. En outre, la couleur une réplique à...
- Page 29 Caractéristiques Matériau : EPO, ABS léger et résistant Servos : MS-12015 DIGI, MS-12022 MG DIGI Envergure : 1400mm Durée de vol : 6 - 15 minutes Longueur hors Feux LED : Feux d‘atterrissage et de navigation 1066mm tout : 5 voies - manette des gaz, ailerons, volets, Nb de voies : Charge alaire : 64,6 g/dm²...
-
Page 30: Instructions De Montage
Instructions de montage Montage du train d‘atterrissage principal M3x10mm Installez le train d‘atterrissage principal dans l’emplacement du fond et montez le cache du train d‘atterrissage avec les vis fournies pour le fixer. Montage du stabilisateur M3x26mm 1. Glissez le stabilisateur horizontal dans la fente comme indiqué et fixez- 2. - Page 31 Instructions de montage Montage de l‘aile M3x10mm 1. Insérez la clé d‘aile dans le fuselage. 3. Fixer l‘aile avec les vis fournies. 2. Montez les deux moitiés d‘aile sur le fuselage à travers le longeron d‘aile, comme indiqué, connectez les fils des servos et les cordons d‘alimentation en conséquence.
- Page 32 Mise en place des guignols de commande Assurez-vous que tous les servos sont au neutre et ajustez la longueur Les croquis suivants montrent les réglages d‘usine par défaut des guignols des tringles de commande aux positions indiquées. de commande et des tringleries recommandés pour le premier vol. Trou de fixation du palonnier pour la liaison du servo de Trou de fixation du palonnier pour la liaison du servo de commande des volets (flap)
-
Page 33: Test Des Gouvernes De Commande
Nota : LA SÉCURITÉ D‘ABORD ! Veuillez retirer l‘hélice (si Multiplex vous recommande fortement d‘effectuer également nécessaire) avant de procéder à tout entretien pré-vol du ce test avant chaque vol ! système d‘alimentation afin d‘éviter toute blessure potentielle... - Page 34 Réglage Dual Rate Ailerons Volets Profondeur Direction Note: When flaps are released, the aircraft will be heading up, so mixed elevator control is required for good landings. It requires 1mm height lower for high dual-rate flap and 2mm lower for low dual-rate flap. Ailerons Profondeur Direction...
-
Page 35: Résolution Des Problèmes
Résolution des problèmes Problem Causes possibles Solutions - Calibrer l‘ESC selon le manuel - Variateurs ESC non calibrés - Activer le manche de commande des gaz Le modèle ne répond pas à la commande des - Manche de commande des gaz désactivé sur l’émetteur gaz mais répond aux autres commandes sur l‘émetteur... -
Page 36: Pièces De Rechanges
Manuel d‘utilisation du variateur Brushless Merci d‘avoir acheté notre variateur de vitesse électronique (ESC). Un défaillance ou du mauvais fonctionnement, etc. sera refusée. Nous système de haute puissance pour un modèle RC est très dangereux, n‘assumons aucune responsabilité pour les dommages corporels, veuillez lire attentivement ce manuel. - Page 37 Manuel d‘utilisation du variateur Brushless Résolution des problèmes Problèmes Raisons possibles Actions - Vérifiez la connexion de l‘alimentation Après la mise sous tension, le moteur ne fonctionne - La connexion entre l’accu est l’ESC pas, aucun son n‘est émis. n’est pas correcte - Remplacez le connecteur Après la mise sous tension, le moteur ne fonctionne pas, une tonalité...
- Page 40 MULTIPLEX Modellsport GmbH & Co.KG · Westliche Gewerbestrasse 1 · D-75015 Bretten-Gölshausen www.multiplex-rc.de...