Table des Matières

Manuels Connexes pour SMA FLX Série


Sommaire des Matières pour SMA FLX Série
- Page 1 SMA Solar Technology AG Solar Inverters GSM Option Kit Installation Guide / Installationsanleitung / Guide d’installation / Guía de instalacion / Guida all’installazione FLX series www.SMA.de...
-
Page 2: Scelta Della Lingua
Choice of Language - Sprachauswahl - Choix de la langue - Selección de idioma - Scelta della lingua Page English UK Seite Deutsch Page Français Página Español Pagina Italiano L00410627-03_2q / Rev. date: 2014-06-20... -
Page 3: General Safety
Safety Safety WARNING Safety Message Types Disconnecting the inverter WARNING Before starting work on the inverter, switch off AC at the Safety information important for human safety. Warning mains switch and PV using the PV load switch. Ensure is used for indicating potentially hazardous situations that the device cannot be unintentionally reconnected. - Page 4 Contents Contents 1 Installation 2 Setup 3 Troubleshooting L00410627-03_2q / Rev. date: 2014-06-20...
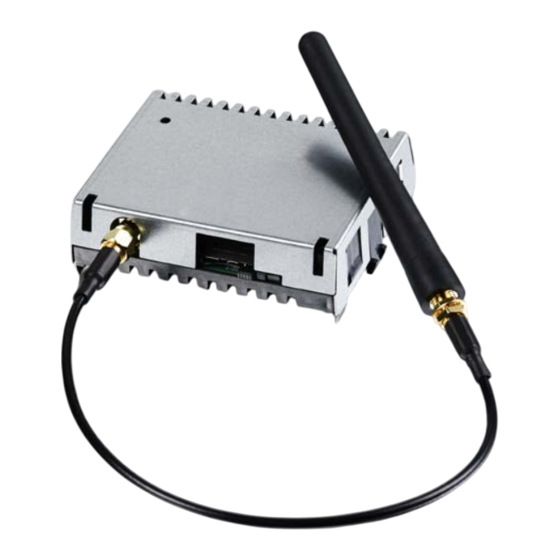
- Page 5 Installation 1 Installation This manual describes the installation of the GSM option in the FLX series inverter. Before installation, have the following ready: • GSM option (1), antenna cable (2), and antenna (3), see Illustration 1.1 • Manual • Active SIM card with PIN code Illustration 1.2 GSM Option Antenna cable connection point Illustration 1.1 Scope of Delivery - GSM Option Kit...
- Page 6 Installation of the inverter base plate and is labelled ‘GSM’. 1.2 Removal See Illustration 1.2. To remove the option: Take the antenna cable. Insert the bulkhead Insert a screwdriver at the snap connector on the connector on the antenna cable through the side of the option.
-
Page 7: Prepare For Setup
Setup 2 Setup 2.1 Prepare for Setup 2.2 Setup via Display 2.1.1 Verification Procedure: Go to [Setup → Communication Setup → GPRS Verify that the option is detected. connection setup]. Set up as follows: Turn on PV and AC connection. •... - Page 8 Setup 2.3.2 GPRS Setup [0] [Plant] 2.3 Setup via Web Interface [0] [Plant] 2.3.1 Communication Channel This menu item is available only for the FLX Pro inverter set up as master, equipped with GSM option and a valid This menu item is available only for the FLX Pro inverter, SIM card.
- Page 9 Setup 2.3.3 Data Warehouse [0] [Plant] /FTP Server Upload Illustration 2.3 Data Warehouse Item Description Time of day for upload, used only when upload Upload time interval is configured to 'daily'. Upload Hourly Daily interval Weekly Monthly Disabled FTP server The FTP server address is user configurable as a name or IP address.
- Page 10 Troubleshooting 3 Troubleshooting If the data upload is unsuccessful: Confirm that the GSM option is correctly installed and can be detected, see section 1.3.1 Closure and verification. Find the event ID reported by the GSM modem: In the display, go to [Status → Inverter → •...
-
Page 11: Allgemeine Sicherheit
Sicherheit Sicherheit WARNUNG Arten von Sicherheitsmeldungen Trennung des Wechselrichters WARNUNG Schalten Sie vor Beginn der Arbeiten am Wechselrichter Für die Personensicherheit wichtige Sicherheitsinforma- das AC-Netz am Netzschalter und die PV über den tionen. „Vorsicht!“ wird für potenziell gefährliche eingebauten PV-Trennschalter ab. Stellen Sie sicher, dass Situationen verwendet, die zu schweren Verletzungen das Gerät nicht versehentlich wieder angeschlossen oder zum Tod führen können. - Page 12 Sicherheit vorhanden. Fehler oder unsachgemäße Verwendung können einen Lichtbogenüberschlag verursachen. WARNUNG PV-Module erzeugen bei Lichteinfall Spannung. L00410627-03_2q / Rev. date: 2014-06-20...
- Page 13 Inhaltsverzeichnis Inhaltsverzeichnis 1 Installation 2 Setup 3 Fehlersuche und -behebung L00410627-03_2q / Rev. date: 2014-06-20...
- Page 14 Installation 1 Installation In diesem Handbuch wird die Installation der GSM-Option in die gesperrte Position verschieben. Siehe in einem Wechselrichter der Reihe FLX beschrieben. Abbildung 1.3. Vor der Installation ist Folgendes bereitzuhalten: • GSM-Option (1), Antennenkabel (2) und Antenne (3), siehe Abbildung 1.1 •...
- Page 15 Installation Entfernen Sie die Plastikkappe von der Antennen- öffnung. Die Öffnung befindet sich in der Mitte der Grundplatte des Wechselrichters und ist mit der Beschriftung „GSM“ gekennzeichnet.. Siehe Abbildung 1.2. Nehmen Sie das Antennenkabel. Führen Sie die Schottverschraubung des Antennenkabels durch die Antennenöffnung.
- Page 16 Installation 1.3 Schließen und Überprüfen Schließen Sie die Abdeckung des Installationsbe- reichs des Wechselrichters. Stellen Sie sicher, dass die Abdeckung richtig befestigt ist. Schalten Sie die PV- und AC-Anschlüsse ein. Überprüfen Sie, ob die Option erkannt wurde. Siehe 2.1.1 Verification. L00410627-03_2q / Rev.
-
Page 17: Vorbereiten Des Setups
Setup 2 Setup Gehen Sie im Display auf [Setup → Wechselrich- • 2.1 Vorbereiten des Setups terdetails → Datum u. Uhrzeit einst.]. 2.1.1 Überprüfung • Über die Webschnittstelle: [Wechselrichterebene: Setup → Wechselrichterdetails → Datum u. Uhrzeit Überprüfen Sie, ob die Option erkannt wurde. einst.]. - Page 18 Setup Stellen Sie Folgendes sicher: Vorgehensweise: • Die Signalstärke liegt vorzugsweise • Wählen Sie „GSM“ zur Übertragung von FTP- zwischen 16 und 31. Upload und E-Mails über das optionale GSM- • Der Upload-Status wechselt von Modem aus. „Initialisie.“ zu „Upload läuft/Leerlauf“. •...
- Page 19 Setup Element Beschreibung Element Beschreibung SIM-PIN-Code Geben Sie den SIM-PIN-Code ein (falls Uhrzeit, zu der das Hochladen stattfindet (nur Hochladezeit zutreffend). wenn Hochlade-Intervall auf „täglich“ gesetzt Der PIN-Code muss aus 4 bis 8 Zeichen ist). bestehen. Hochlade- Stündlich Zugang- Verbindungsinformationen des GPRS-Dienstan- Täglich Intervall spunktname...
-
Page 20: Fehlersuche Und -Behebung
Fehlersuche und -behebung 3 Fehlersuche und -behebung Bei fehlgeschlagenem Daten-Upload: Überprüfen Sie, ob die GSM-Option korrekt installiert ist und erkannt wird, siehe Abschnitt 1.3.1 Closure and verification. Suchen Sie die vom GSM-Modem gemeldete Ereignis-ID: Gehen Sie im Display auf [Status → •... -
Page 21: Types De Messages De Sécurité
Sécurité Sécurité AVERTISSEMENT Types de messages de sécurité Déconnexion de l'onduleur AVERTISSEMENT Avant d'intervenir sur l'onduleur, couper l'alimentation Information importante relative à la sécurité des CA au niveau de l'interrupteur secteur et l'alimentation personnes. Les paragraphes Avertissement indiquent des PV en utilisant l'interrupteur PV. Veiller à empêcher tout situations potentiellement dangereuses pouvant rebranchement accidentel de l'appareil. - Page 22 Sécurité AVERTISSEMENT Les modules photovoltaïques génèrent de la tension lorsqu'ils sont exposés à la lumière. L00410627-03_2q / Rev. date: 2014-06-20...
- Page 23 Table des matières Table des matières 1 Installation 2 Configuration 3 Dépannage L00410627-03_2q / Rev. date: 2014-06-20...
- Page 24 Installation 1 Installation Ce manuel décrit l'installation de l'option GSM dans les onduleurs de la gamme FLX. Les éléments suivants doivent être prêts avant de commencer l'installation : • Option GSM (1), câble de l'antenne (2) et antenne (3) (voir l'Illustration 1.1) •...
-
Page 25: Fermeture Et Vérification
Installation du socle de l'onduleur et est marqué GSM. Voir Option GSM l'Illustration 1.2. Câble de l'antenne Antenne Se munir du câble de l'antenne. Passer le raccord de traversée du câble de l'antenne dans le trou de fixation de l'antenne. Fixer à l'aide d'une 1.2 Dépose rondelle et d'une vis à... -
Page 26: Préparation De La Configuration
Configuration 2 Configuration Aller dans [Configuration → Détails onduleur → • 2.1 Préparation de la configuration Régler date et heure] à l'écran. 2.1.1 Vérification • Dans l'interface Web, accéder à [Niveau onduleur : Configuration → Détails onduleur → Vérifier que l'option est détectée. Régler date et heure]. -
Page 27: Configuration Par L'interface Web
Configuration AVIS! • La force du signal est comprise entre 16 et 31. Lorsque le canal de communication est réglé sur Non • L'état de l'envoi passe de Initialis. à présent, aucun envoi de fichiers FTP ou d'e-mails ne peut Upload/Veille. -
Page 28: Entrepôt De Données Vers Un Serveur Ftp
Configuration Élément Description Élément Description Code PIN Saisir le code PIN, le cas échéant. Tps de Heure de la journée à laquelle l'envoi a lieu ; Le code PIN comporte 4 à 8 caractères. sert uniquement lorsque l'intervalle de chargement chargement est configuré... -
Page 29: Dépannage
Dépannage 3 Dépannage Si l'envoi de données échoue : Confirmer que l'option GSM est correctement installée et peut être détectée, voir la section 1.3.1 Closure and verification. Rechercher l'identifiant de l'événement signalé par le modem GSM : Accéder à [Etats → Onduleur → Modem] •... -
Page 30: Seguridad General
Seguridad Seguridad ADVERTENCIA Tipos de mensajes de seguridad Desconexión del inversor ADVERTENCIA Antes de comenzar a trabajar con el inversor, desconecte Información importante para la seguridad personal. La la CA en el interruptor de red eléctrica y el interruptor advertencia se utiliza para indicar situaciones FV pulsando el interruptor de carga FV. - Page 31 Seguridad ADVERTENCIA Los módulos FV producen tensión cuando se exponen a la luz. L00410627-03_2q / Rev. date: 2014-06-20...
- Page 32 Índice Índice 1 Instalación 2 Configuración 3 Resolución de problemas L00410627-03_2q / Rev. date: 2014-06-20...
- Page 33 Instalación 1 Instalación Este manual describe la instalación de la opción GSM en un inversor de la serie FLX. Para la instalación necesitará: • una opción GSM (1), un cable de antena (2) y una antena (3); consulte Ilustración 1.1 •...
- Page 34 Instalación Retire el tapón de plástico del orificio de montaje Opción GSM de la antena. El orificio se encuentra en el centro Cable de antena de la placa base del inversor y está indicado Antena como «GSM». Consulte Ilustración 1.2. Coja el cable de antena.
-
Page 35: Preparación Para La Configuración
Configuración 2 Configuración En la pantalla, vaya a [Configuración → Detalles • 2.1 Preparación para la configuración del inversor → Configurar fecha y hora]. 2.1.1 Comprobación • En la interfaz web, vaya a [Nivel del inversor: Configuración → Detalles del inversor → Compruebe que se detecta la opción. - Page 36 Configuración AVISO! • La potencia de la señal debe encontrarse entre 16 y 31. Cuando se configure el canal de comunicación como «No • Cargue los cambios de estado de presente», no se realizará ninguna carga a FTP ni Iniciándose a Cargando / inactivo. transmisión por correo electrónico, aunque GPRS, SMTP y / o almacén de datos estén configurados.
- Page 37 Configuración Concepto Descripción Concepto Descripción Código PIN de Introduzca el código PIN, si procede. Tiempo de Momento del día de la carga, solo se utiliza si la tarjeta SIM El código PIN puede tener de 4 a 8 caracteres. el intervalo de carga está configurado como carga «Diario».
-
Page 38: Resolución De Problemas
Resolución de problemas 3 Resolución de problemas Si la carga de datos falla: Confirme que la opción GSM se ha instalado correctamente y se puede detectar, consulte el apartado 1.3.1 Closure and verification. Busque la id. de incidencia del módem GSM: En la pantalla, vaya a [Estado →... - Page 39 Sicurezza Sicurezza AVVISO Tipi di messaggio di sicurezza Disinserimento dell'inverter AVVISO Prima di iniziare a lavorare sull'inverter, disinserire la Informazioni di sicurezza importanti per la sicurezza per rete CA tramite l'interruttore di alimentazione e il l’uomo. Avvertenza viene usata per indicare situazioni sistema FV mediante il sezionatore FV.
- Page 40 Sicurezza AVVISO I moduli FV generano tensione quando sono esposti alla luce. L00410627-03_2q / Rev. date: 2014-06-20...
- Page 41 Sommario Sommario 1 Installazione 2 Setup 3 Ricerca guasti L00410627-03_2q / Rev. date: 2014-06-20...
- Page 42 Installazione 1 Installazione Questo manuale descrive l'installazione dell'opzione GSM nell'inverter della gamma FLX. Prima dell'installazione, tenere a portata di mano quanto segue: • Opzione GSM (1), cavo dell'antenna (2) e antenna (3), vedere Disegno 1.1 • Manuale • SIM card attiva con codice PIN Disegno 1.2 Opzione GSM 1 Punto di collegamento del cavo di antenna 2 Slot per SIM card...
- Page 43 Installazione della piastra base ed è etichettato 'GSM'. Vedere Opzione GSM Disegno 1.2. Cavo dell'antenna Antenna Prendere il cavo dell'antenna. Inserire il connettore passaparete sul cavo dell'antenna attraverso il foro di montaggio dell'antenna. 1.2 Rimozione Fissarlo con una rondella e avvitarlo sull'esterno Per rimuovere l'opzione: della piastra base.
-
Page 44: Preparativi Per Il Setup
Setup 2 Setup Nel display, andare su [Setup → Dettagli inverter • 2.1 Preparativi per il setup → Imposta data e ora]. 2.1.1 Verifica • Nell'interfaccia web, andare su [Livello inverter: Setup → Dettagli inverter → Imposta data e ora]. Verificare che l'opzione venga rilevata. - Page 45 Setup AVVISO! • L'intensità del segnale è compresa tra 16 e 31. Quando il canale di comunicazione è impostato su 'Non • Lo stato di upload cambia da Inizializ- presente', non ha luogo alcun caricamento sull'FTP né zazione a Caricamento/Inattivo. alcuna trasmissione di e-mail, anche se sono configurati GPRS, SMTP e/o magazzino di dati.
- Page 46 Setup Elemento Descrizione Elemento Descrizione Codice PIN Immettere il codice SIM PIN, se applicabile. Tempo di Ora del giorno per il caricamento, utilizzata Il codice PIN può consistere di 4-8 caratteri. solamente quando l'intervallo di upload viene upload configurato su 'giornalmente'. Nome punto Informazioni sulla connessione dal fornitore di di accesso...
-
Page 47: Ricerca Guasti
Ricerca guasti 3 Ricerca guasti Se il caricamento dei dati non ha successo: Confermare che l'opzione SGSM è installata correttamente e può essere rilevata, vedere la sezione 1.3.1 Closure and verification. Trovare l'evento ID segnalato dal modem GSM: Nel display, andare su [Stato → Inverter •... - Page 48 This also applies to products already on order provided that such alterations can be made without subsequential changes being necessary in specifications already agreed. All trademarks in this material are property of the respective companies. SMA Solar Technology AG and the SMA Solar Technology AG logotype are trademarks of SMA Solar Technology AG All rights reserved.