Megger OTS 60PB Guide De L'utilisateur
Masquer les pouces
Voir aussi pour OTS 60PB:
- Manuel de l'utilisateur (25 pages) ,
- Guide de référence rapide (12 pages)
Table des Matières
Publicité
Liens rapides
Publicité
Table des Matières

Manuels Connexes pour Megger OTS 60PB


Sommaire des Matières pour Megger OTS 60PB
- Page 1 OTS 60PB Oil Test Set USER USER GUIDE DE I’UTILISATEUR GEBRAUCHSANLEITUNG...
-
Page 2: Table Des Matières
Causes of Bad Oil, Appearance of the Sample, Cleanliness of the Apparatus, Precautions Necessary During Sampling Repair and Warranty Illustrations Figure 1 OTS 60PB oil test set layout Figure 2 Oil test set controls etc. Figure 3 Oil test set rear panel... -
Page 3: Safety Warnings
• Safety Warnings and Precautions must be read and understood before the OTS 60PB is used. They must be observed during use • The OTS 60PB must only be used in the way intended and for the stated purposes described by Megger Limited. -
Page 4: General Description
General Description The OTS 60PB is a 0 – 60 kV, battery powered portable dielectric strength oil test set. Its size and weight make it suitable for on-site assessment of insulating oil quality. The dielectric strength test it performs is an important deciding factor in knowing whether to retain or replace the oil. -
Page 5: Figure
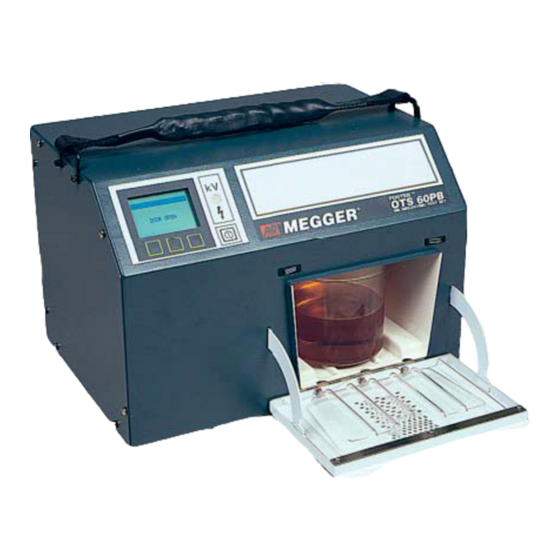
Test chamber Oil sample Chamber cover Figure 1 OTS 60PB Oil Test Set Layout Dot-matrix Printer lead and Power supply charger/vehicle lead display on/off switch connector socket Fuses Control keys Figure 2 Oil Test Set Controls Figure 3... -
Page 6: Applications
Applications The OTS 60PB is used for determining the dielectric strength of liquid insulants such as insulating oils used in transformers, switchgear, cables and other electrical apparatus. It is portable and suitable for testing on site as well as in the laboratory. -
Page 7: Specification
E.M.C. In accordance with IEC 61326-1 Operational uncertainties Refer to www.megger.com Power Supply Internal rechargeable 12 V, 12 Ah, battery (typically 12 hours continuous testing). Charger supply 90 V to 264 V, 50/60 Hz. 12 volt, negative to chassis, vehicle lead set (does not recharge... -
Page 8: Accessories
5152-294 * 2.5mm 5152-295 * 2.54mm 5152-319 * 4mm 5152-296 Battery charger unit 6331-659 Printer lead, OTS 60PB to 25 way ‘D’ 6340-091 Spare fuse 25413-285 User Guide 6171-585 Supplied as optional extras Close fitting test vessel lid 6121-402 Pack of 10 reusable / disposable oil test vessels... -
Page 9: Operation
5 A should be used. The charger must not be used when damaged, immersed or with rain falling on it. The OTS 60PB must only be used to test electrical grades of insulating oils. Other flammable materials such as petrol must not be tested. -
Page 10: Preparing The Test Vessel And Electrodes
Operation Preparing the Test Vessel and Electrodes Clean the oil test vessel thoroughly before pouring the oil sample. Methods for cleaning are usually detailed in the national specifications for oil testing and should be adhered to. Rinsing with part of the oil sample is normally required. -
Page 11: Preparing The Oil Test Set
Operation PREPARING THE OIL TEST SET Expose the display and oil vessel loading areas by pulling the protective covers away. Connect the mains powered charger to the rear socket and power it up unless the equipment is to be used powered from its internal battery. -
Page 12: Automatic Testing Sequences
Operation Display Contrast When ‘DISPLAY CONTRAST’ is selected the darker/lighter keys may be used to adjust the readability of the display screen. Press ‘SELECT’ to return to the ‘OPTIONS’ sub-menu. Note:– A quick way to bring the Display Contrast into view on the screen is to hold the middle key pressed while switching the test set on. -
Page 13: Figure
Operation Standard Deviation The sample standard deviation s (also known as σ ) is given by:- - n x √ n - 1 Where s = sample standard deviation. Data Dispersion The ratio of standard deviation upon mean ( s / x ) also known as the co-efficient of variation is used to determine whether the spread of a set of test results is within acceptable limits. -
Page 14: Example Intermediate Stand Time Screen
Operation 46 kV TEST 1 STIRRING 5 MINUTE TEST STOP Figure 7 Example Stirring Screen The time remaining for stirring is shown alternately with the words ‘STIRRING’. When stirring has finished the test set begins its oil sample intermediate standing period which lasts for 30 s. - Page 15 Operation The three soft keys now assume different functions. Press the left hand key labelled ‘VIEW’ to bring back into view, sequentially, the breakdown voltage values of each individual test and the average value. Press the ‘NEW’ key to return to the start of the ‘5 MINUTE TEST’ followed by the left hand ‘START’ key to repeat a test sequence or the ‘MENU’...
-
Page 16: Figure
Operation ASTM D877 tests On pressing the ‘START’ key ‘TEST 1’ is initiated and the display screen appears similar to that shown in figure 5. The sub-display area indicates that the initial stand time of 2 min 20 s for the oil sample is being undertaken and the time is being counted down to zero. -
Page 17: Withstand (Proof) Tests
Operation The three soft keys now assume different functions. If desired press the left hand key labelled ‘VIEW’ to bring back into view, sequentially, the breakdown voltage values of each individual test and the average value in turn. Press the ‘NEW’ key to return to the start of the selected test sequence. Press the left hand ‘START’ key to repeat a test sequence or the ‘MENU’... - Page 18 Operation FIT VESSEL 2,5 mm BS 5730a : A, D START QUIT Figure 12 Example of display for starting Bs 5730a Proof Test The display will now assume the standard format as shown in figure 6. Use of the right hand key reverts the user to the main menu.
-
Page 19: Withstand (Proof) Test A
Operation BS 5730a LEPLC Follows the same procedure as for BS 5730a test, but note that this test provides an initial stir for 1 minute followed by a stand of 1 minute. The test continues to Breakdown after the test is passed. Withstand (Proof) Test A From the main menu select the ‘WITHSTAND’... -
Page 20: Self Check Tests: Checks For Major Safety And Functional Parts
Operation SELF CHECK Tests: checks the major safety and functional parts The ‘SELF CHECK’ option enables the following parts of the circuit to be checked:– EEPROM Key Pad Display Contrast Door Test Stir Test Test Voltage Watchdog Note:– It is not necessary to have the oil test vessel filled with sample oil for the ‘SELF CHECK’ tests. From the main menu select the ‘SELF CHECK’... -
Page 21: Printing
Operation Printing The following notes describe the OTS60PB software routines for use with an external printer. It will also assist when setting up the printer. Refer also to the instruction leaflet provided with the printer. Charging the Printer The printer requires a 9 – 12 V d.c. supply to charge its internal Nicad battery. A charger is supplied in the printer kit, which operates from a mains supply of 115 –... - Page 22 Operation A PRINTER CONTROL entry is on the OPTIONS sub menu. Selecting PRINTER CONTROL causes a further sub menu to appear, with the following headings:- NO. OF COPIES 1 / 2 QUIT PRINT LAST RESULTS AUTO PRINT OFF / ON ▲...
-
Page 23: Sampling And Testing Oil For Dielectric Strength
Sampling and Testing Oil for Dielectric Strength The following notes are mainly intended for the guidance of those whose experience in the subject may be limited. The notes should be read in conjunction with the relevant oil testing specifications. Causes of Bad Oil Transformers and switchgear oil may be rendered unsuitable for further use due to four main reasons:- Low dielectric strength. -
Page 24: Repair And Warranty
Approved Repair Companies A number of independent companies have been approved for repair work on most Megger products, using genuine Megger spare parts. Consult the Appointed Distributor / Agent regarding spare parts, repair facilities and advice on the best course of action to take. -
Page 25: Utilisation
Lors du remplacement d’un fusible, celui-ci doit avoir les mêmes caractéristiques (pour plus de détails, voir la section spécification). Les fusibles en verre ne doit pas etre utilises à cause de leur capacité de coupure trop lente. Megger Seuls des récipients d’huiles correctes doivent être utilisés. Ceux-ci sont fournis par Limited et le numéro de référence est donné... - Page 26 Une liste sur la forme des électrodes et les espacement pour des spécifications d’essai communes est donnée ci-dessous. Chaque spécification nationale se trouve dans l’OTS 60PB et apparait sur l’afficheur avec le type d’électrode et l’écartement correspondant à chaque sélection.
- Page 27 Voyant haute tension Chambre d’essai Echantillon d’huile Couvercle de la chambre Fig. 1 Photo de l’appareil d’essai d’huile OTS 60PB Matrice à points Interrupteur Prise de raccordement de l’afficheur LCD Marche/Arrêt pour cordon imprimante d’alimentation et chargeur ou véhicule Fusibles Clés tactiles...
- Page 28 Utilisation PREPARATION DE L’APPAREIL D’ESSAI D’HUILE Exposer l’afficheur et la zone de chargement en retirant le couvercle de protection de l’appareil. Raccorder le chargeur à la prise arrière de l’appareil et le mettre sous tension à moins que l’équipement ne doivent travailler sur sa batterie interne. Alternativement, raccorder le cordon véhicle 12 V de l’appareil à...
-
Page 29: Contraste Affichage
Utilisation Options Le sous menu “OPTIONS” propose: — LANGUE — VUE DERNIERS RESULT — CONTROLE IMPRIMANTE — CONTRASTE AFFICHAGE — CHANGER BON/DEFAUT — MENU Se déplacer et sélectionner comme précédemment. Contraste Affichage Lorsque “CONTRASTE AFFICHAGE” est sélectionné, les clés plus foncé/plus clair doivent être utilisées pour régler la lecture sur l’afficheur. - Page 30 Utilisation Sequences d’Essai Automatiques Les détails sur la pré programmation des spécifications d’essai d’huiles sont donnés ci-après. Choisir la spécification désirée à partir du menu principal en le faisant défiler à l’aide des clés ‘L’ et ‘M’ jusqu’à ce que cette spécification soit en surbrillance. Appuyer alors sur “CHOIX”. Lorsqu’une spécification d’essai a été...
- Page 31 Utilisation 56 KV ESSAI 1 EN MARCHE ESSAI 5 MINUTES ARRET Fig. 7 Exemple de l‘écran agitation Le temps d’agitation restant est visualisé en alternance avec le message “AGITATION”. Lorsque le temps d’agitation est terminé, l’appareil commence alors un temps de repos pour l’échantillon en essai pour une période de 30 secondes.
- Page 32 Utilisation ESSAI 5 MINUTES Fig. 10 Exemple d’écran bon Les 3 clés tactiles assurent maintenant des fonctions différentes. Appuyer sur la touche pour visualiser séquentiellement les valeurs des tensions de claquage de chacun des essais individuels et la valeur moyenne. Appuyer sur la clé “NOUVEAU” pour revenir au début du menu “ESSAI 5 MINUTES”...
- Page 33 Utilisation NOTE: A tout moment durant une séquence d’essai, la touche de contrôle droite intitulée “STOP” peut être utilisée pour mettre fin à un essai et revenir à l’écran de l’essai initial. Appuyer sur la clé “NOUVEAU” pour revenir au début de la séquence d’essai sélectionnée. Appuyer sur la touche de droite “DEBUT”...
- Page 34 Utilisation Appuyer sur “NOUVEAU” pour revenir à l’affichage des options d’essai pour renouveler un essai. A partir de cette option, appuyer sur “QUITTER” puis sur “MENU” pour revenir au menu principal. Essai de Tenue B Suivre la procédure de l’essai de tenue A. Par contre, une fois la tension d’essai maintenue durant une minute, la tension continuera à...
- Page 35 Utilisation Impression OTS60PB Les remarques suivantes décrivent les sous-programmes logiciels de l’ en vue d’une utilisation avec une imprimante extérieure. Elles vous aideront également à programmer cette imprimante. Consultez le mode d’emploi qui accompange cette dernière. Chargement de l’imprimante L’imprimante à besoin d’une tension de 9 à 12 V c.c. pour charger sa batterie cadmium-nickel. Un chargeur est remis avec le kit de l’imprimante.
- Page 36 Utilisation La fonction de commande de l’imprimante (CONTROLE IMPRIMANTE) à été ajoutée au sous-menu OPTIONS. Lorsque cette fonction est sélectionnée, un nouveau sous-menu apparaît. Il a les en-têtes suivants: NBRE DE COPIES 1 / 2 IMPRESSION DES DERNIERS RESULT IMPRESSION AUTO NON / OUI CHOIX La fonction NBRE DE COPIES permet d’imprimer 1 à...
-
Page 37: Echantillonnage Et Essai De Résistance Diélectrique Des Huiles
Echantillonnage et essai de résistance diélectrique des huiles es notes suivantes sont destinées principalement aux personnes ayant des connaissances limitées du sujet. Ces notes doivent être lues conjointement aux spécifications d’essai d’huile appropriées. Causes des mauvaises huiles L’huile de transformateur et d’appareillage de commutation peut être devenir inutilisable à cause de quatre raisons:- Faible résistance diélectrique Forte acidité... -
Page 38: Caracteristiques
Caracteristiques Tension de sortie 60 kV rms (30 kV – 0 – 30 kV) à 61,8 Hz Paramètres des spécifications d’essai standard Essai de tenue A La tension monte à 2 kV/s jusqu’à la valeur sélectionnée. Elle est maintenue durant 1 minute puis est retirée à moins qu’un claquage n’apparaisse entre temps. - Page 39 Caracteristiques 12 V négatif au châssis ¡a l’aide du cordon véhicule (cela ne recharge pas la batterie interne) Fusibles 2 x F6, 3 A, IEC 127/1, 20 mm x 5 mm, fusible HPC. Dimensions 373 mm x 259 mm x 247 mm sans accessoires Poids 19 Kg sans accessoires Nettoyage...
- Page 40 Lors du remplacement d’un fusible, celui-ci doit avoir les mêmes caractéristiques (pour plus de détails, voir la section spécification). Les fusibles en verre ne doit pas etre utilises à cause de leur capacité de coupure trop lente. Megger Seuls des récipients d’huiles correctes doivent être utilisés. Ceux-ci sont fournis par Limited et le numéro de référence est donné...
- Page 41 Une liste sur la forme des électrodes et les espacement pour des spécifications d’essai communes est donnée ci-dessous. Chaque spécification nationale se trouve dans l’OTS 60PB et apparait sur l’afficheur avec le type d’électrode et l’écartement correspondant à chaque sélection.
- Page 42 Voyant haute tension Chambre d’essai Echantillon d’huile Couvercle de la chambre Fig. 1 Photo de l’appareil d’essai d’huile OTS 60PB Matrice à points Interrupteur Prise de raccordement de l’afficheur LCD Marche/Arrêt pour cordon imprimante d’alimentation et chargeur ou véhicule Fusibles Clés tactiles...
- Page 43 Utilisation PREPARATION DE L’APPAREIL D’ESSAI D’HUILE Exposer l’afficheur et la zone de chargement en retirant le couvercle de protection de l’appareil. Raccorder le chargeur à la prise arrière de l’appareil et le mettre sous tension à moins que l’équipement ne doivent travailler sur sa batterie interne. Alternativement, raccorder le cordon véhicle 12 V de l’appareil à...
- Page 44 Utilisation Options Le sous menu “OPTIONS” propose: — LANGUE — VUE DERNIERS RESULT — CONTROLE IMPRIMANTE — CONTRASTE AFFICHAGE — CHANGER BON/DEFAUT — MENU Se déplacer et sélectionner comme précédemment. Contraste Affichage Lorsque “CONTRASTE AFFICHAGE” est sélectionné, les clés plus foncé/plus clair doivent être utilisées pour régler la lecture sur l’afficheur.
- Page 45 Utilisation Sequences d’Essai Automatiques Les détails sur la pré programmation des spécifications d’essai d’huiles sont donnés ci-après. Choisir la spécification désirée à partir du menu principal en le faisant défiler à l’aide des clés ‘L’ et ‘M’ jusqu’à ce que cette spécification soit en surbrillance. Appuyer alors sur “CHOIX”. Lorsqu’une spécification d’essai a été...
- Page 46 Utilisation 56 KV ESSAI 1 EN MARCHE ESSAI 5 MINUTES ARRET Fig. 7 Exemple de l‘écran agitation Le temps d’agitation restant est visualisé en alternance avec le message “AGITATION”. Lorsque le temps d’agitation est terminé, l’appareil commence alors un temps de repos pour l’échantillon en essai pour une période de 30 secondes.
- Page 47 Utilisation ESSAI 5 MINUTES Fig. 10 Exemple d’écran bon Les 3 clés tactiles assurent maintenant des fonctions différentes. Appuyer sur la touche pour visualiser séquentiellement les valeurs des tensions de claquage de chacun des essais individuels et la valeur moyenne. Appuyer sur la clé “NOUVEAU” pour revenir au début du menu “ESSAI 5 MINUTES”...
- Page 48 Utilisation NOTE: A tout moment durant une séquence d’essai, la touche de contrôle droite intitulée “STOP” peut être utilisée pour mettre fin à un essai et revenir à l’écran de l’essai initial. Appuyer sur la clé “NOUVEAU” pour revenir au début de la séquence d’essai sélectionnée. Appuyer sur la touche de droite “DEBUT”...
- Page 49 Utilisation Appuyer sur “NOUVEAU” pour revenir à l’affichage des options d’essai pour renouveler un essai. A partir de cette option, appuyer sur “QUITTER” puis sur “MENU” pour revenir au menu principal. Essai de Tenue B Suivre la procédure de l’essai de tenue A. Par contre, une fois la tension d’essai maintenue durant une minute, la tension continuera à...
- Page 50 Utilisation Impression OTS60PB Les remarques suivantes décrivent les sous-programmes logiciels de l’ en vue d’une utilisation avec une imprimante extérieure. Elles vous aideront également à programmer cette imprimante. Consultez le mode d’emploi qui accompange cette dernière. Chargement de l’imprimante L’imprimante à besoin d’une tension de 9 à 12 V c.c. pour charger sa batterie cadmium-nickel. Un chargeur est remis avec le kit de l’imprimante.
- Page 51 Utilisation La fonction de commande de l’imprimante (CONTROLE IMPRIMANTE) à été ajoutée au sous-menu OPTIONS. Lorsque cette fonction est sélectionnée, un nouveau sous-menu apparaît. Il a les en-têtes suivants: NBRE DE COPIES 1 / 2 IMPRESSION DES DERNIERS RESULT IMPRESSION AUTO NON / OUI CHOIX La fonction NBRE DE COPIES permet d’imprimer 1 à...
- Page 52 Echantillonnage et essai de résistance diélectrique des huiles es notes suivantes sont destinées principalement aux personnes ayant des connaissances limitées du sujet. Ces notes doivent être lues conjointement aux spécifications d’essai d’huile appropriées. Causes des mauvaises huiles L’huile de transformateur et d’appareillage de commutation peut être devenir inutilisable à cause de quatre raisons:- Faible résistance diélectrique Forte acidité...
-
Page 53: Caracteristiques
Caracteristiques Tension de sortie 60 kV rms (30 kV – 0 – 30 kV) à 61,8 Hz Paramètres des spécifications d’essai standard Essai de tenue A La tension monte à 2 kV/s jusqu’à la valeur sélectionnée. Elle est maintenue durant 1 minute puis est retirée à moins qu’un claquage n’apparaisse entre temps. - Page 54 Caracteristiques 12 V négatif au châssis ¡a l’aide du cordon véhicule (cela ne recharge pas la batterie interne) Fusibles 2 x F6, 3 A, IEC 127/1, 20 mm x 5 mm, fusible HPC. Dimensions 373 mm x 259 mm x 247 mm sans accessoires Poids 19 Kg sans accessoires Nettoyage...
- Page 55 Leistungsschalter bis maximal 5 A. Das Batterieladgegerät darf nicht mehr verwendet werden, wenn es beschädigt, in Wasser getaucht oder dem Regen ausgesetzt ist. Das OTS 60PB darf nur zur Prüfung elektrischer Sorten von Isolieröl eingesetzt werden. Andere leicht entzündliche Stoffe, wie z.B. Benzin, dürfen nicht geprüft werden.
- Page 56 Einstellung den Abstand erneut prüfen. Nachstehend folgt eine tabellarische Auflistung der verschiedenen Elektrodenformen und Abstände für einige häufig vorkommende Prüfspezifikationen. Jede in das OTS 60PB ingebaute nationale Norm ist so angeordnet, daß bei Auswahl der Prüfung nach dieser Norm stets die zugehörige Elektrodenform und der erforderliche Abstand auf dem Display angezeigt werden.
- Page 57 Bedienungsanleitung Prüfbehälter in Prüfkammer einführen Die Tür der Prüfkammer öffnen, indem man sie nach unten in die waagrechte Lage zeiht. Bedeckel den gefüllten Ölprüfbehälter abnehmen und den Behälter über die Türschale bis zum Anschlag in die Prüfkammer hineinschieben. Durch vollständiges Schließen der Tür die Prüfelektroden in das Öl eintauchen. Hierbei verringert ein langsames Schließen der Tür das Risiko eines Lufteinschlusses im Öl.
- Page 58 Bedienungsanleitung VORBEREITUNG DES ÖLPRÜFGERÄTES Durch Abnehmen der Schutzdeckel das Display und den Ölbehälterbereich öffnen. Das netzbetriebene Ladegerät an die hintere Anschlußbuchse anschließen und einschalten, wenn das Gerät nicht mithilfe der eingebauten Batterie betrieben werden soll. Oder den 12 V Fahrzeugkabelsatz an die hintere Anschlußbuchse und die 12 V Zigarrenanzünder-/Zigarettenanzünderbuchse eines Fahrzeugs (mit Minuapol AM Chassis!) anschließen.
- Page 59 Bedienungsanleitung Auswahl ‘OPTIONEN’ im Hauptmenü Das Untermenü ‘OPTIONEN’ stellt folgende Funktionen zur Verfügung: SPRACHENWAHL LETZTE ERGBN DRUCKERSTEUERUNG ANZEIGE KONTRAST GRENZE-GUT/FEHLER MENU Durchlauf und Auswahl erfolgen wie oben bereits beschrieben. Einstellung des Kontrasts Bei Auswahl von ‘KONTRAST’ läßt sich die Lesbarkeit des Bildschirms über die Tasten ‘Dunkler/Heller’ nachjustieren.
- Page 60 Bedienungsanleitung Automatische Prüfreihen Das Arbeiten mit den vorprogrammierten Spezifikationen zur Ölprüfung wird nachstehend beschrieben. Das Hauptmenü mit den Tasten ‘L’ ‘M’ durchlaugen, bis die gewünschte Spezifikation hervorgehoben ist; dann ‘WAEHLEN’ drücken. Nach Auswahl einer Prüfspezifikation erscheint der Name der gewählten Ölprüfung auf dem Display (und verbleibt dort währen der ganzen folgenden Prüfreihe);...
- Page 61 Bedienungsanleitung 46 kV TEST 1 RÜHRT 5-MINUTEN-TEST QUIT Abbildung 7 Bildschirm: Rührphase Dieses Display zeigt auch die noch verbleibende Rührzeit an, und zwar im Wechsel mit den Worten ‘RÜHRVORGANG LÄUFT’. Nach Beendigung des Rührvorgangs tritt das Prüfgerät in die Zwischenstehzeitphase ein, bei der die Ölprobe 30 Sekunden lang in Ruhe stehen gelassen wird.
- Page 62 Bedienungsanleitung Die drei Bedientasten nehmen nun neue Funktionen an. Die linke mit ‘ANSICHT’ beschriftete Taste betätigen, um nacheinander die Spannungswerte der einzelnen Tests sowie den daraus ermittelten durchschnittlichen Spannungswert wieder aufzurufen. Die Taste ‘NEU’ drücken, um zum Anfang der ‘5-MINUTEN-TEST’ Prüfreihe zurückzukehren; dann die Taste ‘START’...
- Page 63 Bedienungsanleitung Prüfungen nach NFC 27-221 unterscheiden sich wie folgt von der obigen Beschreibung: Das Ergebnis ist der Mittelwert aus den letzten 5 der sechs durchlaufenen Tests. Während eine Prüfreihe läuft, kann ein laufender Test jederzeit mit der rechten Bedientaste ‘QUIT’ beendet werden; es erscheint dann wieder das erste Display der gewählten Testoption.
- Page 64 Bedienungsanleitung Das Unterdisplay zeigt die an die Ölprobe gelegte Prüfspannung an; diese Spannung steigt so lange um 0,5 kV/s an, bis ein Durchschlag auftritt oder die Höchstspannung erreicht ist. Die Warnanzeige ‘Hochspannung’ bleibt dabei die ganze Zeit erleuchtet. Die Nummer des gerade innerhalb der Prüfreihe laufenden Tests wird angezeigt, und es erscheint die Meldung ‘LAUFT’.
- Page 65 Bedienungsanleitung Nach Betätigen der linken, mit A, D beschrifteten Taste erscheint der in Abbildung 11 gezeigte Bildschirm. Mit den linken und mittleren Bedientasten das Programm für den gewünschten Elektrodenabstand wählen. Dieser Abstand sollte vorher entsprechend dem jeweils erforderlichen BS 5730a Überlastversuch eingestellt worden sein. WAEHLEN LÜCKE ? mm BS 5730a : A, D...
- Page 66 Bedienungsanleitung Als nächstes folgt ein erneutes (zweites) Anlegen der Überlastspannung. Obiger Schritt 4 wird wiederholt. Auf dem Display erscheint die Nummer des gerade laufenden Versuchs. Die weitere Reihenfolge hängt nun vom Ergebnis dieses zweiten Versuches ab. Wenn der Versuch nicht erfolgreich war, hört die Versuchsreihe hier auf. Es erscheint der in Abbildung 13b dargestellte Bildschirm.
- Page 67 Bedienungsanleitung KURZTEST MENÜ Abbildung 15 Beispiel: Optionen beim Überlastversuch ‘NEU’ drücken, um zum Ausgangsbildschirm mit den Testoptionen zurückzukehren — bereit für einen Wiederholungstest. Aus diesem Menü heraus mit ‘QUIT’ und ‘MENÜ’ ins Hauptmenü zurückkehren. Kurztest B So wie bei Versuch A beschrieben vorgehen. Dabei aber beachten, daß, nachdem die Prüfspannung 1 Minute lang auf dem voreingestellten Wert gehalten worden ist, sie mit 2 kV/s weiter ansteigt, bis Durchschlag eintritt oder der Höchstwert erreicht ist.
- Page 68 Bedienungsanleitung Es folgt ein Test der Prüfspannung. Start drücken und die angezeigte Spannung erhöht sich linear bis zum Durchschlagspunkt oder dem Höchstwert von 60 kV, wenn der Prüfbehälter mit gutem Öl gefüllt ist. Alternativ hierzu können auch die Elektroden und ihre Spindeln herausgenommen oder zurückgeschoben werden, bis der größtmögliche Luftabstand eingestellt ist;...
- Page 69 Bedienungsanleitung Halten Sie die Taste SET UP gedrückt und drücken Sie kurz die Taste ON. Der Drucker gibt seine Programmbetriebsart ein und druckt eine Liste der gegenwärtigen Einstellungen aus. Durchlaufen Sie die Liste der Parameter durch Drücken der Taste PAPER FEED. Durch Drücken der Taste SET UP werden die einzelnen Parameter durch den Bereich erlaubter Werte geführt.
- Page 70 Entnahme von Ölproben und Prüfung der Durchschlagsfestigkeit des Öls Die folgenden Hinweise richten sich in erster Linie an Bediener, die mit der Materie noch nicht vollkommen vertraut sind, und sollten zusammen mit den entsprechenden technischen Daten zur Ölprüfung gelesen werden. Unbrauchbares Öl und seine Ursachen Es gibt vier hauptsächliche Ursachen, aus denen das Öl von Transformatoren und Schaltvorrichtungen unbrauchbar werden kann...
- Page 71 This instrument is manufactured in the United Kingdom. The company reserves the right to change the specification or design without prior notice. Megger is a registered trademark Part No. 6171-585 V16 Printed in England 1108 www.megger.com...