Publicité
Les langues disponibles
Les langues disponibles
Liens rapides
DOPPELSCHLEIFER MIT FLEXIBLER WELLE /
DOUBLE BENCH GRINDER WITH FLEXIBLE DRIVE
SHAFT / TOURET À MEULER DOUBLE AVEC ARBRE
FLEXIBLE PDFW 120 A1
DOPPELSCHLEIFER
MIT FLEXIBLER WELLE
Originalbetriebsanleitung
TOURET À MEULER DOUBLE AVEC
ARBRE FLEXIBLEE
Traduction des instructions d'origine
SZLIFIERKA PODOWÓJNA Z
GIĘTKIM WAŁEM
Tłumaczenie oryginalnej instrukcji obsługi
DVOJITÁ BRÚSKA S FLEXIBILNÝM
HRIADEĽOM
Preklad originálneho návodu na obsluhu
IAN 315590
DOUBLE BENCH GRINDER WITH
FLEXIBLE DRIVE SHAFT
Translation of the original instructions
DUBBELE SLIJPMACHINE MET
FLEXIBELE AS
Vertaling van de originele gebruiksaanwijzing
DVOJITÁ BRUSKA S FLEXIBILNÍM
HŘÍDELEM
Překlad originálního provozního návodu
Publicité

Manuels Connexes pour Parkside 315590


Sommaire des Matières pour Parkside 315590
- Page 1 FLEXIBELE AS Traduction des instructions d’origine Vertaling van de originele gebruiksaanwijzing SZLIFIERKA PODOWÓJNA Z DVOJITÁ BRUSKA S FLEXIBILNÍM HŘÍDELEM GIĘTKIM WAŁEM Překlad originálního provozního návodu Tłumaczenie oryginalnej instrukcji obsługi DVOJITÁ BRÚSKA S FLEXIBILNÝM HRIADEĽOM Preklad originálneho návodu na obsluhu IAN 315590...
- Page 2 Klappen Sie vor dem Lesen die beiden Seiten mit den Abbildungen aus und machen Sie sich anschließend mit allen Funktionen des Gerätes vertraut. Before reading, unfold both pages containing illustrations and familiarise yourself with all functions of the device. Avant de lire le mode d’emploi, ouvrez les deux pages contenant les illustrations et familiarisez-vous ensuite avec toutes les fonctions de l’appareil.
- Page 5 Inhaltsverzeichnis Einleitung ............2 Bestimmungsgemäßer Gebrauch .
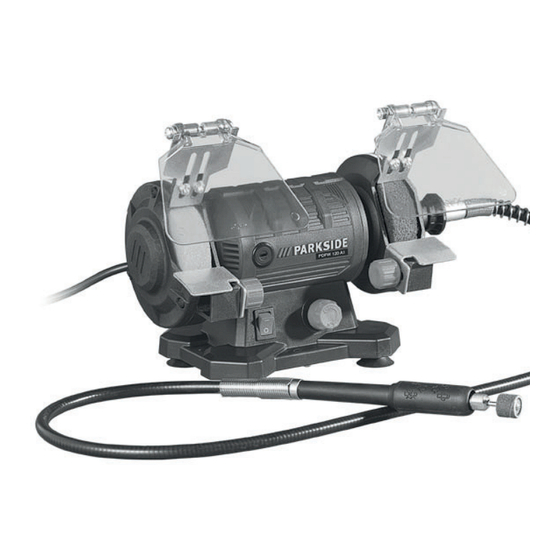
- Page 6 Ausstattung DOPPELSCHLEIFER MIT FLEXIBLER WELLE siehe Abbildung Ausklappseite: PDFW 120 A1 Schutzglas Polierscheibe* Einleitung Arretiermutter Wir beglückwünschen Sie zum Kauf Ihres neuen Anschlussgewinde Gerätes. Sie haben sich damit für ein hochwertiges flexible Welle Produkt entschieden. Die Bedienungsanleitung ist schwarze Hülse Teil dieses Produkts.
- Page 7 Abb. D: 4 Reinigungsbürsten 3 Messingbürsten Welle 2 Aufspanndorne für Schleifbänder Zentrierflansch 2 Aufspanndorne für Polierfilze / Trennscheiben Spannscheibe 1 Abrichtstein, 20 x 10 x 10 mm Überwurfmutter 1 Polierpaste Aufsatz für die flexible Welle 3 Spannzangen für flexible Welle Sicherungsstift (2,0 - 2,4 - 3,2 mm (vormontiert)) Befestigungsschraube...
- Page 8 Erklärung der Symbole auf dem Gerät: WARNUNG! ■ Lesen Sie alle Sicherheitshinweise ► Der Schwingungspegel wird sich entspre- chend dem Einsatz des Elektrowerkzeugs und Anweisungen! verändern und kann in manchen Fällen über ■ Lesen Sie alle Sicherheitshinweise dem in diesen Anweisungen angegebenen und Anweisungen! Wert liegen.
- Page 9 c) Halten Sie Kinder und andere Personen wäh- 3. Sicherheit von Personen rend der Benutzung des Elektrowerkzeugs a) Seien Sie stets aufmerksam, achten Sie dar- fern. Bei Ablenkung können Sie die Kontrolle auf, was Sie tun und gehen Sie mit Vernunft über das Gerät verlieren.
- Page 10 4. Verwendung und Behandlung des 5. Service Elektrowerkzeugs a) Lassen Sie Ihr Elektrowerkzeug nur von quali- fiziertem Fachpersonal und nur mit Original- a) Überlasten Sie das Gerät nicht. Verwenden Ersatzteilen reparieren. Damit wird sicherge- Sie für Ihre Arbeit das dafür bestimmte stellt, dass die Sicherheit des Elektrowerkzeugs Elektrowerkzeug.
- Page 11 e) Schleifscheiben, Schleifwalzen oder anderes i) Achten Sie bei anderen Personen auf siche- Zubehör müssen genau auf die Schleifspindel ren Abstand zu Ihrem Arbeitsbereich. Jeder, oder Spannzange Ihres Elektrowerkzeugs der den Arbeitsbereich betritt, muss persön- liche Schutzausrüstung tragen. Bruchstücke passen. Einsatzwerkzeuge, die nicht genau in die Aufnahme des Elektrowerkzeugs passen, des Werkstücks oder gebrochener Einsatzwerk- zeuge können wegfliegen und Verletzungen...
- Page 12 o) Ziehen Sie nach dem Wechseln von Einsatz- Ein Rückschlag ist die Folge eines falschen oder werkzeugen oder Einstellungen am Gerät die fehlerhaften Gebrauchs des Elektrowerkzeugs. Er Spannzangenmutter, das Spannfutter oder kann durch geeignete Vorsichtsmaßnahmen, wie sonstige Befestigungselemente fest an. Lose nachfolgend beschrieben, verhindert werden.
- Page 13 g) Stützen Sie Platten oder große Werkstücke Zusätzliche Sicherheitshinweise zum ab, um das Risiko eines Rückschlags durch Schleifen und Trennschleifen eine eingeklemmte Trennscheibe zu vermin- dern. Große Werkstücke können sich unter Besondere Sicherheitshinweise zum Schleifen ihrem eigenen Gewicht durchbiegen. Das und Trennschleifen: Werkstück muss auf beiden Seiten der Scheibe a) Verwenden Sie ausschließlich die für Ihr...
- Page 14 ■ Schützen Sie sich vor elektrischem Schlag! ■ Sichern Sie das Werkstück! Benutzen Sie Vermeiden Sie Körperberührung mit geerdeten Spannvorrichtungen oder einen Schraubstock, Teilen (z. B. Rohren, Radiatoren, Elektroherden, um das Werkstück festzuhalten. Es ist damit Kühlgeräten). sicherer gehalten als mit Ihrer Hand. ■...
- Page 15 ■ Überprüfen Sie, ob die beweglichen Teile Restrisiken einwandfrei funktionieren und nicht klemmen Auch wenn Sie dieses Elektrowerkzeug vor- oder ob Teile beschädigt sind. Sämtliche Teile schriftsmäßig bedienen, bleiben immer Restrisiken müssen richtig montiert sein und alle Bedingun- bestehen. Folgende Gefahren können im Zusam- gen erfüllen, um den einwandfreien Betrieb des menhang mit der Bauweise und Ausführung dieses Elektrowerkzeugs zu gewährleisten.
- Page 16 Vor der Inbetriebnahme ♦ Montieren Sie die Funkenschützer so, dass der Abstand zwischen der Schleif- bzw. der HINWEIS Polierscheibe und der Funkenschützer möglichst gering ist. Der Abstand darf nicht ► Beachten Sie, dass Sie mehr als 2 mm betragen. Achten Sie darauf, -- die Werkstückauflagen dass die Funkenschützer nicht die Schleif-...
- Page 17 Schleifvorgang: ♦ Bewegen Sie das Werkstück gleichmäßig hin und her, um ein optimales Ergebnis zu erzielen. Bedenken Sie, dass sich das Werkstück durch den Außdem wird dadurch die Schleifscheibe Schleifvorgang stark erwärmt. Kühlen Sie deshalb gleichmäßiger abgenutzt. das Werkstück in einem Wasserbad ab. Trockenen Sie es danach sorgfältig ab, bevor Sie es weiterbe- Schleifscheibe / Polierscheibe aus- arbeiten.
- Page 18 ♦ Schieben Sie die Spannscheibe wieder auf WARNUNG! VERLETZUNGSGEFAHR! die Welle ► Achten Sie darauf, dass die Schutzgläser ♦ Schrauben Sie die Überwurfmutter wieder bis zu den Werkstückauflagen herunterge- auf die Welle klappt sind. Dies kann ein unbeabsichtigtes Berühren der Schleif- oder Polierscheibe ♦...
- Page 19 ♦ Setzen Sie die Spannzangenhalterung Hinweise zu Materialbearbeitung / wieder auf die flexible Welle . Schrauben Werkzeug / Drehzahlbereich Sie die Spannzangenhalterung mithilfe des ■ Verwenden Sie das Gerät niemals zweckent- Kombischlüssels fest. fremdet und nur mit Originalteilen / -zubehör. ♦...
- Page 20 Anwendungsbeispiele / geeignetes Werkzeug auswählen: Funktion Zubehör Verwendung Überstand (min–max) mm Fräsen Vielseitige Arbeiten; 18–25 Fräser z.B. Ausbuchten, Aus- höhlen, Formen, Nuten oder Schlitze erstellen Polieren, Entrosten 9–15 Messingbürsten Entrosten Verschiedene Metalle 12–18 Polierfilze VORSICHT! und Kunststoffe, insbe- Üben Sie nur leichten sondere Edelmetalle Druck mit dem Werk- wie Gold oder Silber...
- Page 21 Gemäß Europäischer Richtlinie 2012/19/EU über Wartung und Reinigung Elektro- und Elektronik-Altgeräte und Umsetzung in WARNUNG! VERLETZUNGSGEFAHR! nationales Recht müssen verbrauchte Elektrowerk- Vor jeglicher Einstellung, Instandhal- zeuge getrennt gesammelt und einer umweltgerech- tung oder Instandsetzung Netzstecker ten Wiederverwertung zugeführt werden. ziehen. Möglichkeiten zur Entsorgung des ausgedienten HINWEIS Gerätes erfahren Sie bei Ihrer Gemeinde- oder...
- Page 22 Garantieumfang Garantie der Kompernaß Das Gerät wurde nach strengen Qualitätsrichtlinien Handels GmbH sorgfältig produziert und vor Auslieferung gewissen- Sehr geehrte Kundin, sehr geehrter Kunde, haft geprüft. Sie erhalten auf dieses Gerät 3 Jahre Garantie ab Die Garantieleistung gilt für Material- oder Fabrika- Kaufdatum.
- Page 23 Tel.: 0820 201 222 (0,15 EUR/Min.) E-Mail: kompernass@lidl.at Service Schweiz Tel.: 0842 665566 (0,08 CHF/Min., Mobilfunk max. 0,40 CHF/Min.) E-Mail: kompernass@lidl.ch IAN 315590 Importeur Bitte beachten Sie, dass die folgende Anschrift keine Serviceanschrift ist. Kontaktieren Sie zunächst die benannte Servicestelle. KOMPERNASS HANDELS GMBH...
- Page 24 EN 61000-3-2:2014 EN 61000-3-3:2013 EN 50581:2012 Typbezeichnung der Maschine: Doppelschleifer mit flexibler Welle PDFW 120 A1 Herstellungsjahr: 01 - 2019 Seriennummer: IAN 315590 Bochum, 14.11.2018 Semi Uguzlu - Qualitätsmanager - Technische Änderungen im Sinne der Weiterentwicklung sind vorbehalten. │ DE │ AT │ CH ■...
- Page 25 Contents Introduction ........... . . 22 Intended use .
- Page 26 Features DOUBLE BENCH GRINDER WITH FLEXIBLE DRIVE SHAFT see illustration on fold-out page: PDFW 120 A1 Eye shield Buffing disc* Introduction Locking nut Congratulations on the purchase of your new appli- Connecting thread ance. You have chosen a high-quality product. The Flexible shaft operating instructions are part of this product.
- Page 27 Fig. D: 5 milling cutters 4 cleaning brushes Shaft 3 brass brushes Centring flange 2 work arbors for abrasive belts Tension disc 2 work arbors for polishing felts/cutting discs Union nut 1 dressing stone, 20 x 10 x 10 mm Attachment for the flexible shaft 1 polishing paste Locking pin...
- Page 28 Explanation of the symbols used on the WARNING! appliance: ► The vibration level varies in accordance with ■ Read all safety warnings the use of the power tool and may be higher than the value specified in these instructions and all instructions! in some cases.
- Page 29 c) Prevent unintentional starting. Ensure the 2. Electrical safety switch is in the off-position before connecting a) Power tool plugs must match the outlet. to power source and/or battery pack, picking Never modify the plug in any way. up or carrying the tool. Carrying power tools Do not use any adapter plugs with earthed with your finger on the switch or energising (grounded) power tools.
- Page 30 e) Maintain power tools. Check for misalignment b) Do not use any accessories that have not or binding of moving parts, breakage of parts been provided or recommended by the manu- and any other condition that may affect the facturer for this power tool. Just because you power tool’s operation.
- Page 31 h) Wear personal protective equipment. n) Never put the power tool down until the Depending on the application, ensure that accessory tool has come to a complete stand- you use full face protection, eye protection still. The rotating accessory tool could come or goggles.
- Page 32 a) Hold the power tool firmly in both hands b) Use only undamaged mandrels of the correct and position your body and arms so they size and length and without undercut on the can absorb the force of a kickback. By taking shoulder for conical and straight pencil grind- adequate precautions, the operator can stay in ers.
- Page 33 ■ Use the right power tool for the job! Do not Supplementary safety instructions use low-performance tools for heavy work. for working with wire brushes Do not use the power tool for purposes for which it is not intended. For example, do not Special safety instructions for working with wire brushes: use a circular saw to cut tree branches or logs.
- Page 34 ■ Use an extension cord for outdoor use! Use ■ Always leave the tool attached to the spindle only suitably certified and labelled extension to reduce the risk of contact with the rotating cords outdoors. spindle. ■ Remain alert at all times! Pay attention to what Residual risks! you are doing.
- Page 35 Working procedures ♦ Now use the knurled screw to attach the workpiece rest firmly onto the device. Ensure Ensure that the appliance is always stable that the spring washer and washer are properly and secure. For extra safety, you can secure fitted (see fig.
- Page 36 ♦ Switch the appliance on by pressing the ON/ ♦ Remove the tension disc and grinding OFF switch or buffing disc ♦ Set a speed suitable for the work using the ♦ Place the new grinding or buffing disc speed control the shaft ♦...
- Page 37 Use the work arbor for polishing felts Fitting tools onto the flexible shaft ♦ Screw the tip of the work arbor for polishing ♦ Push the black collar all the way back onto felts clockwise into the corresponding hole the flexible shaft to lock the spindle.
- Page 38 Application examples/selecting a suitable tool: Function Accessories Protrusion (min–max) mm Milling Various jobs; e.g. creat- 18–25 Milling cutters ing recesses, hollows, forms, grooves or slits Polishing, rust removal Rust removal 9–15 Brass brushes CAUTION! Various metals and plas- 12–18 Polishing felts Exert only slight pres- tics, especially precious sure when applying the...
- Page 39 Maintenance and cleaning Disposal WARNING! RISK OF INJURY! Always The packaging consists of environmentally pull out the plug before adjustment, friendly material. It can be disposed of in maintenance or repairing the appli- the local recycling containers. ance. NOTE Do not dispose of power tools in ►...
- Page 40 Scope of the warranty Kompernass Handels GmbH This appliance has been manufactured in accordance warranty with strict quality guidelines and inspected meticu- Dear Customer, lously prior to delivery. This appliance has a 3-year warranty valid from The warranty covers material faults or production the date of purchase.
- Page 41 Service Ireland Tel.: 1890 930 034 (0,08 EUR/Min., (peak)) (0,06 EUR/Min., (off peak)) E-Mail: kompernass@lidl.ie IAN 315590 Importer Please note that the following address is not the service address. Please use the service address provided in the operating instructions. KOMPERNASS HANDELS GMBH...
- Page 42 EN 50581:2012 Type designation of machine: double bench grinder with flexible drive shaft PDFW 120 A1 Year of manufacture: 01 - 2019 Serial number: IAN 315590 Bochum, 14/11/2018 Semi Uguzlu - Quality Manager - We reserve the right to make technical changes in the context of further product development.
- Page 43 Table des matières Introduction ........... . . 40 Utilisation conforme à...
- Page 44 Équipement TOURET À MEULER DOUBLE AVEC ARBRE FLEXIBLE PDFW voir l’illustration sur le volet dépliant : 120 A1 Verre de protection Meule de lustrage* Introduction Écrou de retenue Nous vous félicitons pour l’achat de votre nouvel Filetage de raccordement appareil. Vous venez ainsi d’opter pour un produit Arbre flexible de grande qualité.
- Page 45 Fig. D : 5 Fraises 4 Brosses de nettoyage Arbre 3 Brosses en laiton Bride de centrage 2 Mandrins de serrage pour bandes de ponçage Rondelle de serrage 2 Mandrins de serrage pour feutres à polir / Écrou-raccord disques à tronçonner Garniture pour l’arbre flexible 1 Pierre à...
- Page 46 Explication des symboles sur l’appareil : AVERTISSEMENT ! ■ Lisez toutes les avertissements de ► Le niveau des vibrations varie en fonction de l'usage de l'outil électrique et peut, dans sécurité et les instructions ! certains cas, excéder la valeur indiquée dans ■ Lisez toutes les avertissements de ces instructions.
- Page 47 c) Maintenir les enfants et les personnes pré- 3. Sécurité des personnes sentes à l’écart pendant l’utilisation de l’outil. a) Rester vigilant, regarder ce que vous êtes Les distractions peuvent vous faire perdre le en train de faire et faire preuve de bon sens contrôle de l’outil.
- Page 48 4. Utilisation et entretien de l’outil 5. Service après-vente a) Faire entretenir l’outil par un réparateur a) Ne pas forcer l’outil. Utiliser l’outil adapté qualifié utilisant uniquement des pièces de à votre application. L’outil adapté réalisera rechange identiques. Cela assurera que la mieux le travail et de manière plus sûre au sécurité...
- Page 49 e) Les meules abrasives, rouleaux de meulage h) Portez un équipement de protection indivi- ou d’autres accessoires doivent être exacte- duelle. En fonction de l’utilisation, utiliser une ment adaptés à la broche de meulage ou à protection faciale intégrale, une protection la pince de serrage de votre outil électrique.
- Page 50 m) Conservez le cordon d’alimentation loin des Avertissements de sécurité supplé- outils d’intervention rotatifs. Si vous perdez mentaires pour toutes les utilisations le contrôle de l’appareil, le cordon peut être Recul brutal et avertissements de sécurité sectionné ou happé et votre main ou bras peut correspondants entrer brutalement en contact avec l’outil d’inter- vention.
- Page 51 d) Amenez toujours l’outil d’intervention dans le c) Évitez un blocage du disque à tronçonner matériau dans le même sens, dans lequel le ou une pression de contact trop élevée. bord coupant quitte le matériau (correspond N’effectuez pas de coupes trop profondes. au sens dans lequel les copeaux seront éjec- Une surcharge du disque à...
- Page 52 ■ Ranger les outils inutilisés dans un endroit Avertissements de sécurité supplé- sûr ! Les outils inutilisés doivent être rangés mentaires pour le travail avec les hors de portée des enfants dans un endroit sec, brosses métalliques élevé ou fermé à clé. Avertissements de sécurité...
- Page 53 ■ Entretenir l’outillage avec soin ! Conserver ■ Les interrupteurs endommagés doivent être rem- les outils de coupe tranchants et propres afin placés par un atelier du service après-vente. d’assurer un meilleur travail et en toute sécurité. ■ Ne pas utiliser un outil électrique dont l’interrup- Procéder conformément aux instructions de teur ne s’allume et ne s’éteint pas.
- Page 54 Montage des pare-étincelles AVERTISSEMENT ! ♦ Fixez les pare-étincelles à l’aide des vis de ► Cet outil crée un champ électromagnétique fixation des pare-étincelles , des bagues durant le fonctionnement. Dans certaines ressorts, des écrous et rondelles sur le dessus de circonstances, ce champ peut perturber les l’appareil (voir fig.
- Page 55 ♦ Réglez la vitesse de rotation correspondante Veillez à ce que la meule abrasive et la au travail à l’aide du réglage de la vitesse de meule de lustrage ne soient pas bloquées. rotation Veillez au montage et au réglage corrects ♦...
- Page 56 ♦ Dévissez l’écrou-raccord avec une clé à vis AVERTISSEMENT ! RISQUE DE de 17 mm pour le détacher de l’arbre . Ce BLESSURE ! faisant, retenez d’une main la meule abrasive ► Veillez à ce que les verres de protection ou la meule de lustrage concernée pour soient rabattus jusqu'aux supports de pièce à...
- Page 57 Remarques relatives à l’usinage des pour pince de serrage à l’aide de la clé combinée matériaux / outil / plage de vitesse ♦ Relâchez la douille noire ■ Ne jamais utiliser l’outil à d’autres fins que celles prévues ici et utiliser uniquement des Utiliser un mandrin de serrage pour disques pièces/accessoires d’origine.
- Page 58 Exemples d‘application / sélectionner l‘outil adapté : Fonction Accessoires Utilisation Saillie (min–max) mm Fraiser Travaux divers ; par ex. 18–25 Fraise réalisation d'échancrures, d'évidements, de formes, de rainures ou de fentes Polir, dérouiller Dérouiller 9–15 Brosses en laiton ATTENTION ! Usinage de différents 12–18 Feutres à...
- Page 59 Entretien et nettoyage Mise au rebut AVERTISSEMENT ! RISQUE DE L’emballage se compose de matières recy- BLESSURES ! Débranchez la fiche clables. Il peut être éliminé dans les conte- secteur avant tout réglage, entretien neurs de recyclage locaux. ou toute réparation. REMARQUE Ne jetez pas les outils électriques ►...
- Page 60 Étendue de la garantie Garantie de L’appareil a été fabriqué avec soin conformément Kompernass Handels GmbH à des directives de qualité strictes et consciencieu- Chère cliente, cher client, sement contrôlé avant sa livraison. Cet appareil est garanti 3 ans à partir de la date La prestation de garantie est valable pour des d’achat.
- Page 61 E-Mail: kompernass@lidl.be ■ Vous trouverez la référence sur la plaque IAN 315590 signalétique, une gravure, sur la page de garde de votre manuel d’utilisation (en bas à gauche) Importateur ou sous forme d’autocollant au dos ou sur le Veuillez tenir compte du fait que l’adresse suivante...
- Page 62 EN 50581:2012 Désignation du modèle de la machine : Touret à meuler double avec arbre flexible PDFW 120 A1 Année de fabrication : 01 - 2019 Numéro de série : IAN 315590 Bochum, 14.11.2018 Semi Uguzlu - Responsable qualité - Sous réserve de modifications techniques à des fins de perfectionnement.
- Page 63 Inhoud Inleiding ............60 Gebruik in overeenstemming met bestemming .
- Page 64 Uitrusting DUBBELE SLIJPMACHINE MET FLEXIBELE AS PDFW 120 A1 Zie achterste uitvouwpagina: Veiligheidsglas Inleiding Polijstschijf* Hartelijk gefeliciteerd met de aankoop van uw Borgmoer nieuwe apparaat. U hebt hiermee gekozen voor Aansluitschroefdraad een hoogwaardig product. De gebruiksaanwijzing Flexibele as maakt deel uit van dit product. Deze bevat be- langrijke aanwijzingen voor veiligheid, gebruik en Zwarte huls afvoer.
- Page 65 Afb. D: 4 schoonmaakborsteltjes 3 messingborstels 2 opspanpinnen voor schuurbanden Centreerflens 2 opspanpinnen voor polijstvilten/doorslijpschijven Spanschijf 1 africhtsteen, 20 x 10 x 10 mm Wartelmoer 1 polijstpasta Opzetstuk voor flexibele as 3 spantangen voor flexibele as Borgpen (2,0 - 2,4 - 3,2 mm) (voorgemonteerd) Bevestigingsschroef Houten opbergbox Kapje...
- Page 66 Toelichting bij de symbolen op het apparaat: WAARSCHUWING! ■ Lees alle veiligheidsinstructies en ► Het trillingsniveau verandert afhankelijk van het gebruik van het elektrische gereedschap aanwijzingen! en kan in bepaalde gevallen hoger zijn dan ■ Lees alle veiligheidsinstructies en de in deze gebruiksaanwijzing aangegeven aanwijzingen! waarde.
- Page 67 c) Houd kinderen en andere personen uit de 3. Veiligheid van personen buurt tijdens het gebruik van het elektrische a) Wees altijd alert, let op wat u doet en gebruik gereedschap. Als u afgeleid raakt, zou u de uw gezond verstand bij het gebruik van elek- controle over het apparaat kunnen verliezen.
- Page 68 4. Gebruik en behandeling van het 5. Service elektrische gereedschap a) Laat uw elektrische gereedschap alleen door gekwalificeerde vakmensen en uitsluitend met a) Voorkom overbelasting van het apparaat. originele vervangingsonderdelen repareren. Gebruik voor uw werkzaamheden het daar- Op die manier blijft de veiligheid van het elektri- voor bedoelde elektrisch gereedschap.
- Page 69 e) Slijpschijven, slijprollen en andere acces- i) Let op dat anderen een veilige afstand tot soires moeten precies op de slijpspil van uw uw werkomgeving houden. Eenieder die de elektrische gereedschap passen. Slijpschijven werkomgeving betreedt, moet persoonlijke die niet precies in de houder van het elektrische beschermingsmiddelen dragen.
- Page 70 o) Draai na verwisseling van opzetgereed- Een terugslag is het gevolg van onjuist gebruik van het elektrische gereedschap. Dit is te voorkomen schappen of instellingen op het apparaat de spantangmoer, de spankop of andere bevesti- door passende voorzorgsmaatregelen, zoals gingselementen stevig vast. Losse bevestigings- hieronder beschreven.
- Page 71 g) Ondersteun platen of grote werkstukken om Aanvullende veiligheidsvoorschriften het risico van een terugslag door een vastge- voor slijpen en doorslijpen lopen doorslijpschijf te verminderen. Grote werkstukken kunnen onder hun eigen gewicht Bijzondere veiligheidsvoorschriften voor slijpen en doorslijpen: doorbuigen. Het werkstuk moet aan beide zijden van de schijf worden ondersteund, zowel in de a) Gebruik uitsluitend de voor uw elektrische ge- buurt van de doorslijpsnede als aan de rand.
- Page 72 ■ Bescherm uzelf tegen elektrische schokken! ■ Voorkom een abnormale lichaamshouding! Vermijd lichaamscontact met geaarde voorwer- Zorg dat u stevig staat en bewaar altijd uw pen (bijv. buizen, radiatoren, elektrische verwar- evenwicht. mingen, koelapparaten). ■ Onderhoud elektrisch gereedschap zorgvul- ■ Houd andere personen op afstand! Zorg dat dig! Houd snijgereedschappen scherp en schoon andere personen, in het bijzonder kinderen, het...
- Page 73 ■ Controleer of bewegende onderdelen naar Overige risico’s behoren werken en niet klemmen, en of er geen Ook wanneer u dit elektrische apparaat volgens onderdelen beschadigd zijn. Alle onderdelen de voorschriften bedient, blijven er altijd risico’s moeten op de juiste manier zijn gemonteerd en bestaan.
- Page 74 De werkstuk-oplegvlakken monteren De veiligheidsglaspanelen monteren Bevestig de werkstuk-oplegvlakken met behulp ♦ Bevestig de veiligheidsglaspanelen van de meegeleverde kartelschroeven op het behulp van de bevestigingsschroeven voor de apparaat (zie afb. B): veiligheidsglaspanelen , de moeren en de veerringen op de daartoe bestemde houders ♦...
- Page 75 Slijpschijf/polijstschijf verwisselen Ingebruikname In-/uitschakelen WAARSCHUWING! LETSELGEVAAR! ■ Draairichting van het gereed- ► Haal de stekker altijd uit het stopcontact voordat u werkzaamheden aan het schap! apparaat uitvoert. OPMERKING ► Laat vóór het eerste gebruik de slijp- of WAARSCHUWING! polijstschijf ca. 5 minuten zonder belasting ►...
- Page 76 Gereedschap in de flexibele as WAARSCHUWING! LETSELGEVAAR! plaatsen ► Gebruik de slijp- of polijstschijf nooit ♦ Schuif de zwarte huls op de flexibele as zonder beschermingsafdekkingen volledig terug om de spil vast te zetten. Let erop dat de spantanghouder tegen de wijzers LET OP! MATERIËLE SCHADE! van de klok in kan worden losgedraaid.
- Page 77 Opspanpin voor doorslijpschijven gebruiken Aanwijzingen voor materiaalbewer- king/gereedschap/toerentalbereik ♦ Gebruik de schroevendraaierzijde van de com- bisleutel voor het los- en vastdraaien van de ■ Gebruik het apparaat nooit voor doeleinden schroef van de opspanpin voor doorslijpschij- waarvoor het niet bestemd is en uitsluitend met originele onderdelen/accessoires.
- Page 78 Toepassingsvoorbeelden/geschikt gereedschap kiezen: Functie Accessoires Gebruik Overstand (min–max) mm Frezen Uiteenlopende werkzaam- 18–25 Frezen heden, bijv. rondingen, ui- thollingen, vormen, groeven of sleuven maken Polijsten, ontroesten Ontroesten 9–15 Messingborstels VOORZICHTIG! Uiteenlopende metalen en 12–18 Poliervilt Oefen met het kunststoffen bewerken, met gereedschap slechts name edelmetalen zoals lichte druk uit op het...
- Page 79 Onderhoud en reiniging Afvoeren WAARSCHUWING! LETSELGEVAAR! De verpakking bestaat uit milieuvriende- Voor instelling, onderhoud of repara- lijke materialen. De verpakking kan in de tie altijd de stekker uit het stopcon- plaatselijke kringloopcontainers worden tact halen. gedeponeerd. OPMERKING Deponeer elektrisch gereedschap ►...
- Page 80 Garantieomvang Garantie van Het apparaat is op basis van strenge kwaliteitsnor- Kompernaß Handels GmbH men met de grootst mogelijke zorg vervaardigd Geachte klant, en voorafgaand aan de levering nauwkeurig U hebt op dit apparaat 3 jaar garantie vanaf de gecontroleerd. aankoopdatum.
- Page 81 Service Nederland Tel.: 0900 0400223 (0,10 EUR/Min.) E-Mail: kompernass@lidl.nl Service België Tel.: 070 270 171 (0,15 EUR/Min.) E-Mail: kompernass@lidl.be IAN 315590 Importeur Let op: het volgende adres is geen serviceadres. Neem eerst contact op met het opgegeven serviceadres. KOMPERNASS HANDELS GMBH...
- Page 82 EN 61000-3-2:2014 EN 61000-3-3:2013 EN 50581:2012 Typeaanduiding van het apparaat: Dubbele slijpmachine met flexibele as PDFW 120 A1 Productiejaar: 01 - 2019 Serienummer: IAN 315590 Bochum, 14-11-2018 Semi Uguzlu - Kwaliteitsmanager - Technische wijzigingen vanwege verdere ontwikkeling voorbehouden. ■ 78 ...
- Page 83 Spis treści Wstęp............80 Użytkowanie zgodne z przeznaczeniem .
- Page 84 Wyposażenie SZLIFIERKA PODWÓJNA Z GIĘTKIM WAŁEM PDFW 120 A1 patrz rysunek na rozkładanej stronie okładki: osłona szklana Wstęp tarcza polerska* Gratulujemy zakupu nowego urządzenia. Wybrany nakrętka mocująca produkt charakteryzuje się wysoką jakością. gwint połączeniowy Instrukcja obsługi stanowi część niniejszego pro- giętki wałek duktu.
- Page 85 10 kołków szlifierskich Rys. D: 5 frezów Wałek 4 szczotki do czyszczenia Kołnierz centrujący 3 szczotki mosiężne Tarcza mocująca 2 trzpienie mocujące do taśm szlifierskich Nakrętka kołpakowa 2 trzpienie mocujące do filców polerskich / Końcówka giętkiego wałka tarcz tnących Trzpień zabezpieczający 1 kamień...
- Page 86 Stopień twardości OSTRZEŻENIE! Ziarnistość # tarczy szlifierskiej: ► Poziom drgań będzie zmieniał się w zależ- Ziarnistość # tarczy polerskiej: ności od rodzaju zastosowania elektrona- Objaśnienie symboli na urządzeniu: rzędzia i w niektórych przypadkach może przekraczać wartość podaną w niniejszych ■ Przeczytać wszystkie wskazówki instrukcjach. Narażenie na drgania mogłoby bezpieczeństwa oraz instrukcje! zostać...
- Page 87 b) Nigdy nie używaj elektronarzędzia w otocze- 3. Bezpieczeństwo osób niu zagrożonym wybuchem, w którym znaj- a) Należy zawsze zachowywać ostrożność i dują się łatwopalne ciecze, gazy lub pyły. uważać na to, co się robi. Praca z elektrona- Elektronarzędzia wytwarzają iskry, które mogą rzędziem wymaga także zachowania zasad spowodować...
- Page 88 4. Użytkowanie i obsługa elektro- 5. Serwis narzędzia a) Naprawę urządzenia należy zlecać tylko wykwalifikowanemu specjaliście i stosować a) Nie przeciążaj urządzenia. Elektronarzędzia do tego tylko oryginalne części zamienne. używać tylko do ściśle określonego zakresu Dzięki temu zapewnione jest bezpieczeństwo zastosowania. Z odpowiednim elektronarzę- użytkowania elektronarzędzia.
- Page 89 d) Średnica zewnętrzna i grubość narzędzia Należy chronić oczy przed wyrzucanymi w obróbkowego muszą być zgodne z wymia- powietrze ciałami obcymi, które mogą pojawić rami elektronarzędzia. Narzędzia robocze o się w różnych zastosowaniach. Podczas prac niewłaściwych wymiarach uniemożliwiają ich powodujących powstawanie pyłu nosić maskę odpowiednie osłonięcie lub pełną...
- Page 90 n) Nigdy nie odkładać elektronarzędzia, dopóki Tarcza szlifierska zostanie wówczas odrzucona w kierunku do lub od obracające się narzędzie całkowicie się nie zatrzyma. Obracające się narzędzie może użytkownika, zależnie od kierunku obrotów w zetknąć się z miejscem odłożenia, co może spo- miejscu zablokowania.
- Page 91 g) Duże płyty lub duże przedmioty obrabiane Dodatkowe wskazówki bezpieczeń- należy podeprzeć, by zmniejszyć ryzyko od- stwa dotyczące szlifowania i cięcia rzutu wskutek zakleszczenia się tarczy tnącej. Duże przedmioty obrabiane mogą wyginać się Szczególne wskazówki bezpieczeństwa doty- czące szlifowania i cięcia: pod własnym ciężarem.
- Page 92 ■ Podłączyć odciąg pyłowy! Jeżeli elektronarzę- Bezpieczna praca dzie jest wyposażone w przyłącze do odciągu ■ Należy utrzymywać stanowisko pracy w pyłowego, należy go podłączyć i upewnić się, porządku. Nieporządek na stanowisku pracy że działa poprawnie. może być przyczyną wypadków. ■...
- Page 93 ■ Zachowaj ostrożność! Zawsze uważaj na to, Szczegółowe wskazówki bezpie- co robisz. Praca z elektronarzędziami wymaga czeństwa także zachowania zasad zdrowego rozsądku. Nigdy nie używaj elektronarzędzi, gdy masz OSTRZEŻENIE! trudności z koncentracją. ► Nie używaj uszkodzonych lub odkształco- nych tarcz lub szczotek. ■...
- Page 94 Montaż osłon przeciwiskrowych Przed uruchomieniem ♦ Zamocuj osłony przeciwiskrowe za pomocą WSKAZÓWKA śrub mocujących osłon przeciwiskrowych podkładek sprężystych, nakrętek i podkładek ► Prosimy o zastosowanie się do następujących na górze urządzenia (patrz rys. C). punktów: -- uchwyty mocujące przedmiotu ♦ Zakontruj nakrętki kombinerkami lub kluczem obrabianego 7 mm.
- Page 95 Zwróć uwagę na prawidłowy montaż i ustawie- Szlifowanie nie osłon przezroczystych , osłon przeciwiskro- ♦ Połóż obrabiany przedmiot na uchwycie przed- wych oraz uchwytów mocujących detali miotu obrabianego Dosuń obrabiany przedmiot powoli pod żąda- Wystarczy niewielki nacisk: nym kątem do tarczy szlifierskiej , aż...
- Page 96 ♦ Załóż nową tarczę szlifierską lub polerską OSTRZEŻENIE! NIEBEZPIECZEŃSTWO na wałek OBRAŻEŃ! ♦ Wsuń tarczę mocującą ponownie na wałek ► Pamiętaj o tym, że osłony przezroczyste muszą być złożone do uchwytów mocują- cych przedmiotu obrabianego . Może to ♦ Przykręć nakrętkę kołpakową ponownie na wałku zapobiec przypadkowemu dotknięciu tarczy...
- Page 97 Korzystanie z trzpienia mocującego do tarcz Wskazówki dotyczące obróbki mate- tnących riałów / narzędzi / zakresu prędko- ści obrotowej ♦ Użyj stronę klucza dwustronnego zakoń- czoną wkrętakiem, aby odkręcać i przykręcać ■ Nigdy nie używać urządzenia niezgodnie z śrubę trzpienia mocującego tarcz tnących przeznaczeniem;...
- Page 98 Przykłady zastosowania / wybór odpowiedniego narzędzia: Funkcja Akcesoria Przeznaczenie Naddatek (min. – maks.) mm Frezowanie Prace wszechstronne; 18–25 Frez np. wykonywanie wgłębień, drążenie, for- mowanie, wykonywanie wpustów lub szczelin Polerowanie, Usuwanie rdzy 9–15 Szczotki mosiężne usuwanie rdzy Obróbka różnych metali 12–18 Polierfilze PRZESTROGA!
- Page 99 Konserwacja i czyszczenie Utylizacja OSTRZEŻENIE! NIEBEZPIECZEŃ- Opakowanie składa się w całości z mate- STWO OBRAŻEŃ! Przed każdym riałów przyjaznych środowisku naturalne- ustawianiem, konserwacją lub mu. Można je wyrzucić do właściwych naprawą należy wyciągnąć wtyk pojemników na surowce wtórne. sieciowy z gniazda zasilania. WSKAZÓWKA Urządzeń...
- Page 100 Okres gwarancji i ustawowe Gwarancja roszczenia gwarancyjne Kompernaß Handels GmbH Wykonanie usługi gwarancyjnej nie przedłuża Szanowny Kliencie, okresu gwarancji. Dotyczy to również wymienionych To urządzenie objęte jest 3-letnią gwarancją, licząc i naprawionych części. Wszelkie szkody i wady od daty zakupu. W przypadku wad tego produktu, wykryte w chwili zakupu należy zgłosić...
- Page 101 Tel.: 22 397 4996 E-Mail: kompernass@lidl.pl ■ W przypadku wszelkich pytań przygotuj paragon fiskalny oraz numer artykułu (np. IAN IAN 315590 12345) jako dowód zakupu. Importer ■ Numer artykuł można znaleźć na grawerowanej tabliczce znamionowej, umieszczonej na stronie Pamiętaj, że poniższy adres nie jest adresem...
- Page 102 EN 50581:2012 Oznaczenie typu maszyny: Szlifierka podowójna z giętkim wałem PDFW 120 A1 Rok produkcji: 01 - 2019 Numer seryjny: IAN 315590 Bochum, dnia 14.11.2018 Semi Uguzlu - dyrektor ds. jakości - Zastrzegamy sobie prawo do wprowadzania zmian technicznych w ramach procesu udoskonalania urządzenia.
- Page 103 Obsah Úvod ............100 Použití...
- Page 104 Vybavení DVOJITÁ BRUSKA S FLEXIBILNÍM HŘÍDELEM Viz zobrazení na výklopné stránce: PDFW 120 A1 ochranné sklo lešticí kotouč* Úvod aretační matice Blahopřejeme Vám k zakoupení Vašeho nového přípojný závit přístroje. Rozhodli jste se pro vysoce kvalitní výro- pružná hřídel bek. Návod k obsluze je součástí tohoto výrobku. černá...
- Page 105 Obr. D 5 fréz 4 čisticí kartáče hřídel 3 mosazné kartáče středicí příruba 2 upínací trny pro brusné pásy napínací kotouč 2 upínací trny pro lešticí plsti / řezací brusné přesuvná matice kotouče nástavec pro pružnou hřídel 1 orovnávací kámen, 20 x 10 x 10 mm pojistný...
- Page 106 Vysvětlení symbolů na přístroji: VÝSTRAHA! ■ Přečtěte si všechna bezpečnostní ► Hladina vibrací se mění v závislosti na použití elektrického nářadí a může být v některých upozornění a příkazy! případech vyšší než hodnota uvedená v tom- ■ Přečtěte si všechna bezpečnostní to návodu. Pokud se elektrické nářadí užívá upozornění...
- Page 107 2. Elektrická bezpečnost 3. Bezpečnost osob a) Přípojná zástrčka elektrického nářadí musí a) Buďte stále pozorní, sledujte, co děláte, odpovídat zásuvce. Zástrčka se nesmí žád- a k práci s elektrickým nářadím přistupujte ným způsobem pozměňovat. s rozumem. Elektrické nářadí nepoužívejte, Nepoužívejte adaptérové zástrčky v kombinaci pokud jste nemocni, unaveni nebo pod vlivem s uzemněným elektrickým nářadím.
- Page 108 4. Manipulace s elektrickým nářadím 5. Servis a jeho použití a) Nechte své elektrické nářadí opravovat pouze kvalifikovanými odborníky a používejte jen ori- a) Přístroj nepřetěžujte. Pro svou práci používejte ginální náhradní díly. Tím se zajistí, že zůstane elektrické nářadí vhodné k danému účelu. zachována bezpečnost elektrického nářadí.
- Page 109 e) Brusné kotouče, brusné válce nebo jiné i) Dbejte na bezpečnou vzdálenost jiných osob příslušenství musí přesně dosedat na brusné od Vašeho pracoviště. Každý, kdo vstoupí na vřeteno nebo kleštinu Vašeho elektrického toto pracoviště, musí nosit osobní ochranné nářadí. Vsázecí nástroje, které nedosedají prostředky.
- Page 110 p) Nenechte elektrické nářadí běžet, když ho b) Obzvláště opatrně pracujte v oblasti rohů, přenášíte. Vaše oblečení může být při náhod- ostrých hran atd. Zamezte tomu, aby se vsá- ném kontaktu zachyceno rotujícím vsázecím zecí nástroje odrazily od obrobku a vzpříčily. nástrojem, který...
- Page 111 c) Zabraňte zablokování řezacího brusného Dodatečné bezpečnostní pokyny pro kotouče nebo příliš silnému přítlaku. Nepro- práci s drátěnými kartáči vádějte příliš hluboké řezy. Přetěžováním řezacího brusného kotouče se zvyšuje jeho Speciální bezpečnostní pokyny k práci s drá- namáhání a náchylnost ke vzpříčení nebo za- těnými kartáči: blokování, a tím i možnost zpětného rázu nebo a) Mějte na vědomí, že drátěný...
- Page 112 ■ Používejte správné elektrické nářadí! Pro ■ Zabraňte neúmyslnému spuštění! Přesvědčte těžkou práci nepoužívejte stroje s nízkým výko- se, zda je při zastrčení zástrčky do zásuvky nem. Nepoužívejte elektrické nářadí pro takové vypínač vypnutý. účely, pro které není určeno. Nepoužívejte ■...
- Page 113 Bezpečnostní pokyny specifické pro Před uvedením do provozu přístroj UPOZORNĚNÍ VÝSTRAHA! ► Dbejte prosím na to, že ► Nepoužívejte poškozené nebo zdeformované musíte montovat -- podložky pod obrobek kotouče nebo kartáče. -- chrániče proti jiskrám ■ Používejte pouze brusné kotouče a kartáče, -- a ochranná...
- Page 114 Broušení: ♦ Přimontujte chrániče proti jiskrám tak, aby vzdálenost mezi brusným resp. lešticím ko- Mějte na paměti, že se obrobek při broušení silně toučem a chráničům proti jiskrám byla co zahřeje. Proto obrobek ochlaďte ve vodní lázni. nejmenší. Vzdálenost nesmí přesahovat 2 mm. Poté...
- Page 115 Výměna brusného kotouče / lešticího VÝSTRAHA! NEBEZPEČÍ ZRANĚNÍ! kotouče ► Nikdy neuvádějte brusný nebo lešticí ko- touč do provozu bez ochranných krytů VÝSTRAHA! NEBEZPEČÍ ZRANĚNÍ! ► Před prováděním prací na přístroji vytáhněte POZOR! VĚCNÉ ŠKODY! vždy síťovou zástrčku ze zásuvky. ►...
- Page 116 Použití upínacího trnu pro brusné pásy Výměna upínacích kleštin Upínací kleštiny můžete vyměnit, pokud to bude ♦ Nastrčte požadovaný brusný pás zcela vyžadovat průměr násady používaného nástroje. na příslušný upínací trn pro brusné pásy ♦ Pro aretaci vřetena stáhněte zcela zpět černou ♦...
- Page 117 Příklady použití / výběr vhodného nástroje: Funkce Příslušenství Použití Přesah (min. – max.) mm Frézování Různé práce; např. 18–25 Fréza vykružování, dlabání, tvarování, drážkování nebo prořezávání Leštění, odstraňování rzi Odstraňování rzi 9–15 Mosazné kartáče POZOR! Opracování různých 12–18 Lešticí plsti Na obrobek tlačte kovů...
- Page 118 Balení zlikvidujte ekologicky. Údržba a čištění Dbejte na označení na různých VÝSTRAHA! NEBEZPEČÍ ZRANĚNÍ! obalových materiálech a v případě Před jakýmkoli nastavením, jakoukoli potřeby je roztřiďte odděleně. údržbou nebo opravou se musí Obalové materiály jsou označeny vytáhnout zástrčka. zkratkami (a) a číslicemi (b) s UPOZORNĚNÍ...
- Page 119 Tel.: 800143873 E-Mail: kompernass@lidl.cz Výrobek je určen pouze pro soukromé účely a ne pro komerční použití. Při nesprávném a neodborném IAN 315590 používání, při použití násilí a při zásazích, které nebyly provedeny našimi autorizovanými servisními Dovozce provozovnami, záruční nároky zanikají.
- Page 120 EN 61000-3-3:2013 EN 50581:2012 Typové označení stroje: Dvojitá bruska s flexibilním hřídelem PDFW 120 A1 Rok výroby: 01 - 2019 Sériové číslo: IAN 315590 Bochum, 14.11.2018 Semi Uguzlu - manažer kvality - Technické změny ve smyslu dalšího vývoje jsou vyhrazeny.
- Page 121 Obsah Úvod ............118 Používanie v súlade s určením .
- Page 122 Vybavenie DVOJITÁ BRÚSKA S FLEXIBIL- NÝM HRIADEĽOM PDFW 120 A1 pozri obrázok, výklopná stránka: ochranné sklo Úvod leštiaci kotúč* Srdečne vám gratulujeme ku kúpe vášho nového aretačná matica prístroja. Touto kúpou ste sa rozhodli pre výrobok pripájací závit vysokej kvality. Návod na obsluhu je súčasťou pružný...
- Page 123 Obr. D: 5 fréz 4 kefky na čistenie hriadeľ 3 mosadzné kefy strediaca príruba 2 upínacie tŕne pre brúsne pásy upínací kotúč 2 upínacie tŕne pre leštiace plste/rezacie brúsne prevlečná matica kotúče nadstavec pre pružný hriadeľ 1 zrovnávací kameň, 20 x 10 x 10 mm poistný...
- Page 124 Vysvetlenie symbolov na prístroji: VÝSTRAHA! ■ Prečítajte si všetky bezpečnostné ► Vibračná hladina sa mení podľa používania elektrického náradia a v niektorých prípa- upozornenia a pokyny! doch môže byť väčšia ako hodnota uvedená ■ Prečítajte si všetky bezpečnostné v týchto pokynoch. Zaťaženie vibráciami by upozornenia a pokyny! sa mohlo podceniť, keď...
- Page 125 2. Elektrická bezpečnosť 3. Bezpečnosť osôb a) Pripájacia zástrčka elektrického náradia musí a) Buďte vždy pozorní a dbajte na to, čo robíte byť vhodná pre danú zásuvku. Zástrčka sa a pri práci s elektrickým náradím postupujte nesmie žiadnym spôsobom modifikovať. s rozvahou.
- Page 126 4. Manipulácia s elektrickým nára- 5. Servis dím a jeho používanie a) Elektrické náradie smie opravovať len kvali- fikovaný odborný personál a len za použitia a) Prístroj nepreťažujte. Pri vašej práci použí- originálnych náhradných dielov. Týmto je vajte len na to určené elektrické náradie. zabezpečené, že zostane zachovaná...
- Page 127 e) Brúsne kotúče, brúsne valčeky alebo iné prí- i) Dbajte na bezpečnú vzdialenosť iných osôb slušenstvo musia presne dosadať na brúsne od vašej pracovnej oblasti. Každý, kto vstupu- vreteno alebo klieštinu vášho elektrického je do pracovnej oblasti, musí nosiť osobný náradia.
- Page 128 p) Nikdy nenechávajte elektrické náradie a) Elektrické náradie držte pevne a telo i rame- zapnuté, keď ho prenášate na iné miesto. ná uveďte do polohy, v ktorej dokážete za- Váš odev sa v dôsledku náhodného kontaktu chytiť silu spätného rázu. Obsluhujúca osoba s rotujúcim vsadeným nástrojom môže zachytiť...
- Page 129 g) Dosky alebo veľké obrobky podoprite, aby Ďalšie bezpečnostné pokyny pre sa znížilo riziko spätného rázu v dôsledku brúsenie a rezanie brúsnym kotúčom zablokovania rezacieho brúsneho kotúča. Veľké obrobky sa môžu prehnúť následkom Špeciálne bezpečnostné pokyny pre brúsenie a rezanie brúsnym kotúčom: vlastnej hmotnosti.
- Page 130 ■ Kábel nepoužívajte na účely, na ktoré nie je Bezpečná práca určený! Nepoužívajte kábel na vyťahovanie ■ Udržiavajte poriadok na vašom pracovisku. zástrčky z elektrickej zásuvky. Chráňte kábel Neporiadok na pracovisku môže mať za násle- pred teplom, olejom a ostrými hranami. dok úrazy.
- Page 131 ■ Skontrolujte, či pohyblivé diely fungujú bezchyb- Zvyškové riziká ne a nie sú zaseknuté alebo či niektoré diely nie Aj keď toto elektrické náradie používate podľa sú poškodené. Všetky diely musia byť namonto- predpisov, vždy ostávajú zvyškové riziká. V súvis- vané...
- Page 132 Pomocou upevňovacieho materiálu upevnite Nastavenie podložiek obrobku prístroj na podklade. ♦ Pomocou skrutiek s ryhovanou hlavou Dbajte na to, aby brúsny a leštiaci kotúč stavte podložky obrobku . Dbajte na to, aby neboli zablokované. bola vzdialenosť medzi brúsnym kotúčom resp. leštiacim kotúčom a podložkou obrob- Dbajte na správnu montáž...
- Page 133 Brúsenie ♦ Naskrutkujte prevlečnú maticu opäť na hriadeľ ♦ Položte obrobok na podložku obrobku Veďte obrobok pomaly v želanom uhle k brús- ♦ Opäť pevne utiahnite prevlečnú maticu nemu kotúču , dokiaľ sa obrobok a brúsny Držte pritom práve namontovaný brúsny kotúč...
- Page 134 Vloženie nástroja do pružného ♦ Pomocou kombinovaného kľúča utiahnite skrutku na upínacom tŕni pre rezacie brúsne hriadeľa kotúče ♦ Na aretáciu vretena posuňte čierne puzdro úplne dozadu na pružnom hriadeli. Dbajte Použite upínací tŕň pre leštiace plste na to, že držiak klieštiny je možné...
- Page 135 Príklady použitia / voľba vhodného nástroja: Funkcia Príslušenstvo Používanie Presah (min–max) mm Frézovanie Rôzne práce, napr. vyhl- 18–25 Fréza bovanie, vydlabávanie, tvarovanie, vyrezávanie drážok alebo zárezov Leštenie, odstraňovanie Odstraňovanie hrdze 9–15 Mosadzné kefy hrdze Opracovanie rozličných 12–18 Leštiace plste POZOR! kovov a plastov, najmä...
- Page 136 Informácie o možnostiach likvidácie doslúženého Údržba a čistenie prístroja dostanete na obecnej alebo mestskej VÝSTRAHA! NEBEZPEČENSTVO správe. PORANENIA! Pred akýmikoľvek nastavením, pred údržbou alebo Obal zlikvidujte ekologicky. opravou vytiahnite sieťovú zástrčku. Zohľadnite označenie na rozličných obalových materiáloch a tieto UPOZORNENIE prípadne zvlášť vytrieďte. Obalové ►...
- Page 137 Tel. 0850 232001 neodporúčajú alebo pred ktorými sa varuje. E-Mail: kompernass@lidl.sk Výrobok je určený len na súkromné použitie a nie na IAN 315590 priemyselné používanie Záruka zaniká pri nespráv- nom a neodbornom zaobchádzaní, pri použití Dovozca násilia a pri zásahoch, ktoré neboli vykonané naším autorizovaným servisom.
- Page 138 EN 61000-3-3:2013 EN 50581:2012 Typové označenie stroja: Dvojitá brúska s flexibilným hriadeľom PDFW 120 A1 Rok výroby: 01 ‒ 2019 Sériové číslo: IAN 315590 Bochum, 14.11.2018 Semi Uguzlu – Manažér kvality – Technické zmeny v zmysle ďalšieho vývoja sú vyhradené. ■...
- Page 139 BURGSTRASSE 21 DE - 44867 BOCHUM GERMANY www.kompernass.com Stand der Informationen · Last Information Update · Version des informations Stand van de informatie · Stan informacji · Stav informací · Stav informácií: 02 / 2019 · Ident.-No.: PDFW120A1-112018-1 IAN 315590...