Table des Matières
Publicité
Les langues disponibles
Les langues disponibles
Publicité
Chapitres
Table des Matières

Manuels Connexes pour Muller licht Tint


Sommaire des Matières pour Muller licht Tint
- Page 1 Bedienungsanleitung Mode d‘Emploi Instruction Manual Remote Control 404022...
- Page 2 Control your lights simply via remote control. Seite 3 page 29 page 53 DEUTSCH FRANÇAIS ENGLISH...
- Page 3 Die Nichtbeachtung dieser Bedienungsan- leitung kann zu Schäden an den Produkten führen. Bewahren Sie die Bedienungsanleitung für die weitere Nutzung auf. Wenn Sie die tint-Fern- bedienung an Dritte weitergeben, geben Sie unbedingt diese Bedienungsanleitung mit. Sie können diese Anleitung auch im Inter- net unter www.mueller-licht.de/tint als pdf...
-
Page 4: Table Des Matières
INHALT Zeichenerklärung � � � � � � � � � � � � � � � � � � � � � � � � � � � � � � 5 Bestimmungsgemäßer Gebrauch � � � � � � � � � � � � � � � 5 Sicherheitshinweise �... -
Page 5: Zeichenerklärung
ZEICHENERkLäRUNG Die folgenden Symbole und Signalwörter werden in dieser Bedienungsanleitung, auf der tint-Fernbedienung oder auf der Verpackung verwendet. WARNUNG! Dieses Signalsymbol/-wort bezeichnet eine Gefährdung mit einem mittleren Risikograd, die, wenn sie nicht vermieden wird, den Tod oder eine schwere Verletzung zur Folge haben kann. -
Page 6: Sicherheitshinweise
Gefahren verstehen. • Kinder dürfen nicht mit dem Artikel spielen. • Batterien können bei Verschlucken lebensgefährlich sein. Bewahren Sie die Batterien und die tint-Fernbedienung deshalb für Kleinkinder unerreichbar auf. Wurde die Batterie verschluckt, muss sofort medizinische Hilfe in Anspruch genommen werden. -
Page 7: Lieferumfang
Stellen sofort mit reichlich klarem Wasser und suchen Sie umgehend einen Arzt auf. VORSICHT! • Nehmen Sie die Batterie aus der tint-Fernbedienung heraus, wenn diese verbraucht ist oder wenn Sie den Artikel länger nicht benutzen. So vermeiden Sie Schäden, die durch Auslaufen entstehen können. -
Page 8: Auf Einen Blick
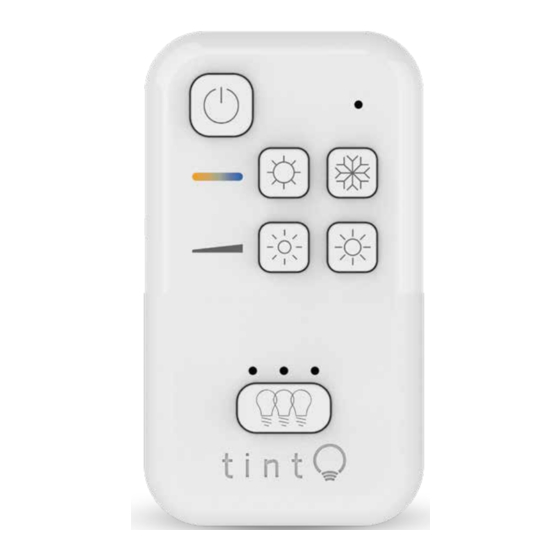
AUF EINEN BLICk 1 Standby-Taste 2 Resonanzanzeige 3 Weißsteuerung 4 Helligkeitssteuerung 5 Gruppenanzeige „3 Leuchtdioden“ 6 Gruppentaste DEUTSCH... - Page 9 7 Reset-Taste 8 Batteriefach für 1 Batterie (CR 2450 / 3 V) AUF EINEN BLICk...
-
Page 10: Inbetriebnahme
Wandhalterung nutzen (optional) Die zum Lieferumfang gehörende Wandhalterung können Sie für die sichere Lagerung der tint-Fernbedienung nut- zen. Ein Magnet in der Halterung hält dabei die tint-Fernbe- dienung sicher auf der Halterung. Die Halterung kann mit Klebestreifen oder mit Schrauben und ggf. - Page 11 Wandhalterung aufkleben 1. Ziehen Sie die Schutzfolie von den beiden Klebepads. 2. Drücken Sie die Halterung mit etwas Kraft auf den sauberen, trockenen und staubfreien Untergrund. Wandhalterung anschrauben Wandhalterung anschrauben HINWEIS! Vergewissern Sie sich, dass sich keine Rohre oder Leitun- gen an der Bohrstelle befinden.
-
Page 12: Grundfunktionen
Fernbedienung gesteuert werden, allerdings können nur die folgenden Funktionen gesteuert werden. Eine Steuerung der Farben bei farbigen tint-Produkten ist nicht möglich. Es können bis zu 50 tint-Produkte eingebun- den werden. Es handelt sich bei der tint-Fernbedienung um eine Funk- fernbedienung. -
Page 13: Helligkeit Einstellen
Ein- /Ausschalten Drücken Sie die Standby-Taste, um die tint-Produkte ein- und wieder auszuschalten. Die Memory-Funktion merkt sich den letzten „Beleuchtungszustand“ und startet damit beim nächsten Einschalten automatisch. Weißton einstellen Durch kurzes Drücken wählen Sie fest hinterlegte Weiß- ton-Einstellungen: warmweiß, neutralweiß und kaltweiß. -
Page 14: Gruppenfunktionen
• Eine Sitzecke, die mittelhell beleuchtet sein soll. • Ein weiterer Bereich, der ein besonderes Licht haben soll. Beachten Sie: • Was eine Gruppe letztlich ist, bestimmen Sie selbst. Sie können z.B. auch die tint-Produkte eines Zimmers oder einer Etage zusammenfassen. DEUTSCH... - Page 15 • Eine Gruppe kann erweitert oder verkleinert werden und es können auch tint-Produkte von einer Gruppe zu einer anderen Gruppe verschoben werden. • Ein einzelnes tint-Produkt kann ebenfalls eine Gruppe darstellen. • Mit der tint-Fernbedienung können Sie maximal 4 Grup- pen steuern, wobei die vierte Gruppe die Zusammenfas- sung der anderen drei Gruppen darstellt.
- Page 16 (siehe entsprechende Anleitung). 2. Drücken Sie ggf. wiederholt die Gruppentaste, bis alle Leuchtdioden oberhalb der Gruppentaste leuchten. 3. Halten Sie die tint-Fernbedienung ganz nah (< 5 cm) an das neue tint-Produkt. 4. Halten Sie die Gruppentaste so lange gedrückt, bis das tint-Produkt anfängt zu blinken.
- Page 17 Sie können die erweiterte Gruppe wie gewohnt bedienen. Ein tint-Produkt aus einer Gruppe entfernen 1. Schalten Sie ggf. die tint-Produkte mit der tint-Fernbe- dienung aus (Standby). 2. Wählen Sie über die Gruppentaste die Gruppe aus, die Sie ändern möchten.
- Page 18 2. Wählen Sie über die Gruppentaste die Gruppe aus, die Sie ändern möchten. (Möchten Sie z.B. aus der Gruppe 2 ein tint-Produkt zur Gruppe 1 hinzufügen, drücken Sie so oft die Gruppen- taste, bis die mittlere Leuchte oberhalb der Gruppentaste leuchtet.)
-
Page 19: Reset
Reset des tint-Produktes/Kopplungsmodus Ein Reset des tint-Produktes ist nur im Ausnahmefall erfor- derlich, z.B. wenn die Fernbedienung zurückgesetzt werden musste, oder wenn Sie die tint-Produkte in ein Smart Home Gateway einbinden möchten. Hinweis: Alle Einstellungen (z. B. die Verknüpfung zur Fernbedienung) werden zurückgesetzt. - Page 20 Sekunden die Reset-Taste , bis die Resonanzanzeige zu blinken beginnt. Warten Sie ab, bis die LED aufhört zu blinken. 3. Gehen Sie danach vor, wie im Abschnitt „Reset des tint-Pro- duktes“ und nachfolgend wie im Abschnitt „Neues tint-Pro- dukt einbinden“ beschrieben.
- Page 21 Smart Home Ready - Einbindung in ein Zigbee-Gateway In der Regel lässt sich ein tint-Produkt nur mit einer Fern- bedienung bzw. einem Smart Home System verbinden. In einige Smart Home Systeme mit Zigbee lässt sich auch die tint-Fernbedienung einbinden, sodass die tint-Pro- dukte anschließend parallel per Fernbedienung oder...
-
Page 22: Fehlersuch-Tabelle
FEHLERSUCH-TABELLE Problem Mögliche Ursache Keine Funktion. • Die Batterien in der tint-Fern- bedienung sind leer und müs- sen gewechselt werden. • Die tint-Produkte selbst sind ausgeschaltet oder die Netz- stecker sind nicht eingesteckt. • Sie haben über die Gruppen- taste eine falsche bzw. gar keine Gruppe ausgewählt. - Page 23 Gruppeneinstellung verbinden Sie es erneut. „Alle“. Das tint-Produkt lässt • Das tint-Produkt ist bereits sich nicht hinzufügen. einer Fernbedienung oder einem Gateway zugeteilt. Bitte entfernen Sie es aus dem be- stehenden Netzwerk.
- Page 24 Problem Mögliche Ursache Die Standby-Taste muss • Wenn die tint-Produkte vorher mehrfach gedrückt über den Lichtschalter aus- werden. geschaltet wurden, muss sich die tint-Fernbedienung neu synchronisieren. • Sie haben Teile des Systems über einen Lichtschalter ab- geschaltet. Die tint-Fernbedie- nung synchronisiert sich neu.
-
Page 25: Technische Daten
TECHNISCHE DATEN Frequenzband des drahtlosen RF-Modus: ....2405-2480,0 MHz Maximale Sendeleistung: ....< 20 mW Funkreichweite (Freifeld): . -
Page 26: Reinigung Und Entsorgung
REINIGUNG UND ENTSORGUNG Konformitätserklärung Hiermit erklärt Müller-Licht International GmbH, dass der Funkanlagentyp „Müller-Licht tint“ der Richtlinie 2014/53/EU entspricht. Der vollständige Text der EU-Konformitätserklä- rung ist unter der folgenden Internetadresse ver- fügbar: www.mueller-licht.de/tint. Reinigung Reinigen Sie die Fernbedienung nur mit einem tro- ckenen Tuch. - Page 27 Entnehmen Sie vor der Entsorgung die Batterie aus dem Gerät und entsorgen Sie diese separat. Batterien und Akkus gehören nicht in den Haus- müll. Jeder Verbraucher ist gesetzlich verpflichtet, Batterien und Akkus bei einer Sammelstelle seiner Gemeinde, seines Stadtteils oder im Handel abzugeben.
- Page 28 Control your lights simply via remote control.
- Page 29 Conservez le mode d’emploi afin de pou- voir vous y référer ultérieurement. Si la télécommande est transmise à des tiers, joignez-leur impérativement ce mode d’em- ploi. Vous pouvez aussi télécharger ce mode d’emploi en tant que fichier pdf sur Internet à l’adresse www.mueller-licht.de/tint.
- Page 30 Contenu du produit � � � � � � � � � � � � � � � � � � � � � � � � � � � � 33 Télécommande tint � � � � � � � � � � � � � � � � � � � � � � � � � � � 34 Mise en service �...
-
Page 31: Légende
LÉGENDE Les symboles et remarques suivants sont utilisés dans ce mode d’emploi, sur la télécommande tint ou sur l‘embal- lage. AVERTISSEMENT! Ce symbole/mot de signalisation désigne un danger de degré moyen qui, s’il n’est pas écarté, peut conduire à des blessures graves voire mortelles. -
Page 32: Consignes De Sécurité
CONSIGNES DE SÉCURITÉ AVIS! • Le présent article peut être utilisé par des enfants à partir de 8 ans, ainsi que par des personnes présentant des capacités physiques, sensorielles ou mentales dimi- nuées, ou un manque d’expérience et de connaissances si elles sont sous surveillance ou ont été... -
Page 33: Contenu Du Produit
• Si nécessaire, nettoyez les contacts de la pile et de l‘ap- pareil avant leur insertion. CONTENU DU PRODUIT • Télécommande tint avec support mural • Matériel de montage • 1 pile CR 2450 / 3 V • Mode d‘emploi... -
Page 34: Télécommande Tint
TÉLÉCOMMANDE TINT 1 Touche de mise en veille 2 Affi chage de la résonance 3 Contrôle du blanc 4 Contrôle de la luminosité 5 Affi chage du groupe (3 voyants lumineux) 6 Touche du groupe FRANÇAIS... - Page 35 7 Touche de remise à zéro 8 Compartiment pour 1 pile (CR 2450 / 3 V) TÉLÉCOMMANDE TINT...
-
Page 36: Mise En Service
3. Repoussez le cache du compartiment pour piles. Utiliser le support mural (en option) Vous pouvez utiliser le support mural fourni pour ranger la télécommande tint en toute sécurité. Un aimant intégré au support maintient la télécommande tint bien en place sur le support. - Page 37 Collage du support mural 1. Tirez sur le film de protection des deux patins adhésifs. 2. Appuyez sur le support en faisant légèrement pression sur le socle propre, sec et exempt de poussières. 3. Vissage du support mural Vissage du support mural AVIS! Assurez-vous que l’emplacement prévu ne comporte ni tuyaux, ni conduites.
-
Page 38: Fonctions De Base
Jusqu’à 50 produits tint peuvent être intégrés. La télécommande tint est une télécommande radio. • Vous n’avez pas besoin de « viser » les produits tint avec la télécommande tint pour les commander. • La télécommande tint pénètre également au travers de matériaux durs, tels que murs, portes et fenêtres. - Page 39 Activation/désactivation Appuyez sur la touche de veille pour activer et désactiver les produits tint. La fonction Mémoire mémorise le dernier « état de l‘éclairage » et démarre automatiquement à l’acti- vation suivante. Réglage du ton de blanc Par une pression courte, sélectionnez des paramètres de ton de blanc définis : blanc chaud, blanc neutre et blanc...
-
Page 40: Fonctions Du Groupe
FONCTIONS DU GROUPE Il s’agit d‘un groupe Les produits tint du kit de démarrage figurent au départ dans le premier groupe. Ainsi, d’une pression sur un bouton, vous pouvez commander plusieurs produits tint simultanément. Ce dispositif est pratique, par exemple, si plusieurs «... - Page 41 • Un groupe peut être élargi ou réduit, et les produits tint peuvent également être déplacées d‘un groupe à l‘autre. • Un seul produit tint peut aussi constituer un groupe. • La télécommande tint permet de contrôler jusqu’à 4 groupes, le quatrième groupe représentant l’ensemble des trois autres.
- Page 42 Si cela ne se produit pas, allumez et éteignez le produit tint 6 fois de suite. 2. Appuyez de manière répétée sur la touche du groupe jusqu‘à...
- Page 43 Le processus est alors terminé et vous pouvez utiliser le groupe étendu comme à l’accoutumée. Suppression d’une produit tint de la télécommande tint 1. Éteignez au besoin les produits tint au moyen de la télé- commande tint (veille). 2. Au moyen de la touche du groupe, sélectionnez le groupe que vous souhaitez modifier.
- Page 44 Raccordement d‘un produit tint d’un groupe avec un autre groupe 1. Éteignez au besoin les produits tint au moyen de la télé- commande tint (veille). 2. Au moyen de la touche du groupe, sélectionnez le groupe que vous souhaitez modifier.
-
Page 45: Réinitialisation
Une réinitialisation n‘est nécessaire que dans des cas exceptionnels, par exemple, si la télécommande a dû être réinitialisée. 1. Activez et désactivez le produit tint 5 fois (notez les ins- tructions respectives). 2. Réactivez le produit tint. Un changement de couleur débute à... - Page 46 « Raccordement d‘un nouveau produit tint ». Chaque produit tint est intégré individuellement l‘un après l‘autre. Si par exemple trois produits tint appar- tiennent au groupe, vous devez répéter le processus « Raccordement d‘un nouveau produit tint » 3 fois.
-
Page 47: Tableau De Recherche Des Erreurs
TABLEAU DE RECHERCHE DES ERREURS Problème Origine possible Sans fonction. • La pile de la télécommande tint est déchargée et doit être remplacée. • Les produits tint sont désac- tivés ou la prise secteur n’est pas branchée. • Au moyen de la touche du groupe, vous avez sélectionné... - Page 48 « Tous ». necter. Impossible d’ajouter le • Le produit tint est déjà attribué produit tint. à une télécommande ou à une passerelle. Veuillez la retirer du réseau existant.
- Page 49 Problème Origine possible La touche de mise en • Si les produits tint ont été au- veille doit être action- paravant éteints au moyen de le née plusieurs fois. interrupteur, la télécommande tint doit se resynchroniser. • Vous avez arrêté certaines par- ties du système au moyen d‘un...
-
Page 50: Données Techniques
DONNÉES TECHNIQUES Bande de fréquence du module RF sans fil : ....2405-2480,0 MHz Puissance de transmission maximale : . . .< 20 mW Portée de radio (champ libre) : . -
Page 51: Nettoyage Et Élimination
Déclaration de conformité La société Müller-Licht International GmbH déclare par la présente que le type d‘installation radio « Müller-Licht tint » est conforme à la directive 2014/53/UE. Le texte complet de la déclaration de conformité UE est disponible à l’adresse Internet suivante : www.mueller-licht.de/tint... - Page 52 Avant d‘éliminer l‘appareil, retirez-en la pile et éliminez celle-ci séparément. Les piles et piles rechargeables ne peuvent pas être éliminées en tant qu‘ordures ménagères. Chaque consommateur est tenu de déposer les piles et piles rechargeables auprès d‘un point de collecte de sa municipalité, de son quartier ou dans le commerce.
- Page 53 Store the user manual for future use. If you pass the remote control on to third parties, please be absolutely sure to include this user manual. You can also download the manual: www.mueller-licht.de/tint.
- Page 54 CONTENT Explanation of symbols ..... 55 Intended use ......55 Safety information .
-
Page 55: Explanation Of Symbols
ExPLANATION OF SyMBOLS The following symbols and signal words are used in this user manual, on the lamps or on the packaging. WARNING! This signal symbol/word designates a hazard with moderate degree of risk which may lead to death or severe injury if not avoided. -
Page 56: Safety Information
SAFETy INFORMATION NOTICE! • This item may be used by children over the age of 8 and persons with reduced physical, sensory or mental abilities or lack of experience and knowledge if they have been supervised or instructed in the safe use of the item and understand the resulting dangers. -
Page 57: Included With The Item
• If necessary, clean the battery and device contacts before inserting them. INCLUDED WITH THE ITEM • tint remote control with wall bracket • Assembly material • 2 batteries LR03 (AAA) / 1.5 V • Operating manual... -
Page 58: At A Glance
AT A GLANCE 1 Standby button 2 Feedback display 3 White control 4 Brightness control 5 Group display (3 LEDs) 6 Group button ENGLISH... - Page 59 7 Reset button 8 Battery compartment (CR 2450 / 3 V) AT A GLANCE...
-
Page 60: Setup
SETUP Inserting the batteries 1. Open the battery compartment at the rear of the tint remote control. 2. Insert 1 CR 2450 / 3 V battery as shown on the bottom of the battery compartment. Ensure the correct polarity of the battery (+/-). -
Page 61: Mounting The Wall Bracket
Mounting the wall bracket 1. Remove the protective film from both sticky pads. 2. Press the bracket with some force against a clean, dry and dust-free surface. Screwing in the wall bracket NOTICE! Make sure there are no pipes or wires in the wall where you intend to drill. -
Page 62: Basic Functions
50 tint products can be incorporated. The tint remote control is a radio remote control. • You do not need to “aim” at the tint products with the tint remote control to operate them. • The tint remote control will also penetrate solid materials such as walls, doors and windows. -
Page 63: Switching On/Off
Switching on/off Press the standby button to switch the tint products on and off again. The memory function will store the last “illumina- tion state” and will start again automatically the next time the tint product is switched on. Set white tone Short-press to select permanently stored white tone set- tings: warm white, neutral white and cold white. -
Page 64: Group Functions
GROUP FUNCTIONS This is a group The tint products in the starter set are in the first group to begin with. This allows you to control several tint products with only one button. This is useful if you have more than one ‘lighting situation’... - Page 65 • You can use the tint remote control to control a maximum of 4 groups, whereby the fourth group is a combination of the other three groups. • Think beforehand about which tint products you want to group together and try to make the groups logical and comprehensible.
- Page 66 2. Press the group button repeatedly until all the LEDs above the group button light up. 3. Hold the tint remote control very close (< 5 cm) to the new tint product. 4. Hold down the group button until the tint product begins to blink.
- Page 67 Remove a tint product from the tint remote control 1. Switch the tint product off (i.e. to standby) with the tint remote control if necessary. 2. Select the group you would like to change using the group button. 3. Hold down the group button for approx. 5 seconds. The feedback display will blink red/green.
-
Page 68: Reset
1. Switch the tint product on and off 5 times (follow the instructions of the respective product) 2. Switch the tint product on again. It will now begin to cycle through its colors. The reset has occurred as desired and you can now use the tint product as normal using your remote control or other Zigbee system. - Page 69 Resetting the tint remote control A reset is only necessary in exceptional cases, for example if the tint products do not respond to the tint remote control even after removing and reinserting the batteries. NOTICE! Resetting the remote control will delete all pre-defined group settings and you will have to connect the tint remote control and the tint products again afterwards.
-
Page 70: Troubleshooting
TROUBLESHOOTING Problem Possible causes tint product is not • The batteries in the tint remote working. control are dead and must be replaced. • The tint product itself is switched off or the mains plug is not plugged in. • You have selected the wrong group, or have not selected a group, using the group button. - Page 71 Possible causes The tint product has Find out for sure which group the been added to the tint product is in. Proceed as de- wrong group. scribed in “Add a tint product from one group into another group”. I cannot add a tint prod- Please check whether the tint uct to a new system.
-
Page 72: Wireless Specifications
Problem Possible causes I have to press the • If the tint product has previ- standby button several ously been switched off using times. the light switch, the tint remote control will have to resynchro- nize. • You have switched off parts of the system using a light switch. -
Page 73: Cleaning And Disposal
CLEANING AND DISPOSAL Declaration of Conformity Hereby Müller-Licht International GmbH declares that the radio equipment type „Müller-Licht tint“ complies with the directive 2014/53 / EU. The full text of the EU Declaration of Conformi- ty is available at the following Internet address: www.mueller-licht.de/tint... - Page 74 Before disposal, remove the battery from the device and dispose of it separately. Batteries and rechargeable batteries should not be disposed of with household waste. Every consumer is legally obliged to hand over batteries and rechargeable batteries to a collection point in his/ her municipality, district or to a retailer.
- Page 75 Discover the whole world of tint. www.mueller-licht.de/tint...
- Page 76 MÜLLER-LICHT International GmbH Goebelstraße 61/63 28865 Lilienthal Germany www.mueller-licht.de 00800 - 44003311 404022_tint-FB-BDA_005...