Table des Matières
Publicité
Liens rapides
Publicité
Table des Matières

Manuels Connexes pour Starkey Table Microphone


Sommaire des Matières pour Starkey Table Microphone
- Page 1 Table Microphone O P E R A T I O N S M A N U A L...
-
Page 2: Table Des Matières
Wearing the Table Microphone . . . . . . . . . . . . . . . . . . -
Page 3: Overview
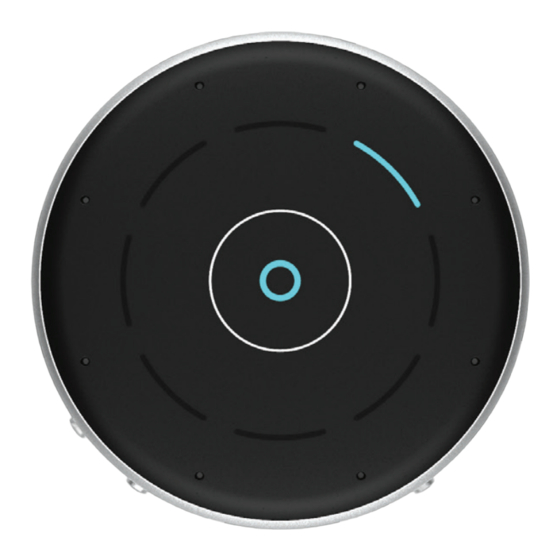
• Power adapter & USB-to-MicroUSB cable wireless hearing aids. • Plugs for up to four territories: Key use modes: o United States • Table Microphone: streaming the target voice from a o Europe selected direction in the following modes: o Australia o Automatic... - Page 4 4 | Overview Overview | 5 1 . MicroUSB jack 7 . 3.5mm audio jack 10 . Hearing aid pairing button 2 . Directional touch keys 8 . Volume +/- buttons 11 . Magnetic interface for hanger 3 . Segments 9 .
- Page 5 6 | Overview Overview | 7 1 . MicroUSB jack 7 . 3 .5mm audio jack • Rechargeable via USB-to-MicroUSB cable • For connecting wired earphones • Streams audio via TV streaming cable 8 . Volume +/- buttons 2 . Touch keys •...
-
Page 6: Indicators
8 | Indicators Indicators | 9 Indicators Product orientation Operational Indicators For best performance, make sure the Table Microphone Recharging Volume and Power buttons are facing you. Green segments indicate battery charge level. Line-in Each segment represents White top segment about 1 hour. - Page 7 10 | Indicators Indicators | 11 Pairing Hearing Aid Indicators Conversation Streaming Indicators Blinking Searching Automatic for hearing blue Automatic mode indicator ( O ) aid(s). brackets solid blue. Blue segment indicates active listening direction. Manual single/dual Solid Hearing aid pairing green One or two blue segments successful.
-
Page 8: Basic Use
Basic Use Pairing 1 . To turn on Table Microphone, press For the Table Microphone to interact with your hearing aids, the power button. you must first pair it with each hearing aid. You only need to perform this action once, as the Table Microphone and 2 . - Page 9 3 . Press the hearing aid pairing button for 2 seconds and Left Right Pairing Result Next Step place the Table Microphone face up on a surface. The Bracket Bracket blinking blue brackets indicate Bluetooth is ready to pair. Left hearing Complete aid paired.
-
Page 10: Daily Use
Tabletop Battery Low Place your Table Microphone in the middle of a table to The active direction indicator(s) illuminate listen to a group of people. For best speech understanding, in red. In parallel, a beep is transmitted to always bring your Table Microphone as close to the the hearing aids every 15 minutes. - Page 11 Streaming audio from your TV to your hearing aids a specific speaker. Insert the TV streaming cable Audio plug in the Table Microphone microUSB jack. Insert the 3.5mm audio plug of the TV streaming cable in the TV’s audio jack.
-
Page 12: Wearing The Table Microphone
(e.g., a Long Press on a user control) can start/stop inserted and secured. streaming. Audio streaming will also stop when the Table Microphone is turned off. An audible indicator may play in your hearing aids to signal • Place lanyard around the neck. -
Page 13: Assembling The Power Adapter
22 | Assembling the Power Adapter Wired Earphones | 23 Assembling the Power Adapter Wired Earphones The Table Microphone may include a variety of plug configurations for use in different countries. If the power adapter requires assembly: 1 . Select the appropriate plug configuration used in your country. -
Page 14: Troubleshooting
Streamed Bluetooth device Move Bluetooth device audio quality may be on the edge closer to Table Microphone. is inconsistent. of wireless range. Audio stream Volume streamed Press volume + or – button is too loud or from Table on Table Microphone. -
Page 15: Safety Information
Turn on as usual. electromagnetic fields from other medical devices, radio signals and electrostatic discharges. The Table Microphone is designed to be cleaned with a damp cloth moistened with soapy water. - Page 16 Safety Information | 29 If you use other medical devices or wear implantable medical devices such as The battery in your Table Microphone is not replaceable. Do not attempt to replace defibrillators or pacemakers and are concerned that your Table Microphone might the battery.
-
Page 17: Regulatory Notices
Such modifications could void the user’s authority to operate the equipment. Hereby, Nuance Hearing declares that Starkey Hearing Technologies Table Microphone is in compliance with the essential requirements and other relevant provisions of Directive 2014/53/EU. A copy of the Declaration of Conformity can be obtained from info@nuancehear.com... - Page 18 Notes Notes...
- Page 19 Bluetooth SIG, Inc. ® and any use of such marks by Starkey is under license. Starkey and Thrive are registered trademarks of Starkey Laboratories, Inc. © 2020 Starkey. All Rights Reserved.