Medela Harmony Mode D'emploi
Masquer les pouces
Voir aussi pour Harmony:
- Mode d'emploi (48 pages) ,
- Mode d'emploi (68 pages) ,
- Mode d'emploi (41 pages)

Manuels Connexes pour Medela Harmony


Sommaire des Matières pour Medela Harmony
- Page 1 Harmony ™ Harmony Pump & Feed Set ™ EN Instructions for use | FR Mode d’emploi AR تعليمات االستخدام...
- Page 2 For mothers who insist on the best for their babies and themselves. Because you care. Medela vous remercie d’avoir acheté un tire-lait Harmony. Le lait maternel est ce qu‘il y a de plus naturel pour votre enfant, mais dans certaines situations l’allaitement au sein n’est pas toujours possible. Depuis plus de 50 ans, Medela s’est donné...
- Page 3 4–31 32–58 59–86...
-
Page 4: Table Des Matières
1. Intended Use / Population – Contraindication 2. Meaning of symbols 3. Important safety information 4. Product description 4.1 Harmony – light, convenient, clever 4.2 Product parts 5. Cleaning 5.1 Before using for the first time and after every use 5.2 Before using for the first time and once a day... -
Page 5: Intended Use / Population - Contraindication
Women are often delighted to learn that a breast pump can be used as a supplement to breastfeeding and that some pumps are designed to mimic the sucking of a nursing baby. Contraindications There are no known contraindications for the Harmony breast pump. -
Page 6: Meaning Of Symbols
The warning symbol identifies all instructions that are important for safety. Failure to follow these instructions can lead to injury or damage to the Harmony breast pump! There are several warning symbols. Each symbol is used together with a specific word. -
Page 7: Symbols On The Device
This symbol indicates to follow the instructions for use. This symbol indicates the manufacturer. This CE symbol indicates the compliance of the Harmony breast pump with the essential requirements of the Council Directive 93/42/EEC of 14 June 1993 concerning medical devices. -
Page 8: Important Safety Information
Failure to follow the safety information on these pages can lead to danger. Device The Harmony breast pump is not heat-resistant: keep away from radiators and open flames. Do not expose the Harmony breast pump to direct sunlight. Check the breast pump’s components for wear or damage. - Page 9 Use the Harmony breast pump only for its intended use as described in this manual. Supervision is necessary when you use the Harmony breast pump in the vicinity of children. Keep all parts that are not in use out of children’s reach.
-
Page 10: Product Description
Or if you want to involve your partner in breastfeeding. You can also use Harmony in addition to a rental pump. Harmony can also help to overcome health problems, such as sore, flat or inverted nipples. -
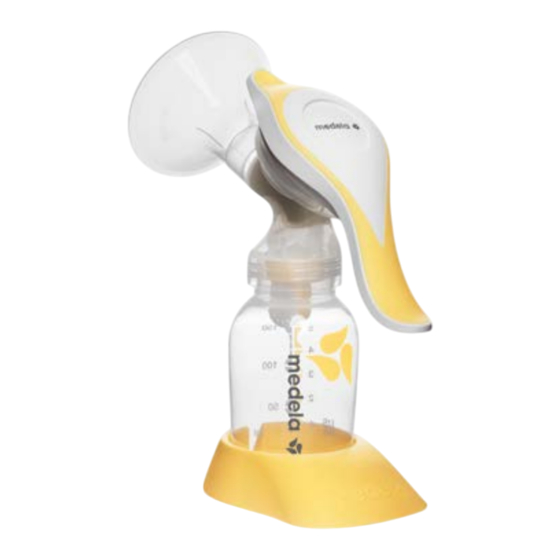
Page 11: Product Parts
1 x valve head membrane 1 x multi-lid 1 x Calma Solitaire 1 x bottle Included in the Harmony Pump & Feed Set, but not in Harmony 1 x bottle stand * for other breast shield sizes, see chapter 12... -
Page 12: Cleaning
Take care not to damage parts its individual parts. of the pump set during cleaning. I Some parts of the Harmony pump set are very small (e.g. the O-ring or the valve membrane). Check that no parts are missing when you reassemble the pump set after cleaning. - Page 13 Rinse all parts with cold, clear Clean all parts with plenty water (approx. 20 ° C). of warm soapy water (approx. Check the parts for damage 30 ° C). and throw away at first signs of damage or weakness. Dry with a clean cloth or If you clean the individual parts leave to dry on a clean cloth.
-
Page 14: Before Using For The First Time And Once A Day
5. Cleaning 5.2 Before using for the Caution first time and once a day I Do not drop the parts of the pump set into boiling water. I To avoid contamination, do not touch the inside of the parts after sterilisation. - Page 15 Cover all parts with water Use a Quick Clean microwave and boil for five minutes. bag* in accordance with the instructions. * More information at www.medela.com...
-
Page 16: Cleaning - Summary
5. Cleaning 5.3 Cleaning – summary Before using for the first time and after every use Rinse with cold, clear water ( approx. 20 ° C ), then clean with plenty of warm soapy water ( approx. 30 ° C ) and √... -
Page 18: Preparing For Pumping
Note l Only use Medela original accessories. I Check that the (white) O-ring is Insert the stem (with the still placed around the stem: O-ring) into the hole on the upper side of the diaphragm. - Page 19 √ Make sure the oval shaped Place the diagraphm into the base of the stem has the pump handle. Press down right position in the dia phragm. firmly around the entire edge to ensure a proper seal. Place the valve membrane in a Push the valve head onto the horizontal position on the valve inner ring of the connector.
-
Page 20: Placing The Breast Shield
6. Preparing for pumping 6.2 continued Screw the bottle onto the Insert the stem of the handle connector. assembly into the opening on top of the connector. Push until the stem locks into place. 6.3 Placing the breast shield Wipe your breast with a warm Hold the breast shield onto cloth (do not use alcohol). - Page 21 If the answer to any of these questions is “No”, or if you experience problems or pain during expression, your breast shield may not be the right size. Medela offers five different sizes of the PersonalFit breast shield. Consult your breastfeeding and...
-
Page 22: Expression
7. Expression Caution l Wash your hands thoroughly (for approx. one minute) with soap and water before you touch your breast and the pump parts. l Contact your midwife or breast- feeding and lactation consultant if you can express only minimal or no milk or if expression is painful. - Page 23 Once your milk starts to flow, switch Stop pumping when you feel that to expression: press down the lower, the milk does not flow anymore or longer part of the handle. when the bottle is full. Use the By doing so, you build up a vacuum stand to prevent the bottle from that facilitates the milk flow.
-
Page 24: Storing And Thawing Breast Milk
Alternatively, you can hold the bottle or “Pump & Save” bag under warm water (max. 37 ° C). l Gently swirl the bottle or “Pump & Save” bag to mix any fat that has separated. Avoid shaking or stirring the milk. * More information at www.medela.com... -
Page 25: Feeding Breast Milk
More milk in breast. Deve lo ped for a great breast- less time feeding experience. * Calma is included in the Harmony Pump & Feed Set only. It is also available separately; please refer to chapter 12. -
Page 26: Troubleshooting
10. Troubleshooting Problem Solution I Make sure the yellow valve head and the white membrane are clean and not damaged. I Make sure the membrane lies flat on the valve head. If there is low I Make sure the valve head is positioned sideways on the connector. or no suction I Make sure the components of the handle are assembled correctly. -
Page 27: Disposal
11. Disposal The Harmony breast pump is made of plastics. You must dispose of it in accordance with local regulations. -
Page 28: Complete Care During Breastfeeding Time
12. Complete care during breastfeeding time The following product variants, spare parts, consumables and accessories for the Harmony breast pump are available from Medela distribution partners. You can order a product by specifying the product name or the corresponding product (article) number. -
Page 29: Accessories
PersonalFit breast shield XXL ( 36 mm ) 008.0072 breast milk bottles 150 ml – 3 pcs. 008.0091 breast milk bottles 250 ml – 2 pcs. 008.0318 Pump & Save Breast milk Bags 008.0203 Calma Solitaire Other Medela products are available at www.medela.com... - Page 30 Breast care Pumping Evidence based research Feeding Collecting Breast milk management...
- Page 32 1. Utilisation/Public cible – Contre-indications 2. Signification des symboles 3. Informations de sécurité importantes 4. Description du produit 4.1. Harmony – Léger, pratique, astucieux 4.2 Pièces du produit 5. Nettoyage 5.1 Avant la première utilisation et après chaque utilisation 5.2 Avant la première utilisation et une fois par jour 5.3 Nettoyage –...
-
Page 33: Utilisation/Public Cible - Contre-Indications
Elles sont souvent ravies d’apprendre qu’un tire-lait peut être utilisé en tant que complément à l’allaitement maternel et que certains sont même conçus pour imiter la succion d’un bébé au sein. Contre-indications Il n’y a aucune contre-indication connue au tire-lait Harmony. -
Page 34: Signification Des Symboles
2. Signification des symboles Les symboles d’avertissement réfèrent aux instructions importantes pour la sécurité. Le non-respect de ces instructions peut provoquer des blessures ou endommager le tire-lait ! Il existe plusieurs symboles d’avertissement. Chacun d’entre-eux est associé à un terme spécifique. Voici l’explication des symboles : Avertissement Le non-respect des instructions de cette catégorie peut entraîner des blessures (mineures) ou une contamination/prolifération bactérienne. -
Page 35: Symboles Présents Sur L'appareil
Ce symbole indique qu’il est impératif de respecter les instructions d’utilisation. Ce symbole fait référence au fabricant. Ce symbole CE indique la conformité du tire-lait Harmony aux exigences essentielles de la directive du Conseil 93/42/CEE du 14 juin 1993 relative aux dispositifs médicaux. -
Page 36: Informations De Sécurité Importantes
Le tire-lait Harmony n’est pas thermorésistant : le tenir éloigné des radiateurs et des flammes. Ne pas exposer le tire-lait Harmony à la lumière directe du soleil. Contrôler les différentes parties du tire-lait et vérifier qu’il ne présente pas de signes d’usure ou de dommages. Ne jamais utiliser un produit défectueux. -
Page 37: Utilisation
Utilisation N’utilisez le tire-lait Harmony que pour l’usage auquel il est destiné, tel que décrit dans ce manuel. Une surveillance est nécessaire lorsque vous utilisez le tire-lait Harmony à proximité d’enfants. Conservez toutes les pièces inutilisées hors de portée des enfants. -
Page 38: Description Du Produit
Vous pouvez ainsi exprimer davantage de lait en moins de temps. Le tire-lait Harmony est idéal pour une utilisation occasionnelle. Par exemple, si vous devez vous séparer de votre bébé pendant de courtes périodes (pratique d’un sport, sortie, etc.). -
Page 39: Pièces Du Produit
2x membranes 1x valve 1x couvercle multifonction 1 x Calma seule 1x biberon Compris dans le set Harmony Pump & Feed Set, mais pas dans Harmony 1x support de biberon * pour d’autres tailles de téterelle, reportez-vous au chapitre 12... -
Page 40: Nettoyage
Veillez à ne pas endommager les pièces du tire-lait lors du nettoyage. I Certaines pièces du tire-lait Harmony sont très petites (par ex. la membrane ou le joint torique). Vérifiez qu’aucune pièce ne manque lorsque vous assemblez le tire-lait après nettoyage. - Page 41 Rincez toutes les pièces à l’eau Nettoyez toutes les pièces claire et froide (plus ou moins à l’eau savonneuse et 20 °C). Vérifiez que les pièces ne chaude (environ 30 °C). présentent pas de dégradation ou de dysfonctionnement, remplacez- les aux premiers signes. Essuyez les pièces avec un Si vous nettoyez les différentes chiffon propre ou laissez-les...
-
Page 42: Avant La Première Utilisation Et Une Fois Par Jour
5. Nettoyage 5.2 Avant la première utilisa- Avertissement tion et une fois par jour I Ne plongez pas les pièces du tire-lait dans l’eau bouillante. I Pour éviter toute contamination, ne touchez pas l’intérieur des pièces après stérilisation. l Démontez et nettoyez toutes les pièces entrant en contact avec la poitrine et le lait maternel immédiatement après utilisation... - Page 43 Recouvrez toutes les pièces Utilisez un sachet pour d’eau et portez à ébullition micro-ondes Quick pendant 5 minutes. Clean* conformément aux instructions. * Pour plus d’informations, consultez le site www.medela.com...
-
Page 44: Nettoyage - Résumé
5. Nettoyage 5.3 Nettoyage – résumé Avant la première utilisation et après chaque utilisation Rincer à l’eau claire et froide (environ 20 °C), puis nettoyer abondamment à l’eau chaude et savonneuse (environ √ √ √ √ √ √ √ √ 30 °C). Enfin, rincer à l’eau claire et froide pendant 10 à... -
Page 46: Préparation Pour La Séance D'expression
Remarque l N’utilisez que des accessoires Medela d’origine. I Vérifiez que le joint torique (blanc) Insérez la tige (avec le joint est toujours placé autour de la tige : torique) dans l’orifice situé sur la face supérieure du diaphragme. - Page 47 √ Assurez-vous que la base ovale de Positionner le diaphragme sur la la tige est correctement positionnée poignée du tire-lait. Appuyez dans le diaphragme. fermement sur les bords pour assurer une bonne étanchéité. Placez la membrane à l’horizontal sur la valve. Insérer la valve munie de la membrane Appuyez fermement sur la partie saillante de sur la partie inférieure du connecteur.
-
Page 48: Positionnement De La Téterelle
6. Préparation pour la séance d’expression 6.2 suite Vissez le biberon sur Une fois la poignée assemblée, le connecteur. insérez la tige de celle-ci dans l’orifice situé au dessus du connecteur. Poussez jusqu’à ce que la tige soit bien enclenchée. 6.3 Positionnement de la téterelle Pour un bonne étanchéité... - Page 49 Si la réponse à l’une de ces questions est « Non », si vous rencontrez des problèmes ou ressentez une douleur pendant l’expression, votre téterelle n’est peut-être pas à la bonne taille. Medela propose des téterelles PersonalFit en 5 tailles différentes. Contac- tez votre professionnel de l’allaitement (consultant(e) en lactation, sage-femme) pour...
-
Page 50: Expression
7. Expression Avertissement l Lavez-vous soigneusement les mains (pendant environ une minute) avec de l’eau et du savon avant de toucher votre sein et les pièces du tire-lait. l Contactez un professionnel des l’allaitement, par exemple une sage-femme ou un(e) consultant(e) en lactation, si vous n’exprimez Démarrez l’expression par la phase que très peu de lait ou pas du... - Page 51 Lorsque le lait commence à s’écouler, Arrêtez l’expression lorsque vous passez en phase d’expression : sentez que le lait ne s’écoule plus appuyez sur la partie inférieure et ou lorsque le biberon est plein. longue de la poignée. Utilisez le support de biberon pour Vous créez ainsi un vide facilitant éviter que celui-ci ne se renverse.
-
Page 52: Conservation Et Décongélation Du Lait Maternel
Vous pouvez également tenir le biberon ou le sachet « Pump & Save » sous l’eau chaude (max. 37 °C). l Secouez délicatement le biberon ou le sachet « Pump & Save » afin d’homogénéiser les corps gras. Évitez de d’agiter brutalement le lait. * Pour plus d’informations, consultez le site www.medela.com... -
Page 53: Alimentation Au Lait Maternel
Plus de lait en moins de temps ment en tétant le sein. Conçue pour une belle expérience d’allaitement. * Calma est comprise uniquement dans Harmony Pump & Feed Set. L‘article est également disponible séparément. Cf. chapitre 12. -
Page 54: Résolution Des Problèmes
10. Résolution des problèmes Problème Solution I Assurez-vous que la valve jaune et la membrane blanche soient propres et ne soient pas endommagées. I Vérifiez que la membrane soit positionnée à plat sur la valve. S’il n’y a pas ou I Assurez-vous que la valve soit positionnée latéralement sur le connecteur. -
Page 55: Mise Au Rebut
11. Mise au rebut Le tire-lait Harmony est composé de matériaux plastiques. Vous devez le jeter conformément aux réglementations locales. -
Page 56: Une Gamme Complète Pour L'allaitement Maternel
12. Une gamme complète pour l’allaitement maternel Les variantes de produit, les pièces de rechange, les consommables et les accessoires indiqués ci-dessous et destinés au tire-lait Harmony sont disponibles chez les distributeurs Medela. Vous pouvez commander un produit en précisant son nom ou le numéro de produit (d’article) correspondant. -
Page 57: Accessoires
SHIELD SIZES 008.0351 Téterelle PersonalFit XXL (36 mm) 800.0796 Biberon pour lait maternel 150 ml (3 pc). 200.1659 Biberon pour lait maternel 250 ml (2 pc). 008.0315 Sachets pour lait maternel Pump & Save 008.0203 Calma Seule Les autres produits Medela sont disponibles sur www.medela.com. - Page 58 Soigner les mamelons Exprimer le lait Recherche factuelle Formation Expertise Service Innovation Professionnels Reccueillir Nourrir bébé le lait Transporter et nettoyer...
- Page 59 ﺿﺦ ﺍﻟﻠﺒﻦ ﺍﻟﻌﻨﺎﻳﺔ ﺑﺎﻟﺜﺪﻱ ﺑﺤﺚ ﻣﺴﺘﻨﺪ ﺇﻟﻰ ﺍﻟﺒﺮﺍﻫﻴﻦ ﺍﻟﺘﺜﻘﻴﻒ ﺍﻟﺨﺒﺮﺓ ﺍﻟﺨﺪﻣﺔ ﺍﻻﺑﺘﻜﺎﺭ ﺍﻟﻤﺤﺘﺮﻓﻮﻥ ﺍﻹﺭﺿﺎﻉ ﺗﺠﻤﻴﻊ ﺍﻟﻠﺒﻦ ﺍﻟﺘﺤﻜﻢ ﻓﻲ ﻟﺒﻦ ﺍﻷﻡ...
- Page 60 ) بالمقاس الكبير جد ً ا جد ً ا (63 ممPersonalFit حاملة الثدي 008.0351 زجاجات لبن األم 051 مل – 3 قطع 008.0072 زجاجات لبن األم 052 مل – قطعتان 008.0091 Pump & Save أكياس لبن األم 008.0318 Calma Solitaire ) EN/AR ( حلمة 008.0203 تاجتنمMedela عقوم ىلع ةرفوتم ىرخألاwww.medela.com...
- Page 61 21. الرعاية الكاملة أثناء وقت اإلرضاع من الثدي األشكال المختلفة من المنتج، واألجزاء االحتياطية، والمواد االستهالكية، والملحقات التالية ِ . يتسنى لكMedela متوفرة من خالل شركاء توزيع شركةHarmony الخاصة بمضخة الثدي .)طلب المنتج من خالل تحديد اسم المنتج أو الرقم المقابل للمنتج (السلعة...
- Page 62 11. التخلص من المنتج . مصنوعة من مواد بالستيكيةHarmony مضخة الثدي .ويجب أن يتم التخلص منها وفق ً ا للوائح القانونية المحلية...
- Page 63 01. استكشاف األخطاء وإصالحها الحل ا لمشكلة . تأكدي من أن رأس الصمام األصفر والغشاء األبيض نظيفان وغير تالفينI . تأكدي من وضع الغشاء بشكل مستو ٍ على رأس الصمامI إذا كانت درجة . تأكدي من أن رأس الصمام موضوع بشكل جانبي على الموصلI الشفط...
- Page 64 مع المحافظة على سلوك المص الذي يكتسبه عند تعامله مع الثدي. وقد تم تطوير هذا الجهاز للحصول على تجربة .رائعة للرضاعة الطبيعية .12 فقط. كما تتوفر بشكل منفصل، يرجى مراجعة الفصلHarmony Pump & Feed Set مضمنة فيCalma *...
- Page 65 .)" تحت الماء الدافئ (بحد أقصى. 73 ° مئويةPump & Save" وضع الزجاجة أو كيس " برفق لخلط أي دهون تم فصلها. تجنبيPump & Save" قومي بتدوير الزجاجة أو كيسl .اهتزاز اللبن أو تحريكه www.medela.com * مزيد من المعلومات على...
- Page 66 توقفي عن الضخ عندما تشعرين بعدم بمجرد أن يبدأ اللبن في التدفق، قومي تدفق المزيد من اللبن أو عند امتالء بالتغيير إلى وضع االعتصار: اضغطي على الزجاجة. استخدمي الحامل لمنع الزجاجة .الجزء األدنى واألطول من المقبض .من اإلمالة بذلك، تقومين بتفريغ الهواء مما يسهل تدفق...
- Page 67 7. االعتصار تنبيه اغسلي يديك ِ جيد ً ا (لمدة دقيقةl تقري ب ًا) بالماء والصابون قبل لمس .الثدي وأجزاء المضخة اتصلي بأخصائية التوليد أو أخصائيl الرضاعة الطبيعية واإلرضاع الخاص بك ِ في حالة اعتصار كمية قليلة للغاية من اللبن، أو عدم اعتصار أي كمية...
- Page 68 إذا كانت اإلجابة عن أي من هذه األسئلة هي "ال"، أو إذا كنت ِ تعانين من مشكالت أو تشعرين خمسةMedela بآالم أثناء االعتصار، فقد تكون حاملة الثدي ليست بالمقاس الصحيح. توفر شركة . قومي باستشارة أخصائي الرضاعة الطبيعيةPersonalFit مقاسات مختلفة من حاملة الثدي...
- Page 69 6. التحضير من أجل الضخ 2.6 تابع قومي بلف الزجاجة أدخلي جذع مجموعة المقبض .لتركيبها في الموصل في الفتحة الموجودة أعلى الموصل. قومي بالدفع حتى .يستقر القضيب في مكانه 3.6 وضع حاملة الثدي امسحي ثديك بقطعة قماش قومي بإمساك حاملة الثدي .)دافئة...
- Page 70 √ ضعي الغشاء الحاجز داخل مقبض تأكدي من أن القاعدة البيضاوية المضخة. اضغطي ألسفل بقوة الشكل للجذع في الوضع حول جميع الحواف لضمان .الصحيح داخل الغشاء الحاجز .اإلحكام كما ينبغي قومي بدفع رأس الصمام نحو ضعي غشاء الصمام في وضع أفقي على رأس الحلقة...
- Page 71 اغسلي يديك ِ جيد ً ا (لمدة دقيقةl تقري ب ًا) بالماء والصابون قبل لمس .الثدي وأجزاء المضخة مالحظة Medela استخدمي ملحقاتl .األصلية فقط تأكدي من أن الحلقة الدائريةI أدخلي الجذع (المزود بحلقة (البيضاء) ال تزال موجودة حول...
- Page 73 5. التنظيف 3.5 التنظيف - ملخص قبل االستخدام ألول مرة وبعد كل استخدام قومي بشطف جميع األجزاء بماء نظيف بارد ( حوالي 02 ° مئوية)، ثم قومي بتنظيفها بالمزيد من الماء الدافئ والصابون (حوالي √ √ √ √ √ √ √ √ 03°...
- Page 74 2ب 2أ أو استخدمي أكياس الميكروويف ،قومي بغمر جميع األجزاء بالماء .* وفق ً ا للتعليماتQuick Clean .وغليها لمدة خمس دقائق www.medela.com * مزيد من المعلومات على...
- Page 75 5. التنظيف 2.5 قبل االستخدام ألول تنبيه مرة ويوم ي ً ا ال تضعي أجزاء جهاز المضخة فيI .الماء المغلي لتتجنبي التلوث، ال تلمسي األجزاء منI .الداخل بعد التعقيم قومي بفصل الجهاز، واغسلي جميعl األجزاء التي تتالمس مع الثدي ولبن األم...
- Page 76 قومي بتنظيف جميع األجزاء قومي بشطف جميع األجزاء بماء بالمزيد من الماء الدافئ .)نظيف بارد (حوالي 02° مئوية .)والصابون (حوالي 03° مئوية افحصي أجزاء المضخة للتحقق من وجود تلف وتخلصي من أي جزء فور مشاهدة أي .عالمات للتلف أو العيب أو...
- Page 77 يجب مراعاة عدم إتالف أجزاء جهازl قومي بتفكيك جهاز المضخة إلى .المضخة أثناء التنظيف .أجزاء منفردة صغيرةHarmony بعض أجزاء مضخةl للغاية (على سبيل المثال، الحلقة الدائرية أو غشاء الصمام). تأكدي من عدم وجود أي أجزاء ناقصة عندما...
- Page 78 مزود بحلقة جذع غشاءان للصمام رأس صمام عدد 1 غطاء متعدد الطبقات زجاجة Calma Solitaire حلمة Harmony م ُ ضمن في حامل زجاجة Pump & Feed Set ولكن ليس في Harmony 12 * لمعرفة المقاسات األخرى لحاملة الثدي، انظري الفصل...
- Page 79 التي يقوم بها طفلك عندما يرضع من ثديك. ومن ثم، يتسنى لك ِ اعتصار مزيد .من اللبن في وقت أقل الحل األمثل لالستخدام العرضي. على سبيل المثال، في حالةHarmony تعد مضخة الثدي اضطرارك إلى ترك طفلك لفترات قصيرة، لممارسة الرياضة مثال ً أو قضاء أمسية خارج المنزل...
- Page 80 االستخدام فقط في الغرض المخصصة له كما هوHarmony استخدمي مضخة الثدي .محدد في هذا الدليل عند استخدامها بالقرب منHarmony يجب اإلشراف على مضخة الثدي .األطفال. احفظي جميع األجزاء غير المستخدمة بعيد ً ا عن متناول األطفال .اتصلي بأخصائي اإلرضاع الخاص بك أو طبيبك إذا تعرضت لمشكالت أو ألم...
- Page 81 قد يؤدي اإلخفاق في االلتزام بمعلومات األمان .الواردة في هذه الصفحات إلى التعرض للخطر الجهاز ليست مقاومة للحرارة: احفظيها بعيد ً ا عن مشعاتHarmony إن مضخة الثدي .الحرارة واللهب المكشوف . ألشعة الشمس المباشرةHarmony ال تعرضي مضخة الثدي افحصي مكونات مضخة الثدي للتحقق مما إذا كان يوجد بلى أو تلف. ال...
- Page 82 .GSI الخاصة بـ .يشير هذا الرمز إلى االلتزام بتعليمات االستخدام .يشير هذا الرمز إلى الجهة المصنعة للمتطلبات الضرورية لتوجيهاتHarmony إلى امتثال مضخة الثديCE يشير الرمز . الصادرة في 41 يونيو 3991 بخصوص األجهزة الطبيةEEC/42/93 المجلس الرموز على الجهاز...
- Page 83 توضح الرموز التحذيرية أن جميع التعليمات مهمة من أجل السالمة واألمان. وأن اإلخفاق في ! هناكHarmony االلتزام بتلك التعليمات يمكن أن يؤدي إلى اإلصابة أو تلف مضخة الثدي العديد من الرموز التحذيرية. يستخدم كل رمز مع كلمة معينة. ترمز تركيبات رمز/كلمة التحذير...
- Page 84 عملهن، أو أثناء سفرهن، أو حتى في حالة انفصالهن عن أطفالهن. تبتهج النساء عادة لمعرفة أن مضخة الثدي يمكن استخدامها كمكمل للرضاعة من الثدي، وأن بعض المضخات مصممة .لمحاكاة طريقة المص لدى الطفل الرضيع موانع االستعمال .Harmony ال توجد موانع معروفة من استعمال مضخة الثدي...
- Page 85 1. االستخدام المقصود/مجموعة المستخدمين - موانع االستعمال 2. معاني الرموز 3. معلومات أمان مهمة 4. وصف المنتج – خفيفة، ومريحة، وفعالةHarmony 1.4. مضحة الثدي 2.4 أجزاء المنتج 5. التنظيف 1.5 قبل االستخدام ألول مرة وبعد كل استخدام 2.5 قبل االستخدام ألول مرة ويوم ي ًا...
-
Page 87: Technical Specifications
13. Technical specifications Vacuum (shield size M) Vide (Téterelle taille M) )M تفريغ الهواء (غطاء واقي مقاس Stimulation phase Expression phase Phase de stimulation Phase d‘expression طور التحفيز طور االعتصار 0...–180 mmHg 0...–230 mmHg 0...–24 kPa 0...–31 kPa Operation Utilisation التشغيل... - Page 88 Lättichstrasse 4b 6341 Baar Switzerland Phone +41 41 562 51 51 www.medela.com France Medela France Sarl 14, rue de la Butte Cordière 91154 Etampes Cedex France Phone +33 1 69 16 10 30 +33 1 69 16 10 32 info@medela.fr...