
Manuels Connexes pour Aprimatic T11


Sommaire des Matières pour Aprimatic T11
- Page 1 T11 - T1E Istruzioni per l’installazione Installation instructions Instructions pour l’installation Montageanleitung Instrucciones para la instalación...
- Page 2 Le specifi che del prodotto sono soggette a modifi che senza preavviso. Pertanto il presente documento potrebbe non corrispondere esattamente alle caratteristiche del prodotto. Licenze e marchi Il logotipo “Aprimatic” è un marchio registrato di Aprimatic S.p.A. Stampato in Italia © Aprimatic S.p.A., 2001. All rights reserved.
-
Page 3: Table Des Matières
Modulo espansione memoria 16 KB o 128 Kbits ........4 Tools di programmazione ................4 Operatori APRIMATIC idraulici per l'azionamento di ante battenti. Safety card ....................4 Operatori APRIMATIC elettromeccanici in abbinamento a SAFETY CARD per Combinatore a tastiera ................5 l'azionamento di ante battenti. Lettore di badge................5... -
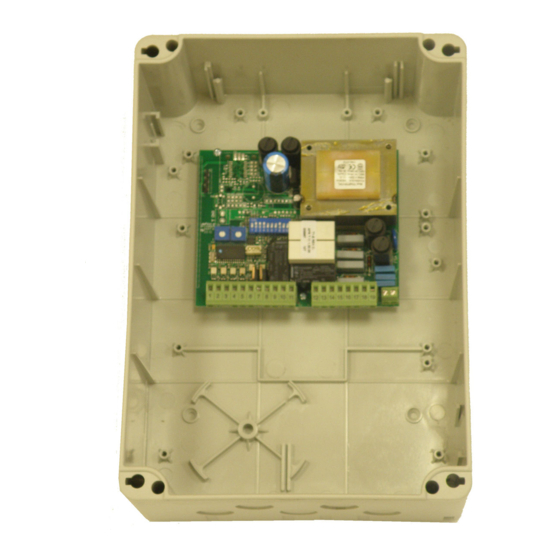
Page 4: Descrizione
Connettore modulo memoria ricevente (SOLO con T11) 1 2 3 4 5 6 7 8 9 10 JP1, JP2 selezione logica di funzionamento canali radio (SOLO con T11) - P2 + - P1 + JP3, JP4 selezione fi la tasti di attivazione (SOLO con T11) -
Page 5: Installazione
INSTALLAZIONE ATTENZIONE - Non utilizzare cavi citofonici o telefonici. Effettuare i collegamenti elettrici come indicato nello schema riportato qui di fi anco. ATTENZIONE - L’installazione del prodotto può essere effettuata soltanto da personale tecnico qualifi cato del servizio di assistenza e/o montaggio. N.B. -
Page 6: Messa In Funzione
DIP-SWITCH SW1 MESSA IN FUNZIONE Dopo aver completato la connessione come indicato e verifi cato accuratamente i collegamenti elettrici, riattivare l’alimentazione di rete e verifi care che l’impianto COLPO D'INVERSIONE MODO DI FUNZIONAMENTO funzioni correttamente come spiegato qui di seguito. AUTOMATICO 3.1 PROVE DI FUNZIONAMENTO Al termine dei collegamenti si deve procedere al controllo del sistema di automazione,... -
Page 7: Controllo Del Funzionamento
Se l'apparecchiatura comanda operatori APRIMATIC idraulici, settare il dip switch si trovano, fi no a quando verrà inviato un altro impulso di start, che comanda la in posizione OFF. -
Page 8: Gestione Dei Telecomandi (Solo Per T11) 5.1 Test Della Memoria
Uscita motori - Le apparecchiature T11 e T1E dispongono di due uscite per motori indipendenti. L’uscita del motore 1 permette di selezionare il ritardo d’anta in chiusura 5.3 PROCEDURA DI APPRENDIMENTO DEL PRIMO TELECOMANDO tramite lo SWITCH; l’uscita del motore 2 comanda invece in apertura un ritardo fi sso 1. -
Page 9: Procedura Di Apprendimento Di Ulteriori Telecomandi
STESSA sonora si riattiverà e sarà quindi possibile inserire ulteriori telecomandi ripetendo, APPARECCHIATURA E IL TELECOMANDO STANDARD a due tasti Aprimatic sarà per essi, i passi 3 e 4. -
Page 10: Combinatore A Tastiera
6.5 COMBINATORE A TASTIERA È possibile installare un combinatore a tastiera inserendo nel connettore K3 la scheda di decodifi ca CT3. 6.6 LETTORE DI BADGE È possibile installare un lettore di badge inserendo nel connettore K3 la scheda di decodifi ca LB4. - Page 11 Application fi eld 6. ACCESSORIES APRIMATIC hydraulic operators to automate swing gates. CA41 module .................8 APRIMATIC electromechanical operators combined with SAFETY CARD to automate 16 kb or 128 kbits memory expansion module.......8 swing gates. Programming tools ...............8 Safety card ..................8 Coded keypad ................8...
-
Page 12: Description
DESCRIPTION Device with Aprimatic microprocessor (15 Watt in stand-by) designed to drive 2 motors with a maximum power of 300 Watt each. 1.1 BLOCK DIAGRAM OF THE DEVICE M1 Signal terminal board M2 Power terminal board Work time trimmer Pause time trimmer... -
Page 13: Installation
2. INSTALLATION CAUTION - Do not use intercom or telephone cables. Make the electrical connections as indicated in the diagram alongside. CAUTION - The product must only be installed by qualifi ed servicing and/or installation N.B. In accordance with the current standards, tie the connecting cables for personnel. -
Page 14: Functioning Tests
3. STARTING UP DIP-SWITCH SW1 After completing the connections as indicated and checking the electrical connections REVERSE STROKE OPERATING MODE carefully, turn ON the mains power supply and check that the system is functioning correctly, as explained below. AUTOMATIC 3.1 FUNCTIONING TESTS SEMIAUTOMATIC WITH STOP When all the connections have been made, it is necessary to check the automation system, checking that the automation opens when you press the start push-button. - Page 15 SEMIAUTOMATIC MODE WITH STOP. If you select this operating mode when the If the device controls APRIMATIC hydraulic operators, set the dip-switch to the gate is closed, when a start pulse is given, the gates open until the set work time OFF position.
-
Page 16: Remote Control Management (Only For T11)
3. You must now wait until the deletion operation is completed. When it is completed, (opening and closing). the unit will run the memory test. NOTE - Only use Aprimatic ET Series LED fl ashing lights or the output may be broken: Power supply this will cause the entire system to malfunction. -
Page 17: Deleting A Remote Control
By fi tting this module to the device, the user will have an additional receiving channel: in 5.4 SELF-TEACHING PROCEDURE OF OTHER REMOTE CONTROLS this way, with the SAME DEVICE AND THE Aprimatic two-key STANDARD REMOTE CONTROL, he will be able to control two different appliances. - Page 19 Module d’expansion memoire16 kb or 128 kbits ......12 Domaine d’application Utilitaire de programmation ............12 Dispositif pour opérateurs APRIMATIC hydrauliques pour actionner des portails Safety card ...................12 battants. Clavier code ................13 Lecteur de cartes magnetiques ...........13...
-
Page 20: Description
Carte ADD/ON anti-écrasement (SAFETY CARD) Connecteur module mémoire récepteur (UNIQUEMENT avec T11) JP1, JP2 Choix logique de fonctionnement canaux radio (UNIQUEMENT avec T11) 1 2 3 4 5 6 7 8 9 10 JP3, JP4 Choix ligne touches d’activation (UNIQUEMENT avec T11) - P2 + - P1 + JP5, JP6, JP7, JP8 Sélection canaux (connexion CA41) -
Page 21: Installation
INSTALLATION ATTENTION - Ne pas utiliser de câbles téléphoniques. ATTENTION - Seul un personnel technique qualifi é du service après-vente et/ou Effectuer les branchements électriques comme le montre la fi gure ci-contre. d’installation pourra effectuer l’installation du produit. N.B. Comme le prévoit les normes en vigueur, attacher séparément les ATTENTION - L’installation électrique devra être conforme aux réglementations en câbles de branchement correspondant aux commandes (bornes de 1 à... -
Page 22: Mise En Oeuvre
DIP-SWITCH SW1 MISE EN OEUVRE Effectuer le branchement comme indiqué et vérifi er avec soin les branchements électriques; ouvrir l’alimentation secteur et vérifier le bon fonctionnement de COUP DINVERSION MODE DE FONCTIONNEMENT l’installation comme suit. AUTOMATIQUE 3.1 ESSAIS DE FONCTIONNEMENT Une fois les branchements effectués, contrôler l’automatisme : ce dernier doit s’ouvrir SEMI-AUTOMATIQUE AVEC ARRET... -
Page 23: Controle Du Fonctionnement
INTERRUPTEUR DIP 9 - LAISSER DANS LA POSITION FIXEE D’USINE. une impulsion de démarrage commande l’ouverture des vantaux jusqu’à la fi n du INTERRUPTEUR DIP 10 - Si l’appareil commande des opérateurs APRIMATIC temps de travail préétabli. Si une autre impulsion de démarrage est donnée pendant électromécaniques, placer le commutateur DIP en position ON (activation de la... -
Page 24: Gestion Des Telecommandes (Seulement Pour T11)
3 secondes avant la commande du mouvement des vantaux tant en ouverture qu’en fermeture. NOTA - N’utiliser que des clignotants à LED Série ET Aprimatic, sous peine de rupture Touche de la sortie et donc d’un mauvais fonctionnement de tout le système. -
Page 25: Procédure D'apprentissage D'autres Télécommandes
: de cette façon, avec le MEME APPAREIL ET déjà mémorisé : le signal sonore se réactivera et d’autres télécommandes LA TELECOMMANDE STANDARD à deux touches Aprimatic, il sera possible pourront être entrées en répétant la procédure des points 3 et 4. -
Page 26: Clavier Code
6.5 CLAVIER CODE Il est possible d’installer un clavier codé en reliant la carte de décodage CT3 au connecteur K3. 6.6 LECTEUR DE CARTES MAGNETIQUES Il est possible d’installer un lecteur de cartes magnétiques en reliant la carte de décodage LB4 au connecteur K3. - Page 27 Unfallgefahr dieses Handbuch aufmerksam durchlesen und die Anweisungen Programmierungs-Tools ............16 genau befolgen. Safety card ...................16 Anwendungsbereich Tastaturkontroller ................17 Hydraulische Antriebe APRIMATIC zur Bewegung von Flügeltüren. Ausweisleser ................17 Elektromechanische Antriebe APRIMATIC in Kombination mit einer SAFETY CARD zur Bewegung von Flügeltüren. DEUTSCH...
-
Page 28: Beschreibung
BESCHREIBUNG Die Aprimatic-Steuerung mit Mikroprozessor (Verbrauch in Stand-by 15 Watt) zur Steuerung von 2 Motoren bis zu einer Leistung von jeweils max. 300 Watt ausgerüstet. 1.1 BLOCKSCHALTBILD DER STEUERUNG M1 Signal-Klemmleiste M2 Leistungs-Klemmleiste P1 Trimmpotentiometer: Betriebszeit P2 Trimmpotentiometer: Pausenzeit BZ1 Summer... -
Page 29: Montage
MONTAGE ACHTUNG - Keine Sprechanlagen- oder Telefonkabel verwenden. Die elektrischen Anschlüsse gemäß nebenstehendem Plan durchführen. ACHTUNG - Die Montage des Produkts darf nur von technischem Fachpersonal Hinweis: Die Steuerstromkabel (Klemmen 1 bis 11) und die Netzstromkabel des Kunden- bzw. Montagedienstes vorgenommen werden. (Klemmen 12 bis 19) getrennt bündeln, wie von den einschlägigen Vorschriften ACHTUNG - Die Elektroanlage muß... -
Page 30: Inbetriebnahme
DIP-SWITCH SW1 INBETRIEBNAHME Nach Ausführung und sorgfältiger Prüfung der Elektroanschlüsse, gemäß Anleitung, die Netzversorgung wieder einschalten und prüfen, ob die Anlage, wie im folgenden UMKEHRSCHLAG BETRIEBSART beschrieben, korrekt funktioniert. AUTOMATIK 3.1 FUNKTIONSTESTS Nach Ausführung der Anschlüsse muß das Automationssystem geprüft werden: Bei NEIN HALBAUTOMATIK MIT STOP Betätigung der Start-Taste muß... -
Page 31: Funktionstests
DIP SWITCH 10 - Wenn die Elektroniksteuerung elektromechanische Antriebe HALBAUTOMATIK MIT STOP - Wird diese Betriebsart bei geschlossenem Tor gewählt, von APRIMATIC steuert, den Tippschalter auf Position ON stellen (Aktivierung der wird bei der Übertragung eines Startimpulses die Öffnungsbewegung bis Ablauf der Einklemmschutzkarte). -
Page 32: Verwaltung Der Fernbedienungen (Nur Bei T11) 5.1 Speichertest
0,5 Sekunden aus. Ist die Funktion Vorblinken eingestellt, wird dieser Ausgang 3 Sekunden vor dem Schließ- oder Öffnungsbefehl aktiviert. Versorgung HINWEIS - Ausschließlich LED-Blinkleuchten der Serie ET Aprimatic verwenden. Andernfalls können Defekte am Ausgang und in der Folge Betriebsstörungen des gesamten Systems auftreten. -
Page 33: Löschen Einer Fernbedienung
• Zum Beenden des Speichervorgangs einfach die Löschtaste drücken. 6.3 PROGRAMMIERUNGS-TOOLS • Das System bleibt für eine Zeit von max. ca. 25 Sekunden weiterhin im Lernmodus Automatiksteuerungen und Fernbedienungen von Aprimatic können auch mit folgenden (Summer ertönt durchgehend); danach schaltet der Empfänger automatisch auf die Tools programmiert werden: normale Betriebsart zurück (Summer aus). -
Page 34: Tastaturkontroller
Wenn der Einklemmschutz anspricht, leuchtet auf der Karte die LED-Anzeige des betreffenden Motors auf 6.5 TASTATURKONTROLLER Es kann ein Tastaturkontroller installiert werden, indem man die Dekoderkarte CT3 in den Steckverbinder K3 einsteckt. 6.6 AUSWEISLESER Es kann ein Ausweisleser installiert werden, indem man die Dekoderkarte LB4 in den Steckverbinder K3 einsteckt... - Page 35 • Está prohibido dejar el área de trabajo sin vigilancia. Objeto del manual 5. CONTROL DE LOS MANDOS A DISTANCIA (SÓLO CON T11) Test de la memoria...............20 Este manual ha sido redactado por el constructor y forma parte integrante del Procedimiento para la cancelación total de la memoria....20...
-
Page 36: Descripción
LD6 LED receptor memory system (SÓLO con T11) LD3 Stop LD7 Start por radio SW1 Dip switch de 10 vías SW2 Tecla mando por radio (SÓLO con T11) K3 Conexión fi cha decodifi cación lector de tarjetas magnéticas y combinador con LD2 LD3 LD4 LD5 teclado / Empalme para radiorreceptor, sólo modelos Aprimatic (SÓLO con T1E) -
Page 37: Instalación
INSTALACIÓN ATENCIÓN - No utilizar cables de interfono o telefónicos. Realizar las conexiones eléctricas según el esquema al lado. ATENCIÓN - La instalación del producto queda reservada al personal técnico califi cado del servicio de asistencia y/o montaje. NOTA Según previsto por las normas previstas, reunir con abrazaderas por separado los cables de conexión relativos a los mandos (bornes de 1 a 11) respecto ATENCIÓN - La instalación eléctrica tendrá... -
Page 38: Puesta En Marcha
DIP-SWITCH SW1 PUESTA EN MARCHA Una vez completada la conexión de la forma indicada, y tras haber controlado atentamente las conexiones eléctricas, restablecer la alimentación de la red y controlar GOLPE DE INVERSIÓN MODO DE FUNCIONAMIENTO que la instalación funcione apropiadamente según se indica a continuación. SÍ... -
Page 39: Control Del Funcionamiento
DIP-SWITCH 9 - DEJAR EN LA POSICIÓN AJUSTADA POR EL FABRICANTE. MODO SEMIAUTOMÁTICO CON STOP. Seleccionando este tipo de funcionamiento DIP-SWITCH 10 - Si el equipo controla operadores APRIMATIC electromecánicos, con la verja cerrada, al enviar un impulso de start, se manda la apertura de las coloque el interruptor DIP en posición ON (activación fi... -
Page 40: Control De Los Mandos A Distancia (Sólo Con T11) 5.1 Test De La Memoria
3 segundos antes del mando del movimiento de las hojas en apertura y en cierre. NOTA - Utilizar únicamente avisadores luminosos con LED Serie ET Aprimatic, Tecla para evitar la rotura de la salida con la consiguiente anomalía de funcionamiento del sistema. -
Page 41: Procedimiento Para El Aprendizaje De Otros Mandosa Distancia
MISMO EQUIPO Y los mandos a distancia puede volver a abrirse pulsando contemporáneamente EL TELEMANDO ESTÁNDAR de dos teclas Aprimatic es posible controlar dos todas las teclas de un emisor ya memorizado: la indicación sonora se reactivará y dispositivos diferentes podrán introducirse otros mandos a distancia repitiendo, para cada uno de ellos,... -
Page 42: Combinador Con Teclado
6.5 COMBINADOR CON TECLADO Es posible instalar un combinador con teclado conectando la fi cha de decodifi cación CT3 en el conectador K3. 6.6 LECTOR DE TARJETAS MAGNÉTICAS Es posible instalar un lector de tarjetas magnéticas conectando la ficha de decodifi...