
Manuels Connexes pour Progress PAI3101F


Sommaire des Matières pour Progress PAI3101F
- Page 1 Gebruiksaanwijzing User Manual Notice d'utilisation Kookplaat Table de cuisson PAI3101F...
-
Page 2: Table Des Matières
2 Progress INHOUDSOPGAVE Veiligheidsinformatie Aanwijzingen en tips Veiligheidsvoorschriften Onderhoud en reiniging Montage Probleemoplossing Beschrijving van het product Technische gegevens Dagelijks gebruik Energiezuinigheid Wijzigingen voorbehouden. GA NAAR ONZE WEBSITE VOOR: Advies over gebruik, brochures, het oplossen van problemen, service- en reparatie-informatie: www.progress-hausgeraete.de/support... -
Page 3: Algemene Veiligheid
Progress 3 Houd alle verpakkingen uit de buurt van kinderen en • verwijder ze op gepaste wijze. WAARSCHUWING: Houd kinderen en huisdieren uit de • buurt van het apparaat als het in werking is of afkoelt. Makkelijk toegankelijke onderdelen worden heet tijdens gebruik. -
Page 4: Veiligheidsvoorschriften
4 Progress Als de glaskeramische / glazen oppervlakte gebarsten is, • schakel het apparaat dan uit en trek de stekker uit het stopcontact. In het geval het apparaat direct op de stroom is aangesloten met een aansluitdoos, verwijdert u de zekering om het apparaat van de stroom te halen. -
Page 5: Aansluiting Aan Het Elektriciteitsnet
Progress 5 vrijgelaten. De garantie dekt geen niet zonder gereedschap kan worden schade veroorzaakt door het gebrek verplaatst. aan een adequate ventilatieruimte. • Steek de stekker pas in het stopcontact als de installatie is voltooid. Zorg ervoor Aansluiting aan het... - Page 6 6 Progress • Het apparaat mag niet worden gebruikt • Dit apparaat is uitsluitend bestemd om als werkblad of aanrecht. mee te koken. Het mag niet worden • Sluit het apparaat direct af van de gebruikt voor andere doeleinden, zoals stroomtoevoer als het oppervlak van het verwarmen van een kamer.
-
Page 7: Montage
Progress 7 MONTAGE • Voor het vervangen van een WAARSCHUWING! beschadigde voedingskabel, gebruikt u Raadpleeg de hoofdstukken het kabeltype: H05V2V2-F dat een Veiligheid. temperatuur van 90 °C of hoger weerstaat. Neem contact op met een Voor montage klantenservice bij u in de buurt. - Page 8 8 Progress min. 2 mm min. 2 mm < 20 mm > 20 mm min. 500 mm min. 500 mm 30 mm 12 mm 57 mm 12 mm 57 mm 28 mm 41 mm 28 mm 41 mm 38 mm...
-
Page 9: Beschrijving Van Het Product
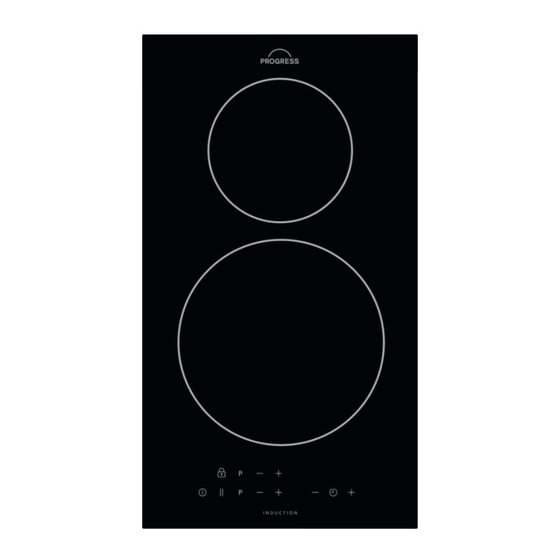
Progress 9 Installatie van meer dan één kookplaat 490 mm min. 500 mm 270 mm BESCHRIJVING VAN HET PRODUCT Indeling kookplaat Inductiekookzone Bedieningspaneel 145 mm 210 mm Bedieningspaneel lay-out Gebruik de tiptoetsen om het apparaat te bedienen. De displays, indicatielampjes en... - Page 10 10 Progress Tip‐ Functie Opmerking toets AAN/UIT De kookplaat in- en uitschakelen. Blokkering / Kinderbeveili‐ Het bedieningspaneel vergrendelen/ontgren‐ gingsinrichting delen. Pauzeren De functie in- en uitschakelen. Kookstanddisplay De kookstand weergeven. Timerindicatie voor de Geeft aan voor welke zone u de tijd instelt.
-
Page 11: Dagelijks Gebruik
Progress 11 OptiHeat Control (3-staps momenteel gebruikt. De aanduidingen restwarmte-indicator) kunnen ook aangaan voor de nabijgelegen kookzones, zelfs als u deze niet gebruikt. WAARSCHUWING! De inductiekookzones creëren de voor het Er bestaat kookproces benodigde warmte direct in de verbrandingsgevaar door bodem van de pan. - Page 12 12 Progress Timer Om de functie te deactiveren: tik op • Timer met aftelfunctie en tik vervolgens op . De resterende tijd U kunt deze functie gebruiken om de telt terug tot 00. lengte van één kooksessie in te stellen.
-
Page 13: Offsound Control (In- En Uitschakelen Van De Geluiden)
Progress 13 • Kookwekker naar beneden komt aan. gaat aan. Schakel de kookplaat • Timer met aftelfunctie naar beneden uit met komt • u iets op het bedieningspaneel plaatst. Om de functie te deactiveren: activeer de kookplaat met . Stel geen Stroommanagement warmteinstelling in. - Page 14 14 Progress • De bodem van de pannen moet zo dik Raadpleeg de technische en vlak mogelijk zijn. gegevens. • Zorg ervoor dat bodems schoon en droog zijn voordat de pannen op de Lawaai tijdens gebruik kookplaat worden gezet. • Schuif of wrijf de pan niet over het...
-
Page 15: Onderhoud En Reiniging
Progress 15 Warmte-in‐ Gebruik om: Tijd Tips stelling (min) 1 - 2 Stollen: luchtige omeletten, ge‐ 10 - Met deksel bereiden. bakken eieren. 2 - 3 Zachtjes aan de kook brengen 25 - Voeg minimaal twee keer zo van rijst en gerechten op melk‐... -
Page 16: Probleemoplossing
16 Progress het blad over het oppervlak te reinigingsmiddel. Droog de kookplaat schuiven. na reiniging af met een zachte doek. • Verwijder nadat de kookplaat • Verkleuring glanzende metalen voldoende is afgekoeld: kalk- en verwijderen: reinig het glazen waterkringen, vetspatten en oppervlak met een doek en een metaalachtig glanzende verkleuringen. - Page 17 Progress 17 Probleem Mogelijke oorzaak Oplossing De restwarmte-indicator De zone is niet heet omdat Als de zone voldoende lang gaat niet aan. deze slechts kortstondig is gebruikt is om heet te zijn, gebruikt, of de sensor is be‐ neemt u contact op met een schadigd.
-
Page 18: Technische Gegevens
18 Progress foutmelding die wordt weergegeven. rekening gebracht, zelfs tijdens de Verzeker u ervan dat u de kookplaat garantieperiode. De instructies over het correct gebruikt heeft. Bij onjuist gebruik service center en de garantiebepalingen van het apparaat wordt het bezoek van de vindt u in het garantieboekje. -
Page 19: Energiezuinigheid
Progress 19 C. Plak het op het instructieboekje. ENERGIEZUINIGHEID Productinformatie volgens EU 66/2014 alleen geldig voor EU-markt Modelidentificatie PAI3101F Type kookplaat Ingebouwde kook‐ plaat Aantal kookzones Verwarmingstechnologie Inductie Diameter ronde kookzones (Ø) Middenvoor 21,0 cm Middenachter 14,5 cm Energieverbruik per kookzone (EC electric... - Page 20 20 Progress CONTENTS Safety information Hints and tips Safety instructions Care and cleaning Installation Troubleshooting Product description Technical data Daily use Energy efficiency Subject to change without notice. VISIT OUR WEBSITE TO: Get usage advice, brochures, trouble shooter, service and repair information: www.progress-hausgeraete.de/support...
-
Page 21: General Safety
Progress 21 WARNING: Keep children and pets away from the • appliance when it operates or when it cools down. Accessible parts become hot during use. If the appliance has a child safety device, it should be • activated. Children shall not carry out cleaning and user maintenance •... -
Page 22: Safety Instructions
22 Progress from power supply. In either case contact the Authorised Service Centre. If the supply cord is damaged, it must be replaced by the • manufacturer, an authorized Service or similarly qualified persons in order to avoid a hazard. - Page 23 Progress 23 • Do not let the electricity mains cable • Do not change the specification of this tangle. appliance. • Make sure that a shock protection is • Make sure that the ventilation openings installed. are not blocked. • Use the strain relief clamp on the cable.
-
Page 24: Installation
24 Progress Service • Be careful not to let objects or cookware fall on the appliance. The • To repair the appliance contact the surface can be damaged. Authorised Service Centre. Use original • Do not activate the cooking zones with spare parts only. - Page 25 Progress 25 2. Attach the supplied 2x6mm seal stripe 3. Add some millimetres to the length to the lower edge of the hob, along the when you cut the seal stripe. outer edge of the glass ceramic. Do 4. Join the two ends of the seal stripe not stretch it.
- Page 26 26 Progress min. 38 mm min. 2 mm R 5mm min. 55mm min. 12 mm min. 2 mm Installation of more than one 490 mm min. 500 mm 270 mm...
-
Page 27: Product Description
Progress 27 PRODUCT DESCRIPTION Cooking surface layout Induction cooking zone Control panel 145 mm 210 mm Control panel layout Use the sensor fields to operate the appliance. The displays, indicators and sounds tell which functions operate. Sen‐ Function Comment field ON / OFF To activate and deactivate the hob. -
Page 28: Daily Use
28 Progress Sen‐ Function Comment field To increase or decrease the time. To set a heat setting. PowerBoost To activate the function. Heat setting displays Display Description The cooking zone is deactivated. The cooking zone operates. Pause operates. PowerBoost operates. -
Page 29: Activating And Deactivating
Progress 29 Activating and deactivating PowerBoost This function makes more power available Touch for 1 second to activate or to the induction cooking zones. The deactivate the hob. function can be activated for the induction cooking zone only for a limited period of Automatic Switch Off time. -
Page 30: Child Safety Device
30 Progress To stop the sound: touch When you deactivate the hob, you also deactivate this • Minute Minder function. You can use this function when the hob is activated and the cooking zones do not Child Safety Device operate. The heat setting display shows This function prevents an accidental operation of the hob. -
Page 31: Power Management
Progress 31 Power management setting display of the reduced zones stays on the reduced heat setting. • All cooking zones are connected to one phase. See the illustration. • The function activates when the total electricity loading of the cooking zones exceeds maximum electricity loading of the phase. -
Page 32: Examples Of Cooking Applications
32 Progress The noises are normal and do not setting, it is not proportional to the indicate any malfunction. increase of the consumption of power. It means that a cooking zone with the Examples of cooking medium heat setting uses less than a half applications of its power. -
Page 33: Cleaning The Hob
Progress 33 • Always use cookware with a clean Use a special hob scraper on the glass base. surface at an acute angle and move the • Scratches or dark stains on the surface blade on the surface. have no effect on how the hob •... - Page 34 34 Progress Problem Possible cause Remedy The hob deactivates. You put something on the Remove the object from the sensor field. sensor field Residual heat indicator The zone is not hot because If the zone operated sufficient‐ does not come on.
-
Page 35: Technical Data
Progress 35 warranty period. The instructions about the Service Centre and conditions of guarantee are in the guarantee booklet. TECHNICAL DATA Cooking zones specification Cooking zone Nominal pow‐ PowerBoost PowerBoost Cookware di‐ er (maximum maximum du‐ ameter [mm] heat setting) -
Page 36: Energy Efficiency
36 Progress ENERGY EFFICIENCY Product information according to EU 66/2014 valid for EU market only Model identification PAI3101F Type of hob Built-In Hob Number of cooking zones Heating technology Induction Diameter of circular cooking zones (Ø) Middle front 21.0 cm Middle rear 14.5 cm... - Page 37 Progress 37 TABLE DES MATIÈRES Informations de sécurité Conseils Consignes de sécurité Entretien et Nettoyage Installation Dépannage Description de l'appareil Caractéristiques techniques Utilisation quotidienne Rendement énergétique Sous réserve de modifications. VISITEZ NOTRE SITE WEB POUR : Obtenir des conseils d’utilisation, des brochures, un dépanneur, des informations sur le service et les réparations :...
-
Page 38: Sécurité Générale
38 Progress Ne laissez pas les emballages à la portée des enfants et • jetez-les convenablement. AVERTISSEMENT : Tenez les enfants et les animaux • éloignés de l'appareil lorsqu'il est en cours de fonctionnement ou lorsqu'il refroidit. Les parties accessibles deviennent chaudes en cours d'utilisation. -
Page 39: Consignes De Sécurité
Progress 39 Après utilisation, éteignez toujours la zone de cuisson à • l'aide de la manette de commande correspondante et ne vous fiez pas à la détection des récipients. Si la surface vitrocéramique / en verre est fissurée, • éteignez l'appareil et débranchez-le. Si l'appareil est branché... -
Page 40: Branchement Électrique
40 Progress être composé d'un matériau non d'alimentation. Contactez notre service inflammable. après-vente agréé ou un électricien • Le panneau de séparation doit couvrir pour remplacer le câble d'alimentation entièrement l'espace sous la table de s'il est endommagé. cuisson. • La protection contre les chocs des •... - Page 41 Progress 41 • Ne posez pas de couverts ou de • Prenez soin de ne pas laisser tomber couvercles sur les zones de cuisson. d'objets ou de récipients sur l'appareil. Elles sont chaudes. Sa surface risque d'être endommagée. • N'utilisez jamais cet appareil avec les •...
-
Page 42: Mise Au Rebut
42 Progress statut opérationnel de l’appareil. Elles • Contactez votre service municipal pour ne sont pas destinées à être utilisées obtenir des informations sur la marche dans d'autres applications et ne à suivre pour mettre l'appareil au rebut. conviennent pas à l’éclairage des •... -
Page 43: Montage
Progress 43 Montage min. min. 500mm 50mm min. min. 2 mm min. 2 mm < 20 mm > 20 mm min. 500 mm min. 500 mm 30 mm 12 mm 57 mm 12 mm 57 mm 28 mm 41 mm... -
Page 44: Installation De Plusieurs Tables De Cuisson
44 Progress min. 12 mm min. 2 mm Installation de plusieurs tables de cuisson 490 mm min. 500 mm 270 mm DESCRIPTION DE L'APPAREIL Description de la table de cuisson Zone de cuisson à induction Bandeau de commande 145 mm... -
Page 45: Description Du Bandeau De Commande
Progress 45 Description du bandeau de commande Les touches sensitives permettent de faire fonctionner l'appareil. Les affichages, les voyants et les signaux sonores indiquent les fonctions activées. Tou‐ Fonction Commentaire sen‐ siti‐ MARCHE/ARRÊT Pour allumer et éteindre la table de cuisson. -
Page 46: Utilisation Quotidienne
46 Progress Affichage du niveau de cuisson Afficheur Description La zone de cuisson est désactivée. La zone de cuisson est activée. Pause est activé. PowerBoost est activé. Une anomalie de fonctionnement s'est produite. + chiffre OptiHeat Control (indicateur de chaleur résiduelle en 3 étapes): conti‐... -
Page 47: Niveau De Cuisson
Progress 47 avant d'utiliser à nouveau la table de Pour activer la fonction pour une zone cuisson. de cuisson : appuyez sur s’allume. • vous avez utilisé un récipient inadapté. Pour désactiver la fonction : appuyez Le symbole s'allume et la zone de cuisson se désactive automatiquement... -
Page 48: Dispositif De Sécurité Enfant
48 Progress L'affichage du niveau de cuisson indique Pour désactiver la fonction : appuyez . Le niveau de cuisson précédent s'allume. Pour activer la fonction : appuyez sur la Lorsque vous éteignez la table touche puis sur la touche de cuisson, cette fonction est minuteur pour régler la durée. -
Page 49: Conseils
Progress 49 • La fonction répartit la puissance entre • - les signaux sonores sont les zones de cuisson. désactivés • La fonction diminue la puissance des • - les signaux sonores sont activés autres zones de cuisson. Pour confirmer le réglage, attendez que la •... -
Page 50: Bruits Pendant Le Fonctionnement
50 Progress petite partie de la puissance générée élevé et le récipient est composé de par la zone de cuisson. différents matériaux (conception • Pour des raisons de sécurité et des « sandwich »). résultats de cuisson optimaux, n’utilisez • bourdonnement : vous utilisez un pas de récipient plus grand qu’indiqué... -
Page 51: Entretien Et Nettoyage
Progress 51 Niveau de Utilisation : Durée Conseils cuisson (min) 4 - 5 Cuire de grandes quantités 60 - Ajoutez jusqu’à 3 litres de li‐ d'aliments, des ragoûts et des quide, plus les ingrédients. soupes. 6 - 7 Faire revenir : escalopes, cor‐... - Page 52 52 Progress Que faire si... Problème Cause possible Solution Vous ne pouvez pas allu‐ La table de cuisson n’est Vérifiez que la table de cuis‐ mer la table de cuisson ni pas branchée à une source son est correctement bran‐...
- Page 53 Progress 53 Problème Cause possible Solution Les touches sensitives Le récipient est trop grand Placez les récipients de gran‐ deviennent chaudes. ou vous le placez trop près de taille sur les zones de cuis‐ des commandes. son arrière, si possible.
-
Page 54: Caractéristiques Techniques
54 Progress du vendeur pourra être facturé, même en conditions de garantie figurent dans le cours de garantie. Les instructions livret de garantie. relatives au service après-vente et aux CARACTÉRISTIQUES TECHNIQUES Caractéristiques des zones de cuisson Zone de cuis‐ Puissance... -
Page 55: Rendement Énergétique
Progress 55 RENDEMENT ÉNERGÉTIQUE Informations sur le produit conformément à la norme EU 66/2014 valable pour le marché européen uniquement Identification du modèle PAI3101F Type de table de cuisson Table de cuisson in‐ tégrée Nombre de zones de cuisson Technologie de chauffage Induction Diamètre des zones de cuisson circulaires... - Page 56 56 Progress recyclage ou contactez vos services municipaux.
- Page 60 867366404-A-502020...