Publicité
Les langues disponibles
Les langues disponibles
Liens rapides
Publicité

Manuels Connexes pour CARE FITNESS CT-750


Sommaire des Matières pour CARE FITNESS CT-750
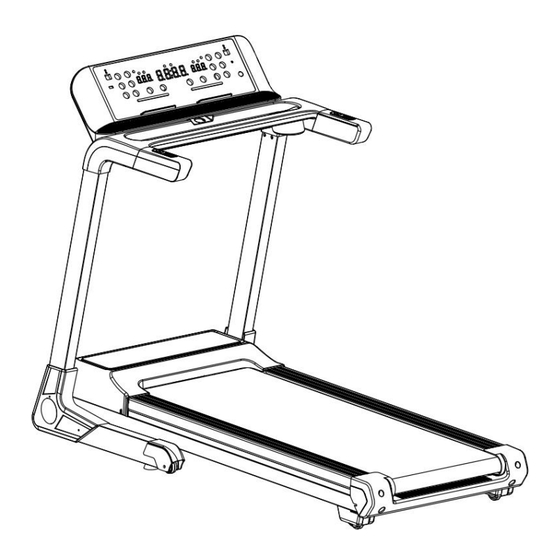
- Page 1 CT-750 Réf : 55750...
- Page 2 AVERTISSEMENTS : Sécurité - Lisez et conservez avec précaution ce manuel de l’utilisateur. N’utilisez ce produit que de la manière indiquée. - Cet appareil doit être assemblé et utilisé par des adultes. - Votre appareil est conforme à la norme EN-957 classe HB pour une utilisation à domicile, il ne doit pas être utilisé...
- Page 3 Important: Read these instructions before using the equipment! Safety Read this user manual and keep it in a safe place. Use this product exclusively in the manner indicated. This equipment must be assembled and used by adults. The equipment complies with the EN-957 standard, classification HB for use in the home. It must not be used in a sports center or any other public, associative or rented space.
- Page 4 Achtung: Nehmen Sie diese Ratschläge zur Kenntnis, bevor Sie Ihr Gerät benutzen! Sicherheit - Lesen Sie dieses Benutzerhandbuch sorgfältig und bewahren Sie es gut auf. Benutzen Sie dieses Gerät nur wie angegeben. - Dieses Gerät ist von Erwachsenen zu montieren und zu benutzen. - Ihr Gerät entspricht der Norm EN 957, Klasse HC, für eine Verwendung zu Hause, es darf nicht in einer Sporthalle oder an einem anderen öffentlichen, einem Verein gehörenden oder angemieteten Ort verwendet werden.
- Page 5 ¡Atención: tenga en cuenta estos consejos antes de utilizar el aparato! Seguridad - Lea cuidadosamente y conserve este manual del usuario. No utilice este producto de un modo distinto del indicado. - Este aparato sólo deben ensamblarlo y utilizarlo personas adultas. - El aparato cumple las especificaciones de la norma EN-957 clase HB para uso domiciliario.
- Page 6 Attenzione: leggere attentamente queste accomandazioni prima di utilizzare l’attrezzo ! Sicurezza - Leggere e conservare con cura il manuale utente. Utilizzare questo prodotto unicamente nei modi Indicati - Questo attrezzo deve essere montato e utilizzato da persone adulte. - L’attrezzo è conforme alla norma EN-957 classe HB per un utilizzo domestico e non deve quindi essere utilizzato in palestre o altri luoghi pubblici, di associazione o a scopo locativo.
- Page 7 BELANGRIJKE AANWIJZINGEN: Veiligheid Deze gebruikshandleiding aandachtig lezen en zorgvuldig bewaren. Dit toestel mag alleen op de aangegeven manier worden gebruikt. Dit toestel moet door volwassenen worden gemonteerd en gebruikt. Uw toestel voldoet aan de norm EN-957 categorie HB voor privé-gebruik in huis en mag niet in een sportzaal of elke andere openbare plaats, in verenigingsverband of voor verhuurde toepassingen worden gebruikt.
- Page 8 Description Quantity (PCS) Description Quantity (PCS) M8*16 φ8.3 ¢4.2x16mm - 7 -...
- Page 9 ÉTAPE 1 Ouvrez la boîte et sortez la console qui est divisée en deux parties. Connectez d’abord un par un les câbles entre les deux parties (4 câbles au total). Utilisez le boulon M8*16 (60) fourni pour fixer la console. STEP 1 Open the box and put out the console which divides into two parts.
- Page 10 ÉTAPE 2 Placez la base sur le sol. Soulevez le montant vertical et utilisez les boulons M8*16 (60) et les rondelles plates (26) fournis pour le fixer sur le cadre principal (ne serrez pas encore complètement les boulons). STEP 2 Put the main frame on the floor. Lift the upright post and use supplied M8*16 bolts (60) and flat washer (26) to fix onto the main frame(not lock the bolts tightly).
- Page 11 ÉTAPE 3 Connectez les câbles entre la console et le montant vertical droit (16R). Utilisez les boulons M8*16 (60) et les rondelles plates (26) pour fixer la console sur le montant vertical. (Serrez fermement tous les boulons.) STEP 3 Connect the cables between console and the right upright post (16R).Use M8*16 bolts(60) and flat washer(26) to fix the console onto the upright post.(Lock all the bolts tightly.) SCHRITT 3 Verbinden Sie die Kabel zwischen der Konsole und dem rechten vertikalen Pfosten (16R).
- Page 12 ÉTAPE 4 Utilisez les vis M4,2*16 fournies (3) pour verrouiller fermement le couvercle du montant vertical sur le montant (16L/R). ATTENTION Confirmez l’assemblage complet comme indiqué ci-dessus et serrez fermement tous les boulons. Effectuez l’opération suivante après avoir vérifié que tout est correct. Avant d’utiliser le tapis de course, veuillez lire attentivement les instructions.
- Page 13 Bestätigen Sie den vollständigen Zusammenbau wie oben beschrieben und ziehen Sie alle Schrauben fest an. Führen Sie den nächsten Schritt durch, nachdem Sie sich vergewissert haben, dass alles korrekt ist. Bevor Sie das Laufband benutzen, lesen Sie bitte die Anleitung sorgfältig durch. PASO 4 Utilice los tornillos M4.2*16 suministrados (3) para fijar firmemente la cubierta del poste vertical al poste (16L/R).
- Page 14 Soulevez la machine et tirez avec force vers le haut jusqu’à ce que vous entendiez un « clic » résultant du blocage du vérin pneumatique par le boîtier de sécurité Lift up the machine and force to pull up until you heard "click" that made by safety casing stuck the pneumatic cylinder.
- Page 15 Utilisez le pied pour actionner légèrement le manchon de sécurité et abaissez en même temps la machine dans le sens de la flèche. La machine se dépliera ensuite doucement. Use foot kick the safety sleeve lightly and pull down the machine at the same time as the arrow direction.
- Page 16 INSTRUCTIONS D’INCLINAISON 【INCLINAISON +/-】sur la main courante se trouve la touche qui sert à augmenter ou à diminuer l’inclinaison. Pour régler l’inclinaison pendant l’utilisation du tapis de course, modifier 1 niveau/temps. Appuyez sur la touche pendant plus de 2 secondes pour monter ou descendre automatiquement. Vous pouvez également actionner les touches de raccourci 3.
- Page 17 【INCLINE +/-】 en el pasamanos es el botón que se utiliza para aumentar o disminuir la inclinación. Para ajustar la inclinación mientras utiliza la cinta de correr, cambie 1 nivel/tiempo. Mantenga pulsado el botón durante más de 2 segundos para subir o bajar automáticamente la inclinación.
- Page 18 Utilisation de l'ordinateur 2. FONCTIONS D’AFFICHAGE La fenêtre « VITESSE » : affiche la vitesse actuelle ; plage de vitesse : 0,8-20 km/h. Lorsqu’ils sont utilisés, les programmes prédéfinis afficheront « P01-P02—P50-HR1-HR2-HR3-FAT » La fenêtre « TEMPS » affiche le temps d’exercice ; temps positif de 0 h 00 à 99 h 59. La fenêtre «...
- Page 19 la vitesse en permanence 3.3 La touche « INC + / - » En fonctionnement, une pression sur ces touches permet d'augmenter ou de diminuer l'inclinaison d'un niveau à chaque fois ; Si vous appuyez sur ces touches pendant plus de 3 secondes, l'inclinaison augmentera ou diminuera constamment. 3.4 La touche «...
- Page 20 Temps PROG SPEED INCLINE SPEED INCLINE SPEED INCLINE SPEED INCLINE SPEED INCLINE SPEED INCLINE SPEED INCLINE SPEED INCLINE SPEED INCLINE SPEED INCLINE SPEED 8 10 INCLINE SPEED INCLINE SPEED INCLINE - 19 -...
- Page 21 SPEED INCLINE SPEED INCLINE SPEED INCLINE SPEED INCLINE SPEED INCLINE SPEED INCLINE SPEED INCLINE SPEED INCLINE SPEED INCLINE SPEED INCLINE SPEED INCLINE SPEED INCLINE SPEED INCLINE SPEED INCLINE SPEED INCLINE 10 10 10 12 12 - 20 -...
- Page 22 SPEED INCLINE SPEED 10 10 INCLINE 8 10 10 6 SPEED INCLINE SPEED INCLINE SPEED INCLINE SPEED INCLINE SPEED INCLINE SPEED INCLINE 10 6 SPEED 10 10 10 12 12 INCLINE SPEED INCLINE SPEED INCLINE SPEED INCLINE SPEED INCLINE SPEED INCLINE - 21 -...
- Page 23 SPEED INCLINE SPEED INCLINE SPEED INCLINE SPEED INCLINE SPEED INCLINE SPEED 10 10 10 12 12 INCLINE SPEED INCLINE SPEED 10 10 INCLINE Speed Vitesse Incline Inclaison 5 GRAISSE DU CORPS 5.1 A l'arrêt, appuyez sur le bouton PROG pour sélectionner FAT. 5.2 Régler les paramètres : F-1 sexe, F-2 âge, F-3 taille, F-4 poids, F-5 graisse corporelle.
- Page 24 Lorsqu’on retire la clé de sécurité, le tapis de course s’arrêtera immédiatement pour protéger l’utilisateur. 7. Mode économie d’énergie. Si vous n’utilisez pas l’appareil pendant 10 minutes, le tapis de course passera en mode Économie d’énergie. Appuyez sur n’importe quelle touche pour le redémarrer. 8.
- Page 25 Entretien et traitement des dysfonctionnements 1) La surface du tapis roulant doit être conservée propre, retirez le cordon d'alimentation avant le nettoyage. Vous pouvez nettoyer la bande de roulement et la surface du tapis roulant avec un chiffon doux et humide. 2) Le tapis de course est réglé...
- Page 26 POUR COMMANDER DES PIECES DETACHEES Dans un soucis d’efficacité munissez-vous des éléments suivants avant de contacter notre Service Après Vente : Le nom ou la référence du produit. Le numéro de fabrication indiqué sur le châssis principal et sur le carton d’emballage. Le numéro de la pièce manquante ou défectueuse indiqué...
- Page 27 Computer instruction 2. DISPLAY FUNCTIONS "SPEED" window: display the current speed, speed range: 0.8-20.0 km/h ,When use the pre-set programs, will display "P01-P02---P50-HR1-HR2-HR3-FAT " TIME" display: display exercise time, positive timing from 0:00-99:59. "DISTANCE." Display the running distance, count forward from 0.00-99.9 "...
- Page 28 3.4 MODE: In stopping state,select countdown time / countdown distance / countdown calories circularly. 3.5 Bluetooth Speaker for play music. 3.6 Quickly Speed buttons: 3 km/h. 3.7 Quickly Incline buttons: 3 levels. 3.8 PROG: In stopping state,select programs: P01-P02...-P50 are preset programs HR1-HR2-HR3 are heart rate programs Body FAT 4.
- Page 29 SETTING TIME / 20 = EVERY PERIOD TIME TIME PROG SPEED INCLINE SPEED INCLINE SPEED INCLINE SPEED INCLINE SPEED INCLINE SPEED INCLINE SPEED INCLINE SPEED INCLINE SPEED INCLINE SPEED INCLINE SPEED INCLINE SPEED INCLINE SPEED INCLINE - 28 -...
- Page 30 SPEED INCLINE SPEED INCLINE SPEED INCLINE SPEED INCLINE SPEED INCLINE SPEED INCLINE SPEED INCLINE SPEED INCLINE SPEED INCLINE SPEED INCLINE SPEED INCLINE SPEED INCLINE SPEED INCLINE SPEED INCLINE SPEED INCLINE 10 10 10 12 12 SPEED INCLINE - 29 -...
- Page 31 SPEED 10 10 INCLINE 10 7 10 10 10 6 SPEED INCLINE SPEED INCLINE SPEED INCLINE SPEED INCLINE SPEED INCLINE SPEED INCLINE 10 6 SPEED 10 10 10 12 12 INCLINE SPEED INCLINE SPEED INCLINE SPEED INCLINE SPEED INCLINE SPEED INCLINE SPEED INCLINE...
- Page 32 SPEED INCLINE SPEED INCLINE SPEED 10 10 10 12 12 INCLINE SPEED INCLINE SPEED 10 10 INCLINE 5. BODY FAT 5.1 In stopping state, press PROG button to select FAT. 5.2 Set the parameter: F-1 Sex, F-2 Age, F-3, Height, F-4, Weight, F-5, body fat. 5.3 Press MODE button to select F-1, press SPEED button to choose your sex.
- Page 33 And Follorw the detailed instruction Code Problem Possible Reason Solution Cable connection Check or replace the Cables Display did not receive display default replace the display the signal controller default replace the controller motor connect wires did not connect Check that the motor wires are well connected correctly The problem between...
- Page 34 To extend the life of this treadmill, the treadmill requires regular lubrication, which is general maintenance for the machine. The routine maintenance procedure will prevent premature wear of the treadmill and motor system. The recommended lubrication schedule is as follows: LUBRICATION USE 1-6 km/h Every 6 months 6-12 km/h Every 3 months...
- Page 35 Verwendung des Computers 2. ANZEIGEFUNKTIONEN Das Fenster "GESCHWINDIGKEIT": Zeigt die aktuelle Geschwindigkeit an; Geschwindigkeitsbereich: 0,8-20 km/h. Wenn sie verwendet werden, zeigen die voreingestellten Programme "P01-P02-P50-HR1-HR2-HR3-FAT" an. Das Fenster "ZEIT" zeigt die Übungszeit an; positive Zeit von 0:00 Uhr bis 99:59 Uhr. Das Fenster "DISTANZ"...
- Page 36 3.3 Die Taste "INC + / -" Im Betrieb wird durch Drücken dieser Tasten die Neigung erhöht oder verringert. die Neigung jeweils um eine Stufe ; Wenn Sie diese Tasten länger als 3 Sekunden drücken, wird die Neigung konstant erhöht oder verringert. 3.4 Die Taste "MODE": Mit der Taste "MODE"...
- Page 37 ZEIT PROG SPEED INCLINE SPEED INCLINE SPEED INCLINE SPEED INCLINE SPEED INCLINE SPEED INCLINE SPEED INCLINE SPEED INCLINE SPEED INCLINE SPEED INCLINE SPEED INCLINE SPEED INCLINE SPEED INCLINE - 36 -...
- Page 38 SPEED INCLINE SPEED INCLINE SPEED INCLINE SPEED INCLINE SPEED INCLINE SPEED INCLINE SPEED INCLINE SPEED INCLINE SPEED INCLINE SPEED INCLINE SPEED INCLINE SPEED INCLINE SPEED INCLINE SPEED INCLINE SPEED INCLINE 10 10 10 12 12 SPEED INCLINE - 37 -...
- Page 39 SPEED 10 10 INCLINE 8 10 10 10 10 6 SPEED INCLINE SPEED INCLINE SPEED INCLINE SPEED INCLINE SPEED INCLINE SPEED INCLINE 10 6 SPEED 10 10 10 12 12 INCLINE SPEED INCLINE SPEED INCLINE SPEED INCLINE SPEED INCLINE SPEED INCLINE SPEED INCLINE...
- Page 40 SPEED INCLINE SPEED INCLINE SPEED 10 10 10 12 12 INCLINE SPEED INCLINE SPEED 10 10 INCLINE Speed Geschwindigkeit Incline Steigung 5 KÖRPERFETT 5.1 Drücken Sie im ausgeschalteten Zustand die PROG-Taste, um FAT auszuwählen. 5.2 Stellen Sie die Parameter ein: F-1 Geschlecht, F-2 Alter, F-3 Größe, F-4 Gewicht, F-5 Körperfett. 5.3 Drücken Sie die Taste MODE, um F-1 auszuwählen, drücken Sie die Taste SPEED, um Ihr Geschlecht auszuwählen.
- Page 41 9. Kalorien Bei Steigungsstufe 0 verbraucht das Laufen für 1 km 70,3 Kalorien. 70,3 x Geschwindigkeit (km/h) x Zeit (Stunde) x (1+ % Steigung) 10. bluetooth-Verbindung & Anwendung Kopieren Sie den untenstehenden Link in Ihren Browser (Edge, Firefox, Chrome, Safari etc.). https://cloud.carefitness.com/index.php/s/E2WD22KMNBQzERL Und folgen Sie den detaillierten Anweisungen Wartung und Störungsbeseitigung...
- Page 42 WARNUNG: Schalten Sie das Laufband aus und entfernen Sie den Sicherheitsschlüssel, bevor Sie die Lauffläche schmieren. SO TRAGEN SIE SILIKON AUF DAS LAUFBAND AUF A/ Suchen Sie die Flasche mit dem Silikon. Sie befindet sich in dem DIY-Kit, das diesem Laufband beiliegt. B/ Suchen Sie einen Strohhalm und setzen Sie ihn auf die Silikonflasche, wie in der Zeichnung dargestellt.
- Page 43 Utilización del ordenador 2. FUNCIONES DE VISUALIZACIÓN La ventana "VELOCIDAD": muestra la velocidad actual; intervalo de velocidad: 0,8-20 km/h. Cuando se utiliza, los Cuando se utiliza, los programas preestablecidos mostrarán "P01-P02-P50-HR1-HR2-HR3-FAT". La ventana "TIEMPO" muestra el tiempo de ejercicio; tiempo positivo de 0:00 a 99:59. La ventana "DISTANCIA"...
- Page 44 3.1 El botón "START" pone en marcha la máquina y el botón "STOP" la detiene. 3.2 El botón "SPEED + / -" En condiciones de funcionamiento, pulsando estos botones aumentará o disminuirá la velocidad en 0,1 km/h cada vez.aumentan o disminuyen la velocidad en 0,1 km/h cada vez. Cada vez;...
- Page 45 tiempo PROG SPEED INCLINE SPEED INCLINE SPEED INCLINE SPEED INCLINE SPEED INCLINE SPEED INCLINE SPEED INCLINE SPEED INCLINE SPEED INCLINE SPEED INCLINE SPEED 8 10 INCLINE SPEED INCLINE SPEED INCLINE - 44 -...
- Page 46 SPEED INCLINE SPEED INCLINE SPEED INCLINE SPEED INCLINE SPEED INCLINE SPEED INCLINE SPEED INCLINE SPEED INCLINE SPEED INCLINE SPEED INCLINE SPEED INCLINE SPEED INCLINE SPEED INCLINE SPEED INCLINE SPEED INCLINE 10 10 10 12 12 - 45 -...
- Page 47 SPEED INCLINE SPEED 10 10 INCLINE 8 10 10 6 SPEED INCLINE SPEED INCLINE SPEED INCLINE SPEED INCLINE SPEED INCLINE SPEED INCLINE 10 6 SPEED 10 10 10 12 12 INCLINE SPEED INCLINE SPEED INCLINE SPEED INCLINE SPEED INCLINE SPEED INCLINE - 46 -...
- Page 48 SPEED INCLINE SPEED INCLINE SPEED INCLINE SPEED INCLINE SPEED INCLINE SPEED 10 10 10 12 12 INCLINE SPEED INCLINE SPEED 10 10 INCLINE Speed Velocidad Incline inclinación 5 GRAISSE DU CORPS 5.1 En parado, pulse la tecla PROG para seleccionar FAT. 5.2 Establezca los parámetros: F-1 sexo, F-2 edad, F-3 altura, F-4 peso, F-5 grasa corporal.
- Page 49 Si no utiliza la máquina durante 10 minutos, la cinta pasará al modo de ahorro de energía. Pulse cualquier tecla para volver a ponerla en marcha. 8. Parada de la máquina Puede desconectar la alimentación en cualquier momento para detener la máquina. 9.
- Page 50 CÓMO APLICAR SILICONA A LA MOQUETA A/ Encuentre la botella de silicona. Se encuentra en el kit de bricolaje incluido con esta cinta de correr. B/ Encuentre una pajita y colóquela en la botella de silicona como se muestra en el dibujo. C/ Aplique la silicona uniformemente como se muestra en el dibujo (ATENCIÓN: la cinta de correr DEBE ESTAR PARADA antes de aplicar el lubricante para evitar lesiones, de lo contrario el borde de la cinta podría cortarle o sus dedos podrían ser aplastados por los rodillos).
- Page 51 Uso del computer 2. FUNZIONI DI VISUALIZZAZIONE La finestra "VELOCITÀ": visualizza la velocità corrente; intervallo di velocità: 0,8-20 km/h. Quando viene utilizzato, il programma Quando viene utilizzata, i programmi preimpostati visualizzano "P01-P02-P50-HR1-HR2-HR3-FAT". La finestra "TEMPO" visualizza il tempo di esercizio; tempo positivo da 0:00 a 99:59. La finestra "DISTANZA"...
- Page 52 Se si premono questi tasti per più di 3 secondi, la velocità aumenta/diminuisce in modo continuo. la velocità in modo continuo 3.3 Il tasto "INC + / -" Durante il funzionamento, la pressione di questi tasti aumenta o diminuisce l'inclinazione di un livello.
- Page 53 Tempo PROG SPEED INCLINE SPEED INCLINE SPEED INCLINE SPEED INCLINE SPEED INCLINE SPEED INCLINE SPEED INCLINE SPEED INCLINE SPEED INCLINE SPEED INCLINE SPEED 8 10 INCLINE SPEED INCLINE SPEED INCLINE - 52 -...
- Page 54 SPEED INCLINE SPEED INCLINE SPEED INCLINE SPEED INCLINE SPEED INCLINE SPEED INCLINE SPEED INCLINE SPEED INCLINE SPEED INCLINE SPEED INCLINE SPEED INCLINE SPEED INCLINE SPEED INCLINE SPEED INCLINE SPEED INCLINE 10 10 10 12 12 - 53 -...
- Page 55 SPEED INCLINE SPEED 10 10 INCLINE 8 10 10 6 SPEED INCLINE SPEED INCLINE SPEED INCLINE SPEED INCLINE SPEED INCLINE SPEED INCLINE 10 6 SPEED 10 10 10 12 12 INCLINE SPEED INCLINE SPEED INCLINE SPEED INCLINE SPEED INCLINE SPEED INCLINE - 54 -...
- Page 56 SPEED INCLINE SPEED INCLINE SPEED INCLINE SPEED INCLINE SPEED INCLINE SPEED 10 10 10 12 12 INCLINE SPEED INCLINE SPEED 10 10 INCLINE Speed Velocità Incline inclinazione 5 GRASSO CORPOREO 5.1 Una volta fermi, premere il pulsante PROG per selezionare FAT. 5.2 Impostare i parametri: F-1 sesso, F-2 età, F-3 altezza, F-4 peso, F-5 grasso corporeo.
- Page 57 7. Modalità di risparmio energetico. Se non si utilizza l'unità per 10 minuti, il tapis roulant entra in modalità di risparmio energetico. Premere un tasto qualsiasi per riavviarlo. 8. Arresto della macchina È possibile spegnere la macchina in qualsiasi momento per arrestarla. 9.
- Page 58 COME APPLICARE IL SILICONE ALLA MOQUETTE A/ Trovare il flacone di silicone. Si trova nel kit fai-da-te incluso in questo tapis roulant. B/ Trovare una cannuccia e posizionarla sul flacone di silicone come mostrato nel disegno. C/ Applicare il silicone in modo uniforme come mostrato nel disegno (ATTENZIONE: il tapis roulant DEVE ESSERE FERMATO prima di applicare il lubrificante per evitare lesioni, altrimenti il bordo del tapis roulant potrebbe tagliarvi o le vostre dita potrebbero essere schiacciate dai rulli).
- Page 59 De computer gebruiken 2. DISPLAYFUNCTIES Het venster "SPEED": toont de huidige snelheid; snelheidsbereik: 0,8-20 km/u. Bij gebruik zullen de Bij gebruik zullen de vooraf ingestelde programma's "P01-P02-P50-HR1-HR2-HR3-FAT" weergeven. Het venster "TIJD" toont de oefentijd; positieve tijd van 0:00 tot 99:59. Het venster "AFSTAND"...
- Page 60 de snelheid continu 3.3 De "INC + / -" toets Tijdens de werking zal het indrukken van deze toetsen de helling telkens met één niveau verhogen of verlagen. de helling telkens met één niveau; Als deze toetsen langer dan 3 seconden worden ingedrukt, zal de helling continu toenemen of afnemen. 3.4 De toets "MODE": Met de toets "MODE"...
- Page 61 Tijd PROG SPEED INCLINE SPEED INCLINE SPEED INCLINE SPEED INCLINE SPEED INCLINE SPEED INCLINE SPEED INCLINE SPEED INCLINE SPEED INCLINE SPEED INCLINE SPEED 8 10 INCLINE SPEED INCLINE SPEED INCLINE - 60 -...
- Page 62 SPEED INCLINE SPEED INCLINE SPEED INCLINE SPEED INCLINE SPEED INCLINE SPEED INCLINE SPEED INCLINE SPEED INCLINE SPEED INCLINE SPEED INCLINE SPEED INCLINE SPEED INCLINE SPEED INCLINE SPEED INCLINE SPEED INCLINE 10 10 10 12 12 - 61 -...
- Page 63 SPEED INCLINE SPEED 10 10 INCLINE 8 10 10 6 SPEED INCLINE SPEED INCLINE SPEED INCLINE SPEED INCLINE SPEED INCLINE SPEED INCLINE 10 6 SPEED 10 10 10 12 12 INCLINE SPEED INCLINE SPEED INCLINE SPEED INCLINE SPEED INCLINE SPEED INCLINE - 62 -...
- Page 64 SPEED INCLINE SPEED INCLINE SPEED INCLINE SPEED INCLINE SPEED INCLINE SPEED 10 10 10 12 12 INCLINE SPEED INCLINE SPEED 10 10 INCLINE Speed Snelheid Incline Helling 5 LICHAAMSVET 5.1 Druk op de PROG knop om FAT te selecteren. 5.2 Stel de parameters in: F-1 geslacht, F-2 leeftijd, F-3 lengte, F-4 gewicht, F-5 lichaamsvet. 5.3 Druk op de MODE knop om F-1 te selecteren, druk op de SNELHEID knop om uw geslacht te selecteren.
- Page 65 6. Functie van de beveiligingssleutel Wanneer de veiligheidssleutel wordt verwijderd, stopt de loopband onmiddellijk om de gebruiker te beschermen. 7. Energiebesparende modus. Als u het apparaat 10 minuten niet gebruikt, gaat de loopband in de spaarstand. Druk op een willekeurige toets om opnieuw te starten.
- Page 66 Deze loopband is uitsluitend ontworpen voor thuisgebruik. Niet gebruiken in een instelling of voor commerciële doeleinden. ONDERHOUD EN SMERING Het is belangrijk om uw loopband goed te verzorgen (vooral het loopoppervlak eronder). Een goede siliconensmering zal ook de prestaties van uw loopband verbeteren. WAARSCHUWING: STOP de loopband en verwijder de veiligheidssleutel voordat u het loopoppervlak smeert..
- Page 67 - 66 -...