Table des Matières
Publicité
Les langues disponibles
Les langues disponibles
Liens rapides
Installation and maintenance manual / Manuel d'installation et de maintenance / Installations- und Wartungshandbuch
Manuale di installazione e di manutenzione / Manual de instalación y de mantenimiento
TControl POD glass EC
GB
Controller for Fan Coil Units
F
Régulateur pour ventilo-convecteurs
D
Regler für Ventilatorkonvektoren
I
Controller per unità fan coil
Publicité
Chapitres
Table des Matières

Manuels Connexes pour SystemAir TControl POD glass EC


Sommaire des Matières pour SystemAir TControl POD glass EC
- Page 1 Installation and maintenance manual / Manuel d’installation et de maintenance / Installations- und Wartungshandbuch Manuale di installazione e di manutenzione / Manual de instalación y de mantenimiento TControl POD glass EC Controller for Fan Coil Units Régulateur pour ventilo-convecteurs Regler für Ventilatorkonvektoren...
- Page 3 INSTALLATION INSTRUCTION English NOTICE D’INSTALLATION Français INSTALLATIONSHANDBUCH Deutsch ISTRUZIONI INSTALLAZIONE Italiano INSTRUCCIONES DE INSTALACIÓN Español...
-
Page 4: Table Des Matières
2 TControl POD glass EC CONTENTS 1. DEVICE PRESENTATION ..................................3 2. TECHNICAL DATA ....................................3 3. CONNECTION DIAGRAM ................................... 3 4. DIMENSIONS ....................................4 5. GENERAL ......................................5 5.1. DESCRIPTION..............................................5 5.2. PHYSICAL INSTALLATION RS-485 ........................................ 5 5.3. RS-485 TRANSMISSION ..........................................5 5.4. -
Page 5: Device Presentation
TControl POD glass EC 1. DEVICE PRESENTATION Controller type TControl POD glass EC (EC Fan, 0-10 V, 230 V) 2. TECHNICAL DATA Measured value Temperature Modbus RS485; Transmission speed: 9600, 19200, 38400 or 57600; Parity: no parity (2 stop bits), even or... -
Page 6: Dimensions
The POD connection box is screwed into the upper part of the box with the 4 screws provided (M3x8) (Figure 3). Wire in accordance with the wiring diagram. Place the TControl POD glass EC on the top of the unit and attach it to the rear of the unit (by clipping it on). Figure 1... -
Page 7: General
This constraint is only due to a current reading ability of the material. 5.4. PROTOCOL The TControl POD glass EC is a “Slave” participant in the network. It only responds to the requests of the “Master”. The protocol corresponds to the default values specified in the Modbus tables (Refer to the §... -
Page 8: Display
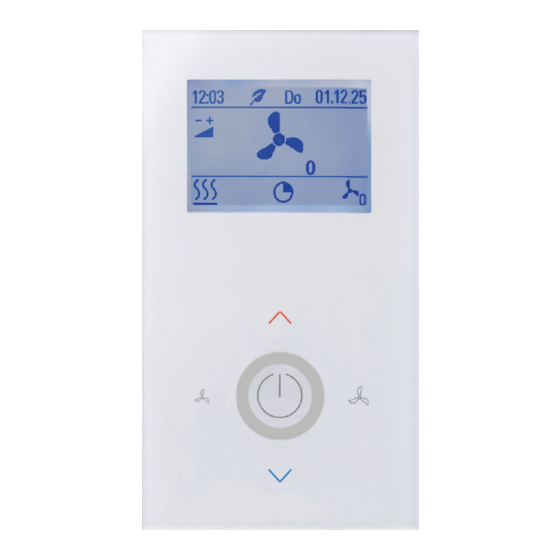
6 TControl POD glass EC 6. DISPLAY 6.1. MAIN DISPLAY The main screen is divided into 3 areas: header, central value and footer. 00:20 Th 07.01.16 Header 22.3°C Central value Footer AUTO 6.2. HEADER The header shows the time, day and date. In addition, an information symbol is available on request or for certain states/modes. -
Page 9: Fan Speed Adjustment
TControl POD glass EC 6.3.2. FAN SPEED ADJUSTMENT Parameter menu access Fan speed adjustment After activating one of the 2 buttons, the value on the screen changes to the fan speed adjustment window. Pressing one of the buttons again adapts the fan speed. -
Page 10: Parameter Menu
8 TControl POD glass EC 7.1. PARAMETER MENU 7.1.1. PARAMETER MENU ACCESS Press the 3 buttons shown below simultaneously for about 5 seconds to access this menu. The button combination can be locked by the “button access menu” parameter (Refer to the § MODBUS TABLES, page 22 - address 124), so that a user will not be able to change the parameters afterwards. -
Page 11: Navigation
TControl POD glass EC 7.1.3. NAVIGATION Navigation is performed using the UP, DOWN, LEFT, RIGHT and ENTER buttons. The menus are structured hierarchically. The highest level is the main menu. From this menu, the user can navigate through different submenus. From there, access to other submenus is made possible. To return to the previous level, “header”... -
Page 12: Hourly Programming Menu
10 TControl POD glass EC 7.2. HOURLY PROGRAMMING MENU The description of the various sub-menus is detailed in the following paragraphs. MENU MENU Time slot Time slot Time/Date Time/Date Alarm Alarm Configuration Configuration Language Language General view of the parameter menu “Time slot selection”... -
Page 13: Date And Time
TControl POD glass EC 7.2.1.2. TIME SLOT MENU Time slot selection Day selection TIME SLOT TIME SLOT/TIMER 1 Time slot 1 Week Mo-Su Time slot 2 Working week Mo-Fr Time slot 3 From day To day Periods Overview/Selecting the time slot period... -
Page 14: Alarm Mode
12 TControl POD glass EC 7.4. ALARM MODE 7.4.1. OVERVIEW Alarm MENU Time slot Tolerance 1.0°C Time/Date Period 30 mm Alarm Alarm triggering Alarm reset Configuration Language At the top of the main screen, a fault symbol will appear if the “over threshold” alarm is validated. This symbol is located in the same place as the ECO symbol. -
Page 15: Fan Menu
Assignment concerns the 2-pipe confi guration: ² C/F: heating and cooling mode that allows use of an external heating source controlled by the TControl POD glass EC. Cold: cooling alone. Heat: heating alone. Lev. Start: Sets the start level after power off. -
Page 16: Configuration Menu
Example: for a minimum value of 30%, you must enter +30 - 32 768 in register 111, i.e. -32 738. Information As standard, the TControl POD glass EC is configured for cyclic ventilation. Configuration via the display is only done by setting the minimum speed value. The TControl POD glass EC automatically integrates the correction. 7.6. CONFIGURATION MENU... -
Page 17: Language Menu
TControl POD glass EC 7.7. LANGUAGE MENU You can change the language by clicking on “Language” in the language menu. Three languages are available: German ² English ² French. ² English is set by default. MENU SELECT THE LANGUAGE Time slot... -
Page 18: Operating Mode
16 TControl POD glass EC 10. OPERATING MODE 10.1. STAND-BY Activated by Modbus or a button. In stand-by mode, the controller is not active and the display is off. The buttons, except the ENTER button, are locked. The building protection systems remain functional. -
Page 19: Configuration
TControl POD glass EC 11. CONFIGURATION 11.1. TEMPERATURE By default, the value of the built-in sensor is used. A universal input can be configured as an input for a temperature sensor. In this case, the value of this sensor will be used as a reference sensor and will replace the value of the internal sensor on the main screen. -
Page 20: Change-Over
18 TControl POD glass EC 11.2.1. CHANGE-OVER The Change-Over function can be performed by the installer by using: a sensor ² that must be connected to universal input 1 a contactor ² connected to either universal input 1 or input 2... -
Page 21: Dew Point
TControl POD glass EC 11.2.4. DEW POINT The dew point contact can be connected at the installer’s choice to: universal input 1 ² input 2 ² The dew point function is activated via the configuration of a digital input (address 18 or 19) or via Modbus (address 258). -
Page 22: Setpoint
20 TControl POD glass EC 12. SETPOINT 12.1. GENERAL The active setpoint is determined by the time slot configuration. If no time slot is configured, the “setpoint after power-up” parameter is used as a reference. The user can change the values within the defined limits. -
Page 23: Modbus Parameter Menu
TControl POD glass EC 14. MODBUS PARAMETER MENU The Modbus parameters menu is accessed by simultaneously pressing the buttons shown below for about 3 seconds. The combination must be made from the main screen. The LED in the center ring lights up when the combination is detected. -
Page 24: Modbus Tables
22 TControl POD glass EC 15. MODBUS TABLES Registers marked with a are stored in the EEPROM. They may only be written during device configuration, not during operation! Modbus Holding Register (R/W) Address-H Min. Max. Gain Name Description EEPROM 0: German... - Page 25 TControl POD glass EC Modbus Holding Register (R/W) 0-100 ≙ 0.0 - 10.0°C Address-H Min. Max. Gain Name Description EEPROM 0-150 ≙ 0.0 - 15.0°C Setpoint range Factory setting: 0.5°C 0-150 ≙ 0.0 - 15.0°C Comfort dead band Factory setting: 2.0°C 0-150 ≙...
- Page 26 24 TControl POD glass EC Modbus Holding Register (R/W) Address-H Min. Max. Gain Name Description EEPROM Time slot 2 setpoint period 4 (#) Time slot 2 period 4 Time slot 2 AC fan period 4 (#) Time slot 2 period 4...
- Page 27 TControl POD glass EC Modbus Holding Register (R/W) Address-H Min. Max. Gain Name Description EEPROM 0: with AUTOMATIC (Factory setting) Fan stage button with/without AUTO 1: without AUTOMATIC 0: Keep the value (Factory setting) Setpoint offset at change of in-use...
- Page 28 26 TControl POD glass EC Modbus Input Register (R) 0-500 ≙ 0-50.0°C Address-I Min. Max. Gain Name Description 0-500 ≙ 0-50.0°C Heat setpoint Example: 21.5°C = 215 0-150 ≙ 0-15.0°C Cold setpoint Example: 21.5°C = 215 0-500 ≙ 0-50.0°C Setpoint offset Example: 3.0°C = 30...
-
Page 29: Installation Instruction
INSTALLATION INSTRUCTION English NOTICE D’INSTALLATION Français INSTALLATIONSHANDBUCH Deutsch ISTRUZIONI INSTALLAZIONE Italiano INSTRUCCIONES DE INSTALACIÓN Español... - Page 30 2 TControl POD glass EC SOMMAIRE 1. PRESENTATION DES APPAREILS ............................... 3 2. DONNEES TECHNIQUES ..................................3 3. SCHEMA DE RACCORDEMENT ................................3 4. DIMENSIONS ....................................4 5. GENERALITES ....................................5 5.1. DESCRIPTION..............................................5 5.2. INSTALLATION PHYSIQUE RS-485 ........................................ 5 5.3.
-
Page 31: Presentation Des Appareils
TControl POD glass EC 1. PRESENTATION DES APPAREILS Type de régulateur TControl POD glass EC (Ventilateur EC, 0-10V, 230V) 2. DONNEES TECHNIQUES Valeur mesurée Température Modbus RS485 ; Vitesse de transmission : 9600, 19200, 38400 ou 57600 ; Parité : sans parité (2 bits de stop), Paramètre réseau... -
Page 32: Dimensions
Le boîtier de connexion du POD est vissé dans la partie supérieure du boîtier avec les 4 vis fournies (M3x8) (Figure 3). Effectuez le câblage conformément au schéma de connexion. Placez le TControl POD glass EC sur le haut du boîtier et fi xez le à la partie arrière du boîtier (en le clipsant). Figure 1... -
Page 33: Generalites
5.4. PROTOCOLE Le TControl POD glass EC est un participant "Esclave" sur le réseau. Il répond uniquement aux requêtes du "Maître". Le protocole correspond aux valeurs par défaut spécificiées dans les tableaux Modbus (Voir § TABLEAUX MODBUS, page 22). -
Page 34: Affichage
6 TControl POD glass EC 6. AFFICHAGE 6.1. AFFICHAGE PRINCIPAL L’écran principal se divise en 3 secteurs : haut de page, valeur centrale et pied de page. 00:20 Th 07.01.16 Haut de page 22.3°C Valeur centrale Pied de page AUTO 6.2. -
Page 35: Ajustement De La Vitesse De Ventilation
TControl POD glass EC 6.3.2. AJUSTEMENT DE LA VITESSE DE VENTILATION Accès au menu des paramètres Ajustement de la vitesse de ventilation Après activation d’une des 2 touches, la valeur sur l’écran se modifi e en fenêtre d’ajustement de la vitesse de ventilation. -
Page 36: Menu Des Parametres
8 TControl POD glass EC 7.1. MENU DES PARAMETRES 7.1.1. ACCES AU MENU DES PARAMETRES Presser simultanément les 3 touches indiquées ci-dessous pendant environ 5 secondes pour accéder à ce menu. La combinaison des touches peut être verrouillée par le paramètre "Menu accessibilité des touches"... -
Page 37: Navigation
TControl POD glass EC 7.1.3. NAVIGATION La navigation se réalise en utilisant les touches HAUT, BAS, GAUCHE, DROITE et ENTRÉE. Les menus sont construits hiérarchiquement. Le plus haut niveau est le menu principal. De ce menu, l’utilisateur peut naviguer dans différents sous-menus. A partir de là, l’accès à d’autres sous-menus est rendu possible. Pour revenir au niveau précédent, le "haut de page"... -
Page 38: Menu Des Programmes Horaires
10 TControl POD glass EC 7.2. MENU DES PROGRAMMES HORAIRES La description des différents sous-menus est détaillée dans les paragraphes suivants. MENU MENU Plage horaire Plage horaire Heure/Date Heure/Date Alarme Alarme Ventilateur Ventilateur Configuration Configuration Langue Langue Vue générale du menu des paramètres Menu "Sélection plage horaire"... -
Page 39: Menu Des Plages Horaires
TControl POD glass EC 7.2.1.2. MENU DES PLAGES HORAIRES Sélection de la plage horaire Sélection des jours PLAGE HORAIRE PLAGE HORAIRE/MINUTEUR 1 Plage horaire 1 Semaine lu-di Plage horaire 2 Semaine de travail lu-ve Plage horaire 3 Du jour Au jour Périodes... -
Page 40: Mode Alarme
12 TControl POD glass EC 7.4. MODE ALARME 7.4.1. VUE D'ENSEMBLE Alarme MENU Plage horaire Tolérance 1.0°C Heure/Date Durée 30mm Alarme Déclenchement d'alarme Ventilateur Réinitialisation d'alarme Configuration Langue En haut de page de l’écran principal, un symbole de défaut apparaîtra si l’alarme "dépassement de seuil"... -
Page 41: Menu Ventilateur
Assignement concerne la confi guration 2-tubes : ² C/F: mode chaud et froid qui permet d’utiliser une source extérieure de chauffage pilotée par le TControl POD glass EC. Froid: froid seul. Chaud: chaud seul. Niv. Démarrage : défi nit le niveau de démarrage après avoir coupé le courant. -
Page 42: Menu Configuration
-32 738. Information En standard le TControl POD glass EC est configuré en ventilation cyclique. Le paramétrage via l'écran se fait uniquement en réglant la valeur de vitesse minimum. Le TControl POD glass EC intègre automatiquement la correction. 7.6. MENU CONFIGURATION MENU SÉLECTIONNER CONFIGURATION... -
Page 43: Menu De Langages
ENTRÉE. Sur cet affichage, vous trouverez des informations variées, comme le type de l‘objet, sa version de logiciel, l’état des entrées-sorties et l’état du régulateur (variable utilisée). Les variables Modbus indique si le TControl POD glass EC communique via Modbus. DIAGNOSTIC... -
Page 44: Mode De Fonctionnement
16 TControl POD glass EC 10. MODE DE FONCTIONNEMENT 10.1. STAND-BY Activé par Modbus ou par une touche. En mode stand-by, le régulateur n’est pas actif et l’écran est éteint. Les touches, exceptée la touche ENTREE, sont bloquées. Les protections protections du bâtiment restent fonctionnelles. -
Page 45: Configuration
TControl POD glass EC 11. CONFIGURATION 11.1. TEMPERATURE Par défaut, la valeur de la sonde intégrée est utilisée. Une entrée universelle peut être paramétrée comme entrée d’une sonde de température. Dans ce cas, la valeur de cette sonde sera utilisée comme sonde de référence et remplacera la valeur de la sonde interne sur l’écran principal. -
Page 46: Change-Over
18 TControl POD glass EC 11.2.1. CHANGE-OVER La fonction Change-Over peut-être assuré au choix de l'installateur par: une sonde ² connectée impérativement sur l'entrée unverselle 1 un contacteur ² connecté soit sur l'entrée unverselle 1 soit sur l'entré 2 SÉLECTIONNER CONFIGURATION La sonde Change-Over est configurée via l'écran de... -
Page 47: Point De Rosee
TControl POD glass EC 11.2.4. POINT DE ROSEE La contact point de rosée peut-être connecté au choix de l'installateur sur: l'entrée unverselle 1 ² l'entré 2 ² La fonction "point de rosée" est activée via la configuration d’une entrée digitale (Adresse 18 ou 19) ou par Modbus (adresse 258). -
Page 48: Point De Consigne
20 TControl POD glass EC 12. POINT DE CONSIGNE 12.1. GENERALITE Le point de consigne actif est déterminé par la configuration des plages horaires. Si aucune plage horaire n’est configurée, le paramètre "point de consigne après remise sous tension" sert de référence. L’utilisateur peut modifier les valeurs dans les limites définies. -
Page 49: Menu Des Parametres Modbus
TControl POD glass EC 14. MENU DES PARAMETRES MODBUS On accède au menu des paramètres Modbus en pressant simultanément les touches indiquées ci-dessous pendant environ 3 secondes. La combinaison doit être effectuée à partir de l’écran principal. La LED de l’anneau central s’allume lorsque la combinaison est détectée. -
Page 50: Tableaux Modbus
22 TControl POD glass EC 15. TABLEAUX MODBUS Les registres marqués d'un sont stockés dans l'EEPROM. Ils ne doivent être écrits que pendant la configuration de l'appareil et non pendant le fonctionnement ! Modbus Holding Register (R/W) Adresse-H Min Max Gain Nom... - Page 51 TControl POD glass EC Modbus Holding Register (R/W) 0-100 ≙ 0,0 - 10,0°C Adresse-H Min Max Gain Nom Description EEPROM 0-150 ≙ 0,0 - 15,0°C Plage de consigne Réglage usine: 0,5°C 0-150 ≙ 0,0 - 15,0°C Bande morte confort Réglage usine: 2,0°C 0-150 ≙...
- Page 52 24 TControl POD glass EC Modbus Holding Register (R/W) Adresse-H Min Max Gain Nom Description EEPROM Plage horaire 2 consigne période 4 (#) Plage horaire 2 période 4 Plage horaire 2 Ventilation AC période 4 (#) Plage horaire 2 période 4 Plage horaire 2 mode ECO période 4...
- Page 53 TControl POD glass EC Modbus Holding Register (R/W) Adresse-H Min Max Gain Nom Description EEPROM Touche étage ventilateur avec/sans 0: avec AUTOMATIC (Réglage usine) AUTO 1: sans AUTOMATIC 0 : Garde la valeur (Réglage usine) Décalage de consigne au changement 1 : Réinitialise la valeur...
- Page 54 26 TControl POD glass EC Modbus Input Register (R) 0-500 ≙ 0-50,0°C Adresse-I Min Max Gain Nom Description 0-500 ≙ 0-50,0°C Consigne chaud Exemple: 21.5°C = 215 0-150 ≙ 0-15,0°C Consigne froid Exemple: 21.5°C = 215 0-500 ≙ 0-50,0°C Décalage consigne Exemple: 3,0°C = 30...
-
Page 55: Installation Instruction
INSTALLATION INSTRUCTION English NOTICE D’INSTALLATION Français INSTALLATIONSHANDBUCH Deutsch ISTRUZIONI INSTALLAZIONE Italiano INSTRUCCIONES DE INSTALACIÓN Español... - Page 56 2 TControl POD glass EC INHALT 1. VORSTELLUNG DER GERÄTE................................3 2. TECHNISCHE DATEN ..................................3 3. ANSCHLUSSPLAN ..................................... 3 4. ABMESSUNGEN ....................................4 5. ALLGEMEINES ....................................5 5.1. BESCHREIBUNG ............................................... 5 5.2. HARDWARE-INSTALLATION RS-485 ......................................5 5.3. ÜBERTRAGUNG ÜBER DIE RS-485-SCHNITTSTELLE ................................... 5 5.4.
-
Page 57: Vorstellung Der Geräte
TControl POD glass EC 1. VORSTELLUNG DER GERÄTE Art des Reglers TControl POD glass EC (EC-Ventilator, 0-10V, 230V) 2. TECHNISCHE DATEN Messwert Temperatur Modbus RS485; Übertragungsgeschwindigkeit: 9600, 19200, 38400 oder 57600; Parität: keine Parität (2 Netzparameter Stoppbits), gerade oder ungerade Parität (1 Stoppbit) Analogausgang 0-10 V, max. -
Page 58: Abmessungen
Das Anschlussgehäuse des POD wird mit den 4 im Lieferumfang enthaltenen Schrauben (M3x8) im oberen Teil des Gehäuses festgeschraubt (Abbildung 3). Nehmen Sie die Verkabelung gemäß Anschlussplan vor. Setzen Sie den TControl POD glass EC auf die Oberseite des Gehäuses und rasten Sie ihn an der Rückseite des Gehäuses ein (Clipverschluss). Abbildung 1... -
Page 59: Allgemeines
Diese Einschränkung ergibt sich aus der aktuellen Lesekapazität der Hardware. 5.4. PROTOKOLL Der TControl POD glass EC wird im Netzwerk als „Slave" betrieben. Als solcher antwortet er lediglich auf Anfragen des „Masters". Das Protokoll entspricht den in den Modbus-Tabellen angegebenen Standardwerten (Siehe §... -
Page 60: Anzeige
6 TControl POD glass EC 6. ANZEIGE 6.1. HAUPTANZEIGE Der Hauptbildschirm ist in 3 Bereiche unterteilt: Kopfbereich, Mittelteil und Fußbereich. 00:20 Th 07.01.16 Kopfbereich 22.3°C Mittelteil Fußbereich AUTO 6.2. KOPFBEREICH Im Kopfbereich werden die Uhrzeit, der Tag und das Datum angezeigt. Zusätzlich ist auf Wunsch bzw. in Abhängigkeit von bestimmten Zuständen / Betriebsarten ein Info-Symbol verfügbar. -
Page 61: Einstellung Der Ventilatordrehzahl
TControl POD glass EC 6.3.2. EINSTELLUNG DER VENTILATORDREHZAHL Aufruf des Parametermenüs Einstellung der Ventilatordrehzahl Bei Betätigung einer der beiden Tasten wechselt der Bildschirm auf ein Eingabefenster zur Änderung der Ventilatordrehzahl. Durch erneute Betätigung der beiden Pfeiltasten kann die Ventilatordrehzahl angepasst werden. -
Page 62: Parametermenü
8 TControl POD glass EC 7.1. PARAMETERMENÜ 7.1.1. AUFRUF DES PARAMETERMENÜS Die 3 gekennzeichneten Tasten gleichzeitig drücken und ca. 5 Sekunden lang gedrückt halten, um dieses Menü aufzurufen. Die Tastenkombination kann durch den Parameter „Menüzugang über Tasten“ (Siehe § MODBUS-TABELLEN, Seite 22 - Adresse 124) gesperrt werden, so dass die Parameter von den Benutzern anschließend nicht mehr geändert werden können. -
Page 63: Navigation
TControl POD glass EC 7.1.3. NAVIGATION Die Navigation erfolgt mithilfe der Tasten AUF, AB, LINKS, RECHTS und EINGABE. Die Menüs sind hierarchisch aufgebaut. Die höchste Ebene bildet das Hauptmenü. Ausgehend von diesem Menü kann der Benutzer die verschiedenen Untermenüs aufrufen. Von dort aus ist der Aufruf weiterer Untermenüs möglich. Um zur jeweils vorausgehenden Ebene zurückgelangen, muss der Kopfbereich angewählt und dann die Taste... -
Page 64: Menü Zeitprogrammierung
10 TControl POD glass EC 7.2. MENÜ ZEITPROGRAMMIERUNG Die verschiedenen Untermenüs werden in nachfolgenden Abschnitten ausführlich beschrieben. MENÜ MENÜ Zeitbereich Zeitbereich Uhrzeit/Datum Uhrzeit/Datum Alarm Alarm Ventilator Ventilator Konfiguration Konfiguration Sprache Sprache Übersicht des Parametermenüs Menü „Auswahl Zeitbereich“ 7.2.1. ZEITBEREICHE 7.2.1.1. ÜBERSICHT Es stehen 3 Zeitbereiche mit jeweils 4 Slots zur Verfügung, die frei programmiert werden können. -
Page 65: Datum Und Uhrzeit
TControl POD glass EC 7.2.1.2. MENÜ ZEITBEREICHE Auswahl des Zeitbereichs Auswahl der Tage ZEITBEREICH ZEITBEREICH/ZEITSCHALTUHR 1 Zeitbereich 1 Woche Mo-So Zeitbereich 2 Arbeitswoche Mo-Fr Zeitbereich 3 Von (Tag) Bis (Tag) Slots Übersicht / Auswahl des Slots innerhalb des Konfiguration des Slots innerhalb des... -
Page 66: Alarmmodus
12 TControl POD glass EC 7.4. ALARMMODUS 7.4.1. ÜBERSICHT Alarm MENÜ Zeitbereich Toleranz 1.0°C Uhrzeit/Datum Dauer 30mm Alarm Alarmauslösung Ventilator Alarm-Reset Konfiguration Sprache Wenn der Alarm „Schwellwertüberschreitung" validiert wurde, erscheint im Kopfbereich des Hauptbildschirms ein Standardsymbol. Dieses Symbol wir an der gleichen Stelle angezeigt wie das Symbol für Energiesparbetrieb. -
Page 67: Menü Ventilator
2T2F: 2-Rohr mit Elektroheizung. Verwendung betrifft die 2-Rohr-Konfi guration: ² H/K: Heiz- und Kühlbetrieb, der die Nutzung einer über den TControl POD glass EC gesteuerten externen Heizquelle erlaubt. Kühlen: nur kühlen. Heizen: nur heizen. Startstufe: Legt die Startstufe nach einer Stromunterbrechung fest. -
Page 68: Konfigurationsmenü
Beispiel: Für einen Mindestwert von 30% muss im Register 111 der Wert +30 - 32.768, also -32.738 eingetragen werden. Information Standardmäßig sieht die Einstellung des TControl POD glass EC eine zyklische Lüftung vor. Am Parameterbildschirm kann lediglich die Mindestdrehzahl eingestellt werden. Der TControl POD glass EC übernimmt die Korrektur automatisch. -
Page 69: Sprachmenü
EINGABE. In dieser Anzeige finden Sie unterschiedlichste Informationen, darunter den Gerätetyp, die Softwareversion, den Zustand der Ein-/Ausgänge und den Zustand des Reglers (Nutzungsvariable). Die Modbus-Variablen geben an, ob der TControl POD glass EC über den Modbus kommuniziert. DIAGNOSE Heizausgang Kühlausgang... -
Page 70: Betriebsmodus
16 TControl POD glass EC 10. BETRIEBSMODUS 10.1. STANDBY Aktivierung per Modbus oder durch Tastenbetätigung. Im Standby-Modus ist der Regler nicht aktiv und der Bildschirm ist ausgeschaltet. Die Taste - mit Ausnahme der EINGABE-Taste - sind gesperrt. Die Gebäudeschutzfunktionen sind weiterhin in Betrieb. -
Page 71: Konfiguration
TControl POD glass EC 11. KONFIGURATION 11.1. TEMPERATUR Standardmäßig wird der Wert des integrierten Temperaturfühlers verwendet. Ein universeller Eingang kann als Eingang für einen Temperaturfühler parametriert werden. In diesem Fall wird der Messwert dieses externen Fühlers als Referenzwert herangezogen und erscheint folglich auch anstelle des Messwerts des internen Fühlers am Hauptbildschirm. -
Page 72: Change-Over
18 TControl POD glass EC 11.2.1. CHANGE-OVER Die Change-Over-Funktion kann je nach Wahl des Installateurs übernommen werden von: einem Temperaturfühler, ² der zwingend am universellen Eingang 1 angeschlossen sein muss einem Schütz, ² das entweder am universellen Eingang 1 oder an KONFIGURATION WÄHLEN... -
Page 73: Taupunkt
TControl POD glass EC 11.2.4. TAUPUNKT Der Taupunktkontakt kann je nach Wahl des Installateurs angeschlossen werden an: den universellen Eingang 1 ² Eingang 2 ² Die Taupunktfunktion wird über die Konfiguration eines Digitaleingangs (Adresse 18 oder 19) oder per Modbus (Adresse 258) aktiviert. -
Page 74: Sollwert
20 TControl POD glass EC 12. SOLLWERT 12.1. ALLGEMEINES Der aktive Sollwert wird anhand der Konfiguration der Zeitbereiche bestimmt. Wenn kein Zeitbereich konfiguriert wurde, dient der Parameter „Sollwert nach dem Einschalten“ als Referenz. Die Werte können vom Benutzer innerhalb der vorgegebenen Grenzen geändert werden. Auf lokaler Ebene kann der Sollwert je nach Bedarf angepasst werden. -
Page 75: Menü Der Mobbus-Parameter
TControl POD glass EC 14. MENÜ DER MOBBUS-PARAMETER Um das Einstellungsmenü für Modbus-Parameter aufzurufen, die nachstehend gekennzeichneten Tasten gleichzeitig drücken und ca. 3 Sekunden lang gedrückt halten. Die Tastenkombination gilt für den Hauptbildschirm. Sobald die Tastenkombination erkannt wird, leuchtet der LED-Ring in der Mitte auf. -
Page 76: Modbus-Tabellen
22 TControl POD glass EC 15. MODBUS-TABELLEN Die mit einem gekennzeichneten Register werden im EEPROM gespeichert. Sie dürfen nur während der Gerätekonfiguration geschrieben werden, nicht während des Betriebs! Modbus Holding Register (R/W) Adresse-H Min. Max. Erhöhung Name Beschreibung EEPROM 0: Deutsch... - Page 77 TControl POD glass EC Modbus Holding Register (R/W) 0- 100 ≙ 0,0 - 10,0°C Adresse-H Min. Max. Erhöhung Name Beschreibung EEPROM 0- 150 ≙ 0,0 - 15,0°C Sollwertbereich Werkseinstellung: 0,5°C 0- 150 ≙ 0,0 - 15,0°C Totband Komfort Werkseinstellung: 2,0°C 0- 150 ≙...
- Page 78 24 TControl POD glass EC Modbus Holding Register (R/W) Adresse-H Min. Max. Erhöhung Name Beschreibung EEPROM Zeitbereich 2 Sollwert Slot 4 (#) Zeitbereich 2 Slot 4 Zeitbereich 2 AC-Lüftung Slot 4 (#) Zeitbereich 2 Slot 4 Zeitbereich 2 Energiesparmodus (ECO)
- Page 79 TControl POD glass EC Modbus Holding Register (R/W) Adresse-H Min. Max. Erhöhung Name Beschreibung EEPROM 0: mit AUTOMATIK (Werkseinstellung) Taste Lüftungsstufe mit/ohne AUTO 1: ohne AUTOMATIK 0: Wert beibehalten (Werkseinstellung) Sollwertverschiebung bei Änderung des 1: Wert neu initialisieren Anwesenheitsmodus 2: Bei Abwesenheit neu initialisieren, bei...
- Page 80 26 TControl POD glass EC Modbus Input Register (R) 0-500 ≙ 0-50,0°C Adresse-I Min. Max. Erhöhung Name Beschreibung 0-500 ≙ 0-50,0°C Sollwert Heizen Beispiel: 21.5°C = 215 0-150 ≙ 0-15,0°C Sollwert Kühlen Beispiel: 21.5°C = 215 0-500 ≙ 0-50,0°C Sollwertverschiebung Beispiel: 3.0°C = 30...
-
Page 81: Istruzioni Per L'installazione
INSTALLATION INSTRUCTION English NOTICE D’INSTALLATION Français INSTALLATIONSHANDBUCH Deutsch ISTRUZIONI PER L'INSTALLAZIONE Italiano INSTRUCCIONES DE INSTALACIÓN Español... - Page 82 2 TControl POD glass EC INDICE 1. PRESENTAZIONE DELLE APPARECCHIATURE ............................. 3 2. DATI TECNICI ..................................... 3 3. SCHEMA DI COLLEGAMENTO ................................3 4. DIMENSIONI ..................................... 4 5. INTRODUZIONE ....................................5 5.1. DESCRIZIONE ..............................................5 5.2. INSTALLAZIONE FISICA RS-485 ........................................5 5.3.
-
Page 83: Presentazione Delle Apparecchiature
TControl POD glass EC 1. PRESENTAZIONE DELLE APPARECCHIATURE Tipo di regolatore TControl POD glass EC (Ventilatore EC, 0-10V, 230V) 2. DATI TECNICI Valore misurato Temperatura Modbus RS485; Velocità di trasmissione: 9600, 19200, 38400 o 57600; Parità: senza parità (2 bit di stop),... -
Page 84: Dimensioni
Il quadro di collegamento del POD è avvitato alla parte superiore del quadro con le 4 viti a corredo (M3x8) (Figura 3). Eseguire il cablaggio rispettando lo schema di collegamento. Posizionare TControl POD glass EC sul quadro in alto e fi ssarlo al retro del quadro (con delle clip). Figura 1 Figura 2... -
Page 85: Introduzione
Il numero massimo di elementi sul bus, senza utilizzare un ripetitore, è stabilita dallo standard di trasmissione RS-485. La trasmissione utilizzata da TControl POD glass EC autorizza un massimo di 32 oggetti per segmento di bus. Questo vincolo è dovuto esclusivamente ad una capacità di lettura attuale del materiale. -
Page 86: Visualizzazione Display
6 TControl POD glass EC 6. VISUALIZZAZIONE DISPLAY 6.1. PAGINA PRINCIPALE La pagina principale è suddivisa in 3 settori: inizio pagina, corpo centrale e piè di pagina. 00:20 Th 07.01.16 Inizio pagina 22.3°C Corpo centrale Piè di pagina AUTO 6.2. INIZIO PAGINA Ad inizio pagina è... -
Page 87: Regolazione Della Velocità Di Ventilazione
TControl POD glass EC 6.3.2. REGOLAZIONE DELLA VELOCITÀ DI VENTILAZIONE Accesso al menu delle impostazioni Regolazione della velocità di ventilazione Una volta premuto uno dei due tasti, il valore sul display diventa una fi nestra di regolazione della velocità di ventilazione. -
Page 88: Menu Impostazioni
8 TControl POD glass EC 7.1. MENU IMPOSTAZIONI 7.1.1. ACCESSO AL MENU IMPOSTAZIONI Tenere premuti contemporaneamente per 5 secondi i 3 tasti sotto indicati, poi entrare nel menu. Con l’impostazione "Menu accessibilità tasti" è possibile bloccare la combinazione dei tasti (Veda § TABELLA MODBUS, pagina 22 - indirizzo 124), in modo che successivamente un utente non possa modifi care le impostazioni. -
Page 89: Navigazione
TControl POD glass EC 7.1.3. NAVIGAZIONE Per navigare servirsi dei tasti SU, GIÙ, SINISTRA, DESTRA e INVIO. I menu hanno una disposizione gerarchica. Al livello più alto si trova il menu principale. Da questo menu, l’utente può navigare nei vari sotto-menu. Da qui è... -
Page 90: Menu Programmazione Oraria
10 TControl POD glass EC 7.2. MENU PROGRAMMAZIONE ORARIA Nei seguenti paragrafi è riportata una descrizione dei vari sotto-menu. MENU MENU Fascia oraria Fascia oraria Ora/Data Ora/Data Allarme Allarme Ventilatore Ventilatore Configurazione Configurazione Lingua Lingua Visualizzazione generale del menu impostazioni Menu “Selezione fascia oraria”... -
Page 91: Data E Ora
TControl POD glass EC 7.2.1.2. MENU DELLE FASCE ORARIE Selezione della fascia oraria Selezione dei giorni FASCIA ORARIA FASCIA ORARIA/TIMER 1 Fascia oraria 1 Settimana lu-do Fascia oraria 2 Settimana lavorativa lu-ve Fascia oraria 3 Dal giorno Al giorno Periodi... -
Page 92: Modalità Allarme
12 TControl POD glass EC 7.4. MODALITÀ ALLARME 7.4.1. PANORAMICA Allarme MENU Fascia oraria Tolleranza 1.0°C Ora/Data Durata 30 mm Allarme Attivazione allarme Ventilatore Reset allarme Configurazione Lingua Se viene confermato l’allarme "superamento soglia", all’inizio della pagina della schermata principale si visualizzerà... -
Page 93: Menu Ventilatore
Assegnazione agisce sulla confi gurazione con 2-tubi: ² C/F: modalità caldo e freddo che consente di usare una fonte di riscaldamento esterna comandata da TControl POD glass EC. Freddo: solo freddo. Caldo: solo caldo. Liv. Avvio: defi nisce il livello di avvio una volta tolta la corrente. -
Page 94: Menu Configurazione
Esempio: per un valore minimo del 30%, bisogna inserire nel registro 111, +30 - 32768 vale a dire -32738. Informazioni Come impostazione predefinita, TControl POD glass EC è configurato con la ventilazione ciclica. La configurazione tramite display si esegue esclusivamente regolando il valore di velocità minimo. TControl POD glass EC acquisisce automaticamente la correzione. -
Page 95: Menu Lingue
Su questa pagina sono disponibili varie informazioni, come la tipologia di oggetto, la versione del software, lo stato delle entrate-uscite e lo stato del regolatore (variabile utilizzata). Le variabili Modbus indicano se TControl POD glass EC comunica tramite Modbus. DIAGNOSI... -
Page 96: Modalità Di Funzionamento
16 TControl POD glass EC 10. MODALITÀ DI FUNZIONAMENTO 10.1. STAND-BY Attivato tramite Modbus o con un tasto. In stand-by, il regolatore non è attivo e lo schermo è spento. I tasti sono bloccati, eccetto il tasto INVIO. Le protezioni dell’edificio restano in funzione. -
Page 97: Configurazione
TControl POD glass EC 11. CONFIGURAZIONE 11.1. TEMPERATURA Come impostazione predefinita, viene usato il valore della sonda integrata. Come entrata di una sonda di temperatura si può impostare un’entrata universale. In questo caso, il valore di questa sonda sarà usato come sonda di riferimento e sostituirà... -
Page 98: Change-Over
18 TControl POD glass EC 11.2.1. CHANGE-OVER La funzione Change-Over può essere garantita, a discrezione dell’installatore, da: una sonda ² collegata obbligatoriamente all’entrata universale 1 un contatore ² collegato o all’entrata universale 1 o all’entrata 2 SELEZIONARE LA CONFIGURAZIONE La sonda Change-Over viene configurata tramite la pagina di configurazione o tramite il Modbus (indirizzo 18). -
Page 99: Punto Di Rugiada
TControl POD glass EC 11.2.4. PUNTO DI RUGIADA Il contatto punto di rugiada può essere collegato a discrezione dell’installatore: all’entrata universale 1 ² all’entrata 2 ² La funzione “punto di rugiada” si attiva configurando un’entrata digitale (indirizzo 18 o 19) o tramite Modbus (indirizzo 258).. -
Page 100: Set Point
20 TControl POD glass EC 12. SET POINT 12.1. INTRODUZIONE Il set point attivo è determinato dalla configurazione delle fasce orarie. Se non è configurata nessuna fascia oraria, funge da riferimento il parametro “set point dopo il riavvio”. L’utente può modificare i valori entro i limiti stabiliti. -
Page 101: Menu Impostazioni Modbus
TControl POD glass EC 14. MENU IMPOSTAZIONI MODBUS Per entrare nel menu delle impostazioni Modbus tenere premuti contemporaneamente per circa 3 secondi i tasti indicati sotto. Questa combinazione deve essere eseguita dalla pagina principale. Il LED del cerchio centrale si accende appena la combinazione viene rilevata. -
Page 102: Tabella Modbus
22 TControl POD glass EC 15. TABELLA MODBUS I registri indicati con un sono archiviati nell'EEPROM. Devono essere redatti solo durante la configurazione dell’apparecchio e non durante il funzionamento! Modbus Holding Register (R/W) Indirizzo-H Min Max Incremento Nome Descrizione EEPROM... - Page 103 TControl POD glass EC Modbus Holding Register (R/W) 0-100 ≙ 0,0 - 10,0°C Indirizzo-H Min Max Incremento Nome Descrizione EEPROM 0-150 ≙ 0,0 - 15,0°C Intervallo set point Predefinito: 0,5°C 0-150 ≙ 0,0 - 15,0°C Zona morta comfort Predefinito: 2,0°C 0-150 ≙...
- Page 104 24 TControl POD glass EC Modbus Holding Register (R/W) Indirizzo-H Min Max Incremento Nome Descrizione EEPROM Fascia oraria 2 set point periodo 4 (#) Fascia oraria 2 periodo 4 Fascia oraria 2 Ventilazione AC periodo 4 (#) Fascia oraria 2 periodo 4 Fascia oraria 2 modalità...
- Page 105 TControl POD glass EC Modbus Holding Register (R/W) Indirizzo-H Min Max Incremento Nome Descrizione EEPROM 0: con AUTOMATIC (impostazione Tasto stadio ventilatore con/senza predefinita) AUTO 1: senza AUTOMATIC 0: Mantenimento valori (impostazione predefinita) Scostamento set point quando cambia 1 : Resetta il valore la modalità...
- Page 106 26 TControl POD glass EC Modbus Input Register (R) 0-500 ≙ 0-50,0°C Indirizzo-I Incremento Nome Descrizione 0-500 ≙ 0-50,0°C Set point caldo Esempio: 21.5°C = 215 0-150 ≙ 0-15,0°C Set point freddo Esempio: 21.5°C = 215 0-500 ≙ 0-50,0°C Scostamento set point Esempio: 3.0°C = 30...
-
Page 108: Tillières-Sur-Avre
A causa della politica di continua miglioria posta in atto dal costruttore, questi prodotti sono soggetti a modifi che senza alcun obbligo di preavviso. Le foto pubblicate non danno luogo ad alcun vincolo contrattuale. Con objeto de mejorar constantemente, nuestros productos pueden ser modifi cados sin previo aviso. Fotos no contractuales. Systemair AC SAS Route de Verneuil 27570 Tillières-sur-Avre FRANCE ...