Publicité
Les langues disponibles
Les langues disponibles
Liens rapides
Publicité

Manuels Connexes pour X-Rite i1 Pro


Sommaire des Matières pour X-Rite i1 Pro
- Page 1 All manuals and user guides at all-guides.com...
- Page 2 All manuals and user guides at all-guides.com Important Notices CE Declaration FEDERAL COMMUNICATIONS COMMISSION NOTICE INDUSTRY CANADA COMPLIANCE STATEMENT...
- Page 3 All manuals and user guides at all-guides.com Safety Information Safety Information LED ILLUMINATION EQUIPMENT INFORMATION RoHS/WEEE...
- Page 4 All manuals and user guides at all-guides.com English Deutsch Français Italiano Español Português 日本語...
- Page 5 All manuals and user guides at all-guides.com User Manual Table of contents Package Contents Device Overview Installation Device Status Indicators Calibrating the Device Scan Measurement Single Pass Scan Measurement Dual Pass Scan Measurement Spot Measurement Display Measurement Ambient Light Measurement Projector Measurement Periodic Maintenance Troubleshooting...
- Page 6 All manuals and user guides at all-guides.com Package Contents...
- Page 7 All manuals and user guides at all-guides.com Tripod Holder Base Plate (optional) Tripod Holder (optional) Ambient Light Measuring Head (optional) Protection Cover (optional) Display Holder Positioning Target Calibration Plate Measurement Device Carrying Case USB Cable Backup Board Ruler (optional) (optional) Application DVD Certificate of Performance User Manual...
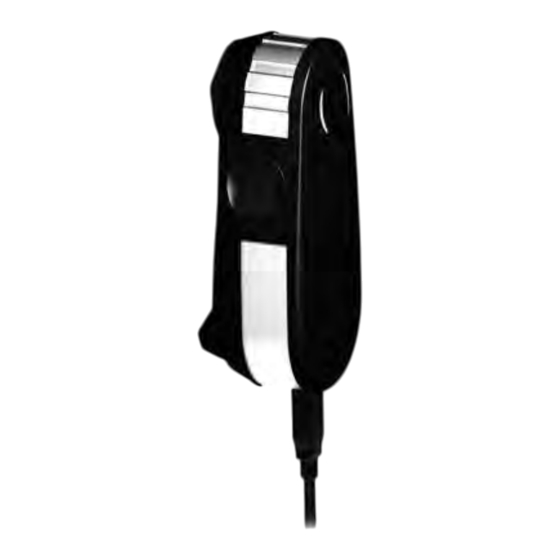
- Page 8 All manuals and user guides at all-guides.com Device Overview Spectrophotometer...
- Page 9 All manuals and user guides at all-guides.com Limiting Aperture Measurement Button Status Indicators Type Label with Serial Number Positioning Sensor Reference Gap for Ruler Mount Mounting Interface for Accessories USB Connector...
- Page 10 All manuals and user guides at all-guides.com Installation...
- Page 11 USB port. If connected successfully both status indicators light up solid white. The X-Rite i1Pro will not work if it is connected to the USB port on your keyboard or to a USB hub without external power supply. i1Pro power rating: 5 V...
- Page 12 All manuals and user guides at all-guides.com Device Status Indicators...
- Page 13 All manuals and user guides at all-guides.com The i1Pro device is equipped with two device status indicators on its top housing. The device status indicators provide feedback on the current status of the device and guide you through the measurement process. General device status: The device is either not connected to your computer, the software is not running, or the latest software to control the device is not...
- Page 14 All manuals and user guides at all-guides.com Calibrating the Device...
- Page 15 All manuals and user guides at all-guides.com Before you start measuring, please calibrate the device. If you own multiple devices make sure that the serial number on the back of the calibration plate matches the serial number of your i1Pro device. Refer to the user guide of your measurement software for additional information on the calibration process.
- Page 16 All manuals and user guides at all-guides.com Scan Measurement Virtual aperture technology During a scan measurement the i1Pro device is performing 200 measurements per second. The automatic patch detection of the device identifies useable measurements made on a patch and unusable measurements made between two patches. Valid measurements on a patch are averaged and the device reports the averaged result to the software.
- Page 17 All manuals and user guides at all-guides.com Measurement conditions The i1Pro measurement device supports multiple measurement conditions. Depending on how you wish to scan a target for UV you need to measure each row of your test chart either once or twice. In a single pass scan measurement and during the first pass of the dual pass scan measurement, the patches are illuminated with the tungsten filament lamp in the i1Pro device.
- Page 18 All manuals and user guides at all-guides.com Scan Measurement...
- Page 19 The distance between the i1Pro device and the surface of the printing substrate is critical for the accuracy of your measurements. If the limiting aperture of the device or the edge of the ruler‘s guide rail is worn out you should replace them. Spare parts can be ordered through X-Rite‘s Service Centers.
- Page 20 All manuals and user guides at all-guides.com Single Pass Scan Measurement 1. Make sure that your device is calibrated and the status indicators are pulsating white. 2. Position the ruler with the device on the white paper in front of row #1 of your test chart.
- Page 21 All manuals and user guides at all-guides.com 2x green flash the row was measured successfully. 2x red flash the row was not measured successfully because not all patches could be recognized. Measure the row again, but reduce your measurement speed and make sure that the device starts and ends the measurement before and after the patches of the test chart.
- Page 22 All manuals and user guides at all-guides.com Dual Pass Scan Measurement 1. Make sure that your device is calibrated and the status indicators are pulsating white. 2. Position the ruler with the device on the white paper in front of row #1 of your test chart.
- Page 23 All manuals and user guides at all-guides.com 2x red flash the row was not measured successfully because not all patches could be recognized. Measure the row again, but reduce your measurement speed and make sure that the device starts and ends the measurement before and after the patches of the test chart.
- Page 24 All manuals and user guides at all-guides.com Spot Measurement...
- Page 25 All manuals and user guides at all-guides.com To prepare your i1Pro device for spot measurement you need to mount the i1Pro device on the positioning target. Make sure your device is calibrated and the status indicators are pulsating white before you mount it. Refer to the user guide of your measurement software for further details on the spot measurement process.
- Page 26 All manuals and user guides at all-guides.com Display Measurement...
- Page 27 All manuals and user guides at all-guides.com To prepare your i1Pro device for a display measurement you need to mount the i1Pro device on the display holder. Make sure your device is calibrated and the status indicators are pulsating white before you mount it. 1.
- Page 28 All manuals and user guides at all-guides.com Ambient Light Measurement...
- Page 29 All manuals and user guides at all-guides.com Before you start measuring, please attach the ambient light measuring head on the limiting aperture of the i1Pro device. If you own multiple devices make sure that the serial number on the ambient light measuring head matches the serial number of your i1Pro device.
- Page 30 All manuals and user guides at all-guides.com Projector Measurement...
- Page 31 All manuals and user guides at all-guides.com To prepare your i1Pro device for projector measurements you need to mount the tripod holder on the tripod holder base plate, or on a tripod with a standard 1/4” screw you i1Pro device on the tripod holder. Make sure that your device is calibrated and the status indicators are pulsating white before you mount the device.
- Page 32 All manuals and user guides at all-guides.com Projector Measurement...
- Page 33 All manuals and user guides at all-guides.com Setup the i1Pro device for projector measurements. 1. Place the i1Pro device on the tripod holder next to the projector or at a distance in front of your screen. 2. Open the locking screw on the tripod holder and adjust the angle of the i1Pro device.
- Page 34 All manuals and user guides at all-guides.com General Maintenance To maintain the measurement performance of your i1Pro over its life time, it is important to observe some rules and to periodically clean certain parts that are critical for measurement performance. transport the i1Pro must be always shipped in its original packaging.
- Page 35 All manuals and user guides at all-guides.com i1Pro device may become dusty after some time. You can remove the protective glass to clean it and the inside of the limiting aperture: 1. To remove the limiting aperture turn it clockwise until the arrow points to the “unlocked”...
- Page 36 All manuals and user guides at all-guides.com Troubleshooting...
- Page 37 2. Perform a functionality check by following the instructions given from the i1Diagnostics Software. 3. If i1Diagnostics software reports an error store the test report and contact your nearest X-Rite Support Center. As an alternative you can also take a look at our online support resources http://xrite.com/support/i1Profiler to troubleshoot your issue.
- Page 38 Repairs or replacement by X-Rite shall not revive an otherwise expired warranty, nor shall the same extend the duration of a warranty. X-Rite shall in no event be liable for losses or costs to Buyer in manufacturing, or for Buyer‘s overhead, other expenses, lost profits, goodwill, or any other special, indirect, consequential, incidental or other damages to...
- Page 39 SUPPORT OPTIONS We are confident you will be pleased with your new X-Rite product. At the same time, we understand your need for on-demand support and training in today’s complex and rapidly evolving workflows. Because of this we are making the following on-line and free support tools available to registered users.
- Page 40 All manuals and user guides at all-guides.com Specification Spectral technology (holographic diffraction grating with 128 pixel diode array) ® engine: with built-in wavelengths check Spectral range: 380 - 730 nm Physical sampling interval: 3.5 nm Optical resolution: 10 nm Spectral reporting: 380 nm ...
- Page 41 10 x 10 mm (0.39” x 0.39”) (Width x Height) without sensor ruler Inter-Instrument-Agreement: 0.4 E94* average, 1.0 E94* max. (deviation from X-Rite manufacturing standard at a temperature of 23ºC (73.4ºF) on 12 BCRA tiles (D50, 2º)) Short-term repeatability: 0.1 E94* on white (D50,2°, mean of 10 measurements every 3 s on...
- Page 42 All manuals and user guides at all-guides.com Minimum System Requirements Minimum System Requirements Macintosh ® Intel CPU, Mac OS X 10.5.8, 10.6.8 or 10.7 (with latest upgrades installed), 1 GB of available RAM, 2 GB of available ® hard disk space, monitor resolution of 1024 x 600 pixels or higher, powered USB port, DVD drive or high speed internet connection to download, install and update the software.
- Page 43 All manuals and user guides at all-guides.com Benutzerhandbuch Inhaltsverzeichnis Lieferumfang Geräteübersicht Installation Gerätestatusanzeige Gerätekalibrierung Streifenmessung Einfache Streifenmessung Doppelte Streifenmessung Einzelmessung Monitormessung Umgebungslichtmessung Projektormessung Allgemeine Wartung Fehlerbehebung Garantie Spezifikationen Minimale Systemvoraussetzungen...
- Page 44 All manuals and user guides at all-guides.com Lieferumfang...
- Page 45 All manuals and user guides at all-guides.com Stativplatte (optional) Stativhalterung (optional) Umgebungslicht-Messkopf (optional) Schutzdeckel (optional) Monitorhalterung Positionsblende Messgerät Tragekoffer Messunterlage Lineal (optional) (optional) Software-DVD Zertifikat Benutzerhandbuch...
- Page 46 All manuals and user guides at all-guides.com Geräteübersicht Spektralfotometer Spectrophotometer...
- Page 47 All manuals and user guides at all-guides.com Limiting Aperture Tubus Measurement Button Messtaste Status Indicators Statusanzeige Type Label with Serial Number Typenschild mit Seriennummer Positionssensor Positioning Sensor Referenzpunkte für Linealbefestigung Reference Gap for Ruler Mount Anschlussstelle für Zubehör Mounting Interface for Accessories USB Connector USB-Verbindung...
- Page 48 All manuals and user guides at all-guides.com Installation...
- Page 49 Ihres Computers an. Bei korrekter Verbindung leuchten nun beide Status-LEDs in weiß. Betreiben Sie das X-Rite i1Pro nur an der USB-Schnittstelle Ihres Computers und nicht an einem USB-Hub oder USB-Schnittstellen, die nicht über eine eigene Stromversorgung verfügen. Das i1Pro benötigt für den Betrieb einen USB-Anschluss mit 5 V 500 mA.
- Page 50 All manuals and user guides at all-guides.com Gerätestatusanzeige...
- Page 51 All manuals and user guides at all-guides.com Auf der Oberseite des i1Pro-Gehäuses befinden sich zwei Status-LEDs. Diese LEDs zeigen die verschiedenen Gerätezustände an, und leiten Sie durch den Messvorgang. Gerätestatus: Gerät ist nicht an den Computer angeschlossen ODER Software wurde nicht gestartet ODER Software ist nicht auf dem aktuellsten Stand.
- Page 52 All manuals and user guides at all-guides.com Gerätekalibrierung...
- Page 53 All manuals and user guides at all-guides.com Bitte kalibrieren Sie zuerst Ihr Gerät, ehe Sie anfangen zu messen. Falls Sie mehrere Geräte besitzen, dann überprüfen Sie bitte vor der Messung, ob die Seriennummer i1Pros übereinstimmt. Weitere durch einen Schieber geschützt. Öffnen Sie den Schieber, bis er einrastet, um auf 2.
- Page 54 All manuals and user guides at all-guides.com Streifenmessung Virtuelle Blende virtuelle Blende ist abhängig von der Messfeldgröße gültige Messung (geeignet für die Mittelwertbildung) ungültige Messung Das i1Pro führt während einer Streifenmessung bis zu 200 Messungen pro Sekunde aus. Das Gerät verfügt über eine Messfelderkennungsfunktion. Hiermit kann ermittelt werden, welche Messungen gültig (Messung auf dem Messfeld) und welche ungültig sind (Messung zwischen zwei Feldern).
- Page 55 All manuals and user guides at all-guides.com Messbedingungen Das Messgerät i1Pro unterstützt verschiedene Messarten. Die Streifen auf dem Testchart Messwerte benötigen. Bei einer einfachen Streifenmessung und im ersten Durchgang einer doppelten Streifenmessung werden die Messfelder im i1Pro mit einer Wolfram- Glühlampe beleuchtet.
- Page 56 All manuals and user guides at all-guides.com Streifenmessung...
- Page 57 5. Gerätetubus muss während des Scans glatt und problemlos über die Führungsschiene gleiten. Der Abstand zwischen dem i1Pro und der Oberfläche des Bedruckstoffs ist für die Messgenauigkeit sehr wichtig. Gerätetubus oder Führungsschiene sollten ausgetauscht werden, falls sie Abnutzungserscheinungen zeigen. Sie erhalten Ersatzteilen von Ihrem X-Rite Servicecenter.
- Page 58 All manuals and user guides at all-guides.com Einfache Streifenmessung 1. Gerät muss kalibriert sein, Statusanzeige muss weiß pulsieren. 2. Lineal mit Gerät auf Papierweiß vor Zeile 1 des Testcharts platzieren. Messrichtung (rechts nach links oder umgekehrt) ist egal. 3. Softwaremodus “Einfache Streifenmessung” wählen. 4.
- Page 59 All manuals and user guides at all-guides.com 2x rot blinken Zeilenmessung fehlerhaft, einige Messfelder wurden nicht erkannt. Bitte messen Sie die Zeile neu, diesmal langsamer und achten Sie darauf, dass das Gerät auf dem Testchart vor dem ersten Messfeld startet und nach dem letzten Messfeld endet.
- Page 60 All manuals and user guides at all-guides.com Doppelte Streifenmessung 1. Gerät muss kalibriert sein, Statusanzeige muss weiß pulsieren. 2. Lineal mit Gerät auf Papierweiß vor Zeile 1 des Testcharts platzieren. Messrichtung (rechts nach links oder umgekehrt) ist egal. 3. Softwaremodus “Doppelte Streifenmessung” wählen. 4.
- Page 61 All manuals and user guides at all-guides.com 2x rot blinken Zeilenmessung fehlerhaft, einige Messfelder wurden nicht erkannt. Bitte messen Sie die Zeile neu, diesmal langsamer und achten Sie darauf, dass das Gerät auf dem Testchart vor dem ersten Messfeld startet und nach dem letzten Messfeld endet. 4x rot blinken Zeilenmessung fehlerhaft, Messung wurde zu früh gestartet und die Glühlampe war noch nicht bereit.
- Page 62 All manuals and user guides at all-guides.com Einzelmessung...
- Page 63 All manuals and user guides at all-guides.com Vor der Einzelmessung müssen Sie das i1Pro auf der Positionsblende befestigen. Bitte achten Sie darauf, dass das Gerät kalibriert ist, und dass die Statusanzeige vor der Installation weiß pulsiert. Weitere Informationen zur Einzelmessung finden Sie im Handbuch Ihrer Software.
- Page 64 All manuals and user guides at all-guides.com Monitormessung...
- Page 65 All manuals and user guides at all-guides.com Vor der Monitormessung müssen Sie das i1Pro auf der Monitorhalterung befestigen. Bitte achten Sie darauf, dass das Gerät kalibriert ist, und dass die Statusanzeige vor der Installation weiß pulsiert. 1. Länge des Gegengewichts an der Halterung ist variabel und kann an das Monitorformat angepasst werden.
- Page 66 All manuals and user guides at all-guides.com Umgebungslichtmessung...
- Page 67 All manuals and user guides at all-guides.com Bitte befestigen Sie vor der Messung den Umgebungslicht-Messkopf am Tubus des i1Pro. Falls Sie mehrere Geräte besitzen, dann überprüfen Sie bitte vor der Messung, ob die Seriennummer auf dem Umgebungslicht-Messkopf mit der des i1Pros übereinstimmt.
- Page 68 All manuals and user guides at all-guides.com Projektormessung...
- Page 69 All manuals and user guides at all-guides.com Für die Messung eines Projektors muss die Stativhalterung auf der Stativgewindeplatte installiert werden. Alternativ kann diese auch mit einer Standardstativschraube (1/4 Zoll) auf einem Stativ befestigt werden. Anschließend muss das i1Pro in der Stativhalterung installiert werden.
- Page 70 All manuals and user guides at all-guides.com Projektormessung...
- Page 71 All manuals and user guides at all-guides.com Richten Sie nun das i1Pro für die Projektormessung ein. 1. i1Pro in Stativhalterung befestigen und neben dem Projektor oder vor der Projektion aufbauen. 2. Verschlussschraube an der Stativhalterung öffnen und Winkel des i1Pro anpassen. Gerätetubus muss auf die Mitte der Projektion gerichtet sein.
- Page 72 All manuals and user guides at all-guides.com Allgemeine Wartung Sie sollten beim Umgang mit Ihrem i1Pro verschiedene Regeln beachten und entscheidende Teile des Geräts regelmäßig reinigen, um mit Ihrem i1Pro immer beste Messergebnisse zu erzielen. i1Pro ist stoß- und schlagempfindlich. Vermeiden Sie Transportschäden, und transportieren und versenden Sie deshalb das i1Pro immer nur in der originalen Verpackung.
- Page 73 All manuals and user guides at all-guides.com Reinigung das Schutzglas, und säubern Sie Glas und Tubus. des i1Pro zeigen. 1. Tubus im Uhrzeigersinn drehen. Pfeil muss auf das Symbol 2. Tubus vom Gerät entfernen. Bitte Optik nicht berühren. 3. Schutzglasschieber aus dem Tubus herausschieben. 4.
- Page 74 All manuals and user guides at all-guides.com Fehlerbehebung...
- Page 75 All manuals and user guides at all-guides.com Software i1Diagnostics Verwenden Sie das Programm i1Diagnostics, wenn Sie befürchten, dass das i1Pro nicht richtig funktioniert. Wenn die hat der interne Diagnosesensor des i1Pro ein Problem vorgefunden. Gehen Sie bitte folgendermaßen vor: 1. i1Diagnostics Software starten. 2.
- Page 76 Zufriedenheit von X-Rite nachgewiesen wurde. Die Garantiefrist wird durch Reparatur oder Aust ausch defekter Teile durch X-Rite nicht erneuert bzw. verlängert. X-Rite haftet in keinem Fall für Verluste oder Produktions- kosten, zusätzliche Betriebskosten, sonstige Auslagen oder Gewinneinbußen, für eine Reduzierung des Unternehmens- wertes oder andere besondere, indirekte, versehentliche oder Folgeschäden an Personen oder Eigentumswerten, die...
- Page 77 Sie sich an Ihren X-Rite-Vertragshändler für weitere Informationen. KUNDENDIENST/SUPPORT Sie werden an Ihrem neuen X-Rite Produkt viel Freude haben. Wir möchten Ihnen hiermit jedoch zusätzlich Support und Training für die komplexen Workflows und häufig wechselnden Prozesse anbieten, die Sie bedarfsgesteuert abrufen können.
- Page 78 All manuals and user guides at all-guides.com Technische Daten Spektral- ® -Technologie (holografisches Beugungsgitter mit einem 128-Pixel- technologie: Diodenraster) mit integriertem Wellenlängentest Spektralbereich 380 - 730 nm Physikalisches Messintervall 3,5 nm Optische Auflösung 10 nm Spektrale Auflösung 380 nm ... 730 nm mit 10 nm Intervall Messfrequenz im Scanmodus 200 Messungen pro Sekunden Optik:...
- Page 79 10 x 10 mm (Breite x Höhe) ohne Sensorlineal Messgeräteübereinstimmungt 0,4 E94* im Mittel, max. 1,0 E94* (Abweichung vom X-Rite Fertigungsstandard bei 23 °C im Einzelmessmo- 0,1 E94* auf weiß (D50/2°, Mittel aus 10 Messungen auf weiß alle 3 s ) Emissions-...
- Page 80 Anschlüssen LUT unterstützt, benötigt. Für die Installation und Deinstallation der Software muss der Benutzer administrative Zugriffsrechte haben. WICHTIG: Das X-Rite i1Pro kann mit Versionen des i1 Versionen von i1Pro entwickelt wurden. Das i1 funktionieren nicht. Um den vollen Funktionsumfang des Geräts ausnutzen zu können sollten Sie die neueste Version...
- Page 81 All manuals and user guides at all-guides.com Manuel de l’utilisateur Table des matières Contenu du coffret Vue d’ensemble de l’instrument Installation Indicateurs d’état de l’instrument Étalonnage de l’instrument Mesure de balayage Mesure de balayage en une seule passe Mesure de balayage en deux passes Mesure d’accompagnement Mesure d’écran Mesure de l’éclairage ambiant...
- Page 82 All manuals and user guides at all-guides.com Contenu du coffret...
- Page 83 All manuals and user guides at all-guides.com Base du support pour trépied (en option) Support pour trépied (en option) Tête de mesure de l’éclairage ambiant (en option) Cache de protection (en option) Support pour écran Semelle de visée Plaque d’étalonnage Instrument de mesure Sacoche de transport Câble USB...
- Page 84 All manuals and user guides at all-guides.com Vue d´ensemble de l´instrument Spectrophotomètre Spectrophotometer...
- Page 85 All manuals and user guides at all-guides.com Limiting Aperture Ouverture de limitation de faisceau Measurement Button Bouton de mesure Status Indicators Indicateurs d’état Étiquette du type d’instrument avec numéro de série Type Label with Serial Number Capteur de positionnement Positioning Sensor Emplacement de référence pour le montage de la règle Reference Gap for Ruler Mount Emplacement de fixation pour les accessoires...
- Page 86 All manuals and user guides at all-guides.com Installation...
- Page 87 4. Une fois le logiciel installé, connectez l’i1Pro au port USB de votre ordinateur. En cas de connexion réussie, les deux indicateurs d’état émettent une lumière blanche continue. L’i1Pro de X-Rite ne fonctionne pas s’il est connecté au port USB de votre nominale de l’i1Pro est de 5 V 500 mA.
- Page 88 All manuals and user guides at all-guides.com Indicateurs d´état de l´instrument...
- Page 89 All manuals and user guides at all-guides.com L’i1Pro est équipé de deux indicateurs d’état situés sur la partie supérieure de l’instrument. Ceux-ci fournissent des informations sur l’état actuel de l’instrument et vous guident tout au long du processus de mesure. État général de l’instrument : ou la dernière version du logiciel de contrôle de l’instrument n’est pas installée sur votre ordinateur.
- Page 90 All manuals and user guides at all-guides.com Étalonnage de l´instrument...
- Page 91 All manuals and user guides at all-guides.com Si vous possédez plusieurs instruments, assurez-vous que le numéro de série figurant i1Pro. Reportez-vous au guide de l’utilisateur de votre logiciel de mesure pour obtenir davantage d’informations sur le processus d’étalonnage. 1. Au centre de la plaque d’étalonnage se trouve un cache coulissant qui protège le déclic se fasse entendre pour exposer le carreau blanc de référence.
- Page 92 All manuals and user guides at all-guides.com Mesure de balayage Technologie d’ouverture virtuelle Ouverture virtuelle lors d’un balayage en fonction de la longueur du patch Mesure valide (utilisée pour l’établissement d’une moyenne) Mesure non valide Lors d’une mesure de balayage, l’i1Pro effectue 200 mesures par seconde. La fonction de détection automatique des patchs de l’instrument fait la distinction entre les mesures utilisables (prises sur un patch) et les mesures inutilisables (prises entre deux patchs).
- Page 93 All manuals and user guides at all-guides.com Conditions de mesure L’instrument de mesure i1Pro prend en charge plusieurs conditions de mesure. Selon la façon dont vous souhaitez gérer les UV lors du balayage de votre charte, vous devez mesurer chaque ligne de votre charte test une ou deux fois. Lors d’une mesure de balayage en une seule passe et lors de la première passe d’une mesure de balayage de l’i1Pro.
- Page 94 All manuals and user guides at all-guides.com Mesure de balayage...
- Page 95 La distance entre l’i1Pro et la surface du substrat d’impression est déterminante pour la précision de vos mesures. Si l’ouverture de limitation de faisceau de l’instrument ou le bord du rail de guidage de la règle est usé, vous contractez un centre de services X-Rite.
- Page 96 All manuals and user guides at all-guides.com Mesure de balayage en une seule passe 1. Assurez-vous que votre instrument est étalonné et que les indicateurs d’état émettent une lumière pulsatoire blanche. 2. Positionnez la règle sur laquelle repose l’instrument sur la partie blanche du papier, 3.
- Page 97 All manuals and user guides at all-guides.com 2 lumières vertes La ligne a été mesurée correctement. 2 lumières rouges La ligne n’a pas été mesurée correctement, car tous les patchs n’ont pas été reconnus. Remesurez la ligne, mais cette fois en réduisant la vitesse de mesure et en vous assurant de démarrer la mesure avant le premier patch de la charte test et de terminer la mesure après le dernier patch.
- Page 98 All manuals and user guides at all-guides.com Mesure de balayage en deux passes 1. Assurez-vous que votre instrument est étalonné et que les indicateurs d’état émettent une lumière pulsatoire blanche. 2. Positionnez la règle sur laquelle repose l’instrument sur la partie blanche du papier, 3.
- Page 99 All manuals and user guides at all-guides.com 2 lumières rouges La ligne n’a pas été mesurée correctement, car tous les patchs n’ont pas été reconnus. Remesurez la ligne, mais cette fois en réduisant la vitesse de mesure et en vous assurant de démarrer la mesure avant le premier patch de la charte test et de terminer la mesure après le dernier patch.
- Page 100 All manuals and user guides at all-guides.com Mesure d´accompagnement...
- Page 101 All manuals and user guides at all-guides.com Pour prendre une mesure d’accompagnement, vous devez tout d’abord monter l’i1Pro sur la semelle de visée. Assurez-vous que votre instrument est étalonné et que les indicateurs d’état émettent une lumière pulsatoire blanche avant de le monter. Reportez- vous au guide de l’utilisateur de votre logiciel de mesure pour obtenir davantage d’informations sur le processus de mesure d’accompagnement.
- Page 102 All manuals and user guides at all-guides.com Mesure d´écran...
- Page 103 All manuals and user guides at all-guides.com Pour prendre une mesure d’écran, vous devez tout d’abord monter l’i1Pro sur le support pour écran. Assurez-vous que votre instrument est étalonné et que les indicateurs d’état émettent une lumière pulsatoire blanche avant de le monter. 1.
- Page 104 All manuals and user guides at all-guides.com Mesure de l´éclairage ambiant...
- Page 105 All manuals and user guides at all-guides.com Avant d’initier une mesure, fixez la tête de mesure de l’éclairage ambiant sur l’ouverture de limitation de faisceau de l’i1Pro. Si vous possédez plusieurs instruments, assurez- vous que le numéro de série figurant sur la tête de mesure de l’éclairage ambiant correspond au numéro de série de votre i1Pro.
- Page 106 All manuals and user guides at all-guides.com Mesure de projecteur...
- Page 107 All manuals and user guides at all-guides.com Pour prendre une mesure de projecteur avec l’i1Pro, vous devez tout d’abord monter le support pour trépied sur sa base ou sur tout autre trépied muni d’une vis standard (1/4 pouce, soit 6,35 mm). Montez ensuite l’i1Pro sur le support pour trépied. Assurez-vous que votre instrument est étalonné...
- Page 108 All manuals and user guides at all-guides.com Mesure de projecteur...
- Page 109 All manuals and user guides at all-guides.com Configurez l’i1Pro pour prendre des mesures de projecteur. 1. Placez l’i1 2. Desserrez la vis de réglage située sur le support pour trépied et ajustez l’angle de l’i1Pro. L’ouverture de limitation de faisceau de l’i1Pro doit pointer vers le centre de votre écran.
- Page 110 All manuals and user guides at all-guides.com Maintenance générale Pour garantir la bonne performance de votre i1Pro tout au long de son cycle de vie, il est important d’observer quelques règles de base et de nettoyer périodiquement certaines i1Pro est sensible aux chocs mécaniques. Pour éviter tout dommage, transportez systématiquement l’i1Pro dans son emballage d’origine.
- Page 111 All manuals and user guides at all-guides.com Avec le temps, il est possible que des poussières s’accumulent sur le verre de protection de l’ouverture de limitation de faisceau. Vous pouvez ôter le verre de protection pour le 1. Pour ôter l’ouverture de limitation de faisceau, tournez-la dans le sens des (position déverrouillée) sur l’i1Pro.
- Page 112 All manuals and user guides at all-guides.com Dépannage...
- Page 113 2. Effectuez un contrôle des fonctionnalités en suivant les instructions du logiciel i1Diagnostics. 3. Si le logiciel i1Diagnostics signale une erreur, enregistrez le rapport de test et contactez le centre de services X-Rite le plus proche de chez vous. Vous pouvez http:// xrite.com/support/i1Profiler...
- Page 114 X-Rite. Une réparation ou un remplacement par X-Rite ne constitue pas une reprise d’une garantie expirée et ne prolonge pas la durée d’une garantie en cours. X-Rite ne pourra en aucun cas être tenue pour responsable de pertes ou de dommages de fabrication encourus par l’Acquéreur, de frais généraux ou autres dépenses, personnes ou aux biens, résultant d’une rupture de l’une ou l’autre clause de la présente garantie.
- Page 115 RECERTIFICATION X-Rite vous recommande de faire recertifier votre spectrophotomètre i1Pro tous les ans. Contactez votre revendeur X-Rite ou le centre de services X-Rite le plus proche de chez vous pour en savoir plus sur la recertification. CENTRES DE SERVICES chez vous ou contactez votre revendeur X-Rite pour plus d’informations.
- Page 116 All manuals and user guides at all-guides.com Spécifications Moteur Technologie i1 (réseau de diffraction holographique avec barrette de ® spectral : diodes de 128 pixels) avec vérification des longueurs d’onde intégrée Plage spectrale : 380 - 730 nm Intervalle d'échantillonnage 3,5 nm physique : Résolution optique :...
- Page 117 All manuals and user guides at all-guides.com OBC : Correction des azurants optiques avec le logiciel i1Profiler Étalonnage : Manuel sur le carreau en céramique blanc externe Fond utilisé pour les mesures : panneau de support) Épaisseur maximale du support : 3 mm (0,12 pouce) sur le panneau de support Taille minimale de patch en mode de 7 x 10 mm (0,28 x 0,39 pouce) (hauteur x largeur) avec la règle...
- Page 118 All manuals and user guides at all-guides.com Configuration système requise Macintosh ® Processeur Intel ® RAM disponible, 2 Go d’espace disque dur disponible, résolution d’écran de 1024 x 600 pixels ou supérieure, port L’affichage sur deux moniteurs nécessite deux cartes vidéo ou une carte vidéo double moniteur prenant en charge le chargement de tables de conversion pour deux écrans.
- Page 119 All manuals and user guides at all-guides.com Manuale dell‘utente Sommario Contenuto della confezione Panoramica del dispositivo Installazione Indicatori di stato del dispositivo Calibrazione del dispositivo Misurazione da scansione Misurazione da scansione singola Misurazione da scansione doppia Misurazione spot Misurazione display Misurazione luce ambiente Misurazione proiettore Manutenzione generale...
- Page 120 All manuals and user guides at all-guides.com Contenuto della confezione...
- Page 121 All manuals and user guides at all-guides.com Piastra base del supporto per treppiede (opzionale) Supporto per treppiede (opzionale) Testina per misurazione della luce ambiente (opzionale) Coperchietto di protezione (opzionale) Supporto per display Target di posizione Piastra base di calibrazione Dispositivo di misurazione Valigetta trasporto Cavo USB Base di appoggio...
- Page 122 All manuals and user guides at all-guides.com Panoramica del dispositivo Spettrofotometro Spectrophotometer...
- Page 123 All manuals and user guides at all-guides.com Limiting Aperture Apertura misurazione Measurement Button Pulsante misurazione Status Indicators Indicatori di stato Type Label with Serial Number Etichetta del tipo con numero di serie Sensore di posizione Positioning Sensor Spazio di riferimento per montaggio del righello Reference Gap for Ruler Mount Interfaccia di montaggio degli accessori Mounting Interface for Accessories...
- Page 124 All manuals and user guides at all-guides.com Installazione...
- Page 125 USB del computer. Se collegato con successo, entrambi indicatori di stato si accendono bianco fisso. Il dispositivo X-Rite i1 sulla tastiera o a un hub USB senza alimentazione elettrica esterna. Energia nominale di i1Pro: 5 V 500 mA.
- Page 126 All manuals and user guides at all-guides.com Indicatori di stato del dispositivo...
- Page 127 All manuals and user guides at all-guides.com Il dispositivo i1Pro è dotato di due indicatori di stato sul suo corpo superiore. Gli indicatori di stato del dispositivo forniscono un feedback sullo stato attuale del dispositivo e guidano l’utente attraverso il processo di misurazione. Stato generale del dispositivo: Il dispositivo non viene collegato al computer, il software non è...
- Page 128 All manuals and user guides at all-guides.com Calibrazione del dispositivo...
- Page 129 All manuals and user guides at all-guides.com Prima di iniziare la misurazione è necessario calibrare il dispositivo. Se si dispone di più dispositivi, assicurarsi che il numero di serie sul retro della piastra base di calibrazione corrisponde al numero di serie del dispositivo i1Pro. Per ulteriori informazioni sul processo di calibrazione, vedere il manuale d’uso del software di misurazione.
- Page 130 All manuals and user guides at all-guides.com Misurazione da scansione Tecnologia di apertura virtuale Apertura virtuale durante la scansione secondo la lunghezza dei patch Misurazione valida (per calcolo della media) Misurazione non valida Durante una misurazione da scansione, il dispositivo i1Pro esegue 200 misurazioni al secondo.
- Page 131 All manuals and user guides at all-guides.com Condizioni di misurazione Il dispositivo di misurazione i1Pro supporta varie condizioni di misurazione. A seconda di come si desidera la scansione di un target per UV, è necessario misurare ogni riga del diagramma di prova una o due volte. In una misurazione da scansione singola, e durante il primo passaggio della misurazione da scansione doppia, i patch sono illuminati con la lampada a filamento di tungsteno nel dispositivo i1Pro.
- Page 132 All manuals and user guides at all-guides.com Misurazione da scansione...
- Page 133 è fondamentale per la precisione delle misurazioni. Se l’apertura di misurazione del dispositivo o il bordo del binario guida del righello sono usurati, si consiglia di sostituirli. É possibile acquistare i pezzi di ricambio tramite i Centri di Servizi X-Rite.
- Page 134 All manuals and user guides at all-guides.com Misurazione da scansione singola 1. Accertarsi che il dispositivo sia calibrato e gli indicatori di stato pulsano in bianco. 2. Posizionare il righello con il dispositivo sulla carta bianca davanti alla riga #1 del destra o da destra a sinistra.
- Page 135 All manuals and user guides at all-guides.com 2 x verde lampeggiante Misurazione della riga riuscita. 2 x rosso lampeggiante Misurazione della riga non riuscita perché non tutti i patch potrebbero essere riconosciuti. Misurare di nuovo la riga, dispositivo inizia e finisce la misurazione prima e dopo i patch del diagramma di prova.
- Page 136 All manuals and user guides at all-guides.com Misurazione da scansione doppia 1. Accertarsi che il dispositivo sia calibrato e gli indicatori di stato pulsano in bianco. 2. Posizionare il righello con il dispositivo sulla carta bianca davanti alla riga #1 del destra o da destra a sinistra.
- Page 137 All manuals and user guides at all-guides.com 2 x rosso lampeggiante Misurazione della riga non riuscita perché non tutti i patch potrebbero essere riconosciuti. Misurare di nuovo la riga, dispositivo inizia e finisce la misurazione prima e dopo i patch del diagramma di prova. 4 x rosso lampeggiante Misurazione della riga non riuscita perché...
- Page 138 All manuals and user guides at all-guides.com Misurazione spot...
- Page 139 All manuals and user guides at all-guides.com Per preparare il dispositivo i1Pro per una misurazione spot, è necessario montare il dispositivo i1Pro sul target di posizione. Accertarsi che il dispositivo sia calibrato e gli indicatori di stato pulsano in bianco prima di montare il dispositivo. Per ulteriori informazioni sul processo di misurazione spot, vedere il manuale d’uso del software di misurazione.
- Page 140 All manuals and user guides at all-guides.com Misurazione display...
- Page 141 All manuals and user guides at all-guides.com Per preparare il dispositivo i1Pro per una misurazione display, è necessario montare il dispositivo i1Pro sul supporto per display. Accertarsi che il dispositivo sia calibrato e gli indicatori di stato pulsano in bianco prima di montare il dispositivo. 1.
- Page 142 All manuals and user guides at all-guides.com Misurazione luce ambiente...
- Page 143 All manuals and user guides at all-guides.com Prima di misurare, collocare la testina di misurazione della luce ambiente sull’apertura di misurazione del dispositivo i1Pro. Se si dispone di più dispositivi, assicurarsi che il numero di serie sulla testina di misurazione della luce ambiente corrisponde al numero di serie del dispositivo i1 utilizzata anche in combinazione con il supporto per treppiede.
- Page 144 All manuals and user guides at all-guides.com Misurazione proiettore...
- Page 145 All manuals and user guides at all-guides.com Per preparare il dispositivo i1Pro per le misurazioni di proiettori è necessario montare il supporto per treppiede sulla piastra base corrispondente o su un proprio treppiede con una vite standard 1/4”. Dopodiché è necessario montare il dispositivo i1Pro sul supporto per treppiede.
- Page 146 All manuals and user guides at all-guides.com Misurazione proiettore...
- Page 147 All manuals and user guides at all-guides.com Imposta il dispositivo i1Pro per eseguire misurazioni di proiettori. 1. Posizionare il dispositivo i1Pro sul supporto per treppiede accanto al proiettore o a una distanza davanti allo schermo. 2. Aprire la vite di fissaggio sul supporto per treppiede e regolare l’angolazione del dispositivo i1Pro.
- Page 148 All manuals and user guides at all-guides.com Manutenzione generale Per mantenere la prestazione colorimetrica del dispositivo i1Pro durante sua durata, è importante osservare alcune regole e di pulire periodicamente alcune parti che sono fondamentali per la prestazione delle misurazioni. i1Pro è sensibile agli urti meccanici. Il dispositivo i1Pro deve essere trasportato nella confezione originale per evitare danni.
- Page 149 All manuals and user guides at all-guides.com impolverarsi dopo qualche tempo. È possibile rimuovere il vetro di protezione per pulirlo e l’interno dell’apertura di misurazione: 1. Per rimuovere l’apertura di misurazione, ruotarla in senso orario fino a quando la freccia indichi la marcatura “unlocked” sul dispositivo i1Pro.
- Page 150 All manuals and user guides at all-guides.com Soluzione dei problemi...
- Page 151 All manuals and user guides at all-guides.com Software diagnostico Utilizzare il software i1Diagnostics se si crede che il dispositivo i1Pro non funziona correttamente. Se gli indicatori di stato diventano rosso fisso dopo la calibrazione, significa che il diagnostico del sensore interno del dispositivo i1Pro ha scoperto un problema.
- Page 152 TERMINI DELLA GARANZIA X-Rite garantisce questo prodotto da qualsiasi difetto dei materiali e della manifattura per un periodo di dodici (12) mesi gratuitamente le parti difettose a sua discrezione. (Questa garanzia non si applica ai pezzi di consumo.) Questa garanzia non si applica a beni forniti in virtù...
- Page 153 - Al momento si sta usando un hardware e una piattaforma (sistema operativo) supportati. workflow, nonché di un’assistenza successiva ai periodi di garanzia, ci pregiamo di offrire programmi di assistenza e opzioni di formazione a pagamento a cura degli esperti del colore di X-Rite. Per maggiori informazioni, visitare il sito Web all’indirizzo: www.xrite.com/i1Profiler/Supportoptions...
- Page 154 All manuals and user guides at all-guides.com Specifica Meccanismo tecnologia i1 (reticolo a diffrazione olografica con matrice fotodiodi di ® spettrale: 128 pixel) con controllo incorporato delle lunghezze d’onda Intervallo spettrale: 380 - 730 nm Intervallo fisico di campionamento: 3,5 nm Risoluzione ottica: 10 nm Rapporto spettrale:...
- Page 155 Concordanza interstrumentale: media di 0.4 E94*, massima di 1.0 E94* (deviazione dallo standard di fabbricazione X-Rite a 23 °C (73.4 °F) su 12 ceramiche BCRA (D50, 2°)) 0.1 E94* su bianco (D50, 2° rispetto al valore medio di 10 misurazioni...
- Page 156 All manuals and user guides at all-guides.com Requisiti minimi di sistema Macintosh ® Processore Intel ® , Mac OS X 10.5.8, 10.6.8 o 10.7 (con gli aggiornamenti più recenti installati), 1 GB di RAM disponibile, 2 GB di spazio disponibile sul disco fisso, monitor con risoluzione di 1024 x 600 pixel o superiore, porta supporto per doppio display richiede la presenza di 2 schede video oppure di una scheda video Dual Head che supporti le tabelle LUT a doppio video.
- Page 157 All manuals and user guides at all-guides.com Manual de uso Contenido Contenido del paquete Visión general del dispositivo Instalación Indicadores de estado del dispositivo Calibrar el dispositivo Medición por digitalización Medición por digitalización única Medición por digitalización doble Medición de punto Medición de pantallas Medición de la luz ambiente Medición de proyectores...
- Page 158 All manuals and user guides at all-guides.com Contenido del paquete...
- Page 159 All manuals and user guides at all-guides.com Placa base del soporte para trípode (opcional) Soporte para trípode (opcional) Cabezal de medición de la luz ambiente (opcional) Tapa de protección (opcional) Soporte para pantalla Marcador de posicionamiento Placa base de calibración Dispositivo de medición Dispositivo de medición Dispositivo de medición...
- Page 160 All manuals and user guides at all-guides.com Spectrophotometer Espectrofotómetro...
- Page 161 All manuals and user guides at all-guides.com Limiting Aperture Abertura de medición Measurement Button Botón de medición Status Indicators Indicadores de estado Type Label with Serial Number Etiqueta del tipo con número de serie Sensor de posicionamiento Positioning Sensor Espacio de referencia para montaje de la regla Reference Gap for Ruler Mount Interfaz de montaje para accesorios Mounting Interface for Accessories...
- Page 162 All manuals and user guides at all-guides.com Instalación...
- Page 163 fijo. El dispositivo X-Rite i1Pro no funciona si está conectado al puerto USB del teclado de la computadora o a un concentrador USB sin suministro de energía externo. Energía nominal de i1Pro: 5 V...
- Page 164 All manuals and user guides at all-guides.com Indicadores de estado del dispositivo...
- Page 165 All manuals and user guides at all-guides.com El dispositivo i1Pro está equipado con dos indicadores de estado en la parte superior de su cuerpo. Los indicadores de estado del dispositivo le proporcionan información sobre el estado actual del dispositivo y le guiarán a lo largo del proceso de medición. Estado general del dispositivo: Apagado El dispositivo no está...
- Page 166 All manuals and user guides at all-guides.com Calibrar el dispositivo...
- Page 167 All manuals and user guides at all-guides.com Antes de comenzar, debe calibrar el dispositivo. Si tiene varios dispositivos, asegúrese de que el número de serie en la parte posterior de la placa base de calibración coincide con el número de serie del dispositivo i1Pro. Consulte el manual del usuario del software de medición para obtener más información sobre el proceso de calibración.
- Page 168 All manuals and user guides at all-guides.com Medición por digitalización Tecnología de abertura virtual La abertura virtual durante la digitalización es en función de la longitud de los parches Medición válida (utilizada para el promedio) Medición no válida Durante una medición por digitalización, el dispositivo i1Pro ejecuta 200 mediciones por segundo.
- Page 169 All manuals and user guides at all-guides.com Condiciones de medición El dispositivo de medición i1Pro acepta varias condiciones de medición. Dependiendo de cómo se desea digitalizar un objetivo para UV, es necesario medir cada fila del gráfico de prueba una o dos veces. En una medición por digitalización única, y durante el primer paso de la medición por digitalización doble, los parches se iluminan con la lámpara de filamento de tungsteno en el dispositivo i1Pro.
- Page 170 All manuals and user guides at all-guides.com Medición por digitalización...
- Page 171 Si la abertura de medición del dispositivo o el borde del riel de guía de la regla estén desgastados, usted deberá reemplazarlos. Las piezas de repuesto se pueden pedir por medio de los Centros de Servicios de X-Rite.
- Page 172 All manuals and user guides at all-guides.com Medición por digitalización única 1. Asegúrese de que el dispositivo esté calibrado y que los indicadores de estado estén pulsando en color blanco. 2. Coloque la regla con el dispositivo sobre el papel blanco delante de la fila #1 del derecha o de derecha a izquierda.
- Page 173 All manuals and user guides at all-guides.com 2x verde parpadeante La fila se midió correctamente. 2x rojo parpadeante La fila no se ha medido correctamente, ya que no ha sido posible reconocer todos los parches. Mida la fila de nuevo, pero reduzca la velocidad de medición y asegúrese de que el dispositivo inicia y finaliza la medición antes y después de los parches del gráfico de prueba.
- Page 174 All manuals and user guides at all-guides.com Medición por digitalización doble 1. Asegúrese de que el dispositivo esté calibrado y que los indicadores de estado estén pulsando en color blanco. 2. Coloque la regla con el dispositivo sobre el papel blanco delante de la fila #1 del derecha o de derecha a izquierda.
- Page 175 All manuals and user guides at all-guides.com 2x rojo parpadeante La fila no se ha medido correctamente, ya que no ha sido posible reconocer todos los parches. Mida la fila de nuevo, pero reduzca la velocidad de medición y asegúrese de que el dispositivo inicia y finaliza la medición antes y después de los parches del gráfico de prueba.
- Page 176 All manuals and user guides at all-guides.com Medición de punto...
- Page 177 All manuals and user guides at all-guides.com Para preparar el dispositivo i1Pro para una medición de punto, es necesario montarlo en el objetivo de posicionamiento. Asegúrese de que el dispositivo esté calibrado y que los indicadores de estado estén pulsando en color blanco antes de montarlo. Consulte el manual del usuario del software de medición para obtener más información sobre el proceso de medición de punto.
- Page 178 All manuals and user guides at all-guides.com Medición de pantallas...
- Page 179 All manuals and user guides at all-guides.com Para preparar el dispositivo i1Pro para una medición de pantalla, es necesario montarlo en el soporte para pantalla. Asegúrese de que el dispositivo esté calibrado y que los indicadores de estado estén pulsando en color blanco antes de montarlo. 1.
- Page 180 All manuals and user guides at all-guides.com Medición de la luz ambiente...
- Page 181 All manuals and user guides at all-guides.com Antes de empezar a medir, coloque el cabezal de medición de la luz ambiente sobre la abertura de medición del dispositivo i1Pro. Si tiene varios dispositivos, asegúrese de que el número de serie en el cabezal de medición de la luz ambiente coincide con el número de serie del dispositivo i1Pro.
- Page 182 All manuals and user guides at all-guides.com Medición de proyectores...
- Page 183 All manuals and user guides at all-guides.com Para preparar el dispositivo i1Pro para la medición de la pantalla de un proyector, es necesario montar el soporte para trípode en la placa base correspondiente, o bien en un trípode con un tornillo estándar de 1/4” no fornecido. Después, monte el dispositivo i1Pro sobre el soporte para trípode.
- Page 184 All manuals and user guides at all-guides.com Medición de proyectores...
- Page 185 All manuals and user guides at all-guides.com Configure el dispositivo i1Pro para realizar mediciones de pantallas de proyectores. 1. Coloque el dispositivo i1Pro en el soporte para trípode al lado del proyector o a una distancia frente a la pantalla del proyector. 2.
- Page 186 All manuals and user guides at all-guides.com Mantenimiento general Para mantener el desempeño de las mediciones de su dispositivo i1Pro durante su tiempo de vida útil, es importante observar algunas reglas y limpiar periódicamente ciertas partes que son fundamentales para dicha finalidad. i1Pro es sensible a los choques mecánicos.
- Page 187 All manuals and user guides at all-guides.com i1Pro se puede ensuciar después de algún tiempo. Es posible sacar el vidrio de protección para limpiarlo y el interior de la abertura de medición: 1. Para sacar la abertura de medición, gírela en sentido horario hasta que la flecha en el dispositivo i1Pro.
- Page 188 All manuals and user guides at all-guides.com Solución de problemas...
- Page 189 3. Si el software i1Diagnostics comunica un error, guarde el informe de prueba y póngase en contacto con el Centro de Soporte X-Rite más próximo. Como alternativa, también se puede consultar nuestros recursos de soporte en línea:...
- Page 190 Por ningún motivo intente desmontar el dispositivo i1Pro de X-Rite. El desmontaje no autorizado del instrumento anulará todas las solicitudes de garantía. Póngase en contacto con el Soporte o el Centro de Soporte de X-Rite más próximo si considera que el instrumento ya no funciona o bien no funciona correctamente.
- Page 191 Porque reconocemos la necesidad de soporte avanzado relacionado con el uso del software i1Profiler y de los productos X-Rite en varios flujos de trabajos, así como la asistencia técnica en los períodos posteriores a la garantía, nos complace ofrecer las siguientes opciones de soporte telefónico y de capacitación, con tarifas específicas, que se le proporcionan por los expertos en color altamente experimentados de X-Rite.
- Page 192 All manuals and user guides at all-guides.com Especificación Mecanismo tecnología i1 (red de difracción holográfica con grupo de diodos de 128 ® espectral: píxeles) con comprobación de longitudes de onda Rango espectral: 380 - 730 nm Intervalo de tomas de muestras: 3,5 nm Resolución óptica: 10 nm...
- Page 193 10 mm x 10 mm (0.39” x 0.39” (anchura x altura) sin la regla del sensor Correlación entre instrumentos: 0.4 E94* promedio, 1.0 E94* máximo (desviación del estándar de fabricación de X-Rite a 23 °C (73.4°F) basado en 12 cerámicas BCRA (D50, 2°)) Repetitividad a corto plazo: 0.1 E94* sobre cerámica blanca (D50, 2°, promedio de 10 mediciones...
- Page 194 All manuals and user guides at all-guides.com Requisitos mínimos del sistema Macintosh ® Procesador Intel ® , Mac OS X 10.5.8, 10.6.8 o 10.7 (con las actualizaciones más recientes), 1 GB de RAM disponible, 2 GB de espacio disponible en disco duro, resolución del monitor de 1024 x 600 píxeles o superior, puerto USB potenciado, unidad de DVD o conexión Internet de alta velocidad para descargar, instalar y actualizar el software.
- Page 195 All manuals and user guides at all-guides.com Manual do Usuário Índice Conteúdo da Embalagem Visão Geral do Dispositivo Instalação Indicadores de Estado do Dispositivo Calibrar o Dispositivo Medição de Digitalização Medição de Digitalização Única Medição de Digitalização Dupla Medição Pontual Medição de Telas Medição da Luz Ambiente Medição de Telas de Projetores...
- Page 196 All manuals and user guides at all-guides.com Conteúdo da Embalagem...
- Page 197 All manuals and user guides at all-guides.com Placa da Base do Suporte para Tripé (opcional) Suporte para Tripé (opcional) Cabeça de Medição da Luz Ambiente (opcional) Tampa Protetora (opcional) Suporte de Telas Alvo de Posicionamento Placa de Calibração Dispositivo de Medição Maleta de Transporte Cabo USB Prancheta de Apoio...
- Page 198 All manuals and user guides at all-guides.com Visão Geral do Dispositivo Spectrophotometer Espectrofotômetro...
- Page 199 All manuals and user guides at all-guides.com Limiting Aperture Abertura de Medição Measurement Button Botão de Medição Status Indicators Indicadores de Estado Type Label with Serial Number Sensor de Posicionamento Positioning Sensor Espaço de Referência para a Montagem em Esquadro Reference Gap for Ruler Mount Interface de Montagem para Acessórios Mounting Interface for Accessories...
- Page 200 All manuals and user guides at all-guides.com Instalação...
- Page 201 4. Depois de terminar o processo de instalação do aplicativo, conecte o instrumento indicadores de estado acenderão na cor branca fixa. O dispositivo X-Rite i1 teclado ou a um concentrador de portas USB sem fornecimento externo de energia. Especificação elétrica do i1Pro: 5 V...
- Page 202 All manuals and user guides at all-guides.com Indicadores de Estado do Dispositivo...
- Page 203 All manuals and user guides at all-guides.com O dispositivo i1Pro vem equipado com dois indicadores de estado na parte de cima do corpo do aparelho. Estes indicadores fornecem informações sobre o estado atual do dispositivo e orientações no decorrer do processo de medição. Estado geral do dispositivo: Apagado O dispositivo não está...
- Page 204 All manuals and user guides at all-guides.com Calibrar o Dispositivo...
- Page 205 All manuals and user guides at all-guides.com Calibre o dispositivo antes de começar a medir. Caso você tenha vários dispositivos, certifique-se de que o número de série na parte de trás da placa de calibração combina com o número de série do seu dispositivo i1Pro. Consulte o guia do usuário do seu aplicativo de medição para obter informações adicionais sobre o processo de calibração.
- Page 206 All manuals and user guides at all-guides.com Medição de Digitalização Tecnologia de abertura virtual Abertura virtual durante a digitalização, dependendo do comprimento das seções de cores Medição válida (utilizada para a média) Medição inválida Durante uma medição de digitalização, o dispositivo i1Pro realiza 200 medições por segundo.
- Page 207 All manuals and user guides at all-guides.com Condições de medição O dispositivo de medição i1Pro trabalha com várias condições de medição. Dependendo de como você for digitalizar um alvo para UV, será necessário medir cada linha ou fileira e durante a primeira passagem no caso da medição em dois passos, as seções de cores são iluminadas com a lâmpada de filamento de tungstênio existente no dispositivo i1Pro.
- Page 208 All manuals and user guides at all-guides.com Medição de Digitalização...
- Page 209 Se a abertura de medição do dispositivo ou a borda do trilho-guia do esquadro estiverem gastas, você deverá substituí-las. Solicite as peças de reposição por meio dos Centros de Assistência Técnica da X-Rite.
- Page 210 All manuals and user guides at all-guides.com Medição de Digitalização Única 1. Certifique-se de que o dispositivo esteja calibrado e que os indicadores de estado estejam pulsando na cor branca. gráfico de prova. O sentido da digitalização da fileira não faz diferença, quer seja da direita para a esquerda ou vice-versa.
- Page 211 All manuals and user guides at all-guides.com 2 verdes piscantes A fileira foi medida com êxito. 2 vermelhos piscantes A fileira não foi medida com êxito porque não foi possível reconhecer todas as seções de cores. Meça a fileira novamente, mas reduza a velocidade de medição e certifique-se que o dispositivo começa e termina a medição antes e depois das seções de cores do gráfico de prova.
- Page 212 All manuals and user guides at all-guides.com Medição de Digitalização Dupla 1. Certifique-se de que o dispositivo esteja calibrado e que os indicadores de estado estejam pulsando na cor branca. gráfico de prova. O sentido da digitalização da fileira não faz diferença, quer seja da direita para a esquerda ou vice-versa.
- Page 213 All manuals and user guides at all-guides.com 2 vermelhos piscantes A fileira não foi medida com êxito porque não foi possível reconhecer todas as seções de cores. Meça a fileira novamente, mas reduza a velocidade de medição e certifique-se que o dispositivo começa e termina a medição antes e depois das seções de cores do gráfico de prova.
- Page 214 All manuals and user guides at all-guides.com Medição Pontual...
- Page 215 All manuals and user guides at all-guides.com Para preparar o dispositivo i1Pro para uma medição pontual, você precisará montá-lo sobre o alvo de posicionamento. Certifique-se de que o dispositivo esteja calibrado e que os indicadores de estado estejam pulsando na cor branca antes de montá-lo. Consulte o guia do usuário do seu aplicativo de medição para obter informações adicionais sobre o processo de medição pontual.
- Page 216 All manuals and user guides at all-guides.com Medição de Telas...
- Page 217 All manuals and user guides at all-guides.com Para preparar o dispositivo i1Pro para a medição de uma tela você precisará montá-lo sobre o suporte de telas. Certifique-se de que o dispositivo esteja calibrado e que os indicadores de estado estejam pulsando na cor branca antes de montá-lo. 1.
- Page 218 All manuals and user guides at all-guides.com Medição da Luz Ambiente...
- Page 219 All manuals and user guides at all-guides.com Antes de começar a medir, acople a cabeça de medição da luz ambiente na abertura de medição do dispositivo i1Pro. Caso você tenha vários dispositivos, certifique-se de que o número de série na cabeça de medição da luz ambiente combina com o número de série do seu dispositivo i1Pro.
- Page 220 All manuals and user guides at all-guides.com Medição de Telas de Projetores...
- Page 221 All manuals and user guides at all-guides.com Para preparar o dispositivo i1Pro para a medição de telas de projetores você precisará montar o suporte para tripé na placa base correspondente, ou em um tripé seu próprio com parafuso padrão de 1/4”. A seguir, será necessário montar o dispositivo i1Pro sobre o suporte para tripé.
- Page 222 All manuals and user guides at all-guides.com Medição de Telas de Projetores...
- Page 223 All manuals and user guides at all-guides.com Configure o dispositivo i1Pro para realizar medições de telas de projetores. 1. Coloque o dispositivo i1Pro no suporte para tripé próximo ao projetor ou a uma certa 2. Desatarraxe o parafuso de trava no suporte para tripé e ajuste o ângulo do dispositivo i1Pro.
- Page 224 All manuals and user guides at all-guides.com Manutenção Geral Para manter o desempenho colorimétrico do dispositivo i1Pro durante toda a sua vida útil, é importante observar algumas regras e periodicamente limpar certas partes que são cruciais para o desempenho das medições. i1Pro é...
- Page 225 All manuals and user guides at all-guides.com i1Pro pode ficar sujo após algum tempo. É possível retirar o vidro protetor para limpá-lo bem como o interior da abertura de medição: 1. Para remover a abertura de medição, gire-a em sentido horário até que a seta no dispositivo i1Pro.
- Page 226 All manuals and user guides at all-guides.com Solução de Problemas...
- Page 227 3. Se o aplicativo i1Diagnostics identificar algum erro, salve o relatório do teste e entre em contato com a Assistência Técnica da X-Rite mais próxima. Como opção, você poderá também consultar nossos recursos de suporte técnico virtual em http://...
- Page 228 CONDIÇÕES DA GARANTIA A X-Rite dá garantia de 12 (doze) meses para este produto (contados a partir da data da venda) quanto a defeitos em termos de materiais e de fabricação, salvo no caso de aplicação de outra regulamentação local. Durante tal período por esta garantia as peças de consumo regular.) A presente garantia não se aplica a quaisquer mercadorias que,...
- Page 229 Centro de Serviços da X-Rite mais próximo para mais informações sobre a recertificação. CENTROS DE SERVIÇOS Visite nosso sítio eletrônico do i1Pro em http://xrite.com para localizar o Centro de Serviços da X-Rite mais próximo ou entre em contato com o seu representante de vendas da X-Rite para obter mais informações.
- Page 230 All manuals and user guides at all-guides.com Especificações Mecanismo tecnologia i1 (grade de difração holográfica com rede de fotodiodos de ® espectral: 128 pixéis) com verificação incorporada dos comprimentos de onda Faixa espectral: 380 - 730 nm Intervalo de amostragem física: 3,5 nm Resolução óptica: 10 nm...
- Page 231 10 mm x 10 mm (0.39” x 0.39” (largura x altura) sem esquadro sensor Concordância inter-instrumental: Média de 0.4 E94*, máximo de 1.0 E94* (desvio do padrão de fabricação da X-Rite a uma temperatura de 23 °C (73.4 °F) para 12 cerâmicas BCRA (D50, 2°)) Repetibilidade a curto prazo: 0.1 E94* sobre branco (D50, 2°, média de 10 medições a cada 3...
- Page 232 Administrador para instalar e desinstalar o aplicativo. Nota importante O dispositivo X-Rite i1Pro pode ser utilizado com versões mais antigas do conjunto de desenvolvimentos do aplicativo um modo de compatibilidade regressiva, já que não será possível utilizar o dispositivo no modo de medição M0 (Sem Filtro) ISO 13655 nem as novas funções, como as luzes indicadoras do estado, a calibração interna dos comprimentos...
- Page 233 All manuals and user guides at all-guides.com ユーザーマニュアル 目次 パッケージ内容 装置の概要 インストール 装置のステータスインジケータ 装置のキャリブレーション スキャン測定 シングルスキャン測定 デュアルスキャン測定 スポッ ト測定 測定値を表示 環境光の測定 プロジェクタの測定 メンテナンス トラブルシューティング 製品保証 サービス/サポート 仕様 システム必要条件...
- Page 234 All manuals and user guides at all-guides.com パッケージ内容...
- Page 235 All manuals and user guides at all-guides.com 三脚ホルダーベースプレート (オプション) 三脚ホルダー (オプション) 環境光源測定ヘッ ド (オプション) 保護カバー (オプション) ディスプレイホルダー ポジショニング ターゲッ ト キャリブレーションプレート 測定器 ケース USBケーブル バッキングボード ルーラー (オプション) (オプション) アプリケーションDVD 性能証明書 ユーザーマニュアル...
- Page 236 All manuals and user guides at all-guides.com 装置の概要 分光測色計 Spectrophotometer...
- Page 237 All manuals and user guides at all-guides.com 測定アパーチャー Limiting Aperture 測定ボタン Measurement Button ステータスインジケータ Status Indicators モデル名、 シリアル番号の表示ラベル Type Label with Serial Number ポジショニングセンサー Positioning Sensor ルーラー取付用リファレンスギャップ Reference Gap for Ruler Mount アクセサリ取付用インターフェース Mounting Interface for Accessories USBコネクタ USB Connector...
- Page 238 All manuals and user guides at all-guides.com インストール...
- Page 239 All manuals and user guides at all-guides.com 装置を使用またはステータスを表示する前に、 ソフトウェアをコンピュータ にインストールする必要があります。 DVDからソフトウェアをインストールす るまで、 装置のUSBケーブルをコンピュータに挿入しないでください。 1. DVDからソフトウェアのアプリケーションをPCまたはMacintosh ® にイ ンストールします。 2. 新しい装置を使用する前に、 本ユーザーマニュアルにある手順をお読み ください。 詳細は同梱ソフトウェアのDVDをご参照ください。 3. 装置から 「初めて使用する前にソフトウェアをインストールし説明書をお 読みください」 の警告シールおよびポジショニングセンサーのシールを 取り外してください。 4. ソフトウェアのインストールが終了後、 i1Pro装置をコンピュータのUSBポ ートに接続してください。 正常に接続すれば両方のステータスインジケ ータ が白で点灯します。 エ ッ ク ス ラ イ ト 社 の i 1 P r o が キ ー ボ ー ド の U S B ポ ー...
- Page 240 All manuals and user guides at all-guides.com 装置のステータスインジケータ...
- Page 241 All manuals and user guides at all-guides.com i1Pro装置は本体上部に2つの装置ステータスインジケータが備わっています。 装置のステータスインジケータは、 装置の現在の状態を表示し測定プロセス をガイドします。 装置の一般ステータス (1)装置がコンピュータに接続されていないか、 (2)ソフト ウェアが実行されていない、 または(3)装置を管理する最 新ソフトウェアがコンピュータにインストールされていま せん。 3番目の場合、 装置はソフトウェアと互換モードで そのまま使用でき、 ソフトウェアがサポートするi1Pro装置 の旧バージョンで動作します。 白の点灯 機器は接続されていますが、 キャリブレーションが必要 です。 白の点滅 装置が接続されており、 測手の準備が完了しています。 赤の点灯 装置のキャリブレーションに失敗しました。 ( 詳しくはトラ ブルシューティングのセクションをご覧ください。 ) 装置ステータスインジケータの測定への影響を避けるめに、 測定中は装置 ステータスのインジケータがOFFに切り替わります。...
- Page 242 All manuals and user guides at all-guides.com 装置のキャリブレーション...
- Page 243 All manuals and user guides at all-guides.com 測定を開始する前に、 装置のキャリブレーションを実行してください。 複数の装置を 保有する場合は、 キャリブレーションプレート裏のシリアル番号がi1Pro装置のシリア ル番号と一致することを確認してください。 キャリブレーション手順については、 測 定ソフトウェアの説明書をご参照ください。 1. キャリブレーションプレートの中央には、 ホワイトキャリブレーションタイルを 保護するスライダーがあります。 この保護スライダーをカチッと音がするまで開 き、 キャリブレーションプレートの白色リファレンスセラミックタイルにアクセス します。 2. i1Pro測定器をキャリブレーションプレートにセッ トします。 装置をキャリブレー ションプレートに安定させてセッ トしてください。 3. ソフトウェアを装置のキャリブレーションにセットし、 測定ボタンを押します。 キャリブレーション中は、 ステータスインジケータの照明がOFFに切り替わり ます。 装置のキャリブレーションが終了したら、 ステータスインジケータの照明 は白で点滅します。 キャリブレーションに失敗した場合、 ステータスインジ ケータ...
- Page 244 All manuals and user guides at all-guides.com スキャン測定 バーチャルアパーチャー技術 スキャニング中のバーチャルアパーチャーの サイズはパッチの長さに依存します。 平均処理に使用される有効な測定 無効な測定 i1Pro装置は、 スキャン測定において1秒間に200回の測定を行います。 装置 の自動パッチ検出機能は、 パッチの有効な測定値とパッチ間の無効な測 定値を判別します。 パッチの有効な測定値は平均化され、 装置は平均測定 結果をソフトウェアに出力します。 この技術により、 i1Pro装置のバーチャル アパーチャーはパッチの長に対して適応することが可能です。 最良の測定 結果を得るには、 テストチャートのパッチ長をプリンタの解像度に基づい て選択してください。 低解像度または粗い線数のプリンタには、 テストチャ ートのパッチ長を長く取るように設定してください。...
- Page 245 All manuals and user guides at all-guides.com 測定条件 i1Pro測定器は複数の測定条件をサポートします。 UVに対してターゲッ トを どの条件でスキャンするかにより、 テストチャートの各列を1回または2回 測定する必要があります。 シングル測定およびデュアル測定の1回目の測 定では、 i1Pro装置はタングステンフィラメントランプで照明します。 2回目 の測定が必要な場合は、 UV LEDに切り替えて照明します。 次の測定条件にはシングル (1回) 測定を行います : • ISO 13655 M0 | UVを含むタングステンフィラメントランプ (フィルタ なし) 次の測定状態にはデュアル (2回) 測定が必要です : • ISO 13655 M1 | D50 •...
- Page 246 All manuals and user guides at all-guides.com スキャン測定...
- Page 247 All manuals and user guides at all-guides.com i1Pro装置でスキャン測定を行うには、 i1Pro装置をルーラーに取り付ける必 要があります。 取り付け前に、 装置がキャリブレーションされており、 ステ ータスインジケータの照明 が白で点滅していることを確認してくださ い。 1. バッキングボードを開きます。 2. 留め金を使い、 テストチャートをバッキングボードに固定します。 3. ルーラーをバッキングボードにセッ トします。 4. i1Pro装置をルーラーの専用台にセッ トします。 専用台のポジショニン グピンがi1Pro装置底のリファレンスギャップに挿入されていることを 確認してください。 i1Pro装置が専用台に固定されていることを再度確 認してください。 5. スキャニング測定を行う際、 装置の測定アパーチャーがルーラーのガ イドレールにしっかり挿入されることを確認してください。 i1Pro装置およびプリント用紙の表面との距離は、 測定精度にとっ て重要です。 装置の測定アパーチャーまたはルーラーのガイドレ ールの端が消耗されている場合は交換してください。...
- Page 248 All manuals and user guides at all-guides.com シングルスキャン測定 1. 取り付け前に、 装置がキャリブレーションされており、 ステータスイン ジケータの照明 が白で点滅していることを確認してください。 2. 装置がテストチャートの1列目横の紙端の白色用紙上にく るように、 ル ーラーをセッ トしてください。 列をスキャンする際は、 左右どちらから でもかまいません。 3. ソフトウェアをシングルスキャニングモードに設定します。 4. 装置の測定ボタンを押し、 装置のスキャンを開始する前に1秒間お待ち ください。 測定ボタンはテストチャートの反対側の白色用紙上にく るま で押し下げた状態にしておきます。 タングステンフィラメントランプのウ ォームアップを行うため、 測定処理の前に少しの遅延時間が必要です。 装置のステータスインジケータ は、 測定の終了後に測定が成功し たかどうかをフィードバック表示します。...
- Page 249 All manuals and user guides at all-guides.com 2x 緑の点滅 列の測定が成功しました。 2x 赤の点滅 全てのパッチを認識することができなかったため、 列の 測定に失敗しました。 測定速度を下げて再度列を測定 してください。 測定がテストチャートのパッチ前後の白 色用紙上で開始および停止していることを確認してくだ さい。 4x 赤の点滅 タングステンフィラメントランプがウォームアップする 前にパッチの測定を開始したため、 列の測定に失敗し ました。 i1Pro装置を動かす前に、 ランプのウォームアッ プ時間を十分に考慮してから再度列を測定してくださ い。 1x 緑、 2x 赤の点滅 列が正常に測定されましたが、 ソフトウェアは別の列を 予期していました。 ソフトウェアが予想していた列であ るかどうか確認してください。 5. 装置がテストチャートの次の列の手前にく るようにルーラーをセット し、...
- Page 250 All manuals and user guides at all-guides.com デュアルスキャン測定 1. 取り付け前に、 装置がキャリブレーションされており、 ステータスインジ ケータの照明 が白で点滅していることを確認してください。 2. 装置がテストチャートの1列目横の紙端の白色用紙上にく るように、 ルー ラーをセッ トしてください。 列をスキャンする際は、 左右どちらからでも かまいません。 3. ソフトウェアをデュアルスキャニングモードに設定します。 4. 装置の測定ボタンを押し、 装置のスキャンを開始する前に1秒間お待ちく ださい。 測定ボタンはテストチャートの反対側の白色用紙上にく るまで押 し下げた状態にしておきます。 タングステンフィラメントランプのウォー ムアップを行うため、 測定処理の前に少しの遅延時間が必要です。 装置 のステータスインジケータ は、 測定の終了後に測定が成功したかど うかをフィードバック表示します。 青の点灯...
- Page 251 All manuals and user guides at all-guides.com 2x 赤の点滅 全てのパッチを認識することができなかったため、 列の 測定に失敗しました。 測定速度を下げて再度列を測定し てください。 測定がテストチャートのパッチ前後の白色 用紙上で開始および停止していることを確認してくださ い。 4x 赤の点滅 タングステンフィラメントランプがウォームアップする前 にパッチの測定を開始したため、 列の測定に失敗しまし た。 i1Pro装置を動かす前に、 ランプのウォームアップ時間 を十分に考慮してから再度列を測定してください。 1x 緑、 2x 赤の点滅 列が正常に測定されましたが、 ソフトウェアは別の列を 予期していました。 ソフトウェアが予想していた列である かどうか確認してください。 5. 同じ列をLEDが示す方向で再度測定してください。 2回目の測定はUV照 明のみの列を測定します。 終了すれば、 次の列に進むことができます。 2x 緑の点滅...
- Page 252 All manuals and user guides at all-guides.com スポッ ト測定...
- Page 253 All manuals and user guides at all-guides.com i1Pro装置でスポッ ト測定の準備を行うには、 i1Pro装置をポジショニングタ ーゲッ トに取り付ける必要があります。 取り付け前に、 装置がキャリブレー ションされており、 ステータスインジケータの照明が白で点滅していること を確認してください。 スポッ ト測定手順については、 測定ソフトウェアの説 明書をご参照ください。 1. i1Pro測定器をポジショニングターゲッ トに取り付けるには、 ポジショニ ングターゲッ ト上の取付コネクタをi1Pro装置後方の取付インターフェー スに挿入します。 2. スポッ ト測定を行うようソフトウェアを設定します。 3. 装置を測定するパッチにセッ トします。 4. 装置の測定ボタンを押します。 ステータスインジケータの照明は測定 中OFFに切り替わり、 測定が成功すると緑の点滅 に変わります。 5.
- Page 254 All manuals and user guides at all-guides.com ディスプレイの測定...
- Page 255 All manuals and user guides at all-guides.com i1Pro装置でディスプレイ測定を行うには、 i1Pro装置をディスプレイホルダ ーに取り付ける必要があります。 取り付け前に、 装置がキャリブレーション されており、 ステータスインジケータの照明が白で点滅していることを確 認してください。 1. スクリーンのサイズに合わせて、 ディスプレイホルダーのバランスウェ イトの長さを調整することが可能です。 バランスウェイトは両端にマジ ックテープが付いており、 ディスプレイホルダーを正しい長さに調整す ることが可能です。 2. i1Pro測定器をディスプレイホルダーに取り付けるには、 ディスプレイホ ルダー上の取付コネクタをi1Pro装置後方の取付インターフェースに挿 入します。 i1Pro装置の先がディスプレイホルダーに固定されていること を確認してください。 3. i1Pro測定器をスクリーン中央に固定します。 4. ソフトウェアをディスプレイ測定に設定し、 アプリケーション内で測定 を開始してください。 測定中は、 ステータスインジケータの照明がOFF に切り替わります。 5. i1Pro装置をディスプレイホルダーから取り外すには、 ディスプレイホル ダーがi1Pro装置後方の取付インターフェースを外した状態で取付コネ...
- Page 256 All manuals and user guides at all-guides.com 環境光の測定...
- Page 257 All manuals and user guides at all-guides.com 測定を開始する前に、 環境光の測定ヘッドをi1Pro装置の測定アパーチャ ーに装着してください。 複数の装置を保有する場合は、 環境光源測定ヘッ ドのシリアル番号がi1Pro装置のシリアル番号と一致することを確認してく ださい。 環境光源測定ヘッドは三脚ホルダーと共に使用することもできま す。 1. 環境光源測定ヘッ ドは三脚ホルダーの底に保存されています。 環境光 測定ヘッドを取り外すには、 測定ヘッドを反時計方向に、 保護カバー の矢印が三脚ホルダーの 「ロック解除」 マーク を指すまで回してく ださい。 2. 環境光の測定ヘッドをi1Pro装置の測定アパーチャーに装着してくださ い。 保護カバーの矢印は、 i1Pro装置の 「ロック解除」 マーク を指し ていなければいけません。 3. 測定ヘッドを時計方向に、 保護カバーの矢印が三脚ホルダーの 「ロッ ク」...
- Page 258 All manuals and user guides at all-guides.com プロジェクタの測定...
- Page 259 All manuals and user guides at all-guides.com i1Pro装置でプロジェクタの測定を行うには、 三脚ホルダーを三脚ホルダー のベースプレートまたは標準の1/4インチねじで三脚に取り付ける必要が あります。 次にi1Pro装置を三脚ホルダーに取り付けます。 取り付け前に、 装 置がキャリブレーションされており、 ステータスインジケータの照明が白で 点滅していることを確認してください。 1. 三脚ホルダーを三脚ホルダーのベースプレートに取り付けるには、 三 脚ホルダーのベースプレートの1/4インチねじを三脚ホルダー底の親 ねじに挿入してください。 三脚ホルダーがベースプレートに固定され るまで、 三脚ホルダーのベースプレートを時計方向に回します。 三脚ホ ルダーを三脚に取り付けるには、 三脚に付属する説明書の取付手順を 参照してください。 2. i1Pro測定器を三脚ホルダーに取り付けるには、 三脚ホルダー上の取付 コネクタをi1Pro装置後方の取付インターフェースに挿入します。 3. i1Pro装置を三脚ホルダーから取り外すには、 三脚ホルダーをi1Pro装置 後方の取付インターフェースから外した状態で取付コネクタをゆっく り引き抜きます。...
- Page 260 All manuals and user guides at all-guides.com プロジェクタの測定...
- Page 261 All manuals and user guides at all-guides.com i1Proをプロジェクタの測定用にセッ トしてください。 1. 三脚ホルダー上のi1Pro装置をプロジェクタの横またはスクリーンの前 に距離を取ってセッ トします。 2. 三脚ホルダーのロック用ねじを緩め、 i1Pro装置の角度を調整してくだ さい。 i1Proの測定アパーチャーが必ずスクリーン中央を指すようにして ください。 装置が正しい位置セッ トされたら、 ロックねじを締めます。 3. 室内照明を投射およびプレゼンテーション時と同じ条件に調整してく ださい。 4. ソフトウェアをプロジェクタの測定用に設定し、 画面に表示される手順 に従ってください。...
- Page 262 All manuals and user guides at all-guides.com メンテナンス i1Proの測定性能を維持するには、 使用上のルールを守り、 測定の性能に重 要となる部品を定期的に清掃することが重要です。 • i1Pro装置は機械的振動に敏感です。 輸送の際には、 i1Proへの損害を防ぐ ために必ず元の箱に入れ直してから発送してください。 • i1Pro装置を油で汚れたりほこりの多い環境で保存 ・ 使用しないでくださ い。 i1Proを35℃以上または10℃以下の温度環境で使用しないでくださ い。 i1Proを50℃以上または-10℃以下の温度環境で保存しないでくださ い。 プラスチックの装置本体の清掃は、 必要に応じて中性洗剤の入った 水で濡らした布で拭いてください。 • i1Pro装置の測定アパーチャーの保護ガラスは、 時間が経つと汚くなりま す。 定期的に保護ガラスを取り外して清掃してください。 測定アパーチャ ーの内側も清掃することができます。...
- Page 263 All manuals and user guides at all-guides.com 1. 測定アパーチャーを取り外すには、 矢印がi1Pro装置の 「ロック解除」 マーク を指すまで時計方向に回してください。 2. 装置から測定アパーチャーを取り外します。 オプチクスには触れないで く ださい。 3. 保護ガラスのスライダーを測定アパーチャーのからスライドして取り 外します。 4. 保護ガラスおよび測定アパーチャーの内側をイソプロピルアルコー ルを付けた柔らかい布で拭いてください。 5. 保護ガラスのスライダーを測定アパーチャーにセッ トします。 スライ ダーが元の位置にカチッと音がするまではめ込みます。 6. 矢印がi1Pro装置の 「ロック解除」 マーク を指す位置で、 測定アパ ーチャーを再度取り付けます。 7. 測定アパーチャーをロックするには、 矢印がi1Pro装置の 「ロック」 マ ーク...
- Page 264 All manuals and user guides at all-guides.com トラブルシューティング...
- Page 265 All manuals and user guides at all-guides.com 診断ソフトウェア (Diagnostic Software) 診断ソフトウェア (Diagnostic Software) i1Proが正常に機能していないと思われる場合は、 i1診断ソフトウェアをご 使用ください。 キャリブレーション後にステータスインジケータ が赤で 点灯した場合、 i1Proのセンサー診断が問題を検出したことを表します。 その際は、 次の手順に沿ってください。 1. i1ソフトウェアを起動します。 2. i1診断ソフトウェアから指示される手順に従って機能チェックを実行し ます。 3. エラーが報告された場合、 テストレポートを保存し、 エックスライト社 の東京サービスセンターまでお問い合わせください。 トラブルシューテ ィングはhttp://xrite.com/support/i1Profilerもご利用ください。...
- Page 266 All manuals and user guides at all-guides.com 製品保証 限定保証 テクニカルサポート、 製品保証、 最新のソフトウェアアップデートや製品ニュースをご希望の方 は、 www.xrite.com/registerでi1Proシステムの製品登録を行ってください。 限定保証 エックスライト社は、 本製品に対して購入日から12ヶ月の構成および製造の保証を提供します。 保証 期間内は欠陥部品を無償で交換または修理いたします。 ( 消耗品は除外。 ) この保証は、 出荷による損 害、 改造、 不注意な取り扱いによる製品には適用しません。 上記保証の破損に対するエックスライト 社の限定義務は、 いかなる部品の無償修理または交換とし、 保証期間内に欠陥品と証明され、 かつエ ックスライト社が合理的に納得できるものに限ります。 エックスライト社による修理または交換により 保証期間は回復されず、 また保証期間は延長されません。 エックスライト社はお客様の製造の損失 ・ コスト、 経常経費、 その他の費用、 利益の損失、 信用、 および前述のいかなる保証の破損により人々ま たは資産に生じた特別、...
- Page 267 All manuals and user guides at all-guides.com サービス/サポート 証明書再発行 エックスライト社では、 i1Pro分光測色計を毎年再校正されることをお勧めしています。 証明書の再発 行に関しては、 エックスライト社のサービスセンターまでお問い合わせください。 サービスセンター i1Proの製品情報はwww.xrite.com をご参照ください。 サポートオプション 弊社では、 今日の複雑で変化し続けるワークフローに対するためにサポートおよびトレーニングが 不可欠と考えています。 そこで、 登録されたユーザーの皆様には、 次のオンラインの無償サポートツ ールをご用意しています。 これらのサポートツールの詳細は次のリンクをご覧ください−> www.xrite.com/support/i1Profiler • 無償 ・ 無制限アクセス可能なi1Profilerソフトウェア内に搭載されたトレーニング資料 • サポート記事やFAQを含むオンラインの詳細ヘルプデスクへのアクセス • 保証期間内における製品の一般的な問題に対するエックスライト社のメールおよび電話による 無償サポート : 以下を条件とします。 - 正規登録者のユーザー - i1Profilerソフトウェアの最新バージョンが使用されている...
- Page 268 All manuals and user guides at all-guides.com 仕様 分光エンジン : 分光波長のチェック機能が搭載されたi1® 技術 (128ピクセル のダイオード アレー付きホログラフィック回折格子) 測定波長範囲: 380 〜 730 nm サンプリング間隔 : 3.5 nm 光学分解能 : 10 nm 分光出力 : 10 nm ステップで 380 nm 〜 730 nm スキャニングモードにおける 測定周波数 : 200回測定/秒...
- Page 269 All manuals and user guides at all-guides.com OBC: i1Profilerソフトウェアによる蛍光増白剤補正 (OBC) キャリブレーション : 付属の白色セラミック校正板による手動キャリブレーション 測定バッキング : 白色、 ISO 13655:2009; バッキングボード上の測定 最大の用紙の厚さ : バッキングボード上で3 mm スキャニングモードにおける 7 x 10 mm (幅 x 高さ) 、 センサールーラー付き 最少パッチサイズ : 10 x 10 mm (幅 x 高さ) 、 センサールーラーなし 器差...
- Page 270 All manuals and user guides at all-guides.com システム必要条件 Macintosh ® Intel® CPU、 Mac OS X 10.5.8、 10.6.8、 10.7 [最新のアップグレードがインストールされたもの]、 1 GB RAM、 2 GBのディスク空き容量、 1024 x 600ピクセル以上のモニタ解像度、 電源付きUSBポート、 ソ フトウェアをダウンロード、 インストール、 更新するためのDVDドライブまたは高速インターネッ ト接 続。 デュアルディスプレイのサポートは、 2つのビデオカードまたはデュアルビデオLUTをサポートす るデュアルヘッ ドのビデオカードを必要とします。 アプリケーションをインストールおよびアンインス トールするには管理者の権限が必要です。 Windows ®...
- Page 271 All manuals and user guides at all-guides.com...
- Page 272 All manuals and user guides at all-guides.com...
- Page 273 All manuals and user guides at all-guides.com...
- Page 274 All manuals and user guides at all-guides.com Spectrophotometer...
- Page 275 All manuals and user guides at all-guides.com Limiting Aperture Measurement Button Status Indicators Type Label with Serial Number Positioning Sensor Reference Gap for Ruler Mount Mounting Interface for Accessories USB Connector...
- Page 276 All manuals and user guides at all-guides.com...
- Page 277 All manuals and user guides at all-guides.com i1Pro i1Pro i1Pro...
- Page 278 All manuals and user guides at all-guides.com...
- Page 279 All manuals and user guides at all-guides.com i1Pro i1Pro...
- Page 280 All manuals and user guides at all-guides.com...
- Page 281 All manuals and user guides at all-guides.com i1Pro i1Pro...
- Page 282 All manuals and user guides at all-guides.com i1Pro i1Pro...
- Page 283 All manuals and user guides at all-guides.com i1Pro i1Pro i1Pro...
- Page 284 All manuals and user guides at all-guides.com...
- Page 285 All manuals and user guides at all-guides.com i1Pro i1Pro i1Pro i1Pro i1Pro i1Pro...
- Page 286 All manuals and user guides at all-guides.com...
- Page 287 All manuals and user guides at all-guides.com i1Pro...
- Page 288 All manuals and user guides at all-guides.com...
- Page 289 All manuals and user guides at all-guides.com i1Pro...
- Page 290 All manuals and user guides at all-guides.com...
- Page 291 All manuals and user guides at all-guides.com i1Pro i1Pro i1Pro i1Pro i1Pro i1Pro...
- Page 292 All manuals and user guides at all-guides.com...
- Page 293 All manuals and user guides at all-guides.com i1Pro i1Pro i1Pro i1Pro i1Pro i1Pro i1Pro i1Pro...
- Page 294 All manuals and user guides at all-guides.com...
- Page 295 All manuals and user guides at all-guides.com i1Pro i1Pro i1Pro i1Pro i1Pro...
- Page 296 All manuals and user guides at all-guides.com...
- Page 297 All manuals and user guides at all-guides.com i1Pro i1Pro i1Pro i1Pro i1Pro i1Pro...
- Page 298 All manuals and user guides at all-guides.com...
- Page 299 All manuals and user guides at all-guides.com i1Pro i1Pro i1Pro i1Pro...
- Page 300 All manuals and user guides at all-guides.com i1Pro i1Pro i1Pro i1Pro i1Pro i1Pro i1Pro...
- Page 301 All manuals and user guides at all-guides.com i1Pro i1Pro i1Pro...
- Page 302 All manuals and user guides at all-guides.com...
- Page 303 All manuals and user guides at all-guides.com i1Pro i1Pro http://xrite.com/ support/i1Profiler...
- Page 304 All manuals and user guides at all-guides.com www.xrite.com/register i1Pro i1Pro...
- Page 305 All manuals and user guides at all-guides.com i1Pro i1Pro http://xrite.com www.xrite.com/support/i1Profiler www.xrite.com/i1Profiler/Supportoptions...
- Page 306 All manuals and user guides at all-guides.com...
- Page 307 All manuals and user guides at all-guides.com...
- Page 308 All manuals and user guides at all-guides.com Macintosh ® Windows ® i1Pro i1Pro i1Pro i1Pro...
- Page 309 All manuals and user guides at all-guides.com China RoHS Disclosure Table !"# EU RoHS COMPLIANCE - The Product(s), Parts, and Assemblies disclosed in this table comply to the threshold limits defined by the European Directive 2002/95/EC and exemptions listed in the Annex.