Table des Matières
Publicité
Les langues disponibles
Les langues disponibles
Liens rapides
Bedienungsanleitung
Operating instructions
Mode d'emploi
Gebruiksaanwijzing
Instuzioni per l'uso
Instrucciónes para el manejo
Einbaumeßgerät
Panel instrument
Appareil de mesure à encastrer
Inbouwmeetinstrumenten
Instrumentos de medición el montaje
Apparecchi di misurazione a panello
SCE - 0 20
SensoControl
Publicité
Chapitres
Table des Matières

Manuels Connexes pour Parker Senso Control SCE - 0 20


Sommaire des Matières pour Parker Senso Control SCE - 0 20
- Page 1 Bedienungsanleitung Operating instructions Mode d’emploi Gebruiksaanwijzing Instuzioni per l’uso Instrucciónes para el manejo Einbaumeßgerät Panel instrument Appareil de mesure à encastrer Inbouwmeetinstrumenten Instrumentos de medición el montaje Apparecchi di misurazione a panello SCE - 0 20 SensoControl...
-
Page 2: Table Des Matières
Inhaltsverzeichnis Allgemeines Funktionen und Einstellungen Tasten und Anzeige Veränderung der Geräteeinstellung Konfigurationsmenü des SCE-020 Konfiguration des SCE 020-01 4.2.1 Einstellen der Dezimalstelle ..- ( M2 ): 4.2.2 Konfiguration des Eingangssignals 0 . . 20 mA ( M3/M4 ) 4.2.3 Konfiguration des Eingangssignals 4 . -
Page 3: Allgemeines
Allgemeines Die Einbaumeßgeräte der Serie SCE sind für den Einsatz in der modernen Meßtechnik entwickelt worden. Alle typischen Eingangs- signale können verarbeitet werden. Sie sind für das SensoControl Programm konzipiert und zeichnen sich durch einfache Bedienung aus. Die gewünschte Einheit kann mittels beigefügter Klebefolie auf einer Leuchtfläche angebracht werden. -
Page 4: Tasten Und Anzeige
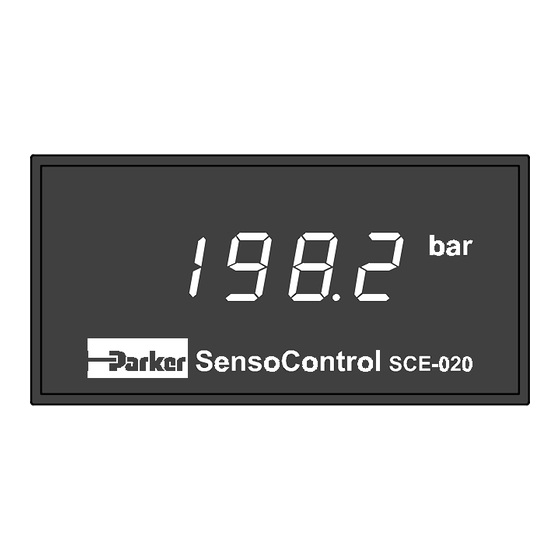
Tasten und Anzeige Abb.1 Display ohne Frontscheibe 4-stelliges LED Display mit freier Wahl des Dezimalpunktes Signal zur Grenzwertüberschreitung SET Taste zum Aufruf des Konfigurationsmenüs +/- Tasten zum Anwählen des nächsten/vorherigen Menüpunktes Dimensionsanzeige durch Aufkleber frei wählbar - 3 -... -
Page 5: Veränderung Der Geräteeinstellung
Veränderung der Geräteeinstellung Konfigurationsmenü des SCE-020 Nach dem Entfernen der Frontplatte (mit Hilfe eines Schraubendre- hers vorsichtig aushebeln) liegen die Tasten und die LED Anzeige frei. Durch betätigen der Taste SET wird die Menüauswahl ermög- licht. Die Veränderung bzw. die Auswahl der Geräteparameter erfolgt über die + / - Tasten. - Page 6 Abb.2 Menüführung SCE 020-01 - 5 -...
-
Page 7: Konfiguration Des Eingangssignal 0
4.2.2 Konfiguration des Eingangssignal 0 . . 20 mA - Einstellung des Anfangswertes in 0 - (M3): Mit den + / - Tasten wird M3 ausgewählt und durch SET die Parameterwahl aktiviert. Anschließend über + / - den Anfangswert einstellen. Für einen Anzeigebereich von z.B. 0 bar bis 100 bar wird der Anfangswert IN 0 mit den + / - Tasten auf 0 bar eingestellt. -
Page 8: Konfiguration Des Eingangssignals 0
4.2.3 Konfiguration des Eingangssignals 4 . . 20 mA Bei Eingangssignalen von 4 . . 20mA muß der Nullpunkt in 0 entsprechend folgender Beziehung definiert werden: inFS = − Folgendes Beispiel zeigt die Eingabe: = = = = = I/mA . - Page 9 Prozedur der Parameterkonfiguration SCE-020-01: Einstellung der Dezimalstelle nach Kapitel 4.2.1 (Beachte Eingangssignal und Meßbereich) Einstellung des Meßbereichs in 0 und in FS Mit den + / - Tasten wird M3 bzw . M4 ausgewählt und durch SET die Parameterwahl aktiviert. Anschließend über + / - den Anfangs- und Endwert eingeben und mit SET bestätigen.
-
Page 10: Blockschaltbild Und Anschlußbelegung
4.2.4 Blockschaltbild und Anschlußbelegung Abb.3 Anschlußbelegung SCE-020-01 Analogeingang Parameter- Spannungs- speicher versorgung 0...20mA / 4...20mA EEPROM 11...30 VDC 0...10V Anzeige LED 7-Segment Microcontroller 4-stellig Anzeige bis 9999 Analogausgang 0...20mA / 4...20mA Abb.4 Blockdiagramm SCE-020-01 - 9 -... -
Page 11: Konfiguration Des Sce
Konfiguration des SCE 020-02 Alle Basis Parameter ( End, .., in 0, inFS ) sind äquivalent zur Programmierung des SCE-020-01 einzustellen bzw. zu verändern (siehe auch Kap. 4.1 und 4.2). In dieser Version ist eine serielle Schnittstelle RS232 und ein potentialfreier Relaiskontakt (220VAC/5A) vorhanden, für den ent- sprechende Grenzwerte definiert werden können. - Page 12 Abb.5 Menüführung SCE 020-02 - 11 -...
-
Page 13: Einstellung Der Datenausgabe Mit Dezimalpunkt - ( M2.2)
4.3.2 Einstellung der Datenausgabe mit Dezimalpunkt - ( M2.2) Analog zu Abschnitt 4.2.1 wird die entsprechende Konfiguration vorgenommen. Mit den + / - Tasten wird M2.2 ausgewählt und durch SET die Parameterwahl aktiviert. Anschließend über + / - die Position des Dezimalpunktes einstellen. Das Datenformat besteht aus der Anzahl der Dezimalstellen und einem Dezimalkomma. -
Page 14: Transfer Rate Rate - (M6)
4.3.4 Transfer Rate rAtE - (M6) Die Transferrate beschreibt den zeitlichen Abstand der Meßwert- ausgabe (Abtastzeit) über die RS232 Schnittstelle zum Empfangs- gerät (PC oder SPS). Diese Abtastzeit wird im Menü rAte einge- stellt . Mit den + / - Tasten wird M5 ausgewählt und durch SET die Parameterwahl aktiviert. - Page 15 4.3.4.1 Meßwertabfrage nach Aufforderung durch das Empfangsgerät Soll der Meßwert nach einer Aufforderung an das Empfangsgerät gesendet werden, so können durch Senden des Zeichens R (Request) einzelne Meßwerte abgefragt werden. Mit den + / - Tasten wird M5 ausgewählt und durch SET die Parameterwahl aktiviert.
-
Page 16: Grenzwerte Li 1 Und Li 0 Setzen - (M7/M8)
4.3.5 Grenzwerte Li 1 und Li 0 setzen - (M7/M8): Der Relaiskontakt arbeitet nach dem Arbeitsstromprinzip d.h. der Ausgang wird bei Überschreitung des eingestellten Wertes aktiv und der Relaiskontakt geschließt. Mit LI 1 ist der Grenzwert des Schließerkontaktes (z.B. 80 bar) definiert. Zum Ausschalten des Relaiskontaktes wird mit LI 0 (M8) der Grenzwert (z.B. - Page 17 Die Parameterkonfiguration für das SCE-020-02 ist beendet, sobald der Wert für Li 0 mit SET bestätigt wird. Die Speicherung dieser Konfiguration erfolgt durch die Anwahl des Menüs End . Durch erneutes bestätigen mit der SET Taste wird die Parameterkonfiguration gespeichert. Das Gerät schaltet automatisch in den Betriebsmodus Messen und Anzeigen .
-
Page 18: Blockdiagramm Und Anschlußbelegung
4.3.6 Blockdiagramm und Anschlußbelegung Abb.9 Anschlußbelegung SCE-020-02 Analogeingang Parameter- Spannungs- speicher versorgung 0...20mA / 4...20mA EEPROM 11...30 VDC 0...10V Anzeige Schnittstelle LED 7-Segment Microcontroller RS-232 4-stellig Anzeige bis 9999 Grenzwert Analogausgang 1 Relaiskontakt 0...20mA / 4...20mA Abb.10 Blockdiagramm SCE-020-02 - 17 -... -
Page 19: Konfiguration Des Sce-020
Konfiguration des SCE-020-03 In dieser Version werden als Eingangssignal keine Analogsignale sondern Frequenzsignale (50 mV . . 5 V ) verarbeitet. Im Unter- schied zu den genannten Varianten SCE-020-01 und -02 ist hier kein Analogausgang vorhanden. Die einzustellenden Parameter setzen sich aus der Dezimalstelle (analog zur Programmierung des SCE-020-01) und den Parametern FACt (Factor) bzw. - Page 20 Bestimmung des K-Faktors FACt (M3) Der Parameter FACt ist ein K-Faktor, bezogen auf eine Frequenz von 1000 Hz : FACt = [ K (1000) ]. Bei Turbinen, die aus dem Parker SensoControl Programm stam- men, ist dieser Wert auf der Turbine angegeben. z.B.: FACt...
- Page 21 Parameterkonfiguration SCE-020 - 03 mit SCFT-xxx-11-07: Einstellung der Dezimalstelle nach Kapitel 4.2.1. (Beachte K-Faktor) Einstellung des K-Faktors nach Angabe Typenschild Turbine. Mit den + / - Tasten wird M3 ausgewählt und durch SET die Parameterwahl aktiviert. Anschließend über + / - den K-Faktor eingeben und mit SET bestätigen.
- Page 22 4.4.2 Kombination mit Turbinen anderer Hersteller Für diese Applikation muß der K-Faktor [K (1000)] mit Hilfe der angegeben Impulse pro Liter = I durch folgende Beziehung definiert 60.000 FACt = K (1000) = Entsprechend gilt diese Beziehung auch für eine Anzeige in GPM: 1 GPM = 3,785 l/min iPr muß...
- Page 23 Parameterkonfiguration SCE-020-03 mit Turbinen anderer Hersteller: Einstellung der Dezimalstelle (Beachte K-Faktor) nach Kapitel 4.2.1 Einstellung des K-Faktors nach angegebener Formel. Mit den + / - Tasten wird M3 ausgewählt und durch SET die Parameterwahl aktiviert. Anschließend über + / - den K-Faktor eingeben und mit SET bestätigen.
-
Page 24: Frequenzmessung
4.4.3 Frequenzmessung Frequenzsensoren, die ein Frequenzsignal im Bereich von 0 . . 9,99 kHz erzeugen, können direkt mit dem SCE-020-03 verbunden werden. Folgende Kombinationen sind möglich: Dezimalstelle FACt Anzeigebereich 00.02 9999 0 . . 99,99 Hz 000.1 0999 0 . . 999,9 Hz 00.02 1000 0 . -
Page 25: Drehzahlmessung
4.4.4 Drehzahlmessung mittels Frequenzsignal und Impulse pro Umdrehung Die Impulse pro Umdrehung des rotierenden Systems (z.B. Zähne- zahl, Anzahl der Flügel eines Flügelrades etc.) werden durch den Parameter iPr bestimmt. Folgende Parameterkonfiguration muß mit den +/- Tasten konfigu- riert sein: Imp./U Dezimalstellen FACt LED-Anzeige... - Page 26 Parameterkonfiguration SCE-020-03 mit Frequenz und Impulse / Umdrehung: Einstellung der Dezimalstelle (..= 0000 ) nach Kapitel 4.2.1 Einstellung des K-Faktors ( FACt = 6000 ) Mit den + / - Tasten wird M3 ausgewählt und durch SET die Parameterwahl aktiviert.
-
Page 27: Blockschaltbild Und Anschlußbelegung
4.4.5 Blockschaltbild und Anschlußbelegung Abb.12 Anschlußbelegung SCE-020-03 Analogeingang Parameter- Spannungs- speicher versorgung 0...8kHz EEPROM 11...30 VDC Anzeige LED 7-Segment Microcontroller 4-stellig Anzeige bis 9999 Abb.13 Blockdiagramm SCE-020-03 - 26 -... -
Page 28: Sonstiges
Sonstiges Technische Daten Umgebungsbedingungen Eingangssignal Betriebstemperatur Meßfehler 0...60 °C ± 0.2% der Anzeige ±1 Digit Temperaturfehler ±0,025% / Lager Temperatur -25...+80 °C Meßrate 5 ms relative Feuchte Grenzwertabfrage 5 ms < 80 % Meßbereich Schutzart wählbar (Programmierung) IP54 to DIN 40050 (Frontseite) Anzeige 7-Segment-LED, 4-stellig... - Page 29 0 - 1 0 - 1 0 - 1 0 - 1 0 - 2 0 - 2 0 - 2 0 - 2 0 - 3 0 - 3 0 - 3 0 - 3 . . . B B B B B .
-
Page 30: Maßbilder
Maßbilder Abb.14 Maßbild SCE-020 - 29 -... -
Page 31: Externe Spannungsversorgung
Externe Spannungsversorgung Falls eine 230 VAC Spannungsversorgung gefordert ist, muß das externe Netzteil SCSN - 410 verwendet werden. Die Montage des Netzteils erfolgt auf einer Tragschiene TS35/TS32. Das Gerät muß separat verdrahtet werden. Achtung: Bitte beachten Sie die Installationshinweise des Netz- teiles (Produktinformation 1077). -
Page 32: Pin-Belegung Der Anschlußkabel
PIN-Belegung der Anschlußkabel Anschlußkabel SCK-400-xx-06 (DIN Stecker) Signal Farbe gelb + Ub braun grün Schirm Anschlußkabel SCK-400-xx-07 (M12x1 Rundsteckverbinder) Signal Farbe P or Q gelb weiss + Ub braun grün Schirm Anschlußkabel des Temperatur-Sensors SCT-150-14-00 Signal Farbe weiss + Ub braun grün Schirm... - Page 33 SCE-020-01/02 ANALOG SENSOR RS-232 SUPPLY OUT 1 1 2 3 4 5 6 7 8 9 10 11 12 +24V green yellow brown shield Converter FLOW SCFT-XXX-11-07 - 32 -...
- Page 34 SCE-020-01/02 ANALOG SENSOR RS-232 SUPPLY OUT 1 1 2 3 4 5 6 7 8 9 10 11 12 +24V green yellow brown shield SCK-400-XX-06/07 SCP-XXX-XX-06/07 - 33 - SCE-020-01/02 ANALOG SENSOR RS-232 SUPPLY OUT 1...
- Page 35 SCE-020-01/02 (P) SCE-020-01/02 (T) ANALOG ANALOG SENSOR RS-232 SUPPLY OUT 1 SENSOR RS-232 SUPPLY OUT 1 1 2 3 4 5 6 7 8 9 10 11 12 1 2 3 4 5 6 7 8 9 10 11 12 +24V green white...
- Page 36 0...10V 0/4...20mA 0/4...20mA 11...30VDC DEUTSCH...
- Page 37 SCE-020-01/02 ANALOG SENSOR RS-232 SUPPLY OUT 1 1 2 3 4 5 6 7 8 9 10 11 12 +24V green white brown shield SCT-150-14-00 - 36 -...
- Page 38 0...10V 0/4...20mA 0/4...20mA 11...30VDC DEUTSCH...
- Page 39 Table of Contents General Functions and settings Keys and display Changing the instrument settings Configuration menu SCE-020 Configuration of the SCE 020-01 4.2.1 Adjusting the decimal places - (M2) : 4.2.2 Configuration of the input signal 0 . . 20 mA (M3/M4) 4.2.3 Configuration of the input signal 4 .
-
Page 40: General
General The SCE series of panel instruments were developed for use in modern measurement technologies. All typical input signals can be used. They are specifically designed to complement SensoControl equipment range and are distinguished by ease of operation. The unit can be attached to the illuminated surface using the tape supplied. -
Page 41: Keys And Display
Keys and display Fig.1 Front panel without cover 4-digit LED display with programmable decimal place over-ranging signal SET key: to call up the configuration menu / to save any adjustments +/- keys to move to the next/previous menu item dimension indicator can be freely selected using the appropriate sticker - 3 -... -
Page 42: Changing The Instrument Settings
Changing the instrument settings Configuration menu SCE-020 After removing the front panel (by carefully lifting it with a screwdriver), the keys and the LED display are exposed. Press the SET key to get into the configuration menu. To change or select the settings use the + / - keys. - Page 43 Fig2: Menu-assisted operations SCE 020-01 - 5 -...
-
Page 44: Configuration Of The Input Signal 0
4.2.2 Configuration of the input signal 0 . . 20 mA - Adjustment of the zero input value in 0 - M3: M3 is selected with the + / - keys and the parameter selection is activated with SET . For an indicator range of, for example, 0 bar to 100 bar, the zero input IN 0 has to be set with the + / - keys to 0 bar. -
Page 45: Configuration Of The Input Signal 4
4.2.3 Configuration of the input signal 4 . . 20 mA With input signals 4 . . 20mA, the zero input value in 0 must be determined by the following ratio: inFS = − The following example shows how to adjust the input: = = = = = I/mA . - Page 46 Parameter configuration procedure SCE-020-01 Adjustment of the decimal place (see Input Signal and Measurement Range) according to 4.2.1. Adjustment of the measurement range in 0 and in FS Select either M3 or M4 with the + / - keys and activate the parameter selection with SET .
-
Page 47: Block Diagram And Pin Configuration
4.2.4 Block diagram and PIN configuration Fig.3: PIN Configuration SCE-020-01 Analog input Parameter Voltage supply m e m o r y 0...20mA / 4...20mA EEPROM 11...30 VDC 0...10V LED display Microcontroller 4 digits Analog output 0...20mA / 4...20mA Fig.4: Block Diagram SCE-020-01 - 9 -... -
Page 48: Configuration Of The Sce
4.3. Configuration of the SCE 020-02 All basic parameters ( End, .., in 0, inFS ) are to be either set or changed similar to the programming of the SCE-020-0 (see also 4.1 and 4.2). In this version a serial interface RS232 and a potential-free relay contact (220VAC/5A) are available for which it is possible to set corresponding limit values. - Page 49 Fig.5: Menu-assisted operations SCE 020-02 - 11 -...
-
Page 50: Configuration Of The Baud Rate Baud - M5
4.3.2 Data output format with a decimal comma – ( M2.2) The corresponding configuration is undertaken together with to Section 4.2.1. M2.2 is selected with the + / - key and the parameter selection is activated by pressing the SET key. The position of the decimal comma is set with the + / - keys. -
Page 51: Scanning Rate Rate - (M6)
4.3.4 Scanning rate rAtE – (M6) The scanning rate describes the time interval between the measurement output data readings to the receiving instrument (either PC or PLC) via the RS232 interface. This scan time interval is set in the menu rAte . M5 is selected with the + / - keys and the parameter selection is activated by SET . - Page 52 4.3.4.1. Measurement reading queries on request If the measurement readings are to be sent upon request to the receiving instrument, then individual measurement readings can be requested by sending the character R (Request). M5 is selected with the + / - keys and the parameter selection is activated with SET .
-
Page 53: Limit Values Li 1 And Li 0 - (M7/M8)
4.3.5 Limit values Li 1 and Li 0 – (M7/M8) : The relay contact functions according to the operating current principle , i.e. the port becomes active when the reading exceeds the adjusted limit value and the relay contact will be closed (normally closed function). - Page 54 The parameter configuration for the SCE-020-02 is ended as soon as the value for Li 0 is confirmed with SET . The saving of this configuration follows by selecting the menu End . A further confirmation with the SET key saves the parameter configuration. The instrument switches into the operating mode Measuring and Display .
-
Page 55: Block Diagram And Pin Configuration
4.3.6 Block diagram and PIN configuration Fig.9: PIN Configuration SCE-020-02 Analog input Parameter Voltage supply m e m o r y 0...20mA / 4...20mA EEPROM 11...30 VDC 0...10V LED display Interface Microcontroller RS-232 4-digit Limit value Analog output 1 Relay contact 0...20mA / 4...20mA Fig.10: Block diagram SCE-020-02... -
Page 56: Configuration Of The Sce-020
Configuration of the SCE-020-03 In this version the input signals are frequency (50 mV .. 5 V ) rather than analog signals. In contrast to the named variants SCE-020-01 and –02, there is no analog output available, so that a setting of the measurement range is inapplicable. -
Page 57: Combination With Sensocontrol Flow-Turbines
Determination of the k-factor FACt (M3) The parameter FACt is a k-factor which is related to a frequency of 1000 Hz. For example: FACt = [ K (1000) ]. This value is indicated on turbines belonging to the Parker SensoControl program. FACt Label SCFT... - Page 58 Parameter configuration of the SCE-020-03 with SCFT-xxx-11-07 Set the decimal place (watch the k-factor) according to Section 4.2.1. Setting of the k-factor according to the turbine type label. Select M3 with the + / - keys and activate the parameter selection with SET .
-
Page 59: Combination With Flow-Turbines From Other Suppliers
4.4.2 Combination with flow-turbines from other suppliers When utilizing flow-turbines from other manufacturers, the k-factor [K (1000)] must be defined with the assistance of the indicated impulses per liter l by the following ratio: 60.000 FACt = K (1000) = This ratio also applies to an indication in GPM: 1 GPM = 3,785 l/min. - Page 60 Parameter configuration SCE-020-03 with flow-turbines from other suppliers: Setting the decimal place (watch the K-factor) according to Section 4.2.1 Setting the K-factor according to the given formula. M3 is selected with the + / - keys and the parameter selection is activated with SET . Then enter the K-factor with the + / - keys and confirm with SET .
-
Page 61: Frequency Measurement
4.4.3 Frequency measurement Frequency sensors, which produce a frequency signal in the range of 0 . . 9,99 kHz, can be directly combined with the SCE-020-03. The following combinations are possible: Decimal place FACt Indication range 00.02 9999 0 . . 99,99 Hz 000.1 0999 0 . -
Page 62: Rotational Speed Measurement
4.4.4 Rotational speed measurement The impulses per rotation of the rotating system (for example, the number of teeth, the number of wings of a winged wheel, etc.) are determined by the parameter iPr. The following parameter configuration must be configured with the + / - keys: Imp./R Decimal... - Page 63 Parameter configuration SCE-020-03 with frequency signal and impulses / rotation Set the decimal place (..= 0000) according to Section 4.2.1. Setting the K-factor (FACt = 6000) M3 is selected with the + / - keys and the parameter selection is activated with SET . Then enter the K-factor with the + / - keys and confirm with SET .
-
Page 64: Block Diagram And Pin Configuration
4.4.5 Block diagram and PIN configuration Fig.12: PIN Configuration SCE-020-03 Analog input Parameter Voltage supply m e m o r y 0...8kHz EEPROM 11...30 VDC LED display Microcontroller 4-digit Fig.13: Block diagram SCE-020-03 - 26 -... -
Page 65: Miscellaneous
Miscellaneous Technical data Environmental conditions Input Signal Operating temperature Accuracy 0...60 °C ± 0.2% display ±1 Digit Temperature Error ± 0,025 % /°C Storing temperature -25...+80 °C Measurement rate 5 ms Relative humidity limit value each 5 ms < 80 % Measurement range Type of protection To be programmed... - Page 66 0 - 1 0 - 1 0 - 1 0 - 1 0 - 2 0 - 2 0 - 2 0 - 2 0 - 3 0 - 3 0 - 3 0 - 3 . . . B B B B B .
-
Page 67: Drawings
Scale drawings Fig.14: Scale drawing SCE-020 - 29 -... -
Page 68: External Voltage Supply
External voltage supply In case a 220 VAC voltage is required, the external power supply unit SCSN – 410 must be used. The installation is effected on a TS35/ TS32 mounting rail. The instrument must be wired separately. Please note: Please observe the installation instructions of the power supply unit (product information 1077). -
Page 69: Pin Configuration For Connection Cable
PIN Configuration for connection cable Connection cable SCK-400-xx-06 (DIN plug) Signal Color yellow + Ub brown green Shield Connection cable SCK-400-xx-07 (M12x1 circular connector) Signal Color P or Q yellow white + Ub brown green Shield Connection cable of the temperature sensor SCT-150-14-00 Signal Color white... - Page 70 SCE-020-01/02 ANALOG SENSOR RS-232 SUPPLY OUT 1 1 2 3 4 5 6 7 8 9 10 11 12 +24V green yellow brown shield Converter FLOW SCFT-XXX-11-07 - 32 -...
- Page 71 SCE-020-01/02 ANALOG SENSOR RS-232 SUPPLY OUT 1 1 2 3 4 5 6 7 8 9 10 11 12 +24V green yellow brown shield SCK-400-XX-06/07 SCP-XXX-XX-06/07 - 33 - SCE-020-01/02 ANALOG SENSOR RS-232 SUPPLY OUT 1...
- Page 72 SCE-020-01/02 (P) SCE-020-01/02 (T) ANALOG ANALOG SENSOR RS-232 SUPPLY OUT 1 SENSOR RS-232 SUPPLY OUT 1 1 2 3 4 5 6 7 8 9 10 11 12 1 2 3 4 5 6 7 8 9 10 11 12 +24V green white...
- Page 73 0...10V 0/4...20mA 0/4...20mA 11...30VDC ENGLISH...
- Page 74 SCE-020-01/02 ANALOG SENSOR RS-232 SUPPLY OUT 1 1 2 3 4 5 6 7 8 9 10 11 12 +24V green white brown shield SCT-150-14-00 - 36 -...
- Page 75 0...10V 0/4...20mA 0/4...20mA 11...30VDC ENGLISH...
- Page 76 Table des matières Généralités Fonctions et réglages Clavier et affichage Modification des réglages de l’appareil Menu de configuration du SCE-020 Configuration du SCE 020-01 4.2.1 Configuration de la décimale ..- ( M2 ): 4.2.2 Configuration du signal d’entrée 0 . . 20 mA (M3/M4) 4.2.3 Configuration du signal d’entrée 4 .
-
Page 77: Généralités
Généralités Les appareils de mesure à encastrer SCE ont été conçus pour l’emploi dans la technique de mesure moderne. Tous les signaux d’entrée typiques peuvent être transformés. Ils ont été élaborés pour le programme SensoControl et sont spécialement faciles à manier. L’unité... -
Page 78: Clavier Et Affichage
Clavier et affichage Fig.1 Affichage sans la vitre Affichage - DEL de 4 chiffres, choix libre de la décimale Signal indiquant le dépassement de la valeur limite Touche SET : Faire appel au menu configuration / Mémoriser la configuration Touches +/- pour appeler le menu suivant / précédent Avec l’autocollant, l‘affichage de dimension peut être choisi librement - 3 -... -
Page 79: Modification Des Réglages De L'appareil
Modification des réglages de l‘appareil Menu de configuration du SCE-020 Il est possible d'accéder au clavier et à l'afficheur DEL après avoir retiré la vitre de protection à l’aide d’un tournevis. En appuyant sur la touche SET , on peut accéder au menu. La modification ou bien la sélection du paramètre de l’appareil se fait avec les touches + / - . - Page 80 Fig.2 : Menu du SCE 020-01 Traduction de la graphique: Start : Lancement Menu Ende : Fin menu , Configuration de la décimale Affichage de la valeur initiale Affichage de la valeur finale - 5 -...
-
Page 81: Configuration Du Signal D'entrée 0
4.2.2 Configuration du signal d‘entrée 0 . . 20 mA - Configuration de la valeur initiale en 0 - (M3): Choisir M3 à l'aide des touches + / - et activer la sélection des paramètres avec SET . Configurer ensuite la valeur initiale avec + / - . -
Page 82: Configuration Du Signal D'entrée 4
4.2.3 Configuration du signal d‘entrée 4 . . 20 mA Lorsqu’il s’agit de signaux d’entrées allant de 4 à 20mA, le point zéro doit être défini en 0 de la façon suivante: inFS = − L’exemple suivant montre la configuration: = = = = = I/mA = = = = =... - Page 83 Procédure de la configuration des paramètres du SCE-020-01: Configurer la décimale (respecter le signal d’entrée et la plage de mesure) selon les indications du chapitre 4.2.1 Configurer la plage de mesure en 0 et en FS M3 ou M4 sont sélectionnés à l'aide des touches + / -. Activer la sélection des paramètres avec SET .
-
Page 84: Schéma Fonctionnel Et Schéma De Raccordement
4.2.4 Schéma fonctionnel et schéma de raccordement Fig. 3: Schéma de raccordement du SCE-020-01 Entrée analogue Mémoire Alimentation en paramètres courant 0...20mA / 4...20mA EEPROM 11...30 VDC 0...10V Affichage DEL de Microcontroller 4 chiffres Sortie analogue 0...20mA / 4...20mA Fig.4: Schéma fonctionnel du SCE-020-01 - 9 -... -
Page 85: Configuration Du Sce
Configuration du SCE 020-02 Tous les paramètres de base ( End, .., en 0, enFS ) doivent être configurés ou bien modifiés de façon équivalente avec la programmation du SCE-020-01. (voir également chapitre 4.1 et 4.2). Cette version offre une interface sérielle RS232 et un contact de relais sans potentiel (220VAC/5A) pour lequel des valeurs limites appropriées peuvent être définies. - Page 86 Fig.5: Menu du SCE 020-02 - 11 -...
-
Page 87: Configuration De La Sortie Des Données Avec Point Décimal - ( M2.2)
4.3.2 Configuration de la sortie des données avec point décimal - ( M2.2) La configuration adéquate est réalisée comme décrit sous le paragraphe 4.2.1. Sélectionner M 2.2 à l'aide des touches + / - et activer la sélection des paramètres avec SET . Définir ensuite la position du point décimale avec + / - . -
Page 88: Taux De Transfert Rate - (M6)
4.3.4 Taux de transfert rAtE - (M6) Le taux de transfert décrit le décalage temporel voulu pour la transmission des valeurs de mesure (temps d’exploration) Cette transmission au récepteur (PC ou PLC) se fait par l’interface RS232. Ce taux de transfert est sélectionné dans le menu rAte . Choisir M5 á... -
Page 89: 1Lecture Des Données Sur Demande
4.3.4.1 Lecture des données sur demande Choisir M5 avec les touches + / - et activer la sélection des paramètres avec SET . Ensuite configurer le taux de transfert rAte = 000.0 avec + / - . Terminer l’entrée avec SET . Si la valeur de mesure doit être transmise au récepteur suite à... -
Page 90: Entrée Des Valeurs Limites Li 1 Et Li 0(M7/M8)
4.3.5 Entrée des valeurs limites Li 1 et Li 0 - (M7/M8) : Le contact du relais fonctionne selon le principe du courant de travail c’est à dire que la sortie sera activée et le contact du relais fermé, si la valeur configurée est dépassée. Avec LI 1 on définit la valeur limite du contact de travail ( par ex. - Page 91 La configuration des paramètres du SCE-020-02 est terminée dès que la valeur Li 0 sera confirmée avec SET . La mise en mémoire de cette configuration se réalise en appelant le menu End . En confirmant de nouveau avec la touche SET , on mémorise la configuration des paramètres.
-
Page 92: Schéma Fonctionnel Et Schéma De Raccordement
4.3.6 Schéma fonctionnel et schéma de raccordement Fig.9: Schéma de raccordement du SCE-020-02 Entrée analogue Mémoire Alimentation en paramètres courant 0...20mA / 4...20mA EEPROM 11...30 VDC 0...10V Affichage Interface DEL de Microcontroller RS-232 4 chiffres Valeurs de seuil Sortie analogue 1 Relais contact 0...20mA / 4...20mA Fig.10:... -
Page 93: Configuration Du Sce-020
Configuration du SCE-020-03 Dans cette version on ne traite pas des signaux analogiques mais des signaux de fréquence (50 mV .. 5 V ). A la différence des versions SCE-020-01 et –02 il n’y a pas de sortie analogue. Les paramètres à... -
Page 94: Utilisation Avec Les Turbines Sensocontrol
Définition du facteur - K FACt (M3) Le paramètre FACt est un facteur-K, relatif à une fréquence de 1000 Hz : FACt = [ K (1000) ]. Lorsqu'il s’agit d'une turbines du programme Parker SensoControl cette valeur est indiquée sur la turbine. FACt Indication SCFT... - Page 95 Configuration des paramètres du SCE-020 – 03 avec SCFT-xxx-11-07: Configuration de la décimale (tenir compte du facteur -K) selon les indications du chapitre 4.2.1 Configuration du facteur -K selon les indications de la turbine . Choisir M3 avec les touches + / - et activer la sélection des paramètres avec SET .
-
Page 96: Utilisation Avec Des Turbines D'autres Fabricants
4.4.2 Utilisation avec des turbines d’autres fabricants Pour cette application il faut que le facteur–K [K (1000)] soit défini à l’aide des impulsions par litre = I par la formule suivante: 60.000 FACt = K (1000) = Cette formule est donc également valable pour une indication en MGP (mètre géopotentiel): 1 MGP = 3,785 l/min. - Page 97 Configuration des paramètres du SCE-020-03 lors d'une utilisation avec des turbines d’autres fabricants: Configuration de la décimale (tenir compte du facteur -K) selon les indications du chapitre 4.2.1 Configuration du facteur-K selon la formule indiquée. Choisir M3 avec les touches + / - et activer la sélection des paramètres avec SET .
-
Page 98: Mesure De La Fréquence
4.4.3 Mesure de la fréquence Les capteurs de fréquence, ayant un signal de fréquence de 0 à 9,99 kHz, peuvent être reliés directement au SCE-020-03. Les combinaisons suivantes sont possibles: Décimale FACt plage d’affichage 00.02 9999 0 . . 99,99 Hz 000.1 0999 0 . -
Page 99: Mesure Derotation
4.4.4 Mesure derotation Les impulsions par tour du système rotatif (par ex. nombre de dents, nombre d' ailettes d’une roue) sont défini par les paramètres iPr . La configuration des paramètres suivante doit être effectuée à l'aide des touches +/- : Imp./t Décimales FACt... - Page 100 Configuration des paramètres du SCE-020-03 avec fréquence et impulsions / tour: Configuration de la décimale (..= 0000) selon les indications du chapitre 4.2.1 Configuration du facteur-K (FACt = 6000) Choisir M3 avec les touches + / - et activer la sélection des paramètres avec SET .
-
Page 101: Schéma Fonctionnel Et Schéma De Raccordement
4.4.5 Schéma fonctionnel et schéma de raccordement Fig.12: Schéma de raccordement du SCE-020-03 Entrée analogue Mémoire Alimentation en paramètres courant 0...8kHz EEPROM 11...30 VDC Affichage DEL de Microcontroller 4 chiffres Fig.13: Schéma fonctionnel du SCE-020-03 - 26 -... -
Page 102: Divers
Divers Données techniques Conditions ambiantes Signal d’entrée Température de service Erreur de mesure 0...60 °C ± 0.2% d‘affichage ±1 digit Erreur de température ± 0,025 % /°C Température de stockage -25...+80 °C Taux de mesure 5 ms Humidité relative Interrogation de la valeur de seuil 5 ms <... - Page 103 0 - 1 0 - 1 0 - 1 0 - 1 0 - 2 0 - 2 0 - 2 0 - 2 0 - 3 0 - 3 0 - 3 0 - 3 . . . n n n n n .
-
Page 104: Schémas
Schémas Fig.14: Schémas du SCE-020 - 29 -... -
Page 105: Alimentation En Courant Externe
Alimentation en courant externe Si une alimentation en 220 VAC est exigée, il faudra utiliser le bloc secteur externe SCSN - 410. Le montage du bloc secteur se réalise sur le profilé TS35/TS32. L’appareil doit être câblé séparément. Attention: Veuillez respecter les consignes d’installation du bloc secteur (Information de produit 1077). -
Page 106: Configuration Des Câbles De Raccordement
Configuration des câbles de raccordement Câble de raccordement SCK-400-xx-06 (connecteur DIN) Signal Couleur jaune + Ub marron vert blindé Câble de raccordement SCK-400-xx-07 (M12x1 connecteur rond) Signal Couleur P ou Q jaune blanc + Ub marron vert blindé Câble de raccordement du capteur température SCT-150-14-00 Signal Couleur... - Page 107 SCE-020-01/02 ANALOG SENSOR RS-232 SUPPLY OUT 1 1 2 3 4 5 6 7 8 9 10 11 12 +24V green yellow brown shield Converter FLOW SCFT-XXX-11-07 - 32 -...
- Page 108 SCE-020-01/02 ANALOG SENSOR RS-232 SUPPLY OUT 1 1 2 3 4 5 6 7 8 9 10 11 12 +24V green yellow brown shield SCK-400-XX-06/07 SCP-XXX-XX-06/07 - 33 - SCE-020-01/02 ANALOG SENSOR RS-232 SUPPLY OUT 1...
- Page 109 SCE-020-01/02 (P) SCE-020-01/02 (T) ANALOG ANALOG SENSOR RS-232 SUPPLY OUT 1 SENSOR RS-232 SUPPLY OUT 1 1 2 3 4 5 6 7 8 9 10 11 12 1 2 3 4 5 6 7 8 9 10 11 12 +24V green white...
- Page 110 0...10V 0/4...20mA 0/4...20mA 11...30VDC FRANCAIS...
- Page 111 SCE-020-01/02 ANALOG SENSOR RS-232 SUPPLY OUT 1 1 2 3 4 5 6 7 8 9 10 11 12 +24V green white brown shield SCT-150-14-00 - 36 -...
- Page 112 0...10V 0/4...20mA 0/4...20mA 11...30VDC FRANCAIS...
- Page 113 (M3/M4) (M3/M4) M2.1 M2.2 M7/M8...
- Page 115 Afb.1 Display zonder frontvenster...
- Page 116 +/ - + / - End (M1) Meten Aangeven. End ..in 0, in FS (M2) + / - + / - Voorbeeld:...
- Page 117 Afb.2 Menustappen SCE 020-01 M1: Start M2: Decimaal Punt Instellen M3: Ingeven Aanvangswaarde M4: Ingeven Eindwaarde...
- Page 118 in 0 - (M3) + / - + / - IN 0 + / - in FS - (M4): + / - + / - in FS + / - Voorbeelden: f j i f j i f j i f j i f j i n i 0...
- Page 119 inFS = − " = = = = = ..= = = = = Δ ) l i = = = = = Δ ) l i = = = = = Δ ) l i = = = = = in 0 in FS...
- Page 120 Procedure van de parameterconfiguratie SCE-020-01: inFS + / - + / - inFS opgeslagen Meten Aangeven...
- Page 121 Afb.3: Verdeling van de aansluitingen SCE-020-01 Afb.4: Blokdiagram SCE-020-01...
- Page 122 End, .., in 0, inFS decimale komma decimaalpunt bAud rAte Li 1 Li 0 (M2.1) + / - M2.1 + / - M1: Start M2: Decimaal Punt Instellen M3: Ingeven Aanvangswaarde M4: Ingeven Eindwaarde M5: Baudrate M6: Transfer Rate M7: Schakel-Punt AAn M8: Schakel Punt Uit...
- Page 123 Afb.5 Menustappen SCE 020-02...
- Page 124 (M2.2) + / - M2.2 + / - (M5) + / - + / - + / - bAud +/- SET...
- Page 125 rAtE - (M6) rAte + / - + / - + / - Transmissiesnelheid rAte +/- SET...
- Page 126 + / - + / - rAte oproep Afb.6: Datatransmissie tussen SCE-020-02 en besturingseenheid...
- Page 127 Li 1 Li 0 (M7/M8): arbeidsstroomprincipe LI 1 (M8) Afb.7: Grenswaardeinstelling Afb.8: Overschrijding van de grenswaarde + / - + / - Li 1 + / - + / - Li 0...
- Page 128 meten aangeven Procedure van de parameterconfiguratie SCE-020-02: inFS + / - + / - opgeslagen Meten Aangeven...
- Page 129 Afb.9: Verdeling van de aansluitingen SCE-020-02 Afb.10: Blokdiagram SCE-020-02...
- Page 130 FACt + / - End, . . , FACt, iPr. M1: Start M2: Decimaal Punt Instellen M3: Kalibratie Faktor Afb. 11 Menustappen SCE-020-03...
- Page 131 FACt (M3) FACt is FACt FACt + / - + / - + / - + / - iPr Meten Aangeven...
- Page 132 Parameterconfiguratie SCE-020 - 03 met SCFT-xxx-11-07: + / - + / - + / - + / - iPr Meten Aangeven...
- Page 133 impulsen per liter = I FACt FACt eerst daarna Decimaalcijfers FACt...
- Page 134 Parameterconfiguratie SCE-020-03 met turbines van ander fabrikaat: + / - + / - + / - + / - iPr Meten Aangeven.
- Page 135 Decimaalcijfer FACt N.B.: + / - + / - + / - Meten Aangeven...
- Page 137 Parameterconfiguratie SCE-020-03 met frequentie en impulsen/ omwenteling: = 0000 FACt = 6000 + / - + / - + / - + / - Meten Aangeven...
- Page 138 Afb.12 Verdeling van de aansluitingen SCE-020-03 Afb.13 Blokdiagram SCE-020-03...
- Page 140 - 1 0 - 1 0 - 1 0 - 1 0 - 2 0 - 2 0 - 2 0 - 2 0 - 3 0 - 3 0 - 3 0 - 3 0 . . . B B B B B .
- Page 141 Afb.14 Afmetingen SCE-020...
- Page 142 N.B.:...
- Page 144 SC E- 020- 01/ 02 ANALOG SENSOR RS-232 SUPPLY OUT 1 1 2 3 4 5 6 7 8 9 10 11 12 +U b +24V G N D gr een yel l ow br ow n shi el d C onver t er FLOW SC FT- XXX- 11- 07...
- Page 145 SC E- 020- 01/ 02 ANALOG SENSOR RS-232 SUPPLY OUT 1 1 2 3 4 5 6 7 8 9 10 11 12 +U b +24V G N D gr een yel l ow br ow n shi el d SC K - 400- XX- 06/ 07 SC P- XXX- XX- 06/ 07...
- Page 146 SC E- 020- 01/ 02 ( P) SC E- 020- 01/ 02 ( T) ANALOG ANALOG SENSOR RS-232 SUPPLY OUT 1 SENSOR RS-232 SUPPLY OUT 1 1 2 3 4 5 6 7 8 9 10 11 12 1 2 3 4 5 6 7 8 9 10 11 12 +U b +24V...
- Page 147 SC E- 020- 01/ 02 ANALOG SENSOR RS-232 SUPPLY OUT 1 1 2 3 4 5 6 7 8 9 10 11 12 +U b +24V G N D gr een yel l ow br ow n shi el d SC K - 400- XX- 07 SC Q - XXX- 10- 07...
- Page 148 SC E- 020- 01/ 02 ANALOG SENSOR RS-232 SUPPLY OUT 1 1 2 3 4 5 6 7 8 9 10 11 12 +U b +24V G N D gr een w hi t e br ow n shi el d SC T- 150- 14- 00...
- Page 149 SC E- 020- 01/ 02 ANALOG SENSOR RS-232 SUPPLY OUT 1 1 2 3 4 5 6 7 8 9 10 11 12 +U b +24V G N D gr een yel l ow br ow n shi el d C onver t er SC VF- XXX- 10- 07...
- Page 150 Sommario Caratteristiche generali Funzioni e impostazioni Tasti e display Modifica delle impostazioni dello strumento Menù di configurazione - SCE-020 Configurazione SCE 020-01 4.2.1 Impostazione dei decimali - (M2 ) 4.2.2 Configurazione del segnale d’ingresso 0 . . 20 mA (M3/M4) 6 4.2.3 Configurazione del segnale d’ingresso 4 .
-
Page 151: Caratteristiche Generali
Caratteristiche generali Gli strumenti del quadro della serie SCE sono stati messi a punto per l’utilizzo con le più moderne tecnologie di misurazione. Accettano tutti i normali segnali di ingresso. Tali strumenti sono stati progettati appositamente per integrare la linea di apparecchi SensoControl, e si caratterizzano per la facilità... -
Page 152: Tasti E Display
Tasti e display Fig.1 Pannello frontale senza coperchio display LED a 4 cifre con posti decimali programmabili segnale di superamento scala tasto SET : per richiamare il menù di configurazione o salvare modifiche tasti +/- per passare alla voce successiva/precedente del menù... -
Page 153: Modifica Delle Impostazioni Dello Strumento
Modifica delle impostazioni dello strumento Menù di configurazione - SCE-020 Rimuovendo il pannello frontale (sollevandolo delicatamente con un cacciavite), si espongono i tasti e il display LED. Premere il tasto SET per accedere al menù di configurazione. Per modificare o selezionare un valore, utilizzare i tasti + / -. - Page 154 Fig.2 Operazioni guidate da menù SCE 020-01 Start: Menue Ende Dezimalpunkteinstellung: posti decimali Anzeige Anfangswert: valore di ingresso zero Anzeige Endwert: valore di ingresso di - 5 -...
-
Page 155: Configurazione Del Segnale D'ingresso 0
4.2.2 Configurazione del segnale di ingresso 0 . . 20 mA - Regolazione del valore di ingresso zero IN 0 - M3: Selezionare M3 con i tasti + / - e attivare la selezione dei parametri con SET . Per un campo da 0 a 100 bar, per esempio, l’ingresso zero IN 0 va impostato con i tasti + / - su 0 bar. - Page 156 4.2.3 Configurazione del segnale di ingresso 4 . . 20 mA Con segnali di ingresso da 4 a 20mA, il valore di ingresso zero in 0 deve essere determinato mediante la seguente relazione: inFS = − L’esempio successivo spiega come regolare il valore di ingresso: = = = = = I/mA = = = = =...
- Page 157 Procedure di configurazione dei parametri - SCE-020-01 Regolazione dei posti decimali (v. Segnali di ingresso e campo di misurazione) come spiegato in 4.2.1. Regolazione del campo di misurazione in0 e inFS Selezionare M3 o M4 con i tasti + / - e attivare la selezione dei parametri con SET, quindi inserire i valori iniziale e finale con i tasti + / - e salvare con il tasto SET .
-
Page 158: Schema A Blocchi E Configurazione Pin
4.2.4 Schema a blocchi e configurazione PIN Fig.3 Configurazione PIN SCE-020-01 Input analogico Memoria Tensione parameteri alimentazione 0...20mA / 4...20mA 0...10V EEPROM 11...30 VDC Display LED Microcontrollore 4 cifre Output analogico 0...20mA / 4...20mA Fig.4 Schema a blocchi - SCE-020-01 - 9 -... -
Page 159: Configurazione Dello Sce
4.3. Configurazione dello SCE 020-02 Tutti i parametri essenziali ( End, .., in 0, inFS ) si impostano o si modificano in modo analogo alla programmazione dello SCE-020-0 (vedere anche 4.1 e 4.2). In questa versione, sono disponibili un’interfaccia seriale RS232 e un contatto di relè... - Page 160 Fig.5 Operazioni guidate da menù - SCE 020-02 - 11 -...
-
Page 161: Formato Dati In Uscita Con Virgola Decimale - ( M2.2)
4.3.2 Formato dei dati in uscita con virgola decimale – ( M2.2) La configurazione corrispondente è analoga a quella descritta nel Paragrafo 4.2.1. M2.2 si seleziona con il tasto + / - e la selezione dei parametri si attiva premendo il tasto SET . La posizione della virgola decimale si imposta con i tasti + / - . -
Page 162: Frequenza Di Scansione Rate - (M6)
4.3.4 Frequenza di scansione rAtE – (M6) La frequenza di scansione definisce l’intervallo fra due invii delle letture dei dati misurati allo strumento ricevente (PC o PLC) attraverso l’interfaccia RS232. Tale intervallo di scansione si imposta nel menù rAte . Selezionare M6 con i tasti + / - e attivare la selezione dei parametri con SET . -
Page 163: 1Misurazione Su Richesta
4.3.4.1. Misurazione su richesta Selezionare M5 con i tasti + / - e attivare la selezione dei parametri con SET . Impostare quindi la frequenza di scansione rAte = 000.0 con i tasti + / - . Terminare l’impostazione premendo SET . Se i rilevamenti delle misurazioni vanno trasmessi allo strumento ricevente su richiesta , i singoli rilevamenti possono essere richiesti inviando il carattere R (Richiesta). -
Page 164: Valori Soglia Li 1 E Li 0 - (M7/M8)
4.3.5 Valori soglia Li 1 e Li 0 – (M7/M8) : Il contatto di relè funziona secondo il principio della corrente operativa , ossia la porta si attiva quando la lettura supera il valore- soglia impostato e il relè è chiuso (funzione normalmente chiuso). Il valore-soglia LI 1 definisce il parametro per aprire il contatto di relè... - Page 165 La configurazione dei parametri dello SCE-020-02 termina non appena si conferma il valore di Li 0 mediante il tasto SET . Il salvataggio della configurazione segue selezionando il menù End . Un’ulteriore conferma con il tasto SET fa salvare i parametri configurati.
-
Page 166: Schema A Blocchi E Configurazione Pin
4.3.6 Schema a blocchi e configurazione PIN Fig.9 Configurazione PIN - SCE-020-02 Input analogico Memoria Tensione parametri alimentazione 0...20mA / 4...20mA 0...10V EEPROM 11...30 VDC Display LED Interfaccia Microcontrollore RS-232 4cifre Valore soglia Output analogico 1 contatto di relé 0...20mA / 4...20mA Fig.10 Schema a blocchi - SCE-020-02 - 17 -... -
Page 167: Configurazione Dello Sce-020
Configurazione dello SCE-020-03 In questa versione, i segnali di ingresso sono costituiti da frequenze (50mV .. 5 V ) invece che da segnali analogici. Contrariamente alle varianti SCE-020-01 e –02, non sono disponibili uscite analogiche, perciò i campi di misurazione non sono impostabili. I parametri impostabili sono il posto decimale (analogo nella sua programmazione allo SCE-020-01, v. -
Page 168: Combinazione Con Turbine Sensocontrol
Il parametro FACt è un fattore K in relazione con una frequenza di 1000 Hz. Per esempio: FACt = [ K (1000) ]. Questo valore è indicato per turbine rientranti nel programma Parker SensoControl. FACt Etichetta SCFT Esempio: K (1000) 500 / 1000 Ne consegue che il valore del fattore K è... - Page 169 Configurazione dei parametri dello SCE-020-03 con SCFT-xxx-11-07 Impostare il posto decimale (attenzione al fattore K) come spiegato nel Paragrafo 4.2.1. Impostazione del fattore K in base all’etichetta del modello di turbina. Selezionare M3 con i tasti + / - e attivare la selezione dei parametri con SET .
-
Page 170: Combinazione Con Turbine Di Altri Fornitori
4.4.2 Combinazione con turbine di altri fornitori Se si utilizzano turbine di altri produttori, il fattore K [K (1000)] va definito con l’ausilio degli impulsi per litro l indicati con la seguente relazione: 60 000 FACt = K (1000) [ litro ] Questa relazione vale anche per indicazioni in GPM: 1 GPM = 3,785 l/min. - Page 171 Configurazione dei parametri dello SCE-020-03 con turbine di altri fornitori Impostazione dei posti decimali (attenzione al fattore K) in base al Paragrafo 4.2.1 Impostazione del fattore K in base a una formula data. Selezionare M3 con i tasti + / - e attivare con SET la selezione dei parametri.
-
Page 172: Misurazione Della Frequenza
4.4.3 Misurazione della frequenza I rilevatori di frequenza, in grado di produrre un segnale di frequenza in un campo da 0 a 9,99 kHz, possono essere combinati direttamente con lo SCE-020-03. Sono possibili le seguenti combinazioni: Posto decimale FACt Campo indicazione 00.02 9999 0 . -
Page 173: Misurazione Della Velocità Di Rotazione
4.4.4 Misurazione della velocità di rotazione mediante segnali di frequenza e impulsi / rotazione Gli impulsi per rotazione del sistema rotante (per esempio, numero di denti, numero di alette su ruota alettata, ecc.) sono determinati mediante il parametro iPr . La seguente configurazione dei parametri deve essere effettuata con i tasti + / -: Imp./R Posti... - Page 174 Configurazione dei parametri dello SCE-020-03 con segnale di frequenza e impulsi/ rotazione Impostare il posto decimale (..= 0000) secondo il Paragrafo 4.2.1. Impostazione del fattore K (FACt = 6000) Selezionare M3 con i tasti + / - e attivare con SET la selezione dei parametri.
-
Page 175: Schema A Blocchi E Configurazione Pin
4.4.5 Schema a blocchi e configurazione PIN Fig.12 Configurazione PIN - SCE-020-03 Input frequenza Memoria Tensione parameteri alimentazione 0...8kHz EEPROM 11...30 VDC Display LED Microcontrollore 4 cifre Fig.13 Schema a blocchi - SCE-020-03 - 26 -... -
Page 176: Varie
Varie Dati tecnici Condizioni ambientali Segnale ingresso Temperatura di esercizio Precisione 0...60 °C ± 0.2% display ±1 Cifra Scostamento termico ±± 0,025 % /°C Temperatura in magazzino -25...+80 °C Frequenza di misurazione 5 ms Umidità relativa valore limite ogni 5 ms <... - Page 177 - 1 0 - 1 0 - 1 0 - 1 0 - 2 0 - 2 0 - 2 0 - 2 0 - 3 0 - 3 0 - 3 0 - 3 0 . . . i l a B B B B B .
-
Page 178: Disegni In Scala
Disegni in scala Fig.14: Disegni in scala SCE-020 - 29 -... -
Page 179: Tensione Alimentazione Esterna
Tensione alimentazione esterna Qualora sia richiesta una corrente di 220 VCA, si rende necessario l’utilizzo dell’alimentatore esterno SCSN – 410. L’installazione si realizza su una guida di montaggio TS35/TS32. Lo strumento va collegato separatamente. Attenzione: Si prega di attenersi alle istruzioni di montaggio dell’alimentatore (info prodotto n. - Page 180 Configurazione PIN per il cavo di collegamento Cavo di collegamento SCK-400-xx-06 (spina DIN) Segnale Colore Giallo + Ub Marrone Verde Schermatura Cavo di collegamento SCK-400-xx-07 (connettore circolare M12x1) SegnaleColore P o Q Giallo Bianco + Ub Marrone Verde Schermatura Cavo di collegamento del trasduttore di temperatura SCT-150-14-00 Segnale Colore...
- Page 181 SCE-020-01/02 ANALOG SENSOR RS-232 SUPPLY OUT 1 1 2 3 4 5 6 7 8 9 10 11 12 +24V green yellow brown shield Converter FLOW SCFT-XXX-11-07 - 32 -...
- Page 182 0...10V 0/4...20mA 0/4...20mA 11...30VDC ITALIANO...
- Page 183 SCE-020-01/02 (P) SCE-020-01/02 (T) ANALOG ANALOG SENSOR RS-232 SUPPLY OUT 1 SENSOR RS-232 SUPPLY OUT 1 1 2 3 4 5 6 7 8 9 10 11 12 1 2 3 4 5 6 7 8 9 10 11 12 +24V green white...
- Page 184 0...10V 0/4...20mA 0/4...20mA 11...30VDC ITALIANO...
- Page 185 SCE-020-01/02 ANALOG SENSOR RS-232 SUPPLY OUT 1 1 2 3 4 5 6 7 8 9 10 11 12 +24V green white brown shield SCT-150-14-00 - 36 -...
- Page 186 0...10V 0/4...20mA 0/4...20mA 11...30VDC ITALIANO...
- Page 187 Índice Datos generales Funciones y ajustes Botones y dispositivo indicador Cambio del ajuste El menu de configuración del SCE-020 Configurar el SCE 020-01 4.2.1 Ajustar la parte decimal ..- ( M2 ): 4.2.2 Configuración de la señal de entrada 0 . . 20 mA (M3/M4) 4.2.3 Configuración de la señal de entrada 4 .
-
Page 188: Datos Generales
Datos generales Los instrumentos de medición para el montaje de la serie SCE han sido desarrollados para el uso en la técnica de medición moderna. Todas las señales de entrada típicas pueden elaborarse. Han sido desarrollados especialmente para el programa SensoControl y se manejan sencillamente. -
Page 189: Botones Y Dispositivo Indicador
Botones y dispositivo indicador figura1: display sin cristal delantero LED display de cuatro dígitos con selección libre del punto decimal Señal indicando el exceso del valor límite botón SET : selecciona el menu de configuración / memoriza el ajuste +/- botones para seleccionar el último/próximo punto del menú... -
Page 190: Cambio Del Ajuste
Cambio del ajuste El menú de configuración del SCE-020 Después de levantar la placa frontal (abra cuidadosamente con un atornillador) aparecen los botones y el LED dispositivo indicador . La selección del menú se hace pulsando el botón SET . El cambio o bien la selección de los parámetros se realizan con los botones + / - . - Page 191 figura2: guía del menú del SCE 020-01 Start: Menue Ende Dezimalpunkteinstellung: partes decimales Anzeige Anfangswert: margen indicator, valor inical Anzeige Endwert: margen indicator, valor final - 5 -...
-
Page 192: Configuración De La Señal De Entrada 0
4.2.2 Configuración de la señal de entrada 0 . . 20 mA - Ajuste del valor inicial en 0 - (M3) : Con los botones + / - se selecciona M3 y con el botón SET se activa la selección de los parámetros. Después ajuste con el botón + / - el valor inicial. -
Page 193: Configuración De La Señal De Entrada 4
4.2.3 Configuración de la señal de entrada 4 . . 20 mA En el caso de señales de entrada de 4 . . 20mA el punto cero hay que definirlo en 0 correspondiente a la siguiente relación: inFS = − El ejemplo siguiente muestra la introducción de datos: ñ... - Page 194 La configuración de parámetros SCE-020-01: Ajuste de la parte decimal (observe la señal de entrada y la escala de medición) según capítulo 4.2.1 Ajuste de la escala de medición in0 y inFS Con los botones + / - se selecciona M3 o M4 y con el botón SET se activa la selección de parámetros.
-
Page 195: Diagrama De Bloques Y Empalmes
4.2.4 Diagrama de bloques y empalmes figura 3: empalmes SCE-020-01 entrada analógica memoria tensión de parámetros alimentación 0...20mA / 4...20mA EEPROM 11...30 VDC 0...10V dispositivo indicador Microcontroller 7-segmentos LED 4 dígitos salida analógica 0...20mA / 4...20mA figura 4: diagrama de bloques SCE-020-01 - 9 -... -
Page 196: Configuración Del Sce
Configuración del SCE 020-02 Todos los parámetros básicos ( End, .., en 0, inFS ) se ajustan o se cambian de forma equivalente a la programación del SCE-020-01 (vea también cap. 4.1 y 4.2). En esta versión hay un interfaz RS232 de serie y un interruptor de relés sin potencial (220VAC/5A), para lo cual pueden definirse los correspondientes valores límites. - Page 197 figura 5: guía del menú SCE 020-02 - 11 -...
-
Page 198: Ajustar La Reproducción De Datos Con Punto Decimal - (M2.2)
4.3.2 Ajustar la reproducción de datos con punto decimal - (M2.2) Se hace la configuración correspondiente análogamente al capítulo 4.2.1. Con los botones + / - se selecciona M2.2 y con SET se activa la selección de parámetros. Después ajuste con los botones + / - la posición del punto decimal. -
Page 199: Transfer Rate Rate - (M6)
4.3.4 Transfer Rate rAtE - (M6) La transferrate describe el intervalo de tiempo de la edición de valores (tiempo de exploración) sobre el interfaz RS232 al aparato receptor (PC o SPS). Este tiempo de exploración se ajusta en el menú rAte . Con los botones + / - se selecciona M5 y con SET se activa la selección de parámetros. -
Page 200: 1Valores De Medición A Soliticitud
4.3.4.1 Valores de medición a solicitud Con los botones + / - se selecciona M5 y con SET se activa la selección de parámetros. Después ajuste con los botones + / - la transferrate rAte = 000.0. Se termina la edición con SET . Si se quiere emitir el valor de medición tras una solicitud al aparato receptor pueden indicarse particulares valores de medición, emitiendo la señal R (Request). -
Page 201: Marcar Los Valores Límites Li 1 Y Li 0 - ( M7/M8 )
4.3.5 Marcar los valores límites Li 1 y Li 0 - (M7/M8): El contacto de relés trabaja conforme al principio de conexión en circuito abierto, es decir la salida se activa en el caso de exceder el valor ajustado y el contacto de relés se cierra. Con LI 1 queda definido el valor límite del contacto de cerrar (p.e. - Page 202 La configuración de parámetros para el SCE-020-02 se termina con la confirmación del valor para Li 0 con SET . Se realiza esta configuración en End . Volviendo a confirmar con SET se memoriza la configuración de parámetros. Después el aparato vuelve automáticamente al modo medir e indicar .
-
Page 203: Diagrama De Bloques Y Empalmes
4.3.6 Diagrama de bloques y empalmes figura 9: empalmes SCE-020-02 entrada analógica memoria tensión de parámetros alimentación 0...20mA / 4...20mA EEPROM 11...30 VDC 0...10V interfaz dispositivo indicador Microcontroller RS-232 7-segmentos LED 4 dígitos valores límites salida analógica 1 Relaiskontakt 0...20mA / 4...20mA figura 10: diagrama de bloques SCE-020-02 - 17 -... -
Page 204: Configurar El Sce-020
Configurar el SCE-020-03 En esta versión no se elaboran señales analógicas como señal de entrada sino señales de frecuencia (50 mV . . 5 V ). Contraria a las versiones SCE-020-01 y -02 aquí no hay una salida analógica. Los parámetros a ajustar consisten en la parte decimal (análogamente a la programación del SCE-020-01) y los parámetros FACt (factor K) o iPr (impulsos / revolución). -
Page 205: Combinación Con Caudalímetros De Turbina Sensocontrol
K FACt (M3) El parámetro FACt es un factor K con relación a una frecuencia de 1000 Hz : FACt = [ K (1000) ]. Este valor está indicado sobre las turbinas del programa Parker SensoControl FACt Angabe SCFT... - Page 206 La configuración de parámetros SCE-020-03 con SCFT-xxx-11-07: Ajuste de la parte decimal (observe el factor K) según capítulo 4.2.1 Ajuste del factor K según indicaciones del modelo de turbinas. Con los botones + / - se selecciona M3 y con el botón SET se activa la selección de parámetros.
-
Page 207: Combinación Con Turbinas De Otros Fabricantes
4.4.2 Combinación con turbinas de otros fabricantes Para esta aplicación debe definirse el factor K [K (1000)] con ayuda de los indicados impulsos por litro = I con la siguiente relación: 60.000 FACt = K (1000)= Esta relación vale también para la indicación en GPM: 1 GPM = 3,785 l/min Para esta aplicación hay que ajustar el parámetro iPr a 0 !! FACt... - Page 208 La configuración de parámetros SCE-020-03 con turbinas de otros fabricantes: Ajuste de la parte decimal (observe el factor K) según capítulo 4.2.1 Ajuste del factor K según la fórmula indicada. Con los botones + / - se selecciona M3 y con el botón SET se activa la selección de parámetros.
-
Page 209: Medida De Frecuencias
4.4.3 Medida de frecuencias Sensores de frecuencias que producen una señal de frecuencias en el margen de 0 . . 9,99 kHz pueden conectarse directamente con el SCE-020-03. Existen las siguientes combinaciónes: parte decimal FACt escala de medición 00.02 9999 0 . -
Page 210: Medición De Cuentarrevoluciones
4.4.4 Medición de cuentarrevoluciones Los impulsos por revolución del sistema rotatorio (p.e. número de dientes, número de alas de una paleta etcétera) se definen con el parámetro iPr . La siguiente configuración de parámetros tiene que estar configurada con los botones +/- : Imp./r Partes FACt... - Page 211 Configuración de parámetros SCE-020-03 con frecuencia e impulsos / rotación: Ajuste de la parte decimal ( ..= 0000 ) según capítulo 4.2.1 Ajuste del factor K ( FACt = 6000 ) Con los botones + / - se selecciona M3 y con el botón SET se activa la selección de parámetros.
-
Page 212: Diagrama De Bloques Y Empalmes
4.4.5 Diagrama de bloques y empalmes figura 12: empalmes SCE-020-03 entrada analógica memoria tensión de parámetros alimentación 0...8kHz EEPROM 11...30 VDC dispositivo indicator Microcontroller 7-segmentos LED 4 dígitos figura 13: diagrama de bloques SCE-020-03 - 26 -... -
Page 213: Particularidades
Particularidades Datos técnicos condiciones del entorno señal de entrada temperatura en funcionamiento error de medición 0...60 °C ± 0.2% de lo indicado ±1 Dígito error de temperatura ? 0,025 % /°C temperatura de almacenamiento relación de medición -25...+80 °C 5 ms indicación del valor límite 5 ms humedad relativa <... - Page 214 0 - 1 0 - 1 0 - 1 0 - 1 0 - 2 0 - 2 0 - 2 0 - 2 0 - 3 0 - 3 0 - 3 0 - 3 ó i ó i ó...
-
Page 215: Croquis De Dimensiones
Croquis de dimensiones figura14: croquis de dimensiones SCE-020 - 29 -... -
Page 216: Tensión De Alimentación Externa
Tensión de alimentación externa En el caso de que se exija una tensión de alimentación de 220 VAC se debe utilizar la fuente de alimentación externa SCSN - 410. Se monta la fuente de alimentación sobre un carril portador TS35/ TS32. -
Page 217: Pin Coordinación De Empalmes
PIN coordinación de empalmes Empalme SCK-400-xx-06 (enchufe DIN) señal color amarillo + Ub marrón verde apantallado Empalme SCK-400-xx-07 (M12x1 conexión redonda) señal color P o Q amarillo blanco + Ub marrón verde apantallado Empalme del sensorio de temperatura SCT-150-14-00 señal color weiss + Ub... - Page 218 SCE-020-01/02 ANALOG SENSOR RS-232 SUPPLY OUT 1 1 2 3 4 5 6 7 8 9 10 11 12 +24V green yellow brown shield Converter FLOW SCFT-XXX-11-07 - 32 -...
- Page 219 0...10V 0/4...20mA 0/4...20mA 11...30VDC ESPAÑOL...
- Page 220 SCE-020-01/02 (P) SCE-020-01/02 (T) ANALOG ANALOG SENSOR RS-232 SUPPLY OUT 1 SENSOR RS-232 SUPPLY OUT 1 1 2 3 4 5 6 7 8 9 10 11 12 1 2 3 4 5 6 7 8 9 10 11 12 +24V green white...
- Page 221 0...10V 0/4...20mA 0/4...20mA 11...30VDC ESPAÑOL...
- Page 222 SCE-020-01/02 ANALOG SENSOR RS-232 SUPPLY OUT 1 1 2 3 4 5 6 7 8 9 10 11 12 +24V green white brown shield SCT-150-14-00 - 36 -...
- Page 223 0...10V 0/4...20mA 0/4...20mA 11...30VDC ESPAÑOL...
- Page 224 Parker Hannifin GmbH Geschäftsbereich ERMETO Postfach 12 02 06, 33652 Bielefeld Am Metallwerk 9, 33659 Bielefeld Tel. ++49 521/40 48-0 FluidConnectors Fax ++49 521/40 48-2 80 http://www.parker.com...