Table des Matières
Publicité
Les langues disponibles
Les langues disponibles
Liens rapides
Publicité
Chapitres
Table des Matières
Dépannage

Manuels Connexes pour Cooke & Lewis CLVH60W-C


Sommaire des Matières pour Cooke & Lewis CLVH60W-C
- Page 1 CLVH60W-C CLVH60SS-C Barcode 5052931055869 / 5052937055852...
- Page 2 [01] x 1 [02] x 1 [03] x 1 [04] [05] x 1 [6] x 2 (3x 12mm)
- Page 3 CLVH60W-C CLVH60SS-C Visor Hood Hotte visière Installation Installation...
-
Page 4: Table Des Matières
Let's get started... started... Getting Before you start Safety more detail... Product functions Operation Care and maintenance Troubleshooting Recycling and disposal Technical and legal information Guarantee CE Declaration of conformity Appendix Installation... -
Page 5: Getting Started
Getting Started... Before you start Safety... -
Page 6: Before You Start
Before you start Before you start To avoid the risks that are always present when you use an electrical appliance it is important that this cooker hood is installed correctly and that you read the safety instructions carefully to avoid misuse and hazards. Please keep this instruction booklet for future reference and pass it on to any future owners. - Page 7 Before you start Tools required Ø6mm Accessories not supplied Recirculation Extraction CARBFILT1 (UK & IE) Ø125mm or Ø150mm VENT PACK 2 (UK & IE ) OR CARBFILT1CL (FR) 3.9 x 32 mm SELF ADHESIVE Short Screw for cabinet ALUMINIUM TAPE Wall Plug Ø6mm CARBON FILTER ORDERING HOTLINE 0844 800 1128 (UK) 1 800 535542 (IE)
-
Page 8: Safety
Safety These instructions are for your safety. Please read through them thoroughly prior to installation and retain them for future reference. • All installation work must be carried out by a competent person or qualified electrician. • This appliance must be installed correctly by a suitably qualified person, strictly following the manufacturer’s instructions. - Page 9 Safety We also recommend that great care be taken during use and cleaning. Read the cleaning and maintenance sections for this appliance carefully. A steam cleaner is not to be used. The appliance is not intended to be operated by means of external timer or separated remote-control system.
-
Page 10: In More Detail
more detail... Product functions Operation Care and maintenance Troubleshooting Recycling and disposal Technical and legal information Guarantee CE Declaration of conformity... -
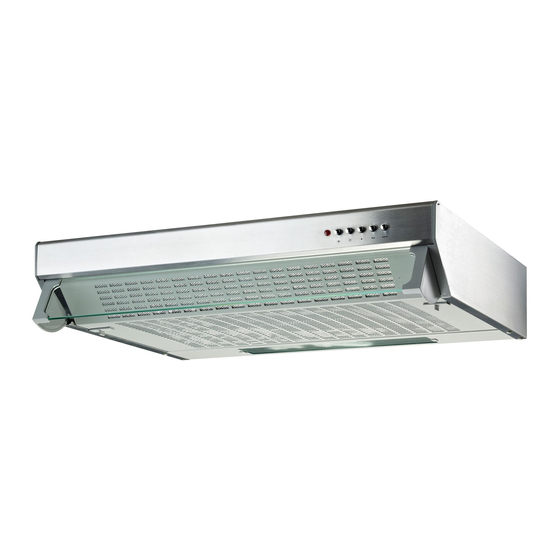
Page 11: Product Functions
Product Functions Product functions This appliance extracts the air of the kitchen to remove the odours and keep an optimum level of the air quality inside the room, it also allows you to illuminate the cooking area. Operation Operation • Switch on the appliance at the switched fused connection unit. The appliance is ready for operation functions. -
Page 12: Care And Maintenance
Care and maintenance Care and maintenance Warning: always switch off the electricity supply before carrying out maintenance work on the hood. In the event of a fault, contact customer services. Bulb replacement FUSE 10’ The Bulb may be hot, leave it 10 minutes before removing.. Push the clips (1) inwards and release the metal filter &... - Page 13 Care and maintenance Warning Always switch off the electricity supply before performing maintenance work. In the event of a fault, FUSE contact customer services. Metal filter maintenance: Use non-corrosive, liquid detergent and avoid the use of abrasive cleaning products. 1 MONTH MAX.65˚C Aluminium filters: to avoid fires, clean thoroughly once a month or whenever the display pilot light (if fitted) indicates as such.
-
Page 14: Troubleshooting
Aluminium grease filter is Clean filters. (see care dirty. and maintenance) Top vent might be Clear any obstruction. obstructed. (CLVH60SS-C & CLVH60W-C) Optional vent kit might be Ensure that the vent kit is twisted. fitted to the manufacturers instructions. Works normally... -
Page 15: Recycling And Disposal
Recycling and disposal Recycling and disposal Environmental protection Waste electrical products should not be disposed of with household waste. Please recycle where facilities exist. Check with your Local Authority or retailer for recycling advice. The symbol on the product or its packaging indicates that this product cannot be treated as normal household waste. - Page 16 Technical and legal information All installation work must be carried out by a competent person or qualified electrician. Before connecting the mains supply ensure that the mains voltage corresponds to the voltage on the rating plate inside the cooker hood. WARNING : THIS APPLIANCE MUST NOT BE EARTHED.
- Page 17 Technical and legal information Electrical Requirements Any permanent electrical installation must comply with the latest I.E.E. Regulations and local electricity company regulations. For your own safety a qualified electrician or contractor who is on the roll of the National Inspection Council for Electrical Installation Contracting (NICEIC) should undertake the electrical installation.
-
Page 18: Guarantee
Guarantee Manufacturer's Guarantee This appliance is covered by a full manufacturer’s 24 month parts and labour guarantee and covers all parts and labour costs associated with the repair of the appliance in a domestic environment. We will repair any defect that arises due to faulty materials or workmanship and use genuine manufacturers parts. - Page 19 Guarantee Exclusions to the guarantee (continued) Claims arising from non-domestic use or commercial environment. Any gas appliance not fitted by a gas safe qualified installer. If no fault is found then GAA reserves the right to charge for the call out at the going rate of £55.00 plus VAT.
-
Page 20: Ce Declaration Of Conformity
We hereby certify that the mentioned accessory complies with the essential requirements of the European Directives applicable, including their modifications and the corresponding transpositions from the national law. CLVH60SS-C MACHINE APPLICATION CLVH60W-C TYPE : Complies with the European Directives 2006/95/CE: EC DIRECTIVES APPLIED : LVD and the 2004/108/CE: EMC... - Page 21 C'est parti... Pour bien commencer... Avant de commencer Sécurité dans le détail... Fonctions du produit Fonctionnement Entretien et maintenance Résolution des problèmes Recyclage et élimination Information technique et légale Garantie Déclaration de conformité CE Annexe Installation...
-
Page 22: Pour Bien Commencer
Pour bien commencer... Avant de commencer Sécurité... -
Page 23: Avant De Commencer
Avant de commencer Avant de commencer Pour éviter les risques liés à l’utilisation d’un appareil électrique, veillez à ce que l'appareil soit correctement installé et lisez attentivement les consignes de sécurité afin d’éviter tout danger ou dommage causé par une mauvaise utilisation. - Page 24 Avant de commencer Outils nécessaires à l'installation Ø6mm Accessoires non fournis Recyclage Évacuation Recirculation Extraction CARBFILT4 (UK & IE) Ø125mm ou Ø150mm CARBFILT1 (UK & IE) Ø125mm or Ø150mm OU CARBFILT4CL (FR) GAINE DE VENTILATION 2 VENT PACK 2 (UK & IE ) OR CARBFILT1CL (FR) (UK &...
-
Page 25: Sécurité
Sécurité Ces instructions ont été rédigées pour votre sécurité. Veuillez les lire attentivement avant toute installation et les conserver pour toute consultation ultérieure. • Toute installation doit être effectuée par une personne compétente ou un électricien qualifié. • Cet appareil doit être installé par une personne qualifiée et conformément aux instructions d’installation du fabricant. - Page 26 Sécurité Un grand soin doit être porté lors de l’utilisation et du nettoyage de l’appareil. Veuillez lire attentivement les sections Nettoyage et Maintenance de cette brochure. Ne pas utiliser de jet de vapeur pour nettoyer votre appareil. L’appareil n’est pas prévu pour fonctionner au moyen d’un minuteur externe ou d’un système de commande à...
-
Page 27: Et Dans Le Détail
dans détail... Fonctions du produit Fonctionnement Entretien et maintenance Résolution des problèmes Recyclage et élimination Information technique et légale Garantie Déclaration de conformité CE... -
Page 28: Fonctions Du Produit
Fonctions du produit Fonctions du produit Cette hotte aspirante évacue l’air de la cuisson pour éliminer les odeurs et améliorer la qualité de l’air à l’intérieur de la pièce. Elle vous permet également d’illuminer la zone de cuisson. Fonctionnement Fonctionnement •... -
Page 29: Entretien Et Maintenance
Entretien et maintenance Entretien et maintenance Avertissement: toujours couper l’alimentation électrique avant d’effectuer des travaux de maintenance sur la hotte. En cas de défaillance, contacter le service après-vente. Remplacement de l’ampoule FUSE 10’ L’ampoule pouvant être très chaude, attendez 10 minutes avant de la remplacer. - Page 30 Entretien et maintenance Avertissement Toujours couper l’alimentation électrique avant d’effectuer des travaux de maintenance. En cas de FUSE défaillance, contacter le service après-vente. Remplacement du filtre métallique: Utilisez un produit de nettoyage liquide doux. Evitez l’utilisation de produits d'entretien abrasifs. 1 MOIS MAX.65˚C Filtres en aluminium: pour éviter tout risque d'incendie, bien...
-
Page 31: Résolution Des Problèmes
Le conduit supérieur Retirer toute obstruction. peut être obstrué. (CLVH60SS-C & CLVH60W-C) Le kit de ventilation en Assurez-vous que le option peut être emmêlé. kit de ventilation a été monté conformément aux instructions du fabricant. -
Page 32: Recyclage Et Élimination
Recyclage et élimination Recyclage et élimination Protection de l'environnement Les déchets de produits électriques ne doivent pas être jetés avec les déchets domestiques. Veuillez recycler là où des installations appropriées existent. Contactez les autorités locales ou votre revendeur pour des conseils en matière de recyclage. La présence de ce symbole sur le produit ou sur son emballage indique que vous ne pouvez pas jeter ce produit de la même façon que vos déchets courants. - Page 33 Information technique et légale Toute installation doit être effectuée par une personne compétente ou un électricien qualifié. Avant la connexion à l'alimentation secteur, assurez-vous que la tension du réseau corresponde à la tension de la plaque signalétique de l'appareil. AVERTISSEMENT : CET APPAREIL NE DOIT PAS ETRE RACCORDE A LA TERRE Le raccordement au réseau électrique peut se faire directement au secteur.
- Page 34 Information technique et légale Réglementations électriques Toute installation électrique permanente doit être conforme aux règlementations de l’I.E.E. et aux réglementations de la compagnie d’électricité locale en vigueur. Pour votre sécurité, un électricien qualifié ou un technicien agréé de l'organisme de certification national doit vérifier la conformité...
-
Page 35: Garantie
Garantie Garantie du fabricant Cet appareil est couvert par une garantie totale de 24 mois, pièces et main- d’œuvre. Cette garantie couvre le remplacement des pièces et les frais de main-d’œuvre relatifs à la réparation de l’appareil dans un environnement domestique. - Page 36 Garantie Exclusions de la garantie (suite) Toute demande d’intervention SAV sur un produit utilisé dans le cadre d’un environnement commercial ou non-domestique. Tout appareil fonctionnant au gaz non installé par un technicien agréé. Si aucun problème n’est constaté lors de l’intervention SAV, GAA se réserve le droit de facturer le coût du déplacement au tarif en vigueur de 75,00 €...
-
Page 37: Déclaration De Conformité Ce
European Directives applicable, including their modifications and the corresponding transpositions from the national law. nationales. CLVH60SS-C MACHINE APPLICATION CLVH60W-C APPLICATION MACHINE C LVH60SS-C CLVH60W-C TYPE : TYPE : Complies with the European Directives 2006/95/CE: EC DIRECTIVES APPLIED : DIRECTIVES CE APPLIQUEES : Directive Basse Tension... -
Page 38: Annexe
Appendix... Annexe... Installation Installation... - Page 39 Installation Installation CARBFIL CARBFILT1CL (UK & IE) VENT PACK 2 (UK & IE) You can choose two types of installation: - Extraction option - Recirculation option Vous pouvez choisir entre deux types d’installation : - Option par évacuation - Option par recyclage...
- Page 40 DIM.B DIM.B MIN.750mm Gas /Gaz MIN 650mm Electric / Electrique Mark on the kitchen wall the holes to fix the cooker hood. Ensure wall plugs (not supplied) used are suitable for wall type. Tracez sur le mur de la cuisine l'emplacement des trous pour fixer la hotte. Assurez-vous que les chevilles (non fournies) utilisées conviennent à...
- Page 41 [05] x 1 MOUNTING OF THE HOOD TO THE WALL (without cupboard above) In this situation the hood should only be used for recirculation purposes only Drill 4 holes corresponding to the diagram on page 40 Insert wall plugs. Insert correct length screw leaving the head protruding 2mm FIXATION DE LA HOTTE AU MUR (sans placard au-dessus) Dans ce cas particulier, la hotte doit être utilisée en version recyclage uniquement.
- Page 42 Position hood over 2 wall screws, and use keyhole slots on adjustment bracket to support the weight. Positionnez la hotte sur les 2 vis, et utilisez les encoches en trou de serrure sur le support de réglage pour soutenir la hotte. Remove the grill Push the clips (1) inwards and release the metal filter &...
- Page 43 Whilst holding the hood, and tighten inside screws Tout en tenant la hotte, insérez et serrez les vis intérieures. Tighten outer screws Serrez ensuite les vis extérieures.
- Page 44 Clip the grill back in place Remettez la grille en place...
- Page 45 [02] MOUNTING THE HOOD UNDERNEATH A CUPBOARD Both extraction and recirculation options can be used EXTRACTION Cut a hole in the cupboard base to suit the position of the exhaust vent in the visor hood and size to suit the vent kit being used. Connect collar [02] this is used to connect to vent kit.
- Page 46 [02] FIXATION DE LA HOTTE SOUS UN MEUBLE DE CUISINE Les options évacuation et recyclage peuvent être utilisées EVACUATION Faites un trou dans la base du meuble afin de pouvoir faire passer le conduit de ventilation dans la hotte visière. La taille doit également correspondre aux dimensions du kit de ventilation utilisé.
- Page 47 Notes...
- Page 48 B&Q plc Chandlers Ford, Hants SO53 3LE United Kingdom 0845 609 6688 www.diy.com Castorama Parc d'Activités B.P.101 59175 Templemars - France 0 810 104 104 www.castorama.fr...