Table des Matières
Publicité
Les langues disponibles
Les langues disponibles
Liens rapides
97050180
r e v. 0 0 6
0 9 / 2 0 1 1
ITALIANO (Lingua originale) ..................................................................3
ENGLISH (translation from the original in Italian).............................85
FRANÇAIS (traduction de l'original en italien)................................167
DEUTSCH (Übersetzung aus dem Original in Italienisch)..............249
IT
EN
FR
DE
Publicité
Chapitres
Table des Matières

Manuels Connexes pour CASTELLINI SKEMA 6 CART


Sommaire des Matières pour CASTELLINI SKEMA 6 CART
- Page 1 97050180 r e v. 0 0 6 0 9 / 2 0 1 1 ITALIANO (Lingua originale) ..............3 ENGLISH (translation from the original in Italian)......85 FRANÇAIS (traduction de l'original en italien)........167 DEUTSCH (Übersetzung aus dem Original in Italienisch)....249...
-
Page 3: Table Des Matières
Comando a piede versione WIRELESS ......31 11.2. Caratteristiche dimensionali SKEMA 6 CP ....81 5.3. Siringa ................33 11.3. Caratteristiche dimensionali SKEMA 6 CART ....82 5.4. Turbina ................34 5.5. Micromotore elettrico ............. 35 Schema generale di igiene e manutenzione del complesso 5.5.1. -
Page 4: Avvertenze Generali
• Le informazioni, le specifi che tecniche, le illustrazioni, contenute in questa pubblicazione non sono vincolanti. CASTELLINI S.p.A. si riserva il diritto di apportare modifi che e miglioramenti tecnici senza modifi care le presenti istruzioni. • Il fabbricante persegue una politica di costante miglioramento dei propri prodotti, quindi è possibile che alcune istruzioni, specifi che e immagini contenute in questo manuale possano differire leggermente dal prodotto acquistato. -
Page 5: Condizioni Ambientali
Il peso del complesso dentale compreso di paziente da 190Kg, è uguale c.a 350Kg/mq. • Il tecnico non autorizzato da CASTELLINI che procede a modifi care il prodotto sostituendo parti o componenti con altri diversi da quelli utilizzati dal costruttore, si assume una responsabilità analoga a quella del costruttore stesso. - Page 6 Per area in cui viene effettuato il trattamento si intende lo spazio circostante il complesso odontoiatrico aumentato di 1,5 mt. • Rispetto della qualità dell'acqua. Al fi ne di soddisfare i requisiti legali medici e nazionali relativi all'acqua proveniente dai riuniti, CASTELLINI S.p.A. consiglia di dotare il complesso odontoiatrico di un impianto di disinfezione.
-
Page 7: Descrizione Degli Apparecchi
SKEMA 6 - ISTRUZIONI PER L'USO 2. Descrizione degli apparecchi 2.1. Targhette di identifi cazione Unità operatoria. La targhetta si trova sul braccio di collegamento tra poltrona e gruppo idrico. Dati riportati sulla targhetta: • Nome del costruttore. • Nome dell'apparecchiatura. •... -
Page 8: Poltrona
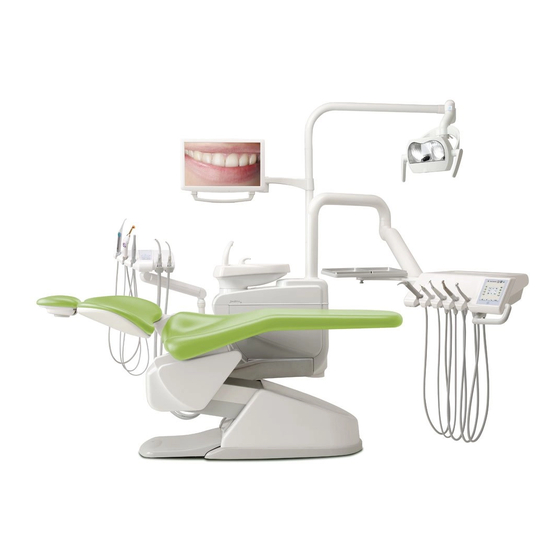
SKEMA 6 - ISTRUZIONI PER L'USO Versione SKEMA 6 CART. Tavoletta medico versione CP (gli strumenti sono inseriti verticalmente in apposite sedi) applicata su carrello regolabile in altezza. Descrizione delle varie parti: [ a ] Gruppo idrico. [ c ] Tavoletta medico. -
Page 9: Funzionamento Poltrona New Skema
SKEMA 6 - ISTRUZIONI PER L'USO 4. Funzionamento poltrona NEW SKEMA La poltrona NEW SKEMA esegue i seguenti movimenti: • Salita/discesa del sedile • Salita/discesa dello schienale con inclinazione del sedile (Trendelem- burg compensato) La poltrona può essere comandata dai seguenti punti: •... -
Page 10: Appoggiatesta Regolabile
SKEMA 6 - ISTRUZIONI PER L'USO 4.3. Appoggiatesta regolabile L'appoggiatesta può essere di 2 tipi: con bloccaggio cuscino di tipo manuale con bloccaggio cuscino di tipo pneumatico Regolazione altezza poggiatesta. Il posizionamento dell'asta del poggiatesta è ottenuto per mezzo di una frizione magnetica. -
Page 11: Funzionamento Tavoletta Medico
SKEMA 6 - ISTRUZIONI PER L'USO 5. Funzionamento tavoletta medico Disposizione degli strumenti. La disposizione degli strumenti sulla tavoletta è defi nita dal cliente in fase di ordine. Attivazione degli strumenti. • La siringa è sempre attiva (vedi paragrafo 5.3.). •... - Page 12 SKEMA 6 - ISTRUZIONI PER L'USO Pulizia tavoletta medico. Per la pulizia della tavoletta medico utilizzare un prodotto idoneo, che sia stato provato effi cace contro batteri e funghi, ed ampiamente effi cace verso i virus (compresi HBV e HIV); vedere il paragrafo 1.4. Pulire la tavoletta medico utilizzando un prodotto idoneo (vedere paragrafo 1.4).
-
Page 13: Consolle Medico
SKEMA 6 - ISTRUZIONI PER L'USO 5.1. Consolle medico Descrizione dei pulsanti: Pulsante richiamo/cambio menu. Pulsanti multifunzione. Pulsante di selezione rapida 100% dei valori impostabili. Pulsante di selezione rapida 50% dei valori impostabili. Pulsante di selezione rapida 1% dei valori impostabili. Pulsante AUMENTA: incrementa i valori impostabili. -
Page 14: Interfaccia Utente
SKEMA 6 - ISTRUZIONI PER L'USO Descrizione icone di segnalazione. Memorizzazione poltrona attivata. Colore nero: Sistema S.S.S. attivo. Colore arancio: serbatoio acqua distillata NON in pressione. Posizione poltrona: programma automatico 1. Colore nero: serbatoio acqua distillata in riserva ed attivo. Colore rosso: serbatoio acqua distillata in riserva ma NON attivo. -
Page 15: Selezione Operatore
L’esecuzione di una qualsiasi operazione riporta l’apparecchiatura nella condizione operativa. NOTA: questa funzione di default è NON attiva. La sua attivazione può essere eseguita solo da un Tecnico Autorizzato CASTELLINI. 5.1.1.1. Selezione operatore La consolle dei complessi odontoiatrici modello SKEMA 6 consente di impostare 3 diversi operatori. -
Page 16: Regolazione Luminosità Display
SKEMA 6 - ISTRUZIONI PER L'USO 5.1.1.2.1. Regolazione luminosità display Questa impostazione è unica per tutti gli operatori. Dal menu IMPOSTAZIONI GENERALI eseguire le seguenti operazioni: • Premere il pulsante MENU per scorrere le icone fi no a selezionare quella relativa a "Regolazione luminosità... -
Page 17: Regolazione/Blocco Freno Braccio A Pantografo
"Blocco freno braccio a pantografo". • Premendo i pulsanti AUMENTA e/o DIMINUISCI è possibile attivare o inibire lo sblocco del freno braccio a pantografo/tavoletta SKEMA 6 CART. NOTA: lo stato di freno non sbloccabile è segnalato dall’apposita icona ( A ) posta in alto sul display consolle. -
Page 18: Inserimento Anagrafi Ca Operatore
SKEMA 6 - ISTRUZIONI PER L'USO 5.1.1.2.4. Inserimento anagrafi ca operatore Dal menu IMPOSTAZIONI GENERALI eseguire le seguenti operazioni: • Premere il pulsante MENU per scorrere le icone fi no a selezionare quella relativa a "Inserimento anagrafi ca operatore" . •... -
Page 19: Regolazione Ora E Data
SKEMA 6 - ISTRUZIONI PER L'USO 5.1.1.2.6. Regolazione ora e data Questa impostazione è unica per tutti gli operatori. Dal menu IMPOSTAZIONI GENERALI eseguire le seguenti operazioni: • Premere il pulsante MENU per scorrere le icone fi no a selezionare quella relativa a "Regolazione ora e data". -
Page 20: Impostazioni Sistemi Di Igiene
SKEMA 6 - ISTRUZIONI PER L'USO 5.1.1.3. Impostazioni sistemi di igiene Dal menu principale eseguire le seguenti operazioni: • Premere il pulsante MENU per scorrere le icone fi no a selezionare quella relativa a "IMPOSTAZIONI SISTEMI DI IGIENE" . • Premere il pulsante muntifunzione OK per entrare nel sottomenu sele- zionato dove sono presenti presenti le seguenti icone: Impostazione ciclo AS Impostazione ciclo TF... -
Page 21: Impostazione Ciclo Time Flushing (Tf)
SKEMA 6 - ISTRUZIONI PER L'USO 5.1.1.3.2. Impostazione ciclo Time Flushing (TF) NOTA: è possibile accedere a questo menu solo se presente il sistema Time Flushing. Questa impostazione è unica per tutti gli operatori. Dal menu IMPOSTAZIONI SISTEMI DI IGIENE eseguire le seguenti operazioni: •... -
Page 22: Svuotamento Serbatoio Sistema M.w.b
SKEMA 6 - ISTRUZIONI PER L'USO 5.1.1.3.3. Svuotamento serbatoio sistema M.W.B. NOTA: è possibile accedere a questo menu solo se presente il sistema M.W.B. Questa funzione permette di svuotare il circuito idrico del sistema M.W.B. (vedi paragrafo 7.3.) qualora il complesso odontoiatrico debba rimanere spento per molti giorni o qualora si desiderasse svuotare l’acqua presente nel sistema stesso. -
Page 23: Impostazione Acqua Alla Bacinella
SKEMA 6 - ISTRUZIONI PER L'USO 5.1.1.4.1. Impostazione acqua alla bacinella Questa impostazione è unica per tutti gli operatori. Dal menu IMPOSTAZIONI GRUPPO IDRICO eseguire le seguenti operazioni: • Premere il pulsante MENU per scorrere le icone fi no a selezionare quella relativa a "Impostazione acqua alla bacinella"... -
Page 24: Impostazione Movimentazioni Automatiche Bacinella
SKEMA 6 - ISTRUZIONI PER L'USO 5.1.1.4.3. Impostazione movimentazioni automatiche bacinella NOTA: è possibile accedere a questo menu solo con bacinella motorizzata. Questa impostazione è unica per tutti gli operatori. Dal menu IMPOSTAZIONI GRUPPO IDRICO eseguire le seguenti operazioni: • Premere il pulsante MENU per scorrere le icone fi no a selezionare quella relativa a "Impostazione movimentazioni automatiche bacinella"... -
Page 25: Programmazione Delle Posizioni 1, 2, 3 E 4 Della Poltrona
SKEMA 6 - ISTRUZIONI PER L'USO 5.1.3. Programmazione delle posizioni 1, 2, 3 e 4 della poltrona Questa impostazione è specifi ca per ogni operatore. Dalla videata principale eseguire le seguenti operazioni: • Regolare la poltrona nella posizione desiderata utilizzando i pulsanti di movimentazione manuale. - Page 26 2 = Inversione rotazione micromotore e modalità ENDO 3 = Modalità chirurgica Di seguito verrà schematizzato il funzionamento nelle varie confi gurazioni. NOTA: la variazione di confi gurazione del comando a piede può essere eseguita solo da un Tecnico Autorizzato CASTELLINI.
- Page 27 SKEMA 6 - ISTRUZIONI PER L'USO Movimenti poltrona ( strumenti riposti ) CONFIGURAZIONI AZIONAMENTO FUNZIONE Salita Discesa Salita schienale Discesa schienale Movimenti automatici poltrona ( strumenti riposti ) CONFIGURAZIONI AZIONAMENTO FUNZIONE G + A Richiamo posizione 1 G + B Richiamo posizione 3 G + C Richiamo posizione 2...
-
Page 28: Comando A Piede "A Pressione
SKEMA 6 - ISTRUZIONI PER L'USO 5.2.2. Comando a piede "a pressione" Descrizione delle parti. 1 Maniglia. 2 Leva di comando. 3 Comando movimenti poltrona. 4 Comando Chip-air/Richiamo posizione risciacquo paziente. 5 Comando Water Clean System /Ritorno automatico della poltrona. 6 LED segnalazione funzionamento con spray. -
Page 29: Comando A Piede "Power Pedal
SKEMA 6 - ISTRUZIONI PER L'USO Funzionamento tasto destro ( 5 ). Funzionamento: • Pressione prolungata (almeno 2 secondi) del tasto con strumenti a riposo: Attivazione del programma "Ritorno automatico della poltrona”. • Pressione prolungata (almeno 2 secondi) del tasto con strumento estratto: Comando Water Clean System: invia un getto di acqua corrente a stru- menti quali la Turbina, il Micromotore e l'Ablatore per il risciacquo delle condotte degli spray. - Page 30 SKEMA 6 - ISTRUZIONI PER L'USO Funzionamento comando movimenti poltrona ( 3 ). Controlla i seguenti movimenti: • salita sedile poltrona, • salita schienale poltrona, • discesa sedile poltrona, • discesa schienale poltrona. Per interrompere il movimento rilasciare il comando. NOTA: tutti i comandi di movimentazione della poltrona risultano bloccati quando uno strumento è...
-
Page 31: Comando A Piede Versione Wireless
SKEMA 6 - ISTRUZIONI PER L'USO 5.2.4. Comando a piede versione WIRELESS Il comando a piede "a pressione" può essere fornito anche nella versione WIRELESS. Il comando a piede versione WIRELESS contiene un modulo trasmittente ZIGBEE (modulo certifi cato per Europa, Canada e USA). Avvertenze per l'uso. - Page 32 SKEMA 6 - ISTRUZIONI PER L'USO Ricarica della batteria. Quando necessario occorre ricaricare le batterie del comando a piede WIRELESS. Procedere come segue: • Aprire lo sportellino di protezione del connettore posto nella parte poste- riore del comando a piede e collegare il cavo di ricarica. •...
-
Page 33: Siringa
SKEMA 6 - ISTRUZIONI PER L'USO 5.3. Siringa Descrizione dello strumento. [a] Beccuccio. [b] Impugnatura. [c] Pulsante smontaggio siringa. [d] Pulsante aria. [e] Pulsante acqua. [f] Selettore caldo/freddo. [g] LED segnalazione caldo freddo. ATTENZIONE! Lo strumento è fornito allo stato non sterile. Utilizzo. -
Page 34: Turbina
SKEMA 6 - ISTRUZIONI PER L'USO 5.4. Turbina Collegamento manipolo e cambio della fresa. Fare riferimento alle specifi che istruzioni allegate al manipolo. Utilizzo. • Tempi di funzionamento: lavoro 5 min., riposo 5 min. • Portare lo strumento in posizione di lavoro. •... -
Page 35: Micromotore Elettrico
SKEMA 6 - ISTRUZIONI PER L'USO Sterilizzazione. Autoclave a vapore d’acqua a 135°C (2 bar). Tempo minimo 15 min. ATTENZIONE! Prima di eseguire la fase di sterilizzazione consultare le specifi che istruzioni di uso allegate al manipolo. Norme di sicurezza. ATTENZIONE! •... - Page 36 SKEMA 6 - ISTRUZIONI PER L'USO Accensione/spegnimento della fi bra ottica. • Portare lo strumento in posizione di lavoro. • Attivare la fi bra ottica premendo il pulsante NOTA: l’attivazione della fi bra ottica è segnalato sul display dall'i- cona ( A ). Regolazione intensità...
-
Page 37: Modalità Di Funzionamento Conservative
SKEMA 6 - ISTRUZIONI PER L'USO 5.5.1. Modalità di funzionamento CONSERVATIVE Menu con micromotore estratto ma non attivo. • Premendo il pulsante multifunzione di sinistra ( M1 ) si seleziona uno dei 4 programmi di lavoro disponibili. • Premendo il pulsante MENU è possibile modifi care la modalità di funziona- mento. -
Page 38: Modalità Di Funzionamento Endo
SKEMA 6 - ISTRUZIONI PER L'USO 5.5.2. Modalità di funzionamento ENDO Menu con micromotore estratto ma non attivo. • Premendo il pulsante multifunzione di sinistra ( M1 ) si seleziona uno dei 4 programmi di lavoro disponibili. • Premendo il pulsante MENU è possibile modifi care la modalità di funziona- mento. -
Page 39: Modalità Di Funzionamento Surgery
SKEMA 6 - ISTRUZIONI PER L'USO 5.5.3. Modalità di funzionamento SURGERY Menu con micromotore estratto ma non attivo. • Premendo il pulsante multifunzione di sinistra ( M1 ) si seleziona uno dei 4 programmi di lavoro disponibili. 20:1 • Premendo il pulsante MENU è possibile modifi care la modalità di funziona- mento. -
Page 40: Menu Impostazione Rapporto Di Riduzione
SKEMA 6 - ISTRUZIONI PER L'USO 5.5.4. Menu impostazione rapporto di riduzione Dal menu impostazioni di funzionamento, selezionando l'cona relativa a "Impostazione rapporto di riduzione" e premendo il pulsante multifunzione di destra ( ) è possibile entrare nel relativo sottomenu dove sono presenti le seguenti icone: Rapporto di riduzione corrente Velocità... -
Page 41: Detartaratore
SKEMA 6 - ISTRUZIONI PER L'USO 5.6. Detartaratore Collegamento manipolo ed inserto. Fare riferimento alle specifi che istruzioni allegate al manipolo. ATTENZIONE! Prima di collegare il manipolo verifi care che i contatti siano perfettamente asciutti. Qualora fosse necessario, asciugarli con l'aria della siringa. Utilizzo. - Page 42 SKEMA 6 - ISTRUZIONI PER L'USO Accensione/spegnimento della fi bra ottica. • Portare lo strumento in posizione di lavoro. • Attivare la fi bra ottica premendo il pulsante NOTA: l’attivazione della fi bra ottica è segnalato sul display dall'i- cona ( A ). Qualora il manipolo utilizzato non disponga della fi bra ottica, sul display verrà...
-
Page 43: Detartaratore Chirurgico Surgison 2
• Il manipolo SURGISON 2 deve essere utilizzato esclusivamente con gli inserti forniti a corredo o altri inserti forniti dalla CASTELLINI S.p.A. o da essa, comunque, approvati. • Non modifi care la forma dell’inserto. -
Page 44: Modalità Di Funzionamento Boost
SKEMA 6 - ISTRUZIONI PER L'USO 5.6.1.2. Modalità di funzionamento BOOST Oltre alla vibrazione ultrasonica dell'l'inserto, viene eseguita una modulazione in ampiezza della potenza erogata (circa +40% della potenza impostata). Questa modulazione crea un effetto di percussione sull’osso favorendone l’incisione. È... - Page 45 SKEMA 6 - ISTRUZIONI PER L'USO Avvertenze generali di utilizzo. ATTENZIONE! • Il LED fonte di luce è una sorgente di classe 2 (Po < 1mW) secondo la norma IEC 60825-1. NON FISSARE IL FASCIO. La luce emessa può danneggiare gli occhi in caso di irradiazioni dirette senza protezione. Utilizzare sempre la lampada con l'apposito schermo di protezione (fornito) oppure con gli appositi occhiali di protezione contro radiazioni emesse dalla luce blu fi...
-
Page 46: Lampada Polimerizzante Leda
SKEMA 6 - ISTRUZIONI PER L'USO 5.7. Lampada polimerizzante LEDA Caratteristiche tecniche. Tensione d’alimentazione : 24-36 Vdc Potenza max assorbita : 10,5 VA Sorgente luminosa : 1 Led da 5 W Lunghezza d’onda : 440÷480 nm Tempi impostabili : 20 – 40 – 60 sec. Segnali acustici : all’inizio, ogni 5 sec. -
Page 47: Lampada Polimerizzante T Led
SKEMA 6 - ISTRUZIONI PER L'USO 5.7.1. Lampada polimerizzante T LED Caratteristiche tecniche. Tensione d’alimentazione : 24-36 Vdc Potenza max assorbita : 6 VA Sorgente luminosa : 1 Led da 5 W Lunghezza d’onda : 430÷490 nm Segnali acustici : all’inizio, ogni 5 sec. e a fi ne ciclo Tipo di funzionamento : intermittente (lavoro 2 cicli - riposo 60 sec.) Programmi... - Page 48 SKEMA 6 - ISTRUZIONI PER L'USO • Estrarre la lampada dal suo alloggiamento in tavoletta assistente o tavoletta medico. L'avvenuta estrazione dello strumento è segnalata dalla relativa immagine sul display consolle. • Ruotare la parte anteriore della lampada e/o la fi bra ottica nella confi gura- zione più...
- Page 49 SKEMA 6 - ISTRUZIONI PER L'USO • Le persone che presentano patologie oculari come individui che hanno subito l’intervento di asportazione della cataratta o patologie della retina devono essere protette durante l’utilizzo della lampada, ad esempio con idonei occhiali di protezione. •...
-
Page 50: Telecamera Endorale C-U2
SKEMA 6 - ISTRUZIONI PER L'USO 5.8. Telecamera endorale C-U2 C-U2 è una telecamera intraorale progettata appositamente per un semplice utilizzo nell’esame dentale intraorale, con un manipolo estremamente leggero, controllo automatico dell’esposizione e fuoco fi sso (versione C-U2) o fuoco variabile (versione C-U2 Pro). E’ concepita per assistere il dentista nella comu- nicazione con il paziente, per spiegare e motivare il trattamento previsto e migliorare la consapevolezza del paziente. - Page 51 SKEMA 6 - ISTRUZIONI PER L'USO Accensione led telecamera. Premendo il pulsante è possibile accendere/spegnere l’illuminazione a led della telecamera. NOTA: l'accensione dei led è segnalata sul display dall'icona ( A ). • Se necessario, regolare il livello dell’intensità luminosa premendo in maniera prolungata (almeno 2 secondi) il pulsante e utilizzando i pulsanti AU- MENTA e/o DIMINUISCI per la regolazione.
- Page 52 SKEMA 6 - ISTRUZIONI PER L'USO Impostazione funzionamento modalità singola immagine o multi immagine. Con la telecamera attivata ed in stato LIVE, per passare dalla modalità singola immagine a quella multi immagine (e viceversa) è suffi ciente pre- mere il pulsante multifunzione di sinistra. L’icona relativa alla modalità...
- Page 53 SKEMA 6 - ISTRUZIONI PER L'USO • Memorizzazione dell'immagine: l'immagine congelata viene direttamente visualizzata sul monitor ponendola nella prima casella libera (es. A) della pagina attiva in quel momento. Ogni successiva immagine congelata viene posizionata nella casella sucessiva ruotando in senso orario. NOTA: una volta riempite le 4 caselle disponibili, ogni sucessiva immagine congelata andrà...
- Page 54 SKEMA 6 - ISTRUZIONI PER L'USO Protezioni igieniche monouso. La telecamera può costituire un mezzo di trasmissione di infezioni crociate da paziente a paziente. Per questo si raccomanda di utilizzarla sempre con le protezioni mo- nouso (cod.97900999 per versione C-U2 e cod.97901338 per versione C-U2 PRO) e di disinfettarla esternamente ogni giorno al termine del suo utilizzo.
-
Page 55: Pannello Di Controllo Osd (On Screen Display)
SKEMA 6 - ISTRUZIONI PER L'USO 5.8.1. Pannello di Controllo OSD (On Screen Display). Questo menu a video permette di modifi care alcuni parametri di funzionamento del manipolo telecamera C-U2 PRO. Il menu a video scompare automaticamente se non si preme pedale o pulsante a sfi oramento per qualche secondo, o semplicemente riponendo nuovamente il manipolo. -
Page 56: Laser Integrato L810
SKEMA 6 - ISTRUZIONI PER L'USO 5.9. Laser integrato L810 Questo dispositivo è un laser a diodi per uso medicale. Utilizzo. • Tempi di funzionamento: 6 min. ON, 3 min. OFF. • Portare lo strumento in posizione di lavoro (sul display della tavoletta medico viene visualizzata la videata relativa all'estrazione del laser). -
Page 57: Pompa Peristaltica
Utilizzare guanti sterili monouso. ATTENZIONE! Verifi care l’integrità dell’imballaggio, nonché la scadenza della linea d’irrigazione. Solo i kit d’irrigazione CASTELLINI garantiscono un funzionamento privo di problemi. Queste linee sono sterili e mo- nouso, un eventuale riutilizzo può comportare la contaminazione microbiologica del paziente. -
Page 58: Localizzatore Apicale Elettronico (Laec)
SKEMA 6 - ISTRUZIONI PER L'USO Impostazione quantità di soluzione fi siologica erogata dalla pompa. • Per impostare quantità di soluzione fi siologica erogata dalla pompa occorre premere in maniera prolungata (almeno 2 secondi) il pulsante • Selezionare il valore relativo alla quantità desiderata utilizzando i pulsanti AUMENTA e/o DIMINUISCI. -
Page 59: Sensore Integrato Zen-Xi
SKEMA 6 - ISTRUZIONI PER L'USO LAEC abbinato a micromotore elettrico. E' possibile usare il LAEC anche in abbinamento con il micromotore elettrico quando sui trova in modalità ENDO. Quando il LAEC è attivato, se si estrae il micromotore elettrico in modalità ENDO sul display appaiono contemporaneamente sia le informazioni rela- tive al micromotore sia quelle relative al LAEC (bargraph e valore APEX). -
Page 60: Funzionamento Tavoletta Assistente
SKEMA 6 - ISTRUZIONI PER L'USO 6. Funzionamento tavoletta assistente Caratteristiche principali. • La tavoletta [ a ] è vincolata al gruppo idrico [ b ] per mezzo di due bracci snodati che ne consentono il posizionamento nella zona più consona all'operatore. Il braccio a pantografo [ e ] permette una escursione verticale della tavoletta assistente di 335 mm attraverso 6 posizioni di lavoro. -
Page 61: Strumenti A Tavoletta Assistente
SKEMA 6 - ISTRUZIONI PER L'USO 6.2. Strumenti a tavoletta assistente Tutti gli strumenti applicati a tavoletta assistente mantengono lo stesso funzionamento di quelli sulla tavoletta medico. Nello specifi co: • Siringa, vedere paragrafo 5.3. • Turbina, vedere paragrafo 5.4. •... -
Page 62: Vassoio Portatray A Tavoletta Assistente
SKEMA 6 - ISTRUZIONI PER L'USO 6.4. Vassoio portatray a tavoletta assistente Il vassoio portatray [ a ] è in acciaio inox e può essere agevolmente tolto dal relativo supporto. Il supporto vassoio può ruotare sia in senso orario che antiorario onde permettere il suo posizionamento nella zona più... - Page 63 SKEMA 6 - ISTRUZIONI PER L'USO Impostazione lavaggio bacinella. L’erogazione dell’acqua alla bacinella può avvenire in maniera temporizzata o manuale (erogazione ON/OFF tramite una breve pressione del relativo pulsante di comando). Per impostare il funzionamento desiderato ed il tempo di erogazione acqua vedere il paragrafo 5.1.1.4.1.
-
Page 64: Sistema S
SKEMA 6 - ISTRUZIONI PER L'USO 7.2. Sistema S.S.S. Descrizione del sistema. Il sistema è dotato di un serbatoio [ a ] posto sotto all'idrico ed idoneo a contenere acqua distillata. Il serbatoio ha una capacità complessiva di 1,8 litri. L’acqua distillata alimenta: •... -
Page 65: Ciclo Di Disinfezione Manuale Con Acqua Ossigenata
SKEMA 6 - ISTRUZIONI PER L'USO 7.2.1. Ciclo di disinfezione manuale con acqua ossigenata. Con il sistema S.S.S. è possibile eseguire un ciclo manuale di disinfezione delle condotte idriche di tutti gli strumenti posti sulla tavoletta medico e della siringa posta sulla tavoletta assistente. Per eseguire il ciclo di disinfezione operare come segue: A) Preparazione della soluzione disinfettante: •... -
Page 66: Sistema M.w.b
SKEMA 6 - ISTRUZIONI PER L'USO 7.3. Sistema M.W.B. Il sistema M.W.B. garantisce una separazione sicura, in modo fi sico, del sistema idrico del complesso odontoiatrico dalla rete idrica pubblica, grazie ad un tratto a caduta libera dell'acqua. Inoltre il sistema realizza l'immissione in continuo nel circuito idrico di perossido di idrogeno con una concentrazione fi... -
Page 67: Sistema Automatico Di Disinfezione Autosteril
SKEMA 6 - ISTRUZIONI PER L'USO 7.4. Sistema automatico di disinfezione AUTOSTERIL Descrizione del sistema. Questo sistema permette di eseguire un ciclo automatico di disinfezione dei circuiti idrici dei seguenti strumenti: • tutti gli strumenti posti sulla tavoletta medico, • la siringa e lo strumento posto sulla tavoletta assistente, •... - Page 68 SKEMA 6 - ISTRUZIONI PER L'USO Esecuzione del ciclo di disinfezione. • Avviare il ciclo di disinfezione premendo il pulsante multifunzione ( sulla consolle medico (vedere paragrafo 5.1.1.3.1.) o il pulsante AS posto sulla tavoletta assistente. • Il sistema, a questo punto, esegue in maniera automatica le seguenti fasi: - svuotamento con aria delle condotte idriche degli strumenti, - introduzione del liquido disinfettante ed inizio conteggio del relativo tempo di permanenza impostato precedentemente,...
-
Page 69: Sistema S.h.d. Per Il Lavaggio Delle Cannule Di Aspirazione
SKEMA 6 - ISTRUZIONI PER L'USO 7.5. Sistema S.H.D. per il lavaggio delle cannule di aspirazione. Descrizione del sistema. Questo sistema permette di lavare, detergere e sanifi care l’impianto di aspirazione chirurgica. Il sistema è dotato di un serbatoio [ a ] contenente il liquido detergente e di due attacchi [ b ] che vengono utilizzati per eseguire il lavaggio delle cannule di aspirazione. -
Page 70: Ciclo Automatico Time Flushing
SKEMA 6 - ISTRUZIONI PER L'USO 7.6. Ciclo automatico TIME FLUSHING Descrizione del sistema. Il ciclo automatico TIME FLUSHING permette di eseguire un ciclo automa- tico di lavaggio per rinnovare l'acqua presente nelle condotte idriche degli strumenti posti sulla tavoletta medico e sulla tavoletta assistente. Il lavaggio può... -
Page 71: Accessori
SKEMA 6 - ISTRUZIONI PER L'USO 8. Accessori 8.1. Lampada operatoria La lampada operatoria può essere di 2 modelli: Lampada con sorgente luminosa alogena modello VENUS PLUS. Le istruzioni di utilizzo e manutenzione sono allegate alla lampada. Lampada con sorgente luminosa a LED modello VENUS PLUS -L. Per le istruzioni di utilizzo e manutenzione vedere paragrafo 8.1.1. - Page 72 SKEMA 6 - ISTRUZIONI PER L'USO Regolazione dell'intensità luminosa. Ruotare la manopola (e): • Senso orario: aumenta luminosità. • Senso antiorario: diminuisce luminosità. NOTA per lampade con sensore NO TOUCH: è possibile eseguire la regolazione dell'intensità luminosa anche lasciando ferma la mano nel campo di sensibilità...
-
Page 73: Monitor / Workstation A Palo Lampada
SKEMA 6 - ISTRUZIONI PER L'USO 8.2. Monitor / Workstation a palo lampada Le istruzioni di utilizzo e manutenzione del monitor/workstation sono allegate al complesso odontoiatrico. 8.3. Attacchi rapidi aria/acqua/230V Gli attacchi rapidi aria/acqua/230V sono posti lateralmente sulla cassetta allacciamenti. ATTENZIONE! Spegnere l’apparecchiatura prima di collegare o scollegare le prese aria/acqua. -
Page 74: Tavoletta Portatray Ausiliaria (Solo Per Versione Cart)
CASTELLINI S.p.A., in qualità di costruttore di complessi odontoiatrici, suggerisce una verifi ca almeno ogni 24 mesi all’installazione e dopo ogni intervento di riparazione/aggiornamento a carico delle parti elettriche a cui è... -
Page 75: Aspirazione Chirurgica
SKEMA 6 - ISTRUZIONI PER L'USO 9.4. Aspirazione chirurgica L'aspirazione chirurgica deve essere igienizzata utilizzando un prodotto idoneo a tal uso. ATTENZIONE! Per la pulizia dell’impianto di aspirazione si raccomanda l’uso di STER 3 PLUS (CEFLA S.C.) con la seguente diluizione: 1 tappo misurino (se confezione di vendita) o 2 tappi misurino (se confezione omaggio) in un litro di acqua (soluzione al 6%). -
Page 76: Pulizia Fi Ltro Aria Di Ritorno Turbina
SKEMA 6 - ISTRUZIONI PER L'USO Come smontare il vaso del separatore. ATTENZIONE! La seguente operazione deve essere tassativamente eseguita con i guanti indossati per prevenire eventuali contatti con materiale infetto. • Portare la poltrona alla massima altezza. • Aprire il carter laterale idrico [ a ] (vedi paragrafo 7.7.) e ruotare la cassetta elettrica [ b ]. -
Page 77: Separatore Di Amalgama Metasys
Per lo smaltimento dei contenitori a perdere pieni di amalgama attenersi alle Normative locali e nazionali. 9.9. Poltrona modello NEW SKEMA La poltrona NEW SKEMA non necessita di particolari operazioni di manutenzione. Si consiglia tuttavia un controllo generale di funzionamento annuale da parte di un tecnico autorizzato CASTELLINI. - Page 78 SKEMA 6 - ISTRUZIONI PER L'USO Messaggi di avvertimento. M = Messaggio sul display consolle C = Causa R = Rimedio M: “Riserva H2O, riempire serbatoio” M: “Controllare cannule fi ltro, aspirazione” C: Malfunzionamento del ciclo di lavaggio cannule. C: Il livello del liquido presente nel serbatoio per l'alimentazione idrica indipendente è...
-
Page 79: Dati Tecnici
SKEMA 6 - ISTRUZIONI PER L'USO 11. Dati tecnici Pianta di installazione: 97042072 Portata alimentazione idrica: 10 l/min Manuale tecnico: 97071123 Consumo acqua: 2 l/min. Catalogo ricambi unità operatoria: 97023067 Durezza dell’acqua: 60 mg/l. Catalogo ricambi poltrona: 97023067 Collegamento scarico: ø40 mm. -
Page 80: Caratteristiche Dimensionali Skema 6 Rs
SKEMA 6 - ISTRUZIONI PER L'USO 11.1. Caratteristiche dimensionali SKEMA 6 RS 19 10 24 5 0 40 0 1 70 53 0 80 0 18 0 189 0 1 00 23 00... -
Page 81: Caratteristiche Dimensionali Skema 6 Cp
SKEMA 6 - ISTRUZIONI PER L'USO 11.2. Caratteristiche dimensionali SKEMA 6 CP 1910 2 450 17 0 31 0 1 890 17 0... -
Page 82: Caratteristiche Dimensionali Skema 6 Cart
SKEMA 6 - ISTRUZIONI PER L'USO 11.3. Caratteristiche dimensionali SKEMA 6 CART 1 910 53 0 2 4 5 0 4 0 0 1 7 0 3 000 / 4500 / 600 0 5 3 0 8 0 0 3 1 0... -
Page 83: Schema Generale Di Igiene E Manutenzione Del Complesso Odontoiatrico Skema 6
SKEMA 6 - ISTRUZIONI PER L'USO Schema generale di igiene e manutenzione del complesso odontoiatrico SKEMA 6 QUANDO CHE COSA COSA FARE PARAGRAFO DI RIFERIMENTO Rubinetto scarico condensa. Eliminare la condensa dalle condotte dell'aria. Vedi paragrafo 9.2. Disinfezione dei condotti idrici degli spray con Vedi paragrafo 7.2.1. - Page 84 SKEMA 6 - ISTRUZIONI PER L'USO Pulire con prodotto disinfettante idoneo atte- nendosi alle istruzioni del fabbricante. Cordoni strumento removibili. Spruzzare il prodotto su carta monouso Vedi paragrafo 5. morbida. Non impiegare prodotti abrasivi o acidi. Disinfezione dei condotti idrici degli spray con Vedi paragrafo 7.2.1.
- Page 85 9.8. DURR amalgam separator ........... 159 5.1.3. Setting dental chair positions 1, 2, 3 and 4 ....107 9.9. CASTELLINI dental chair model NEW SKEMA ..159 5.1.4. Emergency stop button ..........107 5.2. Foot control ..............107 10. Fault messages..............160 5.2.1.
-
Page 86: Safety Guidelines
• The information, technical specifi cations and illustrations contained in this publication are not binding. CASTELLINI S.p.A reserves the right to make technical improvements and changes without modifying the instructions contained herein. • The manufacturer has a company policy of continual development. Although every effort is made to keep technical documentation up-to-date at all times some of the instructions, specifi... -
Page 87: Environmental Conditions
Depending on the type of chair the unit comes with, refer to the installation DATA given in paragraph "Specifi cations”. CASTELLINI S.p.A shall not be held liable for any personal injury or equipment damage resulting from failure to heed the precaution given above. -
Page 88: Cleaning And Disinfecting
• Water quality. CASTELLINI S.p.A recommends providing the dental unit with a water disinfecting system to satisfy national and medical legal requirements regar- ding water coming from dental units. The dental unit user is responsible for the quality of the water and must take alternative actions to maintain the required quality if the dental unit is not equipped with a disinfecting system. -
Page 89: Description Of The Equipment
SKEMA 6 - OPERATING INSTRUCTION 2. Description of the equipment 2.1. Nameplate Dental operatory The nameplate is found on the arm between the dental chair and hydro- group. Data given on plate: • Manufacturer’s name • Name of equipment • Voltage •... -
Page 90: Dental Chair
The maximum chair capacity is 190 Kg. ATTENTION! Do not exceed this value. Note about biocompatibility. For skai upholstery, only CASTELLINI original spare parts must be used. 3. Turning on the dental operatory Use the main switch [ f ]: Equipment on:... -
Page 91: New Skema Dental Chair Operation
SKEMA 6 - OPERATING INSTRUCTION 4. NEW SKEMA Dental chair operation The NEW SKEMA dental chair can be moved as follows: • Chair seat up/down • Back up/down with inclination of the chair seat (Trendelemburg compensated) The dental chair can be operated from the following places: •... -
Page 92: Adjustable Headrest
SKEMA 6 - OPERATING INSTRUCTION Adjustable headrest Two types of headrests are available: Cushion secured in place by hand Cushion secured pneumatically Adjusting the height of the headrest The head rest blade is positioned through a magnetic clutch. The opera- tor should pull up and/or push down the headrest until it is in the desired position. -
Page 93: Instrument Board Operation
SKEMA 6 - OPERATING INSTRUCTION 5. Instrument board operation Layout of instruments The positions the instruments are placed in on the board are determined by the customer at the time of order. Starting the instruments. • The syringe is always on (see paragraph 5.3.). •... - Page 94 SKEMA 6 - OPERATING INSTRUCTION Cleaning the instrument board Clean the instrument board; use a suitable product approved against bacteria and fungi and effective against viruses (including HBV and HIV); see paragraph 1.4. Clean the dentist’s instrument board using a suitable product (see Section 1.4).
-
Page 95: Doctor's Control Console
SKEMA 6 - OPERATING INSTRUCTION 5.1. Doctor’s control console Description of the buttons: Menu change/call up button Multifunction button Fast selection button, 100% of settable values Fast selection button, 50% of settable values Fast selection button, 1% of settable values INCREASE button: increases the values DECREASE button: decreases the values Fiber optic lighting on/off button (on/off) -
Page 96: User Interface
SKEMA 6 - OPERATING INSTRUCTION Description of the icons. Dental chair storage activated. Black: S.S.S. system on. Orange: Distilled water tank NOT pressurized. Dental chair position automated programme 1. Black: Distilled water tank in reserve and active. Red: Distilled water tank in reserve but NOT active. Dental chair position automated programme 2. -
Page 97: Operator Selection
Normal operating conditions are restored as soon as any operation is performed. NOTE: this default function is NOT active. It may only be activated by an authorised CASTELLINI technician. 5.1.1.1. Operator selection The console of SKEMA 6 model dental units allows 3 different operators to be set. -
Page 98: Adjusting The Display Brightness
SKEMA 6 - OPERATING INSTRUCTION 5.1.1.2.1. Adjusting the display brightness This setting is used for all the operators. Perform the following steps from the GENERAL SETTINGS menu: • Press button MENU to scroll the icons and select the one for "Display brightness adjustment"... -
Page 99: Adjusting/Engaging The Pantograph Arm's Brake
• Pressing the INCREASE and/or DECREASE buttons, you can activate or deactivate pantograph arm brake release/ SKEMA 6 CART board. NOTE: icon ( A ) found at the top of the console display signals if the brake cannot be disengaged. . -
Page 100: Entering The Operator's Personal Identifi Cation
SKEMA 6 - OPERATING INSTRUCTION 5.1.1.2.4. Entering the operator’s personal identifi cation Perform the following steps from the GENERAL SETTINGS menu: • Press button MENU to scroll the icons, selecting the one for "Entering the operator’s personal identifi cation". • Press multifunction button OK to enter the selected submenu. •... -
Page 101: Setting The Date And Time
SKEMA 6 - OPERATING INSTRUCTION 5.1.1.2.6. Setting the date and time This setting is used for all the operators. Perform the following steps from the GENERAL SETTINGS menu: • Press button MENU to scroll the icons and select the one for "Date and time setting". -
Page 102: Setting The Disinfecting Systems
SKEMA 6 - OPERATING INSTRUCTION 5.1.1.3. Setting the disinfecting systems Perform the following operations from the main menu: • Press button MENU to scroll the icons, selecting the one for "DISINFEC- TING SYSTEM SETTINGS" . • Press multifunction button OK to enter the selected submenu that contains the following icons: AS cycle setting TF cycle setting... -
Page 103: Setting The Time Flushing Cycle (Tf)
SKEMA 6 - OPERATING INSTRUCTION 5.1.1.3.2. Setting the Time Flushing cycle (TF) NOTE: this menu can be accessed only if the Time Flushing system is present. This setting is used for all the operators. Perform the following steps from the DISINFECTING SYSTEM SETTINGS menu: •... -
Page 104: Emptying The M.w.b. System Tank
SKEMA 6 - OPERATING INSTRUCTION 5.1.1.3.3. Emptying the M.W.B. system tank NOTE: this menu can be accessed only if the M.W.B. system is present. This function is used to empty the M.W.B. system’s water circuit (see pa- ragraph 7.3.) if the dental unit is not going to be used for several days or if you want to drain the water present in the system. -
Page 105: Setting Water To Bowl
SKEMA 6 - OPERATING INSTRUCTION 5.1.1.4.1. Setting water to bowl This setting is used for all the operators. Perform the following steps from the HYDROGROUP SETTINGS menu: • Press button MENU to scroll the icons, selecting the one for " Setting water to bowl"... -
Page 106: Automatic Bowl Motion Settings
SKEMA 6 - OPERATING INSTRUCTION 5.1.1.4.3. Automatic bowl motion settings NOTE: this menu can be accessed only if the powered bowl is present. This setting is used for all the operators. Perform the following steps from the HYDROGROUP SETTINGS menu: •... -
Page 107: Setting Dental Chair Positions 1, 2, 3 And 4
SKEMA 6 - OPERATING INSTRUCTION 5.1.3. Setting dental chair positions 1, 2, 3 and 4 This setting is specifi c for each operator. Perform the following operations from the main screen: • Bring the dental chair into the desired position with the manual movements buttons. - Page 108 [4] sets instrument spray activation or deactivation before you operate the lever [2] (bistable operation). Only a CASTELLINI authorized technician can set the foot control in this manner. NOTE: at the end of work a blast of air is automatically activated to eliminate any residual drops of liquid in the instrument ducts.
- Page 109 SKEMA 6 - OPERATING INSTRUCTION Dental chair movements ( instruments in place ) CONFIGURATIONS ACTIVATION FUNCTION Down Back up Back down Automatic dental chair movements ( instruments in place ) CONFIGURATIONS ACTIVATION FUNCTION G + A Position 1 retrieval G + B Position 3 call up G + C Position 2 call up...
-
Page 110: Push-Pedal" Foot Control
SKEMA 6 - OPERATING INSTRUCTION 5.2.2. "Push-pedal” foot control Description of the parts Handle Control pedal Dental chair movements Chip-air/patient rinsing position control Water Clean System/Automatic dental chair return control Spray operation LED Battery charge LED (wireless version only) Control pedal ( 2 ) Operation: •... -
Page 111: Power Pedal" Foot Control
SKEMA 6 - OPERATING INSTRUCTION Right-hand button operation ( 5 ). Operation: • Holding down the button for at least 2 seconds with the instruments in rest position: Activation of the “Automatic dental chair return” program. • Holding down the button for at least 2 seconds with instrument extracted: Water Clean System control: sends a jet of running water to instruments such as the turbine, the micromotor and the scaler for rinsing the spray ducts. - Page 112 SKEMA 6 - OPERATING INSTRUCTION Operation of command for dental chair movements ( 3 ). These buttons move the dental chair as follows: - Chair seat up - Chair back up - Chair seat down - Chair back down To stop movement, release the button. NOTE: all the dental chair movement controls are locked when an instruments is active or the AUTOSTERIL system is working.
-
Page 113: Wireless Foot Control
SKEMA 6 - OPERATING INSTRUCTION 5.2.4. Wireless foot control The “pressure” foot control can also be supplied in a WIRELESS version. The wireless foot control contains a ZIGBEE transmitter module (module certifi ed for Europe, Canada and the USA). Warnings for use. WARNING! •... - Page 114 SKEMA 6 - OPERATING INSTRUCTION Recharging the battery. When the batteries in the WIRELESS foot control need to be recharged, operate as follows: • Open the protective cap of the connector on the rear of the foot control and connect the recharging cable. •...
-
Page 115: Syringe
SKEMA 6 - OPERATING INSTRUCTION 5.3. Syringe Description of the instrument. [ a ] Nozzle. [ b ] Handpiece. [ c ] Syringe release button. [ d ] Air button. [ e ] Water button. [ f ] Hot/cold selector. [ g ] Hot/cold indicator light. -
Page 116: Turbine
SKEMA 6 - OPERATING INSTRUCTION 5.4. Turbine Connecting the handpiece and changing the chuck. Refer to the specifi c instructions furnished with the handpiece. Use. • Operating time: work 5 min., rest 5 min. • Place the instrument in its work position. •... -
Page 117: Micromotor
SKEMA 6 - OPERATING INSTRUCTION Cleaning and care. Refer to the specifi c instructions furnished with the handpiece. Disinfection. Autoclave with steam at 135°C (2 bar). Minimum time: 15 min. ATTENTION! Carefully read the operating instructions supplied with the handpiece before attempting to sterilize. Safety guidelines. - Page 118 SKEMA 6 - OPERATING INSTRUCTION Turning the fi ber optic on/off. • Set the instrument to its work position. • Press the button to turn on the fi ber optic. NOTE: icon ( A ) appears on the display to signal the fi ber optic has been turned on.
-
Page 119: Conservative Operating Mode
SKEMA 6 - OPERATING INSTRUCTION 5.5.1 CONSERVATIVE operating mode Menu with micromotor withdrawn but not turned on. • Press the left multifunction button (M1) to select one of the 4 programs available. • Press the MENU button to change the operating mode: •... -
Page 120: Endo Operating Mode
SKEMA 6 - OPERATING INSTRUCTION 5.5.2 ENDO operating mode Menu with micromotor withdrawn but not turned on. • Press the left multifunction button (M1) to select one of the 4 programs available. • Press the MENU button to change the operating mode: •... -
Page 121: Surgery Operating Mode
SKEMA 6 - OPERATING INSTRUCTION 5.5.3 SURGERY operating mode Menu with micromotor withdrawn but not turned on. • Press the left multifunction button (M1) to select one of the 4 pro- grams available. 20:1 • Press the MENU button to change the operating mode: •... -
Page 122: Reduction Ratio Setup Menu
SKEMA 6 - OPERATING INSTRUCTION 5.5.4 Reduction ratio setup menu Select the icon for “Reduction ratio setting” on the menu used to set the operating data and press the right multifunction button ( ) to go to the submenu containing the following icons: Current reduction ratio Maximum speed that can be reached with selected reduction ratio NOTE: icon Rpm cannot be edited as it only shows the maximum... -
Page 123: Scaler
SKEMA 6 - OPERATING INSTRUCTION 5.6. Scaler Connecting the handpiece and inserts. Refer to the specifi c instructions furnished with the handpiece. ATTENTION! Before attempting to connect the handpiece, make certain the contacts are perfectly dry. Blow air from the syringe, if necessary, to dry. Use. - Page 124 SKEMA 6 - OPERATING INSTRUCTION Turning the fi ber optic on/off. • Set the instrument to its work position. • Press the button to turn on the fi ber optic. NOTE: icon ( A ) appears on the display to signal the fi ber optic has been turned on.
-
Page 125: Surgison 2 Surgical Detartarer Device
• The SURGISON 2 handpiece must only be used with the bits supplied with the instrument or other bits supplied by CASTELLINI S.p.A. • Do not change the shape of the bit • The instrument is supplied in a non-sterile state. -
Page 126: Boost Functioning Mode
SKEMA 6 - OPERATING INSTRUCTION 5.6.1.2. BOOST functioning mode In addition to the ultrasonic vibration of the bit, a modulation with the amplitude of the generated power (approx. +40% of the set power) is performed. The modulation creates a percussion effect on the bone thereby making incision easier. Three different modulation times can be set depending on the thickness of the bone tissue to be treated. - Page 127 SKEMA 6 - OPERATING INSTRUCTION Safety guidelines ATTENTION! • The LED is a class 2 source (Po < 1mW) in compliance with international standard IEC 60825-1. NEVER CONTINUOUSLY STARE INTO THE LASER SOURCE. The light emitted may cause eye damage in the event of direct radiation without eye protection. Always use the light with the protective screen (provided) or eyewear that protects against radiation emitted by the blue light up to a wave length of 520 mm.
-
Page 128: Leda Curing Light
SKEMA 6 - OPERATING INSTRUCTION 5.7. LEDA curing light Technical specifi cations. Supply voltage: : 24-36 Vdc Max. power absorbed: : 10,5 VA Light source : 1 Led da 5 W Wave length : 440÷480 nm Settable times : 20 – 40 – 60 sec. Audible signals: : at start up every 5 sec and at end of cycle Type of operation... -
Page 129: T Led Curing Light
SKEMA 6 - OPERATING INSTRUCTION 5.7.1. T LED curing light Technical specifi cations. Supply voltage : 24-36 VDC Max. power absorbed : 6 VA Light source : 1 5W LED Wavelength : 430-490 nm Acoustic signals : at cycle start, every 5 seconds, and at cycle end Type of operation : intermittent (runs 2 cycles, rests 60 seconds) General description of the light... - Page 130 SKEMA 6 - OPERATING INSTRUCTION • Take the light out of its housing on the assistant’s board or instrument board. The relative image appears on the console display to signal the instrument has been withdrawn. • Turn the front of the light and/or fi ber optic to the position most suitable for curing (wand, gun or intermediate position).
- Page 131 SKEMA 6 - OPERATING INSTRUCTION • People with eye diseases, such as those who have had cataracts removed or retina diseases must be adequately protected when the curing lamp is used, for example with s uitable protective eyewear. • The rotary end can turn 180° counter-clockwise in relation to the handpiece to change over from wand to gun confi guration. To go back to wand confi...
- Page 132 SKEMA 6 - OPERATING INSTRUCTION 5.8. C-U2 intraoral camera system C-U2 is an intraoral camera system specially designed for simple and well-conceived usability in examining the oral cavity complete with extremely lightweight handpiece, auto-exposure and fi xed focus (version C-U2) or variable focus (version C-U2 Pro) features. This system is designed to facilitate dentist-patient communication, to show and explain to patients all oral conditions and reasons for planned treatment so that they more clearly understand it.
- Page 133 SKEMA 6 - OPERATING INSTRUCTION Turning on the camera’s light (led). Press the button to turn the camera’s led lights on/off. NOTE: icon ( A ) appears on the display to signal the leds have been turned on. • If necessary, adjust the brightness level by keeping pushed (at least 2 seconds) the key and using the INCREASE and/or REDUCE keys to adjust it.
- Page 134 SKEMA 6 - OPERATING INSTRUCTION Setting single image or multi image mode. With the camera turned on and set to LIVE mode, simply press the left multifunction button to change over from single image to multi image mode (and vice versa). The icon for the selected mode appears at the multifunction button: - icon : single image mode activated,...
- Page 135 SKEMA 6 - OPERATING INSTRUCTION • Saving the image: the frozen image appears directly on the monitor in the fi rst box available (e.g. 1) on the page currently displayed. Each subsequent frozen image is placed in the next box, turning clockwise. NOTE: once the 4 boxes available are full, the next frozen images will replace the existing ones, going clockwise.
- Page 136 SKEMA 6 - OPERATING INSTRUCTION Disposable infection control sheaths The camera can be a vehicle of cross-contamination between patients. Always use a disposable infection control sheath with the handpiece (code 97900999 for version C-U2 and code 97901338 for version C-U2 PRO) and disinfect it on the outside after use everyday.
-
Page 137: Osd Control Panel (On Screen Display)
SKEMA 6 - OPERATING INSTRUCTION 5.8.1. OSD control panel (On Screen Display) This menu allows the user to change some operating parameters of the C-U2 PRO handpiece. The menu displayed is automatically cleared if the foot control or touch key is not pressed for a few seconds or if the handpiece is put back in place. -
Page 138: Integrated Laser L810
SKEMA 6 - OPERATING INSTRUCTION 5.9. Integrated laser L810 This is a diode laser for medical use. Use. • Operating times: 6 min. ON, 3 min. OFF. • Place the instrument in its work position (the screen regarding laser ex- traction appears on the display of the instrument board). -
Page 139: Peristaltic Pump
WARNING! Check the condition of the packaging as well as the expiration date of the administration line. Only CASTELLINI administration kits guarantee proper trouble-free operation. These lines are sterile and disposable, reusing them may put patients at risk of microbiological contamination. -
Page 140: Electronic Apex Locator (Laec)
SKEMA 6 - OPERATING INSTRUCTION Setting the amount of saline solution delivered by the pump. • Hold down the button (at least 2 seconds) to set the amount of saline solution delivered by the pump. • Use the increase and/or decrease buttons to select the desired amount. NOTE: a value ranging from 1 to 5 can be used. -
Page 141: Zen-Xi Integrated Sensor
SKEMA 6 - OPERATING INSTRUCTION LAEC combined with the electric micromotor. It is possible to use the LAEC together with the electric micromotor when operating in ENDO mode. When the LAEC is turned on, information about the micromotor and the LAEC (bar graph and APEX value) is displayed when the electric micromotor is withdrawn in ENDO mode. -
Page 142: Assistant's Board Operation
SKEMA 6 - OPERATING INSTRUCTION 6. Assistant’s board operation Main features: • Two articulated arms secure the board (a) to the hydrogroup (b) allowing it to be placed in the most convenient work position. The pantograph arm (e) allows the assistant’s board to be moved 335 mm vertically through 6 work positions. -
Page 143: Instruments On Assistant's Board
SKEMA 6 - OPERATING INSTRUCTION 6.2. Instruments on assistant’s board All the instruments provided on the assistant’s board operate in the same manner as those on the instrument board. More specifi cally: • Syringe, see paragraph 5.3. • Turbine, see paragraph 5.4. •... -
Page 144: Instrument Tray On Assistant's Board
SKEMA 6 - OPERATING INSTRUCTION 6.4. Instrument tray on assistant’s board. The instrument tray [ e ] is constructed in stainless steel and can be conveniently taken off its support. The tray holder can be turned either clockwise or counter-clockwise, allowing it to be placed in the most con- venient position for the operator. - Page 145 SKEMA 6 - OPERATING INSTRUCTION Setting bowl fl ushing. Water can be delivered to the bowl either in manual (with the ON/OFF button) or timed. See paragraph 5.1.1.4.1 to set the desired mode of operation and water delivery time. Setting automatic bowl fl ushing. The bowl is automatically fl...
-
Page 146: Distilled Water Tank System
SKEMA 6 - OPERATING INSTRUCTION Distilled water tank system Description of the system The system is equipped with a tank ( a ), placed under the hydrogroup, that can contain distilled water. The tank can hold 1.8 liters. Distilled water is delivered to: •... -
Page 147: Manual Disinfecting Cycle With Hydrogen Peroxide
SKEMA 6 - OPERATING INSTRUCTION 7.2.1. Manual disinfecting cycle with hydrogen peroxide With the S.S.S. system, you can execute a manual disinfection cycle of the water ducts of all the instruments on the dentist’s instrument board and the syringe on the assistant board. To disinfect, proceed as directed below: A) Prepare the disinfectant: •... - Page 148 SKEMA 6 - OPERATING INSTRUCTION 7.3. M.W.B. system The M.W.B. system assures secure physical separation of the dental unit hydrogroup from the municipal water line thanks to a section with free-fall water. In addition, the system continuously injects hydrogen peroxide into the water circuit with a fi...
-
Page 149: Autosteril Automatic Disinfection System
SKEMA 6 - OPERATING INSTRUCTION 7.4. AUTOSTERIL automatic disinfection system Description of the system. This system performs an automatic disinfection cycle for the water circuits of the following instruments: • all instruments found on the instrument board • the syringe and instrument placed on the assistant's board, •... - Page 150 SKEMA 6 - OPERATING INSTRUCTION Performing the disinfecting cycle. • Press the multifunction button ( ) on the doctor’s console (see pa- ragraph 5.1.1.3.1.) or AS button found on the assistant’s board to start the disinfecting cycle. • At this point, the system performs the following steps automatically: - water ducts for instruments emptied with air;...
-
Page 151: System For Fl Ushing The Suction Tubes
SKEMA 6 - OPERATING INSTRUCTION 7.5. S.H.D. system for fl ushing the suction tubes. Description of the system. This system fl ushes, washes and sterilizes the surgical suction system. The system is equipped with a tank [ a ] containing the detergent liquid and two connect couplers [ b ] , which are used to carry out fl... -
Page 152: Time Flushing Automatic Cycle
SKEMA 6 - OPERATING INSTRUCTION 7.6. TIME FLUSHING automatic cycle Description of the system The automatic TIME FLUSHING cycle allows an automatic fl ushing cycle to be carried out to renew the water present in the water lines of the instruments found on the instrument board and assistant's board. -
Page 153: Accessories
SKEMA 6 - OPERATING INSTRUCTION Accessories 8.1. Operating lamp The operating lamp comes in 2 models: Lamp with halogen light source – model VENUS PLUS. The instructions for use and maintenance come with the lamp. Lamp with LED light source – model VENUS PLUS-L. The instructions for use and maintenance are given in Paragraph 8.1.1. - Page 154 SKEMA 6 - OPERATING INSTRUCTION Adjusting the luminous intensity Turn the knob (e): • Clockwise to increase the luminous intensity. • Anticlockwise to reduce the luminous intensity. NOTE for lamps with NO TOUCH sensor: You can also adjust the luminous intensity by keeping your hand still on the sensor ( k ) (sen- sitivity range 5 cm).
-
Page 155: Monitor / Workstation With Light Pole
SKEMA 6 - OPERATING INSTRUCTION 8.2. Monitor / Workstation with light pole Instructions on how to use the monitor/workstation are enclosed with the dental unit. 8.3. Air/water/230V quick-connect couplers The air/water/230V quick-connect couplers are placed to the side of the elec- trical box. -
Page 156: Auxiliary Tray Holder (For Cart Version Only)
In accordance with standard I.E.C. 62353, the safety checks specifi ed in the Technical care manual and Maintenance and warranty handbook sup- plied with the dental unit are to be carried out at the intervals required by current local regulations. If no precise indications are given, CASTELLINI S.p.A., the manufacturer of the dental units, recommends checking them at least every 24 months at the time of installation and whenever electrical... -
Page 157: Surgical Suction
SKEMA 6 - OPERATING INSTRUCTION 9.4. Surgical suction The surgical suction system must be sanitized using a product suitable for this purpose. WARNING! To clean the suction system, it is recommended to use STER 3 PLUS (CEFLA S.C.) diluted as follows: 1 measuring cap (if purchased package) or 2 measuring caps (if free package) in one litre of water (6% solution). -
Page 158: Cleaning The Turbine Return Air Fi Lter
SKEMA 6 - OPERATING INSTRUCTION How to remove the separator’s container ATTENTION! Gloves must be worn when carrying out the following operation to prevent contact with infected material. • Move the dental chair fully up. • Open the cover at the side of the hydrogroup [ a ] (see paragraph 7.7) and turn the electrical box [ b ]. -
Page 159: Metasys Amalgam Separator
When disposing one-time use containers full of amalgam, observe current local and national laws. 9.9. CASTELLINI dental chair model NEW SKEMA The dental chair NEW SKEMA does not need any special maintenance. In any case, operation should be checked by CASTELLINI authorized personnel once a year. -
Page 160: Fault Messages
SKEMA 6 - OPERATING INSTRUCTION 10. Fault messages M = Message shown on console display C = Cause R = Remedy M: “H2O level low, fi ll tank” M: “Lower dental chair” C: The water in the independent water system's tank has dropped below C: The bowl does not move because the dental chair is in its way. -
Page 161: Specifi Cations
SKEMA 6 - OPERATING INSTRUCTION 11. Specifi cations. Installation plan: 97042072 Water delivery rate: 10 l/min. Technical manual: 97071123 Water usage: 2 l/min. Dental unit spare parts catalogue: 97023067 Water hardness: 60 mg/l Dental chair spare parts catalogue: 97023067 Drain connection: ø40 mm Maximum dental unit weight: 90 kg... -
Page 162: Overall Dimensions: Skema 6 Rs
SKEMA 6 - OPERATING INSTRUCTION 11.1. Overall dimensions: SKEMA 6 RS 19 10 24 5 0 40 0 1 70 53 0 80 0 18 0 189 0 1 00 23 00... -
Page 163: Overall Dimensions: Skema 6 Cp
SKEMA 6 - OPERATING INSTRUCTION 11.2. Overall dimensions: SKEMA 6 CP 1910 2 450 17 0 31 0 1 890 17 0... -
Page 164: Skema 6 Cart Dimensional Characteristics
SKEMA 6 - OPERATING INSTRUCTION 11.3. SKEMA 6 CART dimensional characteristics 1 910 53 0 2 4 5 0 4 0 0 1 7 0 3 000 / 4500 / 600 0 5 3 0 8 0 0 3 1 0... -
Page 165: Skema 6 Dental Operatory Disinfecting And Maintenance Plan
SKEMA 6 - OPERATING INSTRUCTION 12. SKEMA 6 dental operatory disinfecting and maintenance plan WHEN PART WHAT TO DO SEE PARAGRAPH Condensate drain cock Drain condensate from air ducts. See paragraph 9.2. Disinfect water ducts of sprays wih manual See paragraph 7.2.1. cycle (if the S.S.S. - Page 166 SKEMA 6 - OPERATING INSTRUCTION Clean with a suitable disinfectant carefully following the directions for use provided by Removable instrument cords the manufacturer. Spray the product on soft See paragraph 5. disposable paper towels. Do not use acids or harsh products. Disinfect water ducts of sprays with manual See paragraph 7.2.1.
- Page 167 "Power Pedal" ......193 11.2. Caractéristiques de dimensions SKEMA 6 CP.... 245 5.2.4. Commande à pédale version sans fi ls ......195 11.3. Caractéristiques dimensionnelles SKEMA 6 CART ..246 5.3. Seringue ............... 197 5.4. Turbine ................. 198 12. Schéma général d'hygiène et entretien de l'ensemble de soins 5.5.1.
-
Page 168: Remarques Générales
• Les informations, les spécifi cations techniques, les illustrations contenues dans cette publication ne sont pas contractuelles. CASTELLINI S.p.A se réserve le droit d’y apporter des modifi cations et des améliorations techniques sans modifi er les instructions présentes. • Le fabricant applique une politique d’amélioration constante de ses propres produits, il est donc possible que certaines instructions, spécifi ques et des images contenues dans ce livret puissent différer légèrement du produit acheté. -
Page 169: Conditions Ambiantes
En fonction du type de fauteuil auquel l’unit est combiné, se référer au GABARIT d’installation correspondant indiqué au paragraphe "Données Techniques”. CASTELLINI S.p.A décline toute responsabilité pour les dommages aux choses et aux personnes dans le cas de non-respect de cette clause. • État du sol. -
Page 170: Nettoyage Et Désinfection
1,5 m. • Respect de la qualité de l’eau. Afi n de répondre aux pré-requis légaux médicaux et nationaux relatifs à l’eau provenant des units dentaires, CASTELLINI S.p.A conseille de doter l’ensemble dentaire d’une installation de désinfection. -
Page 171: Description Des Appareils
SKEMA 6 - INSTRUCTION DE SERVICE 2. Description des appareils 2.1. Plaquettes d’identifi cation Unité de travail. La plaquette se trouve sur le bras de liaison entre le fauteuil et groupe hydrique. Données reportées sur la plaquette: • Nom du Fabricant. •... -
Page 172: Fauteuil
SKEMA 6 - INSTRUCTION DE SERVICE Version SKEMA 6 CART. Tablette médecin version CP (les instruments sont insérés en vertical dans leurs logements) appliquée sur le chariot à hauteur réglable. Description de l’appareillage: Groupe hydrique Tablette praticien Console commandes praticien... -
Page 173: Fonctionnement Fauteuil New Skema
SKEMA 6 - INSTRUCTION DE SERVICE 4. Fonctionnement fauteuil NEW SKEMA Le fauteuil NEW SKEMA peut effectuer les mouvements suivants: • Montée/descente du siège • Montée/descente du dossier avec inclinaison du siège (Trende- lemburg compensé) Le fauteuil peut être commandé à partir des points suivants: •... -
Page 174: Têtière Réglable
SKEMA 6 - INSTRUCTION DE SERVICE 4.3. Têtière réglable La têtière peut être de deux types: Avec blocage du coussin de type manuel Avec blocage du coussin de type pneumatique Réglage de la hauteur de la têtière. Le positionnement de l’axe de la têtière s’obtient au moyen d’un accouple- ment à... -
Page 175: Fonctionnement De La Tablette Praticien
SKEMA 6 - INSTRUCTION DE SERVICE 5. Fonctionnement de la tablette praticien Disposition des instruments. La disposition des instruments sur la tablette est défi nie par le client lors de la commande. Activation des instruments. • La seringue est toujours active (voir paragraphe 5.3.). •... - Page 176 SKEMA 6 - INSTRUCTION DE SERVICE Nettoyage tablette praticien. En ce qui concerne le nettoyage de la tablette praticien utiliser un produit adapté, dont l'effi cacité contre les batteries et les champignons a été prouvée et qui est largement effi cace contre les virus (HBV et HIV compris); voir paragraphe 1.4.
-
Page 177: Instruction De Service
SKEMA 6 - INSTRUCTION DE SERVICE 5.1. Console praticien Description des touches : Touche rappel/changement menu. Touches multifonctions. Touche de sélection rapide 100% des valeurs programmables. Touche de sélection rapide 50% des valeurs programmables. Touche de sélection rapide 1% des valeurs programmables. Touche AUGMENTE : augmente les valeurs programmables. -
Page 178: Interface Utilisateur
SKEMA 6 - INSTRUCTION DE SERVICE Description icônes de signalisation. Mémorisation fauteuil activée. Couleur noire: système S.S.S. activé. Couleur orange: réservoir eau distillée PAS sous pression. Position du fauteuil programme automatique 1. Couleur noire: réservoir eau distillée en réserve et activé. Couleur rouge: réservoir eau distillée en réserve mais PAS activé. -
Page 179: Sélection De L'opérateur
L’exécution d’une opération quelconque va remettre l’appareil en condition de fonctionnement. NOTE: cette fonction de défaut N'EST PAS active. Elle peut être activée uniquement par un Technicien Autorisé CASTELLINI. 5.1.1.1. Sélection de l’opérateur La console des ensembles de soins dentaires modèle SKEMA 6 permet de programmer 3 opérateurs différents. -
Page 180: Réglage Luminosité Affi Cheur
SKEMA 6 - INSTRUCTION DE SERVICE 5.1.1.2.1. Réglage luminosité affi cheur Ce paramétrage est unique pour tous les opérateurs. À partir du menu PARAMÉTRAGES GÉNÉRAUX, effectuer les opérations suivantes : • Frapper sur la touche MENU pour faire défi ler les icônes jusqu'à sélectionner celle relative à... -
Page 181: Réglage/Blocage Frein Bras À Pantographe
: Bloc frein bras à pantographe / tablette SKEMA 6 CART Réglage sensibilité frein • Une fois que l'on a trouvé les réglages souhaités, frapper sur la touche multifonctions ESC pour sortir du sous-menu en sauvegardant automati- quement les programmations défi... -
Page 182: Introduction État Civil Opérateur
SKEMA 6 - INSTRUCTION DE SERVICE 5.1.1.2.4. Introduction état civil opérateur À partir du menu PARAMÉTRAGES GÉNÉRAUX effectuer les opérations suivantes : • Frapper sur la touche MENU pour faire défi ler les icônes jusqu'à sélec- tionner celle qui correspond à "Introduction état civil opérateur" . •... -
Page 183: Réglage Heure Et Date
SKEMA 6 - INSTRUCTION DE SERVICE 5.1.1.2.6. Réglage heure et date Ce paramétrage est unique pour tous les opérateurs. À partir du menu PARAMÉTRAGES GÉNÉRAUX effectuer les opérations suivantes : • Frapper sur la touche MENU pour faire défi ler les icônes jusqu'à sélec- tionner celle relative à... -
Page 184: Paramétrages Systèmes D'hygiène
SKEMA 6 - INSTRUCTION DE SERVICE 5.1.1.3. Paramétrages systèmes d'hygiène À partir du menu principal effectuer les opérations suivantes : • Frapper sur la touche MENU pour faire défi ler les icônes jusqu'à sé- lectionner celle qui correspond au "PARAMÉTRAGES SYSTÈMES D'HYGIÈNE". -
Page 185: Paramétrage Cycle Time Flushing (Tf)
SKEMA 6 - INSTRUCTION DE SERVICE 5.1.1.3.2. Paramétrage cycle Time Flushing (TF) NOTE: il n'est possible d'accéder à ce sous-menu qu'en présence du système Time Flushing. Ce paramétrage est unique pour tous les opérateurs. À partir du menu PARAMÉTRAGES SYSTÈMES D'HYGIÈNE effectuer les opérations suivantes : •... -
Page 186: Vidage Réservoir Système M.w.b
SKEMA 6 - INSTRUCTION DE SERVICE 5.1.1.3.3. Vidage réservoir système M.W.B. NOTE: il n'est possible d'accéder à ce sous-menu qu'en présence du système M.W.B. Cette fonction permet de vider le circuit hydrique du système M.W.B. (voir paragraphe 7.3.) dans le cas où l'ensemble de soins dentaires doit être éteint pendant plusieurs jours ou si l'on souhaite vider l’eau présente dans le système même. -
Page 187: Programmation Eau Au Crachoir
SKEMA 6 - INSTRUCTION DE SERVICE 5.1.1.4.1. Programmation eau au crachoir Cette programmation est unique pour tous les opérateurs. À partir du menu PROGRAMMATIONS GROUPE HYDRIQUE, effectuer les opérations suivantes : • Frapper sur la touche MENU pour faire défi ler les icônes jusqu'à sélec- tionner cette qui est relative à... -
Page 188: Paramétrages Actionnements Automatiques Du Crachoir
SKEMA 6 - INSTRUCTION DE SERVICE 5.1.1.4.3. Paramétrages actionnements automatiques du crachoir NOTE: il n'est possible d'accéder à ce sous-menu qu'en présence du crachoir motorisé. Ce paramétrage est unique pour tous les opérateurs. À partir du menu PARAMÉTRAGES GROUPE HYDRIQUE effectuer les opérations suivantes : •... -
Page 189: Programmation Des Positions 1, 2, 3 Et 4 Du Fauteuil
SKEMA 6 - INSTRUCTION DE SERVICE 5.1.3. Programmation des positions 1, 2, 3 et 4 du fauteuil Cette programmation est spécifi que à chaque opérateur. À partir de la page-écran principale, effectuer toutes les opérations sui- vantes : • Régler le fauteuil à la position souhaitée en utilisant les touches d’action- nement manuel. - Page 190 [2](fonctionnement bistable). Ce paramétrage de la pédale de commande peut exclusivement être réalisé par un Technicien Autorisé de la société CASTELLINI. NOTE: au terme du travail, un jet d’air s’active automatiquement pour éliminer les éventuelles gouttes de liquide présentes dans les conduits de l’instrument.
-
Page 191: Instruction De Service
SKEMA 6 - INSTRUCTION DE SERVICE Mouvements fauteuil (instruments reposés) CONFIGURATIONS ACTIONNEMENT FONCTION Montée Descente Montée dossier Descente dossier Mouvements automatiques fauteuil (instruments reposés) CONFIGURATIONS ACTIONNEMENT FONCTION G + A Rappel position 1 G + B Rappel position 3 G + C Rappel position 2 G + D Rappel position 4... -
Page 192: Commande Au Pied "À Pression
SKEMA 6 - INSTRUCTION DE SERVICE 5.2.2. Commande au pied "à pression” Description des parties. Poignée. Levier de commande. Commande mouvements fauteuil. Commande puce-air/Rappel de la position de rinçage du patient. Commande Water Clean System /Retour automatique du fauteuil. diode signalant le fonctionnement avec spray. diode État de charge de la batterie (seulement version sans fi... -
Page 193: Commande Au Pied "Power Pedal
SKEMA 6 - INSTRUCTION DE SERVICE Fonctionnement touche droite ( 5 ). Fonctionnement: • Pression prolongée (au moins deux secondes) de la touche avec les instruments au repos: Activation du programme "Retour automatique du fauteuil”. • Pression prolongée ( au moins 2 secondes) de la touche avec les instru- ments non au repos: Commande Water Clean System : Refoule un jet d’air courant aux instru- ments tels que la turbine, le micromoteur et l’ablateur pour le rinçage des... - Page 194 SKEMA 6 - INSTRUCTION DE SERVICE Fonctionnement commande mouvement fauteuil ( 3 ). Contrôle les mouvements suivants: - Montée siège fauteuil. - Montée dossier fauteuil. - Descente siège fauteuil. - Descente dossier fauteuil. Pour interrompre le mouvement, relâcher la commande. NOTE: toutes les commandes de réglage du fauteuil sont bloquées quand un instrument est actif ou si le système AUTOSTERIL est en fonction.
-
Page 195: Commande À Pédale Version Sans Fi Ls
SKEMA 6 - INSTRUCTION DE SERVICE 5.2.4. Commande à pédale version sans fi ls La commande au pied "à pression” peut être fournie dans la version sans fi ls aussi. La commande à pédale version sans fi ls contient un module de transmission ZIGBEE (module certifi é pour Europe, Canada et EU). Avertissements pour l’utilisation. - Page 196 SKEMA 6 - INSTRUCTION DE SERVICE Recharge de la batterie. Si nécessaire, il faut recharger les batteries de la commande à pédale sans fi ls. Procéder de la manière suivante : • Ouvrir la trappe de protection du connecteur situé dans la partie arrière de la commande à...
-
Page 197: Seringue
SKEMA 6 - INSTRUCTION DE SERVICE 5.3. Seringue Description de l’instrument. [ a ] Bec. [ b ] Poignée. [ c ] Touche de démontage seringue. [ d ] touche de l’air. [ e ] Touche de l’eau. [ f ] Sélecteur chaud/froid. [ g ] Led signalisation chaud/froid. -
Page 198: Turbine
SKEMA 6 - INSTRUCTION DE SERVICE 5.4. Turbine Connexion pièce à la main et changement de la fraise. Se référer aux instructions spécifi ques fournies avec la pièce à la main. Utilisation. • Temps de fonctionnement : travail 5 min., repos 5 min. •... -
Page 199: Micromoteur Électrique
SKEMA 6 - INSTRUCTION DE SERVICE Cordon seringue extractible. La seringue est dotée d’un cordon extractible afi n de faciliter les opérations de nettoyage (voir paragraphe 5.). Nettoyage et entretien. Se référer aux instructions spécifi ques fournies avec la pièce à la main. Stérilisation. - Page 200 SKEMA 6 - INSTRUCTION DE SERVICE Allumage/arrêt de la fi bre optique. • Mettre l’instrument en position de travail. • Activer la fi bre optique en frappant sur la touche. NOTE: l’activation de la fi bre optique est signalée sur l'affi cheur par l'icône ( A ).
-
Page 201: Modalité De Fonctionnement Conservative
SKEMA 6 - INSTRUCTION DE SERVICE 5.5.1. Modalité de fonctionnement CONSERVATIVE Menu avec micromoteur extrait mais non activé. • En frappant sur la touche multifonctions de gauche ( M1 ) on sélectionne un des 4 pro- grammes de travail disponibles. •... -
Page 202: Modalité De Fonctionnement Endo
SKEMA 6 - INSTRUCTION DE SERVICE 5.5.2. Modalité de fonctionnement ENDO Menu avec micromoteur extrait mais non activé. • En frappant sur la touche multifonctions de gauche ( M1 ) on sélectionne un des 4 pro- grammes de travail disponibles. •... -
Page 203: Modalité De Fonctionnement Surgery
SKEMA 6 - INSTRUCTION DE SERVICE 5.5.3. Modalité de fonctionnement SURGERY Menu avec micromoteur extrait mais non activé. • En frappant sur la touche multifonctions de gauche ( M1 ) on sélectionne un des 4 programmes de travail disponibles. 20:1 •... -
Page 204: Menu De Programmation Rapport De Réduction
SKEMA 6 - INSTRUCTION DE SERVICE 5.5.4. Menu de programmation rapport de réduction À partir du menu Paramétrages de fonctionnement, en sélectionnant l'icône relative à "Programmation rapport de réduction" et en frappant sur la touche multifonctions de droite ( ) il est possible d'entrer dans le sous-menu cor- respondant dans lequel sont présentes les icônes suivantes : Rapport de réduction actuel Vitesse maximale pouvant être atteinte avec le rapport de... -
Page 205: Détartreur
SKEMA 6 - INSTRUCTION DE SERVICE 5.6. Détartreur Raccordement pièce à la main et embout. Se référer aux instructions spécifi ques jointes à pièce à la main. ATTENTION! Avant de relier la pièce à la main, vérifi er que les contacts sont par- faitement secs. - Page 206 SKEMA 6 - INSTRUCTION DE SERVICE Allumage/arrêt de la fi bre optique. • Mettre l’instrument en position de travail. • Activer la fi bre optique en frappant sur la touche. NOTE: l’activation de la fi bre optique est signalée sur l'affi cheur l'icône ( A ).
-
Page 207: Détartreur Chirurgical Surgison 2
Contrôler que le liquide de refroidissement utilisé soit un modèle convenablement stérile. • La poignée SURGISON 2 doit être utilisée exclusivement avec les inserts fournis ou d'autres inserts CASTELLINI S.p.A. ou approuvés par celle-ci. • Ne pas modifi er la forme de l'insert. -
Page 208: Instruction De Service
SKEMA 6 - INSTRUCTION DE SERVICE 5.6.1.2. Modalité de fonctionnement BOOST En plus de la vibration ultrasonique de l'insert, une modulation de l'ampleur de la puissance distribuée est effectuée (environ 40% de la puissance pro- grammée). Cette modulation créée un effet de percussion sur l'os favorisant son incision. On peut sélectionner 3 types de modulations différentes en fonction de la consistance du tissu osseux à... - Page 209 SKEMA 6 - INSTRUCTION DE SERVICE Avertissements généraux d’Utilisation. ATTENTION! • La DEL source de lumière est une source de classe 2 (Po < 1mW) d’après la norme IEC 60825-1. NE PAS FIXER LE FAISCEAU. La lumière émise peut blesser les yeux en cas d'irradiations directes sans protection. Toujours utiliser la lampe avec l'écran de protection spécifi...
-
Page 210: Lampe À Polymériser Leda
SKEMA 6 - INSTRUCTION DE SERVICE 5.7. Lampe à polymériser LEDA Caractéristiques techniques. Tension d’alimentation : 24-36 Vdc Puissance max absorbée : 10,5 VA Source lumineuse : 1 Del de 5 W Longueur d’onde : 440 à 480 nm Temps programmables : 20 –... -
Page 211: Lampe Polymérisante T Led
SKEMA 6 - INSTRUCTION DE SERVICE 5.7.1. Lampe polymérisante T LED Caractéristiques techniques. Tension d’alimentation : 24-36 Vdc Puissance maximum absorbée : 6 VA Source lumineuse : 1 diode de 5 W Longueur d’onde : 430÷490 nm Signaux acoustiques : Au début, toutes les 5 secondes et à la fin du cycle Type de fonctionnement : intermittent (travail 2 cycles –... - Page 212 SKEMA 6 - INSTRUCTION DE SERVICE • Extraire la lampe de son logement sur la tablette assistante ou tablette praticien. L'extraction de l'instrument est signalée par l'image correspondante sur l'affi cheur de la console. • Tourner la partie avant de la lampe et/ou la fi bre optique dans la confi - guration la plus fonctionnelle pour la photopolymérisation (à...
- Page 213 SKEMA 6 - INSTRUCTION DE SERVICE • Les personnes qui présentent des pathologies oculaires, comme les individus qui ont subit une intervention de retrait de la cataracte ou des pathologies de la rétine, doivent être protégées pendant l’Utilisation de la lampe, par exemple avec des lunettes de protection adaptées. •...
-
Page 214: Caméra Intra-Orale C-U2 Pro
SKEMA 6 - INSTRUCTION DE SERVICE 5.8. Caméra intra-orale C-U2 C-U2 est une caméra intra-orale conçue spécifi quement pour une utilisation simple lors de l’examen dentaire intra-orale, avec une pièce à main extrêmement légère, contrôle automatique de l'exposition et mise au point fi xe (version C-U2) ou foyer variable (version C-U2 Pro). Elle a été conçue pour assister le dentiste au cours de la communication avec le patient, pour expliquer et justifi... - Page 215 SKEMA 6 - INSTRUCTION DE SERVICE Allumage Led caméra. En frappant sur la touche il est possible d'allumer/éteindre l'éclairage à Del de la caméra. NOTE: l'allumage des Dels est signalé sur l'affi cheur par l'icône ( A ). • Si nécessaire, régler le niveau de l'intensité lumineuse en appuyant de manière prolongée (au moins 2 secondes) sur la touche et en utilisant les touches AUGMENTER et/ou DIMINUER pour effectuer le réglage.
- Page 216 SKEMA 6 - INSTRUCTION DE SERVICE Programmation fonctionnement mode image simple ou images multiples. Avec la caméra activée et en état LIVE, pour passer de la modalité image simple à celle d'images multiples (et inversement) il suffi t de frapper sur la touche multifonctions de gauche.
-
Page 217: Brèves Impulsions Rouges
SKEMA 6 - INSTRUCTION DE SERVICE • Mémorisation de l’image: l’image congelée est directement visualisée sur le moniteur en la mettant dans la première case libre (ex. 1) de la page activée à ce moment. Chaque image qui sera congelée par la suite sera positionnée dans la case successive en tournant dans le sens des aiguilles de la montre. - Page 218 SKEMA 6 - INSTRUCTION DE SERVICE Protections hygiéniques jetables. La caméra peut constituer un moyen de transmission d’infections croisées de patient à patient. Pour cette raison, nous recommandons de toujours l’utiliser avec les pro- tections jetables (code 97900999 pour version C-U2 et code 97901338 pour version C-U2 PRO) et de la désinfecter extérieurement tous les jours en fi...
-
Page 219: Tableau De Contrôle Osd (On Screen Display)
SKEMA 6 - INSTRUCTION DE SERVICE 5.8.1. Tableau de Contrôle OSD (On Screen Display) Ce menu à l’écran permet de modifi er certains paramètres de fonctionne- ment de la pièce à main C-U2 PRO. Le menu à l’écran disparaît automatiquement si l’on n’utilise pas la pédale de commande ou la touche à... -
Page 220: Laser Intégré L810
SKEMA 6 - INSTRUCTION DE SERVICE 5.9. Laser intégré L810 Ce dispositif laser est un laser à diodes pour usage médical. Utilisation. • Temps de fonctionnement : 6 min. ON, 3 min. OFF. • Mettre l'instrument en position de travail (sur l'affi cheur de la tablette pra- ticien, est visualisée la page-écran relative à... -
Page 221: Pompe Péristaltique
ATTENTION ! Vérifi er l'état de l’emballage ainsi que la date limite d'utilisation de la ligne d'irrigation. Seuls les kits d’irrigation CASTELLINI garantissent un fonctionnement exempt de problème. Ces lignes sont stériles et jetables, une éventuelle réutilisation peut entraîner la contamination microbiologique du patient. -
Page 222: Localisateur D'apex Électronique (Laec)
SKEMA 6 - INSTRUCTION DE SERVICE Programmation quantité de solution physiologique distribuée par la pompe. • Pour programmer la quantité de solution physiologique distribuée par la pompe il faut frapper de manière prolongée (au moins 2 secondes) sur la touche •... -
Page 223: Capteur Intégré Zen-Xi
SKEMA 6 - INSTRUCTION DE SERVICE LAEC associé à micromoteur électrique. Il est possible d'utiliser le LAEC également en association avec le micro- moteur électrique quand il est en modalité ENDO. Quand le LAEC est activé, si l'on extrait le micromoteur électrique en mo- dalité... -
Page 224: Fonctionnement Tablette Assistante
SKEMA 6 - INSTRUCTION DE SERVICE 6. Fonctionnement tablette assistante Caractéristiques principales : • La tablette ( a ) est liée au groupe hydrique ( b ) au moyen de deux bras articulés qui en permettent le positionnement dans la zone la plus confortable pour l’opérateur. -
Page 225: Instruments Sur Tablette Assistante
SKEMA 6 - INSTRUCTION DE SERVICE 6.2. Instruments sur tablette assistante Tous les instruments installés sur la tablette assistante conservent le même fonctionnement que ceux de la tablette praticien. Plus spécifi quement : • Seringue, voir le paragraphe 5.3. • Turbine, voir le paragraphe 5.4. •... -
Page 226: Plateau Porte-Tray Sur Tablette Assistante
SKEMA 6 - INSTRUCTION DE SERVICE 6.4. Plateau porte-tray sur tablette assistante La tablette porte-plateau [ a ] est en acier inox et peut être facilement retiré de son support. Le support du plateau peut tourner aussi bien dans le sens des aiguilles de la montre que dans le sens contraire afi... - Page 227 SKEMA 6 - INSTRUCTION DE SERVICE Réglage lavage crachoir. L’envoi de l’eau au crachoir peut se faire de manière temporisée ou manuelle (envoi ON/OFF par la touche de commande correspondante). Pour programmer le fonctionnement souhaité et le temps d'envoi de l'eau, consulter le paragraphe 5.1.1.4.1.
-
Page 228: Système Avec Réservoir Eau Distillée
SKEMA 6 - INSTRUCTION DE SERVICE 7.2. Système avec réservoir eau distillée Description du système. Le système SANASPRAY est doté d’un réservoir ( a ) placé sous le groupe hydrique et destiné à contenir de l’eau distillée. Le réservoir a une capacité totale de 1,8 litres. L’eau distillée alimente : •... -
Page 229: Cycle De Désinfection Manuel Avec Eau Oxygénée
SKEMA 6 - INSTRUCTION DE SERVICE 7.2.1. Cycle de désinfection manuel avec eau oxygénée. Avec le système S.S.S. on peut exécuter un cycle manuel de désinfection des conduits hydrauliques de tous les instruments situés sur la tablette médecin et de la seringue située sur la tablette assistante. Pour effectuer le cycle de désinfection, procéder comme suit: A) Préparation de la solution désinfectante: •... - Page 230 SKEMA 6 - INSTRUCTION DE SERVICE 7.3. Système M.W.B. Le système M.W.B. garantit une séparation sûre, de manière physique, du système hydrique de l’ensemble odontologique du réseau hydrique public, grâce à un parcours en chute libre de l’eau. En outre, le système assure l’injection continue du peroxyde d’hydrogène dans le circuit hydraulique avec une concentration fi...
-
Page 231: Système Automatique De Désinfection Autosteril
SKEMA 6 - INSTRUCTION DE SERVICE 7.4. Système automatique de désinfection AUTOSTERIL Description du système. Ce système permet d’effectuer un cycle automatique de désinfection des conduits hydriques et des instruments suivants : • tous les instruments placés sur la tablette praticien, •... - Page 232 SKEMA 6 - INSTRUCTION DE SERVICE Exécution du cycle de désinfection. • Lancer le cycle de désinfection en frappant sur la touche multifonctions ( ) sur la console praticien (voir paragraphe 5.1.1.3.1.) ou la touche AS placée sur la tablette assistante. •...
-
Page 233: Système S.h.d. Pour Le Lavage Des Canules D'aspiration
SKEMA 6 - INSTRUCTION DE SERVICE 7.5. Système S.H.D. pour le lavage des canules d'aspiration. Description du système. Ce système permet de laver, déterger et désinfecter l’installation d’aspi- ration chirurgicale. Le système est équipé d'un réservoir [ a ] qui contient le liquide nettoyant et doté... -
Page 234: Cycle Automatique Time Flushing
SKEMA 6 - INSTRUCTION DE SERVICE 7.6. Cycle automatique TIME FLUSHING Description du système. Le cycle automatique TIME FLUSHING permet d'effectuer un cycle automa- tique de lavage pour renouveler l'eau présente dans les conduits hydriques des instruments placés sur la tablette praticien et sur la tablette assistante. Le lavage peut se faire avec de l'eau courante, avec de l'eau traitée (en présence du système M.W.B.) ou avec de l'eau distillée (en présence du système S.S.S.) -
Page 235: Accessoires
SKEMA 6 - INSTRUCTION DE SERVICE Accessoires 8.1. Lampe opératoire La lampe opératoire peut être de 2 modèles : Lampe avec source lumineuse halogène modèle VENUS PLUS. Les instructions pour l’utilisation et l’entretien sont jointes à la lampe. Lampe avec source lumineuse à diodes modèle VENUS PLUS -L. Pour les instructions d’utilisation et d’entretien, voir le paragraphe 8.1.1. - Page 236 SKEMA 6 - INSTRUCTION DE SERVICE Réglage de l’intensité lumineuse. Tourner la poignée ( e ) : • Sens des aiguilles d’une montre: augmentation de la luminosité. • Sens contraire des aiguilles d’une montre: diminution de luminosité. NOTE pour les l ampes dotées de capteur NO TOUCH: on peut aussi exécuter le réglage de l’intensité...
-
Page 237: Moniteur / Workstation À Potence Lampe
SKEMA 6 - INSTRUCTION DE SERVICE 8.2. Moniteur / Workstation à potence lampe Les instructions d’utilisation et d’entretien du moniteur/workstation sont jointes en annexes de l’ensemble dentaire. 8.3. Raccords rapides air/eau/230V Les attaches rapides air/eau/230V sont placées latéralement sur le boîtier des raccordements. -
Page 238: Tablette Porte-Tray Auxiliaire (Seulement Pour La Version Cart)
Entretien préventif. CASTELLINI S.p.A., en qualité de fabricant d’unités de soins dentaires, en accord aux réglementations du secteur I.E.C. 60601-1 Seconde Ed., I.E.C. 62353 et à la Directive MDD 93/42 et modifi cations ultérieures sur les dispositifs médicaux, préconise que les contrôles pour l’entretien préventif, spécifi és dans le Livret de Service Technique et dans le Livret de Garantie et d’Entretien joint à... -
Page 239: Aspiration Chirurgicale
SKEMA 6 - INSTRUCTION DE SERVICE 9.4. Aspiration chirurgicale L'aspiration chirurgicale doit être stérilisée à l’aide d’un produit approprié à cet emploi. ATTENTION! Pour le nettoyage du système d’aspiration, il est conseillé d’utiliser le produit STER 3 PLUS (CEFLA S.C.) dilué dans les rapports sui- vants: 1 bouchon de dosage (s’il est dans le format de vente) ou 2 bouchons de dosage (s’... -
Page 240: Nettoyage Fi Ltre Air De Retour Turbine
SKEMA 6 - INSTRUCTION DE SERVICE Comment démonter le vase du séparateur. ATTENTION! L'opération suivante doit impérativement être effectuée en portant des gants afi n d'éviter tout contact éventuel avec du matériel infecté. • Mettre le fauteuil à la hauteur maximale. •... -
Page 241: Séparateur D'amalgame Metasys
Pour le recyclage des conteneurs perdus pleins d’amalgame, s’en tenir aux Normes locales et nationales. 9.9. Fauteuil modèle NEW SKEMA Le fauteuil NEW SKEMA ne nécessite aucune opération d’entretien particulière. On conseille toutefois de procéder à un contrôle général de fonctionnement annuel qui sera effectué technicien autorisé CASTELLINI. -
Page 242: Instruction De Service
SKEMA 6 - INSTRUCTION DE SERVICE 10. Messages d'avertissement. M = Message sur l'affi cheur console C = Cause R = Solution M: “Réserve H2O, remplir réservoir” M: “Contrôler canules fi ltre, aspiration” C: Le niveau du liquide présent dans le réservoir pour l'alimentation C: Dysfonctionnement du cycle de lavage des canules. -
Page 243: Données Techniques
SKEMA 6 - INSTRUCTION DE SERVICE 11. Données techniques. Plan d’installation : 97042072 Débit alimentation hydrique : 10 l/min. Livret technique : 97071123 Consommation eau : 2 l/min. Catalogue pièces de rechange unité 97023067 Dureté de l’eau : 60 mg/l de travail : Catalogue pièces de rechange fau- 97023067... -
Page 244: Caractéristiques De Dimensions Skema 6 Rs
SKEMA 6 - INSTRUCTION DE SERVICE 11.1. Caractéristiques de dimensions SKEMA 6 RS 19 10 24 5 0 40 0 1 70 53 0 80 0 18 0 189 0 1 00 23 00... -
Page 245: Caractéristiques De Dimensions Skema 6 Cp
SKEMA 6 - INSTRUCTION DE SERVICE 11.2. Caractéristiques de dimensions SKEMA 6 CP 1910 2 450 17 0 31 0 1 890 17 0... -
Page 246: Caractéristiques Dimensionnelles Skema 6 Cart
SKEMA 6 - INSTRUCTION DE SERVICE 11.3. Caractéristiques dimensionnelles SKEMA 6 CART 1 910 53 0 2 4 5 0 4 0 0 1 7 0 3 000 / 4500 / 600 0 5 3 0 8 0 0 3 1 0... -
Page 247: Schéma Général D'hygiène Et Entretien De L'ensemble De Soins Dentaires Skema 6
SKEMA 6 - INSTRUCTION DE SERVICE 12. Schéma général d'hygiène et entretien de l'ensemble de soins dentaires SKEMA 6 QUAND QUOI FAIRE QUA FAIRE PARAGRAPHE DE REFERENCE Robinet vidage condensat. Éliminer le condensat des conduits de l'air. Voir le paragraphe 9.2. Désinfection des conduits hydriques des sprays Voir le paragraphe 7.2.1. - Page 248 SKEMA 6 - INSTRUCTION DE SERVICE Nettoyer avec du produit désinfectant adapté en respectant les instructions du fabriquant. Cordons de l’instrument ex- Pulvériser le produit sur un papier doux Voir paragraphe 5. tractibles. jetable. Ne pas utiliser de produits abrasifs ou acides.
- Page 249 11.2. Abmessungen SKEMA 6 CP ........327 5.5.1 Funktionsweise CONSERVATIVE ........ 283 11.3. Abmessungen SKEMA 6 CART ........328 5.5.2 Funktionsweise ENDO ..........284 5.5.3 Funktionsweise SURGERY ......... 285 12. Hauptübersicht zu Hygiene und Wartung des zahnärztlichen 5.5.4 Eingabe-Menü Untersetzungsverhältnis ...... 286 Komplexes SKEMA 6 ............
-
Page 250: Allgemeine Hinweise
Übersetzung oder anderer Hilfsmittel) ohne vorherige schriftliche Genehmigung seitens CASTELLINI S.p.A ist verboten. • Die in dieser Veröffentlichung enthaltenen Informationen, technischen Angaben, Darstellungen sind nicht bindend. CASTELLINI S.p.A behält sich das Recht zur Vornahme von Änderungen und Verbesserungen vor, ohne die vorliegende Anleitung dementsprechend zu modifi zieren. -
Page 251: Raumbedingungen
Je nach dem Modell des Patientenstuhls, mit dem die Behandlungseinheit kombiniert ist, muss die diesbezüglich im Abschnitt "Technische Daten” ange- führte Installierungs-VORGABE herangezogen werden. CASTELLINI S.p.A lehnt jegliche Verantwortung für Sach- oder Personenschäden ab, wenn die hier angeführte Klausel nicht berücksichtigt wird. • Bedingungen des Fußbodens. -
Page 252: Reinigung Und Desinfektion
Um die rechtlichen, medizinischen und inländischen Vorgaben und Eigenschaften zu erfüllen, die sich auf das von den Behandlungseinheiten kommende Wasser beziehen, rät CASTELLINI S.p.A dazu, den zahnärztlichen Behandlungskomplex mit einer Desinfektionsanlage auszurüsten. Der Benutzer des zahnärztlichen Behand- lungskomplexes ist für die Wasserqualität verantwortlich und muss im Bedarfsfall alternative Maßnahmen ergreifen, die eine Beibehaltung der Qualität garantieren, wenn der zahnärztlichen Behandlungskomplex ohne Desinfektionsanlage benutzt wird. -
Page 253: Beschreibung Der Geräte
SKEMA 6 - GEBRAUCHSANWEISUNGEN 2. Beschreibung der Geräte 2.1. Kennzeichnungsschilder Behandlungseinheit. Das Schild ist am Verbindungsarm zwischen Patientenstuhl und Wasse- reinheit angebracht. Auf dem Schild angeführten Daten: • Name des Herstellers. • Bezeichnung des Geräts • Nennspannung • Stromtyp • Nennfrequenz •... -
Page 254: Patientenstuhl
SKEMA 6 - GEBRAUCHSANWEISUNGEN Version SKEMA 6 CART. Arztplatte Version CP (die Instrumente sind vertikal in die hierfür vorgesehenen Aufnahmen eingesetzt) am höhenverstellbaren Wagen. Beschreibung der Einrichtung: Wassereinheit Arztplatte Arzt-Steuerpult Helferinneneinheit Steuerpult Helferinneneinheit Anschlusskasten Multifunktionale Fußpedalsteuerung (Rheostat) Erogatore acqua al bicchiere m Speibecken Höhenverstellbaren Wagen... -
Page 255: Betrieb Patientenstuhl New Skema
SKEMA 6 - GEBRAUCHSANWEISUNGEN 4. Betrieb Patientenstuhl NEW SKEMA Der Patientenstuhl NEW SKEMA führt folgende Bewegungen aus: • Auffahren/Abfahren des Sitzes • Auffahren/Abfahren der Rückenlehne mit Sitzneigung (Trendelem- burg kompensiert) Der Patientenstuhl kann durch folgende Stellen gesteuert werden: • Arztplatte [ a ], (siehe Abs. 5). •... -
Page 256: Regulierbare Kopfstütze
SKEMA 6 - GEBRAUCHSANWEISUNGEN Regulierbare Kopfstütze Es können zwei unterschiedliche Kopfstützenmodelle vorliegen: mit manueller Blockierung des Kissens mit druckluftbetriebener Blockierung des Kissens Höheneinstellung der Kopfstütze. Das Positionieren der Kopfstützen-Stange erfolgt anhand einer magneti- schen Kupplung. Der Bediener muss die Kopfstütze solange anheben und/ oder nach unten drücken, bis die gewünschte Stellung erreicht ist. -
Page 257: Funktionsweise Arztplatte
SKEMA 6 - GEBRAUCHSANWEISUNGEN 5. Funktionsweise Arztplatte Anordnung der Instrumente. Die Anordnung der Instrumente auf der Platte wird vom Kunden während der Bestellphase erteilt. Aktivierung der Instrumente. • Die Spritze ist stets aktiviert (siehe Abschnitt 5.3). • Die Polymerisationslampe schaltet sich ein, wenn die dafür vorgesehene Taste bei ausgezogenem Instrument gedrückt wird (siehe Abschnitt 5.7). - Page 258 SKEMA 6 - GEBRAUCHSANWEISUNGEN Reinigung Arztelement. Für die Reinigung des Arztelements muss ein geeignetes Produkt verwen- det werden, dessen Wirksamkeit gegen Bakterie und Pilze erprobt wurde und das weitgehend wirksam gegen Viren ist (einschließlich HBV und HIV), siehe Abschnitt 1.4. Für die Reinigung der Arztplatte ein geeignetes Reinigungsmittel verwenden (siehe Abschnitt 1.4).
-
Page 259: Arztpult
SKEMA 6 - GEBRAUCHSANWEISUNGEN 5.1. Arztpult Beschreibung der Tasten: Taste Menüaufruf/-wechsel. Multifunktionstaste. Schnellwahltaste 100% der eingebbaren Werte. Schnellwahltaste 50% der eingebbaren Werte. Schnellwahltaste 1% der eingebbaren Werte. Taste ERHÖHUNG: zum Erhöhen der eingegebenen Werte. Taste VERMINDERUNG: zum Vermindern der eingegebenen Werte. -
Page 260: Benutzerschnittstelle
SKEMA 6 - GEBRAUCHSANWEISUNGEN Beschreibung der Melde-Ikonen. Grüne Farbe: Kabellose Pedalsteuerung angeschlossen und aktiv. Orange Farbe: Kabellose Pedalsteuerung angeschlossen, aber nicht Farbe Schwarz: S.S.S-System aktiviert. aktiv. Orange Farbe: Behälter destilliertes Wasser NICHT unter Druck. Rote Farbe: Verbindung mit kabelloser Pedalsteuerung wird gesucht. Farbe Schwarz: Behälter für destilliertes Wasser im Reservezu- Speicherung Patientenstuhl aktiviert. -
Page 261: Benutzerwahl
Bei erneuter Ausführung irgendeines beliebigen Eingriffs wird die Einrich- tung wieder in den Betriebszustand versetzt. HINWEIS: diese Default-Funktion ist NICHT aktiviert. Sie kann nur von einem autorisierten CASTELLINI Techniker aktiviert werden. 5.1.1.1. Benutzerwahl Am Pult der zahnärztlichen Behandlungskomplexe Modell SKEMA 6 können 3 verschiedene Bediener eingegeben werden. -
Page 262: Helligkeitseinstellung Display
SKEMA 6 - GEBRAUCHSANWEISUNGEN 5.1.1.2.1. Helligkeitseinstellung Display Diese Einstellung ist für alle Bediener gleich. Über das Menü der GENERELLEN EINSTELLUNGEN lassen sich die folgenden Eingriffe vornehmen: • Die MENÜ-Taste drücken, um die Ikonen solange durchzugehen, bis die Ikone angewählt werden kann, die sich auf die "Helligkeitsregulierung des Displays"... -
Page 263: Regulierung/Sperre Bremse Pantographarm
• Durch Betätigung der Tasten + und/oder - kann die Bremse am Panto- grapharm / Arztelement SKEMA 6 CART gelöst oder festgestellt werden. HINWEIS: der Zustand einer nicht freigebbaren Bremse wird durch die dafür vorgesehene Ikone ( A ), oben im Display des Pults erscheint, angezeigt. -
Page 264: Eingabe Bediener-Stammdaten
SKEMA 6 - GEBRAUCHSANWEISUNGEN 5.1.1.2.4. Eingabe Bediener-Stammdaten Über das Menü der GENERELLEN EINSTELLUNGEN lassen sich die folgenden Eingriffe vornehmen: • Die MENÜ-Taste drücken und die Ikonen solange durchgehen, bis man die Ikone, die sich auf die "Eingabe der Bediener-Stammdaten" bezieht, anwählen kann. -
Page 265: Einstellung Datum Und Uhrzeit
SKEMA 6 - GEBRAUCHSANWEISUNGEN 5.1.1.2.6. Einstellung Datum und Uhrzeit Diese Einstellung ist für alle Bediener gleich. Über das Menü der GENERELLEN EINSTELLUNGEN lassen sich die folgenden Eingriffe vornehmen: • Die MENÜ-Taste drücken, um die Ikonen solange durchzugehen, bis die Ikone angewählt werden kann, die sich auf die "Einstellung von Datum und Uhrzeit"... -
Page 266: Einstellungen Hygienesystem
SKEMA 6 - GEBRAUCHSANWEISUNGEN 5.1.1.3. Einstellungen Hygienesystem Über das Hauptmenü lassen sich die folgenden Eingriffe vornehmen: • Die MENÜ-Taste drücken und die Ikonen solange durchgehen, bis man die Ikone, die sich auf die "EINSTELLUNGEN DES HYGIENESYSTEMS" bezieht, anwählen kann. • Die Multifunktionstest OK drücken, um Zugriff zum ausgewählten Untermenü zu erhalten, das die folgenden Ikonen enthält: Einstellung AS-Zyklus Einstellung TF-Zyklus... -
Page 267: Einstellung Time Flushing-Zyklus (Tf)
SKEMA 6 - GEBRAUCHSANWEISUNGEN 5.1.1.3.2. . Einstellung Time Flushing-Zyklus (TF) HINWEIS: auf dieses Menü kann nur mit vorhandenem Time Flushing-System zugegriffen werden. Diese Einstellung ist für alle Bediener gleich. Über das Menü der EINSTELLUNGEN DES HYGIENESYSTEMS lassen sich die folgenden Eingriffe vornehmen: •... -
Page 268: Entleerung Behälter M.w.b-System
SKEMA 6 - GEBRAUCHSANWEISUNGEN 5.1.1.3.3. Entleerung Behälter M.W.B-System. HINWEIS: auf dieses Menü kann nur mit vorhandenem M.W.B- System zugegriffen werden. Dieser Funktion kann der Wasserkreislauf des M.W.B-Systems entleert werden (siehe Abschnitt 7.3), wenn der zahnärztliche Behandlungskomplex über einige Tage hinweg nicht eingeschaltet wird oder wenn man das im System enthaltene Wasser ablassen möchte. -
Page 269: Einstellung "Wasser Zum Mundspülbecken
SKEMA 6 - GEBRAUCHSANWEISUNGEN 5.1.1.4.1. Einstellung "Wasser zum Mundspülbecken" Diese Einstellung ist für alle Bediener gleich. Über das Menü der EINSTELLUNGEN DER WASSEREINHEIT lassen sich die folgenden Eingriffe vornehmen: • Die MENÜ-Taste drücken und die Ikonen solange durchgehen, bis man die Ikone, die sich auf die "Einstellung Wasser zum Mundspülbecken"... -
Page 270: Einstellungen Automatische Bewegungsabläufe Mundspülbecken
SKEMA 6 - GEBRAUCHSANWEISUNGEN 5.1.1.4.3. Einstellungen automatische Bewegungsabläufe Mundspül- becken HINWEIS: auf dieses Menü kann nur mit vorhandenem motorbe- triebenem Mundspülbecken zugegriffen werden. Diese Einstellung ist für alle Bediener gleich. Über das Menü der EINSTELLUNGEN DER WASSEREINHEIT lassen sich die folgenden Eingriffe vornehmen: •... -
Page 271: Programmierung Der Positionen 1, 2, 3 Und 4 Des Patientenstuhls
SKEMA 6 - GEBRAUCHSANWEISUNGEN 5.1.3. Programmierung der Positionen 1, 2, 3 und 4 des Patientenstuhls Diese Eingabe ist spezifi sch auf den einzelnen Bediener bezogen. Von der Hauptanzeigeseite aus müssen folgende Schritte vorgenommen werden: • Den Patientenstuhl mit Hilfe der Tasten für die manuelle Bewegung in die gewünschte Stellung bringen. - Page 272 (defaultmäßige Konfi guration) 2 = Umkehr Rotation Mikromotor und ENDO-Modalität 3 = Chirurgische Modalität Es folgt eine schematische Darstellung der Funktionsweise in Abhängigkeit zu den verschiedenen Konfi gurationen. HINWEIS: die Konfi guration der Fußschaltung darf nur von einem autorisierten CASTELLINI-Techniker geändert werden.
- Page 273 SKEMA 6 - GEBRAUCHSANWEISUNGEN Patientenstuhlbewegungen (rückplatzierte Instrumente) KONFIGURATIONENI BETÄTIGUNG FUNKTION Aufwärtsbewegung Abwärtsbewegung Aufwärtsbewegung Rückenlehne Abwärtsbewegung Rückenlehne Automatische Bewegungen Patientenstuhl (rückplatzierte Instrumente) KONFIGURATIONENI BETÄTIGUNG FUNKTION G + A Aufruf Position 1 G + B Aufruf Position 3 G + C Aufruf Position 2 G + D Aufruf Position 4 G + E...
-
Page 274: Druck"-Fußpedalsteuerung
SKEMA 6 - GEBRAUCHSANWEISUNGEN 5.2.2. "Druck"-Fußpedalsteuerung Beschreibung der Teile. Griff. Steuerhebel. Steuerung Patientenstuhlbewegungen. Steuerung Chip-air/Rückkehr in Spülposition. Steuerung Water Clean System /Automatische Rückstellung des Patientenstuhls. LED-Anzeige für eingeschaltete SPRAY-Funktion. LED-Anzeige für Batterieladestand (nur in drahtloser Ausführung). Steuerhebel (2). Funktionsweise: • Das Instrument ausziehen. •... -
Page 275: Fußpedalsteuerung "Power Pedal
SKEMA 6 - GEBRAUCHSANWEISUNGEN Funktionsweise rechte Taste ( 5 ). Funktionsweise: • Langes Drücken (mindestens 2 Sekunden) bei Instrumenten in Grund- stellung: Start des Programms "Automatische Rückstellung des Patientenstuhls”. • Langes Drücken (mindestens 2 Sekunden) bei abgehobenem Instrument: Steuerung Water Clean System: Aktiviert einen Wasserstrahl an den Instrumenten Turbine, Mikromotor und Zahnsteinentferner, um die Spray- Wasserleitungen durchzuspülen. - Page 276 SKEMA 6 - GEBRAUCHSANWEISUNGEN Funktionsweise Steuerung Patientenstuhlbewegungen ( 3 ). Folgende Bewegungen werden gesteuert: - Auffahrt Sitz Patientenstuhl - Auffahrt Rückenlehne Patientenstuhl - Abfahrt Sitz Patientenstuhl - Abfahrt Rückenlehne Patientenstuhl Zum Unterbrechen des Bewegungsablaufs, das Bedienelement loslassen. HINWEIS: alle Bewegungssteuerungen des Patientenstuhls sind gesperrt, wenn ein Instrument aktiviert oder das AUTOSTERIL-System in Betrieb ist.
-
Page 277: Pedalsteuerung In Drahtloser Ausführung
SKEMA 6 - GEBRAUCHSANWEISUNGEN 5.2.4. Pedalsteuerung in DRAHTLOSER Ausführung Die „Druck“- Fußpedalsteuerung ist auch in der drahtlosen Ausführung erhältlich. Die Pedalsteuerungen in DRAHTLOSER Ausführung sind mit einem ZIGBEE-Transmitter ausgestattet (für Europa, Kanada und USA zertifi ziertes Modul). Bedienungshinweise. ACHTUNG! • Vermeiden Sie die Verwendung der Pedalsteuerung in DRAHTLOSER Ausführung in der Nähe von anderen RF-Quellen, wie beispielsweise W-LAN-Karten, anderen Funk- oder Home RF-Geräten sowie Mikrowellenherden. - Page 278 SKEMA 6 - GEBRAUCHSANWEISUNGEN Wiederaufl aden der Batterie. Die Batterie der Pedalsteuerungen in DRAHTLOSER Ausführung muss nach einer bestimmten Betriebszeit wieder aufgeladen werden. Dazu wie folgt vorgehen: • Die Schutzabdeckung des Steckers auf der Rückseite der Pedalsteuerung öffnen und das Ladekabel anschließen. •...
-
Page 279: Spritze
SKEMA 6 - GEBRAUCHSANWEISUNGEN 5.3. Spritze Beschreibung des Instruments. [ a ] Tülle. [ b ] Handgriff. [ c ] Taste Spritzenausbau. [ d ] Taste Luft. [ e ] Taste Wasser. [ f ] Wähler Kalt/Warm. [ g ] LED Kalt/Warm-Anzeige. ACHTUNG! Das Instrument wird in nicht sterilem Zustand ausgeliefert. -
Page 280: Turbine
SKEMA 6 - GEBRAUCHSANWEISUNGEN 5.4. Turbine Handstückanschluss und Fräsenwechsel. Siehe dazu die entsprechende Gebrauchsanleitung in Anlage an das Handstück. Gebrauch. • Funktionszeiten: 5 Minuten langer Betrieb; 5 Minuten Ruhezeit. • Das Instrument in Arbeitsstellung bringen. • Zum Starten des Instruments den Hebel der Fußpedalsteuerung betätigen (siehe Abschnitt 5.2). -
Page 281: Elektrischer Mikromotor
SKEMA 6 - GEBRAUCHSANWEISUNGEN Sterilisierung. Autoklav mit Wasserdampf bei 135°C (2 Bar). Mindestdauer: 15 Min. ACHTUNG! Vor Durchführung der Sterilisierung muss die darauf bezogene Ge- brauchsanleitung in Anlage an das Handstück eingesehen werden. Sicherheitsvorschriften. ACHTUNG! • Die Turbine darf nicht ohne eingesetzte Fräse oder eingesetzte Blindfräse in Betrieb gesetzt werden. - Page 282 SKEMA 6 - GEBRAUCHSANWEISUNGEN Einschalten/Ausschalten der Optikfaser. • Das Instrument in Arbeitsstellung bringen. • • Die Optikfaser durch Drücken der Taste aktivieren. HINWEIS: die Aktivierung der Optikfaser wird auf dem Display durch die Ikone ( A ) angezeigt. Regulierung der Lichtstärke der Optikfasern. •...
-
Page 283: Funktionsweise Conservative
SKEMA 6 - GEBRAUCHSANWEISUNGEN 5.5.1 Funktionsweise CONSERVATIVE Menü mit ausgezogenem, aber nicht aktiviertem Mikromotor. • Durch Drücken der linken Multifunktionstaste (M1) kann eines der 4 zu Verfügung stehenden Arbeitsprogramme ausgewählt werden. • Durch Drücken der MENÜ-Taste kann die Funktionsweise geändert werden. •... -
Page 284: Funktionsweise Endo
SKEMA 6 - GEBRAUCHSANWEISUNGEN 5.5.2 Funktionsweise ENDO Menü mit ausgezogenem, aber nicht aktiviertem Mikromotor. • Durch Drücken der linken Multifunktionstaste (M1) kann eines der 4 zu Verfügung stehenden Arbeitsprogramme ausgewählt werden. • Durch Drücken der MENÜ-Taste kann die Funktionsweise geändert werden. •... -
Page 285: Funktionsweise Surgery
SKEMA 6 - GEBRAUCHSANWEISUNGEN 5.5.3 Funktionsweise SURGERY Menü mit ausgezogenem, aber nicht aktiviertem Mikromotor. • Durch Drücken der linken Multifunktionstaste (M1) kann eines der 4 zu Verfügung stehenden Arbeitsprogramme ausgewählt werden. 20:1 • Durch Drücken der MENÜ-Taste kann die Funktionsweise geändert werden. -
Page 286: Eingabe-Menü Untersetzungsverhältnis
SKEMA 6 - GEBRAUCHSANWEISUNGEN 5.5.4 Eingabe-Menü Untersetzungsverhältnis Wenn man im Menü der Funktionseinstellungen die Ikone auswählt, die sich auf die "Einstellung des Untersetzungsverhältnisses" bezieht, und die rechte Multifunktionstaste ( ) gedrückt wird, erhält man Zugriff auf das entsprechende Untermenü, das die folgenden Ikonen enthält: Angewandtes Untersetzungsverhältnis Mit dem gewählten Untersetzungsverhältnis maximal erreichbare Geschwindigkeit... -
Page 287: Zahnsteinentferner
SKEMA 6 - GEBRAUCHSANWEISUNGEN 5.6. Zahnsteinentferner Anschluss von Handstück und Einsatz. Siehe dazu die entsprechende Gebrauchsanleitung in Anlage an das Handstück. ACHTUNG! Vor dem Anschließen des Handstücks muss man sicherstellen, dass die Kontakte ganz trocken sind. Falls notwendig sind diese mit Luft der Spritze zu trocken. - Page 288 SKEMA 6 - GEBRAUCHSANWEISUNGEN Einschalten/Ausschalten der Optikfaser. • Das Instrument in Arbeitsstellung bringen. • Die Optikfaser durch Drücken der Taste aktivieren. HINWEIS: die Aktivierung der Optikfaser wird auf dem Display durch die Ikone ( A ) angezeigt. Wenn keine Optikfaser am verwendeten Handstück vorhanden ist, wird die Ikone (E) auf dem Display angezeigt.
-
Page 289: Chirurgisches Gerät Zur Entfernung Des Zahnsteins Surgison 2
Sicherstellen, dass die eingesetzte Kühlfl üssigkeit steril und geeignet ist. • Das Handstück SURGISON 2 darf ausschließlich mit den mitgeliefer- ten Einsätzen oder mit anderen von CASTELLINI S.P.A zur Verfügung gestellten bzw. zugelassenen Einsätzen verwendet werden. • Die Form des Einsatzes nicht abändern. -
Page 290: Boost Betrieb
SKEMA 6 - GEBRAUCHSANWEISUNGEN 5.6.1.2. BOOST Betrieb Neben den Ultraschallschwingungen des Einsatzstückes wird eine Amplitudenmodulation der abgegebenen Leistung (ungefähr +40% der eingestellten Leistung) durchgeführt. Die Modulation erzeugt Schläge und so kann besser eingeschnitten werden. Es können 3 unterschiedliche Modulationen eingestellt werden, je nach Beschaffenheit des zu behandelnden Knochengewebes. 16ms 64ms Menü... - Page 291 SKEMA 6 - GEBRAUCHSANWEISUNGEN Allgemeine Gebrauchshinweise. ACHTUNG! • Bei der LED-Lichtquelle handelt es sich gemäß der IEC-Norm 60825-1 um eine Quelle der Klasse 2 (Po < 1mW). DAS LICHTBÜNDEL NICHTMIT DEN AUGEN FIXIEREN. Im Fall von direkten Bestrahlungen ohne Schutzmaßnahmen kann das ausgestrahlte Licht zu Schäden an den Augen führen. Die Lampe stets zusammen mit dem dafür vorgesehenen Schutzschirm (mitgeliefert) oder der dafür vorgesehenen Schutzbrille verwenden, um sich vor den bis zu einer Wellenlänge von 520 nm ausgegebenen Blaulichtstrahlungen zu schützen.
-
Page 292: Polymerisationslampe Leda
SKEMA 6 - GEBRAUCHSANWEISUNGEN 5.7. Polymerisationslampe LEDA Technische Eigenschaften. Speisespannung: 24-36 Vdc Max. Leistungsaufnahme: 10,5 VA Lichtquelle: 1 Led mit 5 W Wellenlänge: 440-480 nm Eingebbare Zeiten: 20 - 40 - 60 Sek. Akustische Signale:zu Beginn, alle 5 Sek. und am Ende des Arbeitsgangs. Funktionsweisen: intermittierend (60 Sek. -
Page 293: Polymerisationslampe T-Led
SKEMA 6 - GEBRAUCHSANWEISUNGEN 5.7.1. Polymerisationslampe T-LED Technische Merkmale. Versorgungsspannung : 24-36 Vdc Maximal aufgenommene Leistung : 6 VA Lichtquelle : 1 Led mit 5 W Wellenlänge : 430÷490 nm Akustiksignale : zu Beginn, alle 5 Sekunden und am Zyklusende Betriebsart : Intervallbetrieb (2 Arbeitszyklen –... - Page 294 SKEMA 6 - GEBRAUCHSANWEISUNGEN • Die Lampe aus ihrem Sitz an der Helferinnen- oder an der Arztplatte herausziehen. Das erfolgte Ausziehen des Instruments wird durch die entsprechende Abbildung auf dem Display des Pults signalisiert. • Den vorderen Teil der Lampe und/oder der Optikfaser auf eine solche Position drehen, die sich für die Fotopolymerisation als am funktions- wirksamsten erweist (stabförmig, pistolenförmig oder entsprechende Zwischenpositionen).
- Page 295 SKEMA 6 - GEBRAUCHSANWEISUNGEN • Personen mit Augenkrankheiten (z.B. Personen, die einer Operation zur Beseitigung des grauen Stars unterzogen wurden oder die Netz- hautpathologien aufweisen) müssen während des Gebrauchs der Lampe entsprechend geschützt werden, indem diesen beispielsweise eine geeignete Schutzbrille aufgesetzt wird. •...
-
Page 296: Endorale Kamera C-U2 Pro
SKEMA 6 - GEBRAUCHSANWEISUNGEN 5.8. Endorale Kamera C-U2 Bei der C-U2 handelt es sich um eine intraorale Kamera, die eigens für eine einfache Handhabung bei der zahnärztlichen intraoralen Untersuchung entworfen wurde und die mit einem extrem leichten Handstück sowie einer automatischen Kontrolle der Belichtung und einem festen Brennpunkt (Version C-U2) oder einem variablen Brennpunkt (Version C-U2 Pro) ausgestattet ist. - Page 297 SKEMA 6 - GEBRAUCHSANWEISUNGEN Einschalten Kamera-Leuchtdiode. Durch Drücken der Taste kann die LED-Beleuchtung der Kamera eingeschaltet/ausgeschaltet werden. HINWEIS: das Einschalten der Leuchtdioden wird auf dem Display durch die Ikone ( A ) angezeigt. • Bei Bedarf die Helligkeit durch mindestens 2 Sekunden langen Druck auf die Taste und mit den Tasten ZUNAHME und/oder ABNAHME regulieren.
- Page 298 SKEMA 6 - GEBRAUCHSANWEISUNGEN Einstellung Funktionsweise Einzelbildmodalität oder Mehrfachbild- modalität. Um mit aktivierter und in den LIVE-Betriebszustand versetzter Kamera von der Einzelbildanzeige auf die Mehrfachbildanzeige überzugehen (oder umgekehrt), muss einfach nur die linke Multifunktionstaste gedrückt werden. Die Ikone, die sich auf entsprechend gewählte Modalität bezieht, wird übereinstimmend zur Multifunktionstaste angezeigt: - Ikone : Einzelbildanzeige aktiviert,...
- Page 299 SKEMA 6 - GEBRAUCHSANWEISUNGEN • Speichern der Aufnahme: Das eingefrorene Bild wird direkt auf dem Mo- nitor angezeigt, wobei es in das erste freie Feld (Bsp. 1) der momentan aktivierten Seite platziert wird. Je nachfolgend eingefrorene Aufnahme wird in dem nächsten Feld posi- tioniert, wobei im Uhrzeigersinn vorgegangen wird.
- Page 300 SKEMA 6 - GEBRAUCHSANWEISUNGEN Hygienische Einweg-Schutzhauben. Durch die Kamera können Infektionen von einem Patienten auf einen anderen übertragen werden. Aus diesem Grund muss sie stets zusammen mit dem Einwegschutz verwendet werden (Art.-Nr. 97900999 für Version C-U2 und Art.- Nr.97901338 für Version C-U2 PRO) und täglich nach Einstellung ihres Gebrauchs äußerlich desinfi...
-
Page 301: Osd-Bedienpanel (On Screen Display)
SKEMA 6 - GEBRAUCHSANWEISUNGEN 5.8.1. OSD-Bedienpanel (On Screen Display) Mit diesem auf dem Bildschirm angezeigten Menü lassen sich einige Funktionsparameter des Handstücks C-U2 PRO ändern. Wenn das Pedal oder die berührungssensitive Taste einige Sekunden lang nicht betätigt werden oder das Handstück wieder rückplatziert wird, verschwindet das Menü... -
Page 302: Integrierter Laser L810
SKEMA 6 - GEBRAUCHSANWEISUNGEN 5.9. Integrierter Laser L810 Bei diesem Gerät handelt es sich um einen Diodenlaser für medizinischen Gebrauch. Gebrauch. • Betriebszeiten: 6 Min. ON, 3 Min. OFF. • Das Instrument in Arbeitsposition bringen (auf dem Display der Arztplatte wird erscheint die Bildschirmanzeige, die sich auf das Ausziehen des Lasers bezieht). -
Page 303: Schlauchpumpe
ACHTUNG! Die einwandfreien und unbeschädigten Zustand sowie das Verfal- ldatum der Irrigationsleitung kontrollieren. Nur die Irrigationssets CASTELLINI gewährleisten eine einwandfreie und problemlose Funktionsweise. Diese sterilen Leitungen sind für einen Einwegge- brauch bestimmt. Eine eventuelle Wiederverwendung kann zu einer mikrobiologischen Kontamination des Patienten führen. -
Page 304: Elektronischer Apex-Locator (Laec)
SKEMA 6 - GEBRAUCHSANWEISUNGEN Eingabe der von der Pumpe abgegebenen Menge an physiologischer Kochsalzlösung. • Um die Menge der von der Pumpe abgegebenen Menge an physiologischer Kochsalzlösung einzugeben, muss lang anhaltend (mindestens 2 Sekunden lang) auf die Taste gedrückt werden •... -
Page 305: Integrierter Sensor Zen-Xi
SKEMA 6 - GEBRAUCHSANWEISUNGEN LAEC in Kombination mit elektrischem Mikromotor. LAEC kann in der ENDO-Modalität auch in Kombination mit dem elektri- schen Mikromotor benutzt werden. Wenn man den elektrischen Mikromotor mit aktiviertem LAEC in der ENDO- Modalität herauszieht, erscheinen auf dem Display gleichzeitig sowohl die Informationen zum Mikromotor als auch die Informationen zum LAEC (Bargraph und APEX-Wert). -
Page 306: Funktionsweise Helferinnenplatte
SKEMA 6 - GEBRAUCHSANWEISUNGEN 6. Funktionsweise Helferinnenplatte. Haupteigenschaften: • Die Platte (a) ist über die beiden Gelenk-Ausleger, die ihre Positionierung in den jeweils günstigsten Arbeitsbereich ermöglichen, mit der Wassereinheit (b) verbunden. • Der Pantographarm (e) ermöglicht eine vertikal gerichtete Spannweite von 335 mm, die sich über 6 Arbeitspositionen erstreckt. -
Page 307: Instrumente Am Helferinnenelement
SKEMA 6 - GEBRAUCHSANWEISUNGEN 6.2. Instrumente am Helferinnenelement Alle am Helferinnenelement angebrachten Instrumente behalten die glei- che Funktionsweise der am Arztelement angebrachten Instrumente bei. Im Einzelnen handelt es sich um die folgenden Instrumente: • Spritze, siehe Abschnitt 5.3. • Turbine, siehe Abschnitt 5.4. •... -
Page 308: Traytablett An Helferinnenelement
SKEMA 6 - GEBRAUCHSANWEISUNGEN 6.4. Traytablett an Helferinnenelement Das Traytablett [ a ] besteht aus Edelstahl und lässt sich einfach und leicht aus der entsprechenden Halterung nehmen. Der Trayhalter kann sowohl im Uhrzeigersinn als auch gegen den Uhrzei- gersinn gedreht werden, damit sie vom Benutzer in dem Bereich positioniert werden kann, der sich am besten eignet. - Page 309 SKEMA 6 - GEBRAUCHSANWEISUNGEN Einstellung Beckenspülung. Die Wasserabgabe für das Becken kann auf zeitgesteuerte Weise oder auf manuelle Weise (Ausgabe ON/OFF anhand der entsprechenden Bedientaste) erfolgen. Zum Eingeben der gewünschten Funktionsweise und der Wasserabgabe- zeit, siehe Abschnitt 5.1.1.4.1. Einstellung der automatischen Beckenspülfunktion. In folgenden Fällen schaltet sich die Beckenspülfunktion automatisch ein: •...
-
Page 310: System Mit Tank Von Distilliertem Wasser
SKEMA 6 - GEBRAUCHSANWEISUNGEN System mit Tank von distilliertem Wasser Beschreibung des Systems. Das System ist mit einem Behälter ( a ) ausgestattet, der unter der Wasse- reinheit angebracht ist und sich für destilliertes Wasser eignet. Das Gesamtfassungsvermögen dieses Behälters beträgt 1,8 Liter. Mit diesem destillierten Wasser wird folgendes versorgt: •... -
Page 311: Manueller Desinfektionszyklus Mit Wasserstoffperoxyd
SKEMA 6 - GEBRAUCHSANWEISUNGEN 7.2.1. Manueller Desinfektionszyklus mit Wasserstoffperoxyd Mit dem S.S.S-System ist es möglich, die Wasserleitungen aller Instru- mente der Arztplatte und der Spritze an der Helferinnenplatte manuell zu desinfi zieren. Zur Durchführung des Desinfektionszyklus ist wie folgt vorzugehen: A) Vorbereitung der desinfi... - Page 312 SKEMA 6 - GEBRAUCHSANWEISUNGEN 7.3. M.W.B-System Das M.W.B.-System gewährleistet dank eines Freifallbereichs des Wasser eine sichere Trennung aus physikalischer Sicht zwischen dem Wasserversor- gungssystem der zahnärztlichen Behandlungskomplexes und dem öffentlichen Leitungswassernetz. Darüber hinaus sorgt das System durch die konstante Einspeisung einer Wasserstoffperoxydlösung mit einer Endkonzentration von 0,06% (600 ppm) in die Wasserleitungen dafür, dass die Vermehrung von Bakterien wirksam vermieden wird.
-
Page 313: Automatisches Desinfektionssystem Autosteril
SKEMA 6 - GEBRAUCHSANWEISUNGEN 7.4. Automatisches Desinfektionssystem AUTOSTERIL Beschreibung des Systems. Mit Hilfe dieses Systems kann ein automatischer Desinfektionszyklus an den Wasserkreisläufen der folgenden Instrumente ausgeführt werden. • alle an der Arztplatte angebrachten Instrumente, • der Spritze und des am Helferinnenelements platzierten Instruments, •... - Page 314 SKEMA 6 - GEBRAUCHSANWEISUNGEN Durchführung des Desinfektionszyklus. • Den Desinfektionszyklus durch Drücken der Multifunktionstaste ( am Arztpult (siehe Abschnitt 5.1.1.3.1.) oder der am Helferinnenelement angebrachten AS-Taste starten. • Nun werden automatisch die folgenden Phasen vom System ausgeführt: - Ausblasen der Wasserleitungen der Instrumente mit Luft. - Einfüllen des Desinfektionsmittels und beginnende Zählung der zuvor als Verweildauer eingegebenen Zeit.
-
Page 315: S.h.d-System Für Die Saugkanülenreinigung
SKEMA 6 - GEBRAUCHSANWEISUNGEN 7.5. S.H.D-System für die Saugkanülenreinigung. Beschreibung des Systems. Dieses System dient der Spülung, Reinigung und zur hygienischen Sau- berhaltung bzw. Desinfi zierung der Sauganlage. Das System umfasst einen Behälter [a] mit dem Reinigungsmittel und zwei Anschlüsse [ b] für die Spülung der Saugkanülen. Der Behälter mit der Reinigungsfl... -
Page 316: Automatischer Time Flushing-Zyklus
SKEMA 6 - GEBRAUCHSANWEISUNGEN 7.6. Automatischer TIME FLUSHING-Zyklus Beschreibung des Systems. Der automatische TIME FLUSHING-Zyklus ermöglicht die Durchführung eines automatischen Spülzyklus, um das Wasser zu erneuern, das in den Wasserleitungen der Instrumente an der Arztplatte und an der Helferin- nenplatte enthalten ist. Das Spülen kann mit Leitungswasser, mit behandeltem Wasser (mit vorhandenem M.W.B-System) oder mit destilliertem Wasser (mit vorhandenem S.S.S-System) erfolgen. -
Page 317: Zubehör
SKEMA 6 - GEBRAUCHSANWEISUNGEN Zubehör 8.1. Operationslampe Die OP-Lampe steht in 2 unterschiedlichen Modellen zur Verfügung: OP-Lampe mit Halogen-Lichtquelle, Modell VENUS PLUS. Die Bedienungs-und Wartungsanleitung liegt der Lampe bei. OP-Lampe mit LED-Lichtquelle, Modell VENUS PLUS -L. Für die Bedienungs-und Wartungsanleitung siehe Absatz 8.1.1. HINWEIS: Während der automatischen Patientenstuhlbewegun- gen, schaltet sich die Lampe automatisch aus, damit der Patient nicht geblendet wird. - Page 318 SKEMA 6 - GEBRAUCHSANWEISUNGEN Regulierung der Leuchtintensität. Drehen des Drehknopfes ( e ): • Uhrzeigersinn: Zunahme der Leuchtintensität. • Gegen den Uhrzeigersinn: Abnahme der Leuchtintensität. HINWEIS für Lampen mit berührungslosem Sensor: Die Leuch- tintensität kann auch durch die stillstehende Hand im Empfi ndlichkeitsbe- reich (5 cm) des Sensors ( k ) reguliert werden.
-
Page 319: Monitor / Workstation Mit Lampenständer
SKEMA 6 - GEBRAUCHSANWEISUNGEN 8.2. Monitor / Workstation mit Lampenständer Die Gebrauchs- und Wartungsanleitungen des Monitors/der Workstation werden dem zahnärztlichen Behandlungskomplex beigefügt. 8.3. Luft-/Wasser Schnellkupplungen/230V Die Schnellanschlüsse für Luft/Wasser/230V sind seitlich am Anschlusskasten angebracht. ACHTUNG! Vor dem Anschließen oder Ablösen der Luft-/Wasseranschlüsse muss die Einrichtung ausgeschaltet werden. -
Page 320: Tray-Hilfstragsplatte (Nur Für Die Version Cart)
Behandlungseinheit zu fi nden) beschriebenen Sicherheitskontrollen gemäß den durch die örtlich geltenden Vorschriften vorgegebenen Abstände durchgeführt werden. Sollten derartige Angaben bzw. Anweisungen nicht vorliegen, so rät Ihnen sie Firma CASTELLINI S.p.A. in ihrer Eigenschaft als Hersteller zahnärztlicher Behandlungseinheiten dazu, eine derartige Kontrolle zumindest alle 24 Monate durchzuführen zum Aufstellungszeitpunkt sowie nach jedem Instandsetzungsein- griff/jeder Abänderung zur Aktualisierung an den mit Netzstrom versorgten, elektrischen Teilen vorgenommen werden. -
Page 321: Chirurgisches Saugsystem
SKEMA 6 - GEBRAUCHSANWEISUNGEN 9.4. Chirurgisches Saugsystem Die Reinigung der chirurgischen Absaugung muss mit einem für diesen Zweck geeigneten Desinfektionsmittel erfolgen. ACHTUNG! Für die Reinigung der Absauganlage wird die Verwendung von STER 3 PLUS (CEFLA S.C.) in der folgenden Verdünnung empfohlen: 1 Dosierdeckel (bei Verkaufsverpackungen), bzw. -
Page 322: Reinigung Filter Umluftsystem Turbine
SKEMA 6 - GEBRAUCHSANWEISUNGEN Ausbauweise des Abscheider-Gefässes. ACHTUNG! Bei der Durchführung des folgenden Eingriffs müssen unbedingt Schutzhandschuhe getragen werden, um einem eventuellen Kontakt mit infi ziertem Material vorzubeugen. • Den Patientenstuhl auf Maximalhöhe einstellen. • Die seitliche Schutzabdeckung der Wassereinheit [ a ] öffnen (siehe Ab- schnitt 7.7) und den Stromkasten [ b ] drehen. -
Page 323: Amalgam-Abscheider Metasys
Zum Entsorgen der vollen Amalgam-Einwegbehälter müssen die örtlichen und nationalen Vorschriften eingehalten werden. 9.9. Patientenstuhl Modell NEW SKEMA Für den Patientenstuhl NEW SKEMA sind keine besonderen Wartungsmaßnahmen erforderlich. Dennoch empfi ehlt es sich, einmal pro Jahr eine generelle Funktionskontrolle von einem CASTELLINI-Fachtechniker ausführen zu lassen. -
Page 324: Hinweismeldungen
SKEMA 6 - GEBRAUCHSANWEISUNGEN 10. Hinweismeldungen. M = Meldung auf dem Pult-Display C = Ursache R = Abhilfe M: “Reservestand H2O, Behälter auffüllen” M: "Instrument rückplatzieren” C: Der Stand der im Behälter enthaltenen Flüssigkeit zur Versorgung der C: Wenn man die zahnärztliche Behandlungseinheit einschaltet, wird unabhängigen Wassereinheit ist unter den Mindeststand abgesunken. -
Page 325: Technische Daten
SKEMA 6 - GEBRAUCHSANWEISUNGEN 11. Technische Daten. Einbauplan 97042072 Wasser-Förderleistung: 10 l/Min. Technisches Handbuch:: 97071123 Wasserverbrauch: 2 l/Min. Ersatzteilkatalog Behandlungseinheit: 97023067 Wasserhärte: 60 mg/l Ersatzteilkatalog Patientenstuhl: 97023067 Ablass-Anschluss: ø40 mm Höchstgewicht Behandlungseinheit: 90 kg Förderleistung Ablass: 10 l/Min. Behandlungseinheit zahnärztlicher 115 kg Neigung der Ablassleitung: 10 mm/m... -
Page 326: Abmessungen Skema 6 Rs
SKEMA 6 - GEBRAUCHSANWEISUNGEN 11.1. Abmessungen SKEMA 6 RS 19 10 24 5 0 40 0 1 70 53 0 80 0 18 0 189 0 1 00 23 00... -
Page 327: Abmessungen Skema 6 Cp
SKEMA 6 - GEBRAUCHSANWEISUNGEN 11.2. Abmessungen SKEMA 6 CP 1910 2 450 17 0 31 0 1 890 17 0... -
Page 328: Abmessungen Skema 6 Cart
SKEMA 6 - GEBRAUCHSANWEISUNGEN 11.3. Abmessungen SKEMA 6 CART 1 910 53 0 2 4 5 0 4 0 0 1 7 0 3 000 / 4500 / 600 0 5 3 0 8 0 0 3 1 0 5 3 0... -
Page 329: Hauptübersicht Zu Hygiene Und Wartung Des Zahnärztlichen Komplexes Skema 6
SKEMA 6 - GEBRAUCHSANWEISUNGEN 12. Hauptübersicht zu Hygiene und Wartung des zahnärztlichen Komplexes SKEMA 6 WANN WAS TUN? SIEHE ABSCHNITT Hahn Kondenswassera- Das Kondenswasser aus den Leitungen entfernen. Siehe Abschnitt 9.2. blass. Spray-Leitungen. Desinfektion der Wasserleitungen der Sprays mit Siehe Abschnitt 7.2.1. (wenn der zahnärztliche manuellem Zyklus (falls S.S.S-System vorhanden). - Page 330 SKEMA 6 - GEBRAUCHSANWEISUNGEN Mit einem geeigneten Desinfektionsmittel reinigen und die Anleitungen des Herstellers einhalten. Ablösbare Instrumentenstränge. Das Produkt auf weiches Einwegpapier auf- Siehe Abschnitt 5. sprühen. Keine abscheuernden oder säurehaltigen Produkte verwenden. Desinfektion der Wasserleitungen der Sprays mit manuellem Zyklus (falls S.S.S-System Siehe Abschnitt 7.2.1.