
Manuels Connexes pour Sinmag Europe LIFTO 60


Sommaire des Matières pour Sinmag Europe LIFTO 60
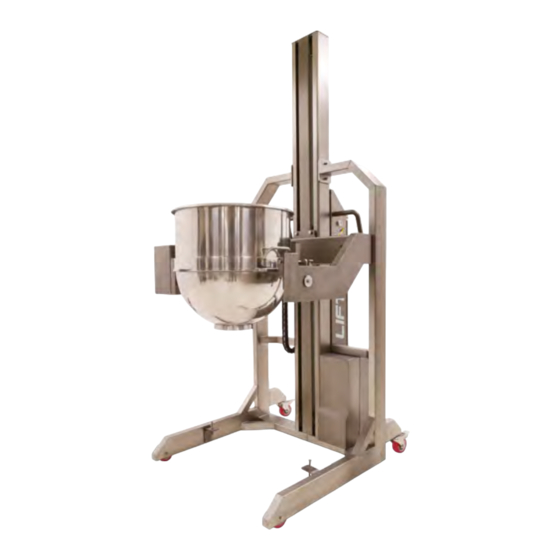
- Page 1 Mode d’emploi Manual Handleiding Handbuch Manual Istruzione Élévateur de cuve Bowl lift Kuiplift Hebekipper...
- Page 2 Pour une bonne utilisation et une longue durée de vie de la machine, nous vous recommandons de lire ce mode d’emploi avec attention avant d’utiliser la machine. Sinmag Europe vous remercie pour la confiance et l’intérêt et nous vous souhaitons beaucoup de joie au travail avec cette machine...
-
Page 3: Protection Contre Les Accidents
REMARQUE : L’utilisation de ce matériel ou de tout équipement industriel peut comporter des dangers comme une surface chaude, des bords tranchants, un risque de choc électrique. Ce manuel est destiné à vous aider pour une utilisation efficace et en toute sécurité de notre appareil. Toute machine, qu’elle soit considérée comme dangereuse ou non, doit être utilisée selon les principes des bonnes pratiques de fabrication. -
Page 4: Caractéristiques
La machine est conforme aux réglementations généralement acceptées. Le niveau de pression de son continu est inférieur à 70 dB(A). Ce résultat a été obtenu avec une sélection et des composant appropriés. 3. CARACTÉRISTIQUES 3.1. UTILISATION PRÉVUE Le chariot porte-cuve est conçu pour déplacer et soulever les cuves à pâtisserie à la hauteur souhaitée. - Page 5 Après avoir soulevé la cuve du chariot de transport, les verrous (C) reviennent à la position initiale et fixe la cuve au chariot. La cuve peut être levée et inclinée. Il est recommandé de vérifier si la cuve est correctement «...
-
Page 6: Déchargement De La Cuve Sur Le Chariot
5. DÉCHARGEMENT DE LA CUVE SUR LE CHARIOT Lorsque la cuve est en position verticale et n’a pas encore été placée dans le chariot de transport (elle est suspendue aux bras du chariot), déplacez le chariot vers la cuve et abaissez la cuve pour qu’elle sur le chariot. -
Page 7: Charger Les Batteries
Appuyez et maintenez l’interrupteur latéral (2) et sélectionnez la flèche vers le haut ↑ ou la flèche vers le bas ↓ sur l’interrupteur de levage (6) ou l’interrupteur basculant (5) selon le cas. Sélectionnez ↑ de l’interrupteur de levage (6) pour lever les bras du chariot vers le haut. -
Page 8: Possible Failures
10. POSSIBLE FAILURES Échec Raison possible Le chariot ne démarre pas Make sure that the red main switch is pressed on the control box. Assurez-vous que l’interrupteur de sécurité est enfoncé. Assurez-vous que l’interrupteur latéral est enfoncé et maintenu pendant un essai. Vérifiez le fusible S301 C63 dans le compartiment à... - Page 9 Mode d’emploi Manual Handleiding Handbuch Manual Istruzione Élévateur de cuve Bowl lift Kuiplift Hebekipper...
- Page 10 This machine has been tested thoroughly in our warehouse in Belgium before delivery. This way, Sinmag Europe is able to guarantee delivery of a machine ready for installation. For correct use and long service life of this machine, we recommend that you read this manual attentively before starting to use the machine.
- Page 11 1. INTRODUCTION 1.1 BRIEF INTRODUCTION This handbook aims at introducing you on how to install, operate and maintain the bowl lift . Thanks for choosing as your supplier. Any question, please contact our local office or dealer that will provide you with instant and ideal service. Before starting the machine for the first time, please read this manual carefully.
- Page 12 2. PROTECTION FROM ACCIDENTS Specific recommendations and guidelines for a bowl carriage operator: 2.1. Do not use a load greater than that recommended by the manufacturer. 2.2. Do not walk into the machine bowl. 2.3. Do not seat in the machine bowl. 2.4.
- Page 13 4. FIXING THE BOWL TO THE CARRIAGE The bowl fixing system ensures quick and safe installation of the bowl in the lift holder. This reduces handling procedures to minimum and guarantees safe operation. Lower the carriage all the way to the bottom position, then move the transport carriage so that the straight piece of the bowl ring (A) touches the rest plate (B).
- Page 14 Such mounted bowl can be lifted and tilted. It is recommended to check whether the bowl is properly ‘locked’ before each tilting. 5. DISCONNECTING THE BOWL FROM THE CARRIAGE When the bowl is in a vertical position and has not been seated in any transport carriage yet (it is suspended from the carriage arms), move the carriage to the bowl and lower the bowl so that it lands on the carriage.
- Page 15 6. CARRIAGE OPERATION CONTROL In order to start the carriage, check whether the safety switch (4) is pressed. If yes, pull it back. Turn the main switch (3) on. The indicator light (7) will then turn on. Press and hold the side switch (2) and select the up arrow ↑...
- Page 16 7. CHARING THE BATTERIES When the machine is used, the battery level decreases gradually. The current battery voltage can be viewed on a tester (1) located on the panel. The actual voltage is shown when the carriage performs no operation related to the bowl movement. At the end of work or when the battery is discharged (the red indicator light located on the power indicator 1 will turn on), it is recommended to connect the carriage for charging.
- Page 17 10. POSSIBLE FAILURES Failure Possible reasons The carriage won’t start Make sure that the red main switch is pressed on the control box. Make sure that the safety switch is pressed. Make sure that the side switch is pressed and held during a trial run.
- Page 18 Mode d’emploi Manual Handleiding Handbuch Manual Istruzione Élévateur de cuve Bowl lift Kuiplift Hebekipper...
- Page 19 Proficiat met de aankoop van uw kuiplift. De machine werd alvorens te leveren getest in het magazijn te België. Zo kan Sinmag Europe garant staan voor de levering van een machine die klaar is voor installatie. Voor een goede werking en lange levensduur van uw spiraalkneder, raden wij u aan deze handleiding grondig door te nemen alvorens aan de slag te gaan met de machine.
- Page 20 1. INLEIDING 1.1 KORT OVERZICHT Deze handleiding is bedoeld om u op de hoogte te brengen van de plaatsing, bediening en onderhoud van de kuiplift. Wij danken u om als leverancier te kiezen. Heeft u een vraag, aarzel dan niet om ons of uw lokale verdeler te contacteren. Wij garanderen u een snelle respons en service.
- Page 21 2. BESCHERMING TEGEN ONGEVALLEN Specifieke aanbevelingen en richtlijnen voor een gebruiker van de kuiplift: 2.1. Gebruik geen lading die groter is dan die aanbevolen door de fabrikant. 2.2. Stap niet in de kuip. 2.3. Ga niet in de kuip zitten. 2.4.
- Page 22 4. PLAATSEN VAN DE KUIP Het kuipbevestigingssysteem zorgt voor een snelle en veilige vergrendeling van de kuip in de liftarmen. Dit vermindert werktijd tot een minimum en garandeert een veilige werking. Laat de liftarmen helemaal zakken naar de onderste positie en verplaats de kuiplift zodat het rechte stuk van de kuipring (A) de steunplaat (B) raakt.
- Page 23 Een dergelijke vergrendelde kuip kan worden opgetild en gekanteld. Het wordt aanbevolen om voor elke kanteling te controleren of de kuip goed is ‘vergrendeld’. 5. DE KUIP ONTGRENDELEN Als de kuip in een verticale positie staat en nog niet in een kuipwagen is geplaatst (hij hangt aan de liftarmen), verplaats de kuipwagen dan onder de kuip en laat de kuip zakken zodat deze op de kuipwagen terechtkomt.
-
Page 24: Controlepaneel
6. CONTROLEPANEEL In order to start the carriage, check whether the safety switch (4) is pressed. If yes, pull it back. Turn the main switch (3) on. The indicator light (7) will then turn on. Press and hold the side switch (2) and select the up arrow ↑ or the down arrow ↓ on the lifting switch (6) or tilting switch (5) as appropriate. -
Page 25: Batterijen Opladen
7. BATTERIJEN OPLADEN Bij het gebruik van de machine neemt het batterijniveau geleidelijk af. Het huidige batterijniveau kan je aflezen op de batterijmeter (1) op het paneel. Het werkelijke batterijniveau wordt weergegeven als de machine niet wordt gebruikt. Aan het einde van de werkdag of als de batterij leeg is (het rode indicatielampje op de batterijmeter 1 licht op), wordt het aanbevolen om de batterij van de kuiplift op te laden. -
Page 26: Probleemoplossing
10. PROBLEEMOPLOSSING Probleem Mogelijke oorzaak De kuiplift werkt niet De noodschakelaar is niet ontrendeld De hoofdschakelaar is niet ingedrukt De zijschakelaar ingedrukt blijven houden Controleer de zekering S301 C63 in de batterijkast. Controleer de glazen zekering in de schakelkast. Ontkoppel de oplader van de batterij (het is niet mogelijk de kuiplift te bedienen wanneer de oplader is angesloten). - Page 27 SINMAG EUROPE BLANKENBERGSESTEENWEG 44A 8377 ZUIENKERKE - BELGIUM ❙ ❙ T: +32 50 32 89 05 F.: +32 50 32 89 09 info@sinmageurope.com ❙ ❙...