aldes EasyVEC C4 Notice D'installation
Masquer les pouces
Voir aussi pour EasyVEC C4:
- Notice d'installation (36 pages) ,
- Notice d'installation (16 pages)

Manuels Connexes pour aldes EasyVEC C4


Sommaire des Matières pour aldes EasyVEC C4
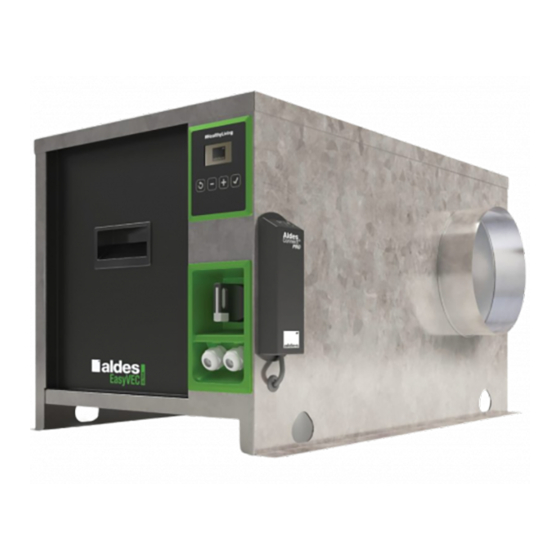
- Page 1 ® EasyVEC Notice d’installation 400 - 4000 m Installation instructions www.aldes.com...
-
Page 2: Table Des Matières
T A B L E D E S M A T I È R E S • C O N T E N T S 1. GÉNÉRALITÉS • GENERAL INFORMATION ........................... 3 1.1. Documents de référence associés • Related reference documents ...................... 3 1.2. -
Page 3: Généralités • General Information
1. GÉNÉRALITÉS • GENERAL INFORMATION 1.1. Documents de référence associés • Related reference documents Documents Aldes.com ✔ Documentation Technico-commerciale / Technical and commercial documentation ✔ PV C4 ✔ Guide de démarrage rapide / Quick Start Guide Conformité CE / Conformity CE ✔... -
Page 4: Encombrement • Dimensions
1.3. Encombrement • Dimensions ® EasyVEC C4 Standard Ø (mm) (mm) (mm) (mm) (mm) (mm) (mm) (mm) (mm) (mm) (mm) (mm) (mm) (mm) 121,3 161,5 292,5 357,5 56,5 258,5 15,2 Ø (mm) (mm) (mm) (mm) (mm) (mm) (mm) (mm) (mm) (mm) (mm) (mm) -
Page 5: Préconisations Avant Montage • Recommendations Prior To Assembly
Ø Aspi Ø Aspi Ø Aspi Ø Aspi Ø aspi (mm) (mm) (mm) (mm) (mm) (mm) (mm) (mm) (mm) (mm) (mm) (mm) (mm) 1000 688,6 401,6 408,3 233,5 156,3 456,5 314,8 182,5 1500 368,5 202,5 2000 44,6 2500 1007 384,5 3000 4000 1057... -
Page 6: Consignes De Sécurité • Safety Instructions
2.2. Consignes de sécurité • Safety instructions Ne laisser aucun corps étranger dans le caisson. Leave no foreign materials inside the unit. NOCIF Ne pas utiliser pour l'extraction de produits nocifs ou chimiques. Not suitable for extracting toxic or chemical fumes. -
Page 7: Montage • Assembly
3. MONTAGE • ASSEMBLY 3.1. Préconisation avant montage • Recommendations prior to assembly Modèle • Model A (mm) EasyVEC ® C4 400 EasyVEC ® C4 700 EasyVEC ® C4 1000 EasyVEC ® C4 1500 EasyVEC ® C4 2000 Panneau d’accès / Access panel EasyVEC ®... -
Page 8: Protection Électrique • Electrical Protection
3.3. Protection électrique • Electrical protection Le caisson doit être alimenté par une ligne dédiée et protégée au départ du tableau par une protection décrite dans le tableau ci-dessous : The fan must be powered by a dedicated line and protected from the board by a protection described in the table below: P max absorbée (W) Disjoncteur Courbe C Différentiel 30 mA,300m... -
Page 9: Raccordements Électriques • Electrical Connections
3.4. Raccordements électriques • Electrical connections Raccorder le produit avec des conducteurs de section minimum de 0.75 mm² et maximum 2.5 mm². Le diamètre du câble de raccordement devra être compris entre 6 et 12 mm.. • Connect the product with conductors with minimum section 0.75 mm² and maximum 2.5 mm². The connection cable should be between 6 and 12 mm in diameter. - Page 10 EasyVEC ® C4 PRO / ULTRA / ULTIMATE 400 - 4000...
-
Page 11: Pressostat Fi Xe (80 Pa) • Static 80 Pa Pressure Switch
3.5. Pressostat fi xe (80 Pa) • Static 80 Pa pressure switch ® EasyVEC C4 Standard 400 - 2500 Connecter le câble d'alimentation électrique. Connect the power supply cable. ® EasyVEC C4 Standard 4000 Connecter le câble d'alimentation électrique. Connect the power supply cable. -
Page 12: Mise En Service • Activation
4. MISE EN SERVICE • ACTIVATION ® 4.1. EasyVEC C4 Standard : 400 - 700 - 1000 - 1500 - 2500 Opérations de mise en service • Activation operations Note : EasyVEC ® C4 Standard 400 et 700, aucun réglage n’est nécessaire. • Note: EasyVEC ®... - Page 13 ® EasyVEC C4 Standard 2500 Max 1500 rpm Position Potentiomètre Vitesse • Speed 1000 rpm Potentiometer position 745 rpm Min 500 rpm Hygro Min Hygro Max 1000 1500 2000 2500 3000 3500 Q (m Il est possible d'utiliser un manomètre sur la prise de pression présente sur le caisson pour ajuster le réglage en cas de besoin. • It is possible to use a pressure gauge on the unit pressure inlet to adjust the setting if necessary.
-
Page 14: Easyvec ® C4 Standard : 4000 : Opérations De Mise En Service • Activation Operations
® 4.2. EasyVEC C4 Standard 4000 : Opérations de mise en service • Activation operations Réglage manuel du variateur. Pour régler la consigne de pression, ajuster la consigne en % selon le tableau suivant. • Manual controller adjustment. To adjust the pressure setpoint, adjust the setpoint % as per the next table. Consigne [%] Mesure de pression [Pa] Setpoint [%]... -
Page 15: Easyvec ® C4 Pro / Ultra / Ultimate : Opérations De Mise En Service • Activation Operations
® 4.3. EasyVEC C4 PRO / ULTRA / ULTIMATE : Opérations de mise en service • Activation operations 4.3.1. Description des boutons en façade • Description of buttons on façade : retour • back : diminuer une valeur et faire défiler le texte vers le haut • reduce a value and scroll the text upwards : augmenter une valeur et faire défiler le texte vers le bas •... -
Page 16: Paramétrage Des Modèles Easyvec ® C4 Pro • Configuring Easyvec® C4 Pro Models
® a. Paramétrage des modèles EasyVEC C4 PRO • Configuring EasyVEC® C4 PRO models a.1. Sélectionner le mode de fonctionnement • Selecting the operating mode PARAMÉTRAGES RÉGULATION PARAMÉTRAGES RÉGULATION P. Constante Régulation P. Constante … Press. Régulée … Expert CONFIGURATION CONFIGURATION CONTROLS CONTROLS... -
Page 17: Paramétrage Des Modèles Easyvec ® C4 Ultra Et Ultimate • Configuring Easyvec® C4 Ultra And Ultimate Models
EXPERT U1 = 1,5 V CONSIGNE min. 0-10V Vitesse = 20 % Consigne min. U1 = 1,5 V EXPERT Consigne max. V1 = 20 % 0-10 V U2 = 10 V EXPERT CONSIGNE max. 0-10V Vitesse = 100 % U2 = 10 V Consigne max. -
Page 18: B.3. Mode Expert • Expert Mode
(without thermodynamic water heater connected to the exhaust air), - 135 Pa for the humidity-controlled mode + T.Flow (T. Flow) when EasyVEC C4 ULTRA or ULTIMATE is combined with a T.Flow Hygro+ and T.Flow Nano on humidity-controlled terminals,... - Page 19 • Un pilotage par débit constant : • Control by constant airflow: EXPERT EXPERT MODE Q Constant Const. airflow ... 0-10 V … 0-10V • Un pilotage linéaire de la vitesse du ventilateur en fonction d’une consigne 0 - 10 V : • Linear control of the fan speed based on a 0 - 10 V setpoint: EXPERT EXPERT MODE...
-
Page 20: Réglages • Settings
4.3.4. Réglages • Settings Le menu « Réglages » permet de : • Changer l’affichage de l’écran : texte noir sur fond banc ou texte blanc sur fond noir, • Sélectionner une autre langue, • Afficher le N° de série du caisson. RÉGLAGES RÉGLAGES RÉGLAGES Couleur Langues... -
Page 21: Log Erreur-S • Error-S Log
4.3.5. LOG ERREUR-S • ERROR LOG Le menu « LOG ERREUR-S » permet d’afficher la dernière erreur active sur la machine depuis la dernière mise sous tension. L'historique des erreurs est consultable par Modbus. Un appui prolongé sur le bouton « Valider » permet d’acquitter une erreur. En cas d’erreurs multiples, chaque erreur restera affichée pendant 3 secondes. -
Page 22: Reset
4.3.7. Reset La fonction « Reset » est accessible depuis le menu « PARAMÉTRAGE » et permet de revenir au paramétrage d’usine : • The Reset function can be accessed from the “CONFIGURATION” menu and returns the system to the factory configuration: RESET PARAMÉTRAGES RESET Paramétrage Reset Reset... -
Page 23: Easyvec ® C4 Pro / Ultra / Ultimate : Schéma Carte Électrique • Wiring Board Diagram
® 4.4. EasyVEC C4 PRO / ULTRA / ULTIMATE : Schéma carte électrique • Wiring board diagram ® EasyVEC C4 PRO / ULTRA / ULTIMATE Fonctionnement extraction Smoke exhaust operation Modbus de série Modbus as standard Entrée 0-10 V 0-10 V input Signal défaut Fault signal Relais 5A... -
Page 24: Easyvec ® C4 Standard 4000 : Schéma Carte Électrique • Wiring Board Diagram
® 4.5. EasyVEC C4 Standard 4000 : Schéma carte électrique • Wiring board diagram ® EasyVEC C4 Standard 4000 0-10 V N0 C NC BOOST 30 min Contact représenté en position défaut/hors tension PUSH Contact shown in default/de-energised position Modbus en option disponible à la commande Modbus available as an option when ordering Entrée Boost Boost input... -
Page 25: Contrôles Et Essais • Tests And Trials
4.6. Contrôles et essais • Tests and trials Code erreur (PRO / Problème Cause Diagnostique Solution ULTRA / ULTIMATE) Un défaut s’affi che EXXX • Se reporter au guide de maintenance partie IHM sur l'écran IHM* L'interrupteur est éteint Vérifi er visuellement interrupteur sur 1 •... - Page 26 Error code (PRO/ Problem Cause Troubleshooting Solution ULTRA/ ULTIMATE) A fault is displayed on the EXXX • Refer to the maintenance guide HMI part HMI screen * The switch is off Check visually for switch on 1 • Refer to the maintenance guide HMI part HMI** switched off (and connected) The product has no power Check power supply wiring visually on product and on...
-
Page 27: Modbus
Modbus network in your installation, please refer to the pairing procedure available on our Internet site www.aldes.com or consult our after-sales service. • To associate one or more box fans with the Modbus network in your installation, please refer to the pairing procedure available on our Internet site www.aldes.com or consult our after-sales service. - Page 28 Taille Catégorie Remarques (Décimal) (Hexa) (Words) (0x03) (0x10) Code ID Machine Code SAP Numéro de série Aldes Version Logiciel Identifi cation Ordre Sauvegarde EasyVEC ® : Mémorisation $1213, Reset C4 : $5452 Paramètres Numéro de caisson ID product GTB Ventilation...
- Page 29 Data Comments (Decimal) (Hexa) (Words) (0x03) (0x10) Machine ID code SAP code Aldes serial number Software version Identifi cation Back-up order EasyVEC®: Storing $1213, Reset C4: $5452 Parameters Box fan number Product ID BMS Ventilation Constant pressure self-balancing = 12...
-
Page 30: Aldesconnect ™ Pro
6.2. Présentation - Descriptif du matériel • Presentation - Description of equipment AldesConnect ™ Pro est le service connecté Aldes pour les professionnels. Le produit est compatible avec tous les modèles EasyVEC ® Micro Watt et Micro Watt+ fabriqués à partir d’Avril 2016. Il est composé d’un boitier aimanté à installer pour la partie matériel et d’une interface web. -
Page 31: Utilisation Du Matériel / Enregistrement Pour Accès Au Service • Using The Equipment/Registering For Access To The Service
Make sure you have the box ID number and the box fan serial number. Create your customer account on aldesconnectpro.com Once the Aldes Connect box is installed and connected to the box fan, go to aldesconnectpro.com with the ID numbers of the box and the box fan serial number. -
Page 32: Acceptation Des Cgu • Acceptance Of General Conditions Of Use
In accordance with the provisions for the protection of personal data (General Data Protection Regulation), the professional installer and the end Customer have at any time the right to access and rectify personal data or object to the service upon simple request e-mailed to ata-sve@aldes.com. Customer consent is required... - Page 34 NOTES...
- Page 35 NOTES...
- Page 36 www.aldes.com...