
Manuels Connexes pour Vorwerk KOBOLD SPB100


Sommaire des Matières pour Vorwerk KOBOLD SPB100
- Page 1 KOBOLD SPB100 GEBRAUCHSANLEITUNG / USER MANUAL / MANUEL D'UTILISATION / MANUAL DE INSTRUCCIONES / NÁVOD K POUŽITÍ / ISTRUZIONI PER L'USO DE EN FR ES CZ IT • V1.0 • XXXXX...
- Page 2 DEUTSCH..................... ENGLISH ....................FRANÇAIS.................... ESPAÑOL ..................... ČESKY....................ITALIANO.....................
- Page 3 GEBRAUCHSANLEITUNG KOBOLD SPB100...
-
Page 5: Table Des Matières
INHALTSVERZEICHNIS 6.6.2 Erstbefeuchtung eines tro- VOR DEM START ..ckenen Tuchs...... 23 Aufbewahrung der Unter- lagen ........6.6.3 Befeuchtungsstufen än- Mitgeltende Unterlagen ..dern ........23 6.6.4 LED-Wellen im Überblick ... 24 PRODUKTÜBERSICHT .. 6.6.5 Empfehlungen für Be- ZU IHRER SICHERHEIT . feuchtungsstufen.... -
Page 6: Vor Dem Start
VOR DEM START Herzlichen Glückwunsch zu Ihrem neuen Kobold Gerät. Zusammen mit Ihrem Kobold Akku-Staubsauger VB100 werden Sie viel Freude an diesem Gerät haben. • Lesen Sie die Gebrauchsanleitung aufmerksam durch, bevor Sie das Gerät zum ersten Mal benutzen. AUFBEWAHRUNG DER UNTERLAGEN •... -
Page 7: Produktübersicht
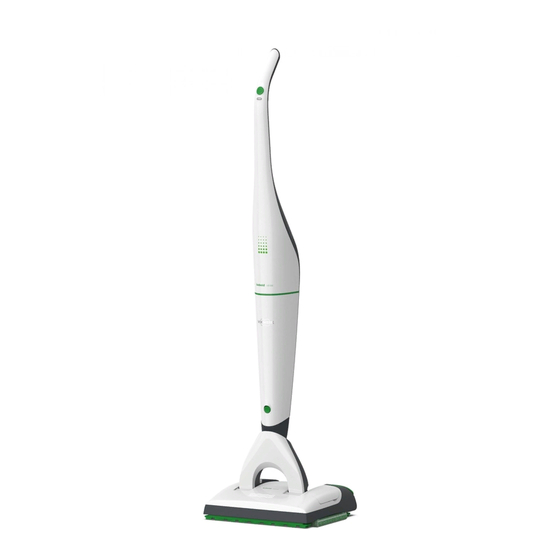
PRODUKTÜBERSICHT Gelenk Saugöffnungen vorne und hinten Fußtaste, zum Lösen des Reinigungstuch auf Tuchträgerrahmen Tuchträgerrahmens im Gerät Revisionsklappe eingesetzter Tank LED-Wellen Tankentriegelung Tankverschluss mit Dosierhilfe Funktionstaste, zur Befeuchtung des Reinigungstuches Tank MF600/601 Reinigungstücher (Universal, Universal Soft, Parkett, Dry) vorderer Dichtlippenrahmen Tuchträgerrahmen Tuchträgerplatte ohne Koboclean, verschiedene Sorten Tuchträgerrahmen... -
Page 8: Zu Ihrer Sicherheit
ZU IHRER SICHERHEIT Größtmögliche Sicherheit gehört zu den Eigenschaften der Vorwerk Produkte. Die Produktsicherheit kann jedoch nur dann gewährleistet werden, wenn Sie dieses Kapitel sowie die Warnhinweise in den folgenden Kapiteln beachten. GEFAHREN UND SICHERHEITSHINWEISE Eine nicht fachgerecht durchgeführte Reparatur des Brandgefahr oder Geräts und des zugehörigen Netzteils kann zu Brand... - Page 9 Der Saugwischer ist nur für die Verwendung auf Verletzungsgefahr! Fußböden geeignet. Wenn das Gerät an Decken oder Wänden verwendet wird, kann es sich vom Staubsauger lösen und auf den Nutzer fallen. • Reinigen Sie ausschließlich horizontale Flächen mit dem Saugwischer. •...
- Page 10 Gebrochener Kunststoff kann scharf sein und Sie Verletzungsgefahr können sich verletzen. durch scharfkanti- • Benutzen Sie das Gerät nicht, wenn die Kunststoffteile ge Bruchstücke durch Stürze oder Stöße beschädigt wurden. des Kunststoffs! • Schützen Sie sich vor scharfkantigen Bruchstücken. Wenn Sie das Gerät unsachgemäß belasten, können Sie Verletzungs- und stürzen.
- Page 11 Befindet sich das Gerät nicht in einwandfreiem Zustand, Beschädigungsge- kann dies zu Beschädigungen führen. fahr durch unsach- • Benutzen Sie ausschließlich original Vorwerk Produkte. gemäßen Ge- • Betreiben Sie das Gerät nicht, wenn es oder das Kabel des brauch! Netzteils beschädigt ist oder wenn das Gerät nicht vollständig zusammengebaut ist.
- Page 12 Bodenschädigungen kommen könnte. • Bei sensitiven Böden, u. a. nicht dauerhaft versiegelten Böden (z. B. geölter Kork, geöltes Parkett, beschichtetes, geöltes Steinzeug), empfiehlt Vorwerk, vorab das Gerät an einer nicht sichtbaren Stelle auszuprobieren, um Bodenbeschädigungen vorzubeugen. • Wischen Sie bei besonders feuchtigkeitsempfindlichen Böden mit einem trockenen Reinigungstuch Parkett oder...
- Page 13 Gefahr eines oder Stromschlag führen. Stromschlags! • Führen Sie Reparaturen an Ihrem Gerät nie eigenständig aus. • Reparaturen an Elektrogeräten dürfen nur vom Vorwerk Kundenservice, einer von Vorwerk autorisierten Werkstatt oder einer ähnlich qualifizierten Person durchgeführt werden, um Gefährdungen zu vermeiden.
-
Page 14: Aufbau Der Warnhinweise
Bedeutung der Sicherheitssymbole Warnhinweis mit Hinweis auf die Schwere der Gefahr Hinweis auf Sachschaden PFLICHTEN DES NUTZERS Um eine einwandfreie Funktion des Geräts und des Vorwerk Zubehörs zu gewährleisten, beachten Sie Folgendes: 1. Beachten Sie die Gebrauchsanleitung und alle zugehörigen Dokumente. -
Page 15: Bestimmungsgemässe Verwendung
Gefahren für sich selbst oder Dritte sowie Schäden am Gerät und an anderen Sachwerten zu vermeiden. Kobold SPB100 Nutzen Sie Ihren Kobold SPB100 Saugwischer ausschließlich für Saugwischer die Hartbodenreinigung im häuslichen Bereich. Der Saugwischer darf nur in Verbindung mit einem Kobold VB100 Akku- Staubsauger verwendet werden. - Page 16 Sicherheitsstandards des anderen Landes nicht garantiert werden. Vorwerk übernimmt deshalb keine Verantwortung für daraus resultierende Sicherheitsrisiken für den Nutzer.
-
Page 17: Das Zubehör Kennenlernen
DAS ZUBEHÖR KENNENLERNEN Der Kobold SPB100 Saugwischer ermöglicht das Saugen und Feuchtreinigen von Hartböden in einem Arbeitsschritt. Außerdem können Sie mit dem Saugwischer Ihre Böden trocken reinigen. KOBOCLEAN Das Reinigungsmittel eignet sich zur Reinigung von verschiedenen Hartböden. Koboclean Universal Für den Einsatz auf allen feucht abwischbaren, versiegelten Oberflächen (z. B. -
Page 18: Eignung Der Reinigungstücher Für Verschiedene Bodenarten
Anmerkungen Die Reinigungstücher Universal Soft, Parkett und Dry sind nicht im Lieferumfang des Basic-Sets enthalten. Für eine optimale Reinigungsleistung empfehlen wir, die Reinigungstücher vor dem erstmaligen Gebrauch bei 60 °C ohne Weichspüler zu waschen. Beachten Sie die Übersichtstabelle in Kapitel Eignung der Reinigungstücher für verschiedene Bodenarten [} 18]. -
Page 19: Bedienung
BEDIENUNG VORSATZGERÄT ANSETZEN • Stecken Sie den Anschlussstutzen (1) des Akku-Staubsaugers in das Gelenk am Saugwischer (2). ð Der Anschlussstutzen rastet hörbar ein. PARKPOSITION EINSTELLEN UND LÖSEN 1. Drehen Sie den Akku-Staubsauger über das Gelenk, sodass er und der Saugwischer genau nach vorne ausgerichtet sind. 2. -
Page 20: Betriebsbereit Machen
BETRIEBSBEREIT MACHEN 6.3.1 Tuchträgerrahmen lösen 1. Setzen Sie den Saugwischer an den Akku-Staubsauger an, wie Vorsatzgerät ansetzen [} 19] beschrieben. 2. Bringen Sie den Akku-Staubsauger in Parkposition, wie in Parkposition einstellen und lösen [} 19] beschrieben. 3. Kippen Sie den Akku-Staubsauger in Parkposition nach hinten (1). -
Page 21: Tuchträgerrahmen Einsetzen
6.3.3 Tuchträgerrahmen einsetzen 1. Legen Sie den Tuchträgerrahmen mit korrekt befestigtem Tuch auf den Boden. 2. Kippen Sie den Akku-Staubsauger in Parkposition nach hinten (1). ð Der Saugwischer steht nun auf seinen Rollen. 3. Rollen Sie den Akku-Staubsauger gerade an den Tuchträgerrahmen. -
Page 22: Ein- Und Ausschalten
EIN- UND AUSSCHALTEN HINWEIS Bodenbeschädigung durch scharfkantige Gegenstände! Scharfkantige Gegenstände unterhalb des Reinigungstuches können zu Bodenschäden führen. • Stellen Sie vor dem Einschalten sicher, dass sich keine kleinen Steinchen, Granulate (z. B. Katzenstreu) oder andere spitze oder scharfkantige Gegenstände unter dem Reinigungstuch befinden. 1. -
Page 23: Trockenmodus
6.6.1 Trockenmodus Nachdem Sie den Akku-Staubsauger und damit auch den Saugwischer eingeschaltet haben, arbeitet der Saugwischer zunächst im Trockenmodus. Keine LED-Welle leuchtet. 6.6.2 Erstbefeuchtung eines trockenen Tuchs • Betätigen Sie die grüne Funktionstaste (1) hinten links am Saugwischer für ca. 5 Sekunden, um die komplette Befeuchtung des Tuches zu starten. -
Page 24: Led-Wellen Im Überblick
6.6.4 LED-Wellen im Überblick A Trockenmodus Keine Welle leuchtet (jedoch ist Der Saugwischer ist betriebsbereit und läuft im der Akku-Staubsauger Trockenmodus, ohne Befeuchtung. angeschaltet und der Saugwischer läuft). B 1. Befeuchtungsstufe Eine Welle leuchtet. Der Saugwischer ist betriebsbereit, die grüne Funktionstaste wurde einmal betätigt, das Reinigungstuch wird über den Saugwischer auf der geringsten Stufe befeuchtet. -
Page 25: Empfehlungen Für Befeuchtungsstufen
Störungen Alle Wellen blinken rot. Die Revisionsklappe springt auf, der Saugwischer hat Feuchtigkeit aufgesaugt (siehe Störungen beheben [} 30]). Alle Wellen leuchten rot. Saugwischer hat einen Fehler festgestellt. 6.6.5 Empfehlungen für Befeuchtungsstufen Hartbodenart Trocken 1. Stufe 2. Stufe 3. Stufe Holzböden versiegelt/lackiert (Dielen, Parkett) Holzböden geölt/gewachst –... -
Page 26: Mit Dem Vorsatzgerät Reinigen
• Bei sensitiven Böden, u. a. nicht dauerhaft versiegelten Böden (z. B. geölter Kork, geöltes Parkett, beschichtetes, geöltes Steinzeug), empfiehlt Vorwerk, vorab das Gerät an einer nicht sichtbaren Stelle auszuprobieren, um Bodenbeschädigungen vorzubeugen. • Wischen Sie bei besonders feuchtigkeitsempfindlichen Böden mit einem trockenen Reinigungstuch Parkett oder Dry und dem Staubsauger in voller Leistung nach, falls der Boden zu feucht ist. -
Page 27: Reinigungstuch Wechseln
Die Gebrauchsdauer eines Reinigungstuches ist von der Verschmutzung des Bodens und vom Bodentyp abhängig. BETRIEBSARTEN UND AKKULAUFZEIT Je nachdem, in welcher Saugstufe Sie Ihren Kobold VB100 Akku-Staubsauger in Kombination mit dem Kobold SPB100 Saugwischer betreiben, hat der Akku-Staubsauger unterschiedliche Laufzeiten. Saugstufe soft... -
Page 28: Nach Der Arbeit
6.10 NACH DER ARBEIT Lagern 1. Lagern Sie Ihren Saugwischer mit eingesetztem Tank und Tuchträgerrahmen. 2. Leeren Sie vorher den Tank aus und entfernen das Reinigungstuch, siehe Tank entnehmen, befüllen und einsetzen [} 21] Reinigungstuch wechseln [} 27]. Reinigungstücher waschen 1. Reinigen Sie die gebrauchten Reinigungstücher in der Waschmaschine bei 60 °C ohne Weichspüler. -
Page 29: Dichtlippenrahmen Prüfen Und Reinigen
DICHTLIPPENRAHMEN PRÜFEN UND REINIGEN 7.2.1 Dichtlippenrahmen ausbauen Damit die Dichtlippen gründlich gereinigt werden können, lassen sich die Rahmen aus dem Kobold SPB100 Saugwischer entnehmen. 1. Legen Sie den Saugwischer umgekehrt hin. 2. Achten Sie darauf, dass das Gelenk zu Ihnen weist. -
Page 30: Störungen Beheben
STÖRUNGEN BEHEBEN VORSICHT Verletzungsgefahr durch bewegliche Teile! Sie können sich an beweglichen Teilen (bspw. rotierende Bürsten oder schwingende Tuchträgerplatte) verletzen. • Schalten Sie das Gerät vor allen Umrüst-, Reinigungs- oder Wartungsarbeiten immer aus. • Trennen Sie das Vorsatzgerät vom Gerät, bevor Sie Umrüst-, Reinigungs- oder Wartungsarbeiten am Vorsatzgerät vornehmen. - Page 31 Störung Mögliche Ursache und Behebung – Öffnen Sie die Revisionsklappe an der linken Seite des Geräts. Schieben Sie dazu eine Münze in den Schlitz (1). Der Magnetverschluss der Revisionsklappe öffnet sich und springt hoch (2). Sie haben nun freie Sicht auf den Saugkanal.
- Page 32 Störung Mögliche Ursache und Behebung – Lassen Sie den Saugkanal trocknen, bevor Sie weiterarbeiten. Der Saugwischer schwingt Das Reinigungstuch ist nicht richtig befestigt. zu stark. – Kontrollieren Sie, ob das Reinigungstuch gerade und fest auf dem Tuchträgerrahmen sitzt. – Kontrollieren Sie, ob die grüne Befestigung des Reinigungstuches korrekt und vollständig eingeschoben worden ist.
- Page 33 Störung Mögliche Ursache und Behebung – Um Verstopfungen zu beseitigen, öffnen Sie die Revisionsklappe an der linken Seite des Saugwischers. Schieben Sie dazu eine Münze in den Schlitz (1). Der Magnetverschluss der Revisionsklappe öffnet sich und springt hoch (2). Sie haben nun freie Sicht auf den Saugkanal.
- Page 34 Störung Mögliche Ursache und Behebung – Wechseln Sie das Reinigungstuch, siehe Reinigungstuch wechseln [} 27]. – Der Feuchtigkeitsfilm trocknet nicht gleichmäßig. – Nehmen Sie die zurückgebliebene Flüssigkeitsmenge in einem zweiten Reinigungsschritt mit einem trockenen Reinigungstuch im Trockenmodus des Saugwischers auf. Die Randreinigung des Eventuell ist das Reinigungstuch nicht richtig befestigt.
- Page 35 Ihnen der Boden zu trocknen erscheint. – Schalten Sie den Saugwischer dann in die Befeuchtungsstufe 1, siehe Automatische Befeuchtung und Trockenmodus [} 22]. Falls sich die Störungen nicht beheben lassen, wenden Sie sich an den Vorwerk Kundendienst, siehe Kundenservice [} 37].
-
Page 36: Entsorgung
Sie haben außerdem die Möglichkeit, Ihr altes Gerät fach- und umweltgerecht durch Vorwerk entsorgen zu lassen, wenn – Sie entweder Ihren neuen Staubsauger bei Vorwerk gekauft haben und Sie ihr altes Gerät gleicher Art und Güte entsorgen möchten; oder –... -
Page 37: Kundenservice
Kundenservice@vorwerk.de Telefon: 0202 564 3000 Reparaturservice@vorwerk.de Telefon: 0202 564 3586 Wenden Sie sich alternativ an einen unserer deutschlandweiten Vorwerk Shops. Service in Österreich Die Mitarbeiter unseres Telefonservice stehen Ihnen gern zur Verfügung: Telefon: 0505 800, Telefax: 0505 800 145 Service in der Schweiz Die Mitarbeiter unseres Telefonservice stehen Ihnen gern zur Verfügung:... -
Page 38: Technische Daten
3,5 kg (ohne Tuch und bei leerem Tank) Abmaße Höhe: ca. 10 cm (mit liegendem Gelenk) Breite: ca. 32 cm Länge: ca. 38 cm (mit liegendem Gelenk) Tankvolumen ca. 300 ml Schallleistungspegel 80 dB(A) Hersteller Vorwerk Elektrowerke GmbH & Co. KG Mühlenweg 17-37 42270 Wuppertal Deutschland... - Page 39 USER MANUAL KOBOLD SPB100...
- Page 41 TABLE OF CONTENTS 6.6.1 Dry mode......57 BEFORE YOU START..42 Storing of Product Docu- 6.6.2 Single application of mois- mentation ......42 ture to a dry cloth ....57 Applicable documents..42 6.6.3 Changing moisture set- tings........57 PRODUCT OVERVIEW... 43 6.6.4 LED wave symbols at a FOR YOUR SAFETY ..
-
Page 42: Before You Start
BEFORE YOU START Congratulations on the purchase of your new Kobold device. We hope that you will enjoy using this accessory with your Kobold VB100 Cordless Vacuum Cleaner. • Read the instruction manual carefully before you use the device for the first time. STORING OF PRODUCT DOCUMENTATION •... -
Page 43: Product Overview
PRODUCT OVERVIEW Pivot Suction openings, front and back Pedal for releasing the cloth holder Cleaning cloth on the cloth holder frame frame in the device Inspection flap Tank installed LED wave symbol Tank release mechanism Tank cap with dosage dispenser Function key for applying water to the cleaning cloth Tank... -
Page 44: For Your Safety
FOR YOUR SAFETY Safety is an essential part of every Vorwerk product. However, product safety can only be ensured if this chapter and the warning notices in the following chapters are followed. HAZARDS AND SAFETY INSTRUCTIONS If incorrect repairs are performed on the device and the... -
Page 45: Risk Of Burns
You may sustain burns from hot or boiling water. Risk of burns! • Do not pour hot or boiling water into the tank of the DuoClean. Small parts may enter the airways and cause choking. Risk of choking! • Perform regular checks to establish that the seam on the green nose of the cleaning cloth is in proper condition. - Page 46 If the device is not in perfect condition, this may cause Risk of damage damage. from improper • Only use original Vorwerk products. use! • Do not operate the device if the device itself or the power cord is damaged or if the device is not fully assembled.
- Page 47 • For delicate floors, such as floors which are not permanently sealed (e.g. oiled cork, oiled parquet, coated, oiled stoneware), Vorwerk recommends that you first test the device in an inconspicuous area to prevent damage to the floor.
- Page 48 • Never attempt to repair the device yourself. • Repairs to electrical appliances may only be carried out by a Vorwerk Customer Service Centre, a workshop authorised by Vorwerk or a person with similar qualifications in order to avoid hazards.
-
Page 49: Classification Of Safety Warning Messages
Safety warning message indicating the severity of the potential hazard Reference to material damage OBLIGATIONS OF THE USER To ensure that your appliance and Vorwerk accessory operate correctly, please follow the guidelines below: 1. Please read the instruction manual and all accompanying documents carefully. -
Page 50: Intended Use
The device complies with the safety regulations of the country in which it has been sold by an authorised Vorwerk organisation. If the device is used in another country, compliance with the local safety standards cannot be guaranteed. Vorwerk therefore... -
Page 51: Familiarising Yourself With The Accessories
FAMILIARISING YOURSELF WITH THE ACCESSORIES The Kobold SPB100 DuoClean makes it possible to vacuum and wet-clean hard floors in a single step. It is also possible to buff/ clean your floors with a dry cloth using the DuoClean. KOBOCLEAN The cleaning agent is suitable for cleaning various types of hard floors. -
Page 52: Suitability Of The Cleaning Cloths For Diverse Floor Types
°C without fabric softener before first use. Please refer to the overview table under Suitability of the cleaning cloths for diverse floor types [} 52]. SUITABILITY OF THE CLEANING CLOTHS FOR DIVERSE FLOOR TYPES Hard floor type Universal Universal Parquet Soft Sealed/varnished wooden floors (floorboards, parquet) Oiled/waxed wooden floors... -
Page 53: Operation
OPERATION ATTACHING THE ACCESSORY HEAD • Connect the attachment socket (1) of the cordless vacuum cleaner to the pivot on the DuoClean (2). ð Make sure you hear the attachment socket click into the pivot. SETTING AND RELEASING THE STANDBY POSITION 1. -
Page 54: Getting Ready For Use
GETTING READY FOR USE 6.3.1 Releasing the cloth holder 1. Attach the DuoClean to the cordless vacuum cleaner as described in the chapter Attaching the accessory head [} 53]. 2. Put the cordless vacuum cleaner in the standby position as described in the chapter Setting and releasing the standby position [} 53]. -
Page 55: Attaching The Cloth Holder
6.3.3 Attaching the cloth holder 1. Place the cloth holder onto the floor with the cloth correctly attached. 2. Tilt the cordless vacuum cleaner backwards in the standby position (1). ð The DuoClean is now positioned on its rollers. 3. Roll the cordless vacuum cleaner directly onto the cloth holder. -
Page 56: Switching On And Off
SWITCHING ON AND OFF NOTICE Damage to the floor from sharp-edged objects! Sharp-edged objects under the cleaning cloth may cause damage to the floor. • Before switching on the device, make sure that there are no small stones, granulates (e.g. cat litter) or other pointed or sharp-edged objects under the cleaning cloth. -
Page 57: Dry Mode
6.6.1 Dry mode After you have switched on the cordless vacuum cleaner and the DuoClean, the DuoClean initially runs in dry mode. No LED waves are lit. 6.6.2 Single application of moisture to a dry cloth • Press the green function key (1) at the left on the rear of the DuoClean for about five seconds to start the process of fully moistening the cloth. -
Page 58: Led Wave Symbols At A Glance
6.6.4 LED wave symbols at a glance A Dry mode No waves are lit (but the The DuoClean is ready to use and is running in dry mode, cordless vacuum cleaner is without applying any moisture to the cloth. switched on and the DuoClean is running). -
Page 59: Recommendations For Moisture Settings
Faults All waves lit up red. The DuoClean has detected a fault. 6.6.5 Recommendations for moisture settings Hard floor type Dry mode Setting 1 Setting 2 Setting 3 Sealed/varnished wooden floors (floorboards, parquet) Oiled/waxed wooden floors – – Unsealed/untreated wooden floors ++ –... -
Page 60: Cleaning With The Accessory Head
30 seconds. Otherwise, delicate floors may be damaged. • For delicate floors, such as floors which are not permanently sealed (e.g. oiled cork, oiled parquet, coated, oiled stoneware), Vorwerk recommends that you first test the device in an inconspicuous area to prevent damage to the floor. -
Page 61: Replacing The Cleaning Cloth
REPLACING THE CLEANING CLOTH 1. Release the cloth holder frame, see Releasing the cloth holder [} 54]. 2. Take hold of the cloth holder frame. 3. With the other hand, take hold of the tab (1) on the cleaning cloth and fold it in half (2). 4. -
Page 62: After Use
6.10 AFTER USE Storage 1. Store your DuoClean with the tank inside and the cloth holder. 2. Before doing so, empty the tank and take off the cleaning cloth as described in the chapters Removing, filling and inserting the tank [} 55] Replacing the cleaning cloth [} 61]. -
Page 63: Checking And Cleaning The Sealing Lip Frames
7.2.1 Removing the sealing lip frames In order to be able to clean the sealing lips thoroughly, the frames can be removed from the Kobold SPB100 DuoClean. 1. Place the DuoClean upside down. 2. Make sure that the pivot is facing you. -
Page 64: Troubleshooting
TROUBLESHOOTING CAUTION Risk of injury from moving parts! Moving parts (such as the rotating brushes or oscillating cloth holder) could cause injury. • Always switch the device off before all retrofitting, cleaning and maintenance work. • Disconnect the accessory head from the device before performing retrofitting, cleaning or maintenance work on the accessory head. - Page 65 Fault Possible cause and solutions – Open the inspection flap on the left hand side of the device. This can be done by inserting a coin into the groove (1). The magnetic latch on the inspection flap comes open (2). You can now clearly see inside the suction channel.
- Page 66 Fault Possible cause and solutions – Check whether the cleaning cloth is straight and firmly fixed on the cloth holder frame. – Check whether the green nose of the cleaning cloth has been correctly and fully pushed in. The cloth holder frame is not inserted correctly. –...
- Page 67 Fault Possible cause and solutions – Press the inspection flap down to close it again. The magnetic latch on the inspection flap will click into place and it is now firmly closed. The cleaning performance It is possible that the cleaning cloth is soiled excessively. of the –...
- Page 68 Fault Possible cause and solutions – Wash the cleaning cloth prior to first use, see After use [} 62]. It is possible that the cleaning cloth is too dry. – Check the LED wave symbol on the DuoClean. If it is lit up yellow, you need to fill the tank, see Removing, filling and inserting the tank...
- Page 69 – Then set the DuoClean to moisture setting 1, see Automatic application of moisture and dry mode [} 56]. If the fault cannot be rectified, please contact Vorwerk customer service, see Service [} 70].
-
Page 70: Disposal
1. Use the return options provided free of charge instead. 2. Contact your city or municipal administration for more information. WARRANTY Any warranty services can be found in the order note or purchase contract. SERVICE Either in person with your customer representative or at the Customer Services. www.vorwerk.co.uk... -
Page 71: Technical Data
Height: approx. 10 cm (with horizontal joint) Width: approx. 32 cm Length: approx. 38 cm (with horizontal joint) Tank volume approx. 300 ml Sound power level 80 dB(A) Manufacturer Vorwerk Elektrowerke GmbH & Co. KG Mühlenweg 17-37 42270 Wuppertal Germany... - Page 73 MANUEL D'UTILISATION KOBOLD SPB100...
- Page 75 SOMMAIRE Mise en marche et arrêt..93 AVANT LA PREMIÈRE UTILISATION ....77 Arrêt temporaire ....93 Conservation des docu- Humidification automa- ments ......... 77 tique et mode nettoyage à Documents applicables ..77 sec........93 6.6.1 Mode nettoyage à sec..94 VUE D’ENSEMBLE DU PRODUIT.......
- Page 76 SPÉCIFICATIONS TECH- NIQUES......108...
-
Page 77: Avant La Première Utilisation
AVANT LA PREMIÈRE UTILISATION Félicitations pour l’achat de votre nouvel appareil Kobold. Associé à votre Aspirateur sans fil Kobold VB100, nettoyer avec ce brosseur deviendra un véritable plaisir. • Lisez attentivement le mode d’emploi dans son intégralité avant d’utiliser l’appareil pour la première fois. CONSERVATION DES DOCUMENTS •... -
Page 78: Vue D'ensemble Du Produit
VUE D’ENSEMBLE DU PRODUIT Articulation Bouches d'aspiration avant et arrière Bouton-pédale pour détacher le cadre- Lingette sur cadre-support de lingette support de lingette dans l'appareil Trappe de révision Réservoir inséré Indicateurs lumineux Déverrouillage du réservoir Bouchon du réservoir avec doseur Bouton de fonction pour humidifier la lingette Réservoir... -
Page 79: Pour Votre Sécurité
POUR VOTRE SÉCURITÉ La sécurité est l'un des critères de qualité essentiels à tous les produits Vorwerk. La sécurité du produit ne peut cependant être assurée que si vous lisez attentivement ce chapitre ainsi que les avertissements figurant dans les chapitres suivants. - Page 80 Le DuoSpeed est uniquement destiné à être utilisé sur Risque de bles- des sols. Si l’appareil est utilisé sur des plafonds ou sure ! murs, il risque de se détacher de l’aspirateur et tomber sur l’utilisateur. • Nettoyez exclusivement des surfaces horizontales avec le DuoSpeed.
- Page 81 Le plastique cassé peut présenter des bords tranchants Risque de blessure et vous blesser. par des fragments • N'utilisez pas l'appareil si les parties en matière plastique de plastique à ont été endommagées par des chutes ou des chocs. bords tranchants ! •...
- Page 82 Si l’appareil ne se trouve pas en parfait état, cela peut Risque d'endom- entraîner des dommages. magement dû à • Utilisez exclusivement des produits d'origine Vorwerk. une utilisation non • N’utilisez pas l’appareil, s’il lui-même ou le cordon de la conforme ! prise électrique est endommagé, ou si l’appareil n’est pas...
- Page 83 • Dans le cas de sols fragiles tels que des sols qui ne sont pas vitrifiés à long terme (p. ex. liège ou parquet huilé, grès huilé et enduit), Vorwerk recommande de tester l'appareil au préalable sur un endroit discret afin de prévenir tout endommagement du sol.
- Page 84 • N'effectuez jamais vous-même de réparation sur votre appareil. • Les réparations sur les appareils électriques doivent être effectuées uniquement par le Service de la Relation Client Vorwerk, auprès de nos Stations Techniques Agréées Vorwerk ou toute autre personne qualifiée afin d'éviter toute mise en danger.
-
Page 85: Structure Des Avertissements
Indication d’un dommage matériel OBLIGATIONS DE L’UTILISATEUR Pour assurer le fonctionnement irréprochable de l’appareil et des accessoires Vorwerk, respectez les points suivants : 1. Lisez attentivement le manuel d’utilisation et tous les documents associés. 2. Conservez le manuel à proximité de l’appareil. -
Page 86: Utilisation Conforme
L'appareil est conforme aux dispositions de sécurité du pays dans lequel il est distribué par une organisation Vorwerk agréée. Le respect des normes de sécurité locales d’un autre pays ne peut pas être garanti si l'appareil est utilisé dans un autre pays que... - Page 87 C'est pourquoi Vorwerk décline toute responsabilité pour les risques de sécurité encourus de ce fait par l'utilisateur.
-
Page 88: Apprendre À Connaître Les Accessoires
APPRENDRE À CONNAÎTRE LES ACCESSOIRES Le DuoSpeed Kobold SPB100 permet d’aspirer et de laver les sols durs en un seul geste. Vous pouvez aussi nettoyer vos sols à sec à l'aide du DuoSpeed. KOBOCLEAN Le produit de nettoyage convient au nettoyage de différents sols durs. -
Page 89: Utilisation Des Lingettes Microfibres Pour Différents Sols
Remarques Les lingettes tous sols soft, parquet et dépoussiérage à sec ne sont pas comprises dans la livraison des sets incluant le DuoSpeed. Vous pouvez les acheter séparément. Pour un nettoyage optimal, nous vous recommandons de laver les lingettes microfibres à 60 °C avec une lessive classique sans adoucissant avant leur première utilisation. -
Page 90: Utilisation
UTILISATION UTILISER UNE BROSSE • Insérez l'embout de raccordement (1) de l'aspirateur sans fil dans l'articulation du DuoSpeed (2). ð L’embout de raccordement s'enclenche de manière audible. ENCLENCHEMENT ET SORTIE DE LA POSITION PARKING 1. Tournez l'aspirateur sans fil à l'aide de l'articulation, de manière à... -
Page 91: Préparer Le Duospeed À L'emploi
PRÉPARER LE DUOSPEED À L'EMPLOI 6.3.1 Retrait du cadre-support de lingette 1. Fixez le DuoSpeed sur l'aspirateur sans fil comme décrit au chapitre Utiliser une brosse [} 90]. 2. Placez l'aspirateur sans fil en position de rangement, comme décrit au chapitre Enclenchement et sortie de la position parking [} 90]. -
Page 92: Fixation Du Cadre-Support Sur Le Duospeed
6.3.3 Fixation du cadre-support sur le DuoSpeed 1. Posez au sol le cadre-support de lingette contenant la lingette correctement fixée. 2. Faites basculer l'aspirateur sans fil en position de rangement vers l'arrière (1). ð Le DuoSpeed repose maintenant sur ses roulettes. 3. -
Page 93: Mise En Marche Et Arrêt
MISE EN MARCHE ET ARRÊT REMARQUE Risque d’endommagement du sol dû à des objets tran- chants ! Des objets tranchants se trouvant sous la lingette microfibres peuvent endommager le sol. • Avant d‘allumer l‘appareil, assurez-vous qu‘aucun caillou, aucune granule (p. ex. de la litière pour chat) ni aucun autre objet pointu ou tranchant ne se trouve sous la lingette microfibres. -
Page 94: Mode Nettoyage À Sec
6.6.1 Mode nettoyage à sec Après que vous avez allumé l'aspirateur sans fil et donc mis en marche le DuoSpeed, celui-ci fonctionne d'abord en mode nettoyage à sec. Aucune vague LED n'est allumée. 6.6.2 Première humidification d’une lingette sèche • Appuyez sur le bouton de fonction vert (1) située sur la gauche à... -
Page 95: Présentation Des Vagues Led
6.6.4 Présentation des vagues LED A Mode nettoyage à sec Aucune vague n’est allumée Le DuoSpeed est prêt à l'emploi et fonctionne en mode (bien que l’aspirateur sans fil soit nettoyage à sec, sans humidification. allumé et le DuoSpeed tourne). B 1. -
Page 96: Recommandations Pour Les Niveaux D'humidifica- Tion
Dysfonctionnements Toutes les vagues sont allumées Le DuoSpeed a détecté un problème. en rouge. 6.6.5 Recommandations pour les niveaux d'humidification Type de sol dur Mode de Niveau 1 Niveau 2 Niveau 3 nettoyage à Planchers en bois vitrifiés/vernis (planches, parquet) Planchers en bois huilés/cirés –... -
Page 97: Nettoyer Avec Le Duospeed
• Dans le cas de sols fragiles tels que des sols qui ne sont pas vitrifiés à long terme (p. ex. liège ou parquet huilé, grès huilé et enduit), Vorwerk recommande de tester l'appareil au préalable sur un endroit discret afin de prévenir tout endommagement du sol. -
Page 98: Remplacer La Lingette
DE LA BATTERIE Les durées de fonctionnement de l’aspirateur sans fil varient en fonction de la puissance d’aspiration que vous avez sélectionnée pour votre aspirateur sans fil Kobold VB100 en combinaison avec le Kobold SPB100 DuoSpeed. Puissance Puissance Puissance d'aspiration... -
Page 99: Après L'utilisation Du Duospeed
• Ne mettez jamais les mains dans les pièces en rotation. PIÈCES DE RECHANGE ET CONSOMMABLES Nous vous recommandons d’utiliser des produits et consommables Vorwerk spécialement conçus pour votre appareil et de les commander en temps utile. Vous trouverez tous les détails concernant le réapprovisionnement au chapitre Service [} 107]. -
Page 100: Vérifier Et Nettoyer Les Cadres À Lèvres D'étanchéité
VÉRIFIER ET NETTOYER LES CADRES À LÈVRES D'ÉTANCHÉITÉ 7.2.1 Démonter les cadres à lèvres d’étanchéité Afin de bien nettoyer les lèvres d'étanchéité, il est possible de sortir les cadres du DuoSpeedKobold SPB100. 1. Posez le DuoSpeed à l'envers. 2. Veillez à ce que l'articulation soit orientée vers vous. 3. -
Page 101: Éliminer Les Dysfonctionnements
ÉLIMINER LES DYSFONCTIONNEMENTS ATTENTION Risque de blessure par des pièces en mouvement ! Vous pouvez vous blesser dû aux pièces en mouvement (p.ex. brosses rotatives ou support de lingette vibrant). • Éteignez toujours l'appareil et débranchez e câble électrique avant de réaliser des changement d'accessoires, de nettoyage ou d’entretien. - Page 102 Dysfonctionnement Cause possible et élimination Le canal d'aspiration du – Arrêtez l'aspirateur sans fil. DuoSpeed est bouché. – Ouvrez la trappe de sécurité du côté gauche de l'appareil. Pour ce faire, insérez une pièce de monnaie dans la fente (1). La fermeture magnétique de la trappe de sécurité...
- Page 103 Dysfonctionnement Cause possible et élimination Le DuoSpeed vibre trop La lingette microfibres n'est pas fixée correctement. fortement. – Vérifiez si la lingette microfibres est droite et bien fixée sur le cadre-support de lingette. – Vérifiez si la languette verte de la lingette a été correctement et complètement insérée.
- Page 104 Dysfonctionnement Cause possible et élimination La fermeture magnétique de la trappe de sécurité s'ouvre et saute (2). Le canal d'aspiration est ainsi entièrement dégagé. – Retirez les éléments qui pourraient l'obstruer (3). Pour ce faire, utilisez si nécessaire un objet émoussé approprié (p. ex.
- Page 105 Dysfonctionnement Cause possible et élimination Le nettoyage en bordure La lingette n'est peut-être pas fixée correctement. – Vérifiez si la lingette microfibres est droite et bien fixée sur DuoSpeed est inefficace. le cadre-support de lingette. Il est possible que la lingette n'ait pas été lavée avant la première utilisation.
- Page 106 – Passez alors le DuoSpeed au niveau d’humidification 1, cf. Humidification automatique et mode nettoyage à sec [} 93]. Si vous ne parvenez pas à résoudre les dysfonctionnements, adressez-vous au Service de la Relation Client Vorwerk France, Service [} 107].
-
Page 107: Recyclage
Pour tout appel de garantie, nous vous prions de vous référer à votre bon de commande ou contrat d’achat. SERVICE Notre Service de la Relation Client Vorwerk est à votre disposition : Par téléphone : 02 518 547 47 www.vorwerk-kobold.fr... -
Page 108: Spécifications Techniques
Hauteur : env. 10 cm (avec articulation à plat) Largeur : env. 32 cm Longueur : env. 38 cm (avec articulation à plat) Capacité du réservoir env. 300 ml Émission sonore 80 dB(A) Fabricant Vorwerk Elektrowerke GmbH & Co. KG Mühlenweg 17-37 42270 Wuppertal Allemagne... - Page 109 MANUAL DE INSTRUCCIONES KOBOLD SPB100...
- Page 111 ÍNDICE DE CONTENIDO Breve pausa ......127 ANTES DE EMPEZAR ..112 Conservación de los docu- Humectación automática y mentos ....... 112 modo de limpieza en seco ... 127 Documentos vigentes ..112 6.6.1 Modo de limpieza en seco ... 128 VISTA GENERAL DEL 6.6.2 Primera humectación de...
-
Page 112: Antes De Empezar
ANTES DE EMPEZAR ¡Enhorabuena por haber adquirido su nuevo aparato Kobold! Estamos seguros de que va a disfrutar de este inteligente aparato junto con su Kobold VB100 Aspirador sin cable. • Lea atentamente el manual de instrucciones antes de utilizar el aparato por primera vez. -
Page 113: Vista General Del Producto
VISTA GENERAL DEL PRODUCTO Articulación Canal de aspiración frontal y trasero Pedal de liberación del soporte de la Mopa en soporte de la mopa instalado mopa Tapa de revisión Depósito instalado Ondas LED Desbloqueo del depósito Tapón del depósito con dosificador Pedal de selección del nivel de humectación Depósito... -
Page 114: Para Su Seguridad
PARA SU SEGURIDAD El más alto grado de seguridad posible es una de las propiedades de los productos de Vorwerk. No obstante, la seguridad del producto solo se puede garantizar si el usuario lee con atención este capítulo, prestando atención a las advertencias y siguiendo las indicaciones de los capítulos siguientes. - Page 115 El 2en1 Aspira y friega solo es apto para suelos. Si el ¡Peligro de lesio- aparato se utiliza en techos o paredes, puede salirse del nes! aspirador y caer sobre el usuario. • Limpie solo superficies horizontales con el 2en1 Aspira y friega.
- Page 116 Si el aparato no está en perfectas condiciones, pueden ¡Peligro de daños producirse daños. debido al uso ina- • Utilice solo productos originales de Vorwerk. decuado! • No utilice el aparato si este o el cable del cargador están defectuosos o si el aparato no está completamente...
- Page 117 • En suelos sensibles, p. ej., suelos sin sellado permanente (como corcho tratado con aceite, parquet tratado con aceite, gres recubierto y tratado con aceite), Vorwerk recomienda hacer primero una prueba en una zona oculta para evitar daños en el suelo.
- Page 118 • Nunca realice reparaciones usted mismo a su equipo. eléctrica! • Las reparaciones de aparatos eléctricos deben ser llevadas a cabo solo por el servicio técnico oficial de Vorwerk.
-
Page 119: Clasificación De Las Indicaciones De Seguridad
Aviso sobre daños materiales OBLIGACIONES DEL USUARIO Para garantizar el funcionamiento adecuado del aparato y de los accesorios Vorwerk, tenga en cuenta lo siguiente: 1. Lea el manual de instrucciones y todos los documentos correspondientes. 2. Guarde el manual cerca del aparato. -
Page 120: Utilización Conforme A Lo Previsto
El equipo cumple con las normas de seguridad del país, debido a que fue distribuido por una organización autorizada por Vorwerk. Al usar ese equipo en otro país que no sea el país de... - Page 121 Es por ello que Vorwerk no asume la responsabilidad de los riesgos de seguridad que de ahí resulten para el usuario.
-
Page 122: Presentación De Los Accesorios
PRESENTACIÓN DE LOS ACCESORIOS El Kobold SPB100 2en1 Aspira y friega permite aspirar y limpiar en húmedo suelos duros de una sola pasada. Además, con el 2en1 Aspira y friega se pueden limpiar los suelos en seco. KOBOCLEAN Koboclean es apropiado para la limpieza de diferentes suelos duros. -
Page 123: Idoneidad De Las Mopas De Limpieza Para Distintos Tipos De Suelo
Observaciones En función del mercado de venta las mopas incluidas en el set básico de venta pueden variar. Para un rendimiento de limpieza óptimo, recomendamos lavar las mopas de limpieza a 60 °C sin suavizante antes de su primer uso. Observe tabla-resumen en el capítulo Idoneidad de las mopas de limpieza para distintos tipos de suelo... -
Page 124: Uso
COLOCACIÓN DE UN COMPLEMENTO O ACCESORIO • Inserte el conector de accesorios (1) del aspirador sin cable en la articulación del 2en1 Aspira y friega (2). ð El conector de accesorios encajará produciendo un clic audible. COLOCACIÓN Y LIBERACIÓN DE LA POSICIÓN DE DESCANSO 1. -
Page 125: Preparativos Antes Del Uso
PREPARATIVOS ANTES DEL USO 6.3.1 Liberación del soporte de la mopa 1. Coloque el 2en1 Aspira y friega en el aspirador sin cable tal como se describe en Colocación de un complemento o accesorio [} 124]. 2. Coloque el aspirador sin cable en posición de descanso como se describe en Colocación y liberación de la posición de descanso... -
Page 126: Colocación Del Soporte De La Mopa
6.3.3 Colocación del soporte de la mopa 1. Coloque el soporte de la mopa sobre el suelo con la mopa correctamente fijada. 2. Incline el aspirador sin cable en posición de descanso hacia atrás (1). ð El 2en1 Aspira y friega se quedará de pie sobre sus ruedas. 3. -
Page 127: Encendido Y Apagado
ENCENDIDO Y APAGADO ¡AVISO! ¡Daños en el suelo por objetos afilados! La presencia de objetos afilados debajo de la mopa puede producir daños en el suelo. • Antes de conectar, cerciórese de que no haya piedrecitas, granulados (como arena para gatos) u otros objetos puntiagudos o cortantes debajo de la mopa de limpieza. -
Page 128: Modo De Limpieza En Seco
6.6.1 Modo de limpieza en seco Después de haber encendido el aspirador sin cable y, con ello, también el 2en1 Aspira y friega, este último empieza siempre a funcionar en modo de limpieza en seco. Ninguna onda LED estará encendida. 6.6.2 Primera humectación de una mopa seca •... -
Page 129: Significado De Las Ondas Led
6.6.4 Significado de las ondas LED A Modo de limpieza en seco Ninguna onda encendida El 2en1 Aspira y friega está listo para el uso y en modo (aunque el aspirador sin cable de limpieza en seco, sin humectación. está encendido y el 2en1 Aspira y friega está... -
Page 130: Recomendaciones Para Los Niveles De Humectación
Problemas Todas las ondas parpadean en La tapa de revisión se abre, el 2en1 Aspira y friega ha rojo. aspirado líquido (consulte Resolución de fallos [} 135]). Todas las ondas en rojo. El 2en1 Aspira y friega ha detectado un fallo. 6.6.5 Recomendaciones para los niveles de humectación Tipo de suelo En seco... -
Page 131: Limpieza Con El Complemento O Accesorio
• En suelos sensibles, p. ej., suelos sin sellado permanente (como corcho tratado con aceite, parquet tratado con aceite, gres recubierto y tratado con aceite), Vorwerk recomienda hacer primero una prueba en una zona oculta para evitar daños en el suelo. -
Page 132: Cambio De La Mopa De Limpieza
MODOS DE OPERACIÓN Y DURACIÓN DE LA BATERÍA Según el nivel de aspiración con el que utilice el Kobold VB100 Aspirador sin cable en combinación con el Kobold SPB100 2en1 Aspira y friega, la autonomía del aspirador sin cable variará. Nivel de... -
Page 133: Después Del Trabajo
Servicio de atención al cliente [} 141]. REVISAR Y LIMPIAR LAS FALDILLAS 7.2.1 Desmontar las faldillas Para poder limpiar a fondo las faldillas, los marcos correspondientes se pueden retirar del Kobold SPB100 2en1 Aspira y friega. -
Page 134: Montar Las Faldillas
1. Dé la vuelta al 2en1 Aspira y friega. 2. Asegúrese de que la articulación mire hacia usted. 3. Tire del centro (1) de la faldilla para liberarla de sus dos anclajes (2). 4. Si es necesario, limpie las faldillas bajo el grifo. 7.2.2 Montar las faldillas Antes de volver a insertar las faldillas en el aparato, se tienen que haber secado por completo. -
Page 135: Resolución De Fallos
RESOLUCIÓN DE FALLOS ¡ATENCIÓN! ¡Riesgo de lesiones por piezas móviles! Puede lesionarse con piezas móviles (p. ej., cepillos giratorios o placa de balanceo). • Desconecte el aparato siempre antes de realizar cualquier tarea de reequipamiento, limpieza o mantenimiento. • Desconecte el complemento o accesorio del aparato siempre antes de realizar cualquier tarea de reequipamiento, limpieza o mantenimiento en el complemento o accesorio. - Page 136 Fallo Posible causa y solución – Si el 2en1 Aspira y friega se ha almacenado en un ambiente frío, deje que se caliente durante varias horas a temperatura ambiente antes de usarlo. El canal de aspiración del – Apague el aspirador sin cable. 2en1 Aspira y friega está...
- Page 137 Fallo Posible causa y solución – Deje que el canal de aspiración se seque antes de seguir trabajando. El 2en1 Aspira y friega La mopa de limpieza no está bien fijada. oscila en exceso. – Revise si la mopa está colocada firmemente en posición recta sobre el soporte de la mopa.
- Page 138 Fallo Posible causa y solución – Para eliminar las obstrucciones, abra la tapa de revisión que hay a la izquierda del 2en1 Aspira y friega. Para ello, inserte una moneda en la ranura (1). El cierre magnético de la tapa de revisión se abrirá hacia arriba (2).
- Page 139 Fallo Posible causa y solución – La película de humedad no se seca regularmente. – Recoja el líquido restante en una segunda operación de limpieza con una mopa seca y con el 2en1 Aspira y friega en modo de limpieza en seco. El 2en1 Aspira y friega Posiblemente, la mopa de limpieza no esté...
- Page 140 – A continuación, ponga el 2en1 Aspira y friega al nivel de humectación 1 (consulte Humectación automática y modo de limpieza en seco [} 127]). Si no se solucionan los problemas, póngase en contacto con el servicio de atención al cliente de Vorwerk (consulte Servicio de atención al cliente [} 141]).
-
Page 141: Eliminación Y Protección Ambiental
ELIMINACIÓN Y PROTECCIÓN AMBIENTAL Como propietario de un aparato eléctrico o electrónico no le está permitido por ley (en conformidad con la DIRECTIVA DEL CONSEJO Y DEL PARLAMENTO EUROPEO 2012/19/UE de 4 de julio de 2012 sobre desechos de aparatos eléctricos y electrónicos así... -
Page 142: Características Técnicas
CARACTERÍSTICAS TÉCNICAS Kobold SPB100 2en1 Aspira y friega Símbolo de seguridad Carcasa Plástico reciclable de alta calidad Motor Motor de corriente continua sin escobillas, sin mantenimiento Peso Aprox. 3,5 kg (sin mopa y con el depósito vacío) Dimensiones Altura: aprox. 10 cm (con la articulación en horizontal) Anchura: aprox. - Page 143 NÁVOD K POUŽITÍ KOBOLD SPB100...
- Page 145 OBSAH Krátká přestávka ....160 PŘED PRVNÍM POUŽITÍM ..... 146 Automatické navlhčení a Uložení podkladů ....146 režim na sucho ....160 Použité dokumenty .... 146 6.6.1 Režim na sucho ....161 POPIS VÝROBKU ..147 6.6.2 První navlhčení suché mikroutěrky .......
-
Page 146: Před Prvním Použitím
PŘED PRVNÍM POUŽITÍM Srdečně gratulujeme k vašemu novému přístrojiKobold. Spolu s vaším tyčovým aku vysavačemKobold VB100 vám tento přístroj přinese hodně radosti. • Před prvním použitím přístroje si pozorně pročtěte návod k použití. ULOŽENÍ PODKLADŮ • Uschovejte si návod k použití pro budoucí potřeby. Je důležitou součástí... -
Page 147: Popis Výrobku
POPIS VÝROBKU Kloub Sací otvory vpředu a vzadu Nožní tlačítko, pro uvolnění rámečku Mikroutěrka na rámečku držáku držáku mikroutěrky mikroutěrky v přístroji Revizní klapka Vložená nádobka Vlny LED Uvolnění nádobky Uzávěr nádobky s dávkovací Funkční tlačítko pro navlhčení pomůckou mikroutěrky Nádobka Mikroutěrky MF600/601 (Universal, Universal Soft, Parkett, Dry) -
Page 148: Pro Vaši Bezpečnost148
• Opravy elektrických přístrojů smí vykonávat jen příslušný proudem! zákaznický servis společnosti Vorwerk, autorizovaná dílna Vorwerk nebo podobně kvalifikovaná osoba, aby se tak zabránilo rizikům. Pokud se do vnitřku přístroje dostanou hořící nebo Nebezpečí požáru snadno hořlavé látky, může to způsobit požár nebo nebo úrazu... -
Page 149: Nebezpečí Úrazu
Nástavec na vlhké čištění pevných podlah je vhodný Nebezpečí úrazu! pouze pro použití na podlahy. Pokud je přístroj použit na stropech nebo stěnách, může se odpojit od vysavače a spadnout na uživatele. • Nástavcem na vlhké čištění pevných podlah čistěte pouze vodorovné... - Page 150 • Přístroj uchovávejte chráněný před vlhkostí. Nebezpečí Pokud není přístroj v bezvadném stavu, může to vést k jeho poškození. poškození následkem • Používejte výhradně originální výrobky Vorwerk. neodborného • Nepoužívejte přístroj, pokud je tento nebo napájecí kabel poškozen, nebo pokud není přístroj úplně smontován. použití!
- Page 151 • U citlivých podlah, mimo jiné u podlah bez trvale konzervovaného povrchu např. (naolejovaný korek, naolejované parkety, potažená, naolejovaná kamenina), doporučuje Vorwerk vyzkoušet čistič předem na neviditelném místě, aby nedošlo k poškození podlahy. • Pokud je podlaha příliš vlhká, vytírejte podlahy, které jsou obzvláště...
- Page 152 úrazu elektrickým proudem. nebo úrazu • Nikdy neprovádějte opravy přístroje sami. elektrickým • Opravy elektrických přístrojů smí vykonávat jen příslušný proudem! zákaznický servis společnosti Vorwerk, autorizovaná dílna Vorwerk nebo podobně kvalifikovaná osoba, aby se tak zabránilo rizikům.
-
Page 153: Struktura Výstražných Upozornění
Výstražné upozornění udávající závažnost nebezpečí Upozornění na poškození majetku POVINNOSTI UŽIVATELE Chcete-li zajistit správnou funkci přístroje a příslušenství Vorwerk, dodržujte následující pokyny: 1. Dodržujte návod k použití a všechny související dokumenty. 2. Návod uchovávejte v blízkosti přístroje. 3. Poškozený přístroj nechejte okamžitě opravit výrobcem. - Page 154 Nástavec na vlhké čištění Nástavec na vlhké čištění pevných podlah Kobold SPB100 pevných podlah Kobold používejte výhradně pro péči o pevné podlahy v domácnosti SPB100 Nástavec na vlhké čištění pevných podlah se smí používat jen ve spojení s tyčovým aku vysavačem Kobold VB100. Je určen k použití...
-
Page 155: Seznámení Se Spříslušenstvím
SEZNÁMENÍ SE S PŘÍSLUŠENSTVÍM Nástavec na vlhké čištění pevných podlahKobold SPB100 umožňuje vysávání a vlhké čištění pevných podlah v jednom pracovním kroku. Kromě toho můžete nástavcem na vlhké čištění pevných podlah čistit podlahy také nasucho. ČISTICÍ PROSTŘEDEK KOBOCLEAN Čisticí prostředek se hodí k čištění různých pevných podlah. Koboclean Universal Pro použití... -
Page 156: Vhodnost Mikroutěrek Na Různé Druhy Pevných Podlah
vyprat na 60 °C bez aviváže. Dodržujte pokyny pro likvidaci v kapitole Vhodnost mikroutěrek na různé druhy pevných podlah [} 156]. VHODNOST MIKROUTĚREK NA RŮZNÉ DRUHY PEVNÝCH PODLAH Druh pevné podlahy Universal Universal Parkett Soft Dřevěné podlahy s konzervovaným povrchem / lakované (prkna, parkety) Dřevěné... -
Page 157: Obsluha
OBSLUHA NASAZENÍ NÁSTAVCE • Vsuňte připojovací kloub (1) tyčového aku vysavače do kloubu na nástavci na vlhké čištění pevných podlah (2). ð Připojovací kloub slyšitelně zacvakne. ODSTAVENÍ DO PARKOVACÍ POLOHY A UVOLNĚNÍ Z PARKOVACÍ POLOHY 1. Natočte tyčový aku vysavač přes kloub tak, aby byl i s nástavcem na vlhké... -
Page 158: Příprava K Provozu
PŘÍPRAVA K PROVOZU 6.3.1 Uvolnění rámečku držáku mikroutěrky 1. Nasaďte nástavec na vlhké čištění pevných podlah na tyčový aku vysavač podle popisu v Nasazení nástavce [} 157] 2. Umístěte tyčový aku vysavač do parkovací polohy podle popisu v Odstavení do parkovací polohy a uvolnění z parkovací... -
Page 159: Nasazení Rámečku Držáku Mikroutěrky
6.3.3 Nasazení rámečku držáku mikroutěrky 1. Položte rámeček držáku mikroutěrky se správně upevněnou mikroutěrkou na podlahu. 2. Naklopte přitom tyčový aku vysavač v parkovací poloze dozadu (1). ð Nástavec na vlhké čištění pevných podlah nyní stojí na kolečkách. 3. Najeďte vysavačem rovně na rámeček držáku mikroutěrky. 4. -
Page 160: Zapnutí A Vypnutí
ZAPNUTÍ A VYPNUTÍ UPOZORNĚNÍ Poškození podlahy předměty s ostrými hranami! Ostré předměty pod mikroutěrkou mohou způsobit poškození podlahy. • Před zapnutím přístroje se přesvědčte, že se pod mikroutěrkou nenacházejí žádné drobné kamínky, granuláty (např. krmivo pro kočky) ani jiné špičaté nebo ostré předměty. 1. -
Page 161: První Navlhčení Suché Mikroutěrky
6.6.1 Režim na sucho Po spuštění tyčového aku vysavače, a tím také nástavce na vlhké čištění pevných podlah, pracuje nástavec na vlhké čištění pevných podlah nejprve v režimu na sucho. Nesvítí ani jedna vlna LED. 6.6.2 První navlhčení suché mikroutěrky •... -
Page 162: Přehled Vln Led
6.6.4 Přehled vln LED A Režim na sucho Nesvítí žádná vlna (tyčový aku Nástavec na vlhké čištění pevných podlah je připraven k vysavač je však zapnutý a provozu a běží v režimu na sucho, bez navlhčení. nástavec na vlhké čištění pevných podlah běží). -
Page 163: Doporučení Pro Stupně Navlhčení
Poruchy Všechny vlny blikají červeně. Revizní klapka vyskočila, nástavec na vlhké čištění pevných podlah nasál vlhkost (viz Odstranění poruch [} 167]). Všechny vlny svítí červeně. Nástavec na vlhké čištění pevných podlah detekoval chybu. 6.6.5 Doporučení pro stupně navlhčení Druh pevné podlahy Režim na 1. -
Page 164: Čištění Nástavcem
• U citlivých podlah, mimo jiné u podlah bez trvale konzervovaného povrchu např. (naolejovaný korek, naolejované parkety, potažená, naolejovaná kamenina), doporučuje Vorwerk vyzkoušet čistič předem na neviditelném místě, aby nedošlo k poškození podlahy. • Pokud je podlaha příliš vlhká, vytírejte podlahy, které jsou obzvláště... -
Page 165: Výměna Mikroutěrky
VÝMĚNA MIKROUTĚRKY 1. Uvolněte rámeček držáku mikroutěrky, viz Uvolnění rámečku držáku mikroutěrky [} 158]. 2. Pevně držte rámeček držáku mikroutěrky. 3. Uchopte druhou rukou mikroutěrku za úchytku (1) a položte ji dvojitě (2). 4. Palcem uchopte zelené uchycení mikroutěrky (3) a vytáhněte je z rámečku držáku mikroutěrky (4). -
Page 166: Po Ukončení Práce
6.10 PO UKONČENÍ PRÁCE Uložení 1. Nástavec na vlhké čištění pevných podlah uložte s nasazenou nádobkou a rámem držáku mikroutěrky. 2. Nejprve vyprázdněte nádobku a sejměte mikroutěrku, vizVyjmutí, naplnění a nasazení nádobky [} 159] Výměna mikroutěrky [} 165]. Praní mikroutěrek 1. Použité mikroutěrky perte v pračce při teplotě 60 °C bez avivážního prostředku. -
Page 167: Nasazení Rámečku Těsnění Krytu
1. Položte nástavec na vlhké čištění pevných podlah obráceně. 2. Dbejte na to, aby kloub byl nasměrován k vám. 3. Vytáhněte uprostřed rámeček těsnění krytu (1), abyste jej uvolnili z jeho obou upevnění (2). 4. Vyčistěte rámeček těsnění krytu v případě potřeby pod tekoucí... - Page 168 Porucha Možná příčina a odstranění Nástavec na vlhké čištění Motor je možná přetížený. pevných podlah se sám – Vypněte tyčový aku vysavač. vypne a vlny LED svítí červeně. – Zapněte tyčový aku vysavač. Nástavec na vlhké čištění Byla nasáta vlhkost. pevných podlah se vypne.
- Page 169 Porucha Možná příčina a odstranění – Zkontrolujte, zda je revizní klapka správně zavřená; pokud ne, zavřete ji. – Zkontrolujte usazení a aretaci rámečku držáku mikroutěrky. Pravděpodobně není nádobka správně upevněna. – Vypněte tyčový aku vysavač. – Nasaďte nádobku, viz Vyjmutí, naplnění a nasazení nádobky [} 159] –...
- Page 170 Porucha Možná příčina a odstranění Výsledek vysávání Pravděpodobně jsou rámečky těsnění krytu znečištěné a nástavcem na vlhké čištění váznou. pevných podlah není – Vyjměte rámečky těsnění krytu a vyčistěte je, viz Kontrola uspokojivý. a čištění rámečku těsnění krytu [} 166]. – Zkontrolujte, zda jsou sací otvory mezi těsněním krytu zdola volné.
- Page 171 Porucha Možná příčina a odstranění – Opakujte proces čištění s novou mikroutěrkou a čistou vodou. Pravděpodobně se na podlaze nacházejí zbytky starých konzervačních a čisticích prostředků. – Opakujte proces čištění, dokud nedosáhnete zlepšení; případně je zapotřebí důkladné vyčištění. Mikroutěrka je možná příliš silně znečištěná. –...
- Page 172 – Spusťte nástavec na vlhké čištění pevných podlah se stupněm navlhčení 1, viz Automatické navlhčení a režim na sucho [} 160]. Pokud nelze poruchu odstranit, obraťte se na zákaznický servis společnosti Vorwerk, viz SERVISNÍ VÝKONY [} 173].
-
Page 173: Ekologická Likvidace Aochrana Životního Prostředí
2. Informujte se o možnostech na místním úřadu vašeho města nebo obce. ZÁRUKA Záruční podmínky naleznete ve své kupní smlouvě. SERVISNÍ VÝKONY SERVIS V ČESKÉ REPUBLICE Pracovníci naší bezplatné zákaznické linky vám rádi poskytnou pomoc. Zákaznická linka: 800 168 987 PŘÍTOMNOST NA INTERNETU www.vorwerk-kobold.cz... -
Page 174: Technické Údaje
TECHNICKÉ ÚDAJE Nástavec na vlhké čištění pevných podlah Kobold SPB100 Bezpečnostní znak Plášť Vysoce kvalitní recyklovatelný plast Motor Bezúdržbový bezkartáčový stejnosměrný motor Hmotnost cca 3,5 kg (bez mikroutěrky a s prázdnou nádobkou) Rozměry Výška: cca 10 cm (s ležícím kloubem) Šířka: cca 32 cm... - Page 175 ISTRUZIONI PER L'USO KOBOLD SPB100...
- Page 177 INDICE Umidificazione automatica PRIMA DI INIZIARE..178 e modalità a secco....192 Conservare la documenta- zione ........178 6.6.1 Modalità di pulizia a secco.. 193 Documentazione di riferi- 6.6.2 Prima umidificazione del mento......... 178 panno asciutto ....193 PANORAMICA DEL 6.6.3 Modificare i livelli di umi- PRODOTTO ....
-
Page 178: Prima Di Iniziare
PRIMA DI INIZIARE Complimenti per l’acquisto di un nuovo apparecchio Kobold . Abbinato al vostro Kobold VB100 Aspirapolvere senza filo, questo apparecchio vi darà grandi soddisfazioni. • Leggere attentamente tutte le istruzioni per l'uso prima di utilizzare per la prima volta l’apparecchio. CONSERVARE LA DOCUMENTAZIONE •... -
Page 179: Panoramica Del Prodotto
PANORAMICA DEL PRODOTTO Snodo Aperture di aspirazione anteriore e posteriore Meccanismo di sblocco, per sganciare Panno di pulizia su telaio portapanno il telaio portapanno nell'apparecchio Sportello di ispezione Serbatoio montato Linee LED Elemento di sblocco serbatoio Tappo serbatoio con dosatore Tasto funzione, per l’umidificazione del panno Serbatoio... -
Page 180: Per La Vostra Sicurezza
PER LA VOSTRA SICUREZZA Caratteristica comune di tutti i prodotti Vorwerk è la massima sicurezza. Tuttavia la sicurezza del prodotto può essere garantita solo se ci si attiene a quanto indicato in questo capitolo e alle avvertenze di pericolo nei capitoli seguenti. -
Page 181: Pericolo Di Lesioni
La Pulilava è indicata solo per l’uso su pavimenti. Se Pericolo di lesioni! l’apparecchio viene usato su soffitti o pareti, può staccarsi dall’aspirapolvere e cadere sull’utilizzatore. • Pulire esclusivamente superfici orizzontali con la Pulilava. • Non usare mai la Pulilava in verticale o sopra la testa. È... - Page 182 Se l’apparecchio non è in perfette condizioni, sono Pericolo di danni a possibili danni. causa di uso non • Utilizzare esclusivamente prodotti originali Vorwerk. conforme! • Non utilizzare l'apparecchio se esso o il cavo dell’alimentatore sono danneggiati o se l’apparecchio non è...
- Page 183 • Per pavimenti delicati, quali pavimenti non sigillati permanentemente (ad es. sughero oliato, parquet oliato, pietra rivestita o oliata) Vorwerk consiglia di provare preventivamente l'apparecchio in un punto non visibile, per prevenire danni al pavimento.
- Page 184 • Non eseguire mai autonomamente le riparazioni all'apparecchio. • Le riparazioni degli apparecchi elettrici devono essere effettuate solo dal personale dei Centri Assistenza Vorwerk, da un'officina autorizzata da Vorwerk o da un tecnico con qualifica simile, per evitare situazioni di pericolo.
-
Page 185: Struttura Delle Avvertenze Di Pericolo
Avvertenza di pericolo con indicazione della gravità del pericolo Avviso di danni materiali OBBLIGHI DELL'UTILIZZATORE Per garantire il perfetto funzionamento dell'apparecchio e degli accessori Vorwerk è necessario attenersi a quanto segue: 1. Rispetta le istruzioni per l'uso e tutta la relativa documentazione. 2. Conserva le istruzioni vicino all'apparecchio. -
Page 186: Utilizzo Conforme
Kobold SPB100 Pulilava Utilizzare Kobold SPB100 Pulilava esclusivamente per la pulizia di pavimenti duri in ambito domestico. La Pulilava può essere utilizzata solo in combinazione con un Kobold VB100 Aspirapolvere senza filo. -
Page 187: Conoscere Gli Accessori
CONOSCERE GLI ACCESSORI Kobold SPB100 Pulilava consente di aspirare e lavare pavimenti duri in un solo passaggio. Inoltre con la Pulilava è possibile pulire i pavimenti a secco. KOBOCLEAN Questo detergente è indicato per la pulizia dei vari pavimenti duri. -
Page 188: Idoneità Dei Panni Di Pulizia Per I Diversi Tipi Di Pavimento
ammorbidente. Fare riferimento alla tabella generale nel capitolo Idoneità dei panni di pulizia per i diversi tipi di pavimento [} 188]. IDONEITÀ DEI PANNI DI PULIZIA PER I DIVERSI TIPI DI PAVIMENTO Tipo di pavimento duro Universale Universale Parquet Fughe Soft Pavimenti in legno sigillati/laccati (tavole, parquet) Pavimento in legno oliati/incerati... -
Page 189: Utilizzo
UTILIZZO MONTARE L’ACCESSORIO • Inserire l'attacco (1) dell’Aspirapolvere senza filo nello snodo della Pulilava (2). ð L’attacco si innesta con un suono percepibile. ATTIVARE E DISATTIVARE LA POSIZIONE DI PARCHEGGIO 1. Ruotare l’Aspirapolvere senza filo tramite lo snodo, in modo che l’aspirapolvere e la Pulilava siano in posizione verticale. -
Page 190: Preparare Per L'uso
PREPARARE PER L’USO 6.3.1 Sganciare il telaio portapanno 1. Montare la Pulilava sull'Aspirapolvere senza filo come descritto nel capitolo Montare l’accessorio [} 189]. 2. Mettere l'Aspirapolvere senza filo in posizione di parcheggio come descritto nel capitolo Attivare e disattivare la posizione di parcheggio [} 189]. -
Page 191: Agganciare Il Telaio Portapanno
6.3.3 Agganciare il telaio portapanno 1. Appoggiare sul pavimento il telaio portapanno con il panno correttamente fissato. 2. Inclinare l'Aspirapolvere senza filo in posizione di parcheggio all'indietro (1). ð A questo punto la Pulilava poggia sulle ruote. 3. Far scorrere l'Aspirapolvere senza filo sulle ruote avvicinandolo bene al telaio portapanno. -
Page 192: Accensione E Spegnimento
ACCENSIONE E SPEGNIMENTO NOTA! Danni al pavimento a causa di oggetti affilati! Eventuali oggetti affilati che si trovano sotto il panno di pulizia possono causare danni al pavimento. • Prima dell'accensione accertarsi che sotto al panno di pulizia non vi siano sassolini, granelli (ad es. -
Page 193: Modalità Di Pulizia A Secco
6.6.1 Modalità di pulizia a secco All'accensione dell’Aspirapolvere senza filo e quindi anche della Pulilava, quest'ultima funziona inizialmente in modalità pulizia a secco. Nessuna linea LED illuminata. 6.6.2 Prima umidificazione del panno asciutto • Azionare il tasto funzione verde (1) a sinistra sul retro della Pulilava per ca. -
Page 194: Riepilogo Degli Indicatori Lineari A Led
6.6.4 Riepilogo degli indicatori lineari a LED A Modalità di pulizia a secco Nessuna linea accesa (però La Pulilava è pronta all'uso e funziona in modalità a l’Aspirapolvere senza filo è secco, senza umidificazione. acceso e la Pulilava gira). B 1° livello di umidificazione Una linea illuminata. -
Page 195: Consigli Sul Livello Di Umidificazione
Anomalie Tutte le linee si illuminano di La Pulilava ha riscontrato un guasto. rosso. 6.6.5 Consigli sul livello di umidificazione Tipo di pavimento duro A secco 1° livello 2° livello 3° livello Pavimenti in legno sigillati/laccati (tavole, parquet) Pavimento in legno oliati/incerati –... -
Page 196: Pulire Con L'accessorio
• Per pavimenti delicati, quali pavimenti non sigillati permanentemente (ad es. sughero oliato, parquet oliato, pietra rivestita o oliata) Vorwerk consiglia di provare preventivamente l'apparecchio in un punto non visibile, per prevenire danni al pavimento. -
Page 197: Sostituire Il Panno Di Pulizia
SOSTITUIRE IL PANNO DI PULIZIA 1. Sganciare il telaio portapanno, vedere Sganciare il telaio portapanno [} 190]. 2. Afferrare saldamente il telaio portapanno. 3. Con l'altra mano afferrare il panno di pulizia nel punto di presa (1) e piegarlo su se stesso (2). 4. -
Page 198: Dopo L'uso
Per maggiori dettagli sulle possibilità di ordinazione consultare il capitolo ASSISTENZA [} 206]. CONTROLLARE E PULIRE I SET GUARNIZIONE 7.2.1 Smontare i set guarnizione Per pulire a fondo le guarnizioni è possibile estrarre i set dal Kobold SPB100 Pulilava. -
Page 199: Montare I Set Guarnizione
1. Appoggiare la Pulilava capovolta. 2. Accertarsi che lo snodo sia rivolto verso di sé. 3. Tirare al centro (1) del set guarnizione, per liberare il set guarnizione dai due punti di aggancio (2). 4. Se necessario, lavare i set guarnizione sotto acqua corrente. 7.2.2 Montare i set guarnizione I set guarnizione devono essere perfettamente asciutti, prima di essere riposizionati nell'apparecchio. -
Page 200: Risoluzione Dei Guasti
RISOLUZIONE DEI GUASTI ATTENZIONE Pericolo di lesioni a causa di parti in movimento! Le parti in movimento (ad es. le spazzole rotanti o la piastra portapanno mentre vibra) possono causare ferite. • Prima di qualsiasi intervento di allestimento, pulizia o manutenzione spegnere sempre l’apparecchio. - Page 201 Guasto Possibili cause e soluzioni – Aprire lo sportello di ispezione sul lato sinistro dell'apparecchio. Per far ciò, inserire una moneta nella fessura (1). La chiusura magnetica dello sportello di ispezione si apre e si solleva (2). Il canale di aspirazione è visibile. –...
- Page 202 Guasto Possibili cause e soluzioni – Controllare che il panno di pulizia sia posizionato ben diritto e fissato bene al telaio portapanno. – Controllare che l'elemento di fissaggio verde del panno sia inserito correttamente e fino in fondo. Il telaio portapanno non è inserito correttamente. –...
- Page 203 Guasto Possibili cause e soluzioni – Premere per richiudere lo sportello di ispezione. La chiusura magnetica dello sportello di ispezione scatta e lo sportello si chiude perfettamente. L’efficacia di pulizia della Probabilmente il panno di pulizia è troppo sporco. Pulilava diminuisce. –...
- Page 204 Guasto Possibili cause e soluzioni – Prima del primo utilizzo lavare il panno di pulizia, vedere Dopo l’uso [} 198]. Probabilmente il panno di pulizia è troppo asciutto. – Controllare le linee LED della Pulilava. Se si illuminano di giallo, è necessario riempire il serbatoio, vedere Estrarre, riempire e inserire il serbatoio [} 191].
- Page 205 – Proseguire il lavoro senza umidificazione automatica fino a che il pavimento sembra asciugarsi. – Commutare la Pulilava nel livello di umidificazione 1, vedere Umidificazione automatica e modalità a secco [} 192]. Nel caso non fosse possibile eliminare i guasti, rivolgersi al Servizio Clienti Vorwerk, vedere ASSISTENZA [} 206].
-
Page 206: Smaltimento E Tutela Ambientale
ASSISTENZA Gli addetti al nostro servizio telefonico sono a vostra completa disposizione: telefono: 0844 300 868 fax: 061 716 98 89 Da lunedì a venerdì dalle 9 alle 12 e dalle 14 alle 17 www.vorwerk-kobold.ch... -
Page 207: Dati Tecnici
Dimensioni Altezza: ca. 10 cm (con snodo abbassato) Larghezza: ca. 32 cm Lunghezza: ca. 38 cm (con snodo abbassato) Capacità serbatoio ca. 300 ml Emissioni sonore 80 dB(A) Produttore Vorwerk Elektrowerke GmbH & Co. KG Mühlenweg 17-37 42270 Wuppertal Germania... - Page 212 Achten Sie auf Qualität. Vorwerk Qualität ORIGINAL Q UA L I T Y DEUTSCHLAND Vorwerk Deutschland Stiftung & Co. KG Vorwerk UK Ltd Mühlenweg 17-37 Ashurst Manor 42270 Wuppertal Church Lane, Sunninghill, Ascot www.vorwerk-kobold.de Berkshire , SL5 7DD www.kobold.vorwerk.co.uk ÖSTERREICH Vorwerk Austria GmbH &...