Graf EcoBloc Inspect smart Notice Pour L'installation, L'utilisation Et L'entretien
Masquer les pouces
Voir aussi pour EcoBloc Inspect smart:
- Mode d'emploi (18 pages) ,
- Mode d'emploi (20 pages)
Publicité
Les langues disponibles
Les langues disponibles
Liens rapides
DE
Anleitung für Einbau des GRAF EcoBloc Inspect smart
>> Seite 2-18
EN
Instructions for installing the GRAF EcoBloc Inspect smart
>> Page 19-35
FR
Notice pour l'installation du GRAF EcoBloc Inspect smart
>> Page 36-52
ES
Instrucciones para la instalación del GRAF EcoBloc Inspect Smart
>> Página 53-69
EcoBloc Inspect smart
1 / 72
Publicité

Manuels Connexes pour Graf EcoBloc Inspect smart


Sommaire des Matières pour Graf EcoBloc Inspect smart
- Page 1 >> Seite 2-18 Instructions for installing the GRAF EcoBloc Inspect smart >> Page 19-35 Notice pour l’installation du GRAF EcoBloc Inspect smart >> Page 36-52 Instrucciones para la instalación del GRAF EcoBloc Inspect Smart >> Página 53-69 1 / 72...
- Page 2 Anleitung für den Einbau des GRAF EcoBloc Inspect smart GRAF EcoBloc Inspect smart Best.-Nr. 402500 Inhaltsverzeichnis Die in dieser Anleitung beschriebe- ALLGEMEINE INFORMATIONEN nen Punkte sind unbedingt zu be- Allgemein achten. Bei Nichtbeachtung erlischt Sicherheit jeglicher Garantieanspruch. Für alle Hinweise zum Betrieb der Anlage über GRAF bezogenen Zusatzarti-...
- Page 3 Ausschluss der Gewährleistung/Garantie. Hinweise zum Betrieb der Anlage Im ergänzenden Dokument „Anleitung für den Betrieb und Wartung des GRAF EcoBloc Inspect smart fin- den Sie darüber hinaus weitere Informationen zu den Richtlinien und Pflichten für den Betreiber einer Ver- sickerungsanlage.
- Page 4 402501 GRAF EcoBloc Inspect smart Endplatten 402503 GRAF EcoBloc Verbindungselemente z.B. 25er Set 420018 Schächte GRAF EcoBloc Inspect smart plus Schacht 450151 GRAF EcoBloc Inspect smart Konus 450160 GRAF Vario 800 Schacht flex, Typ 1 450050 GRAF Vario 800 Schacht flex, Typ 2...
- Page 5 Material 100 % Polypropylen (PP), Recyclingmaterial Max. / Min. Erdüberdeckung siehe Tabelle 1 Technische Daten zur GRAF EcoBloc Inspect smart Bodenplatte Volumen (Brutto/Netto) 24 Liter / 21 Liter Maße (L x B x H) 800 x 800 x 40 mm Anschlüsse...
- Page 6 4. Transport & Lagerung Transport & Lagerung Der Transport kann mit Gabelstapler o.ä. Gerät bis zum Aufstellungsort erfolgen. Am Aufstellungsort kön- nen die Rigolenelemente und Bodenplatten von Hand oder leichtem Gerät versetzt werden. Bei der Zwischenlagerung ist auf eine geeignete Fläche (eben und fest) zu achten. Es ist auf eine sachge- mäße Lagerung zu achten.
- Page 7 5. Standortwahl Standortwahl Standort Der Standort der Versickerungsanlage ist so zu wählen, dass austretendes Wasser keine Beschädigungen an Gebäuden oder weiteren Installationen verursacht. Um ein Unterspülen und Anstauen zu vermeiden, sind Versickerungsanlagen stets in einer Entfernung von mind. 1,5-facher Baugrubentiefe zu platzieren. Die Mächtigkeit des Erdbodens zwischen Baugrubensohle der Versickerungsanlage und dem zu erwarten- den mittleren höchsten Grundwasserstand darf, nach Arbeitsblatt DWA A-138, ein Meter nicht unterschrei- ten.
- Page 8 5. Standortwahl Hanglage Beim Einbau einer Anlage mit einem Abstand von weniger als 5 m zu einem Hang, Erdhügel oder einer Böschung mit einer Steigung von >5°, muss eine statisch berechnete Stützmauer zur Aufnahme des Erddrucks errichtet werden. Die Mauer muss die Anlage um min. 0,5 m in alle Richtungen überragen sowie mit einem Mindestabstand von 1 m zum System errichtet werden.
- Page 9 - schächten. Die Baugrube muss zudem entsprechend nach DIN 4124 „Baugruben und Gräben“ ausgeführt werden. gewählt werden muss. Anmerkung: Wenn Sie Fragen zu Rückhaltesysteme haben, wenden Sie sich bitte an das technische Team von GRAF. 9 / 72...
- Page 10 PKW, LKW12, SLW30, SLW40 und SLW60. In Tabelle 1 sind die min. und max. Erdüberdeckungen der verschiedenen Belastungsklassen abgebildet. Abweichende Einbausituationen sind grundsätzlich mit GRAF abzustimmen. Es werden Füllmaterialien (wiederverwendetes Aushubmaterial und/oder Kies) mit einer maximalen Dichte von 20kN/m³ vorausgesetzt.
- Page 11 7. Einbau Einbau Die Abmessung der Baugrube richten sich nach den Dimensionen der Versickerungsanlage sowie einem umlaufenden Arbeitsraum von ca. einem Meter Breite, siehe Kapitel 5.4. Baugrube vorbereiten Die Baugrubensohle muss grundsätzlich als waagrechtes, ebenes und tragfähiges Planum vorbereitet werden. Spitze Gegenstände, größere Steine oder ähnliche Fremdkörper sind zu entfer- nen.
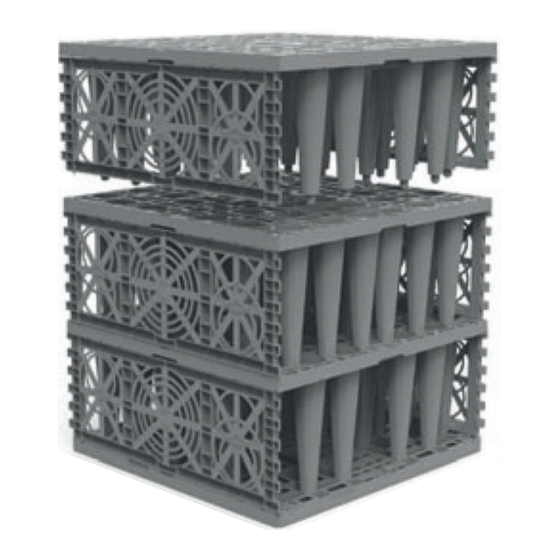
- Page 12 Die Rigolenelemente werden in die Bodenplatte gesteckt. Die EcoBloc Verbindungselemente wer- den ebenfalls in jeder Lage zur Verbindung ver- wendet. Der EcoBloc Inspect smart wird vorzugsweise mit dem Inspektionskanal (offene Seite) in Längsrich- tung gelegt. EcoBloc Inspect smart Module müssen mit Hilfe von Verbindern mit den benachbarten Modulen verbunden werden.
- Page 13 7. Einbau Nach Positionierung aller Blöcke wird die Anlage komplett mit Geotextil eingeschlagen. Das Ge- otextil verhindert den Eintrag von Schmutzparti- keln durch das Verfüllmaterial in das Versicke- rungssystem Bitte beachten: Bei Nässe und Frost besteht erhöhte Rutschgefahr beim Betreten der Rigo- lenelemente.
- Page 14 7. Einbau Verfüllen der Versickerungsanlage Vor dem Verfüllen der Baugrube müssen alle Zu- läufe, Entlüftungen und Schächte angeschlossen sein. Es ist darauf zu achten, dass das Geotextil nicht auseinandergezogen wird. Überlappungen müssen auch während des Verfüllens erhalten bleiben. Das direkte Befahren der Blöcke mit Bauma- schinen ist nicht zulässig.
- Page 15 Aufbau als Rückhaltevolumen / Retentionsbehälter Für die Nutzung als Retentionsbehälter ist ein Durchflussregler oder eine Abflussdrossel in einem separa- ten Schacht einzubauen. Für weitere Informationen und Beratung steht Ihnen die Firma GRAF oder die lokalen Handelspartner gerne zur Verfügung. Bitte beachten: Beim Aufbau eines Retentionsbehälters ist der Grundwasserstand zwingend zu beachten.
- Page 16 9. Einbau unter befahrbaren Verkehrsfläche bis SLW60 Einbau unter befahrbaren Verkehrsfläche bis SLW60 Hinweise: Die Rigolenkörper werden gemäß Ka- pitel 6 und 7 eingebaut und ange- schlossen. Entlüftungsabschlüsse sind in Grünflächen zu installieren. Verfüllmaterialien unter- schiedlichen Bodenschichten dürfen max. eine Wichte von 20 kN/m³ [124.86 lbs/ft³] aufweisen.
- Page 17 Walzenzüge, Bagger Gesamtgewicht: ca. 12t min. 0,5 verteilt auf: Gleichmäßig, auf 2 Walzen Dimension: 5,9 x 2,3 min. 0,8 SLW 60 Fahrzeuge Bitte halten Sie bei Abweichung von den hier genannten Materialien und Geräten Rücksprache mit GRAF. 17 / 72...
- Page 18 Die vorliegende Dokumentation behandelt ausschließlich die Verwendung der GRAF EcoBloc Inspect smart Rigolenkörper zur Rückhaltung, Speicherung oder Versickerung von Niederschlagswasser. Jegliche anderweitige Nutzung der Rigolenkörper ist mit der Otto GRAF GmbH hinsichtlich technischer, stofflicher und/oder statischer Betrachtung abzustimmen. Des Weiteren empfiehlt sich, bei speziellen Anforderungen die Kontaktaufnahme mit Architekten oder Planern mit Kenntnissen im Bereich Hydrologie und Geologie.
- Page 19 GENERAL PRODUCT INFORMATION GRAF, you will receive separate in- TECHNICAL DATA stallation instructions Technical data for the GRAF EcoBloc Inspect smart transport packaging. Technical data for the GRAF EcoBloc Inspect smart base plate TRANSPORT AND STORAGE The components must be checked...
- Page 20 All work should be undertaken in compliance with the relevant accident prevention regulations as per BGV C22. There is an increased risk of slipping on infiltration ditch elements in frosty and wet conditions. There is an increased risk of slipping on the GRAF EcoBloc Inspect smart in wet conditions! GRAF provides an extensive range of accessories, which are all coordi- nated and can be combined to form complete systems.
- Page 21 Product type Description Item no. Infiltration ditch elements GRAF EcoBloc Inspect smart 402500 GRAF EcoBloc Inspect smart base plate 402501 GRAF EcoBloc Inspect smart end plates 402503 GRAF EcoBloc connecting elements, e.g. 25-piece set 420018 Shafts GRAF EcoBloc Inspect smart plus shaft...
- Page 22 10 kg Material 100% polypropylene (PP), recycled material Max. / min. earth covering see Table 1 Technical data for the GRAF EcoBloc Inspect smart base plate Volume (gross/net) 24 litres / 21 litres Dimensions (LxWxH) 800 x 800 x 40 mm...
- Page 23 4. Transport and storage Transport and storage The transportation to the installation site can be facilitated using a forklift truck or similar equipment. Upon reaching the installation location, both the infiltration ditch elements and base plates can be manoeuvred either manually or with light-duty equipment.
- Page 24 5. Selecting the location Selecting the location Location The selection of the infiltration system's location is critical to prevent water discharge from causing damage to buildings or other installations. To mitigate the risks of erosion and accumulation, it is imperative that infiltration systems be situated at a minimum distance of 1.5 times the trench depth, ensuring optimal func-...
- Page 25 5. Selecting the location Slope When installing a system within a distance of less than 5 metres from a slope, mound, or embankment featuring an incline exceeding 5°, a structurally calculated supporting wall is mandatory. This wall must be designed to withstand the pressure of the soil, extending beyond the system by a minimum of 0.5 metres...
- Page 26 The trench must also be designed in accordance with DIN 4124 "Excavation pits and trenches". In particu- lar, this includes the slope angle. With installation depths 1.25 m, this must be selected according to the type of soil. Comments: If you have any questions about retention systems, please contact the GRAF technical team. 26 / 72...
- Page 27 HGV30, HGV40 and HGV60. Table 1 shows the min. and max. earth coverings for the various load cate- gories. Deviating installation situations should always be discussed with GRAF. Fillers (reused excavated material and/or gravel) with a maximum density of 20kN/m³ are needed.
- Page 28 7. Installation Installation The sizes of the trench depend on the dimensions of the infiltration system, leaving a working space of around one metre all the way round, see chapter 5.4. Preparing the trench The trench bed must always be prepared as a level, flat pit with load-bearing capacity.
- Page 29 The infiltration ditch elements are placed in the base plate. The EcoBloc connecting elements are also used in each layer. The EcoBloc Inspect smart is preferably laid with the inspection channel (open side) lying length- ways. EcoBloc Inspect smart modules must be con- nected to the adjoining modules using connectors.
- Page 30 7. Installation After positioning all the blocks, the entire system is enveloped in geotextile. This crucial step serves to prevent the infiltration system from being com- promised by the ingress of dirt particles through backfill. Please note: There is an increased risk of slipping on infiltration ditch elements in frosty and wet conditions.
- Page 31 7. Installation Backfilling the infiltration system Before backfilling the trench, all inlets, vents and shafts must be connected. Ensure that the geotex- tile is not pulled apart. Overlaps must remain in place when backfilling. The blocks must not be driven over directly with construction machinery.
- Page 32 When installing the retention system, check again that no com- paction of the subsoil or silting-up has taken place during the construction phase. It may be necessary to install extra drainage. GRAF will be happy to provide advice on this. 32 / 72...
- Page 33 9. Installation under traffic areas up to HGV60 Installation under traffic areas up to HGV60 Please note: The infiltration ditch modules are in- stalled and connected in accordance with sections 6 and 7. Ventilation heads should be installed in green spaces.
- Page 34 Roller compact, excavator Total weight: approx. 12t min. 0.5 Distributed: evenly, over 2 rollers Dimension: 5.9 x 2.3 min. 0.8 HGV60 vehicles Please contact GRAF in the event of deviation from the materials and equipment stated here. 34 / 72...
- Page 35 11. Other applications 11. Other applications This documentation exclusively pertains to the application of GRAF EcoBloc Inspect smart infiltration ditch modules for the retention, storage, or infiltration of rainwater. Any alternative use of the infiltration ditch modules requires prior agreement with Otto GRAF GmbH, taking into account technical, material, and/or static considerations.
- Page 36 REMARQUES GENERALES SUR LE PRODUIT achetés auprès de GRAF sont tous DONNEES TECHNIQUES accompagnés de notices d’installa- Données techniques de GRAF EcoBloc Inspect smart tion jointes dans l’emballage de Données techniques de la plaque de fond GRAF transport. EcoBloc Inspect smart TRANSPORT ET STOCKAGE CHOIX DE L’EMPLACEMENT...
- Page 37 Remarques sur le fonctionnement du système. Dans le document complémentaire « Notice d’instructions pour l’exploitation et la maintenance du GRAF EcoBloc Inspect smart », vous trouverez en outre des informations complémentaires sur les directives et obligations pour l’exploitant d’un ouvrage d’infiltration.
- Page 38 GRAF EcoBloc Inspect smart 402500 Plaque de fond GRAF EcoBloc Inspect smart 402501 Plaques terminales GRAF EcoBloc Inspect smart 402503 Clips GRAF EcoBloc, p. ex. kit de 25 éléments 420018 Regards Regard GRAF EcoBloc Inspect smart plus 450151 Cône GRAF EcoBloc Inspect smart...
- Page 39 10 kg Matériau 100 % polypropylène (PP), matériau recyclé Recouvrement max. / min. voir tableau 1 Données techniques de la plaque de fond GRAF EcoBloc Inspect smart Volume (brut/net) 24 litres/21 litres Dimensions (Lo x La x Ha) Raccordements Poids 4 kg Matériau...
- Page 40 4. Transport et stockage Transport et stockage Le transport jusqu’au site d’installation peut se faire avec un chariot élévateur à fourche ou similaire. Sur le site d’installation, les éléments de l’ouvrage et les plaques de fond peuvent être déplacés à la main ou à...
- Page 41 5. Choix de l’emplacement Choix de l’emplacement Site L’emplacement de l’ouvrage d’infiltration doit être choisi de sorte que l’eau en sortant ne risque pas d’en- dommager des bâtiments ou d’autres installations à proximité. Pour éviter les phénomènes de ravinement et d’affouillement, les ouvrages d’infiltration doivent toujours être installés à...
- Page 42 5. Choix de l’emplacement Terrain en pente Lors de l’installation d’un système à une distance de moins de 5 m d’une pente, d’un monticule ou d’un remblai avec une pente > 5°, il faudra construire un mur de soutènement issu d’un calcul de résistance statique pour contenir la poussée du terrain.
- Page 43 être choisi en fonction du type de sol pour les profondeurs de cons- Remarque : Si vous avez des questions sur les systèmes de rétention, veuillez vous adresser à l’équipe technique de GRAF. 43 / 72...
- Page 44 SPL 60. Le Tableau 1 présente les recouvrements min. et max. des différentes classes de charge. Les autres situations d’installation doivent toujours être convenues avec GRAF. Des matériaux de remblai (matériaux excavés réutilisés et/ou gravier) d’une densité maximale de 20 kN/m³...
- Page 45 7. Installation Installation Les dimensions de la fouille dépendent des dimensions de l’ouvrage d’infiltration ainsi que de l’espace de travail périphérique, large d’env. 1 mètre (voir chapitre 5.4). Préparation de la fouille Le fond de la fouille doit toujours être préparé...
- Page 46 Inspect smart. Les plaques termi- nales doivent être mises en place en concordance avec le sens d’écriture du logo GRAF. Les arri- vées peuvent être installées au niveau des rac- cords de plaque EcoBloc DN 110, DN 160 ou DN 200.
- Page 47 7. Installation Après avoir positionné tous les blocs, l’ouvrage est complètement enveloppé de géotextile. Le géotextile empêche les particules de saleté de pé- nétrer dans l’ouvrage d’infiltration à travers le ma- tériau de remblai. Veuillez noter : En présence de surfaces mouillées et de gel, risque accru de déraper en mar- chant sur les éléments de l’ouvrage.
- Page 48 7. Installation Remblai de l’ouvrage d’infiltration Toutes les conduites d’alimentation, évents et re- gards doivent être raccordés avant de remblayer la fouille. Veiller à ce que le géotextile ne soit pas dé- chiré. Les chevauchements doivent également être conservés lors du remblayage.
- Page 49 Structure du volume de rétention / de la cuve de rétention Pour un ouvrage de rétention, un régulateur ou un limiteur de débit doit être installé dans un regard séparé. Pour de plus amples informations et des conseils, veuillez contacter le GRAF ou votre partenaire commer- cial local.
- Page 50 9. Installation avec passage véhicules jusqu’à 60 t Installation avec passage véhicules jusqu’à 60 t Consignes : Les blocs posés et assemblés comme décrit aux chapitres 6 et 7. Des évents d’aération doivent être installés dans les espaces verts.
- Page 51 12 t min. 0,5 Réparti sur : uniformément sur 2 rouleaux Dimensions : 5,9 x 2,3 min. 0,8 Poids lourds 60 t Veuillez consulter GRAF en cas de divergence par rapport aux matériaux et appareils mentionnés ci- dessus. 51 / 72...
- Page 52 La présente documentation porte exclusivement sur l’utilisation des corps d’ouvrage GRAF EcoBloc Ins- pect smart pour la rétention, le stockage ou l’infiltration des eaux de pluie. Toute autre utilisation des Eco- Bloc doit être convenue avec Otto GRAF GmbH en ce qui concerne les éléments techniques, matériels et/ou statiques.
- Page 53 INDICACIONES GENERALES SOBRE EL PRODUCTO instrucciones. Todos los artículos DATOS TÉCNICOS adicionales adquiridos a GRAF Datos técnicos del GRAF EcoBloc Inspect Smart vendrán con sus correspondientes Datos técnicos de la base GRAF EcoBloc Inspect instrucciones de instalación en el Smart embalaje de transporte.
- Page 54 Indicaciones sobre el funcionamiento de la instalación En el documento complementario «Instrucciones de uso y mantenimiento del GRAF EcoBloc Inspect Smart» encontrará más información sobre las normativas y directrices para los operadores de sistemas de infiltración. En el mismo documento encontrará también información sobre los elementos filtrantes necesarios para la limpieza previa de las aguas pluviales que capten los canales de infiltración.
- Page 55 450050 Arqueta flexible GRAF Vario 800, tipo 2 450051 Juego de suelo/cono GRAF Vario 800 450052 Módulo de entrada de sistema de infiltración GRAF VS 600 330360 Pieza intermedia GRAF 600, long.: 1100 mm 371015 Cubierta telescópica GRAF 600 Maxi 371011 Cubierta telescópica GRAF 600 Guss...
- Page 56 Material 100 % polipropileno (PP), material reciclado Cobertura de tierra máx./mín. Véase la Tabla 1 Datos técnicos de la base GRAF EcoBloc Inspect Smart Volumen (bruto/neto) 24 litros/21 litros Medidas (L x A x H) 800 x 800 x 40 mm...
- Page 57 4. Transporte y almacenamiento Transporte y almacenamiento Para transportar el sistema hasta el lugar de instalación, se puede utilizar una carretilla elevadora o un dispositivo similar. En el lugar de instalación, los elementos de la zanja de infiltración y las bases se pueden colocar fácilmente a mano o con maquinaria ligera.
- Page 58 5. Selección del lugar de instalación Selección del lugar de instalación Lugar de instalación El lugar elegido para instalar el sistema de infiltración debe cumplir esta condición: si rebosa agua o se produce una fuga, no debe provocar ningún daño a edificaciones ni ninguna otra instalación. Para evitar que se produzcan acumulaciones de agua y riesgo de descalces, los sistemas de infiltración deben ubicarse respetando siempre una distancia mínima 1,5 veces superior a la profundidad de la excavación.
- Page 59 5. Selección del lugar de instalación Montaje en pendiente Si el sistema se va a instalar a menos de 5 m de distancia de una ladera, un montículo o una inclinación con > 5° de pendiente, será preciso levantar un muro de contención para sostener el peso de la tierra, teniendo en cuenta los cálculos de fuerzas estáticas.
- Page 60 1,25 m, en función del tipo de suelo. Observación: Si tiene alguna duda o pregunta acerca de los sistemas de contención y retención, no dude en ponerse en contacto con el departamento técnico de GRAF. 60 / 72...
- Page 61 Si se trabaja con una situación de montaje que difiera de las aquí especificadas, es obligatorio consultar a GRAF. Se necesitan materiales de relleno (material reutilizable extraído de la excavación y/o grava) con un peso específico máximo de 20 kN/m³.
- Page 62 7. Instalación Instalación Las medidas de excavación deben ajustarse a las dimensiones del sistema de infiltración y tener en cuenta el espacio de trabajo que debe rodearlo, según se indica en el apartado 5.4. Preparación de la zanja de excavación La base de la excavación debe prepararse sobre un plano horizontal, uniforme y resistente.
- Page 63 El sistema EcoBloc Inspect Smart se instala provisionalmente con el canal de inspección (por su lado abierto) en sentido longitudinal. Los módulos EcoBloc Inspect Smart deben unirse a los módulos adyacentes con la ayuda de conectores. Las siguientes capas de módulos deben instalarse sobre los módulos ya colocados según se indica en la...
- Page 64 7. Instalación Después de posicionar todos los bloques, se cubrirá todo el sistema con geotextil. El geotextil evita que se filtren partículas de suciedad en el sistema de infiltración a través del material de relleno Por favor, tenga en cuenta que: En caso de heladas o condiciones de humedad, será...
- Page 65 7. Instalación Relleno del sistema de infiltración Antes de rellenar la excavación, deben estar cerradas todas las tuberías de entrada, de aireación y las arquetas. Hay que prestar atención a que el geotextil no se haya estirado. Los solapamientos deben mantenerse también durante el llenado.
- Page 66 Dado el caso, puede ser necesario instalar un drenaje adicional. La empresa GRAF le asesorará sin problemas. 66 / 72...
- Page 67 9. Instalación bajo superficies transitables por vehículos pesados de hasta 60 t (SLW60) Instalación bajo superficies transitables por vehículos pesados de hasta 60 t (SLW60) Indicaciones: Los cuerpos de la zanja de infiltración se instalan y se conectan de conformidad con lo que se describe en los apartados 6 y 7.
- Page 68 De forma uniforme en 2 rodillos Dimensiones: 5,9 x 2,3 Vehículos pesados de hasta 60 t (SLW 60 T) mín. 0,8 Por favor, si usa materiales o dispositivos diferentes a los que aquí se nombran, consúltelo con GRAF 68 / 72...
- Page 69 Smart, cuerpos de sistema de infiltración para la retención, almacenamiento o infiltración del agua de lluvia. Cualquier otro uso de los cuerpos del sistema de infiltración debe consultarse con Otto GRAF GmbH respecto a consideraciones técnicas, estadísticas y de materiales.
- Page 70 Notizen / Notes / Notes / Notas 70 / 72...
- Page 71 71 / 72...
- Page 72 4 0 2 3 1 2 2 2 9 9 6 0 8 963307 72 / 72...