Table des Matières
Publicité
Les langues disponibles
Les langues disponibles
Liens rapides
FERRUM
RESISTENT 3590, 3610
D
A
CH
Gebrauchsanleitung. . . . . . . . . . . . . . . . . . . . . . . . . . . . . . . 6
GB
IRL AUS
USA
Instructions for Use . . . . . . . . . . . . . . . . . . . . . . . . . . . . . . 12
F CH B NL CDN
Mode d'emploi . . . . . . . . . . . . . . . . . . . . . . . . . . . . . . . . . . 18
NL
B
Gebruiksaanwijzing . . . . . . . . . . . . . . . . . . . . . . . . . . . . . . 24
E
MEX
Instrucciones de uso . . . . . . . . . . . . . . . . . . . . . . . . . . . . . 30
I
CH
Istruzioni per l'uso . . . . . . . . . . . . . . . . . . . . . . . . . . . . . . . 36
3560, 3580
NZ CDN IND
MESTO Spritzenfabrik
Ernst Stockburger GmbH
Ludwigsburger Straße 71
D 71691 Freiberg/Neckar
Tel : +49 71 41 27 20
Fax :+49 71 41 27 21 00
info@mesto.de
www.mesto.de
Publicité
Table des Matières

Manuels Connexes pour Mesto FERRUM 3560


Sommaire des Matières pour Mesto FERRUM 3560
- Page 1 3560, 3580 RESISTENT 3590, 3610 MESTO Spritzenfabrik Gebrauchsanleitung....... 6 Ernst Stockburger GmbH Ludwigsburger Straße 71...
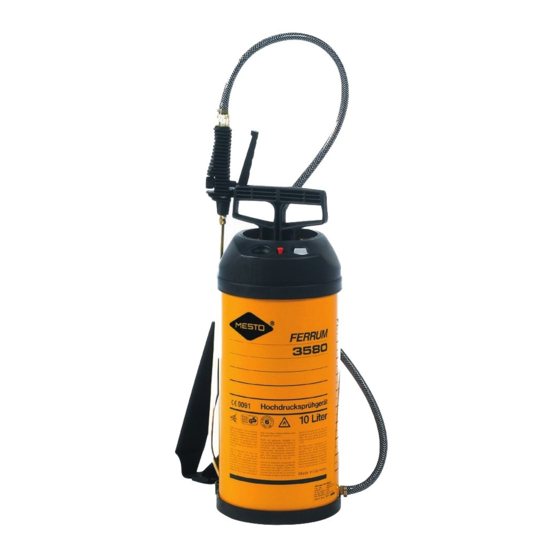
- Page 2 Ersatzteile Spare Parts Pièces de Rechange Varaosat Reserve-onderdelen Varuosade Pezzi di ricambio Reservdelar Reservedele FERRUM 3560 FERRUM 3580G, 3580 RESISTENT 3590 RESISTENT 3610G, 3610 www.mesto.de...
- Page 3 FERRUM 3560 FERRUM 3580G, 3580 RESISTENT 3590 RESISTENT 3610G, 3610...
- Page 6 Herzlichen Glückwunsch zu Ihrem neuen MESTO-Sprühgerät und Danke für das Vertrauen in unsere Marke. Ihre Zufriedenheit mit den Produkten und dem Service von MESTO ist uns sehr wichtig. Wir bitten um eine Rückmeldung, sollten Ihre Erwartungen nicht erfüllt sein. Lesen Sie die Gebrauchsanleitung vor der Verwendung des Gerätes! Bewahren Sie die Gebrauchsanleitung gut auf.
-
Page 7: Lieferumfang
Stellen Sie sicher, dass das Gerät nicht über die maximale Betriebstempe- ratur erwärmt wird. Blasen Sie Düsen oder Ventile niemals mit dem Mund durch. Verwenden Sie nur Ersatz- und Zubehörteile von MESTO. Für Schäden durch Verwendung von Fremdteilen übernehmen wir keine Haftung. - Page 8 Zusammenbauen 1. Befestigen Sie den/die Tragriemen [5] am Behälter [2]. [9] fest ein. 3. Schrauben Sie das Spritzrohr [7] auf das Abstellventil [8]. Prüfen Sichtkontrolle: Sind Behälter [2], Pumpe [4], Spritzleitung [6] mit Abstellventil [8], Ma- nometer [14 und 15] und Spritzrohr [7] unbeschädigt? Dichtheit: Pumpen Sie das leere Gerät auf 2 bar auf.
-
Page 9: Nach Gebrauch
Sprühen Beachten Sie die Hinweise im Kapitel „Sicherheit“. Betreiben Sie das Gerät nur senkrecht bzw. steil aufrecht hängend. Vermeiden Sie die Abdrift von Sprühtröpfchen auf nicht zu behandelnde Flächen. Achten Sie auf die Vorschriften des Mittelherstellers! 1. Hängen Sie das Gerät über die Schulter bzw. setzen Sie es auf den Rücken. Druckregulierung am Abstellventil nicht einstellbar 3. - Page 10 Beachten Sie die Hinweise im Kapitel „Sicherheit“. Nach 50-maligem Gebrauch, mindestens einmal jährlich: • Bauen Sie die Pumpe [4] auseinander und fetten Sie die Manschette [17]. • Nehmen Sie den Filter [20] zwischen Abstellventil [8] und Schlauch [6] heraus und reini- •...
-
Page 11: Garantie
Wir garantieren, dass ab dem Zeitpunkt des Ersterwerbs für den Zeitraum der jeweilig gül- Verarbeitungsfehler aufweist. Sollten sich während der Garantiezeit Mängel herausstellen, wird MESTO oder der Distributeur in Ihrem Land ohne Berechnung der Arbeits- und Ma- schadhaften Teile ersetzen. - Page 12 Liquids containing ammonia • Solvents and liquids containing solvents Under no circumstances should you use • external pressure sources without a MESTO compressed air valve • for storing and holding liquids Safety Children and adolescents must not use the device.
-
Page 13: Scope Of Delivery
nature to an explosion. Never place such agents in the device. operating temperature. Wear suitable protective equipment when working with hazardous substan- ces. Collect and dispose of the residual liquid according to all applicable laws, product manufacturer! Scope of delivery Technical information Device family FERRUM... -
Page 14: Making Preparations
Assembly wrench Checks Visual inspection: No leaks: Function: Making preparations the tank 2. Press the pump handle [11] down and turn it counterclockwise. 3. Unscrew the pump [4] from the tank [2] 5. Screw the pump [4] onto the tank [2] 6. -
Page 15: After Usage
Spraying vertical. on the pressure gauge [14]. Spraying pressure Spraying quantity with nozzle 1302 1.5 bar 0.49 l/min 2.0 bar 0.56 l/min 3.0 bar 0.69 l/min 3. Turn the red „DOSICONTROL“ adjusting wheel [16] („+“ higher pressure, and readjust if 5. -
Page 16: Care And Maintenance
Care and maintenance • Disassemble the pump [4] and grease the diaphragm [17] ing water • Grease the O-rings [22] and [23] the device in regular intervals. Faults parts pouch [3], Fault Cause Remedy No pressure builds up in The pump is not screwed on the device. -
Page 17: Ce Declaration Of Conformity
Warrantee processing errors. If defects are discovered during the warrantee period, MESTO or the cash register receipt for purchase of the device. fects that occur due to improper use or unforeseeable circumstances. CE Declaration of Conformity MESTO Spritzenfabrik Ernst Stockburger GmbH Ludwigsburger Straße 71... -
Page 18: Toutes Nos Félicitations
Toutes nos félicitations pour l‘achat de votre nouveau pulvérisateur MESTO et tous nos remerciements pour la Votre satisfaction en ce qui concerne les produits et le service de MESTO est très impor- tante pour nous. Nous vous serions reconnaissants de nous informer si vos attentes devaient être déçues. -
Page 19: Etendue De La Livraison
Ne laissez jamais l‘appareil sous pression et / ou exposé au soleil. Assurez- de service. Utilisez uniquement des pièces de rechange et accessoires de MESTO. Nous déclinons toute responsabilité en cas d‘utilisation de pièces d‘autres fabricants. Portez un équipement de protection approprié lors de la manipulation de substances dangereuses. -
Page 20: Assemblage
Assemblage 1. Fixez la ou les courroies de transport [5] au récipient [2]. clé de 16. 3. Vissez le tube de pulvérisation [7] sur la soupape d‘arrêt [8]. Contrôler Contrôle visuel : d‘arrêt [8], le manomètre [14 et 15] et le tube de pulvérisation [7] sont-ils intacts ? Etanchéité... -
Page 21: Pulvérisation
Pulvérisation Respectez les indications du chapitre « Sécurité ». Utilisez l‘appareil uniquement de pulvérisation vers des surfaces qui ne doivent pas être traitées. Respectez les prescriptions du fabricant du produit ! 2. Actionnez la soupape d‘arrêt [8]. La régulation de la pression n‘est pas réglable sur la soupape d‘arrêt au manomètre [14]. -
Page 22: Maintenance Et Nettoyage
2 ans, pour un contrôle intérieur tous les 5 ans et pour un essai de résistance tous les 10 ans. Défauts Utilisez uniquement des pièces de rechange et accessoires de MESTO (vous en trouverez quelques-unes dans le sac de pièces de rechange [3], Défaut Cause Remède... -
Page 23: Déclaration De Conformité Ce
Déclaration de conformité CE selon les directives CE sur les machines 2006/42/CE, annexe II, N° 1A. Nous, la société MESTO Spritzenfabrik Ernst Stockburger GmbH Ludwigsburger Straße 71 D-71691 Freiberg déclarons sous notre entière responsabilité que les produits, pulvérisateurs haute pression dent dans leur version livrée aux dispositions pertinentes de la directive 2006/42/CE. -
Page 24: Hartelijk Gefeliciteerd
Hartelijk gefeliciteerd met uw nieuwe MESTO-spuit en hartelijk dank voor uw vertrouwen in ons merk. Uw tevredenheid met de producten en de service van MESTO zijn voor ons van uitermate groot belang. Wij verzoeken u om contact op te nemen, indien niet aan uw verwachtingen wordt voldaan. -
Page 25: Omvang Levering
Blaas sproeiers of ventielen nooit met de mond door. Gebruik alleen reserveonderdelen en toebehoren van MESTO. Voor schade doordat gebruik is gemaakt van onderdelen die niet bij MES- TO vandaan komen, kunnen wij niet aansprakelijk worden gesteld. - Page 26 Monteren 1. Bevestig de draagriem [5] aan het reservoir [2]. [9]. 3. Draai de sproeibuis [7] op het uitzetventiel [8]. Controleren Zichtcontrole: Zijn reservoir [2], pomp [4], sproeileiding [6] met uitzetventiel [8], mano- meter [14 en 15] en sproeibuis [7] onbeschadigd? Afdichting: Pomp het lege apparaat op tot 2 bar.
-
Page 27: Na Het Gebruik
Sproeien Neem de aanwijzingen in het hoofdstuk „Veiligheid“ in acht. Gebruik het apparaat alleen rechtop c.q. steil rechtop hangend. Voorkom het wegdriften van sproeidruppeltjes naar niet te behandelen oppervl- akken. Neem de voorschriften van de fabrikant van de middelen in acht! 1. - Page 28 2 jaar een controle van de buitenkant en iedere 5 jaar een inwendige controle, evenals iedere 10 jaar een sterktetest door een deskundige te laten uitvoeren. Storingen Maak alleen gebruik van reserveonderdelen en toebehoren van MESTO (enkele daarvan zitten in de reserveonderdelenzak [3], Storing...
-
Page 29: Ce-Verklaring Van Overeenstemming
Garantie Wij garanderen dat vanaf het tijdstip dat het apparaat nieuw is gekocht gedurende een garantieperiode gebreken worden geconstateerd, zal MESTO of de distributeur in uw land zonder berekening van arbeidsloon en materiaalkosten het apparaat repareren (volgens de Wij verzoeken u om in dergelijke gevallen contact met ons op te nemen. Wij verzoeken u de rekening of de kassabon met betrekking tot de aankoop van het apparaat te overleg- gen. - Page 30 Lea las instrucciones de uso antes de la utilización del aparato. Guarde adecuadamente las instrucciones de uso. Utilización Los pulverizadores FERRUM 3560, 3580 e RESISTENT 3590, 3610 han sido diseñados mente ventilados. graves. Utilice otros productos sólo cuando se garantice que no existen efectos dañinos sobre el nos una lista de los materiales utilizados en el pulverizador.
-
Page 31: Volumen De Suministro
La válvula de seguridad no debe anularse. En caso de que los materiales del pulverizador entren en contacto con pueden producirse aumentos de presión como una explosión. Nunca utilice este tipo de productos. Las piezas dañadas o que no funcionen deberán sustituirse de inmediato por nuestro Servicio Técnico o por un centro de servicio técnico autorizado por nosotros. - Page 32 Ensamblaje Comprobación Control visual: daños? Estanqueidad: Función: Tire del botón rojo de la válvula de seguridad [10]. Accione la válvula de desconexión [8]. Preparación Tenga en cuenta las indicaciones del capítulo „Seguridad“. 1. Tire hacia arriba del botón rojo de la válvula de seguridad [10] hasta que el depósito se jas del reloj.
-
Page 33: Después De La Utilización
agujas del reloj. Pulverización Tenga en cuenta las indicaciones del capítulo „Seguridad“. El aparato sólo deberá funcionar en posición vertical o suspendido en vertical. tratarse. Tenga en cuenta las prescripciones del fabricante del producto. 1. Cuélguese el aparato al hombro o colóqueselo sobre la espalda. 2. -
Page 34: Mantenimiento Y Cuidados
cante del producto. 5. Limpie el aparato con un paño húmedo. Mantenimiento y cuidados Tenga en cuenta las indicaciones del capítulo „Seguridad“. Después de 50 utilizaciones, al menos una vez al año: comprobación interior cada 5 años, así como la realización de una prueba de resistencia cada 10 años a través de un experto. -
Page 35: Declaración De Conformidad Ce
Dirección de contacto para mayor información Garantía tiempo de garantía, MESTO o el distribuidor en su país repararán o (de acuerdo con el En tal caso, rogamos se pongan en contacto inmediatamente con nosotros. Necesitare- mos la factura o el tiquet de compra del aparato. - Page 36 Congratulazioni per la nostra marca. Diamo molta importanza alla vostra soddisfazione con i prodotti e il servizio della MESTO. Qualora non fossero soddisfatte le vostre aspettative, vi preghiamo di informarci in merito. Il nostro indirizzo si trova sulla prima pagina delle presenti istruzioni per l‘uso.
-
Page 37: Dati Tecnici
Accertarsi di non surriscaldare l‘apparecchio oltre la massima temperatura di esercizio consentita. Utilizzare esclusivamente pezzi di ricambio e accessori della MESTO. Per danni attribuibili all‘utilizzo di pezzi di fabbricazione altrui non ci potre- Durante la manipolazione con sostanze pericolose si raccomanda di porta- re degli indumenti di protezione adeguati. - Page 38 Assemblaggio 1. Fissare la/le cinghia/e a tracolla [5] al serbatoio [2]. 2. Avvitare strettamente la condotta di spruzzatura [6] per mezzo di una chiave del 16 all‘apertura di scarico [9]. 3. Avvitare la lancia di spruzzatura [7] sulla valvola d‘arresto [8]. Controllo Controllo visivo: Il serbatoio [2], la pompa [4], la condotta di spruzzatura [6] e la valvola d‘arresto [8], il manometro [14 e 15] e la lancia di spruzzatura [7] sono intatti?
- Page 39 8. Premere verso il basso la manopola della pompa [11] e girarla quindi in senso antiorario. Spruzzatura Osservare le avvertenze riportate al capitolo „Sicurezza“. Utilizzare l‘apparecchio solo in perpendicolare ovvero sospesa in posizione verticale scoscesa. Osservare le prescrizioni fornite dal produttore della sostanza utilizzata! 1.
-
Page 40: Pulizia E Manutenzione
2 anni un controllo visivo esterno e un controllo interno ogni 5 anni, nonché Anomalie Si raccomanda di utilizzare esclusivamente pezzi di ricambio e accessori origina- li della MESTO (alcuni di questi si trovano nel sacchetto dei pezzi di ricambio [3], Anomalia Causa... -
Page 41: Dichiarazione Di Conformità Ce
Indirizzo di contatto per maggiori informazioni Garanzia Dal momento del primo acquisto per il periodo relativo all‘obbligo di concessione di garanzia durante il periodo di garanzia, la MESTO o il distributore competente nel rispettivo paese di componenti danneggiati. ricevuta relativa all‘acquisto dell‘apparecchio.