Publicité
Liens rapides
instaLLatiOn instructiOns
GuiDE D'instaLLatiOn
Guía DE instaLación
read all instructions carefully before proceeding.
Lire toutes les instructions attentivement avant de commencer
l'installation.
Leer detenidamente todas las instrucciones antes de comenzar
la instalación.
important
• record the serial number
important
• noter le numéro de série
importante
• registre el número de serie
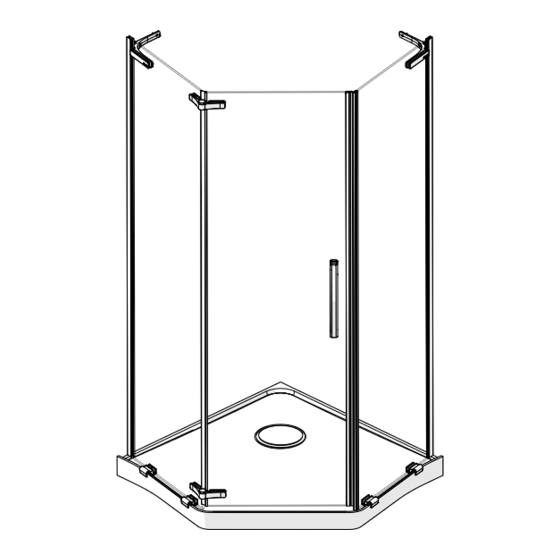
FOr riGht anD LEFt siDE DOOr instaLLatiOn
(LEFT sidE shown)
POur instaLLatiOn DE POrtE côté DrOit Et GauchE
(côTé GAUchE iLLUsTRé)
Para La instaLación DE La PuErta DEL LaDO DErEchO E izquiErDO
(sE mUEsTRA insTALAciÓn AL LAdo iZQUiERdo)
MODEL • MODÈLE • MODELO
105759 • 105753
Save thiS guide for future reference.
conServer pour un uSage ultérieur.
conServe eSte manual como referencia.
serial number • numéro de série • número de serie
26
Publicité

Manuels Connexes pour MAAX 105759


Sommaire des Matières pour MAAX 105759
- Page 1 Para La instaLación DE La PuErta DEL LaDO DErEchO E izquiErDO (sE mUEsTRA insTALAciÓn AL LAdo iZQUiERdo) MODEL • MODÈLE • MODELO 105759 • 105753 read all instructions carefully before proceeding. Save thiS guide for future reference. conServer pour un uSage ultérieur.
- Page 2 Parts PiÈcEs PiEzas anD cOMPOnEnts Et cOMPOsantEs Y cOMPOnEntEs...
- Page 3 Parts PiÈcEs PiEzas anD cOMPOnEnts Et cOMPOsantEs Y cOMPOnEntEs...
- Page 4 Parts PiÈcEs PiEzas anD cOMPOnEnts Et cOMPOsantEs Y cOMPOnEntEs Part nom de la pièce Pieza code cant. Bottom bracket support en bas soporte inferior 10068129-084-600 Base Base Base 10029022-001-600 Fixed panel Panneau fixe Panel fijo 10044681-900 supports des soportes de las wall jamb supports 10041530-084-600 montants muraux...
- Page 5 tOOLs OutiLs hErraMiEntas rEquirED rEquis nEcEsarias Electric drill Level Pencil Perceuse électrique Niveau Crayon Taladro eléctrico Nivel Lápiz ¼" ceramic drill bit Clear silicone sealant Masking tape Mèche à céramique Silicone claire de ¼ po. Ruban adhésif Broca para ceramica Sellador de silicona Cinta de de ¼"...
- Page 6 BEFOrE aVant antEs YOu BEGin DE cOMMEncEr DE cOMEnzar A two person installation is recommended. une installation par deux personnes est recommandé. Se recomienda realizar la instalacion entre dos personas. a. Before beginning the installation, make sure that the door and panel fit within the shower enclosure.
- Page 7 instaLLatiOn | instaLación STEP ÉTAPE ETAPA a. if necessary, remove finished wall to expose studs. confirm that the walls are vertical (plumb) within 3/8", square, and that the floor is level. B. The pipe should be 2" diameter (outside diameter should be 2-3/8") and centered 12"...
- Page 8 instaLLatiOn | instaLación STEP ÉTAPE ETAPA a. draw layout lines. For side layout lines, measure 38" from the corner, top and bottom. For top layout lines, measure 81" from the floor. B. Expose the wall studs by removing all of the finished wall contained within the layout lines.
- Page 9 instaLLatiOn | instaLación STEP ÉTAPE ETAPA a. install the base (2) directly against the studs and confirm that the drain pipe is centered in the drain head. B. with a 3/16" bit, drill holes in the base flange then secure the base to the wall studs with #8 x 1¼ " screws.
- Page 10 instaLLatiOn | instaLación header Left side shown STEP Linteau coté gauche illustré ÉTAPE Dintel Vista del lado izquierdo ETAPA in order to properly secure the wall kit, it is necessary to add additional structural members to the existing stud wall. Layout the locations for the centers of the structural studs. Then install horizontal 2"...
- Page 11 instaLLatiOn | instaLación STEP ÉTAPE ETAPA a. Apply a bead of silicone sealant along the mating surfaces. The bead of silicone should be located towards the insidE of the assembly holes, as shown. For best results, the silicone should be applied in one continuous bead.
- Page 12 instaLLatiOn | instaLación Ø 3/16" STEP ÉTAPE ETAPA a. Apply a bead of silicone sealant to the top of the base as shown. This will create a watertight seal between the base and the wall kit. B. Lift the entire assembled wall kit and place against the stud wall and down onto the base.
- Page 13 instaLLatiOn | instaLación STEP ÉTAPE ETAPA Remove the plastic film completely from the fastening flange. install drywall down to the top of the fastening flange as shown below. The ceramic tiles must completely cover the fastening flange. Finish the joint between the base and the wall covering with a silicone sealant.
- Page 14 instaLLatiOn | instaLación A two person installation is recommended. une installation par deux personnes est recommandé. Se recomienda realizar la instalación entre dos personas. STEP ÉTAPE ETAPA a. cut the bottom bracket gaskets as shown. B. insert one of the gaskets with the bottom bracket (1) into the threshold of the base (2).
- Page 15 instaLLatiOn | instaLación STEP ÉTAPE ETAPA a. separate the wall jamb supports (4) from the wall jambs (5) using the Allen key 2.5mm. Position and level both wall jamb supports (4) in the previously marked positions. B. mark the fastening holes. check position with the level. c.
- Page 16 instaLLatiOn | instaLación STEP ÉTAPE ETAPA a. Fasten the corner bracket to the fixed panels (3) and (9) as shown. Use the allen key 4mm to tighten the screws. do not tighten completely to allow adjustement. B. mark the fastening holes on the walls. c.
- Page 17 Bushing top view, for right or left installation coussinet de pivot, pour installation a doite ou gauche instaLLatiOn | instaLación Eje del buje, para instalación a la derecha o izquierda STEP ÉTAPE ETAPA a. install the door gasket (12) on the hinge side of the door and door gasket (15) at the bottom of the door.
- Page 18 instaLLatiOn | instaLación STEP ÉTAPE ETAPA a. insert the magnetic door gasket (13) on the door (10) and the adjustable magnetic gasket (14) on the fixed panel (9) as shown. B. cut the excess from the magnetic gaskets (13) and (14). c.
- Page 19 instaLLatiOn | instaLación STEP ÉTAPE ETAPA a. install the handle (11) on the door (10) as shown using a phillips screwdriver and the 2mm Allen key. a. installer la poignée (11) sur la porte (10) tel que démontré avec un tournevis phillips et la clé...
- Page 20 instaLLatiOn | instaLación STEP ÉTAPE ETAPA a. Fixed panel Ajustement relative to the door, occlusion door with the magnet. B. once the occlusion of the door is satisfactory, screw insidE the brackets (1) and (7). do not overtighten the inTéRiEUR screws to avoid breaking the glass panels.
- Page 21 instaLLatiOn | instaLación STEP ÉTAPE ETAPA a. From outside the shower, apply silicone sealant between the wall jambs (5) and the walls. B. Apply a 100mm silicone sealant line at the bottom between the wall jamb (4) and the small fixed panels (3) and (9).
- Page 22 instaLLatiOn | instaLación STEP if the optional walls were installed this last step is ÉTAPE necessary ETAPA si les murs en option on été installés cette der- nière étape est nécessaire a. From outside the shower, apply silicone sealant Si las paredes opcionales fueron instaladas este between the base (2) and the acrylic walls.
- Page 23 Except in the case of mAAX products with pre-plumbed fixtures, mAAX shall in no event sauf dans le cas des produits mAAX munis...
- Page 24 / service technique / servicio técnico t. 1 888 304-4388 F. 1 877 636-6250 10049217 © 2008 MaaX Bath inc. PrintED in canaDa / iMPriMé au canaDa / iMPrEsO En canaDa 2013-05-13...