
Manuels Connexes pour Amici FRANCISFRANCIS Y5 milk IPERESPRESSO


Sommaire des Matières pour Amici FRANCISFRANCIS Y5 milk IPERESPRESSO
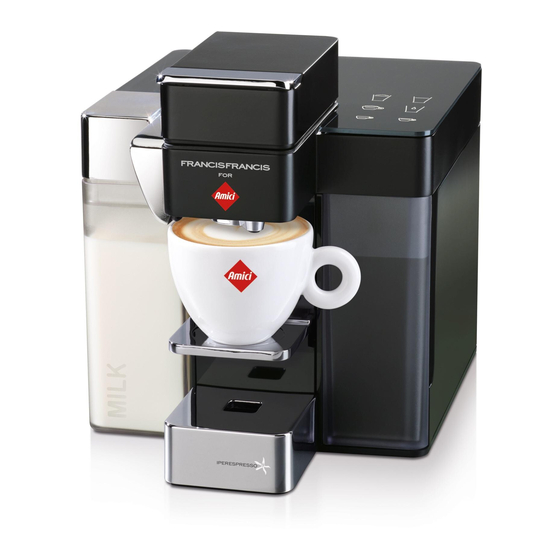
- Page 1 INSTRUCTION MANUAL - MANUALE DI ISTRUZIONI BEDIENUNGSANLEITUNG - MANUEL D’UTILISATION...
-
Page 2: General Machine Operating Rules
Dimensioni (L x P x A) (mm): 215 x 285 x 245 Il produttore si riserva il diritto d’apportare modifi che o miglioramenti senza preavviso. ACQUISTA LE CAPSULE AMICI DIRETTAMENTE AL NUMERO 041 854 41 41 E SUL SITO WWW.AMICI.CH O DAL DISTRIBUTORE ESCLUSIVO... -
Page 3: Table Des Matières
CONTENTS GENERAL MACHINE OPERATING RULES ...............2 ADJUSTING CAPPUCCINO QUANTITY ..............24 TECHNICAL SPECIFICATIONS ................2 PREPARING LATTE MACCHIATO .................25 MACHINE PARTS ....................4 ADJUSTING LATTE MACCHIATO QUANTITY ............27 DISHWASHER SUITABILITY ................5 PREPARING HOT FOAMED MILK ................28 ... -
Page 4: Machine Parts
MACHINE PARTS ILLUMINATION LIGHT CAPSULE COMPARTMENT OPENING/ CLOSING LEVER HOT WATER DISPENSING SPOUT CAPSULE COMPARTMENT (internal) COFFEE DISPENSING SPOUT WATER TANK MILK DISPENSING SPOUT CONNECTOR USED CAPSULE (MAX. 10 PCS) and MILK DISPENSING SPOUT post-brewing liquid residues TRAY MILK TANK ESPRESSO CUP HOLDER SURFACE CONTROL PANEL MUG HOLDER SURFACE... -
Page 5: Dishwasher Suitability
DISHWASHER SUITABILITY IDONEITA’ LAVASTOVIGLIE... -
Page 6: Important Warnings
IMPORTANT WARNINGS When using electrical appliances always follow the safety precau- • hotels, motels and other residential type environments; tions below. • bed and breakfast type environments. - This machine is intended for household use only. Any other use Using the espresso machine is considered improper and therefore dangerous. - Page 7 IMPORTANT WARNINGS insuffi cient experience and/or skills, unless they are supervised any other liquid. by a person responsible for their safety, who provides instructions - Do not place the machine on, or on how to use the appliance. near, electrical or gas burners or - Children must be kept under supervision to prevent them from inside a hot oven.
-
Page 8: Installation Of The Machine
IMPORTANT WARNINGS - Do not carry or pull the coff ee machine by the cord. Installation of the machine - To reduce the risk of injury, do not drape cord over the counter - Read the instructions carefully. top or table top where it can be pulled on by children or tripped - Do not install the machine in an area where the temperature may over unintentionally. -
Page 9: Cleaning The Machine
IMPORTANT WARNINGS - Place the machine on a countertop away from water taps and Cleaning the machine sinks. - Unplug the machine before cleaning. - After removing the packaging, check that the appliance is in - Wait until the machine is cool before cleaning. perfect condition before installation. -
Page 10: In Case Of Malfunctioning
IMPORTANT WARNINGS In case of malfunctioning the safe operation of the machine and will result in the forfeiture of warranty rights. Do not use the appliance if the cord or plug are damaged or if the appliance shows signs of malfunctioning or has been damaged in Improper use of the appliance any way. - Page 11 Power-supply cord instructions 2) If the appliance is of the grounded type, the extension cord should be a grounding-type 3-wire cord; and a) A short power-supply cord is to be provided to reduce risks resul- 3) The longer cord should be arranged so that it will not drape ting from becoming entangled in or tripping over a longer cord.
-
Page 12: Installation And Start-Up Of The Machine
INSTALLATION AND START-UP OF THE MACHINE INSTALLAZIONE E MESSA IN FUNZIONE DELLA MACCHINA Remove the milk and water tanks and wash them thoroughly before use. Fill the water tank with fresh drinking water up Insert the water tank completely into the machine. to the MAX level. - Page 13 INSTALLATION AND START-UP OF THE MACHINE INSTALLAZIONE E MESSA IN FUNZIONE DELLA MACCHINA The machine automatically enters Power Save mode after 10 minutes of inactivity. button blinks slowly. Touch any button to turn on the machine again. Dopo 10 minuti d’inutilizzo la macchina entra automaticamente in modalità Power Save. Il tasto lampeggia lentamente.
-
Page 14: Capsules Range
CAPSULES RANGE With this machine you can use both Iperespresso ESPRESSO and FILTER COFFEE capsules. VARIETA’ CAPSULE Con questa macchina è possibile utilizzare capsule Iperespresso sia ESPRESSO che CAFFÈ ALL’AMERICANA. Iperespresso ESPRESSO capsules. Use Iperespresso Espresso capsules for preparing espresso, cappuccino and latte macchiato. If you accidentally select when using FILTER COFFEE capsules or when using ESPRESSO capsules, we suggest to repeat the process by matching cor-... -
Page 15: Preparing Espresso
PREPARING ESPRESSO PREPARAZIONE DELL’ESPRESSO For espresso preparation, use only Iperespresso All buttons are steady on. Disengage the lever. Lift the lever. ESPRESSO capsules. Per questo tipo di preparazione utilizzare esclusiva- Tutti i tasti sono accesi fi ssi. Sganciare la leva. Sollevare la leva. -
Page 16: Recommendations
PREPARING ESPRESSO PREPARAZIONE DELL’ESPRESSO Place the espresso cup on the cup holder. Press to brew an espresso coff ee, the machine Brewing will stop automatically. gives out an acoustic signal. Posizionare la tazzina espresso. L’ e rogazione termina automaticamente. Premere per erogare un espresso, la macchina emette un segnale acustico. -
Page 17: Preparing Brewed Coffee
PREPARING BREWED COFFEE PREPARAZIONE DEL CAFFÈ ALL’AMERICANA Only use Iperespresso FILTER COFFEE capsules to All buttons are steady on. Disengage the lever. Lift the lever. prepare brewed coff ee. Per questo tipo di preparazione utilizzare solo Tutti i tasti sono accesi fi ssi. Sganciare la leva. -
Page 18: Recommendations
PREPARING BREWED COFFEE PREPARAZIONE DEL CAFFÈ ALL’AMERICANA Flip the cup holder tray up and place a mug on Brewing will stop automatically. Press to brew a brewed coff ee, the machine the mug holder. gives out an acoustic signal. Sollevare il supporto e posizionare una tazza grande L’... -
Page 19: Programming Your Custom Volume/Quantity Setting
PROGRAMMING YOUR CUSTOM VOLUME/QUANTITY SETTING REGOLAZIONE QUANTITÀ DI CAFFÈ IN TAZZA Insert the capsule. Lock by lowering the lever. Press and hold during the entire brewing Release when the desired quantity of coff ee is reached. process to save the volume in the cup. Inserire la capsula. -
Page 20: Using The Milk Tank And The Milk Dispensing Spout
USING THE MILK TANK AND THE MILK DISPENSING SPOUT UTILIZZO DEL SERBATOIO ED EROGATORE LATTE Remove the milk tank lid. Fill the tank with milk up to the MAX level. Make sure that the dispensing spout is fully in- Attach the milk dispensing spout to the machine serted into the milk tank lid. - Page 21 USING THE MILK TANK AND THE MILK DISPENSING SPOUT UTILIZZO DEL SERBATOIO ED EROGATORE LATTE Attach the tank to the milk dispensing spout until When the tank is attached, milk-based beverages If there is any leftover milk in the tank after pre- Remove the milk dispensing spout and rinse it as it locks into place.
-
Page 22: Preparing Cappuccino
PREPARING CAPPUCCINO PREPARAZIONE DEL CAPPUCCINO Attach the milk dispensing spout and milk tank For cappuccino preparation, use only Iperespresso Insert the capsule. Choose the holder position according to the cup as shown in the “USING THE MILK TANK AND THE ESPRESSO capsules. - Page 23 PREPARING CAPPUCCINO PREPARAZIONE DEL CAPPUCCINO Check that all buttons are steady on. The machine starts brewing coff ee into the cup. Once coff ee has been brewed, frothed milk dispen- Brewing will stop automatically. sing will automatically start after a few seconds. Press to brew a cappuccino.
-
Page 24: Adjusting Cappuccino Quantity
ADJUSTING CAPPUCCINO QUANTITY REGOLAZIONE QUANTITÀ DI CAPPUCCINO Attach the milk dispensing spout and milk tank Insert the capsule. Choose the holder position according to the cup Keep the button pressed. The machine gives as shown in the “USING THE MILK TANK AND THE type. -
Page 25: Preparing Latte Macchiato
PREPARING LATTE MACCHIATO PREPARAZIONE DEL LATTE MACCHIATO Attach the milk dispensing spout and milk tank For latte macchiato preparation, use only Iperes- Insert the capsule. Lift the holder and position a mug. as shown in the “USING THE MILK TANK AND THE presso ESPRESSO capsules. - Page 26 PREPARING LATTE MACCHIATO PREPARAZIONE DEL LATTE MACCHIATO Check that all buttons are steady on. After a few seconds the machine begins to dispen- Once milk has been dispensed, the machine will Brewing will stop automatically. se hot milk in the cup. automatically start brewing coff ee.
-
Page 27: Adjusting Latte Macchiato Quantity
ADJUSTING LATTE MACCHIATO QUANTITY REGOLAZIONE QUANTITÀ DI LATTE MACCHIATO Attach the milk dispensing spout and milk tank Insert the capsule. Lift the holder and position a mug. Keep the button pressed. The machine gives as shown in the “USING THE MILK TANK AND THE out an acoustic signal. -
Page 28: Preparing Hot Foamed Milk
PREPARING HOT FOAMED MILK PREPARAZIONE DEL LATTE CALDO SCHIUMATO Attach the milk dispensing spout and milk tank Lift the holder and position a mug. Check that all buttons are steady on. After a few seconds, the machine begins to di- as shown in the “USING THE MILK TANK AND THE spense hot milk in the cup. -
Page 29: Adjusting Hot Foamed Milk Quantity
ADJUSTING HOT FOAMED MILK QUANTITY REGOLAZIONE QUANTITÀ DI LATTE CALDO SCHIUMATO Attach the milk dispensing spout and milk tank Lift the holder and position a mug. Release the button when the desired quantity of Press and hold the button. as shown in the “USING THE MILK TANK AND THE hot milk is reached. -
Page 30: Dispensing Hot Water
DISPENSING HOT WATER EROGAZIONE ACQUA CALDA Make sure there is enough water in the tank. Lift the holder and position a mug. Check that all buttons are steady on. When the saved quantity is reached dispensing will stop automatically. Press the button to dispense hot water. -
Page 31: Cleaning And Maintenance
CLEANING AND MAINTENANCE PULIZIA E MANUTENZIONE Turn off the machine and unplug it. Remove and wash the water tank. Lift and remove the cup holder surface and wash it. Remove the used capsule tray. Spegnere la macchina e staccare la spina. Estrarre e lavare il serbatoio dell’acqua. - Page 32 CLEANING AND MAINTENANCE PULIZIA E MANUTENZIONE Remove the milk tank lid and empty its contents, Remove the dispensing spout. Hold the tab and Wash the dispensing spout in the dishwasher or Wash the milk tank and its lid with warm water if any.
- Page 33 CLEANING AND MAINTENANCE PULIZIA E MANUTENZIONE Remove the fi nal connector. Wash the two components in the dishwasher or Wash the milk dispensing spout with warm water Dry and reassemble the components. using warm water and dish soap. and dish soap. Do not wash in the dishwasher. Rimuovere il raccordo fi nale.
-
Page 34: Descaling
DESCALING Read all instructions carefully before performing the descaling cycle. Duration: about 20 minutes. Limescale normally builds up with the use of the machine. Descaling allows you to optimise cleaning and to remove limescale deposits from the inside. will automati- DECALCIFICAZIONE cally start blinking alternately when the machine needs to be descaled. - Page 35 DESCALING DECALCIFICAZIONE 1 Litro 1 Litro 1 Liter 1 Liter Place a container of at least 1 litre capacity under Turn on the machine. The cycle starts (duration: about 10 minutes). Within 15 seconds press and hold the button the coff ee dispensing spout. for 7 seconds until you hear the acoustic signal.
- Page 36 DESCALING DECALCIFICAZIONE 1 Litro 1 Liter Place the container back in position. The buttons blink sequentially in a anticlockwise At the end of the cycle, when the buttons are Press : The machine begins the rinse cycle direction. steady on, the machine is ready. dispensing water at regular intervals (duration: about 10 minutes).
-
Page 37: Warranty Limitations
WARRANTY LIMITATIONS Improper use or use that is not compliant with the instructions. WARNING: Not performing descaling periodically as indicated can cause malfunctions Internal modifi cations. not covered by warranty. Do not use vinegar, lye, salt or formic acid because they may damage the machine. The warranty does not cover repair costs on machines that have been tampered with by unauthorized service centres. -
Page 38: Warnings - Machine Status
WARNINGS - MACHINE STATUS SEGNALAZIONI - STATO MACCHINA Blinking The hot water button blinks The machine has been turned on and is in warm-up phase. The machine is dispensing hot water. Lampeggiano Il tasto acqua calda lampeggia La macchina è stata accesa ed è in fase di riscaldamento. La macchina sta erogando acqua calda. - Page 39 WARNINGS - MACHINE STATUS SEGNALAZIONI - STATO MACCHINA Blinking Blinking sequentially in an anticlockwise direction The machine indicates that the descaling process has been selected. In this The machine indicates that the second part of the descaling cycle is status the tank must contain the descaling solution. being performed.
-
Page 40: Problem - Cause - Solution
PROBLEM - CAUSE - SOLUTION Persistence of PROBLEM CAUSE SOLUTION the problem Power cord not connected to a power Connect the plug to a socket conforming to the technical data indicated in the data plate under the base of the machine. socket. - Page 41 PROBLEM - CAUSE - SOLUTION Persistence of PROBLEM CAUSE SOLUTION the problem Milk type not suitable for this prepa- Use cold whole milk. ration. Milk dispensing spout dirty or clogged Wash the milk dispensing circuit. by milk from previous dispensing. Not enough milk in the tank.
- Page 42 PROBLEMA - CAUSA - SOLUZIONE Permanenza del PROBLEMA CAUSA SOLUZIONE problema Cavo d’alimentazione non collegato alla Collegare la spina ad una presa di corrente conforme ai dati tecnici indicati nella targa dati sotto la base della macchina. presa di corrente. La macchina non si ac- Interruttore generale posizionato su “0”.
- Page 43 PROBLEMA - CAUSA - SOLUZIONE Permanenza del PROBLEMA CAUSA SOLUZIONE problema Tipo di latte non idoneo a questa pre- Utilizzare latte intero freddo. parazione. Erogatore latte sporco od ostruito di latte Lavare il circuito di erogazione del latte. da precedenti erogazioni. Insuffi ciente quantità...
-
Page 44: Restoring The Factory Settings
RESTORING THE FACTORY SETTINGS DISPOSAL Proceed as follows to restore the factory settings for beverage dispensing: Disposal of end-of-life electric and electronic equipment by private households in the European Union. Turn on the machine. The WEEE symbol used on this product means that it must not be disposed of together with other domestic waste and should be collected separately. -
Page 46: Allgemeine Hinweise Zur Bedienung Des Geräts
Der Hersteller behält sich das Recht vor, Änderungen oder Verbesserungen am Produkt ohne Vorankün- digung vorzunehmen. KAPSELN SIND DIREKT BEI AMICI UNTER 041 854 41 41 UND AUF WWW.AMICI.CH ERHÄLTLICH SOWIE BEI AUSGEWÄHLTEN FACHHÄNDLERN RÈGLES GÉNÉRALES POUR L'UTILISATION DE LA MACHINE DONNÉES TECHNIQUES... - Page 47 INHALT ALLGEMEINE HINWEISE ZUR BEDIENUNG DES GERÄTS ........46 EINSTELLUNG DER MENGE AN CAPPUCCINO ............68 TECHNISCHE DATEN ..................46 ZUBEREITUNG VON LATTE MACCHIATO ..............69 TEILE DER MASCHINE ..................48 EINSTELLUNG DER MENGE AN LATTE MACCHIATO ..........71 EIGNUNG FÜR SPÜLMASCHINE .................49 ...
-
Page 48: Teile Der Maschine
TEILE DER MASCHINE LED BELEUCHTUNG HEBEL ZUM ÖFFNEN/SCHLIESSEN DES KAPSELFACHS HEISSWASSER-AUSLAUF KAPSELFACH (innen) KAFFEE-AUSLAUF WASSERTANK STECKVERBINDUNG FÜR MILCHAUSLAUF AUFFANG-BEHÄLTER FÜR LEERE KAP- MILCHAUSLAUF SELN (MAX. 10 STCK.) und Flüssigkeits- MILCHTANK reste bei Ende der Ausgabe BEDIENFELD ESPRESSO-TASSENABSTELLFLÄCHE LATTE MACCHIATO KAFFEEBECHER-ABSTELLFLÄCHE CAPPUCCINO ESPRESSO HAUPTSCHALTER... -
Page 49: Eignung Für Spülmaschine
EIGNUNG FÜR SPÜLMASCHINE POSSIBILITÉ DE LAVAGE AU LAVE-VAISSELLE... -
Page 50: Wichtige Sicherheitsvorschriften
WICHTIGE SICHERHEITSVORSCHRIFTEN Bei der Verwendung von Elektrogeräten sind folgende Sicherheits- gebungen; hinweise immer zu beachten. • Ferienwohnungen auf Bauernhöfen; • Kunden in Hotels, Motels und anderen Ferienunterkünften; Gerätebenutzung • Ferienpensionen. - Alle Anleitungen durchlesen. - Das Gerät darf nur für den bestimmungsgemäßen Gebrauch - Diese Maschine wurde entwickelt, um Espresso und Filterkaff ee verwendet werden. - Page 51 WICHTIGE SICHERHEITSVORSCHRIFTEN - Das Gerät ist nicht für den Gebrauch von Personen mit einge- fl üssen geschützten Räumen schränkten physischen, geistigen oder sensoriellen Fähigkeiten verwenden. Nicht im Freien oder ungenügender Erfahrung bzw. Kompetenz (einschl. Kinder) betreiben. gedacht, außer wenn diese unter der Aufsicht einer für ihre Si- - Zum Schutz vor Brand, Strom- cherheit verantwortlichen Person stehen oder ausdrücklich von schlägen oder Verletzungen das...
-
Page 52: Installation De L'appareil
WICHTIGE SICHERHEITSVORSCHRIFTEN Stromschlägen oder Körperverletzungen führen. Geräteinstallation - Vor dem Ziehen des Netzsteckers sicherstellen, dass der Haupt- - Die Bedienungsanleitung aufmerksam lesen. schalter auf “0” (Abb. 1) steht. - Das Gerät niemals in Räumlichkeiten aufstellen, in denen die - Zum Abziehen des Steckers nicht am Kabel ziehen und den Stecker Temperatur auf 0°C oder tiefer sinken (wenn das Wasser gefriert, nicht mit nassen Händen anfassen. -
Page 53: Nettoyage De L'appareil
WICHTIGE SICHERHEITSVORSCHRIFTEN - Falls die Netzsteckdose und der Gerätestecker nicht kompatibel Gerätereinigung sind, den Stecker von einem autorisierten Kundendienst durch - Den Stecker von der Elektroanlage abziehen, bevor man die einen geeigneten ersetzen lassen. Reinigung durchführt. - Das Gerät auf einer Arbeitsfl äche fern von Wasserhähnen und - Vor der Reinigung das Gerät abkühlen lassen. -
Page 54: Bei Störungen
WICHTIGE SICHERHEITSVORSCHRIFTEN Bei Störungen dieser Hinweise kann die Sicherheit des Geräts beeinträchtigt werden und der Garantieanspruch entfallen. Das Gerät nicht benutzen, wenn Kabel oder Stecker beschädigt sind oder wenn es Anzeichen von schlechtem Funktionieren oder Schäden Unsachgemäße Verwendung des Geräts aufweist. -
Page 55: Instructions Concernant Le Câble D'alimentation
Hinweise für das Netzkabel bels sollte mindestens der elektrischen Leistung des Gerätes entsprechen; a) Um Gefahren durch das Hängenbleiben in oder das Stolpern 2) Bei einem geerdeten Gerät sollte das Verlängerungskabel über über ein längeres Kabel zu vermeiden, wird ein kurzes Netzkabel 3 Leiter mit Masseanschluss verfügen;... -
Page 56: Installation Und Inbetriebnahme Des Geräts
INSTALLATION UND INBETRIEBNAHME DES GERÄTS INSTALLATION ET MISE EN MARCHE DE LA MACHINE Den Wasser- und den Milchtank herausnehmen und vor deren Verwendung beide sorgfältig waschen. Den Wassertank bis zum Füllstand MAX mit Den Tank vollständig in das Gerät einsetzen. frischem Trinkwasser füllen. - Page 57 INSTALLATION UND INBETRIEBNAHME DES GERÄTS INSTALLATION ET MISE EN MARCHE DE LA MACHINE Wenn das Gerät länger als 10 Minuten unbenutzt bleibt, tritt automatisch die Pow- er-Save-Funktion in Betrieb. Die Taste blinkt mit langen Intervallen. Um die Maschine wieder zu aktivieren, wird lediglich irgendeine der Tasten leicht berührt.
-
Page 58: Kapselsorten
KAPSELSORTEN Auf diesem Gerät können Kapseln Iperespresso ESPRESSO und FILTERKAFFEE verwendet werden. VARIÉTÉ CAPSULES Sur cette machine, il est possible d’utiliser des capsules Iperespresso EXPRESSO et CAFÉ FILTRE. Kapseln Iperespresso ESPRESSO. Für die Zubereitung von Espresso, Cappuccino und Latte Macchiato, die Kapseln Iperespresso Bei einer falschen Kombination von Kapsel und Zubereitungsanwahl (Kapsel Espresso Espresso verwenden. -
Page 59: Zubereitung Von Espresso
ZUBEREITUNG VON ESPRESSO PRÉPARATION DE L’EXPRESSO Für diese Zubereitung sollten ausschließlich die Alle Tasten leuchten dauerhaft auf. Hebel lösen. Hebel anheben. Kapseln Iperespresso für ESPRESSO verwendet werden. Pour ce type de préparation, utiliser exclusivement Toutes les touches sont allumées fi xes. Décrocher le levier. -
Page 60: Empfehlungen
ZUBEREITUNG VON ESPRESSO PRÉPARATION DE L’EXPRESSO Die Espresso-Tasse unter den Auslauf stellen. Die Ausgabe wird automatisch beendet. Die Taste drücken, um einen Espresso aus- zugeben, die Maschine gibt ein Tonsignal ab. Positionner la petite tasse à café expresso. La distribution s’arrête automatiquement. Appuyer sur pour distribuer un café... -
Page 61: Zubereitung Von Filterkaffee
ZUBEREITUNG VON FILTERKAFFEE PRÉPARATION DU CAFÉ FILTRE Für die Zubereitung sollten ausschließlich die Alle Tasten leuchten dauerhaft auf. Hebel lösen. Hebel anheben. Kapseln Iperespresso für FILTERKAFFEE verwendet werden. Pour ce type de préparation, utiliser exclusivement Toutes les touches sont allumées fi xes. Décrocher le levier. -
Page 62: Empfehlungen
ZUBEREITUNG VON FILTERKAFFEE PRÉPARATION DU CAFÉ FILTRE Die Halterung anheben und eine große Tasse/ Die Ausgabe wird automatisch beendet. Die Taste drücken, um einen Filterkaff ee Becher unter den Auslauf stellen. auszugeben, die Maschine gibt ein Tonsignal ab. Soulever le support et positionner un mug. La distribution s’arrête automatiquement. -
Page 63: Einstellung Der Kaffeemenge In Der Tasse
EINSTELLUNG DER KAFFEEMENGE IN DER TASSE RÉGLAGE DE LA QUANTITÉ DE CAFÉ DANS LA TASSE Die Kapsel einsetzen. Blockieren, indem der Hebel abgesenkt wird. Die Taste für die Dauer der gesamten Aus- Die Taste nach Erreichen der gewünschten Kaf- feemenge wieder loslassen. gabe gedrückt halten, um die Kaff eemenge in der jeweiligen Tasse zu speichern. -
Page 64: Verwendung Des Milchtanks Und Milchauslaufs
VERWENDUNG DES MILCHTANKS UND MILCHAUSLAUFS UTILISATION DU RÉSERVOIR À LAIT ET DE LA BUSE DE DISTRIBUTION DU LAIT Den Deckel des Milchtanks abnehmen. Den Tank bis zum Füllstand MAX mit Milch füllen. Sicherstellen, dass die Auslauftülle fest im Deckel Den Milchauslauf an seiner Steckverbindung auf des Milchtanks eingesetzt ist. - Page 65 VERWENDUNG DES MILCHTANKS UND MILCHAUSLAUFS UTILISATION DU RÉSERVOIR À LAIT ET DE LA BUSE DE DISTRIBUTION DU LAIT Den Milchtank am Milchauslauf einhängen, er Sobald der Tank eingehängt ist, kann die Zuberei- Sollte nach der Zubereitung noch Milch im Milch- Den Milchauslauf abnehmen und ihn gut spülen, muss perfekt einrasten.
-
Page 66: Zubereitung Eines Cappuccinos
ZUBEREITUNG EINES CAPPUCCINOS PRÉPARATION DU CAPPUCCINO Den Milchauslauf und den Milchtank einsetzen, Für die Zubereitung eines Cappuccinos sollten Die Kapsel einsetzen. Die Position der Halterung je nach verwendetem wie im Kapitel VERWENDUNG DES MILCHTANKS ausschließlich die Kapseln Iperespresso ESPRESSO Tassen-Typ auswählen. UND MILCHAUSLAUFS dargestellt. - Page 67 ZUBEREITUNG EINES CAPPUCCINOS PRÉPARATION DU CAPPUCCINO Sicherstellen, dass alle Tasten dauerhaft au- Die Maschine beginnt mit der Ausgabe des Kaff ees Wenn die Kaff eeausgabe beendet ist, beginnt nach Die Ausgabe wird automatisch beendet. fl euchten. in die Tasse. einigen Sekunden automatisch die Ausgabe von aufgeschäumter Milch.
-
Page 68: Einstellung Der Menge An Cappuccino
EINSTELLUNG DER MENGE AN CAPPUCCINO RÉGLAGE DE LA QUANTITÉ DE CAPPUCCINO Den Milchauslauf und den Milchtank einsetzen, Die Kapsel einsetzen. Die Position der Halterung je nach verwendetem Die Taste gedrückt halten. Die Maschine gibt wie im Kapitel VERWENDUNG DES MILCHTANKS Tassen-Typ auswählen. -
Page 69: Zubereitung Von Latte Macchiato
ZUBEREITUNG VON LATTE MACCHIATO PRÉPARATION DU LATTE MACCHIATO Den Milchauslauf und den Milchtank einsetzen, Für die Zubereitung von Latte Macchiato sollten Die Kapsel einsetzen. Die Halterung anheben und eine große Tasse/ wie im Kapitel VERWENDUNG DES MILCHTANKS ausschließlich die Kapseln Iperespresso ESPRESSO Becher unter den Auslauf stellen. - Page 70 ZUBEREITUNG VON LATTE MACCHIATO PRÉPARATION DU LATTE MACCHIATO Sicherstellen, dass alle Tasten dauerhaft aufl euch- Die Maschine beginnt nach einigen Sekunden Wenn die Milchausgabe beendet ist, beginnt Die Ausgabe wird automatisch beendet. mit der Ausgabe von heißer Milch in die Tasse. die Maschine automatisch mit der Ausgabe des ten.
-
Page 71: Einstellung Der Menge An Latte Macchiato
EINSTELLUNG DER MENGE AN LATTE MACCHIATO RÉGLAGE DE LA QUANTITÉ DE LATTE MACCHIATO Den Milchauslauf und den Milchtank einsetzen, Die Kapsel einsetzen. Die Halterung anheben und eine große Tasse/ Die Taste gedrückt halten. Die Maschine gibt wie im Kapitel VERWENDUNG DES MILCHTANKS Becher unter den Auslauf stellen. -
Page 72: Zubereitung Von Heisser Aufgeschäumter Milch
ZUBEREITUNG VON HEISSER AUFGESCHÄUMTER MILCH PRÉPARATION DU LAIT CHAUD MOUSSEUX Den Milchauslauf und den Milchtank einsetzen, Die Halterung anheben und eine große Tasse/ Sicherstellen, dass alle Tasten dauerhaft auf- Die Maschine beginnt nach einigen Sekunden wie im Kapitel VERWENDUNG DES MILCHTANKS Becher unter den Auslauf stellen. -
Page 73: Einstellung Der Menge An Heisser Aufgeschäumter Milch
EINSTELLUNG DER MENGE AN HEISSER AUFGESCHÄUMTER MILCH RÉGLAGE DE LA QUANTITÉ DE LAIT CHAUD MOUSSEUX Den Milchauslauf und den Milchtank einsetzen, Die Halterung anheben und eine große Tasse/ Die Taste nach Erreichen der gewünschten Menge Die Taste gedrückt halten. wie im Kapitel VERWENDUNG DES MILCHTANKS Becher unter den Auslauf stellen. -
Page 74: Ausgabe Von Heisswasser
AUSGABE VON HEISSWASSER DISTRIBUTION D’EAU CHAUDE Sicherstellen, dass ausreichend Wasser im Was- Die Halterung anheben und eine große Tasse/ Sicherstellen, dass alle Tasten dauerhaft auf- Wenn die gespeicherte Füllmenge erreicht ist, sertank vorhanden ist. Becher unter den Auslauf stellen. endet die Ausgabe automatisch. leuchten. -
Page 75: Reinigung Und Wartung
REINIGUNG UND WARTUNG NETTOYAGE ET ENTRETIEN Das Gerät ausschalten und den Netzstecker ziehen. Den Wassertank herausnehmen und waschen. Tassenabstellfl äche anheben, herausnehmen Den Auff angbehälter für leere Kapseln heraus- und waschen. nehmen. Éteindre la machine et débrancher la fi che. Retirer et laver le réservoir à... - Page 76 REINIGUNG UND WARTUNG NETTOYAGE ET ENTRETIEN Den Deckel des Milchtanks abnehmen und den Die Auslauftülle herausziehen. Die Lasche nehmen Die Auslauftülle in der Spülmaschine oder mit Den Deckel und den Milchtank mit warmem Was- eventuell vorhandenen Inhalt ausleeren. und sie dann drehen. warmem Wasser und Geschirrspülmittel waschen.
- Page 77 REINIGUNG UND WARTUNG NETTOYAGE ET ENTRETIEN Den Endanschluss abnehmen. Die beiden Bestandteile in der Spülmaschine Den Milchauslauf mit warmem Wasser und Geschir- Die Bestandteile abtrocknen und wieder zusam- oder mit warmem Wasser und Geschirrspülmit- rspülmittel waschen. Nicht in der Spülmaschine mensetzen.
-
Page 78: Entkalken
ENTKALKEN Bitte alle Anweisungen aufmerksam durchlesen bevor der Entkalkungszyklus gestartet wird. Dauer: ca. 20 Minuten. Die Bildung von Kalk ist eine natürliche Folge des Betriebs des Geräts. Durch das Entkalken wird die Reinigung optimiert und die Kalkrückstände im Inneren werden DÉTARTRAGE entfernt. - Page 79 ENTKALKEN DÉTARTRAGE 1 Litro 1 Litro 1 Liter 1 Liter Ein mindestens 1-Liter fassendes Gefäß unter den Die Maschine einschalten. Innerhalb 15 Sekunden die Taste drücken und Der Zyklus wird gestartet (Dauer: cirka 10 Min.). Kaff eeauslauf stellen. sie 7 Sekunden lang gedrückt halten, bis ein Akus- tiksignal ertönt.
- Page 80 ENTKALKEN DÉTARTRAGE 1 Litro 1 Liter Den Behälter wieder positionieren. Die Tasten blinken im Gegenuhrzeigersinn nach- Wenn der Zyklus beendet ist und die Tasten dau- Die Taste drücken: Die Maschine startet einander auf. erhaft aufl euchten ist die Maschine betriebsbereit. die Spülung und gibt Wasser in regelmäßigen Abständen aus (Dauer: zirka 10 Min.).
-
Page 81: Garantieeinschränkungen
GARANTIEEINSCHRÄNKUNGEN nicht vorschriftsmäßiger Gebrauch oder nicht den Anleitungen entsprechend. an der Maschine vorgenommene Änderungen. ACHTUNG: Wenn die Entkalkung nicht regelmäßig durchgeführt wird, so kann der Kalk Betriebsschäden verursachen, die nicht durch die Garantie gedeckt werden. Die Garantie deckt keine Reparaturkosten an Maschinen, die von nicht autorisierten Kundendienststellen Auf keinen Fall Essig, Lauge, Salz, Ameisensäure verwenden, da diese die Maschine ausgeführt worden sind. -
Page 82: Anzeigen - Gerätestatus
ANZEIGEN - GERÄTESTATUS SIGNALISATIONS - ÉTAT DE LA MACHINE Blinken Die Heißwassertaste blinkt Das Gerät wurde eingeschaltet und befi ndet sich in der Aufheizphase. Das Gerät gibt Heißwasser aus. Clignotent La touche eau chaude clignote La machine a été allumée et elle est en phase de chauff age. La machine est en train de distribuer de l’... -
Page 83: Signalisation - État De La Machine
ANZEIGEN - GERÄTESTATUS SIGNALISATION - ÉTAT DE LA MACHINE Blinken Blinken im Gegenuhrzeigersinn nacheinander auf Das Gerät zeigt an, dass der Entkalkungsvorgang angewählt wurde. In Die Maschine zeigt an, dass der zweite Teil der Entkalkung im Gange diesem Zustand muss der Wassertank die Entkalkerlösung enthalten. ist. -
Page 84: Problem - Ursache - Abhilfe
PROBLEM - URSACHE - ABHILFE Problem bleibt PROBLEM URSACHE ABHILFE bestehen Stecker an einer den auf dem Datenschild vorgeschriebenen technischen Werten entsprechenden Steckdose Netzkabel nicht mit der Steckdose verbunden. anschließen, Datenschild befi ndet sich an der Maschinen-Unterseite. Die Maschine schaltet sich Hauptschalter in Position “0”. - Page 85 PROBLEM - URSACHE - ABHILFE Problem bleibt PROBLEM URSACHE ABHILFE bestehen Der Milch-Typ ist für diese Zubereitung nicht Kalte Vollmilch verwenden. geeignet. Milchauslauf ist verschmutzt oder von vorhe- Das Milchausgabe-System reinigen. rigen Ausgaben verstopft. Milchmenge im Tank ist unzureichend. Den Milchtank bis zum MIN. Füllstand auff üllen. Ein oder mehrere Bestandteile des Milchaus- Die Bestandteile des Milchauslaufs mit Geschirrspülmittel oder in der Spülmaschine waschen, dazu die Anleitungen Die Maschine gibt keine...
- Page 86 PROBLÈME - CAUSE - SOLUTION Le problème PROBLÈME CAUSE SOLUTION persiste Le câble d'alimentation n'est pas connecté à la Brancher la fi che à une prise de courant conforme aux données techniques indiquées sur la plaque signalétique prise de courant. placée sous la base de la machine.
- Page 87 PROBLÈME - CAUSE - SOLUTION Le problème PROBLÈME CAUSE SOLUTION persiste Type de lait qui n'est pas approprié à cette Utiliser du lait froid entier. préparation. Buse de distribution du lait sale ou obstrué par Laver le circuit de distribution du lait. des distributions de lait précédentes.
-
Page 88: Wiederherstellung Der Werkseinstellungen
WIEDERHERSTELLUNG DER WERKSEINSTELLUNGEN ENTSORGUNG Für die Wiederherstellung der Werkseintellungen, ist wie folgt vorzugehen: Entsorgung von Elektro- und Elektronikgeräten von privaten Haushalten in der EU. Das Gerät einschalten. Das für dieses Produkt verwendete Symbol RAEE weist darauf hin, dass dieses nicht den anderen Haushaltsabfällen zugeführt werden darf, sondern dass es getrennt entsorgt werden muss.