Publicité
Liens rapides
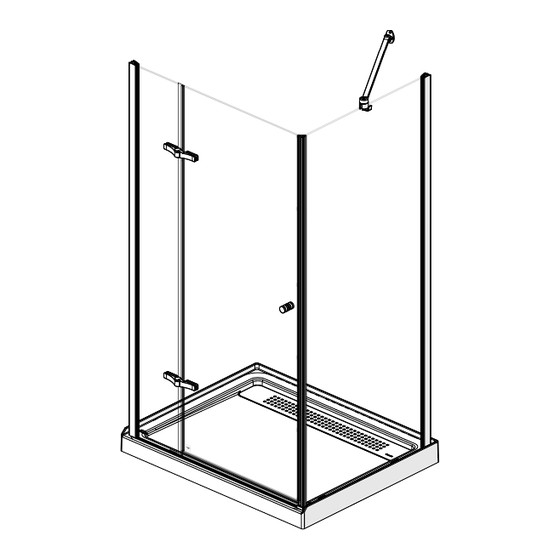
INSTALLATION INSTRUCTIONS
GUIDE D'INSTALLATION
GUÍA DE INSTALACIÓN
Read all instructions carefully before proceeding.
Lire toutes les instructions attentivement avant de commencer
l'installation.
Leer detenidamente todas las instrucciones antes de comenzar
la instalación.
IMPORTANT
• Record the serial number
IMPORTANT
• Noter le numéro de série
IMPORTANTE
• Registre el número de serie
FOR SHOWER DOOR INSTALLATION
POUR INSTALLATION DE PORTE DE DOUCHE
PARA LA INSTALACIÓN DE LA PUERTA DE DUCHA
MODEL • MODÈLE • MODELO
300008
300010
•
SAVE THIS GUIDE FOR FUTURE REFERENCE.
CONSERVER POUR UN USAGE ULTÉRIEUR.
CONSERVE ESTE MANUAL COMO REFERENCIA.
Serial number • Numéro de série • Número de Serie
Publicité

Manuels Connexes pour MAAX 300008


Sommaire des Matières pour MAAX 300008
- Page 1 GUIDE D’INSTALLATION POUR INSTALLATION DE PORTE DE DOUCHE GUÍA DE INSTALACIÓN PARA LA INSTALACIÓN DE LA PUERTA DE DUCHA MODEL • MODÈLE • MODELO 300008 300010 • Read all instructions carefully before proceeding. SAVE THIS GUIDE FOR FUTURE REFERENCE. CONSERVER POUR UN USAGE ULTÉRIEUR.
- Page 2 PARTS PIÈCES PIEZAS AND COMPONENTS ET COMPOSANTES Y COMPONENTES...
- Page 3 PARTS PIÈCES PIEZAS AND COMPONENTS ET COMPOSANTES Y COMPONENTES 30 * Parts included with optional walls only Pièces incluses avec des murs en option seulement Piezas incluidas con los muros opcionales únicamente...
- Page 4 PARTS PIÈCES PIEZAS AND COMPONENTS ET COMPOSANTES Y COMPONENTES Part Nom de la pièce Pieza Code Cant. Base Base Base 10033659-001-600 Fixed panel Panneau fixe Panel fijo 10044920-900 Door Porte Puerta 10044928-900 Return panel Panneau de retour Panel de retorno 10044530-900 Wall jamb Montant mural...
- Page 5 TOOLS OUTILS HERRAMIENTAS REQUIRED REQUIS NECESARIAS Electric drill Level Pencil Perceuse électrique Niveau Crayon Taladro eléctrico Nivel Lápiz ¼" ceramic drill bit Clear silicone sealant Masking tape Mèche à céramique Silicone claire de ¼ po. Ruban adhésif Broca para ceramica Sellador de silicona Cinta de de ¼"...
- Page 6 BEFORE AVANT ANTES YOU BEGIN DE COMMENCER DE COMENZAR A two person installation is recommended. Une installation par deux personnes est recommandé. Se recomienda realizar la instalación entre dos personas. A. Before beginning the installation, make sure that the door NOTE | REMARQUE | NOTA and panel fit within the shower enclosure.
- Page 7 INSTALLATION | INSTALACIÓN STEP ÉTAPE ETAPA A. If they are covered, remove finished wall to expose bottom of studs. Confirm that the studs are vertical (plumb) within 3/8" and square. B. The pipe should be 2" diameter (outside diameter should be 2-3/8"), 21¼"...
- Page 8 INSTALLATION | INSTALACIÓN STEP ÉTAPE ETAPA A. Install the base (1) directly against the studs and confirm that the drain pipe is centered in the drain head. Please refer to drain guide for drain installation. We recommend a plumber to do the connection. B.
- Page 9 INSTALLATION | INSTALACIÓN STEP ÉTAPE ETAPA This frame is for this model only Ce cadre est pour ce modèle seulement Note: the wooden pieces must be fixed on finished wall. Esta estructura es para este modelo A. Starting with the longest vertical pieces, fasten wood 500008 pieces as shown.
- Page 10 INSTALLATION | INSTALACIÓN STEP ÉTAPE ETAPA A. Align the walls (24-25) and the caddy (26) on a flat surface. Drill holes on the imprints with a 7/32" brill bit as shown. B. Remove the plastic wrap. C. Apply a continuous bead of silicone inside the bolts from top to bottom on one of the wall flanges.
- Page 11 INSTALLATION | INSTALACIÓN STEP ÉTAPE ETAPA A. Slide the shower into its location. THE SHOWER BASE MUST BE UNI-FORMLY LEVELED AND RESTING OVER ITS ENTIRE SURFACE.The wood framing built in step 1 should fall inside raised sections of the walls without interference. If there is any interference adjust framing accordingly to remove any stress from walls.
- Page 12 INSTALLATION | INSTALACIÓN STEP ÉTAPE ETAPA A. Install the base (1) directly against the studs and confirm that the drain pipe is centered in the drain head. Please refer to drain guide for drain installation. We recommend a plumber to do the connection. B.
- Page 13 INSTALLATION | INSTALACIÓN STEP ÉTAPE ETAPA A. Position and level the return panel wall jamb (5) against the shower wall and on the middle of the threshold of the center shower base. Ensure that the distance from side wall to centre front of return panel track (14) is 40⅛".
- Page 14 INSTALLATION | INSTALACIÓN STEP ÉTAPE ETAPA Clean the shower base (1) with alcohol. B. Place the end block (15) on the track. Ensure that the distance from wall jamb (5) to front of track is 30¼" as shown. Cut track if needed. Apply a bead of silicone sealant under the track (14) and under the end block (15) and position the track...
- Page 15 INSTALLATION | INSTALACIÓN STEP ÉTAPE ETAPA A. Apply a drop of silicone under the setting block (13), then hook it to the track (14) at approximately 3" from the wall jamb (5). See diagram. B. Hook a second setting block (13) to the track (14) at approximately 3"...
- Page 16 INSTALLATION | INSTALACIÓN STEP ÉTAPE ETAPA A. Insert the return panel (4) in the wall jamb (5), lower the panel onto the setting blocks (13). Level the panel and push the gasket in the extrusion. B. Fully tighten the set screws in the wall jamb (5). C.
- Page 17 INSTALLATION | INSTALACIÓN STEP ÉTAPE ETAPA A. Temporarily place the wall jamb (5) on the threshold and against the wall. Measure the distance from the wall jamb (5) to the end block (15). Cut the track (14) to this length. B.
- Page 18 INSTALLATION | INSTALACIÓN STEP ÉTAPE ETAPA A. Drill the wall covering. [For ceramics always use a ceramics 1/4" drill bit and for acrylic use a 1/8" drill bit]. B. Fill the holes with a generous amount of silicone and apply silicone behind the wall jamb (5). C.
- Page 19 INSTALLATION | INSTALACIÓN STEP ÉTAPE ETAPA A. Apply silicone inside the wall jamb (5) and behind the track at the bottom as shown. B. Apply a drop of silicone under the glass clip (13), then hook it to the track (14) at approximately 3" from the wall jamb (5).
- Page 20 INSTALLATION | INSTALACIÓN STEP ÉTAPE ETAPA A. Insert the sealing gasket (6) on the fixed panel (2). B. Insert the fixed panel (2) in the wall jamb (5), lower the panel onto the setting block (13). It should snap into its fully engaged position. Level the panel and adjust the gasket as needed.
- Page 21 INSTALLATION | INSTALACIÓN STEP ÉTAPE ETAPA A. Install the bottom parts of the hinges (8) on the fixed panel (2) using the allen key (20) and level them. A. Fixer les parties inférieures des charnières (8) sur le panneau fixe (2) avec la clé allen (20) et les mettre à...
- Page 22 INSTALLATION | INSTALACIÓN STEP ÉTAPE ETAPA A. Place the door (3) temporarily and safely on a wall Highest over cardboard. Le plus haut B. Make sure the door (1) is installed side up based on Bushing top view, for right or left installation El más alto Coussinet de pivot, pour installation a Doite ou gauche arrow pointing up.
- Page 23 INSTALLATION | INSTALACIÓN STEP ÉTAPE ETAPA A. Join the door (3) to the fixed panel (2) insert top hinge in bottom (8). B. Add one or two drops of Loctite adhesive (19) to the anti-jump screw and immediately fasten with the allen key 4mm until flush with the lower end of the hinge (8).
- Page 24 INSTALLATION | INSTALACIÓN STEP ÉTAPE ETAPA A. Do a "dry fit" by Inserting the magnetic door gasket (9) on the door (3) and the magnetic return panel gasket (10) on the return panel (4). Remove the gaskets and cut 1/2" of the rigid part of the bottom of the magnetic door jamb (9) and 7/8"...
- Page 25 INSTALLATION | INSTALACIÓN 9" to 15" STEP ÉTAPE ETAPA 2 1/4" A. Join the wall fastener (21) and the support bar (22) as shown. B. Install the support bar (22) on the support (23), place the wall fastener (21) against the wall and mark the fastening holes. The center of the wall fastener (21) must be 2¼"...
- Page 26 INSTALLATION | INSTALACIÓN For optimal water tightness ensure STEP the cone of water from the shower head is not directed at door joint ÉTAPE ETAPA Pour maximiser l'étanchéité, ne pas diriger le jet d'eau vers l'ouverture A. From outside the shower, apply silicone sealant de la porte between the wall jambs (5) and the walls, between Para garantizar una perfecta...
-
Page 27: Garantie Limitée
MAAX garantit les portes de douche et MAAX garantiza las puertas de ducha y los glass panels to be free of all material or panneaux de verre contre tout défaut de paneles de vidrio contra cualquier defecto workmanship defects under normal use and matière ou de fabrication dans des conditions... - Page 28 Technical Services / Service technique / Servicio técnico T. 1 877 GET-MAAX (1 877 438-6229) F. 1 888 361-2045 10049821 © 2008 MAAX Bath Inc. PRINTED IN CANADA / IMPRIMÉ AU CANADA / IMPRESO EN CANADA 2018-10-03...