Table des Matières
Publicité
Les langues disponibles
Les langues disponibles
Liens rapides
Publicité
Chapitres
Table des Matières

Manuels Connexes pour Telecom Behnke 5 Serie


Sommaire des Matières pour Telecom Behnke 5 Serie
- Page 1 anleitung Version 4.3 SIP-Sprechstellen Serie 5 / 10, Serie 20 / 30 / 40 / 50 / SPL Seite ..3 SIP intercoms series 5 / 10, series 20 / 30 /40 / 50 / SPL Page ..41 Postes téléphoniques SIP Séries 5 / 10, Séries 20 / 30 / 40 / 50 / SPL Page ..79...
- Page 2 Wartungs- oder Reparaturarbeiten vom Stromnetz (Steckernetzteil) und vom Netzwerk bzw. Telefonanschluss getrennt sind und die einschlägigen Sicherheitsregeln eingehalten werden. Weitere rechtliche Hinweise finden Sie auf Seite 36. kontakt Info-Hotline Telecom Behnke GmbH Ausführliche Informationen zu Produkten, Gewerbepark „An der Autobahn“ Projekten und unseren Dienstleistungen: Robert-Jungk-Straße 3...
-
Page 3: Table Des Matières
Anleitung Behnke SIP 2.0 Inhalt inhalt 1. Einleitung 1.1. Lieferumfang ........................5 1.2. Allgemeines ........................5 2. Montage 2.1. Serie 20 / 30 / 40 / 50 (20-0001A-IP, 20-0002A-IP, 20-0013A-IP, 20-0014A-IP, 20-0016A- IP, 20-0041A-IP, 20-0043A-IP) ..................... 10 2.2. Mechanische Montage Serie 20/30 ................11 2.3. - Page 4 Anleitung Behnke SIP 2.0 Inhalt 12. Behnke SIP-Sprechstellen der Serie 5/Serie 10 12.1. Türstationen Serie 5 und 10 ..................29 13. Kameraaufruf Serie 5/10 via Browser 13.1. Einleitung ........................30 13.2. Generelle Funktionen ....................30 14. Kamerakonfiguration 14.1. Login ..........................31 14.2.
-
Page 5: Einleitung
Anleitung Behnke SIP 2.0 Einleitung einleitung 1.1. Lieferumfang 1.2. Allgemeines ▸ Leistungsmerkmale Basiselektronik als • Elektronikbox Serie 20, 30, 40, 50 oder Die Behnke SIP-Sprechstellen der Serien • Kompaktsprechstelle der Serie 5, 10 20, 30 und 50 sind hochwertige modulare ▸... - Page 6 Anleitung Behnke SIP 2.0 Einleitung Bei den kompakten Sprechstellen der Serien 5 Systemvoraussetzungen und 10 handelt es sich um hochwertige vormon- Bitte beachten Sie bei der Installation der tierte Sprechstellen mit bis zu zwei Ruftasten. Behnke SIP-Sprechstelle folgende Mindest- Sie sind ebenfalls mit akustischer Echoun- voraussetzungen: ▸...
- Page 7 Anleitung Behnke SIP 2.0 Einleitung Zur Installation der Behnke IP-Video-Software sind Bitte beachten Sie, dass es eine Vielzahl von folgende Mindestvoraussetzungen erforderlich: Betriebssystemversionen gibt. Jede Variante ▸ PC mit Intel Pentium IV-Prozessor (1,7GHz) hat unterschiedliche Energiesparfunktionen, ® ® oder AMD Athlon™ Prozessor (1,2GHz) oder so dass eine dauerhafte und ständige Funktion besser der SIP-App „TC-Behnke“...
- Page 8 Anleitung Behnke SIP 2.0 Einleitung Einbaubedingungen Montage im Außenbereich ▸ Die optimale Einbauhöhe liegt vor, wenn ▸ Beim Einsatz an Wetterseiten sollten Türsta- die Bedienung der Türstation mit einem tionen der Serie 20, 30 und 40 in Unter- Abstand von 30-50 cm gewährleistet ist putzmontage mit einer Regenschutzblende und eine stehende Person bequem in das eingebaut werden (Achten Sie bitte immer...
-
Page 9: Konfiguration
Anleitung Behnke SIP 2.0 Einleitung Dichtungen Reinigung und Pflege Zum Schutz vor Feuchtigkeit achten Sie bitte Sie haben hochwertige Behnke Produkte mit beim Einbau Ihrer Türstation auf den korrekten Frontblenden aus verschiedenen Materialien Sitz der mitgelieferten Dichtungen. Die Dichtung verbaut. Für alle Materialien gilt, dass diese muss sauber auf dem Rahmen des Unter- oder in regelmäßigen ausreichend kleinen Abstän- Aufputzgehäuses bzw. -
Page 10: Montage
Anleitung Behnke SIP 2.0 Montage Montage Hinweis: Bemaßungs- und Einbauskizzen finden Sie unter www.behnke-online.de/bemassung 2.1. Serie 20 / 30 / 40 / 50 (20-0001A-IP, 20-0002A-IP, 20-0013A-IP, 20-0014A-IP, 20-0016A-IP, 20-0041A-IP, 20-0043A-IP) Hinweis: Achten Sie beim Einsetzen der Funktions- 3. Mikrofon (Mik) ▸... -
Page 11: Mechanische Montage Serie 20/30
Anleitung Behnke SIP 2.0 Montage 2.2. Mechanische Montage Serie 20/30 Funktionsmodule in Frontrahmen einlegen. Hinweis: Beim Einsatz der Lautsprechertypen 20-1107-IP / 21-1107-IP, 20-1109-IP / 21-1109-IP sowie 43-9913 ist darauf zu achten, dass die Lautsprecher nicht in unmittelbarer Nähe der Relais der Basiselektronik (AIF) platziert sind. - Page 12 Anleitung Behnke SIP 2.0 Montage Elektronikbox vom Modulgehäuse entfernen Modulgehäuse befestigen bei abgesetzter Montage mit offener Gegenplatte verschrauben. www.behnke-online.de...
- Page 13 Anleitung Behnke SIP 2.0 Montage Verbinden der Flachbandanschlussleitung mit den Einbaumodulen (Lautsprecher, Mikro- fon, Tasten etc.) Steckerbelegung Anschlussleitung Serie 20, 30, 50: LP (Blau) ▸ Lautsprecher Mik (Weiß) ▸ Mikrofon T1 bis T8 (Gelb) ▸ Taste 1 bis 8 12-poliger Stecker ▸...
-
Page 14: Beschriftetes Etikett Einlegen
Anleitung Behnke SIP 2.0 Montage 2.3. Beschriftetes Etikett einlegen Auslieferungszustand Das beschriftete Etikett von links einlegen Beschriftungsfeld durch Druck Das Beschriftungsfeld links anlegen und auf die rechte Seite lösen einrasten lassen und herausdrehen Fertig! www.behnke-online.de... -
Page 15: Universalgeräte 20-0005-Ip
Anleitung Behnke SIP 2.0 Montage 2.4. Universalgeräte 20-0005-IP 2.5. Serie 10 / 50 1. Montieren Sie die Universalelektronik an Türstationen der Serie 10 / 50 werden bereits einem wettergeschützten Ort im gelieferten montiert geliefert. Gehen Sie bitte beim Einbau Gehäuse und verbinden Sie die Elektronik mit wie hier gezeigt vor. -
Page 16: Anschluss
Anleitung Behnke SIP 2.0 Anschluss anschluss Serie 20 / 30 / 40 / 50 und 20-0005-IP Hinweis zum Anschluss von 20-0005-IP: Beginnen Sie bitte mit dem Anschließen von Lautsprecher, Mikrofon und Tasten und achten Sie dabei auf einen max. Abstand zwischen Lautsprecher, Mikrofon, den Tasten und der Elektronik. -
Page 17: Hardware
Anleitung Behnke SIP 2.0 Hardware hardware 20-0001A-IP, 20-0002A-IP, 20-0013A-IP, 20-0014A-IP, 4.1. Kompaktelektronik 20-0016A-IP, 20-0041A-IP, 20-0043A-IP, SPL-Sprechstellen (SPL-Sprechstelle ist vormontiert und kann nur in den im Katalog ersichtlichen Konfigurationen betrieben werden) Erweiterungs- LAN-Anschluss INPUT anschluss (SIP-Sprechstelle zum Switch) LAN-Anschluss PORT 2 (Anschluss für weitere IP-Geräte, wie z. -
Page 18: Abgesetzte Elektronik (Bis 50M) 20-0005-Ip
Anleitung Behnke SIP 2.0 Hinweis: Betrieb nur in Verbindung mit der Anschlussbox Hardware 43-9251 möglich. Ein detailierte Beschreibung der Ver- kabelung zwischen 20-0005-IP und Anschlussbox 43-9251 finden Sie in der Anleitung zur Anschlussbox 43-9251 4.2. Abgesetzte Elektronik (bis 50m) 20-0005-IP Erweiterungs anschluss LAN-Anschluss INPUT (SIP-Sprechstelle zum Switch) -
Page 19: Schirmung Der Sip-Sprechstelle
Anleitung Behnke SIP 2.0 Hardware 4.3. Schirmung der SIP-Sprechstelle Schirmung bei Betrieb über die RJ-45-Buchse Schirmung bei Betrieb über die Schraubklem- men (siehe auch Seite 17 und 18) (siehe auch Seite 17 und 18) Legen Sie die Schirmung des geerdeten Ethernet-Kabels, wie im Bild dargestellt, am unteren Gehäusesteg auf. -
Page 20: Konfiguration Und Inbetriebnahme
Anleitung Behnke SIP 2.0 Konfiguration und Inbetriebnahme konfiguration und inbetriebnahMe Vorbereitung Wenn kein DHCP-Server vorhanden ist, so kann ▸ die IP-Adressvergabe auf „statisch“ umgestellt Verbindung der SIP-Sprechstelle mit einem werden: 10 / 100 Mbit Ethernet LAN ▸ Stromversorgung via Power over Ethernet (PoE nach IEEE 802.3af ) 1. - Page 21 Anleitung Behnke SIP 2.0 Konfiguration und Inbetriebnahme Wenn nun der Begrüßungsbildschirm erscheint, Anmerkung: In einer Verbindung kann die Laut- gelangen Sie durch Klicken auf „Anmelden“ zur stärke durch Drücken der Tasten am Telefon wie Passwortabfrage. Die Standardeinstellungen folgt eingestellt werden: ▸...
-
Page 22: Autoprovisionierung
Anleitung Behnke SIP 2.0 Autoprovisionierung autoprovisionierung Mit der Autoprovisionierung kann die Behnke Beispiel für eine gültige Option 66: SIP-Sprechstelle vollautomatisch konfiguriert werden. Alle über das Web-Frontend zugängli- ftp://192.168.30.2/behnke/ chen Parameter einschließlich der Telefonbü- In diesem Ordner muss eine Datei mit folgen- cher lassen sich mit der Autoprovisionierung dem Dateinamen liegen: einrichten. -
Page 23: Reset Auf Werkseinstellungen
Anleitung Behnke SIP 2.0 Reset auf Werkseinstellungen reset auf werkseinstellungen Um ein Reset auf Werkseinstellung durchzu- Das Web-Interface bietet eine weitere Mög- führen, führen Sie folgende Schritte aus: lichkeit, das Gerät auf Werkseinstellungen zurückzusetzen, im Folgenden sind die dies- ▸ SIP-Sprechstelle stromlos schalten bezüglichen Schritte aufgeführt: ▸... -
Page 24: Hardware
Anleitung Behnke SIP 2.0 Hardware hardware 8.1. Kompaktgeräte Serie 5, 10 Lautsprecheranschluss Erweiterungs anschluss LAN-Anschluss INPUT (SIP-Sprechstelle zum Switch) LAN-Anschluss PORT 2 (Anschluss für weitere IP-Geräte, wie z. B. IP-Kamera. Technische Daten des Switchport beachten) Masterprozessor T1 + T2 Tasten zur Ausgabe von Geräteinfor- mationen (siehe S. -
Page 25: Konfiguration Und Inbetriebnahme
Anleitung Behnke SIP 2.0 Konfiguration und Inbetriebnahme konfiguration und inbetriebnahMe Vorbereitung Wenn kein DHCP-Server vorhanden ist, so kann ▸ die IP-Adressvergabe auf „statisch“ umgestellt Verbindung der SIP-Sprechstelle mit einem werden: 10 / 100 Mbit Ethernet LAN ▸ Stromversorgung via Power over Ethernet (PoE nach IEEE 802.3af ) 1. - Page 26 Anleitung Behnke SIP 2.0 Konfiguration und Inbetriebnahme Wenn nun der Begrüßungsbildschirm erscheint, Anmerkung: In einer Verbindung kann die gelangen Sie durch Klicken auf „Anmelden“ zur Lautstärke durch Drücken der Tasten am Telefon Passwortabfrage. Die Standardeinstellungen wie folgt eingestellt werden: ▸ lauten: ##1 + Lautstärke von 1-9 •...
-
Page 27: Autoprovisionierung
Anleitung Behnke SIP 2.0 Autoprovisionierung autoprovisionierung Mit der Autoprovisionierung kann die Behnke Beispiel für eine gültige Option 66: SIP-Sprechstelle vollautomatisch konfiguriert werden. Alle über das Web-Frontend zugängli- ftp://192.168.30.2/behnke/ chen Parameter einschließlich der Telefonbü- In diesem Ordner muss eine Datei mit folgen- cher lassen sich mit der Autoprovisionierung dem Dateinamen liegen: einrichten. -
Page 28: Reset Auf Werkseinstellungen
Anleitung Behnke SIP 2.0 Reset auf Werkseinstellungen reset auf werkseinstellungen Um ein Reset auf Werkseinstellung durchzuführen, Das Web-Interface bietet eine weitere Möglichkeit, führen Sie folgende Schritte aus: das Gerät auf Werkseinstellungen zurückzu- setzen, im Folgenden sind die diesbezüglichen ▸ SIP-Sprechstelle stromlos schalten Schritte aufgeführt: ▸... -
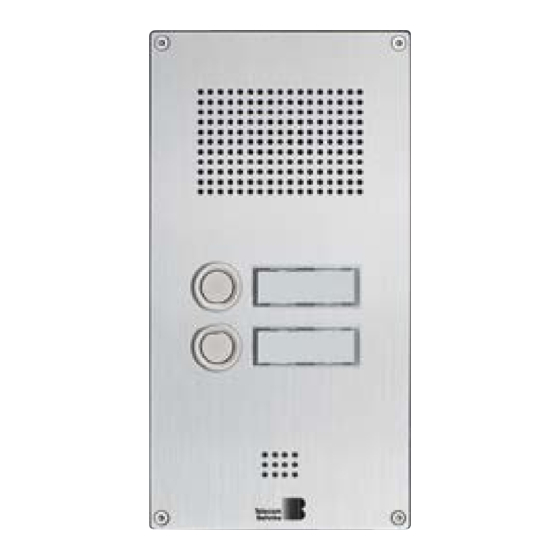
Page 29: Behnke Sip-Sprechstellen Der Serie 5/Serie
Anleitung Behnke SIP 2.0 Behnke SIP-Sprechstellen der Serie 5/Serie 10 behnke sip sprechstellen der serie serie 12.1. Türstationen Serie 5 und 10 Beispiel für Türstationen der Serie 5 mit Kamera Beispiel für Türstationen der Serie 10 mit Kamera www.behnke-online.de... -
Page 30: Kameraaufruf Serie 5/10 Via Browser
Anleitung Behnke SIP 2.0 Kameraaufruf Serie 5/10 via Browser kaMeraaufruf serie via browser 5/10 13.1. Einleitung Die IP-Kamera benötigt zwingend eine DHCP- Server für den Betrieb. Die Kamera kann nicht mit einer statischen IP-Adresse betrieben werden. Die Behnke Weitwinkel IP-Kamera bietet die Möglichkeit einer Konfiguration und Abruf des Videobildes via Browser. -
Page 31: Kamerakonfiguration
Anleitung Behnke SIP 2.0 Kamerakonfiguration kaMerakonfiguration 14.1. Login Administratorzugang: Benutzername: admin Passwort: admin Auf dieser Seite können Sie sich anmelden, um alle Funktionen des Webclients zu nutzen. Benutzerzugang: Geben Sie bitte Ihren Benutzernamen und Benutzername: viewer Passwort: viewer Passwort ein und klicken Sie auf den Button unterhalb der Eingabefelder. -
Page 32: Reset Auf Werkseinstellungen
Anleitung Behnke SIP 2.0 Kamerakonfiguration 14.2. Reset auf Werkseinstellungen (Bei Kameramodulen der Serie 20/50 vor dem Reset den Kameradeckel entfernen) ▸ ▸ Die Kamera kann auf Werkseinstellungen Die rote LED fängt an zu blinken wenn der zurückgesetzt werden, nachdem sie hochge- Resettaster gedrückt wird und blinkt schneller fahren ist (ca. -
Page 33: Technische Daten
Anleitung Behnke SIP 2.0 Technische Daten technische daten Alle Sprechstellen ▸ Rufnummern nach E.164 ▸ ▸ Status-/Fernsteuermeldungen zur Integra- Schnittstelle zum Behnke EBS-ControlCenter tion mit Fremdsoftware ▸ 9 Sprachansagen mit je bis zu 40 Sekunden Sprachcodecs Länge speicherbar ▸ Lautsprecher Lautstärke in 10 Stufen ▸... - Page 34 Anleitung Behnke SIP 2.0 Technische Daten Leistungsmerkmale IP-Kamera Serie 5 / 10 Sicherheit und Administration RTSP-Stream ▸ Passwortschutz für Admin-Zugriff ▸ rtsp://<Benutzername>:<Passwort>@<IP-Adresse Web-Browser gestützte Administration der Behnke IP-Kamera>:8557(Port)/video.mp4 Physikalische Anschlüsse Benutzername: admin (alternativ: viewer) ▸ Passwort: admin (alternativ: viewer) RJ45-Port für 100baseT Ethernet, alternativ HTTP-Stream mittels Schraubklemme http://<Benutzername>:<Passwort>@<IP-Adresse...
-
Page 35: Ce-Erklärung
Anleitung Behnke SIP 2.0 CE-Erklärung erklärung www.behnke-online.de... -
Page 36: Rechtliche Hinweise
Anleitung Behnke SIP 2.0 Rechtliche Hinweise Rechtliche Hinweise rechtliche hinweise Infos zum Produkthaftungsgesetz: 1. Änderungen an unseren Produkten, die dem technischen Fortschritt dienen, behalten wir uns vor. Die abgebildeten Produkte können im Zuge 1. Alle Produkte aus dieser Anleitung dürfen der ständigen Weiterentwicklung auch optisch von nur für den angegebenen Zweck verwendet den ausgelieferten Produkten abweichen. -
Page 37: Wichtige Lizenzinformationen
Software befindet und/oder ab dem Download Unter der LGPLv2.1 lizenzierte Software der Software. Bitte richten Sie Ihre Anfrage an • libnl Telecom Behnke GmbH Gewerbepark .An der Autobahn“ Robert-Jungk-Straße 3 66459 Kirkel Tel.: +49 (0) 68 41 / 81 77-700 E-Mail: info@behnke-online.de... - Page 38 Notizen/Notes www.behnke-online.de...
- Page 39 instructions Version 4.3 SIP-Sprechstellen Serie 5 / 10, Serie 20 / 30 / 40 / 50 / SPL Seite ..3 SIP intercoms series 5 / 10, series 20 / 30 /40 / 50 / SPL Page ..41 Postes téléphoniques SIP Séries 5 / 10, Séries 20 / 30 / 40 / 50 / SPL Page ..79...
- Page 40 (unplug power supply unit) and are disconnected from any other network and that all relevant safety regulations will be maintained. For further legal information, please see page 74. contact Information: Telecom Behnke GmbH For detailed information on our product, Gewerbepark “An der Autobahn” projects and services: Robert-Jungk-Str. 3...
- Page 41 Instructions for Behnke SIP 2.0 Contents contents 1. Introduction 1.1. What’s in the box ......................41 1.2. General information .......................41 2. Installation 2.1. Series 20 / 30 / 40 / 50 (20-0001A-IP, 20-0002A-IP, 20-0013A-IP, 20-0014A-IP, 20-0016A- IP, 20-0041A-IP, 20-0043A-IP) .....................46 2.2. Mechanical mounting Series 20/30 ................47 2.3.
- Page 42 Instructions for Behnke SIP 2.0 Contents 12. Behnke SIP door intercoms Series 5/10 12.1. Door intercom devices Series 5 and 10 ................. 65 13. Accessing the Series 5/10 camera via browser 13.1. Introduction .........................66 13.2. General functions .......................66 14. Camera configuration 14.1.
-
Page 43: Introduction
Instructions for Behnke SIP 2.0 Introduction introduction 1.1. What’s in the box 1.2. General information ▸ Features Basic electronics as • electronics boxes Series 20, 30, 40, 50 or With Behnke*s Series 20, 30 and 50 SIP • as compact intercom station of Series 5, 10 intercom stations, you get high-quality modular ▸... - Page 44 Instructions for Behnke SIP 2.0 Introduction The Series 5 and 10 compact intercom stations System Requirements are pre-assembled high-quality intercom Please note the following minimum system stations with up to two call buttons. They requirements when installing a Behnke SIP door also feature acoustic echo cancellation, and intercom station: ▸...
- Page 45 Instructions for Behnke SIP 2.0 Introduction Minimum requirements to install Behnke's IP a permanent and uninterrupted functionality video software: of the TC Behnke SIP App. Therefore we always ▸ PC with Intel Pentium IV processor (1.7GHz) recommend the usage of additional wired ®...
- Page 46 Instructions for Behnke SIP 2.0 Introduction Installation requirements Outside mounting ▸ The perfect installation height for your device ▸ When using your door intercom on a weather is a position that enables operating the door side, the Series 20, 30 and 40 intercom sta- intercom at a distance of 30-50 cm with a tions should be mounted in-wall with a rain person standing in front of the device being...
- Page 47 Instructions for Behnke SIP 2.0 Introduction Sealings Maintenance and Care To protect your device from any dampness, please You have chosen high-quality Behnke products make sure the included sealings have been put with front panels made from various materials. in place correctly upon installation of your door Regardless of the material, all front panels intercom station.
-
Page 48: Installation
Instructions for Behnke SIP 2.0 Installation Please note: Measurement and installations installation sketches are available at www.behnke-online.de/bemassung 2.1. Series 20 / 30 / 40 / 50 (20-0001A-IP, 20-0002A-IP, 20-0013A-IP, 20-0014A-IP, 20-0016A-IP, 20-0041A-IP, 20-0043A-IP) Please note: When placing the function modules, 2. -
Page 49: Mechanical Mounting Series 20/30
Instructions for Behnke SIP 2.0 Installation 2.2. Mechanical mounting Series 20/30 Insert the function modules into the front frame. Please note: When using the loudspeaker types 20-1107-IP/21-1107-IP, 20-1109-IP/21-1109-IP and 43-9913, please note that the loudspeakers are not placed in the immediate vicinity of the relays of the basic electronics (AIF). - Page 50 Instructions for Behnke SIP 2.0 Installation Remove the electronics box from the module housing Fix the module housing for remote mounting, please use the open counterplate. www.behnke-online.de...
- Page 51 Instructions for Behnke SIP 2.0 Installation Connect the ribbon cable to the installation components (speaker, microphone, buttons etc.) Plug connection for the branch line Series 20, 30, 50: LP (blue) ▸ speaker Mic (white) ▸ microphone T1 to T8 (yellow) ▸...
-
Page 52: Inserting A Label
Instructions for Behnke SIP 2.0 Installation 2.3. Inserting a label Default status Insert the label from the left Release the label field by pressing Put the label field in from the left the on the right side and click it back into place and remove with a twist Done! www.behnke-online.de... -
Page 53: Universal Devices 20-0005-Ip
Instructions for Behnke SIP 2.0 Installation 2.4. Universal devices 20-0005-IP 2.5. Series 10/50 1. Please mount the universal electronics in a Series 10/50 door intercom stations come weatherproof location inside the provided pre-assembled. To mount these door intercom housing and please connect the electronics devices, please follow the steps shown here. -
Page 54: Connection
Instructions for Behnke SIP 2.0 Connection connection Series 20 / 30 / 40 / 50 and 20-0005-IP Advice on the connection of 20-0005-IP: Please start by connecting the speaker, the micro- phone and the buttons and make sure to main- tain a maximum possible distance between the speaker, the microphone, the buttons and the electronics. -
Page 55: Hardware
Instructions for Behnke SIP 2.0 Hardware hardware 20-0001A-IP, 20-0002A-IP, 20-0013A-IP, 20-0014A-IP, 4.1. Compact electronics 20-0016A-IP, 20-0041A-IP, 20-0043A-IP, SPL intercom stations (SPL intercom station is pre-assembled and can only be operated in the configurations shown in the catalogue) Connection for LAN receptacle INPUT extensions (SIP intercom station to Switch) Network connection PORT 2... -
Page 56: Remote Electronics (Up To 50M) 20-0005-Ip
Instructions for Behnke SIP 2.0 Please note: Operation only possible in conjunction Hardware with connection box 43-9251. Please see the manual for connection box 43-9251 for a detailed description of the wiring between 20-0005-IP and connection box 43-9251 4.2. Remote electronics (up to 50m) 20-0005-IP Connection for extensions LAN receptacle INPUT (SIP intercom station to Switch) -
Page 57: Shielding Sip Intercom
Instructions for Behnke SIP 2.0 Hardware 4.3. Shielding SIP intercom When operating via the RJ-45 socket (see also Shielding during operation via the screw termi- nals (see also page 55 and 56) page 55 and 56) Position the shielding of the earthed ethernet cable, as shown in the diagram, on the bottom housing web. -
Page 58: Configuration And Set-Up
Instructions for Behnke SIP 2.0 Configuration and Set-up configuration and set Preparation Where no DHCP server is available, the method ▸ Connection via SIP intercom station with to obtain an IP address for your indoor station 10/100 Mbit Ethernet LAN can be set to "static": ▸... - Page 59 Instructions for Behnke SIP 2.0 Configuration and Set-up Once you get to the welcome screen, click login Please note: In a connected call, you may to get to the login page. Standard settings are change the volume by pressing the following as follows: keys on your phone: •...
-
Page 60: Autoprovisioning
Instructions for Behnke SIP 2.0 Autoprovisioning autoprovisioning With autoprovisioning, you can have your SIP An example for a valid option 66: intercom station automatically set-up. Any of the parameters accessible via the web frontend ftp://192.168.30.2/behnke/ including telephone books can be set-up using This folder needs to contain a file with the autoprovisioning. -
Page 61: Reset To Default Settings
Instructions for Behnke SIP 2.0 Reset to default settings reset to default settings To reset the door intercom to its default set- The web interface provides a second option to tings, please perform the following steps: reset the door intercom to its default settings, please see the following description of the ▸... -
Page 62: Hardware
Instructions for Behnke SIP 2.0 Hardware hardware 8.1. Compact devices Series 5/10 Connection speaker Connection for extensions LAN receptacle INPUT (SIP intercom station to Switch) Network connection PORT 2 (receptacle for additional IP devices, e.g. an IP camera. Please adhere to the technical data of the Switchport). -
Page 63: Configuration And Set-Up
Instructions for Behnke SIP 2.0 Configuration and Set-up configuration and set Preparation Where no DHCP server is available, the method ▸ Connection via SIP intercom station with to obtain an IP address for your indoor station 10/100 Mbit Ethernet LAN can be set to "static": ▸... - Page 64 Instructions for Behnke SIP 2.0 Configuration and Set-up Once you get to the welcome screen, click login Please note: In a connected call, you may to get to the login page. Standard settings are change the volume by pressing the following as follows: keys on your phone: •...
-
Page 65: Autoprovisioning
Instructions for Behnke SIP 2.0 Autoprovisioning autoprovisioning With autoprovisioning, you can have your SIP An example for a valid option 66: intercom station automatically set-up. Any of the parameters accessible via the web frontend ftp://192.168.30.2/behnke/ including telephone books can be set-up using This folder needs to contain a file with the autoprovisioning. -
Page 66: Reset To Default Settings
Instructions for Behnke SIP 2.0 Reset to default settings reset to default settings To reset the door intercom to its default set- The web interface provides a second option to tings, please perform the following steps: reset the door intercom to its default settings, please see the following description of the ▸... -
Page 67: Behnke Sip Door Intercoms Series
Instructions for Behnke SIP 2.0 Behnke SIP door intercoms Series 5/10 behnke sip door intercoMs series 5/10 12.1. Door intercom devices Series 5 and 10 Example of a Series 5 door intercom station Example of a Series 10 door intercom station www.behnke-online.de... -
Page 68: Accessing The Series 5/10 Camera Via Browser
Instructions for Behnke SIP 2.0 Accessing the Series 5/10 camera via browser accessing the series caMera via browser 5/10 13.1. Introduction The IP camera requires a DHCP server for operation. The camera cannot be operated with a static IP address. Behnke's wide angled IP Camera enables both configuration and access of the video image feed via browser. -
Page 69: Camera Configuration
Instructions for Behnke SIP 2.0 Camera configuration caMera configuration 14.1. Login Administrator access: User name: admin Password: admin Use this page to login in order to use all the functions within the webclient. Please enter User access: your credentials (user name and password) and User name: viewer Password: viewer click on the button underneath the entry boxes. -
Page 70: Reset To Default Settings
Instructions for Behnke SIP 2.0 Camera configuration 14.2. Reset to default settings (For 20/50 series camera modules, remove the camera cover before resetting) ▸ ▸ The camera may be returned to default The red LED starts flashing upon pressing settings after initialisation (approx. 2 minutes the reset button and increases the flashing after power on) when the red LED is perma-... -
Page 71: Technical Specifications
Instructions for Behnke SIP 2.0 Technical Specifications technical specifications All door intercom stations Voice codecs ▸ ▸ Status and remote control notifications to Speaker volume configurable integrate with third-party software to 10 settings ▸ ▸ 9 voice messages each up to 40 seconds long Microphone sensitivity configurable can be saved to 10 settings... - Page 72 Instructions for Behnke SIP 2.0 Technical Specifications Features of the series 5 / 10 IP camera Safety and administration RTSP stream ▸ Password protection for admin access ▸ rtsp://<user name>:<password>@<IP address of the Administration via web browser Behnke IP camera>:8557(Port)/video.mp4 Physical connections User name: admin (alternatively: viewer) ▸...
-
Page 73: Ce-Declaration
Instructions for Behnke SIP 2.0 CE-Declaration declaration www.behnke-online.de... -
Page 74: Legal Information
Instructions for Behnke SIP 2.0 Legal Information Legal Information legal inforMation Information with regard to product liability: 1. We reserve the right to change our products, without notice, for technical progress. As a result of continuous development, the products 1. All products mentioned in these instructions illustrated may look different from the products may only be used for the purpose intended. -
Page 75: Important License Information
• lproute2 the date of downloading the software. Please address your request to Software licensed under LGPLv2.1 • libnl Telecom Behnke GmbH Gewerbepark .An der Autobahn“ Robert-Jungk-Straße 3 66459 Kirkel Tel.: +49 (0) 68 41 / 81 77-700 Email: info@behnke-online.de... - Page 76 Notizen/Notes www.behnke-online.de...
- Page 77 Manuel Version 4.3 SIP-Sprechstellen Serie 5 / 10, Serie 20 / 30 / 40 / 50 / SPL Seite ..3 SIP intercoms series 5 / 10, series 20 / 30 /40 / 50 / SPL Page ..41 Postes téléphoniques SIP Séries 5 / 10, Séries 20 / 30 / 40 / 50 / SPL Page ..79...
- Page 78 Vous trouverez des informations légales complémentaires sur la page 112. contact Infoline Telecom Behnke S.à r.l. Pour des informations détaillées concer- 1, Avenue Saint Rémy nant les produits, les projets et nos 57600 Forbach services :...
- Page 79 Manuel Behnke SIP 2.0 Sommaire soMMaire 1. Introduction 1.1. Étendue de la livraison ....................77 1.2. Généralités ........................77 2. Montage 2.1. Séries 20 / 30 / 40 / 50 (20-0001A-IP, 20-0002A-IP, 20-0013A-IP, 20-0014A-IP, 20-0016A- IP, 20-0041A-IP, 20-0043A-IP) ..................... 82 2.2.
- Page 80 Manuel Behnke SIP 2.0 Sommaire 12. Postes SIP Behnke de la série 5/10 12.1. Portiers téléphoniques séries 5 et 10 ................101 13. Appel caméra séries 5/10 par navigateur 13.1. Introduction ........................102 13.2. Fonctions générales ....................102 14. Configuration de la caméra 14.1.
-
Page 81: Introduction
Manuel Behnke SIP 2.0 Introduction introduction 1.1. Étendue de la livraison 1.2. Généralités ▸ Caractéristiques de fonctionnement Électronique de base sous forme de • boîtier électronique des séries 20, 30, 40, Les postes SIP de Behnke des séries 20, 30, 50 ou 40 et 50 sont des postes VoIP modulaires •... - Page 82 Manuel Behnke SIP 2.0 Introduction Pour les postes compacts des séries 5 et 10, il Configuration système requise s’agit de combinés pré-montés de haute qualité Veuillez respecter la configuration minimale avec jusqu’à deux touches d’appel. Ils sont requise pour l’installation du poste SIP Behnke : ▸...
- Page 83 Manuel Behnke SIP 2.0 Introduction Pour l’installation du logiciel IP Vidéo de Behnke, Veuiller remarquer qu´il existe une multitude la configuration minimale suivante est requise : de versions des différents systèmes d´exploita- ▸ PC avec processeur Intel Pentium IV (1,7GHz) tions. Chaque variante a différentes fonctions ®...
- Page 84 Manuel Behnke SIP 2.0 Introduction Conditions de montage Montage en extérieur ▸ La hauteur de montage optimale est atteinte, ▸ Lors d’une implantation dans un lieu exposé lorsque la distance d’utilisation du portier aux intempéries, les portiers téléphoniques téléphonique est de 30-50 cm et qu’une per- des séries 20, 30 et 40 doivent être encastrés sonne se tenant debout peut confortablement avec un châssis anti-pluie (faites attention...
- Page 85 Manuel Behnke SIP 2.0 Introduction Joints d’étanchéité Entretien et nettoyage Pour protéger de l’humidité, assurez-vous que les Vous avez installé des produits Behnke de haute joints d’étanchéité fournis sont bien positionnés qualité avec des plaques avant fabriquées à partir lors du montage du portier téléphonique. Le joint de différents matériaux.
-
Page 86: Montage
Manuel Behnke SIP 2.0 Montage Remarque : vous trouverez les cotations et les schémas de montage à l’adresse Montage www.behnke-online.de/bemassung 2.1. Séries 20 / 30 / 40 / 50 (20-0001A-IP, 20-0002A-IP, 20-0013A-IP, 20-0014A-IP, 20-0016A-IP, 20-0041A-IP, 20-0043A-IP) Remarque : pour des raisons d’optique et de protec- 2. -
Page 87: Montage Mécanique Séries 20/30
Manuel Behnke SIP 2.0 Montage 2.2. Montage mécanique séries 20/30 Insérer les modules fonctionnels dans le cadre avant Remarque : en cas d'utilisation des types de haut-parleurs 20-1107-IP/21-1107-IP, 20-1109-IP/21-1109-IP et 43-9913, attention à ce que les hauts-parleurs ne soient pas placés à proximité... - Page 88 Manuel Behnke SIP 2.0 Montage Retirez le boîtier électronique du boîtier modulaire Fixation du boîtier des modules pour un montage délocalisé, vissez avec une plaque de renforcement ouverte. www.behnke-online.fr...
- Page 89 Manuel Behnke SIP 2.0 Montage Raccordement du fil de connexion du câble plat avec les modules intégrés (haut-parleurs, microphones, touches, etc.) Affectation des connecteurs, câblage Série 20, 30, 50 : HP (bleu) ▸ Haut-parleur Mic (blanc) ▸ microphone T1 à T8 (jaune) ▸...
-
Page 90: Placez L'étiquette Avec L'inscription
Manuel Behnke SIP 2.0 Montage 2.3. Placez l’étiquette avec l’inscription État à la livraison Placez l’étiquette avec l’inscription par la gauche Détachez le champ d’inscription en Placez le champ d’inscription par la gauche appuyant sur le côté droit et laissez-le s’enclencher et tournez C’est terminé ! www.behnke-online.fr... -
Page 91: Appareils Universels 20-0005-Ip
Manuel Behnke SIP 2.0 Montage 2.4. Appareils universels 20-0005-IP 2.5. Séries 10 / 50 1. Montez l’électronique universelle dans un Les portiers téléphoniques des séries 10 / 50 endroit à l’abri des intempéries dans le boî- sont livrés déjà montés. Pour l’installation, tier fourni et connectez l’électronique avec procédez en vous basant sur ce qui suit. -
Page 92: Raccordement
Manuel Behnke SIP 2.0 Raccordement raccordeMent Séries 20 / 30 / 40 / 50 et 20-0005-IP Consignes pour le raccordement de 20-0005-IP : veuillez commencer avec le raccordement des haut-parleurs, microphones et touches, et respec- tez une distance maximale entre les haut-parleurs, microphones, les touches et l’électronique. -
Page 93: Composants
Manuel Behnke SIP 2.0 Composants coMposants 20-0001A-IP, 20-0002A-IP, 20-0013A-IP, 20-0014A-IP, 4.1. Électronique compacte 20-0016A-IP, 20-0041A-IP, 20-0043A-IP, stations SPL (la station SPL est prémontée et ne peut fonctionner que dans les configurations indiquées dans le catalogue) Raccord Raccordement LAN INPUT (poste SIP pour switch) d’extension Raccordement LAN PORT 2 (raccordement pour d’autres appareils IP... -
Page 94: Électronique Éloignée (Jusqu'à 500 M) 20-0005-Ip
Manuel Behnke SIP 2.0 Remarque : fonctionnement uniquement possible en Composants liaison avec le boîtier de raccordement 43-9251. Vous trouverez une description détaillée du câblage entre 20-0005-IP et le boîtier de raccordement 43-9251 dans le manuel du boîtier de raccordement 43-9251 4.2. -
Page 95: Isolation Postes Téléphoniques Sip
Manuel Behnke SIP 2.0 Composants 4.3. Isolation postes téléphoniques SIP en cas de fonctionnement via la prise RJ-45 (voir Isolation pendant le fonctionnement grâce aux bornes à vis (voir aussi pages 93 et 94) aussi pages 93 et 94) Placez le blindage du câble Ethernet mis à la terre comme indiqué sur l’illustration du bas Le site web du logement comme indiqué... -
Page 96: Configuration Et Mise En Service
Manuel Behnke SIP 2.0 Configuration et mise en service configuration et Mise en service Préparation Lorsqu’il n’y a aucun serveur DHCP disponible, ▸ Raccordement du poste SIP au réseau l’attribution d’une adresse IP se fait de manière Ethernet LAN 10/100 Mbit « statique » : ▸... - Page 97 Manuel Behnke SIP 2.0 Configuration et mise en service Lorsque l’écran d’accueil apparaît, il est Remarque : En communication, l’acoustique possible de passer à l’écran d’enregistrement peut être réglée en appuyant sur les touches du avec demande du mot de passe en cliquant sur téléphone comme suit : ▸...
-
Page 98: Configuration Automatique
Manuel Behnke SIP 2.0 Configuration automatique configuration autoMatique Grâce à cette fonction, le poste SIP de Behnke se Exemple pour une option 66 valide : laisse configurer de manière automatique. Tous les paramètres accessibles via l’application Web, ftp://192.168.30.2/behnke/ y compris les répertoires téléphoniques, peuvent Un fichier avec le nom suivant doit être déposé... -
Page 99: Réinitialisation Aux Paramètres D'usine
Manuel Behnke SIP 2.0 Réinitialisation aux paramètres d’usine réinitialisation aux paraMètres d usine ’ Pour effectuer une réinitialisation aux paramé- L’interface Web offre une autre possibilité pour trages d’usine, suivre la procédure : réinitialiser l’appareil aux paramètres d’usine. La procédure est la suivante : ▸... -
Page 100: Composants
Manuel Behnke SIP 2.0 Composants coMposants 8.1. Appareils compacts, séries 5, 10 Raccord de haut-parleur Raccord d’extension Raccordement LAN INPUT (poste SIP pour switch) Raccordement LAN PORT 2 (raccordement pour d’autres appareils IP comme par ex. caméra IP. Respectez les spécificités techniques du port de commu- tation réseau) Processeur master... -
Page 101: Configuration Et Mise En Service
Manuel Behnke SIP 2.0 Configuration et mise en service configuration et Mise en service Préparation Lorsqu’il n’y a aucun serveur DHCP disponible, ▸ Raccordement du poste SIP au réseau l’attribution d’une adresse IP se fait de manière Ethernet LAN 10/100 Mbit « statique » : ▸... - Page 102 Manuel Behnke SIP 2.0 Configuration et mise en service Lorsque l’écran d’accueil apparaît, il est possible Remarque : En communication, l’acoustique de passer à l’écran d’enregistrement avec demande peut être réglée en appuyant sur les touches du du mot de passe en cliquant sur « s’enregistrer ». téléphone comme suit : ▸...
-
Page 103: Configuration Automatique
Manuel Behnke SIP 2.0 Configuration automatique configuration autoMatique Grâce à cette fonction, le poste SIP de Behnke se Exemple pour une option 66 valide : laisse configurer de manière automatique. Tous les paramètres accessibles via l’application Web, ftp://192.168.30.2/behnke/ y compris les répertoires téléphoniques, peuvent Un fichier avec le nom suivant doit être déposé... -
Page 104: Réinitialisation Aux Paramètres D'usine
Manuel Behnke SIP 2.0 Réinitialisation aux paramètres d’usine réinitialisation aux paraMètres d usine ’ Pour effectuer une réinitialisation aux paramé- L’interface Web offre une autre possibilité pour trages d’usine, suivre la procédure : réinitialiser l’appareil aux paramètres d’usine. La procédure est la suivante : ▸... -
Page 105: Postes Sip Behnke De La Série 5
Manuel Behnke SIP 2.0 Postes SIP Behnke de la série 5/10 postes sip behnke de la série 5/10 12.1. Portiers téléphoniques séries 5 et 10 Exemple pour portiers téléphoniques de la série 5 avec caméra Exemple pour portiers téléphoniques de la série 10 avec caméra www.behnke-online.fr... -
Page 106: Appel Caméra Séries 5/10 Par Navigateur
Manuel Behnke SIP 2.0 Appel caméra séries 5/10 par navigateur appel caMéra séries par navigateur 5/10 13.1. Introduction La caméra IP a besoin un serveur DHCP pour fonctionner. La caméra ne peut pas fonction- ner avec une adresse IP statique. La caméra IP grand angle Behnke permet la configura- tion et l’affichage d’une image vidéo dans le navigateur. -
Page 107: Configuration De La Caméra
Manuel Behnke SIP 2.0 Configuration de la caméra configuration de la caMéra 14.1. Login Accès administrateur : Nom d’utilisateur : admin Mot de passe : admin Sur cette page, vous pouvez vous enregistrer pour accéder aux fonctions du client Web. Accès utilisateur : Veuillez saisir votre nom d’utilisateur et mot de Nom d’utilisateur : viewer Mot de passe : viewer... -
Page 108: Réinitialisation Aux Paramètres D'usine
Manuel Behnke SIP 2.0 Configuration de la caméra 14.2. Réinitialisation aux paramètres d’usine (Pour les modules de caméra de la série 20/50, retirez le couvercle de la caméra avant de la réinitia- liser) ▸ ▸ La caméra peut être réinitialisée aux para- La LED rouge commence à... -
Page 109: Caractéristiques Techniques
Manuel Behnke SIP 2.0 Caractéristiques techniques caractéristiques techniques Tous les postes Codecs vocaux ▸ ▸ Messages d’état et de télécommande pour Volume de haut-parleur configurable intégration dans un logiciel tiers en 10 niveaux ▸ ▸ 9 messages vocaux enregistrables avec une Sensibilité... -
Page 110: Sécurité Et Administration
Manuel Behnke SIP 2.0 Caractéristiques techniques ▸ Caractéristiques de la série de caméras IP 5 / 10 Touche multiple avec jusqu’à 100 touches Streaming RTSP d’appel, sur demande rtsp://<nom d’utilisateur>:<mot de passe>@<adresse Sécurité et administration IP de la caméra IP Behnke>:8557(port)/video.mp4 ▸... -
Page 111: Déclaration Ce
Manuel Behnke SIP 2.0 Déclaration CE déclaration ce www.behnke-online.fr... -
Page 112: Informations Légales
Manuel Behnke SIP 2.0 Informations légales inforMations légales Informations relatives à la loi sur la responsabi- 1. Nous nous réservons le droit de modifier nos lité du fait des produits : produits en vertu des progrès techniques. En raison de l’évolution technique, les produits livrés peuvent avoir une apparence différente 1. -
Page 113: Informations Importantes Relatives Aux Licences
Logiciels sous licence LGPLv2.1 logiciel. Veuillez adresser votre demande à • libnl Telecom Behnke GmbH Gewerbepark .An der Autobahn“ Robert-Jungk-Straße 3 D-66459 Kirkel Tél. : +49 (0) 68 41 / 81 77-700 e-mail : info@behnke-online.de... - Page 114 Notizen/Notes www.behnke-online.fr...
- Page 115 Notizen/Notes www.behnke-online.fr...
- Page 116 Version 4.3 Kirkel, Januar 2021 telecoM behnke gMbh Telecom Behnke GmbH Info-Hotline: +49 (0) 68 41 / 81 77-700 Gewerbepark „An der Autobahn“ Service-Hotline: +49 (0) 68 41 / 81 77-777 Robert-Jungk-Straße 3 Telefax: +49 (0) 68 41 / 81 77-750 66459 Kirkel info@behnke-online.de...