Publicité
Les langues disponibles
Les langues disponibles
Liens rapides
VIDEOREGISTRATORE DIGITALE AHD
STAND ALONE H264 CON 4‐8-16
INGRESSI HD/FULL-HD
GUIDA RAPIDA
ART. AHDVR040x-AHDVR080x-AHDVR160x
ART. AHDVR042x-AHDVR082x-AHDVR162x
Leggere questo manuale prima dell'uso e conservarlo per consultazioni future
0
Publicité

Manuels Connexes pour Comelit AHDVR040 Serie


Sommaire des Matières pour Comelit AHDVR040 Serie
- Page 1 VIDEOREGISTRATORE DIGITALE AHD STAND ALONE H264 CON 4‐8-16 INGRESSI HD/FULL-HD GUIDA RAPIDA ART. AHDVR040x-AHDVR080x-AHDVR160x ART. AHDVR042x-AHDVR082x-AHDVR162x Leggere questo manuale prima dell’uso e conservarlo per consultazioni future...
- Page 2 Caratteristiche tecniche Modello AHDVR040x AHDVR080x AHDVR160x Sistema Embedded Linux operativo Parametri video Ingressi video 4 (BNC: 1.0Vp-p,75Ω) 8 (BNC: 1.0Vp-p,75Ω) 16 (BNC: 1.0Vp-p,75Ω) Compressione H.264 Risoluzione 720p / 960H / D1 codifica Bit rate 512 ~ 4096 Kbps (default: 3072 Kbps) 4 ch @ 720p regist.
- Page 3 Modello AHDVR042x AHDVR082x AHDVR162x Sistema Embedded Linux operativo Parametri video Ingressi video 4 (BNC: 1.0Vp-p,75Ω) 8 (BNC: 1.0Vp-p,75Ω) 16 (BNC: 1.0Vp-p,75Ω) Compressione H.264 Risoluzione 1080p / 720p / 960H / D1 codifica Bit rate 512 ~ 4096 Kbps (default: 3072 Kbps) Interfaccia video Ingressi BNC x 4...
- Page 4 Installazione del disco rigido Prima dell'uso, accertarsi di installare l'unità disco rigido (HDD). 1. Smontare le viti di fissaggio della 2. Collegare il cavo dati del disco rigido. copertura superiore del dispositivo. 3. Collegare il cavo di alimentazione del 4. Collocare il disco rigido nella posizione disco rigido.
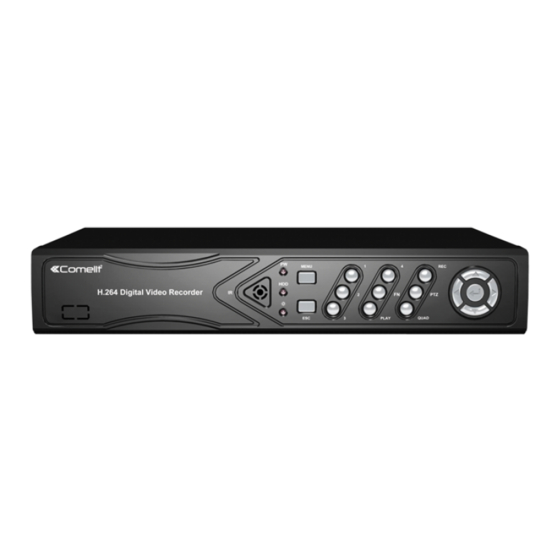
- Page 5 Descrizione pannello anteriore art. AHDVR080x e AHDVR042x 1. Led HDD 8. REC: tasto registrazione manuale 2. Led di stato, riservato 9. PLAY: tasto riproduzione 3. 1 – 8: tasti pieno schermo CH1 – CH8 10. ESC: tasto Esci 4. ▲▼◄►: tasti direzionali 11.
- Page 6 Descrizione pannello posteriore DVR 4 canali 7 9 10 1. VIDEO IN: ingressi video 2. HD OUTPUT: uscita video alta definizione 3. AUDIO IN: ingresso audio 4. AUDIO OUT: uscita audio 5. VGA: uscita video VGA 6. NET: interfaccia di rete RJ45 7.
- Page 7 3. AUDIO IN 1: ingresso audio 1 4. ALARM: ingressi / uscita di allarme 5. Interruttore di alimentazione 6. HD OUTPUT: uscita video alta definizione 7. AUDIO OUT: uscita audio 8. VGA: uscita video VGA 9. NET: interfaccia di rete RJ45 10.
- Page 8 Channel mode (Modalità canale) Nel menu di scelta rapida, selezionare "Channel mode" (modalità canale). In questo menu è possibile, tramite la barra di scorrimento [1], selezionare la modalità dei canali che verranno connessi al DVR (telecamere AHD, telecamere Analogiche, telecamere IP della serie Easy). Per aggiungere automaticamente le telecamere IP della serie Easy, cliccare successivamente il pulsante "Add IP Camera"...
- Page 9 Record setup (Impostazione registrazione) In System Setup (Impostazione sistema) selezionare "Record setup" (Impostazione registrazione). Channel (Canale): è possibile selezionare il canale di destinazione, facendo clic sulla corrispondente casella di selezione. Weekday (Giorno): selezionare il giorno della settimana in base alle proprie esigenze; "ALL" indica che la registrazione è...
- Page 10 Web port (Porta Web): numero di porta utilizzato per l'accesso da browser (IE); il valore predefinito è "80". Preferred DNS (DNS primario): indirizzo IP del DNS primario. DDNS (DNS dinamico): consente di utilizzare un servizio DNS dinamico tra quelli supportati, quali Comelit DNS, ecc. Per l’utilizzo di Comelit DNS vedere l’ultima pagina di questo manuale.
- Page 11 Nota: il nome utente predefinito è admin e non è impostata alcuna password. Remote Video Viewer (Visualizzatore video remoto) Una volta effettuato il collegamento, il visualizzatore video remoto mostra i seguenti elementi: finestra di anteprima, pannello di controllo PTZ, modalità di anteprima, opzione stream, attivazione/disattivazione canali, impostazione, configurazione, riproduzione, disconnessione utente come illustrato nella seguente figura:...
- Page 12 Apertura anteprima: nella finestra di anteprima, fare clic con il pulsante sinistro del mouse, selezionare il canale di destinazione (la cornice di colore rosso indica che il canale è selezionato). Nella tabella di attivazione/disattivazione canali, è possibile fare clic su ciascun canale per aprirlo o chiuderlo, per es.: attivato;...
- Page 13 ENREGISTREUR VIDÉO NUMÉRIQUE AHD AUTONOME H264 4-8-16 ENTRÉES HD/FULL-HD MINI GUIDE ART. AHDVR040x-AHDVR080x-AHDVR160x ART. AHDVR042x-AHDVR082x-AHDVR162x Lire attentivement ce manuel avant d'utiliser et le conserver pour référence future...
- Page 14 Paramètres techniques Modèle AHDVR040x AHDVR080x AHDVR160x Système Embedded Linux d'exploitation Paramètres vidéo Entrées vidéo 4 (BNC: 1.0Vp-p,75Ω) 8 (BNC: 1.0Vp-p,75Ω) 16 (BNC: 1.0Vp-p,75Ω) Compression H.264 Résolution 720p / 960H / D1 d'encodage Bit rate 512 ~ 4096 Kbps (défaut: 3072 Kbps) 4 ch @ 720p enreg..
- Page 15 Modèle AHDVR042x AHDVR082x AHDVR162x Système Embedded Linux d'exploitation Paramètres vidéo Entrées vidéo 4 (BNC: 1.0Vp-p,75Ω) 8 (BNC: 1.0Vp-p,75Ω) 16 (BNC: 1.0Vp-p,75Ω) Compression H.264 Résolution 1080p / 720p / 960H / D1 d'encodage Bit rate 512 ~ 4096 Kbps (défaut: 3072 Kbps) Interface vidéo Entrées BNC x 4...
- Page 16 Installation DD Veillez à installer l'DD dès la première utilisation. 2. Brancher le câble de données au disque 1. Dévisser les vis de fixation du boîtier du dur. dispositif. 3. Brancher le câble d’alimentation du 4. Placer le disque dur dans son logement à disque dur.
- Page 17 Description du tableau avant art. AHDVR080x et AHDVR042x 1. Led état Disque Dur 8. REC: bouton enregistrement manuel 2. Led d'état, réservé 9. PLAY: bouton lecture enregistrement 3. 1 – 8: bouton écran simple 10. ESC: bouton pour quitter 4. ▲▼◄►: bouton fléché 11.
- Page 18 5. VGA: sortie vidéo VGA 6. NET: Interface réseau RJ45 7. Interface USB 8. ALARM: entrées / sortie d’alarme 9. RS485 10. Alimentation 12 VDC 11. Bouton d’alimentation Description du tableau arrière du DVR 8 canaux 9 10 1. VIDEO IN: entrée vidéo 2.
- Page 19 Marche/Arrêt Vérifiez que la tension CA disponible corresponde à celle du DVR et que la sortie du DVR soit branchée à une mise à la terre adéquate. Après avoir mis le dispositif sous tension et l'avoir allumé, le voyant 【POWER】 s'allume.
- Page 20 Paramètres système Dans le menu raccourci, sélectionnez « system setup » (Paramètres système) en entrez dans son sous-menu. Il comprend : Paramètres généraux, paramètres du canal, paramètres d'enregistrement, paramètres de réseau, administration du système. Paramètres généraux Sélectionnez « General setup » (Paramètres généraux) et entrez dans l'interface de paramétrage. Déconnexion auto : le DVR s'éteint si aucune opération n'a lieu pendant 10 minutes.
- Page 21 Channel (Canal) : permet de choisir le canal cible en cliquant sur la case à cocher Weekday (Jour de la semaine) : permet de sélectionner le jour souhaité par l'utilisateur. « ALL » (Tout) entend mémoriser toutes les dates. Dans la boîte d'édition de l'heure, sélectionnez l'heure selon les différents modes de reprogrammation. «...
- Page 22 DDNS : c'est la fonction analytique automatique du nom de domaine dynamique. Elle prend en charge Comelit DNS,.ect. Pour utiliser Comelit DNS voir la dernière page de ce manuel. Dans le menu « Network setup » (Paramètres réseau), cliquez sur « DDNS » pour entrer dans l'interface de paramétrage.
- Page 23 Afficheur vidéo distant Lorsque vous êtes connecté, l'afficheur vidéo distant comprend: la fenêtre d'aperçu, le contrôle PTZ, le mode d'aperçu, les options de streaming, les commandes marche/arrêt canal, la configuration, la lecture, la déconnexion de l'utilisateur, comme indiqué ci-dessous :...
- Page 24 Ouvrir l'aperçu : dans la fenêtre d'aperçu, cliquez gauche, choisissez le canal cible (si l'encadré du canal est rouge, il est sélectionné). Si le canal est activé/désactivé, cliquez gauche pour ouvrir ou fermer le canal vidéo ; on (activé) ; off (Désactivé) Mode affichage : en mode affichage, commuter le tableau, cliquez sur pour choisir le mode ou...
- Page 25 4-8-16 HD/FULL-HD INPUTS H264 STAND-ALONE AHD DIGITAL VIDEO RECORDER QUICK GUIDE ART. AHDVR040x-AHDVR080x-AHDVR160x ART. AHDVR042x-AHDVR082x-AHDVR162x Please read this manual thoroughly before use and keep it for future reference...
- Page 26 Technical Parameters Model Number AHDVR040x AHDVR080x AHDVR160x Operating Embedded Linux System Video parameter Video Input 4 (BNC: 1.0Vp-p,75Ω) 8 (BNC: 1.0Vp-p,75Ω) 16 (BNC: 1.0Vp-p,75Ω) Compression H.264 Encode 720p / 960H / D1 resolution Bit rate 512 ~ 4096 Kbps (default: 3072 Kbps) 4 ch @ 720p record + 1 ch 8 ch @ 720p record + 1 ch 16 ch @ 720p record + 1 ch...
- Page 27 Model Number AHDVR042x AHDVR082x AHDVR162x Operating Embedded Linux System Video parameter Video Input 4 (BNC: 1.0Vp-p,75Ω) 8 (BNC: 1.0Vp-p,75Ω) 16 (BNC: 1.0Vp-p,75Ω) Compression H.264 Encode 1080p / 720p / 960H / D1 resolution Bit rate 512 ~ 4096 Kbps (default: 3072 Kbps) Video interface Inputs BNC x 4...
- Page 28 HDD Installation Make sure to install the HDD when you first use it. Panels Description Art. AHDVR040x front panel description 1. POWER led 9. PTZ: PTZ key 2. 1 ~ 4: CH1 ~ CH4 Single-Screen keys 10. ESC: Exit key 3.
- Page 29 Art. AHDVR080x and AHDVR042x front panel description 1. HDD led 8. REC: Manual recording key 2. State led, reserved 9. PLAY: Playback key 3. 1 ~ 8: CH1 ~ CH8 Single-Screen key 10. ESC: Exit key 4. ▲▼◄►: Direction key 11.
- Page 30 9. RS485 10. 12 VDC power supply 11. POWER key 8 channels DVR rear Panel 7 9 10 1. VIDEO IN: video input 2. HD OUTPUT: high definition video output 3. AUDIO IN: audio input 4. AUDIO OUT: audio output 5.
- Page 31 Turn ON / OFF Confirm that AC voltage accessible matches with DVR. Ensure that the DVR power outlet connect with a good middle ground grounding. After switching power, the device started, 【POWER】 light is on. Turn into system, if the panel status light flashing, it's normal conditions. After device start, preview interface can be seen immediately.
- Page 32 System setup In the shortcut menu, choose “system setup” and turn into it's sub menu. It includes: General setup, Channel setup, Record setup, Network setup, System admin. General setup Choose the "General setup" and turn into it's setup interface. Auto Logout: DVR will log off if there is no operation within 10 minutes, it needs login again. Key Buzzer:...
- Page 33 Web port:this port number is used for IE browser visit; default port is "80". Preferred DNS:preferred DND IP address. DDNS: The automatic analytic function of dynamic domain name, it could supported Comelit DNS, etc. To use Comelit DNS see the last page of this manual.
- Page 34 Esee User Manual 1. Connect DVR with network, make sure network working fine 2. For remote view in computer, go to www.dvrskype.com Do the following setup before you log in Esee on computer Note: Internet Explorer setting. If use it for the first time and the software can't load, then need to make the following setting: Internet options Safety-Internet Custom options...
- Page 35 Open preview: In preview window, click left mouse, choose target channel, (If channel frame is red, means select). In channel on/off table, click left mouse, can open or close that channel video, such as: Preview mode: In preview mode switch table, can click to choose mode, or double click channel to signal channel preview mode, or switch to multi-channel mode.
- Page 36 VIDEOGRABADOR DIGITAL AHD INDEPENDIENTE H264, 4-8-16 ENTRADAS HD/FULL-HD GUÍA RÁPIDA ART. AHDVR040x-AHDVR080x-AHDVR160x ART. AHDVR042x-AHDVR082x-AHDVR162x Lea este manual antes uso y consérvelo para consultarlo en el futuro...
- Page 37 Parámetros técnicos Modelo AHDVR040x AHDVR080x AHDVR160x Sistema Embedded Linux operativo Parámetros de vídeo Entradas vídeo 4 (BNC: 1.0Vp-p,75Ω) 8 (BNC: 1.0Vp-p,75Ω) 16 (BNC: 1.0Vp-p,75Ω) Compresión H.264 Resolución 720p / 960H / D1 codificación Bit rate 512 ~ 4096 Kbps (default: 3072 Kbps) 4 ch @ 720p grab.
- Page 38 Modelo AHDVR042x AHDVR082x AHDVR162x Sistema Embedded Linux operativo Parámetros de vídeo Entradas vídeo 4 (BNC: 1.0Vp-p,75Ω) 8 (BNC: 1.0Vp-p,75Ω) 16 (BNC: 1.0Vp-p,75Ω) Compresión H.264 Resolución 1080p / 720p / 960H / D1 codificación Bit rate 512 ~ 4096 Kbps (default: 3072 Kbps) Interfaz de vídeo Entradas BNC x 4...
- Page 39 Instalación de la HDD Asegúrese de instalar la HDD al utilizarla por primera vez. 2. Conecte la línea de datos del disco duro. 1. Extraiga los tornillos fijados de la cubierta superior del dispositivo. 3. Conecte la línea de alimentación del 4.
- Page 40 Descripción del panel frontal de la videograbadora art. AHDVR080x y AHDVR042x 1. Led de estado de la HDD 8. REC: tecla de grabación manual 2. Led de estado, reservado 9. PLAY: tecla de reproducción 3. 1 – 8: tecla de pantalla única 10.
- Page 41 5. VGA: salida VGA 6. NET: interfaz de red RJ45 7. Interfaz USB 8. ALARM: entradas / salida de alarma 9. RS485 10. Alimentación 12 VDC 11. Tecla de alimentación Descripción del panel trasero de la videograbadora de 8 canales 7 9 10 1.
- Page 42 Encendido/apagado Confirme que la tensión de AC accesible coincide con la videograbadora. Asegúrese de que la toma de alimentación de la videograbadora se conecta con una buena toma de tierra. Después de conmutarse la alimentación y de ponerse el dispositivo en funcionamiento, la luz 【 POWER】 se enciende. Encienda el sistema; si la luz de estado del panel parpadea, significa que el estado es normal.
- Page 43 Configuración del sistema En el menú de acceso directo, elija "system setup" (configuración del sistema) y acceda a su menú secundario. Incluye: Configuración general, Configuración del canal, Configuración de grabación, Configuración de red y Administración del sistema. Configuración general Elija "General setup" (Configuración general) y acceda a su interfaz de configuración. Auto Logout (Cierre de sesión automático): la videograbadora se desactivará...
- Page 44 Web port (Puerto web): este número de puerto se utiliza para visitas con el explorador IE; el puerto predeterminado es "80". Preferred DNS (DNS preferido): dirección IP del DNS preferido. DDNS: La función analítica automática de nombre de dominio dinámico; puede admitir Comelit DNS, etc. Para utilizar Comelit DNS ver la última página de este manual.
- Page 45 En el menú "network setup", haga clic en "DDNS" para entrar en su interfaz de configuración. Enable (Activar): significa que el servicio DDNS se ha empezado a utilizar; "□" significa detención. Seleccione el servidor de red correspondiente e introduzca el nombre de usuario, contraseña y nombre de dominio.
- Page 46 Visor de vídeo remoto Tras conectarse, el visor de vídeo remoto incluye: ventana de vista previa, control de PTZ, modo de vista previa, opción de flujo, activación/desactivación de canales, ajuste, configuración, reproducción, cierre de sesión de usuario, como se muestra a continuación: Abra la vista previa: En la ventana de vista previa, haga clic con el botón izquierdo del ratón y elija el canal que desee (si el marco del canal es rojo, significa seleccionar).
- Page 47 SNELGIDS VOOR AHD H264 STANDALONE DIGITALE VIDEORECORDER 4-8-16 INGANGEN HD/FULL-HD ART. AHDVR040x-AHDVR080x-AHDVR160x ART. AHDVR042x-AHDVR082x-AHDVR162x Lees deze handleiding vóór gebruik zorgvuldig door en bewaar hem voor toekomstig gebruik...
- Page 48 Technische specificaties Model AHDVR040x AHDVR080x AHDVR160x Embedded Linux Besturingssysteem Parameters video Video-ingangen 4 (BNC: 1.0Vp-p,75Ω) 8 (BNC: 1.0Vp-p,75Ω) 16 (BNC: 1.0Vp-p,75Ω) Beeldcompressie H.264 Coderingsresolutie 720p / 960H / D1 Bit rate 512 ~ 4096 Kbps (default: 3072 Kbps) 4 ch @ 720p opnem. + 1 8 ch @ 720p opnem.
- Page 49 Model AHDVR042x AHDVR082x AHDVR162x Besturingssysteem Embedded Linux Parameters video Video-ingangen 4 (BNC: 1.0Vp-p,75Ω) 8 (BNC: 1.0Vp-p,75Ω) 16 (BNC: 1.0Vp-p,75Ω) Beeldcompressie H.264 Coderingsresolutie 1080p / 720p / 960H / D1 Bit rate 512 ~ 4096 Kbps (default: 3072 Kbps) Video interface Ingangen BNC x 4 BNC x 8...
- Page 50 Harde schijf installeren Zorg ervoor dat u vóór ingebruikname de harde schijf hebt geïnstalleerd. 1. Draai de schroeven van de bovenste 2. Sluit de gegevenskabel van de afdekking van het apparaat los. harde schijf aan. 3. Sluit de voedingskabel van de harde 4.
- Page 51 Voorpaneel beschrijving art. AHDVR080x en AHDVR042x 1. Led harde schijf 8. REC: toets voor handmatig opnemen 2. Statusled, gereserveerd 9. PLAY: afspeeltoets 3. 1 t/m 8: toetsen CH1 t/m CH8 enkelvoudig scherm 10. ESC: toets voor afsluiten 4. ▲▼◄►: Pijltoetsen 11.
- Page 52 7. USB-interface 8. ALARM: ingang/uitgang alarm 9. RS485 10. 12 VDC-voeding 11. Toets voeding Achterpaneel 8-kanaals DVR 7 9 10 1. VIDEO IN: video-ingang 2. HD OUTPUT: uitgang HD-video 3. AUDIO IN: audio-ingang 4. AUDIO OUT: audio-uitgang 5. VGA: uitgang VGA-video 6.
- Page 53 In- en uitschakelen Controleer of de beschikbare AC-spanning geschikt is voor de DVR. Zorg ervoor dat de stekker van de DVR is aangesloten op een goede aarding. Zodra de stroom wordt ingeschakeld, wordt het apparaat gestart en gaat het lampje【POWER】 aan. Als u het systeem start en het statuslampje op het paneel knippert, werkt het apparaat correct.
- Page 54 Configuratie Selecteer in het snelmenu System Setup [configuratie] en open het bijbehorende submenu. Dit submenu bevat de volgende items: General Setup [algemene], Channel Setup, Record Setup [opname], Network Setup [netwerk], System admin. Algemene Selecteer General Setup [algemene] en open de bijbehorende interface. Auto Logout [automatisch afmeld]: de DVR wordt afgemeld als er binnen 10 minuten geen activiteit is.
- Page 55 Preferred DNS [woorkeur-DNS]: IP-adressen van de primaire DNS. DDNS: de automatische analysefunctie van een dynamische domeinnaam, biedt ondersteuning voor onder meer Comelit DNS, etc. Zie de laatste pagina. Klik in het menu Network Setup [netwerk] op DDNS om de instellingen te bewerken Enable [toestaan]: '☑' betekent dat het gebruik van de DDNS-service wordt gestart;...
- Page 56 Selecteer PPPOE in het menu Network Setup [netwerk]. Enable [toestaan]:'☑ PPPOE Function' [PPPOE-functie] betekent dat ingebeld wordt via het PPPOE-protocol, '□' betekent dat dit wordt gestopt. Username [gebruikersnaam]: voer de gebruikersnaam van de ISP in Password [wachtwoord]: voer het wachtwoord van de ISP in Nadat de pagina-instelling voltooid is, klikt u op OK om de wijzigingen op te slaan en af te sluiten;...
- Page 57 [streamingoptie], Channel On/Off [kanaal aan/uit], Setting [instellingen], Configuration [configuratie], Playback [afspelen] en User Logout [gebruiker afmelden]: Voorbeeld openen: klik in het voorbeeldvenster met de linkermuisknop en kies Target Channel [doelkanaal] (als het kanaal een rood kader heeft, is het geselecteerd). Klik in de tabel Channel On/Off [kanaal aan/uit] met de linkermuisknop om de video van dat kanaal aan of uit te zetten: aan;...
- Page 58 2 – verify that on the device, nearby label showing the model, is present the label with the univocal code for Technical service registration. In case it was not present, contact Comelit support 3 – connect to the site http://www.comelitdns.com...
- Page 59 80) COMELIT DNS SERVICE Voor deze reeks DVR’s is een eigen Comelit dynamische DNS Service beschikbaar. Voor het gebruik van de dienst volgt u deze stappen: 1 – verifieer de firmware versie van het toestel. Indien nodig, de firmware bijwerken 2 –...