Table des Matières

Manuels Connexes pour AERMEC Omnia HL C Série


Sommaire des Matières pour AERMEC Omnia HL C Série
- Page 1 VENTILCONVETTORI FAN COIL VENTILO-CONVECTEURS GEBLÄSEKONVEKTOREN Omnia HL C HL CM ISO 9001 - Cert. n° 0128/4 IHLCLX Sostituisce - Replace 0711 Remplace - Ersetzt: 68872.02_03 68872.02_02/0404...
-
Page 3: Table Des Matières
INDICE • CONTENTS • INDEX • INHALTSVERZEICHN INFORMAZIONI GENERALI • GENERAL INFORMATION INFORMATIONS GENERALES • ALLGEMEINE INFORMATIONEN Descrizione di Omnia HL C - HL CM Utilizzo • Visualizzazioni Caratteristiche di funzionamento • Imballo • Installazione dell’unità Collegamenti elettrici • Rotazione batteria Configurazione Dip Autotest Informazioni importanti e manutenzione... -
Page 4: Dichiarazione Di Conformità
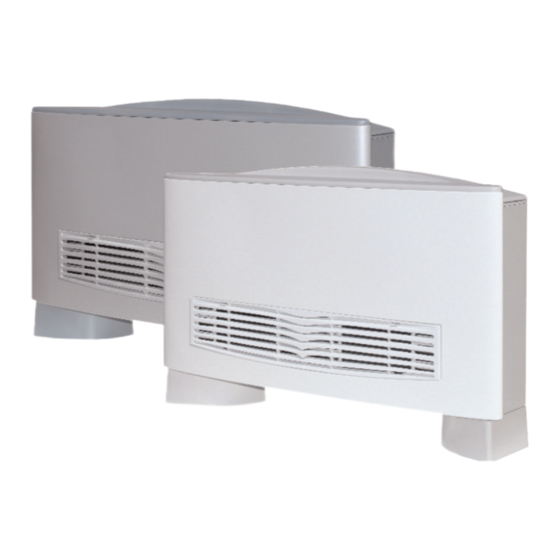
Omnia HL + ZUBEHÖR Il est interdit de faire fonctionner l'appareil avec des acces- Falls das Gerät mit Zubehörteilen ausgerüstet wird, die nicht soires qui ne sont pas fournis de Aermec. von Aermec geliefert werden, ist dessen Inbetriebnahme solange untersagt. - Page 5 VENTILCONVETTORE OMNIA HL C - HL CM Il ventilconvettore OMNIA HL (High Line) è caratterizzato La silenziosità del nuovo gruppo di ventilazione centrifu- dal suo design esclusivo opera dello Studio Giugiaro go è tale che alla normale velocità di utilizzo, non si perce- Design, ma concentra anche elevate caratteristiche tecnolo- pisce quando l’OMNIA HL entra in funzione, l’utilizzo di giche che ne fanno il mezzo ideale di climatizzazione per...
-
Page 6: Visualizzazioni Luminose
UTILIZZO (OMNIA HL C - HL CM) COMANDI: La ventilazione è consentita solo con la aletta aperta, è necessario aprirla manualmente. La chiusura dell’aletta pro- voca lo spegnimento della ventilazione ma il termostato elettronico rimane attivo e registra continuamente i dati ambientali per un pronto riavvio alla riapertura dell’aletta. -
Page 7: Caratteristiche Di Funzionamento • Imballo • Installazione Dell'unità
b) se il termostato è in modo Caldo e la richiesta del termo- CARATTERISTICHE DI FUNZIONAMENTO stato è di 5°C superiore al set impostato, allora automatica- I ventilconvettori OMNIA HL C - HL CM sono forniti pronti mente il termostato richiede il modo Freddo. a funzionare in configurazione standard, ma consentono all’installatore di adeguarli alle necessità... -
Page 8: Rotazione Della Batteria
COLLEGAMENTI ELETTRICI ROTAZIONE DELLA BATTERIA ATTENZIONE: prima di effettuare qualsiasi intervento, Se per motivi di allacciamenti idraulici, si dovesse ruotare la assicurarsi che l’alimentazione elettrica sia disinserita. batteria, dopo aver tolto il mobile, procedere come segue: In particolare per i collegamenti elettrici si richiedono le a) staccare i collegamenti elettrici dalla morsettiera;... -
Page 9: Configurazione Dip
CONFIGURAZIONE DIP Impianto senza valvola Pretarato in fabbrica Pretarato in fabbrica Sw 1 Sw 2 Pretarato in fabbrica Pretarato in fabbrica Pretarato in fabbrica Impianto con valvola IMPOSTAZIONI DIP-SWITCH Togliere tensione all’unità. Da eseguire in fase di installazione solo da personale specializzato. Agendo sui Dip-Switch all’interno del termostato otterremo le seguenti funzionalità: Sw 1 Sw 2... -
Page 10: Autotest
AUTOTEST É disponibile la funzione Autotest per accertare il funzionamento del ventilconvettore. La sequenza di Autotest è la seguente: 1) Selettore (B) in posizione centrale. 2) Selettore (A) in posizione OFF. 3) Agendo sul selettore (A), eseguire velocemente la sequenza: AUTO →... -
Page 11: Informazioni Importanti E Manutenzione
INFORMAZIONI IMPORTANTI E MANUTENZIONE Il ventilconvettore è collegato alla rete elettrica ed al circuito idraulico, un intervento da parte di personale non provvisto di specifica competenza tecnica può causare danni allo stesso operatore, all’apparecchio ed all’ambiente circostante. ALIMENTARE IL VENTILCONVETTORE SOLO CON TENSIONE 230 VOLT MONOFASE Utilizzando alimentazioni elettriche diverse il ventilconvettore può... -
Page 12: Description Of Omnia Hl C - Hl Cm
OMNIA HL C - HL CM FANCOIL The OMNIA HL (High Line) fancoil, with its characteristic standard operation it's virtually impossible to hear when the design by Studio Giugiaro, offers an array of technical featu- OMNIA HL starts up. And the use of electronic control res that make it the ideal climate-control unit for all types of panels eliminates the annoying noises typical of mechanical applications. -
Page 13: Use • Displays
USE (OMNIA HL C - HL CM) CONTROLS: Ventilation is only permitted when the louver is manually opened. When the louver is closed, ventilation is shut down (the thermostat however remains operative, continually detecting room conditions for prompt restart when the lou- vers are reopened). -
Page 14: Operation • Packaging • Installation
geover" mode. OPERATION - ventilation is constantly enabled. OMNIA HL C - HL CM fancoils are delivered ready to ope- Season changeover proceeds as follows: rate in standard configuration, though can be adjusted by a) when the thermostat is in cooling mode and the thermo- the installation technician to specific requirements by means stat request is 5°C below the setting, the thermostat automa- of dedicated accessories and configuration of functions at... -
Page 15: Electrical Connections • Coil Rotation
ELECTRICAL CONNECTIONS COIL ROTATION WARNING: always check that the electricity supply to the If the water connection layout makes it necessary to turn the unit has been disconnected before carrying out any opera- coil around, first remove the cabinet and then proceed as tions. -
Page 16: Dipswitch Configuration
DIPSWITCH P SETTING Sw 2 = Factory settings DIPSWITCH CONFIGURATION Configuration of dipswitches must only be carried out by qualified personnel during unit installation. Always disconnect the power supply before performing this operation. Adjust the dipswitches inside the thermostat for the following functions: Sw 1 Sw 2 Dipswitch 1 (Default OFF) -
Page 17: Autotest Function
AUTOTEST FUNCTION This function is designed to check the operation of the fancoil. To run the Autotest function, proceed as follows: 1) Selector switch D in central position. 2) Selector switch A in OFF position. 3) Adjust the selector switch A rapidly to obtain the following sequence: AUTO →... -
Page 18: Important Maintenance Information
IMPORTANT MAINTENANCE INFORMATION The fancoil is connected to the power supply and a water circuit. Operations performed by persons without the required technical skills can lead to personal injury to the operator or damage to the unit and surrounding objects. POWER THE FANCOIL WITH SINGLE-PHASE 230 V ONLY Use of other power supplies could cause permanent damage to the fancoil. -
Page 19: Ventilo-Convecteur Omnia Hl C - Hl Cm
VENTILO-CONVECTEUR OMNIA HL C - HL CM Le ventilo-convecteur OMNIA HL (High Line) est caracté- Le caractère silencieux caractéristique de ce nouveau risé par son design exclusif, élaboré par le Studio Giugiaro groupe de ventilation centrifuge est tel que l'on ne perçoit Design, mais ce sont principalement ses caractéristiques pas la mise en service d'OMNIA HL avec une vitesse nor- technologiques qui en font un moyen idéal de climatisation... -
Page 20: Visualisations Lumineuses
EMPLOI (OMNIA HL C - HL CM) COMMANDES: La ventilation est autorisée uniquement avec l'ailette ouver- te; il faut l'ouvrir manuellement. La fermeture de l'ailette provoque l'extinction de la ventilation, mais le thermostat électronique reste actif et enregistre, de manière continue, les données ambiantes pour un redémarrage rapide lors de la réouverture de l'ailette. -
Page 21: Installation De L'unite
suivantes : CARACTERISTIQUES DE FONCTIONNEMENT a) si le thermostat est en mode Froid et si la demande du Les ventilo-convecteurs OMNIA HL C - HL CM sont livrés prêts thermostat est inférieure de 5° C au set programmé, le ther- à... -
Page 22: Connexions Electriques • Rotation Batterie
CONNEXIONS ELECTRIQUES ROTATION DE LA BATTERIE ATTENTION ! s'assurer, avant d'effectuer une quelconque Si pour des motifs de raccordement hydraulique on devait intervention, que l'alimentation électrique est bien désactivée. tourner la batterie, après avoir retiré le meuble, procéder En particulier pour les branchements électriques les con- comme suit: trôles suivants sont requis: a) débrancher les raccordements électriques du bornier;... -
Page 23: Configuration Dip
CONFIGURATION DIP Sw 2 PROGRAMMATIONS DIP-SWITCH Couper la tension sur l'Unité. A effectuer au cours de l'installation uniquement par un personnel spécialisé. En intervenant sur les Dip-Switch à l'intérieur du thermostat nous obtiendrons les fonctionnalités suivantes: Sw 1 Sw 2 Dip 1 (Default OFF) Dip 1 (Default OFF ) Contrôle thermostatique de la température:... -
Page 24: Autotest
AUTOTEST La présence de la fonction d'Autotest permet de s'assurer du fonctionnement du ventilo-convecteur. La séquence d'Autotest est la suivante : 1) Sélecteur (D) sur la position centrale. 2) Sélecteur (A) sur la position OFF. 3) En intervenant sur le sélecteur (A), effectuer rapidement la séquence : AUTO →... -
Page 25: Informations Importantes Sur La Maintenance
INFORMATIONS IMPORTANTES SUR LA MAINTENANCE Le ventilo-convecteur est connecté au réseau électrique et au circuit hydraulique : l'intervention d'un personnel sans compétence technique spécifique peut entraîner des blessures pour l'opérateur ou endommager l'appareil ou le milieu inté- ressé. ALIMENTER LE VENTILO-CONVECTEUR EXCLUSIVEMENT AVEC UNE TENSION DE 230 VOLTS MONOPHASE Si l'on utilise des alimentations électriques différentes, le ventilo-convecteur peut être irrémédiablement endommagé. -
Page 26: Beschreibung Des Gerätes Omnia Hl C - Hl Cm
GEBLÄSEKONVEKTOR OMNIA HL C - HL CM Der Gebläsekonvektor OMNIA HL (High Line) mit exklu- Die ausgeprägte Laufruhe der neuen Radiallüftereinheit sivem Design des Designer Studios Giugiaro ist ein macht selbst das Anlaufen des Gebläsevektors OMNIA HL Konzentrat neuester Technologien, die ihn zum idealen bei normaler Drehzahl unhörbar;... -
Page 27: Bedienelemente
ANWENDUNG (OMNIA HL C - HL CM) BEDIENELEMENTE: Die Lüftung ist nur bei geöffneter Umlenkklappe freigege- ben; sie muss nur von Hand geöffnet werden. Die geschlos- sene Umlenkklappe löst den umgehende Halt des Gerätes aus; der elektronische Raumthermostat bleibt jedoch aktiv und speichert kontinuierlich die Raumdaten und hält das Gerät betriebsbereit, sobald die Klappen geöffnet werden. -
Page 28: Funktionseigenschaften • Verpackung • Installation Der Einheit
Die saisonbedingte Umschaltung erfolgt nach folgenden FUNKTIONSEIGENSCHAFTEN Vorgaben: Die Gebläsekonvektoren OMNIA HL C - HL CM werden a) Ist der Thermostat auf Kühlbetrieb gestellt und die betriebsbereit mit Standardkonfiguration geliefert, lassen Thermostatanforderung liegt 5°C unter dem vorgegebenen dem Installateur jedoch genügend Spielraum, um die Geräte Sollwert, erfolgt eine automatische Umstellung auf Heizbetrieb. -
Page 29: Elektrischer Anschluss • Umdrehen Des Wärmetauschers
ELEKTRISCHER ANSCHLUSS UMDREHEN DES WÄRMETAUSCHERS ACHTUNG: Vergewissern sich, dass Falls es für den Wasseranschluss erforderlich sein sollte, den Stromversorgung des Gerätes unterbrochen ist, bevor Sie Wärmetauscher zu drehen, gehen Sie nach Abnahme der Eingriffe an demselben vornehmen. Verkeidung, wie folgt, vor: Die elektrischen Anschlüsse sind ganz besonders folgenden a)die elektrischen Anschlüsse von der Klemmenleiste abk- Prüfungen zu unterziehen:... -
Page 30: Konfiguration Der Dip-Schalter
KONFIGURATION DER DIP - SCHALTER Sw 2 EINSTELLUNG DER DIP - SCHALTER Das Gerät spannungslos schalten. Die Arbeiten sind während der Installation von nachweislich dazu befähigten Fachkräften auszuführen. Durch Einstellung der DIP - Schalter im Inneren des Thermostats können folgende Funktionsweisen erzielt werden: Sw 1 Sw 2 DIP 1 (Default ON) -
Page 31: Autotest
AUTOTEST Die verfügbare Funktion Autotest dient zur Funktionskontrolle des Gebläsekonvektors. Die Autotest - Abfolge ist die folgende: 1) Wahlschalter (D) in die mittlere Position drehen. 2) Wahlschalter (A) auf Position OFF stellen. 3) Mit dem Schalter (A) schnell hintereinander die folgende Sequenz eingeben: AUTO →... -
Page 32: Wichtige Hinweise Und Wartung
WICHTIGE HINWEISE UND WARTUNG Der Gebläsekonvektor ist sowohl an das Stromnetz wie auch an die Wasserversorgung angeschlossen; Eingriffe durch Personen ohne spezifische technische Fachkenntnisse können zu Personenverletzungen und zu Maschinen- und Umweltschäden führen. DER GEBLÄSEKONVEKTOR DARF NUR MIT WECHSELSPANNUNG 230 VOLT BETRIEBEN WERDEN Jede andere Netzspannung kann zu nicht wiedergutzumachenden Schäden des Gebläsekonvektors führen. -
Page 33: Dati Dimensionali • Dimensions • Dimensions • Abmessungen
DATI DIMENSIONALI • DIMENSIONS • DIMENSIONS • ABMESSUNGEN [mm] Accessorio ZH ZH Accessory Accessorie ZH Zubehör ZH Mod Omnia HL 11 HL 16 HL 26 HL 36 Larghezza • Width • Largeur • Breite 1200 Altezza • Height • Hauter • Höhe Profondità... - Page 34 DATI DIMENSIONALI • DIMENSIONS • DIMENSIONS • ABMESSUNGEN [mm] Mod. HL 11 HL 16 HL 26 HL 36 1200 360,5 470,5 701,5 921,5...
-
Page 35: Schemi Di Montaggio • Installation Diagrams • Schémas De Montage • Einbaupläne
SCHEMI DI MONTAGGIO • INSTALLATION DIAGRAMS • SCHÉMAS DE MONTAGE • EINBAUPLÄNE OMNIA HL C - HL CM... - Page 36 SCHEMI ELETTRICI • WIRING DIAGRAMS • SCHEMAS ELECTRIQUES • SCHALTPLÄNE LEGENDA • READING KEY • LEGENDE • LEGENDE = Microinterruttore • Microswitch VCH = Valvola solenoide Microinterrupteur • Mikroschalter Solenoid valve Vanne solenoide = Interruttore generale • Main switch Magnetventil Interupteur général •...
-
Page 37: Trasporto • Carriage • Transport • Transport
TRASPORTO • CARRIAGE • TRANSPORT • TRANSPORT NON bagnare • Do NOT wet NON calpestare • Do NOT trample CRAINT l’humidité • Vor Nässe schützen NE PAS marcher sur cet emballage • Nicht betreten Sovrapponibilità: controllare sull’imballo la posizione della freccia per conoscere il numero di macchine impilabili Stacking: control the packing for the arrow position to know the number of machines that can be stacked... -
Page 38: Solution • Abhilfe
PROBLEMA • PROBLEM PROBABILE CAUSA • PROBABLE CAUSE SOLUZIONE • REMEDY PROBLEME • PROBLEM CAUSE PROBABLE • MÖGLICHE URSACHE SOLUTION • ABHILFE Poca aria in uscita Errata impostazione della velocità sul pannello comandi Scegliere la velocità corretta sul pannello comandi Select the speed on the control panel Feeble air discharge Wrong speed setting on the control panel... -
Page 39: Garanzia Di 3 Anni
– guasti conseguenti ad azioni volontarie o accidentali che non derivino da difetti originari dei materiali di fabbricazione. AERMEC Spa effettuerà la riparazione o la sostituzione gratuita, a sua scelta, delle parti di apparecchiatura che dovessero presentare difetti dei materiali o di fabbricazione tali da impedirne il normale funzionamento. Gli eventuali interventi di riparazione o sostituzione di parti dell’apparecchio, non modificano la data di decorrenza e la durata del periodo di garanzia.