Table des Matières
Publicité
Les langues disponibles
Les langues disponibles
Liens rapides
BELLINI 90
ISTRUZIONI D'USO
PER L'UTENTE
LEGGERE ATTENTAMENTE E CONSERVARE
CON CURA ASSIEME AL MOBILE
MODE D'EMPLOI POUR
L'UTILISATEUR
lire avec attention ce manuel et le conserver
près du meuble avec soin
USER INSTRUCTIONS
READ CAREFULLY AND KEEP WITH THE CASE
BETRIEBSANLEITUNG
FÜR BETREIBER
sorgfÄlting lesen und mit dem mÖbel aufbewahren
QUM000143A_rev. A
Publicité
Table des Matières

Manuels Connexes pour Costan BELLINI 90


Sommaire des Matières pour Costan BELLINI 90
- Page 1 BELLINI 90 ISTRUZIONI D’USO PER L’UTENTE LEGGERE ATTENTAMENTE E CONSERVARE CON CURA ASSIEME AL MOBILE MODE D’EMPLOI POUR L’UTILISATEUR lire avec attention ce manuel et le conserver près du meuble avec soin USER INSTRUCTIONS READ CAREFULLY AND KEEP WITH THE CASE BETRIEBSANLEITUNG FÜR BETREIBER...
- Page 2 Bellini 90 ITALIANO...
- Page 3 PREMESSA E CONTROLLO QUALITÁ TRASPORTO E IMMAGAZZINAMENTO DESCRIZIONE DEL MOBILE PRESCRIZIONI, USI E DIVIETI CONDIZIONI AMBIENTALI DATI TECNICI INSTALLAZIONE USO DEL MOBILE PULIZIA E MANUTENZIONE SMALTIMENTO TERMOSTATO ELETTRONICO SCHEMA ELETTRICO...
-
Page 4: Trasporto E Immagazzinamento
1. TRASPORTO E IMMAGAZZINAMENTO Trasporto effettuato senza Pallet o Gabbia di legno • Inserire le staffe del carrello elevatore come indicato nelle due figure che seguono. Tenere una distanza minima fra le staffe di 600mm assicurandosi che siano centrate rispetto alla mezzeria del mobile. - Page 5 Trasporto effettuato con Pallet o Gabbia di legno • Inserire le staffe del carrello elevatore nei punti indicati. • Inserire le staffe fino in fondo per Punti di evitare rovesciamenti. sollevamento • La distanza tra le staffe deve essere la maggiore possibile per aumentare la stabilità.
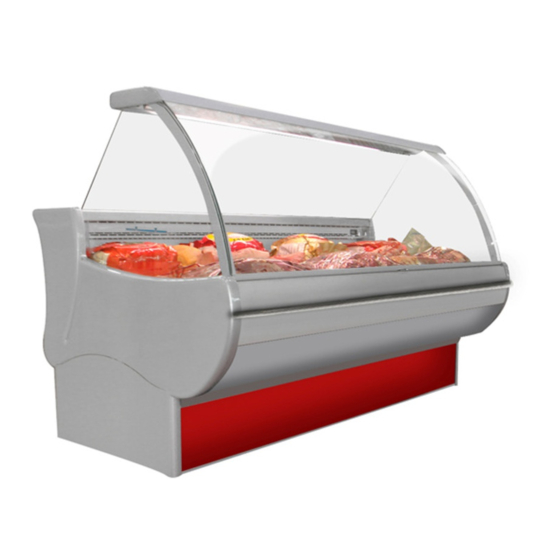
- Page 6 DESCRIZIONE DELL’ESPOSITORE Il mobile refrigerato BELLINI 90 è adatto per l’esposizione e la vendita di prodotti gastronomici. Prodotto in serie, è disponibile in sei misure lineari standard (1250, 1563, 1875, 2500, 3125, 3750), più quattro (4) modelli ad angolo (938 + angolo dritto, 938 + angolo rovescio, angolo 135” e angolo 225”), tutti con o senza gruppo incorporato.
- Page 7 senza riserva refrigerata CAPPELLO VETRI FRONTALI APRIBILI FIANCO VETRO FASCIA DECORO PANNELLO CURVO DECORO INFERIORE...
- Page 8 CONDENSATORE TARGA DATI PRESCRIZIONI, USI E DIVIETI L’espositore refrigerato BELLINI 90 è adatto esclusivamente all’esposizione di generi alimentari freschi o bibite. Si fa assoluto divieto di esporre prodotti farmaceutici. Istruire l’operatore sull’uso del mobile secondo le indicazioni riportate nel presente manuale;...
-
Page 9: Condizioni Ambientali Di Installazione
4. CONDIZIONI AMBIENTALI DI INSTALLAZIONE L’espositore deve essere installato in un ambiente chiuso, coperto e al riparo dagli agenti atmosferici. L’espositore non deve essere installato in ambienti con presenza di sostanze esplosive. Evitare l’esposizione diretta del banco ai raggi solari, ad unità di illuminazione concentrata, a fonti di calore quali caloriferi, stufe, forni;... -
Page 10: Dati Tecnici
5. DATI TECNICI Caratteristiche generali Caratteristiche generali (25°C / 60% U.R.) Temperatura di esercizio +2°C / +4°C Classe climatica (EN441) Classe temperatura prodotto (EN 441) Tipo di refrigerazione Ventilata Temperatura di evaporazione -10°C R404A Tipo di sbrinamento Fermata compressore Diametro tubo ingresso evaporatore 6 mm Diametro tubo uscita evaporatore 12mm... -
Page 11: Collegamenti Elettrici
Collegamenti elettrici Attenzione: prima di procedere con le operazioni che seguono, controllare che l’impianto elettrico del locale in cui il mobile va installato sia conforme ai regolamenti e ai codici di sicurezza vigenti. L’alimentazione di energia elettrica dell’apparecchio deve essere indipendente da altre alimentazioni; a monte della presa di alimentazione, è... -
Page 12: Primo Avviamento
Dopo avere tolto il quadro elettronico, con un cacciavite di piccole dimensioni agire sul trimmer (3) della scheda elettronica (4). 7. USO DEL MOBILE Primo avviamento Prima di inserire la spina di alimentazione, eseguire un’accurata pulizia utilizzando detersivi neutri e spugne non abrasive. -
Page 13: Pulizia E Manutenzione
8. PULIZIA E MANUTENZIONE PRIMA DI QUALSIASI OPERAZIONE, TOGLIERE SPINA ALIMENTAZIONE. E’ CONSIGLIATO L’UTILIZZO GUANTI PROTETTIVI Pulizia È assolutamente vietato utilizzare getti d’acqua per il lavaggio del banco. pulizia banco deve essere eseguita frequentemente; utilizzare acqua tiepida, detersivi neutri, spugne non abrasive e un panno morbido per asciugare Negli espositori con gruppo incorporato, procedere mensilmente alla pulizia del condensatore agendo... -
Page 14: Manutenzione Ordinaria
Manutenzione ordinaria Fare eseguire, almeno una volta all’anno , da personale specializzato, un controllo generale sul sistema di apertura dei vetri, sull’impianto elettrico e sul circuito frigorifero. Qualora sia necessario effettuare un rabbocco di gas refrigerante, utilizzare una stazione provvista di ¼... -
Page 15: Pannello Di Controllo
10. PANNELLO DI CONTROLLO INTERRUTTORE INTERRUTTORE LUCI GENERALE TERMOSTATO ELETTRONICO USATO 10.1 Indicazioni relative al termostato Si raccomanda all’utilizzatore di non accedere alla programmazione dello strumento; per qualsiasi variazione dei parametri impostati che non sia la variazione del valore di temperatura impostato (10.2 - Setpoint) rivolgersi all’installatore. - Page 16 10.4 Uso e funzione dei tasti Codici per ricambi: • ID 961: cod. 30004064 • Sonda: cod. 30006840 Descrizione dei LED Descrizione dei Tasti...
- Page 17 Bellini 90 ENGLISH...
-
Page 18: Technical Data
INTRODUCTION AND QUALITY CONTROL 1. HANDLING AND STORAGE 2. DESCRIPTION OF COUNTER 3. REGULATION, USAGE AND PRESCRIPTION 4. ENVIRONMENTAL CONDITIONS 5. TECHNICAL DATA 6. INSTALLATION 7. DISPLAY CASE SET-UP 8. INDICATION FOR CLEANING AND MAINTENANCE 9. WASTE DISPOSAL 10. CONTROL PANEL 11. -
Page 19: Handling And Storage
1. HANDLING AND STORAGE Transport carried out without pallet or wooden box • Insert the forklift truck prongs as indicated in the two following pictures. Keep a minimum distance between the 600 mm. prongs making sure that they are properly centered in the middle of the cabinet. - Page 20 Transport carried out on pallet or wooden box • Insert the forklift truck prongs in the shown points. • Insert the forklift truck prongs right to the end to avoid overturning. Lifting-up • There must be the greatest possibile points distance between the prongs to increase the stability.
- Page 21 DESCRIPTION OF COUNTER The refrigerated counter BELLINI 90 is suitable for the display and sale of deli products. It is standard model, available in six linear lengths (1250, 1563, 1875, 2500, 3125, 3750) plus four refrigerated corner models (938 + open corner, 938 + closed corner, 135° corner, 225° corner), all of them with or without compressor unit.
- Page 22 Without refrigerated storage TOP CANOPY OPEN FRONT GLASS SIDE GLASS FRONT FACIA DECORATION CURVED PANEL LOWER DECORATION...
- Page 23 BACK-SHELF LOAD LINE CONDENSING WATER TRAY REFRIGERATED STORAGE UNIT CONDENSATOR DATA LABEL REGULATIONS, USAGE AND PROHIBITIONS Euro’Cryor’s display cases have been designed and produced exclusively for the display of fresh foodstuffs and beverages inside the refrigerated sections. it is absolutely forbidden to use the case to display pharmaceutical products.
- Page 24 4. ENVIRONMENTAL CONDITIONS FOR INSTALLATION The display case must be installed indoors and never exposed to rain or bad weather conditions. The display case must not be installed in places where there are explosive materials. Ensure that the display case is installed away from direct sunlight, concentrated lighting units and/or sources of heat such as radiators, stoves and ovens;...
-
Page 25: Electrical Connections
Electrical connections Warning: before proceeding with the following operations, check that the electrical installation complies with the standard laws regulating such installation in the country concerned. The device’s power supply must be independent from the other supplies and separately insulated; before the supply socket, it is compulsory to install a differential bipolar magnetothermic switch with 30mA sensitivity. -
Page 26: First Start-Up
After having removed the electronic control panel, work on the electronic circuit board trimmer “3” with a small size screw driver. 7. DISPLAY CASE SET-UP First Start-up Before making the display case working, we recommend to clean it using a neutral soap and non- abrasive sponges, then wipe it away. -
Page 27: Cleaning And Maintenance
8. CLEANING AND MAINTENANCE BEFORE ANY OPERATION, REMOVE THE POWER SUPPLY PLUG RECOMMENDED PROTECTIVE GLOVES. Cleaning NEVER USE DIRECT OR INDIRECT JETS OF WATER FOR CLEANING THE DISPLAY CASE Clean all internal and external parts frequently with warm water, neutral soaps and non-abrasive sponges and dry using a soft cloth For the display cabinets with condensing unit, the condenser must be cleaned at least once a month. -
Page 28: Waste Disposal
Ordinary maintenance Carry out, at least once a year by skilled personnel, a general check of the glasses opening system, on the electric system and on the refrigerating circuit. Should it be necessary to top up with refrigerating gas, use a station equipped with two ¼ SAE valves, to screw on the appropriate fittings placed near the compressor Extraordinary maintenance Any other operation not listed in the previous point, must be carried out by skilled personnel. -
Page 29: Control Panel
10. CONTROL PANEL LIGHT SWITCH MAIN SWITCH ELECTRONIC THERMOSTAT USED 10.1 Electronic Thermostat We recommend to the final user not to programm the instrument; for any changement of the set parameters, unless it is the changement of the temperature setpoint, we suggest to contact the installer. - Page 30 Bellini 90 FRANÇAIS...
- Page 31 AVANT-PROPOS ET CONTRÔLE DE LA QUALITÉ TRANSPORT ET STOCKAGE DESCRIPTION DU MEUBLE USAGE PRÉVU ET INTERDICTIONS CONDITIONS AMBIANTES DONNÉES TECHNIQUES MONTAGE UTILISATION DU MEUBLE NETTOYAGE ET ENTRETIEN DEMOLITION CONDITIONS DE GARANTIE SCHEMA ELECTRIQUE...
-
Page 32: Transport Et Stockage
1. TRANSPORT ET STOCKAGE Transport sans palette ou caisse à claire-voie en bois • Introduire les fourches du chariot élévateur comme indiqué sur les figures qui suivent. Veiller à avoir une distance minimale entre les fourches de 600 mm et à les centrer par rapport à la moitié du meuble. - Page 33 Transport avec palette ou caisse à claire-voie en bois • Placer les fourches du chariot élévateur aux endroits indiqués. • Les introduire à fond pour éviter que meuble ne bascule. Points de • La distance entre les fourches doit être la soulèvement plus grande possible pour augmenter la stabilité...
-
Page 34: Description Du Meuble
DESCRIPTION DU MEUBLE Le meuble réfrigéré BELLINI 90 est prévu pour l’exposition et la vente de spécialités gastronomiques. Produit en série, il est disponible en six dimensions linéaires standard (1250, 1563, 1875, 2500, 3125 et 3750), plus quatre (4) modèles d’angle (938 + angle droit, 938 + angle saillant, angle 135” et angle 225”), tous avec ou sans groupe incorporé. - Page 35 Sans riserve refrigérée TABLETTE SUPERIEURE GLACES TEMPRÉES RÉLÉVABLES JOUE DE VITRE BANDEAU SUPERIEUR PANNEAU COURBE DECOR INFERIEURE...
- Page 36 LIGNE TABLETTE TRAVAIL CHARGEMENT PRODUIT EAU DE CONDENSATION RESERVE REFRIGEREE CONDENSATEUR ETIQUETTE 3. USAGE PRÉVU ET INTERDICTIONS La vitrine réfrigérée MICRON ne doit être utilisée que pour exposer des denrées alimentaires fraîches ou des boissons. Il est strictement interdit d’y exposer des produits pharmaceutiques. Montrer à...
-
Page 37: Conditions Ambiantes
4. CONDITIONS AMBIANTES La vitrine doit être montée dans un local fermé, couvert et à l’abri des agents atmosphériques. La vitrine ne doit pas être montée dans un endroit contenant des substances explosives. Ne pas exposer le meuble aux rayons du soleil, à une unité d’éclairage concentrée, à une source de chaleur (tels que radiateur, poêle ou four) ;... -
Page 38: Branchements Électriques
Branchements électriques Attention : vérifier si l’installation électrique du local où le meuble doit être monté est conforme aux règlements et aux normes de sécurité en vigueur avant d’effectuer les opérations qui suivent. L’alimentation d’energie electrique de la vitrine doit être indipendant des autres alimentations ;... -
Page 39: Utilisation Du Meuble
Après avoir enlevé le tableau électronique, agir sur le compensateur (3) de la carte électronique (4) avec un petit tournevis. 7. UTILISATION DU MEUBLE Mise en service Bien laver la vitrine avec du détergent neutre et une éponge non abrasive et l’essuyer avec un chiffon doux avant de la brancher. -
Page 40: Nettoyage Et Entretien
8. NETTOYAGE ET ENTRETIEN COUPER COURANT AVANT D’EFFECTUER OPÉRATION QUELCONQUE. METTRE GANTS POUR PROCÉDER AUX OPÉRATIONS DE NETTOYAGE OU D’ENTRETIEN. Nettoyage Ne pas user jet d’eau pour le lavage. Le nettoyage de la vitrine doit être fait souvent; utiliser de l’eau tiede, detersif neutre, une eponge non-abrasive et assuyer avec du chiffon souple. -
Page 41: Entretien Courant
Entretien courant Demander à du personnel spécialisé de faire un contrôle général du système d’ouverture des vitres, de l’installation électrique et du circuit frigorifique au moins une fois par an. S’il est nécessaire de rajouter du gaz réfrigérant, choisir une station munie de deux valves de ¼ SAE, à... -
Page 42: Panneau De Controle
10. PANNEAU DE CONTROLE INTERRUPTEUR INTERRUPTEUR GENERAL LUMIERE TERMOSTAT NE PAS ELECTRONIQUE UTILISE 10.1 Indications relatives au thermostat Il est recommandé à l’utilisateur de ne pas altérer la programmation de l’appareil ; s’adresser à l’installateur pour modifier les paramètres saisis autres que la température (10.2 –... -
Page 43: Emploi Et Fonction Des Touches
10.4 Emploi et fonction des touches Codes pour pièces détachées • ID 961: cod. 30004064 • Sonde: cod. 30006840 Description des LED Description des touches... - Page 44 Bellini 90 DEUTSCH...
- Page 45 EINFÜHRUNG UND QUALITÄTSKONTROLLE TRANSPORT UND EINLAGERUNG BESCHREIBUNG DER KÜHLTHEKE VORSCHRIFTEN, ANWENDUNGEN UND VERBOTE UMGEBUNGSBEDINGUNGEN TECHNISCHE DATEN INSTALLATION GEBRAUCHSANWEISUNG FÜR DIE KÜHLTHEKE REINIGUNG UND WARTUNG ENTSORGUNG ELEKTRONISCHER SCHALTKASTEN ELEKTRISCHES SCHEMA...
-
Page 46: Transport Und Einlagerung
TRANSPORT UND EINLAGERUNG Transport ohne Palette oder Holzkiste • Die Gabeln des Gabelstaplers wie auf den zwei folgenden Abbildungen einstecken. Einen Abstand zwischen den Gabeln von mindestens 600 mm halten und sicher stellen, dass sie zur Mitte der Kühltheke zentriert sind Die Kühltheken mit einer Länge von 1250mm müssen wie folgt transportiert werden: Die Theke hinten so anheben, dass die Gabeln des Gabelstaplers durchgeführt werden können... - Page 47 Transport mit Palette oder Holzkiste • Führen Gabeln Gabelstaplers an den angezeigten Stellen ein. • Führen Sie die Gabeln vollständig ein, Hebenpunkte um ein Kippen zu vermeiden. • Der Abstand zwischen den Gabeln muss so groß wie möglich sein, um eine möglichst große Stabilität zu >...
- Page 48 BESCHREIBUNG DER KÜHLTHEKE Die Kühltheke BELLINI 90 ist für die Ausstellung und den Verkauf von Gastronomie Produkten geeignet. Serienmäßig steht sie in sechs linearen Standardmaßen (1250, 1563, 1875, 2500, 3125 und 3750) sowie in vier (4) Eckmodellen (938 + offener Winkel, 938 + geschlossener Winkel, 135“...
- Page 49 senza riserva refrigerata ZAHLPLATTE ZAHLPLATTE FRONTHEBESCHEIBEN SEITENSCHEIBE DEKOR- LEISTE FRONTVER KLEIDUNG UNTERE VERKLEIDUNG...
- Page 50 ARBEITSPLATTE BEGRENZUNG LADELINIE KONDENS WASSER SAMMELWANNE GEKÜHLTER UNTERBAU KONDENSATOR TECHNISCHE DATEN AUFKLEBER VORSCHRIFTEN, ANWENDUNGEN UND VERBOTE Alle Kühltheke der Gesellschaft EURO’CRYOR sind ausschließlich für den Verkauf von Lebensmittel und Getränken geeignet. Auslage pharmazeutischen Produkten strengstensVERBOTEN. Es ist daher notwendig, dass man sich diese Gebrauchsanleitung vor der Inbetriebnahme genauestens durchliest.
- Page 51 4. UMGEBUNGSTEMPERSATUR BEI DER INSTALLATION Die Theke muss in einem abgedeckten u. geschlossenen Raum installiert werden. Die Theke darf nicht in der Nähe von explosiven Substanzen installiert werden. Die Theke darf keinen direkten Sonnenstrahlen oder konzentrierten Lichtquellen ausgesetzt werden, ferner nicht in absoluter Nähe von Fenstern, Ventilatoren, Heizkörper und Klima-Anlagen montiert werden.
- Page 52 Elektrischer anschlüsse Achtung: vor Durchführung der hier folgend beschriebenen Arbeiten muss kontrolliert werden, ob die elektrische Anlage des Raums, in den das Möbel installiert wird, gültigen Verordnungen Sicherheitsnormen übereinstimmt. Die Stromzuleitung der Kühltheke muss von anderen Zuleitungen unabhängig und isoliert sein; aus diesem Grunde muss stromaufwärts der Zuleitungssteckdose ein zweipoliger magnetothermischer Differentialschalter mit = 30mA Ansprechvermögen und Stromfestigkeit gemass...
-
Page 53: Periodische Kontrollen
Nach Entfernung der elektronischen Tafel, den Trimmer (3) der elektronischen Karte (4) mit einem kleinen Schraubenzieher betätigen. 7. GEBRAUCHSANWEISUNG FÜR DIE KÜHLTHEKE Erstes Anlassen Bevor der Versorgungsstecker eingesteckt wird, eine sorgfältige Reinigung mit neutralen Reinigungsmitteln und nicht schleifenden Schwämmen ausführen. Mit einem weichen Tuch trocknen. Achtung: die Kühltheke ist auf 4°C eingestellt. -
Page 54: Reinigung Und Wartung
8. REINIGUNG UND WARTUNG VOR ARBEITEN IMMER DEN VERSORGUNGSSTECKER ZIEHEN. DER GEBRAUCH VON SCHUTZHANDSCHUHEN WIRD EMPFOHLEN. Reinigung der Kühltheke Die Vitrine nie direktem Wasserstrahl aussetzen. Die Reinigung der Kühltheke muss häufig ausgeführt werden; lauwarmes Wasser, neutrale Reinigungsmittel, nicht schleifende Schwämme und ein weiches Tuch zum Trocknen verwenden. -
Page 55: Entsorgung
Regelmäßige Wartungen Lassen Sie zumindest einmal pro Jahr eine allgemeine Kontrolle des Öffnungssystems der Scheiben, der elektrischen Anlage sowie des Kühlkreislaufs durch Fachpersonal vornehmen. Falls es notwendig sein sollte, das Kühlmittel nachzufüllen, benutzen Sie dazu eine Einrichtung, die ¼ SAE mit zwei Ventilen ausgerüstet ist. - Page 56 10.2 Um die voreingestellte Temperatur zu ändern Drücken und loslassen ändert Wert (°C) 10.3 Tabelle mit voreingestellten Parametern Parameter Einheit ID 961 Parameter Einheit ID 961 °C °C °C °C ---------- °C Flag ---------- Nummer Flag ---------- °C °C ---------- Flag Flag ----------...
- Page 57 LED Beschreibung Tasten Beschreibung...