
Manuels Connexes pour BENE FREE DESK


Sommaire des Matières pour BENE FREE DESK
- Page 1 FREE DESK FREE DESK FREE DESK MONTAGE- UND BEDIENUNGSANLEITUNG ASSEMBLY AND OPERATING INSTRUCTIONS INSTRUCTIONS DE MONTAGE ET D’UTILISATION...
-
Page 2: Table Des Matières
INHALT CONTENT SOMMAIRE Produktübersicht ........3 Product overview ........3 Aperçu du produit ........3 Sicherheitshinweise ........4 Safety instructions ........8 Consignes de sécurité ......12 Richtig sitzen ......... 16 Sitting correctly ........17 S'asseoir correctement ......18 Konformitätserklärung ......19 CE Certificate of Comformance .... -
Page 3: Produktübersicht
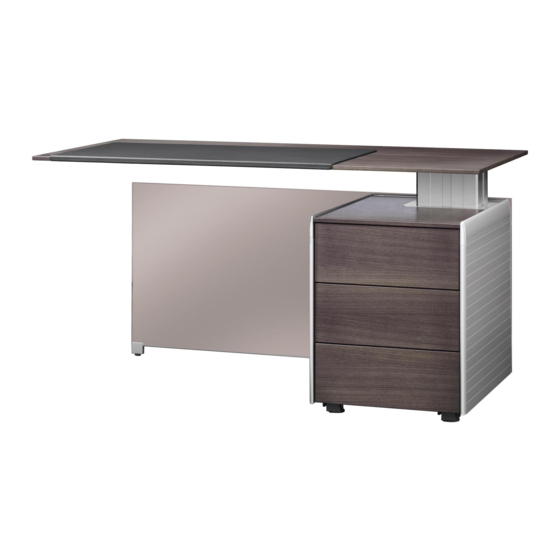
PRODUKTÜBERSICHT PRODUCT OVERVIEW APERÇU DU PRODUIT AL-K Free Desk mit AL-Free Desk mit Flügeltürschrank Flügeltürschrank AL-K Free Desk with hinged AL-Free Desk with hinged door cabinet door cabinet AL-K Free Desk avec armoire AL-Free Desk avec armoire à portes battantes à... -
Page 4: Sicherheitshinweise
SICHERHEITSHINWEISE Die Sicherheitshinweise sind unbedingt 5. Die Höhenverstellung ist nur im Tipp- zu beachten! Wird das System unsach- betrieb möglich. Beim Auffahren auf ein gemäß betrieben, können Gefahren für Hindernis oder bei Funktionsstörungen Personen und Sachgegenstände ent- ist die Verstellung sofort zu stoppen. stehen! 6. - Page 5 SICHERHEITSHINWEISE 9. Im Falle eines Auffahrens auf ein 14. Dieses Möbel ist nur für den gewerblichen Hindernis ist es nicht auszuschließen, Büro- und Verwaltungsbereich in dass das Hindernis leichte Beschädig- Innenräumen zugelassen. ungen (Kratzer, Druckstellen, etc.) 15. Dieses Gerät kann von Kindern ab 8 erhalten kann, da der Tisch mit Nenn- Jahren und darüber sowie von Personen geschwindikeit auffährt!
- Page 6 SICHERHEITSHINWEISE 17. Die Steckerleisten müssen sachgemäß 19. Bei Möbel mit beweglichen oder höhenver- befestigt sein und so platziert werden, stellbaren Bauteilen gilt besondere Sorg- dass die Stecker problemlos verbunden falt: Die Kabellängen müssen so bemes- und gezogen werden können. Stecker und sen werden, dass beim Verstellen keinerlei Steckerleisten müssen so positioniert sein, Schäden an Kabel und Leitung entstehen...
- Page 7 SICHERHEITSHINWEISE 23. Montieren Sie daher die Steuerung nicht Gefahr: Bei allen Resetvorgängen (Abschnitt 5) ist der Kollisionsschutz - über oder vor Wärmequellen (wie z.B. nicht aktiv. Beachten Sie dabei eine Heizkörper) mögliche Quetschgefahr. - nicht an Stellen mit direkter Sonnen- Achtung: Wenn das Produkt sichtbar einstrahlung beschädigt ist, darf es nicht montiert...
-
Page 8: Safety Instructions
SAFETY INSTRUCTIONS Please observe the safety instructions! 6. Make sure adjacent objects are placed at Improper operation of the system may a minimum distance of 25 mm to prevent result in personal injury and cause them from being squeezed or sheared! damage to objects! 7. - Page 9 SAFETY INSTRUCTIONS 10. Do not change or modify the control they are supervised by a person mechanism or the operating device. responsible for their safety or received instructions about how to use the appli- 11. Never open the enclosure of the control ance.
- Page 10 SAFETY INSTRUCTIONS 19. Furniture with flexible or height-adjustable 22. The operation of the control mechanism components require special care. Cables and the power supply unit requires a must be sufficiently long to allow height minimum of 5°C and a maximum adjustments without damaging the cables temperature of 40°C.
- Page 11 SAFETY INSTRUCTIONS Warning: In the event of a fault it is 24. After 1 minutes of continuous operation possible that the table top moves a bit the system automatically shuts itself off during every attempt whilst operating and cannot be used for an additional before the safety switch off kicks in.
-
Page 12: Consignes De Sécurité
CONSIGNES DE SÉCURITÉ Les instructions de sécurité doivent être d‘un obstacle, ou en cas de dysfonction- respectées scrupuleusement ! Une nements stopper immédiatement le réglage. mauvaise utilisation du système peut 6. Une distance minimale de 25 mm par entraîner des dangers pour les rapport aux objets avoisinants doit être personnes et des dommages matériels ! respectée afin d‘éviter des points de... - Page 13 CONSIGNES DE SÉCURITÉ 9. En cas de collision sur un obstacle, il 14. Ce meuble n’est autorisé que pour un n‘est pas à exclure que l‘obstacle puisse usage commercial dans les espaces de être légèrement endommagé (égratignu- bureaux à l‘intérieur. res, les points de pression, etc.) car la 15.
- Page 14 CONSIGNES DE SÉCURITÉ 17. Les blocs prises doivent être solidement aucun dommage ne puisse survenir sur fixés et placés de façon à faciliter le bran- les câbles (par ex. : étirements, chement et le débranchement des prises. coincements,...). Les prises et les blocs prises doivent être 20.
- Page 15 CONSIGNES DE SÉCURITÉ 23. Pour cette raison, ne pas monter la Danger: Lors de toutes les opérations commande: de réinitialisation (paragraphe 5), la - au-dessus ou devant des sources de proection de collision n‘est pas active. chaleur (par ex. radiateur), Tenez compte d‘un risque éventuel de - dans des lieux avec rayonnement direct coincement.
-
Page 16: Richtig Sitzen
RICHTIG SITZEN 200% > 600 mm 140% 20° 100% > 100 mm 90-100° Beim Sitzen mit gekrümm- ten Rücken ist die Belastung 90-100° der Bandscheiben doppelt so hoch (200%) wie beim Stehen (100%). Die Kenntnis, dass falsches und verkrampftes Sitzen die Leistungsfähigkeit einschränkt und auf Dauer zu körperlichen Langzeitschäden führt, bildet die allgemeine arbeitsmedizinische Grundlage für die Gesundeits-Vorsorge am Büroarbeitsplatz, wie sie sich in den einschlägigen Normen und Empfehlungen widerspiegelt. -
Page 17: Sitting Correctly
SITTING CORRECTLY 200% > 600 mm 140% 20° 100% > 100 mm 90-100° Sitting with a hunched back doubles the burden (200%) on 90-100° the vertebral disks compared to standing up (100%). Source: Wilkhahn Occupational health experts have issued standards and recommendations for preventing harmful habits and their negative health impact at the office workplace. -
Page 18: S'asseoir Correctement
S'ASSEOIR CORRECTEMENT 200% > 600 mm 140% 20° 100% > 100 mm 90-100° Lors d'une position assise avec le dos voûté, la sollicitation des disques intervertébraux 90-100° est deux fois plus élevée (200 %) qu'en position debout (100 %). Source : Wilkhahn Une position assise inadéquate et contractée restreint la productivité... -
Page 19: Konformitätserklärung
KONFORMITÄTSERKLÄRUNG CE CERTIFICATE OF COMFORMANCE DÉCLARATION DE CONFORMITÉ... -
Page 20: Lieferzustand
LIEFERZUSTAND INCLUDED IN DELIVERY ETAT DE LIVRAISON Tischplatte komplett Container Tabletop complete Pedestal Plateau de table, complet Caisson Beschlägebox Fittings box Boîte d‘attaches Holzblende oder Glasblende Wooden panel or glass panel Cache en bois ou cache vitré... -
Page 21: Montage Blende
Vis sans tête M8x65 pour cache en bois Kunststoffbeilage Blendenbefestigung Plastic washer panel fixing Rondelle plastique pour le cache Distanz Blendenbefestigung Spacer panel fixing Écartement pour le cache SK61113937 Hakenschlüssel Free Desk Hook key Free Desk Clé à crochet Free Desk... -
Page 22: Stellfuss Montieren
STELLFUSS MONTIEREN MOUNT ADJUSTMENT LEG MONTER LE VÉRIN DE RÉGLAGE doppelseitiges Klebeband double-sided tape Ruban adhésif double face... -
Page 23: Nivellierung
NIVELLIERUNG LEVELLING MISE À NIVEAU Nivellierung Stellfuss Blende Levelling adjustment leg panel Mise à niveau du vérin de réglage pour le cache Nivellierung Korpusstellfüsse Levelling carcass adjustment leg Mise à niveau du vérin de réglage pour le meuble... -
Page 24: Montage Tischplatte
MONTAGE TISCHPLATTE ASSEMBLY TABLETOP MONTAGE DU PLATEAU DE TABLE D990681 GWSR-ZKIS-VZ-M10*20... -
Page 25: Montage Kabelkette
MONTAGE KABELKETTE ASSEMBLY CABLE DUCT MONTAGE DE LA VERTÈBRE Zuvor muss die Notebookwanne abgenommen werden, wenn vorhanden. First, the notebook tray must be removed, if it is existing. Si le meuble est doté d‘un compartiment pour ordinateur portable,il faut enlever ceci auparavant. Alle Kabel anstecken! Fix on all cables! Brancher tous les câbles ! -
Page 26: Montage Kabelwanne
MONTAGE KABELWANNE ASSEMBLY OF CABLE TRAY MONTAGE DE LA GOULOTTE D990285 SPAX-PHPZ-SZ-4,0*12 D990582 Rändelschraube Knurled screw Vis moletée... -
Page 27: Montage Notebookwanne
MONTAGE NOTEBOOKWANNE ASSEMBLY OF NOTE BOOK TRAY MONTAGE DU COMPARTIMENT POUR ORDINATEUR PORTABLE Langlöcher sind zur Höhenregulierung der Notebookwanne vorgesehen. Standard: Oberste Position; Bei größeren Dockingstations entsprechend runter setzen. Slotted holes are provided for height ajustment of the notebook tray. Standard: Top position; At bigger dockingstations put it down. -
Page 28: Notebookwanne
NOTEBOOKWANNE NOTEBOOK TUB COMPARTIMENT POUR ORDINATEUR PORTABLE... - Page 29 NOTEBOOKWANNE NOTEBOOK TUB COMPARTIMENT POUR ORDINATEUR PORTABLE Kabel immer in Ausnehmung legen! Put all cables into the recess! Mettre tous les câbles dans la découpe !
-
Page 30: Montage / Demontage Flügeltür
MONTAGE / DEMONTAGE FLÜGELTÜR ASSEMBLY / DISASSEMBLY HINGED DOOR MONTAGE / DÉMONTAGE PORTE BATTANTE... -
Page 31: Position Flügeltür Fugenbild
POSITION FLÜGELTÜR FUGENBILD POSITION OF HINGED DOOR JOINT PATTERN POSITION PORTE BATTANTE, SITUATION DES JOINTS A/B/C A/B/C... -
Page 32: Auszug Für Lade
AUSZUG FÜR LADE PULLOUT SYSTEM FOR DRAWER SYSTÈME D‘EXTENSION POUR TIROIR TIP ON... -
Page 33: Ladentausch
LADENTAUSCH SWAP THE DRAWER ÉCHANGE DE TIROIR KLACK, KLACK KLACK, KLACK... -
Page 34: Steuerung
STEUERUNG Das System wird durch Drücken der“ Abwärts Taste“ auf dem Desk Panel initialisiert. Sie muss gedrückt gehalten werden, bis die Antriebe die unte- re Endlage erreicht haben. Sobald alle Antriebe in der untersten Endlage gestoppt haben, muss die „ Abwärts-Taste“ für 2-3 Sekunden losgelassen werden, um dann für weitere 6-8 Sekunden gedrückt gehalten zu werden. -
Page 35: Control Unit
CONTROL UNIT The system is initialised by pressing the „Down“ button on the desk panel. The button has to be kept pressed down until the drives have reached the lower limit. As soon as all drives have stopped at the lower limit, the „Down“... -
Page 36: Commande
COMMANDE Initialiser le système en appuyant la touche « descendre » sur la comman- de. Maintenir la pression jusqu‘à ce que la table atteigne sa position inféri- eure. Relâcher les touches pour 2 à 3 secondes quand le système s‘arrête. Puis, appuyer à... -
Page 37: Ersatzteileübersicht
ERSATZTEILEÜBERSICHT SPARE PARTS OVERVIEW APERÇU DU PIÈCES DE RECHANGE Teile-Nr. Zchng.-Nr. Benennung Part no. Drawing no. Designation n° d‘attache numéro dedessin Dénomination Lüfterbox mit Netzteil X000430 70117 Ventilator box with power supply Ventilateur box avec bloc d’alimentation Lüfterset X000440 70116 Ventilator set Jeu d‘aération Elektronische Sperre... - Page 38 ERSATZTEILEÜBERSICHT SPARE PARTS OVERVIEW APERÇU DU PIÈCES DE RECHANGE Teile-Nr. Zchng.-Nr. Benennung Part no. Drawing no. Designation n° d‘attache numéro de dessin Dénomination Controlbox CBD6S Controlbox CBD6S T011390 79343 Boîte de commande « Controlbox CBD6S » Hubsäule DL2 D114010 40537 Lifting column DL2 Colonne de levage DL2 Netzkabel...
- Page 39 ERSATZTEILEÜBERSICHT SPARE PARTS OVERVIEW APERÇU DU PIÈCES DE RECHANGE Teile-Nr. Zchng.-Nr. Benennung Part no. Drawing no. Designation n° d‘attache numéro de dessin Dénomination Desk Panel DPH D002700 79199 Desk Panel DPH Commande « Desk Panel DPH » Kabelwanne 70067 Cable tray Goulotte horizontale Lade AL WC/SB/Container 50060...
- Page 40 APERÇU DU PIÈCES DE RECHANGE Teile-Nr. Zchng.-Nr. Benennung Part no. Drawing no. Designation n° d‘attache numéro de dessin Dénomination Free Desk Container 20573 Free Desk pedestal Free Desk caisson Blende komplett 20574 Panel complete Voile de fond complet Eckabdeckung 60437 Corner coverage Cache d‘angle...
-
Page 41: Technische Daten
TECHNISCHE DATEN Maximale Belastung 60 kg (PC, PC-Halterung, Druckerplatten, Table Panel etc. sind einzurechnen!) Steuerung-Typ CBD6S Artikel CBD6SP00020A-009 Imax. 10% ~2 Min./18 Min., max. 2 Einschaltdauer Minuten Dauerbetrieb gefolgt von 18 Minuten Pause Netzanschluss Eingang | Ausgang 230 V, 50 Hz Schutzgrad Schutzklasse fixe Höhe... -
Page 42: Technical Data
TECHNICAL DATA Maximum load 60 kg (Including PC, PC holder, printer extensions, table panel etc.) Control type CBD6S Item CBD6SP00020A-009 max. 10% ~2 min./18 min., max. 2 On-time minutes on-time followed by 18 minute inactivity Input | output power supply 230 V, 50 Hz Protection level Protection class... -
Page 43: Caractéristiques Techniques
CARACTÉRISTIQUES TECHNIQUES Charge maximale 60 kg (PC, support de PC, plateaux p. imprimantes, écran de séparat. etc. doivent être inclus!) Commande type CB4 Numéro de référence CBD6SP00020A-009 10 % max. ~ 2 minutes/18 minutes ; 2 Durée de la mise en circuit minutes utilisation continue suivi par 18 minutes pause Raccordement électrique : entrée |... - Page 44 TECHNISCHE DATEN TECHNICAL DATA CARACTÉRISTIQUES TECHNIQUES Steuerung CBD6S Hubsäule Control unit CBD6S Electric lift column Commande CBD6S Colonne de levage Item: CBD6SP00020A-009 Item No.: DL2400A00500655 Date: 2017.11.06 Prod. Date: 2006.05.09 U In: 230V ~, 50 Hz Max Load: 1000 N P In: 300 W Power Rate: 24 V /Max 7 Amp.
-
Page 45: Pflegehinweise. Zertifikate
Ihrer Möbel und Wände ist besonders wichtig, um deren opti- ligen Herstellers zu reinigen. Informationen bzw. Unterlagen malen Zustand möglichst lange zu erhalten. dazu erhalten Sie von Ihrem Bene Betreuer. Für Schäden an Oberflächen, die durch unsachgemäße Reinigung verursacht Grundsätzlich empfiehlt sich die Reinigung mit einem feuch- wurden, übernimmt Bene keine Haftung. -
Page 46: Cleaning Instructions. Certificates
Never use polishes containing silicon, caustic cleaning agents with ammonia additives, alcohol or DISPOSAL softeners. The same applies for scratching cleaning agents Instructions for the disposal of Bene products can be found in with abrasive additives. the sustainability report at: http://www.bene.com... -
Page 47: Instructions D'entretien. Certificats
Bene. Humidifié avec de l’eau, sans addition de produit de netto- Bene se dégage de toute responsabilité concernant les sur- yage et de polissage ou analogue. Si toutefois le nettoyage faces endommagées suite à une utilisation inappropriée.