Table des Matières
Publicité
Les langues disponibles
Les langues disponibles
Liens rapides
Publicité
Chapitres
Table des Matières
Dépannage

Manuels Connexes pour Amprobe LT-10


Sommaire des Matières pour Amprobe LT-10
- Page 3 LT-10 LT-10-EUR Lamp Tester Users Manual 7/2013, 6000765 A ©2013 Amprobe Test Tools. All rights reserved. Printed in China...
- Page 4 Limited Warranty and Limitation of Liability Your Amprobe product will be free from defects in material and workmanship for one year from the date of purchase unless local laws require otherwise. This warranty does not cover fuses, disposable batteries or damage from accident, neglect, misuse, alteration, contamination, or abnormal conditions of operation or handling.
-
Page 5: Table Des Matières
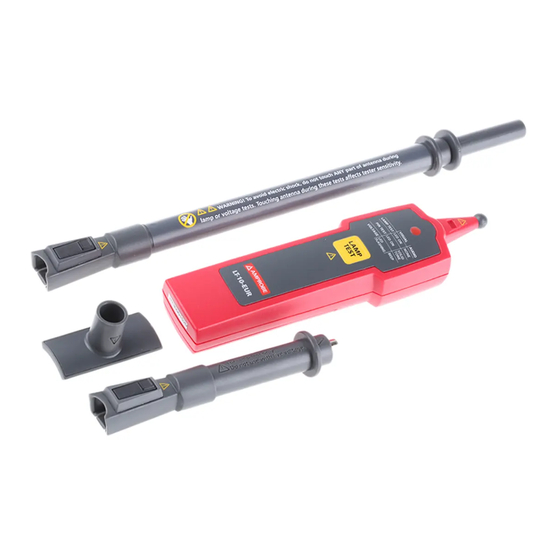
LT-10 / LT-10-EUR Lamp Tester CONTENTS SYMBOL ......................3 SAFETY INFORMATION ................. 3 UNPACKING AND INSPECTION ..............4 FEATURE ......................4 OPERATING THE LAMP TESTER ..............5 Attaching and Removing the Antenna ........... 6 Attaching and Removing the Adaptor ............ 7 LAMP TEST .................... - Page 6 LT-10 / LT-10-EUR Lamp Tester Fluorescent lamp test antenna Sodium Lamp Antenna Test probe (CAT III 300 V, CAT II 600 V) LED indicator LAMP TEST button Adaptor plate Finger guard Locking switch for antenna connection Antenna connection to test probe...
-
Page 7: Symbol
SYMBOLS Caution! Risk of electric shock. Caution! Refer to the explanation in this manual. To avoid electric shock, do not touch ANY part of antenna dur- ing lamp or voltage tests. Touching antenna during these tests affects tester sensitivity. The equipment is protected by double insulation or reinforced insulation. -
Page 8: Unpacking And Inspection
If any of these items are damaged or missing, return the complete package to the place of purchase for an exchange. FEATURES The Amprobe LT-10 Lamp Tester is a pocket-sized tool designed to troubleshoot fluorescent lamps prior to installation or removal and verify presence of voltage of electrical systems. -
Page 9: Operating The Lamp Tester
• Insulated antenna sleeve and tip provided to safely extend and retract during use • Does not work with LED and incandescent (standard) light bulbs • Replacement parts: Antenna LT-10-ANT (Item No. 4357839) OPERATING THE TESTER The test probe and antennas emit a high frequency voltage (approximately 3 kV) to ionize the light fixtures in order to diagnose a failure. -
Page 10: Attaching The Antenna
• Do not allow lamp test probe or antenna to touch energized wires. • To avoid damages to antenna and personal injury, do not attempt to bend or use the antenna as a crowbar. • Do not operate the instrument if the case or the battery door is open. • Do not use if the instrument appears damaged or doesn’t operate properly. -
Page 11: Lamp Test
Press and hold down the switch to unlock. Remove the antenna from the probe. Removing the antenna in a manner not specified in this manual may cause damages to the instrument and protection provided by the instrument may be impaired. Attaching and Removing the Adapter Plate Attaching adaptor plate (clockwise) -
Page 12: Testing Fluorescent Lamps
• Operating time: one second ON, one second OFF for maximum five cycles and wait for 1 minute before taking another measurement. Testing Fluorescent Lamps Lamp test with antenna 1. Attach the antenna to the test probe and make sure the switch is locked and secured. -
Page 13: Using Sodium Lamp Antenna
Lamp test with the probe 1. Touch the surface of the light bulb or the lamp socket with the probe. Do not touch energized parts with the probe. Do not touch the lamp socket during test. This could lead to faulty test results and cause electric shock. -
Page 14: Voltect™ Non-Contact Voltage Detection
VolTect™ Non-contact Voltage Detection Amprobe LT-10 Lamp Tester is NOT equipped with a probe tip to be inserted into the slot of the receptacle contact. Testing voltage that way will not be reliable. -
Page 15: Voltage Detection With Antenna
• When using the instrument, if LED indicator does not glow or the instrument does not beep, voltage could still be present. The instrument indicates active voltage in the presence of electrostatic fields of sufficient strength generated from the source voltage. If the field strength is low, the instrument may not provide indication of live voltage. -
Page 16: Voltage Detection With Probe
Figure 7: Voltage detection with antenna Voltage Detection with Probe Do not touch the energized bare parts with the probe. Test on energized insulated parts or insulated wires only. To avoid electric shock, do not touch ANY part of antenna during lamp or voltage tests. -
Page 17: Pin Test
Figure 8: Voltage detection at ballast input wires Figure 9: Voltage detection at ballast output wires Pin Test The pin test (filament test) can be used on dual pin fluorescent lamps that have a filament under the metal cap. The filament is used to excite the gas inside the tube and turn it on. -
Page 18: Detailed Specifications
2. Repeat step 1 with the other end of the lamp. LED indicator ON Solid continuous beep Figure 10: Plug the lamp into the pin test slots Figure 11: Pin test indications DETAILED SPECIFICATIONS Test voltage Approximately 3 kV / 280 kHz (with new battery) Field strength Approximately 100 μV/m at 260 - 300 kHz... -
Page 19: Maintenance
1 x 9V lithium or alkaline battery only, Battery 6LR61/6LF22/MN1604 or equivalent Battery life 500 tests (alkaline typically) Dimensions Approximately 170 x 40 x 24 mm (L x W x H) (6.69 x 1.57 x 0.94 in) Approximately 80 g (0.18 lb) with battery Weight installed IEC 61010-1, UL 61010-1... -
Page 20: Troubleshooting
TROUBLESHOOTING Lamp tester doesn’t work: Problem: Possible low or dead battery Action: Check and/or replace battery Low lamp tester response: Problem: 1. Possible low battery 2. Bad contact between the probe/antenna and the lamp tester Action: 1. Check and/or replace battery 2. -
Page 21: Battery Replacement
BATTERY REPLACEMENT Replacing BATTERY follow below steps: 1. On the battery case, turn the screw to “open” position by using a flat screw driver. Then open the battery cover. 2. Remove battery and replace it with one 9V alkaline or lithium battery only (6LF22, 6LR61, MN1604 or equivalent). -
Page 23: Testeur De Lampes
LT-10 LT-10-EUR Testeur de lampes Guide d'utilisation 4/2013, 4265801 B © 2013 Amprobe Test Tools. Tous droits réservés. Imprimé en Chine... - Page 24 Les revendeurs ne sont pas autorisés à prolonger toute autre garantie au nom de Amprobe. Pour une réparation au cours de la période de garantie, retournez le produit avec la preuve d'achat à un centre de service autorisé par Amprobe ou à...
- Page 25 Testeur de lampes LT-10 / LT-10-EUR TABLE DES MATIÈRES SYMBOLE ....................... 3 CONSIGNES DE SÉCURITÉ ................3 DÉBALLAGE ET INSPECTION ................. 4 CARACTÉRISTIQUES ..................4 UTILISATION DU TESTEUR DE LAMPES ............5 Montage et démontage de l'antenne ............. 6 Montage et démontage de l'adaptateur ..........6 Testeur de lampes ..................
-
Page 26: Testeur De Lampes Lt-10 / Lt-10-Eur
Testeur de lampes LT-10 / LT-10-EUR Sonde de vérification (CAT III 300 V, CAT II 600 V) Indicateur DEL Bouton LAMP TEST Plaque adaptatrice Protège-doigts Interrupteur de verrouillage pour le raccordement d'antenne Raccordement d'antenne à la sonde de vérification... -
Page 27: Symbole
SYMBOLES Attention! Risque de choc électrique. Attention! Reportez-vous aux explications de ce guide. Cet équipement est protégé par une isolation double ou renforcée. Pile. Association canadienne de normalisation (NRTL/C) Conforme aux directives européennes. Conforme aux normes australiennes. Ne jetez pas ce produit avec les déchets municipaux non triés. Contactez un recycleur qualifié. -
Page 28: Déballage Et Inspection
Si l'un de ces éléments est manquant ou endommagé, retourner l'emballage complet à votre point d'achat pour un échange. CARACTÉRISTIQUES Le testeur de lampes Amprobe LT-10 est un outil de poche conçu pour dépanner les lampes fluorescentes et de vérifier la présence de tension dans les installations électriques. -
Page 29: Utilisation Du Testeur De Lampes
• Ne fonctionne pas avec les DEL et les ampoules à incandescence (standard) • Pièces de rechange : Antenne LT-10-ANT (No. 4357839) UTILISATION DU TESTEUR La sonde d'essai / l'antenne émet une tension à haute fréquence (environ 3 kV) pour ioniser les luminaires afin de diagnostiquer la panne. -
Page 30: Interrupteur
Fonctions de test et indications : Indication Test Visuel Audio Test de lampes DEL allumée Aucun Test de broche DEL allumée Tonalité continue Tension sans contact LED clignote Modulation sonore Installation de l'antenne Assurez-vous que l'interrupteur est bien verrouillé sur la sonde avant utilisation. -
Page 31: Montage Et Démontage De L'adaptateur
Montage et démontage de l'adaptateur Montage de la plaque adaptatrice Démontage de la plaque adaptatrice Figure 3 : Montage et démontage de l'adaptateur Testeur de lampes La détection de tension sans contact est toujours activée. Lorsque la sonde de l'antenne est proche de fils sous tension, la DEL clignote et émet un signal sonore. - Page 32 • Si la lampe fluorescente s'allume pendant le test, mais ne fonctionne pas lorsqu'elle est installée dans le luminaire, le filament en spirale, le démarreur ou le ballast est défectueux. Ne touchez pas la l’antenne pendant le test. Figure 4 : Testez le tube de verre de la lampe dans le luminaire avec l'antenne Test de lampe avec sonde...
-
Page 33: Détection De Tension Sans Contact Voltect
Figure 5 : Testez la Figure 6 : Testez le douille de la lampe tube de verre de la lampe avec la sonde avec la sonde Détection de tension sans contact VolTech™ W AVERTISSEMENT! • Si l'instrument est utilisé d'une manière non spécifiée par le fabricant, la protection fournie par le testeur peut être altérée. - Page 34 • Ne pas utiliser si l'instrument semble endommagé ou ne fonctionne pas correctement. Examiner de près la pointe de la sonde pour des fissures ou un bris avant l'utilisation. En cas de doute, faites réparer l'instrument. • Ne pas utiliser l'instrument pour tester une tension supérieure à la tension nominale comme indiqué...
- Page 35 Détection de tension avec la sonde Ne pas toucher les parties sous tension avec la sonde. 1. Allumer l'alimentation du luminaire. 2. Utiliser la sonde pour détecter la présence d'une tension alternative sur les fils à l'entrée du ballast. • Si le voyant DEL du testeur clignote en rouge et émet un signal sonore, iune tension alternative est présente.
-
Page 36: Test De Broche
Test de broche Le test de la broche (test du filament) peut être utilisé sur des lampes fluorescentes à double broche ayant un filament sous la capsule métallique. Le filament est utilisée pour activer le gaz dans le tube et le mettre en marche. -
Page 37: Entretien
La DEL s'allume et émet un signal sonore à environ 3 mm (0,12 po) de distance d'un fil Sensibilité de tension transportant 120 V CA sans contact (avec sonde) La DEL s'allume et émet un signal sonore à environ 5 mm (0,2 po) de distance d'un fil transportant 230 V CA Chute de preuve 1 mètre... -
Page 38: Dépannage
Sauf pour le remplacement de la pile, la réparation du testeur doit être effectuée uniquement par un centre de service ou un technicien autorisé. La face avant et la mallette de transport peuvent être nettoyées avec un détergent doux et de l'eau. Appliquer en petite quantité avec un chiffon doux et laisser sécher complètement avant utilisation. -
Page 39: Remplacement De La Pile
La sonde ne fonctionne pas ou pas bien contre la douille de la lampe Problème : 1. Possibilité de pile faible 2. Mauvais contact entre la sondeet la douille de lampe NOTA : La sonde isolée peut ne pas fonctionner sur la douille d'une lampe à... - Page 41 LT-10 LT-10-EUR Leuchtmittelprüfer Bedienungsanleitung 4/2013, 4265801 B © 2013 Amprobe® Test Tools. Sämtliche Rechte vorbehalten. In China gedruckt.
- Page 42 Eine Liste mit Distributoren in Ihrer Nähe finden Sie im Bezugsquellen-Bereich („Where to Buy“) bei www.Amprobe.com. In den USA und in Kanada können Geräte zum Austausch oder zur Reparatur auch an das Amprobe-Servicecenter (Anschrift weiter unten) eingesandt werden.
- Page 43 LT-10 / LT-10-EUR-Leuchtmittelprüfer Inhalt Symbole ......................3 Sicherheitshinweise ..................3 Auspacken und prüfen ................. 4 Merkmale ....................... 4 Leuchtmittelprüfer bedienen ............... 5 Antenne anschließen und trennen ............6 Adapter anbringen und trennen ............. 6 Leuchtmittelprüfung ................7 Berührungslose VolTect™-Spannungsprüfung ........9 Kontaktprüfung..................
-
Page 44: Lt-10 / Lt-10-Eur-Leuchtmittelprüfer
LT-10 / LT-10-EUR-Leuchtmittelprüfer Prüfsonde (CAT III 300 V, CAT II 600 V) LED-Anzeige LAMP TEST-Taste Adapterplatte Fingerschutz Antennenanschluss- Freigabetaste Antennenanschluss, zur Prüfsonde... -
Page 45: Symbole
SYMBOLE Achtung! Stromschlaggefahr. Achtung! Erläuterung in dieser Anleitung beachten. Doppelte oder verstärkte Geräteisolierung. Batterie. Canadian Standards Association (NRTL/C) Erfüllt europäische Vorgaben. Erfüllt zutreffende australische Vorgaben. Entsorgen Sie das Gerät nicht mit dem regulären Hausmüll. Wenden Sie sich an ein qualifiziertes Recyclingunternehmen. SICHERHEITSHINWEISE Das Messgerät entspricht folgenden Vorgaben: IEC/EN 61010-1, 3. -
Page 46: Auspacken Und Prüfen
Falls etwas fehlen oder beschädigt sein sollte, lassen Sie bitte das komplette Paket von Ihrem Händler gegen ein einwandfreies austauschen. MERKMALE Der Amprobe LT-10-Leuchtmittelprüfer ist ein handliches Werkzeug zur Fehlerbehebung bei Fluoreszenzleuchten und zum Nachweis von Spannungen in elektrischen Systemen. -
Page 47: Prüfgerät Bedienen
Ausfahren bei der Anwendung • Kann nicht zur Prüfung von LED- und Glühfadenleuchtmitteln (herkömmliche Glühbirnen) eingesetzt werden • Ersatzteile: Antenne LT-10-ANT (Art.-Nr. 4357839) PRüFGERäT BEDIENEN Die Prüfsonde/Antenne gibt eine Hochspannung (etwa 3 kV) zur Ionisierung der Leuchtmittel zur Fehlerdiagnose ab. -
Page 48: Leuchtmittelprüfung
Prüffunktionen und Anzeigen: Signalisierung Prüfung Optisch Akustisch Leuchtmittelprüfung LED ein – Kontaktprüfung LED ein Dauerton Spannung, LED blinkt Moduliertes berührungslos Tonsignal Antenne anbringen Vergewissern Sie sich vor dem Einsatz, dass die Freigabetaste richtig an der Sonde einrastet ist. Taste Abbildung 1: Antenne anbringen Antenne abnehmen Abbildung 2: Antenne abnehmen Halten Sie die Taste zum Lösen der Verbindung gedrückt. - Page 49 Adapter anbringen und abnehmen Adapterplatte anbringen Adapterplatte abnehmen Abbildung 3: Adapter anbringen und abnehmen Leuchtmittelprüfung Die berührungslose Spannungsprüfung ist grundsätzlich aktiv. Die LED blinkt und ein Tonsignal erklingt, wenn Sonde oder Antenne in die Nähe von spannungsführenden Leitern gebracht werden. Die berührungslose Spannungsprüfung wird beim Drücken der LAMP TEST-Taste abgeschaltet.
- Page 50 • Falls die Fluoreszenzleuchte während der Prüfung aufleuchtet, jedoch nicht leuchtet, wenn sie in der Fassung sitzt, können Heizwendel, Starter oder Vorschaltgerät defekt sein. Antenne bei der Prüfung nicht berühren. Abbildung 4: Antenne zum Prüfen des Leuchtmittels in der Fassung an das Glas anlegen Leuchtmittelprüfung mit der Sonde 1.
-
Page 51: Berührungslose Voltect™-Spannungsprüfung
Abbildung 6: Abbildung 5: Leuchtmittel mit Leuchtmittel mit der Sonde am Glas der Sonde am prüfen Sockel prüfen Berührungslose VolTech™-Spannungsprüfung WARNUNG! W • Falls das Instrument auf eine nicht vom Hersteller vorgegebene Weise eingesetzt wird, können die Schutzmechanismen des Prüfgerätes beeinträchtigt werden. - Page 52 • Benutzen Sie das Instrument nicht, falls sichtbare Beschädigungen oder Fehlfunktionen vorliegen. Überprüfen Sie die Spitze der Sonde vor dem Einsatz sorgfältig auf Risse und andere Beschädigungen. Instrument im Zweifelsfall überprüfen und reparieren lassen. • Verwenden Sie das Instrument nicht zum Prüfen von Spannungen, welche die am Instrument angegebenen Höchstspannungen überschreiten.
- Page 53 Spannungsprüfung mit der Sonde Berühren Sie keine spannungsführenden Teile mit der Sonde. 1. Schalten Sie das Leuchtmittel ein. 2. Verwenden Sie die Sonde zur Erkennung von Wechselspannung in den Leitern am Eingang des Vorschaltgerätes. • Wenn die LED des Prüfgerätes rot blinkt und ein Tonsignal zu hören ist, liegt Wechselspannung an.
-
Page 54: Kontaktprüfung
Kontaktprüfung Die Kontaktprüfung (Heizdrahtprüfung) kann bei zweipoligen Fluoreszenzleuchten mit Heizdraht unter der Metallkappe angewandt werden. Der Heizdraht regt das Gas im Inneren der Röhre an und lässt es aufleuchten. Bei defektem Heizdraht funktioniert das Leuchtmittel nicht richtig. Schalten Sie die Stromversorgung der Leuchtmittelfassung ab, bevor Sie das Leuchtmittel aus der Fassung nehmen. - Page 55 LED- und Tonsignalisierung bei etwa 3 mm Berührungslose Abstand zu einem Leiter, an dem 120 V Spannungsprüfung, Wechselspannung anliegen Empfindlichkeit (mit LED- und Tonsignalisierung bei etwa 5 mm Sonde) Abstand zu einem Leiter, an dem 230 V Wechselspannung anliegen Sturzfestigkeit Eine Sekunde ein, eine Sekunde aus Betriebszeit bei maximal fünf Zyklen;...
-
Page 56: Problemlösung
Mit Ausnahme des Batteriewechsels sollten sämtliche Reparaturen des Gerätes ausschließlich durch autorisierte Servicecenter oder durch gleichwertig qualifiziertes Fachpersonal ausgeführt werden. Frontblende und Transporttasche können Sie mit Wasser und etwas mildem Reinigungsmittel säubern. Sparsam mit einem weichen Tuch anwenden, vor dem nächsten Einsatz gründlich trocknen lassen. Keine aromatischen Kohlenwasserstoffe, Benzin oder chlorhaltige Lösungsmittel zur Reinigung verwenden. -
Page 57: Batteriewechsel
Die Sonde funktioniert nicht oder nur schlecht an der Leuchtmittelfassung Problem: 1. Batterie eventuell schwach 2. Schlechter Kontakt zwischen Sonde und Leuchtmittelfassung HINWEIS: An der Fassung von Energiesparlampen funktioniert die isolierte Sonde eventuell nicht. Abhilfe: 1. Batterie prüfen, gegebenenfalls auswechseln 2. - Page 59 LT-10 LT-10-EUR Tester per lampade Manuale di istruzioni 4/2013, 4265801 B ©2013 Amprobe Test Tools. Tutti i diritti riservati. Stampato in Cina...
- Page 60 Riparazione Tutti i prodotti Amprobe restituiti per la riparazione in garanzia o non in garanzia o per la taratura, devono essere accompagnati da quanto segue: il nome del cliente, il nome della società, l'indirizzo, il numero di telefono e la prova d'acquisto.
- Page 61 Tester per lampade LT-10 / LT-10-EUR INDICE SIMBOLO ......................3 INFORMAZIONI SULLA SICUREZZA .............. 3 ESTRAZIONE DALL'IMBALLO E ISPEZIONE ........... 4 CARATTERISTICHE ..................4 UTILIZZO DEL TESTER PER LAMPADE ............5 Fissaggio e rimozione dell'antenna ............6 Fissaggio e rimozione dell'adattatore ............. 6 Test lampada .....................
-
Page 62: Tester Per Lampade Lt-10 / Lt-10-Eur
Tester per lampade LT-10 / LT-10-EUR Sonda di prova (CAT III 300 V, CAT II 600 V) Indicatore LED Pulsante LAMP TEST (test lampada) Piastra adattatore Protezione per dita Interruttore di blocco per connessione antenna Connessione antenna per sonda di prova... -
Page 63: Simbolo
SIMBOLI Attenzione! Rischio di folgorazione. Attenzione! Fare riferimento alle spiegazioni contenute nel manuale. L'apparecchio è protetto da un doppio isolamento o da isola- mento rinforzato. Batteria. Canadian Standards Association (NRTL/C) Conforme alle direttive europee. Conforme alle normative australiane pertinenti. Non smaltire questo prodotto nella raccolta indifferenziata comunale. -
Page 64: Estrazione Dall'imballo E Ispezione
CARATTERISTICHE Il tester per lampada Amprobe LT-10 è un utensile tascabile per risolvere i problemi di lampade fluorescenti e verificare la presenza di tensione nei sistemi elettrici. Per risolvere i problemi con le lampade, bastano tre semplici operazioni: 1. -
Page 65: Utilizzo Del Tester
• Non funziona con lampadine a LED e lampadine incandescenti (standard) • Parti sostitutive: Antenna LT-10-ANT (Articolo n ° 4357839) UTILIZZO DEL TESTER La sonda di prova/antenna emette una tensione ad alta frequenza (circa 3 kV) per ionizzare gli impianti di illuminazione e diagnosticare il guasto. -
Page 66: Fissaggio E Rimozione Dell'antenna
Funzioni di prova e indicazioni: Indicazione Test Visiva Audio Test lampada LED acceso Nessuno Test dei pin LED acceso Segnale acustico fisso Tensione senza contatto LED lampeggiante Bip modulato Fissaggio dell'antenna Accertarsi che l'interruttore sia bloccato in sicurezza sulla sonda prima dell'uso. -
Page 67: Test Lampada
Fissaggio e rimozione dell'adattatore Fissaggio della piastra adattatore Rimozione della piastra adattatore Figura 3: Fissaggio e rimozione dell'adattatore Test lampada La rilevazione di tensione senza contatto è sempre attiva. Se la sonda o l'antenna è vicina ai cavi in tensione, il LED lampeggia ed emette segnali acustici. - Page 68 • Se la lampada fluorescente si accende durante il test della lampada ma non funziona quando è installata nell'impianto di illuminazione, potrebbe essere guasto il filamento avvolto a spirale, lo starter o il regolatore di corrente. Non toccare la l’antenna durante il test. Figura 4: Test della lampada sulla superficie di vetro dell'apparecchio di...
-
Page 69: Voltect™ Rilevazione Della Tensione Senza Contatto
Figura 6: Test della Figura 5: Test della lampada contro la lampada contro la superficie di vetro presa con la sonda con la sonda VolTech™ rilevazione della tensione senza contatto AVVISO! W • Se lo strumento è usato in modo non specificato dal produttore, la protezione fornita dallo stesso potrebbe essere compromessa. - Page 70 • Non usare lo strumento se appare danneggiato o non funziona correttamente. Esaminare attentamente la punta della sonda per verificare che non ci siano crepe o rotture prima dell'uso. In caso di dubbi, portare lo strumento in manutenzione. • Non usare lo strumento per testare tensioni superiori a quelle previste e indicate sullo strumento.
- Page 71 Rilevazione della tensione con la sonda Non toccare le parti in tensione con la sonda. 1. Accendere l'apparecchio di illuminazione. 2. Usare la sonda per rilevare la presenza di tensione CA sui cavi all'ingresso del regolatore di corrente. • Se il LED del tester lampeggia di luce rossa ed emette un segnale acustico la tensione CA è...
-
Page 72: Test Dei Pin
Test dei pin Il test dei pin (test dei filamenti) può essere usato sulle lampade fluorescenti a due pin con filamento presente sotto il cappuccio metallico. Il filamento è usato per eccitare il gas che si trova all'interno del tubo e accenderlo. La lampada non funzionerà... -
Page 73: Manutenzione
Il LED si illumina e sono emessi segnali acustici a circa 3 mm (0,12") di distanza da un filo che Sensibilità tensione conduce 120 VCA senza contatto Il LED si illumina e sono emessi segnali acustici (con sonda) a circa 5 mm (0,2") di distanza da un filo che conduce 230 VCA Prova di caduta 1 metro... -
Page 74: Risoluzione Dei Problemi
A parte la sostituzione della batteria, la riparazione del tester deve essere effettuata solo da un centro di assistenza autorizzato o da altro personale di assistenza qualificato. Il pannello frontale e la custodia possono essere puliti con una soluzione delicata di detergente e acqua. Applicare morigeratamente con un panno soffice e lasciare asciugare completamente prima dell'uso. -
Page 75: Sostituzione Della Batteria
La sonda non funziona o non funziona bene con la presa della lampada Problema: 1. Possibile batteria parzialmente scarica 2. Contatto difettoso tra la sonda e la presa della lampada NOTA: La sonda isolata potrebbe non funzionare sulle prese delle lampade a risparmio energetico. - Page 77 LT-10 LT-10-EUR Medidor de lámparas Manual de instrucciones 4/2013, 4265801 B ©2013 Amprobe Test Tools. Todos los derechos reservados. Impreso en China...
- Page 78 Los proveedores no están autorizados a ampliar la garantía en nombre de Amprobe. Para hacer uso del servicio de reparaciones durante el periodo de garantía, devuelva el producto con la prueba de compra a un servicio técnico autorizado de Amprobe o a un proveedor o distribuidor.
- Page 79 LT-10 / LT-10-EUR Medidor de lámparas CONTENIDO SÍMBOLOS ...................... 3 INFORMACIÓN DE SEGURIDAD ..............3 DESEMBALAJE Y REVISIÓN ................4 CARACTERÍSTICAS ..................4 FUNCIONAMIENTO DEL MEDIDOR DE LÁMPARAS ........5 Colocar y retirar la antena ............... 6 Colocar y retirar el adaptador ..............6 Lamp test (medición de lámparas) ............
-
Page 80: Lt-10 / Lt-10-Eur Medidor De Lámparas
LT-10 / LT-10-EUR Medidor de lámparas Sonda de medición (CAT III 300 V, CAT II 600 V) Indicador LED Botón LAMP TEST (medición de lámparas) Placa del adaptador Protección para los dedos Interruptor de bloqueo para la conexión de la antena Conexión de la antena a... -
Page 81: Símbolos
SÍMBOLOS ¡Precaución! Riesgo de descarga eléctrica. ¡Precaución! Consulte la explicación en este manual. El equipo está protegido por un doble aislamiento o un aisla- miento reforzado. Pila. Canadian Standards Association (Asociación Canadiense de Normalización, NRTL/C) Cumple con la normativa europea. Está... -
Page 82: Desembalaje Y Revisión
CARACTERÍSTICAS El medidor de lámparas Amprobe LT-10 es una herramienta de tamaño de bolsillo diseñada para solucionar problemas de lámparas fluorescentes y comprobar la presencia de voltaje en sistemas eléctricos. -
Page 83: Cómo Utilizar El Medidor
• Funda y punta de antena aislante incluida para extenderla y retraerla con seguridad durante su uso • No funciona con bombillas LED ni incandescentes (estándar) • Partes reemplazables: Antena LT-10-ANT (Artículo No. 4357839) CÓMO UTILIZAR EL MEDIDOR La sonda/antena de medida emite un voltaje de alta frecuencia (aprox. 3 kV) para ionizar los aparatos luminosos con el fin de hacer un diagnóstico de los... - Page 84 Funciones de medida e indicaciones: Indicación Medición Visual Audio Lamp test LED on (LED Sin sonido (medición de lámparas) encendido) Pin test (medición LED on (LED Tono continuo mediante las clavijas) encendido) Non-contact voltage LED parpadeando Pitido modulado (voltaje sin contacto) Colocar la antena Asegúrese de que el interruptor esté...
-
Page 85: Colocar Y Retirar El Adaptador
Colocar y retirar el adaptador Colocar la placa del adaptador Retirar la placa del adaptador Imagen 3: Colocar y retirar el adaptador Lamp test (medición de lámparas) La detección de voltaje sin contacto siempre está activada. Cuando la sonda o la antena esté cerca de cables con corriente, el indicador LED parpadeará y sonará... - Page 86 • Si la lámpara fluorescente se enciende durante la medición de la lámpara pero no funciona cuando se instala en el aparato luminoso, el filamento en espiral de la bobina, el arrancador o el balasto pueden estar defectuosos. No toque la antena durante la medición. Imagen 4: Medir la lámpara en la superficie de cristal del aparato luminoso con la antena...
-
Page 87: Detección De Voltaje Sin Contacto Voltect
Imagen 5: Medir Imagen 6: Medir la lámpara en el la lámpara en la casquillo con la superficie de cristal sonda con la sonda Detección de voltaje sin contacto VolTect™ W Advertencia: • Si el instrumento se utiliza de una manera no especificada por el fabricante, podrá... - Page 88 • No utilice el instrumento si muestra signos de daños o si no funciona correctamente. Examine detenidamente la punta de la sonda por si tuviera grietas o estuviera rota. Si tuviera alguna duda, lleve a reparar el instrumento. • No utilice el instrumento para medir un voltaje superior al voltaje nominal que se indica en el instrumento.
- Page 89 Detección del voltaje con la sonda No toque las partes con corriente con la sonda. 1. Encienda el aparato luminoso. 2. Utilice la sonda para detectar la presencia de voltaje de CA en los cables de la entrada del balasto. • Si el indicador LED del medidor parpadea en rojo y emite un pitido, hay presencia de voltaje de CA.
-
Page 90: Pin Test (Medición Mediante Las Clavijas)
Pin test (medición mediante las clavijas) La medición mediante las clavijas (medición del filamento) se puede utilizar en lámparas fluorescentes de dos clavijas que tienen un filamento debajo de la tapa de metal. El filamento se utiliza para excitar el gas que hay en el interior del tubo y encenderlo. -
Page 91: Mantenimiento Y Reparaciones
El indicador LED se ilumina y emite un pitido a aproximadamente 3 mm (0,12 pulgadas) de Sensibilidad al voltaje sin distancia a un cable que tenga 120 V de CA contacto (con sonda) El indicador LED se ilumina y emite un pitido a aproximadamente 5 mm (0,2 pulgadas) de distancia a un cable que tenga 230 V de CA Resistencia a caídas... -
Page 92: Resolución De Problemas
3. Revise el manual de instrucciones para comprender mejor cómo funciona el medidor. Excepto para la sustitución de la pila, las reparaciones del medidor las podrá llevar a cabo únicamente un centro de asistencia técnica autorizado o personal cualificado que tenga conocimientos sobre el instrumento. Podrá... -
Page 93: Sustitución De La Pila
posible que esté dañada Consulte a un servicio técnico autorizado para que repare o sustituya la antena La sonda no funciona o funciona correctamente con el casquillo de la lámpara Problema: 1. El posible que la pila esté baja de carga 2. - Page 95 LT-10 LT-10-EUR Lamptestare Användarhandbok 4/2013, 4265801 B ©2013 Amprobe Test Tools. Alla rättigheter förbehålles. Tryckt i Kina...
- Page 96 Begränsad garanti och ansvarsbegränsning Din Amprobe-produkt är garanterad att vara fri från fel i material och utförande under ett år från inköpsdatum om inte lokala lagar stipulerar annat. Denna garanti omfattar inte säkringar och engångsbatterier eller skador orsakade av olycka, försummelse, felaktig användning, ändring, nedsmutsning eller användning och hantering under onormala förhållanden.
- Page 97 LT-10 / LT-10-EUR Lamptestare INNEHÅLL SYMBOLER ..................... 3 SÄKERHETSINFORMATION ................3 UPPACKNING OCH INSPEKTION ..............4 FUNKTIONER ....................4 ANVÄNDA LAMPTESTAREN ................5 Sätta fast och ta bort antennen .............. 6 Sätta fast och ta bort adaptern ............... 6 Lamptest....................7 Beröringsfri VolTect™...
- Page 98 LT-10 / LT-10-EUR Lamptestare Mätsond (CAT III 300 V, CAT II 600 V) LED-indikator LAMPTEST knapp Adapterplatta Fingerskydd Låsswitch för antennanslutning Antennanslutning till mätsond...
-
Page 99: Symboler
SYMBOLER Försiktighet! Risk för elektrisk chock. Försiktighet! Se förklaringen i denna handbok. Utrustningen skyddas av dubbel eller förstärkt isolering. Batteri. Canadian Standards Association (NRTL/C) Överensstämmer med Europeiska direktiv. Uppfyller relevanta standarder för Australien. Släng inte produkten som osorterade kommunala sopor. Kontakta ett kvalificerat återvinningsföretag. -
Page 100: Uppackning Och Inspektion
Om något av dessa föremål är skadade eller saknas, returnera det kompletta paketet till inköpsstället för utbyte. FUNKTIONER Amprobe LT-10 Lamptestare är ett verktyg i fickstorlek som är designat för att felsöka fluorescerande lampor och verifiera förekomsten av spänning i elektriska system. -
Page 101: Använda Testaren
• Isolerad antennhållare och spets medföljer för att på ett säkert sätt skjuta ut och dra in vid användning • Fungerar inte på LED och standardglödlampor • Reservdelar: Antenn LT-10-ANT (Tuote nro 4357839) ANVÄNDA TESTAREN Mätsond/antenn avger en högfrekvent spänning (cirka 3 kV) för att jonisera belysningsarmaturen för att på... - Page 102 Testfunktioner och indikatorer: Indikering Test Visuell Ljud Lamptest LED på Ingen Stifttest LED på Fast ton Beröringsfri spänning LED blinkar Modulerat pip Sätta fast antennen Tillse att switchen är säkert låst vid sonden före användning. Switch Figur 1: Sätta fast antennen Ta bort antennen Figur 2: Ta bort antennen Tryck och håll inne switchen för att låsa upp.
-
Page 103: Sätta Fast Och Ta Bort Adaptern
Sätta fast och ta bort adaptern Sätta fast adapterplatta Ta bort adapterplatta Figur 3: Sätta fast och ta bort adaptern Lamptest Beröringsfri spänningsdetektion är alltid på. När sonden eller antennen är i närheten av strömförande ledningar, blinkar och piper LED. Beröringsfri spänningsdetektion är avaktiverat när knappen LAMPTEST trycks. - Page 104 • Om den fluorescerande lampan tänds under lamptest men inte fungerar installerad i belysningsarmatur kan den spirallindade glödtråden, tändaren eller ballasten vara trasig. Rör inte antenn under testet. Figur 4: Lamptest med antenn mot glasyta i belysningsarmatur Lamptest med sond 1.
-
Page 105: Beröringsfri Voltect™ Spänningsdetektor
Figur 5: Lamptest Figur 6: Lamptest med sond mot med sond mot glasyta sockel Beröringsfri VolTect™ spänningsdetektor W Varning: • Om instrumentet används på ett sätt som inte specificerats av tillverkaren kan skyddet som uppnås av testaren försämras. • Testa på en spänningsförande källa som är inom den nominella ac spänningen för instrumentet, både före och efter för att kontrollera att instrumentet är i gott skick. - Page 106 • Använd inte om instrumentet verkar skadat eller om det inte fungerar normalt. Undersök noggrant spetsen på sonden för sprickor eller brott före användning. Vid tveksamheter, lämna in instrumentet för service. • Använd inte instrumentet för att testa högre spänning än den nominella spänning som är markerad på...
- Page 107 Spänningsdetektion med sond Rör inte spänningsförande delar med sonden. 1. Slå på strömmen till belysningsarmaturen. 2. Använd sonden för att upptäckta närvaro av ac spänning på ledningarna vid ballastens ingång. • Om LED blinkar rött och piper, finns det ac-spänning. 3.
-
Page 108: Stifttest
Stifttest Stifttestet (glödtrådstestet) kan användas på fluorescerande lampor med dubbla stift som har glödtråden under metallhöljet. Glödtråden används för att stimulera gasen på rörets insida och antända den. Lampan fungerar inte normalt om glödtråden är trasig. Slå av strömmen till belysningsarmaturen före lampan tas bort därifrån. 1. -
Page 109: Underhåll Och Reparation
LED lyser och piper vid cirka 3 mm (0,12 tum) Beröringsfri avstånd från en ledning som bär 120 Vac spänningskänslighet LED lyser och piper vid cirka 5 mm (0,2 tum) (med sond) avstånd från en ledning som bär 230 Vac Fallsäker 1 meter En sekund PÅ, en sekund AV i max. -
Page 110: Felsökning
Förutom batteribyte ska reparation av testaren alltid göras av ett auktoriserat servicecenter eller av annan kvalificerad instrumentservicepersonal. Framsidan och bärväskan kan rengöras med en mild blandning av rengöringsmedel och vatten. Applicera sparsamt med en mjuk duk och tillse att det är ordentligt torrt innan användning. Använd inte aromatiska kolväten, bensin eller klorerade lösningsmedel vid rengöring. -
Page 111: Byta Batteri
Sonden fungerar inte eller fungerar bra mot lampsockel Problem: 1. Batteriet har troligen låg nivå 2. Dålig kontakt mellan sonden och lampsockeln NOTERA: Det är möjligt att den isolerade sonden inte fungerar på en lampsockel till en energiglödlampa. Åtgärd: 1. Kontrollera och/eller byt batteri 2. - Page 112 Visit www.Amprobe.com for • Catalog • Application notes • Product specifications • User manuals Amprobe ® www.Amprobe.com info@amprobe.com Everett, WA 98203 Tel: 877-AMPROBE (267-7623) Amprobe Europe ® Beha-Amprobe In den Engematten 14 79286 Glottertal, Germany Please Tel.: +49 (0) 7684 8009 - 0...