Table des Matières

Manuels Connexes pour Rotel U1541CH


Sommaire des Matières pour Rotel U1541CH
- Page 1 MICROWAVEOVEN1541CH U1541CH • GEBRAUCHSANWEISUNG MODE D’EMPLOI • ISTRUZIONI PER L’USO • INSTRUCTIONS FOR USE • Gebrauchsanweisung ○ Mode d’emploi ○ Istruzioni per l’uso ○ Instruction for use...
-
Page 2: Schematische Darstellung
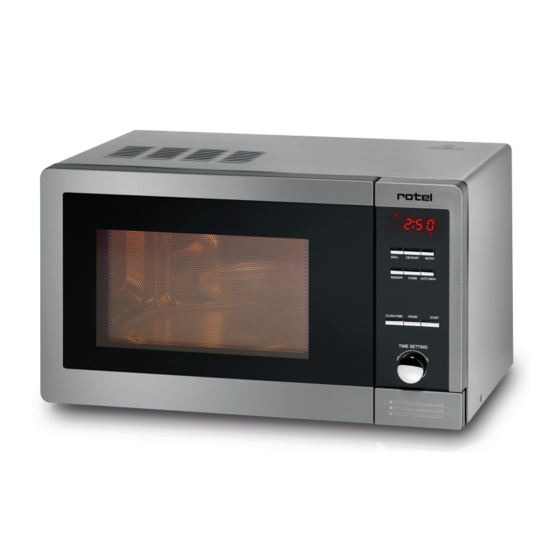
D / F / I / E • SCHEMATISCHE DARSTELLUNG Vue d’ensemble • Diagramma della struttura • Structure diagram • Gerätebeschreibung Description de Descrizione Description of the l’appareil dell’apparecchio appliance Türverschluss Système de verrouil- Sistema di sicurezza Door latch lage de la porte dello sportello Sichtfenster Hublot Finestrella Viewing window Lüftungsgitter Orifice de ventila- Fori di ventilazione Vent tion Antriebsachse Axe d’entraînement Base rotante Turntable shaft Gleitring Anneau de guidage Anello rotante Turntable roller ring Drehteller Plateau tournant Piatto girevole di Turntable... - Page 3 Gerätebeschreibung Description de Descrizione Description of the l’appareil dell’apparecchio appliance Digital Anzeige Panneau digital Display digitale Display digitale Umluft Air chaud Ventilazione Ventilazione Grill Gril Grill Grill Mikrowelle Micro-ondes Microonde Microonde Memory Mémoire Memoria Memoria Kombinationspro- Programme de Programmi com- Programmi com- gramme combinaison binati binati Auto Programme Programmes Programmi au- Programmi au- automatique tomatici tomatici Uhrzeit/Timer...
-
Page 4: Table Des Matières
Inhaltsverzeichnis / Table des matières / Indice / Table of contents Deutsch ............................... 7 Sicherheitshinweise ........................ 7 • Hinweise zum Grill, Umluft- und Kombibetrieb ................ 1 3 • Inbetriebnahme .......................... 1 3 • Wissenswertes zum Mikrowellenbetrieb .................. 1 3 • Einfache Mikrowelleneinstellung .................... 1 4 • Manuelle Zeiteinstellung ....................... 1 4 • Häufigste Anwendungen ....................... 1 5 • Auftauen ............................ 1 5 •... - Page 5 Utilisations fréquentes ........................ 3 2 • Décongélation .......................... 3 2 • Gril .............................. 3 3 • Air chaud ............................ 3 3 • Menu Auto ............................ 3 3 • Fonction Mémoire ......................... 3 5 • Combinaisons .......................... 3 5 • C – 1: Air chaud et micro-ondes .................... 3 5 C – 2 : Gril et air chaud ........................ 3 6 C – 3: Gril et micro-ondes .
- Page 6 C - 3 : grill e microonde ......................... 5 3 Orario ............................ 5 4 • Timer ............................. 5 4 • Sicurezza bambini .......................... 5 5 • Pulizia ............................ 5 5 • Disturbi/soluzioni .......................... 5 6 • English ............................... 5 7 Safety instructions ......................... 5 7 • Notes on the grill, convection and combination mode .............. 6 3 • Before starting the appliance .
-
Page 7: Deutsch
Deutsch • SICHERHEITSHINWEISE Lesen Sie erst alle Hinweise, bevor Sie das Gerät in Be- trieb nehmen. o Dieses Gerät kann von Personen mit einge- schränkten physischen, sensorischen oder geisti- gen Fähigkeiten oder einem Mangel an Erfahrung und/oder Wissen verwendet werden, wenn sie beaufsichtigt werden oder bezüglich des sicheren Gebrauchs des Geräts unterwiesen wurden und die daraus resultierenden Gefahren verstanden haben. o Dieses Gerät darf nicht von Kindern benutzt wer- den. Das Gerät und seine Anschlussleitung sind von Kindern fernzuhalten. - Page 8 verringern, sind die folgenden grundlegenden Si- cherheitsmassnahmen zu beachten: o Warnung: Flüssigkeiten und andere Lebensmittel dürfen nicht in geschlossenen Behältern erwärmt werden, da sie explodieren können. o Warnung: Instandhaltungs- oder Reparaturarbei- ten dürfen nur von Fachpersonal durchgeführt werden. Beim Entfernen von Schutzabdeckungen kann gesundheitsschädliche Mikrowellenstrahlung austreten. o Gerät und Netzkabel sind von Kindern unter acht Jahren fernzuhalten.
- Page 9 Halten Sie die Tür geschlossen, um Flammen ge- gebenenfalls zu ersticken. o Lassen Sie nichts überkochen. o Lagern Sie nichts im Garraum. Bewahren Sie keine Artikel wie Brot, Kekse usw. im Gerät auf. o Entfernen Sie alle Metallteile von Papier- oder Plastikbehältern/-tüten, bevor Sie sie in den Gar- raum legen. o Installieren und platzieren Sie das Gerät nur ge- mäss der beiliegenden Anweisungen. o Eier in der Schale oder ganze hart gekochte Eier dürfen in der Mikrowelle nicht erwärmt werden, da sie selbst nach Abschluss des Erhitzungsvor-...
- Page 10 lifizierten Elektriker auszutauschen, um die Gefahr von Stromschlägen zu vermeiden. o Lagern oder verwenden Sie das Gerät nicht im Freien. o Verwenden Sie das Gerät nicht in der Nähe von Wasser, in einem feuchten Keller oder in der Nähe eines Schwimmbeckens. o Während des Betriebs können sich auch benach- barte Oberflächen stark erwärmen. Die Oberflä- chen werden im Betrieb heiss. Halten Sie das Netzkabel von warmen Flächen fern. Alle Lüf- tungsöffnungen müssen stets frei zugänglich sein.
- Page 11 chen kommen. Gehen Sie deshalb vorsichtig mit dem entsprechenden Behälter um. o Dieses Gerät darf nicht von Personen (Kinder ein- geschlossen) mit eingeschränkten physischen, sensorischen oder geistigen Fähigkeiten bzw. ei- nem Mangel an Erfahrung und Kenntnissen ver- wendet werden, es sei denn, sie werden von einer für ihre Sicherheit verantwortlichen Person beauf- sichtigt oder sie wurden von dieser in die Ver- wendung des Geräts eingewiesen. o Kinder sind zu beaufsichtigen, um sicherzustellen, dass sie nicht mit dem Gerät spielen.
- Page 12 o WARNUNG: Das Gerät und von aussen zugängli- che Teile werden während des Betriebs heiss. Achten Sie darauf, dass Sie die Heizelemente nicht berühren. Kinder unter 8 Jahren sind fernzuhal- ten, es sei denn, sie werden kontinuierlich beauf- sichtigt. o Das Mikrowellengerät darf nicht mit geöffneter Dekortür betrieben werden (sofern eine Dekortür vorgesehen ist). o Die Rückseite der Mikrowelle muss zu einer Wand hin zeigen. o Die Mikrowelle darf nicht in einen Schrank einge- baut werden. o Das Mikrowellengerät dient zum Erwärmen von Speisen und Getränken. Das Trocknen von Le- bensmitteln oder Kleidung, das Erwärmen von...
-
Page 13: Hinweise Zum Grill, Umluft- Und Kombibetrieb
• HINWEISE ZUM GRILL, UMLUFT- UND KOMBIBETRIEB Da im Grill- Umluft- und Kombibetrieb Strahlungshitze benutzt wird, benutzen Sie bitte nur hitzebeständiges Geschirr. Im reinen Grill- und Umluftbetrieb dürfen Sie auch Metall- oder Alugeschirr benut- zen nicht jedoch bei Kombi- Auto- oder Mikrowellenbetrieb. Stellen Sie nichts auf die Oberseite des Gehäuses. Diese wird heiss. Lassen Sie im- mer die Lüftungsschlitze frei. Im Grillbetrieb stellen Sie den Grillständer auf den Drehteller und legen Sie das Gar- gut auf den Grillständer. So wird das Grillgut nah an den Grill gebracht. • INBETRIEBNAHME Entnehmen Sie alles im Garraum befindliche Zubehör, packen Sie es aus und legen Sie den Gleitring in die Mitte. Positionieren Sie den Glasteller so auf der An- triebsachse, dass dieser in die Ausbuchtungen der Antriebswelle einrastet und ge- rade aufliegt. Kontrollieren Sie das Gerät auf sichtbare Schäden, besonders im Bereich der Tür. Bei Schäden jeglicher Art darf das Gerät auf keinen Fall in Betrieb genommen wer- den. -
Page 14: Einfache Mikrowelleneinstellung
Verwenden Sie nur geeignetes Geschirr wie: Glas, Porzellan, Keramik, Hitzebeständiges Kunststoff oder spezielles Mikrowel- § lengeschirr. Verwenden Sie niemals metallisches Geschirr. § Für Rezepte und deren Gardauer im Mikrowellenbetrieb bedienen Sie sich bitte im Buchhandel eines Rezeptbuches für Mikrowellengeräte. • EINFACHE MIKROWELLENEINSTELLUNG Öffnen sie die Türe und stellen Sie das Kochgut z. Bsp. eine Tasse Milch in die Mitte des Glastellers. Türe gut schliessen. (Das Gerät arbeitet aus Sicherheitsgründen nur mit fest geschlossener Türe). Sobald Sie die Starttaste (10) betätigen schaltet das Gerät ein und erwärmt den In- halt automatisch für 1 Minute im Mikrowellenmodus bei 100% Leistung Ist die Kochzeit abgelaufen ertönen fünf Signale. Sie könne die Türe jetzt öffnen und die Tasse heraus nehmen. (Bitte beachten Sie beim Erwärmen von Flüssigkeiten un- seren speziellen Sicherheitshinweis: Achtung Siedeverzug). • MANUELLE ZEITEINSTELLUNG Die Zeit kann auch mit dem Timer auf 10 Sekunden genau eingestellt werden. Bitte beachten Sie, dass die Leistung nach der Zeiteinstellung nicht mehr verändert wer- den kann: 1. Kochgut in die Mikrowelle stellen und Türe schliessen. 2. Drücken Sie die Mikrowellentaste (4) solange bis die gewünschte Leistung an- gezeigt wird (sofern diese weniger als 100% sein soll). Dabei gilt: Drücken der Mik- Anzeige Bedeutung Anwendungsgebiet row.taste (4) Display Leistung Mikrowelle 100% / P100 Schnelles erhitzen 900W Leistung Mikrowelle 70% / P 70 Zum Garen z.Bsp. von Fleisch 675W Leistung Mikrowelle 50% /... -
Page 15: Häufigste Anwendungen
Beachten Sie: § Wenn Sie etwas Falsches eingestellt haben oder das laufende Programm unter- brechen möchten, drücken Sie die Pause/Reset Taste (9) (die Leistung wird da- bei automatisch wieder auf 100% gestellt). • HÄUFIGSTE ANWENDUNGEN Getränk / Speise Portionengrösse ca. Zeit Leistung Getränke erhitzen 150 ml 1 – 2 Min. 100% / 900W Suppen + Sossen erhitzen 200 – 300 ml 3 – 4 Min. 100% / 900W Tellermenüs aufwärmen 1 Teller 2 – 3 Min. 70% / 675W Aufläufe aufwärmen 1 Portion 5 – 8 Min. 30% / 270W Wähen od.Pizza aufwärm. 1 Stück 1 – 2 Min. 100% / 900W Fleisch allgem. auftauen Zeitang. in Min.pro 450g 6 – 11 Min. 30% / 270W Fisch allgem. auftauen Zeitang. in Min.pro 450 g 3 – 5 Min. 30% / 270W Brot auftauen gross / klein 5 – 7 / 6 – 8 Min. -
Page 16: Grill
• GRILL Die Grill-Leistung kann auf zwei Stufen eingestellt werden: G-1 = 85% Leistung (ca. 160°C) und G-2 = 50% Leistung (ca. 140°C). 1. Grillgut in die Mikrowelle auf den Grillständer legen und Türe schliessen. 2. Drücken Sie die Grilltaste (3) bis das gewünschte Symbol auf dem Display er- scheint. 3. Stellen Sie mit den Zeitwähler (11) die gewünschte Kochzeit ein (Drehung nach rechts). Sie können bis zu max.60 Minuten einstellen. 4. Drücken Sie die Starttaste (10). 5. Nach Ablauf der Hälfte der eingestellten Grillzeit wird das Programm unterbro- chen und es ertönen 2 Signaltöne. 6. Öffnen Sie die Türe und drehen Sie das Grillgut auf die andere Seite. 7. Schliessen Sie die Tür und drücken Sie die Starttaste (10) damit das Programm weiter läuft. • UMLUFT Sie können dieses Gerät auch als ganz normalen Umluftofen benützten. Beachten Sie aber, dass er nicht ihren herkömmlichen Backofen ersetzten kann. Grössere Speisen sollten Sie weiterhin im normalen Ofen backen. -
Page 17: Auto-Menu
• AUTO-MENU Mit dieser Programmtaste (7) haben Sie die Möglichkeit, verschiedene vorpro- grammierte „Menüs“ einzustellen. Die Programmpunkte sind nach Produkt und Gewicht programmiert. Auf der folgenden Tabelle ist aufgeführt, wieviel Gewicht für die jeweiligen Produk- te einstellbar ist: A-1 A-2 A-3 A-4 A-5 A-6 Aufheizen Kartoffeln Fleisch Pizza Fisch Geflügel 100 200 100 100 100 200 150 300 200 200 200 400 200 400 300... -
Page 18: Memory Funktion
• MEMORY FUNKTION Diese Funktion erlaubt es Ihnen, eine Einstellung die Sie besonders häufig verwen- den, abzuspeichern. 1. Drücken Sie die Memory Taste (5). Eine „1“ blinkt im Display. 2. Stellen Sie die gewünschte Einstellung ein die Sie speichern möchten. Gehen Sie dabei vor wie in den entsprechenden Absätzen in dieser Anleitung beschrieben. Z. Bsp: Sie möchten Mikrowellen Leistung 70% bei einer Zeit von 1:30 einstel- len: Drücken Sie die Mikrowellentaste (4) bis P 70 erscheint. § Drehen Sie den Zeitwähler (11) nach rechts bis 1:30 erscheint § 3. Drücken Sie die Memory Taste (5) und die Einstellungen sind gespeichert. 4. Auf dem Display erscheint nun in kleiner Schrift „memory“ oberhalb der Zeitan- gabe. 5. Stellen Sie die Speise in die Mikrowelle. 6. Drücken Sie die Memory Taste (5) und danach die Starttaste (10). 7. Die gespeicherte Einstellung läuft automatisch ab. Um die gespeicherte Einstellung zu ändern gehen Sie gleich vor wie oben beschrie- ben. Bei einer Unterbrechung der Stromzufuhr wird die gespeicherte Einstellung ge- löscht. • KOMBINATIONEN C - 1 : Umluft und Mikrowelle Diese Kombination braucht man zum Rösten und Backen usw. Das Gerät schaltet zwischen Mikrowellen- und Umluft-Betrieb um (230°C Umluft + 40% Mikrowelle). -
Page 19: Grill Und Umluft
C - 2 : Grill und Umluft Diese Kombination braucht man zum knusprigen braten und backen usw. Es eignet sich hervorragend um Brötchen, Käseküchlein, Schinkengipfeli usw aufzubacken (beachten Sie die Zeitangaben auf der jeweiligen Verpackung). Das Gerät schaltet zwischen Grill- und Umluft-Betrieb um (230°C Umluft + 50% Grill). Bei diesem Programm ist es von Vorteil, wenn Sie zuerst das Gerät vorheizen. Ge- ben Sie also bei der Zeiteingabe (Punkt 2) ca. ¼ Stunde mehr ein. 1. Drücken Sie die Kombitaste (6) bis das gewünschte Symbol (C-2) auf dem Dis- play erscheint. 2. Drehen Sie den Zeitwähler (11) nach rechts bis die gewünschte Kochzeit (inkl. Vorheizzeit) erscheint. Sie können von 10 Sek bis max. 60 Min einstellen. 3. Drücken Sie die Starttaste (10). 4. Sobald die Vorheizzeit abgelaufen ist können Sie das Programm unterbrechen indem Sie die Türe öffnen. -
Page 20: Uhrzeit
• UHRZEIT Das Digitaldisplay kann auf die aktuelle Uhrzeit eingestellt werden. 1. Drücken Sie die Uhrzeittaste (8). Die Stundenziffern blinken. 2. Drehen Sie den Zeitwähler (11) bis die gewünschten Stundenziffern erscheinen. 3. Drücken Sie die Uhrzeittaste (8) zur Bestätigung. Die Minutenziffern blinken. 4. Drehen Sie den Zeitwähler (11) bis die gewünschten Minutenziffern erscheinen. 5. Drücken Sie die Uhrzeittaste (8) zur Bestätigung. Wenn das Gerät von der Stromzufuhr getrennt wird, muss die Uhrzeit wieder neu programmiert werden. • TIMER Vorprogammation: Mit der Timerfunktion können Sie das Gerät so programmieren, dass es zu einem bestimmten Zeitpunkt automatisch einschaltet und den gewün- schten Kochvorgang startet. Beachten Sie, dass für diesen Vorgang die Uhrzeit bereits programmiert sein muss. -
Page 21: Kindersicherung
• KINDERSICHERUNG Drücken Sie die Tasten „Auto Menu“ (7) und „Combi“ (6) zusammen für etwa 2 sec. bis ein Signal ertönt. Im Display wird die Sicherung angezeigt. Um die Sicherung wieder auszuschalten drücken Sie wieder beide Tasten zusammen (ca.2sec) bis das Signal wieder ertönt. • REINIGUNG Trennen Sie das Gerät vom Netz. Reinigen Sie den Garraum nach der Benutzung mit einem leicht feuchten Tuch. Reinigen Sie das Zubehör in gewohnter Weise in einem Spülbad. Türrahmen/Türdichtung und benachbarte Teile müssen bei Verschmutzung mit einem feuchten Tuch sorgfältig gereinigt werden. Dieses Gerät entspricht den einschlägigen CE-Richtlinien und ist nach den neusten sicherheitstechnischen Vorschriften gebaut. Technische Änderungen vorbehalten. Gebrauchsanweisung ○ Mode d’emploi ○ Istruzioni per l’uso ○ Instruction for use... -
Page 22: Störungen Und Deren Behebung
Gargut ungleichmässig gegart Verwenden Sie geeignetes Kochgeschirr? § Verwenden Sie den mitgelieferten Drehteller? § Rühren oder wenden Sie die Speisen! § War das Gargut komplett aufgetaut? § Gargut zerkocht Wurden die Funktionsschalter korrekt bedient? § Gargut zu wenig gekocht Verwenden Sie geeignetes Kochgeschirr? § War das Gargut komplett aufgetaut? § Wurden die Funktionsschalter korrekt bedient? § Sind alle Lüftungsschlitze frei? § Ungleichmässiges Auftauen Verwenden Sie geeignetes Kochgeschirr? § Verwenden Sie den mitgelieferten Drehteller? § Rühren oder wenden Sie die Speisen! § Wurden die Funktionsschalter korrekt bedient? § Sind alle Lüftungsschlitze frei? § Öffnen Sie die Türe etwas und warten Sie 10 bis 15 Minuten zur Abkühlung des § Gargutes. • ENTSORGUNG Für eine sachgerechte Entsorgung ist das Gerät dem Fachhändler, der Servicestelle oder der Firma Rotel AG zurückzugeben. Gebrauchsanweisung ○ Mode d’emploi ○ Istruzioni per l’uso ○ Instruction for use... -
Page 23: Français
Français • CONSIGNES DE SÉCURITÉ Veuillez lire toutes les instructions avant la mise en ser- vice de l’appareil. o Cet appareil peut être utilisé par des personnes aux capacités physiques, sensorielles ou intellec- tuelles limitées ou manquant d’expérience ou de connaissance si elles sont sous surveillance ou ont été instruites sur l’utilisation sûre de l’appareil et si elles ont compris les risques pouvant en résulter. o Cet appareil ne peut pas être utilisé par des en- fants. L’appareil et son cordon d’alimentation doi- vent être tenus hors de portée des enfants. - Page 24 o Attention : Il est dangereux pour quiconque autre qu'une personne compétente d'effectuer un entre- tien ou une réparation nécessitant l'enlèvement d'un capot qui protège contre l'énergie des micro- ondes. o Placez l'appareil et son cordon hors de porté des enfants de moins de huit ans. o Utilisez uniquement des ustensiles qui conviennent pour les fours à micro-ondes. o Le four doit être nettoyé régulièrement et les rési- dus d'aliments doivent être éliminés. o Veuillez lire et observer les points suivants: "PRÉ- CAUTIONS POUR ÉVITER UNE ÉVENTUELLE EXPO- SITION À L'ÉNERGIE MICRO-ONDES".
-
Page 25: Les Œufs Avec Coquille, Les Œufs Entiers Cuits Durs
o Retirez préalablement les liens à fils métalliques des sacs/conteneurs en papier ou plastique avant de les placer dans le four. o Installez ou placez ce four en respectant scrupule- usement les instructions d'installation fournies. o Les œufs avec coquille, les œufs entiers cuits durs ne doivent pas être chauffés dans des fours à mi- cro-ondes, car ils peuvent exploser, même après que le chauffage par micro-ondes s'est arrêté. o Cet appareil est prévu pour un usage domestique ou des applications similaires, comme: §... -
Page 26: L'omission D'un Nettoyage Régulier Peut Provoquer
o La température des surfaces accessibles peut être très élevée lorsque l'appareil est en marche. Les surfaces peuvent devenir très chaudes lors de l'uti- lisation. Gardez le cordon à distance des surfaces chaudes et ne recouvrez pas les ouïes de ventila- tion du four. o Ne pas laisser pendre le cordon du bord de la table ou du plan de cuisine. o L'omission d'un nettoyage régulier peut provoquer la détérioration de la surface, ce qui peut affecter négativement la durée de vie de l'appareil et provoquer des situations dangereuses. -
Page 27: Utilisez Uniquement La Sonde De Température
vent des instructions par une personne re- sponsable pour utiliser l'appareil en toute sécurité. o Les enfants doivent être surveillés afin de s'assurer qu'ils ne jouent pas avec l'appareil. o L'appareil n'est pas prévu pour être opéré par une minuterie externe ou un système de commande à distance séparé. o Des parties accessibles peuvent être très chaudes lors de l'utilisation. Les jeunes enfants doivent être tenus à distance. o Ne jamais utiliser un nettoyeur à vapeur pour net- toyer l'appareil. o L'appareil peut être très chaud lors de son utilisa- tion. Attention de ne pas toucher les éléments chauffants à l'intérieur du four. -
Page 28: Le Four À Micro-Ondes Doit Être Opéré Avec La Porte
o Le four à micro-ondes doit être opéré avec la porte décorative ouverte (pour les fours avec porte dé- corative). o La surface arrière de l'appareil doit être orientée vers un mur. o Le four à micro-ondes ne doit pas être placé dans une armoire. o Le four à micro-ondes est prévu pour chauffer des aliments et des boissons. Le séchage d'aliments et l'échauffement de coussins, chaussons, éponges chauffants, de chiffons humides ou similaire peu- vent entraîner un risque de blessures ou d'em- brasement. -
Page 29: Consignes Pour Les Modes Gril, Air Chaud Et Combiné
• CONSIGNES POUR LES MODES GRIL, AIR CHAUD ET COMBINÉ Comme de la chaleur par rayonnement est utilisée dans les modes gril, air chaud et combiné, veuillez ne vous servir que de vaisselle résistant à la chaleur. En mode gril et circulation d’air uniquement, vous pouvez également utiliser de la vaisselle en métal ou en aluminium, mais toutefois pas en mode combiné, auto ou micro-ondes. Ne rien déposer sur le dessus du boîtier. Celui-ci devient chaud. Toujours laisser li- bres les fentes d'aération. En mode gril placer la grille sur le plateau tournant et déposer le produit à griller sur la grille. Ainsi, l'aliment à griller sera plus proche du gril. • MISE EN SERVICE Retirer tous les accessoires se trouvant dans l'espace de cuisson, les déballer et dé- poser l'anneau glissant au milieu. Positionner le plateau de verre sur l'axe d'en- traînement, de manière à ce que celui-ci s'engage dans les évidements de l'axe d'entraînement et repose droit. -
Page 30: Réglage Automatique Du Temps
Le four micro-ondes ne remplace pas votre ancien four, il sert essentiellement à: décongeler des produits surgelés/congelés § chauffer/réchauffer rapidement des aliments ou des boissons § cuire/mijoter des plats dans certaines conditions § N'utiliser que de la vaisselle appropriée, par exemple : Verre, porcelaine, céramique, matière synthétique résistant à la chaleur ou une § vaisselle spécialement adaptée aux micro-ondes. Ne jamais utiliser de vaisselle en métal. § Pour des recettes et leur temps de cuisson en mode micro-ondes, se procurer en librairie un livre de recettes pour fours à micro-ondes. • RÉGLAGE AUTOMATIQUE DU TEMPS Ouvrir la porte et placer le produit à cuire, par ex. une tasse de lait, au centre du plateau de verre. Bien refermer la porte. (Pour des raisons de sécurité, l'appareil ne travaille que si la porte est bien fermée). L'appareil démarre dès que la touche 'Start' (10) a été actionnée et commence au- tomatiquement à réchauffer le contenu pour une durée de 1 minute à 100% de pu- issance. Cinq signaux acoustiques retentissent dès que le temps de cuisson est écoulé. Vous pouvez maintenant ouvrir la porte et ressortir la tasse, (Veuillez tenir compte de notre consigne de sécurité particulière: 'Attention retard à l'ébullition', lorsque vous réchauffez des liquides). -
Page 31: Réglage Manuel Du Temps
• RÉGLAGE MANUEL DU TEMPS Le temps peut également être réglé exactement à 10 secondes au moyen de la minuterie. Veuillez noter que ceci ne fonctionne que si la puissance du micro-ondes a été d'abord réglée. 1. Placer le produit à cuire dans le four micro-ondes puis refermer la porte 2. Appuyez sur la touche Micro-ondes (4) jusqu’à ce que la puissance souhaitée s’affiche (si celle-ci doit être inférieure à 100%). La règle à cette occasion est: Presser la touche Affichage Signification Domaine d’application Micro (4) à l’écran P100 Puiss. micro-ondes 100%/900W Chauffage rapide... -
Page 32: Utilisations Fréquentes
• UTILISATIONS FRÉQUENTES Niveau de puis- Aliment Quantité approx. Temps sance Boissons: chauffer 150 ml 1 – 2 min 100% / 900W Soupe + Sauce: chauffer 200 – 300 ml 3 – 4 min 100% / 900W Assiettes indiv.: réchauffer 1 assiette 2 – 3 min 70% / 675W Plats non mélang.: réchauf. 1 portion 5 – 8 min 30% / 270W Pizza: réchauffer 1 quartier 1 – 2 min 100% / 900W Viande général: décongéler minutes / 450g 6 – 11 min 30% / 270W Poisson général: décongéler minutes / 450g 3 – 5 min 30% / 270W Pain: décongéler grand / petit 5 – 7 / 6 – 8 min 30% / 270W Petit pain: décongéler 1 pièce 10 – 20 s 30% / 270W... -
Page 33: Gril
• GRIL Il est possible de régler la puissance du gril sur deux niveaux: G-1 = 85% de la puis- sance (env. 160°C) et G-2 = 50% de la puissance (env. 140°C). 1. Placer l’aliment à griller dans le micro-ondes sur la grille métallique et fermer la porte. 2. Presser la touche de gril (3) jusqu’à ce que le symbole souhaité apparaisse à l’écran. 3. Avec la minuterie (11), réglez la durée de cuisson souhaitée (rotation vers la droite). Vous pouvez régler au maximum jusqu’à 60 minutes. 4. Pressez sur la touche Start (10). 5. - Page 34 Les points du programme sont programmés en produit et poids. Le tableau ci-dessous indique les poids réglables pour les produits respectifs: A-1 A-2 A-3 A-4 A-5 A-6 Réchauffer Pommes de Viande Pizza Poisson Volaille terre 100 200 100 100 100 200 150 300 200 200 200 400 200 400 300 250 300 600 250 500 400 300 400 800 Poids en 300 600 500...
-
Page 35: Fonction Mémoire
• FONCTION MÉMOIRE Cette fonction vous permet de sauvegarder un réglage que vous utilisez par- ticulièrement souvent. 1. Appuyez sur la touche Mémoire (5). Un «1» se met à clignoter sur l’écran. 2. Procédez au réglage souhaité. Pour ce faire, procédez comme décrit dans les paragraphes correspondants du présent manuel d’utilisateur. Par ex.: vous souhaitez régler une puissance de micro-ondes de 70% pour une durée de 1 minute 30: Appuyez sur la touche Micro-ondes (4) jusqu’à ce qu’apparaisse P 70. -
Page 36: Gril Et Air Chaud
C – 2 : Gril et air chaud On utilise cette combinaison pour faire rôtir en vue d’obtenir une croûte et cuire en dorant, etc. Elle se prête parfaitement à la cuisson de petits pains, de ramequins au fromage, de croissants aux jambons, etc. (observer les durées de cuisson indiquées sur les emballages). L’appareil travaille en variant entre les deux modes gril et air chaud ( 230°C air chaud et 50% gril). Avec ce programme, il est avantageux de préchauffer l’appareil au préalable. Entrer de la sorte env. ¼ heure supplémentaire lors du réglage de la durée de cuisson (Point 2). 1. Appuyez sur la touche combinée (6) jusqu’à ce que le symbole (C-2) souhaité apparaisse sur l’écran. -
Page 37: Stop/Reset
• STOP/RESET Pour interrompre un programme en cours, soit appuyez une fois sur la touche Pause/Reset (9), soit ouvrez et refermez la porte. Le programme redémarre dès que l’on appuie sur la touche Start (10). Pour mettre un terme à un programme en cours, appuyez deux fois sur la touche Pause/Reset (9)! Si vous avez commis une erreur durant la programmation, vous pouvez tout remet- tre à zéro en appuyant une fois sur la touche Pause/Reset (6). • HEURE Il est possible de régler l’écran numérique sur l’heure actuelle. 1. Appuyez sur la touche Heure (8). Les chiffres des heures se mettent à clignoter. 2. Tournez la minuterie (11) jusqu’à ce que les chiffres d’heure souhaités appa- raissent. 3. -
Page 38: Sécurité Enfants
6. Appuyez maintenant sur la touche Micro-ondes (4) et maintenez la pression jusqu’à ce qu’apparaisse P-50. 7. Tournez la minuterie (11) jusqu’à ce qu’apparaissent 2 minutes. 8. Appuyez sur la touche Start (10). L’appareil est maintenant programmé et va se mettre en marche à l’heure souhaitée. Il est possible d’interrompre à tout moment la programmation en appuyant une fois sur la touche Pause/Reset (9). Fonction Timer normale La fonction Timer peut aussi être utilisée comme Timer. Procédez comme ci- § dessus, mais sans exécuter les points 6 et 7. Après l’heure programmée, 10 bips retentissent. • SÉCURITÉ ENFANTS Presser ensemble les touches «Auto Menu» (7) et «Combi» (6) durant environ 2 secondes jusqu’à l’émission d’un signal sonore. L’écran affiche que la sécurité est en marche. -
Page 39: Defaillances/Remèdes
Cuisson irrégulière utilisez-vous une vaisselle appropriée? § utilisez-vous le plateau fournant livré avec le four? § remuez ou fournez les aliments! § les aliments étaient-ils entièrement décongelés? § Les aliments sont trop cuits avez-vous correctement utilisé les boutons de commande? § Les aliments ne sont pas assez utilisez-vous une vaisselle appropriée? § Cuits les aliments étaient-ils entièrement décongelés? § avez-vous correctement utilisé les boutons de commande? § toutes les fentes d'aération sont-elles libres? § Décongélation irrégulière utilisez-vous une vaisselle appropriée? § utilisez-vous le plateau fournant livré avec le four? § remuez ou fournez les aliments! § avez-vous correctement utilisé les boutons de commande? § toutes les fentes d'aération sont-elles libres? § qu'à ce que les aliments soient refroidis. § • ELIMINATION A la fin de la phase d’utilisation, la machine doit être remise au détaillant ou à un point de service après-ventre, ou renvoyées directement à Rotel AG, qui se chargera de l’éliminination ou du recyclage. Gebrauchsanweisung ○ Mode d’emploi ○ Istruzioni per l’uso ○ Instruction for use... -
Page 40: Italiano
Italiano • AVVERTENZE DI SICUREZZA Prima dell'uso leggere tutte le istruzioni. o Questo apparecchio può essere usato da persone con ridotte capacità fisiche, sensoriali o mentali, o con insufficiente esperienza e conoscenza, a con- dizione che siano sotto sorveglianza o che abbiano ricevuto istruzioni sull'uso sicuro dell'apparecchio e siano consapevoli dei rischi connessi. o Questo apparecchio non deve essere utilizzato dai bambini. L'apparecchio e il cavo di alimentazione devono essere tenuti fuori dalla portata dei bam- bini. - Page 41 o Avvertenza: per chiunque non sia una persona competente è pericoloso eseguire operazioni di manutenzione o riparazione che comportino la rimozione di pannelli che proteggono dall'e- sposizione all'energia a microonde. o Tenere l'apparecchio e il relativo cavo fuori dalla portata di bambini di meno di 8 anni. o Usare solamente utensili idonei per l'uso in forni a microonde. o Pulire regolarmente il forno e rimuovere eventuali depositi di cibo dallo stesso.
- Page 42 o Rimuovere i laccetti metallici che chiudono sac- chetti di carta o di plastica prima dell'uso. o Installare o posizionare il forno solo in conformità alle istruzioni di installazione fornite. o Non usare il forno per scaldare uova crude o uova sode con il guscio, che potrebbero esplodere anche dopo la fine della cottura a microonde. o L'apparecchio è progettato per l'uso in ambiti do- mestici e simili, tra cui: § aree cucina riservate al personale in negozi, uffici e altri ambienti di lavoro;...
- Page 43 to. Tenere il cavo lontano da superfici riscaldate e non coprire le aperture di ventilazione del forno. o Impedire che il cavo di alimentazione resti sospeso sul bordo di un tavolo o di un banco. o Se non si mantiene il forno in condizioni di pulizia, si potrebbe causare un deterioro della superficie, che potrebbe compromettere la vita utile dell'ap- parecchio ed eventualmente provocare situazioni di pericolo. o Mescolare o agitare contenuti di biberon e vasetti con alimenti per bambini e controllare la tempera- tura prima del consumo per evitare scottature. o Il riscaldamento a microonde di bevande può causare una bollitura brusca: fare attenzione nel maneggiare il contenitore.
- Page 44 o L'apparecchio non è progettato per l'uso tramite timer esterno o sistema con telecomando separa- to. o Alcune parti accessibili potrebbero diventare molto calde durante l'uso. Tenere a distanza i bambini piccoli. o Non usare pulitrici a vapore. o Durante l'uso, l'apparecchio diventa molto caldo. Fare in modo di evitare di toccare elementi riscaldanti all'interno del forno.
- Page 45 o Il forno a microonde è progettato per riscaldare al- imenti e bevande. L'asciugatura di alimenti o vestiti e il riscaldamento di cuscinetti riscaldanti, pan- tofole, spugne, panni umidi e simili può provocare il rischio di lesioni, fiamme o incendio. o AVVISO: Se la porta o la guarnizione sono guaste, l'apparecchio di cottura non si deve usare fintanto- ché sia stato riparato da una persona esperta. Gebrauchsanweisung ○ Mode d’emploi ○ Istruzioni per l’uso ○ Instruction for use...
-
Page 46: Consigli Per L'uso Con Grill, Ventilazione E Combinato
• CONSIGLI PER L'USO CON GRILL, VENTILAZIONE E COMBINATO Dato che per il funzionamento con il grill, la ventilazione e quello combinato si usa calore di irradiazione combinato, vi preghiamo di utilizzare unicamente delle stov- iglie resistenti al calore. Per il solo funzionamento con il grill e la ventilazione potete anche usare stoviglie metalliche ed in alluminio, ma non per il funzionamento combinato, auto o a mi- croonde. Non mettetele sulla parte alta del corpo del forno. Questa si riscalda. Lasciate sem- pre libere le feritoie per la ventilazione. In caso di esercizio con il grill, mettete il supporto del grill sul piatto rotante e mettete la pietanza sul supporto. Così la pietanza si troverà vicina al grill. •... -
Page 47: Informazioni Utili Per Il Funzionamento
• INFORMAZIONI UTILI PER IL FUNZIONAMENTO Il vostro apparecchio lavora con irradiazioni di microonde che scaldano molto rap- idamente le particelle d'acqua contenute negli alimenti. Non si tratta di un'irradia- zione termica e quindi la pietanza praticamente non imbrunisce. L'apparecchio non è pertanto adatto ad asciugare. Riscaldate solo alimenti con questo apparecchio. L'apparecchio non è adatto a cuocere in presenza di grassi fluidi. Non riscaldate quantità troppo grandi in una sola volta. In questo caso l'apparecchio perde la sua efficienza. Le microonde liberano immediatamente tutta l'energia. Un preriscaldamento risulta pertanto inutile per il funzionamento a microonde. Il forno a microonde non sostituisce il vostro vecchio forno. Esso serve principalmente a: Scongelare alimenti congelati e surgelati. § Riscaldare rapidamente pietanze e bevande. § Cuocere pietanze in certe condizioni. § Utilizzate unicamente stoviglie adatte come: Vetro, porcellana, ceramica, materie plastiche resistenti al calore o stoviglie fat- § te appositamente per i forni a microonde. Non utilizzate mai stoviglie metalliche. § Per le ricette e la relativa durata di cottura al microonde, servitevi di un libro di ri- cette specifico per forni a microonde, normalmente disponibile in libreria. • REGOLAZIONE AUTOMATICA DEL TEMPO Aprite lo sportello e ponete l'alimento da cuocere, ad es. una tazza di latte, nel cen- tro del piatto di vetro. Chiudete bene lo sportello (per motivi di sicurezza, l'apparec- chio funziona solo quando lo sportello è chiuso). Non appena premete sul pulsante "Start" (10) l'apparecchio si accende riscaldando la pietanza automati-camente per 1 minuto al 100% della potenza. Se il tempo di cottura è trascorso, si sentono 5 segnali acustici. Potete ora aprire lo sportello ed estrarre la tazza (riscaldando dei liquidi vi preghiamo di prestare atten- zione al nostro capitolo. Attenzione ritardo d’ebollizione). Gebrauchsanweisung ○ Mode d’emploi ○ Istruzioni per l’uso ○ Instruction for use... -
Page 48: Regolazione Manuale Del Tempo
• REGOLAZIONE MANUALE DEL TEMPO Il tempo può anche essere regolato con il timer, con una precisione di 10 secondi. Questo funziona unicamente se viene dapprima inserita la potenza del microonde: 1. Riponete la pietanza nel forno a microonde e chiudete lo sportello. 2. Premete il tasto microonde (4) finché non viene visualizzata la potenza desider- ata (purché essa debba essere inferiore a 100%). Vale quanto segue: Premendo il Indicazione Significato Applicazione / Uso tasto micro. display (4) 1 volta P100 Potenza microonde 100% / 900W Riscaldamento rapido 2 volte P 70 Potenza microonde 70% / 675W Cottura, ad esempio carne 3 volte P 50 Potenza microonde 50% / 450W Ulteriore cottura 4 volte P 30 Potenza microonde 30% / 270W Scongelamento di cibi surgelati 5 volte P 10 Potenza microonde 10% / 90W Per fondere formaggi ecc. 3. Ruotate il comando Tempo (11) verso destra finché compare il tempo di cottura desiderato. Potete impostare da 10 secondi fino al massimo 60 minuti. 4. Dopo avere assegnato il tempo di cottura desiderato, potete premere il pul- sante "Start" (10). -
Page 49: Applicazione
• APPLICAZIONE Bibite / Alimenti Quantità ca. Tempo Potenza Bibite da riscaldare 150 ml 1 – 2 Min. 100% / 900W Minestre + Salse 200 – 300 ml 3 – 4 Min. 100% / 900W Piatti pronti da riscaldare 1 piatto 2 – 3 Min. 70% / 675W Pietanze gratinate 1 porzione 5 – 8 Min. 30% / 270W Torte o Pizze 1 pezzo 1 – 2 Min. 100% / 900W Scongelamento carne min. per 450gr 6 – 11 Min. 30% / 270W Scongelamento pesce min. per 450gr 3 – 5 Min. 30% / 270W Scongelamento pane grande / piccolo 5 – 7 / 6 – 8 Min. 30% / 270W Scongelamento panini 1 pezzo 10 – 20 Sec. -
Page 50: Grill
• GRILL La potenza del grill può essere impostata su due livelli: G-1 = 85% della potenza (ca. 160°C) e G-2 = 50% della potenza (ca. 140°C). 1. Inserite la pietanza da grigliare o gratinare nel microonde sulla griglia in metallo e chiudete lo sportello. 2. Premete il tasto grill (3) fino alla visualizzazione del simbolo desiderato sul dis- play. 3. Impostate con il comando Tempo (11), il tempo di cottura desiderato (ruotando verso destra). Potete impostare un massimo di 60 minuti. 4. Premete il tasto Start (10). 5. Trascorsa la metà del tempo impostato per il grill, il programma si interrompe e vengono emessi 2 segnali acustici. 6. Aprite la porta e girate il cibo da grigliare dall’altra parte. 7. Chiudete la porta e premete il tasto Start (10) per far ripartire il programma. • VENTILAZIONE Questo apparecchio può essere utilizzato anche come un normale forno ventilato. Tuttavia, non può sostituire il vostro forno normale. Le pietanze più grandi dovran- no continuare a essere preparate nel forno normale. La modalità di ventilazione di questo forno è adatta soprattutto alla preparazione di panini o piccoli prodotti pronti, come pizzette, cornetti al prosciutto ecc. È possibile impostare cinque temperature: 230°C, 220°C, 200°C, 180°C e 160°C. 1. Premete il tasto Ventilazione (2) tante volte, finché non compare la tempera- tura desiderata. -
Page 51: Auto-Menu
• AUTO-MENU Con questo tasto dei programmi (7) avete la possibilità di impostare diversi menu pre-programmati. Le fasi del programma sono programmate in base al prodotto e al peso. Nella seguente tabella trovate le indicazioni sul peso che può essere utilizzato per ciascun tipo di prodotto: A-1 A-2 A-3 A-4 A-5 A-6 Riscaldare Patate Carne Pizza Pesce Pollame 100 200 100 100 100 200 150 300 200 200 200 400... -
Page 52: Funzione Memory
• FUNZIONE MEMORY Questa funzione vi consente di memorizzare un’impostazione che utilizzate piut- tosto frequentemente. 1. Premete il tasto Memoria (5). Un “1” lampeggia sul display. 2. Impostate la regolazione desiderata che volete memorizzare. Procedete come descritto nei paragrafi corrispondenti di queste istruzioni. Se ad esempio volete impostare una potenza del microonde del 70% e un tempo di 1:30: Premete il tasto Microonde (4) finché non compare P 70. § Ruotate il comando Tempo (11) verso destra finché compare 1:30. § 3. Premete il tasto Memoria (5) e le impostazioni sono salvate. 4. Ora sul display compare “memory” scritto in piccolo, sopra l’indicazione del tempo. -
Page 53: Grill E Ventilazione
C - 2 : grill e ventilazione Questa combinazione serve per gratinare, cuocere ecc. È particolarmente adatta per cuocere panini, tortini al formaggio, cornetti al prosciutto ecc. (osservate i tem- pi di cottura indicati sulle confezioni). L'apparecchio passa dal funzionamento con grill alla ventilazione e viceversa (venti- lazione 230°C + grill 50%). Per questo programma è consigliabile preriscaldare il forno, inserendo un tempo supplementare (punto 2) di circa ¼ d'ora. 1. Premete il tasto Programmi combinati (6) finché sul display compare il simbolo desiderato (C-2). 2. Ruotate il comando Tempo (11) verso destra finché compare il tempo di cottura desiderato (incl. tempo di preriscaldamento). È possibile inserire fino a 60 minuti al massimo. -
Page 54: Orario
• ORARIO Sul display digitale è possibile impostare l’ora attuale. 1. Premete il tasto Ora (8). La cifra dell’ora lampeggia. 2. Ruotate il comando Tempo (11) finché compare l’ora desiderata. 3. Premete il tasto Ora (8) per confermare. Le cifre dei minuti lampeggiano. 4. Ruotate il comando Tempo (11) finché compaiono i minuti desiderati. 5. Premete il tasto Ora (8) per confermare. Se l’apparecchio viene scollegato dall’alimentazione elettrica, è necessario ripro- grammate nuovamente l’orario. • TIMER Pre-programmazione Con la funzione Timer potete programmare l’apparecchio in modo che si avvii au- tomaticamente a un orario prestabilito, eseguendo il programma di cottura desid- erato. Fate attenzione che per questa procedura è necessario che l’orologio sia già stato impostato. Esempio: volete riscaldare una pietanza alle ore 17:00 al 50% di potenza del mi- croonde, per 2 minuti. Procedete come segue: 1. -
Page 55: Sicurezza Bambini
• SICUREZZA BAMBINI Premete contemporaneamente i tasti "Auto Menu" (7) e "Combi" (6) per 2 secondi circa fino ad udire un segnale acustico. Sul display apparirà il simbolo del blocco di sicurezza. Per disattivare il blocco premete nuovamente questi due tasti contemporaneamen- te (circa 2 sec.) fino ad udire il segnale acustico. • PULIZIA Staccare l’apparecchio dalla rete. Dopo l’uso, pulite il vano cottura con un panno leggermente umido. Pulite gli accessori come d’abitudine nel lavandino. Il telaio e la guarnizione della porta e le parti adiacenti, quando sono sporchi, devo- no essere puliti accuratamente con un panno umido. Questo apparecchio corrisponde alle direttive CE in materia e viene realizzato se- condo le ultime normative sulla sicurezza. Cambiamenti tecnici riservati. Gebrauchsanweisung ○ Mode d’emploi ○ Istruzioni per l’uso ○ Instruction for use... -
Page 56: Disturbi/Soluzioni
§ I cibi non sono cotti Uniformemente Le stoviglie usate sono appropriate? § Il piatto rotante è in posizione? § Mescolare o girare il cibo! § La pietanza era interamente scongelata? § I cibi sono stracotti Le funzioni sono state impostate in modo corretto? § I cibi non sono cotti abbastanza Le stoviglie usate sono appropriate? § La pietanza era interamente scongelata? § Le funzioni sono state impostate in modo corretto? § Le aperture di ventilazione sono ostruite? § Lo scongelamento non è uniforme Le stoviglie usate sono appropriate? § Il piatto rotante è in posizione? § Mescolare o girare il cibo! § Le funzioni sono state impostate in modo corretto? § Le aperture di ventilazione sono ostruite? § Aprire lo sportello e lasciare raffreddare per 10 - 15 minuti. § • SMALTIMENTO Per lo smaltimento corretto, la macchina deve essere restituita al rivenditore spe- cializzato, al servizio di assistenza o alla ditta Rotel AG. Gebrauchsanweisung ○ Mode d’emploi ○ Istruzioni per l’uso ○ Instruction for use... -
Page 57: English
English • SAFETY INSTRUCTIONS Read all instructions before using. o This appliance can be used by persons with re- duced physical, sensory or mental capabilities or lack of experience and knowledge if they have been given supervision or instruction concerning use of the appliance in a safe way and understand the hazards involved. o This appliance must not be used by children. The appliance and its connecting cable must be kept away from children. - Page 58 o Warning: It is hazardous for anyone other than a competent person to carry out any service or re- pair operation that involves the removal of a cover which gives protection against exposure to micro- wave energy. o Keep the appliance and its cord out of reach of children less than 8 years. o Only use utensils that are suitable for use in a mi- crowave.
- Page 59 o Remove wire twist-ties and metal handles from paper or plastic containers/bags before placing them in the oven. o Install or locate this oven only in accordance with the installation instructions provided. o Eggs in their shell and whole hard-boiled eggs should not be heated in microwave ovens since they may explode, even after microwave heating has ended.
- Page 60 are liable to get hot during use. Keep cord away from heated surfaces and do not cover any vents on the oven. o Do not let the cord hang over edge of a table or counter. o Failure to maintain the oven in a clean condition could lead to deterioration of the surface that could adversely affect the life of the appliance and possibly result in a hazardous situation.
- Page 61 o The appliances are not intended to be operated by means of an external timer or separate remote- control system. o Accessible parts may become hot during use. Young children should be kept away. o A steam cleaner is not to be used. o During use the appliance becomes hot. Care should be taken to avoid touching heating elements inside the oven. o Only use the temperature probe recommended for this oven (for ovens provided with a facility to use a temperature-sensing probe). o WARNING: The appliance and its accessible parts become hot during use. Care should be taken to avoid touching heating elements. Children under 8 years of age must be kept away unless continuous- ly supervised.
- Page 62 o The microwave oven is intended for heating food and beverages. Drying food or clothing and heating warming pads, slippers, sponges, damp cloth and similar may lead to the risk of injury, ignition or fire. o WARNING: When the door or the door seals are damaged, the microwave oven must not be used until it has been repaired by a qualified specialist.
-
Page 63: Notes On The Grill, Convection And Combination Mode
• NOTES ON THE GRILL, CONVECTION AND COMBINATION MODE Because the heat in the grilling, convection and combination mode is radiated, please only use heat-proof cookware. When you are using just the grilling and convection mode, you may also use metal or alu- minium cookware, but not in the combination, auto or standard microwave mode. Do not place anything on the top of the housing, as this heats up. Make sure the vent slots are never obstructed. In grilling mode, place the grill rack on the turntable and place the food to be cooked on the grill rack. This positions the food nearer to the grill. • BEFORE STARTING THE APPLIANCE Remove all the accessories from inside the oven area, unpack them and place the turntable roller ring in the middle. Position the glass turntable on the shaft in the centre so that it slots into the drive shaft coupling and is level. Check the appliance for any visible damages, especially around the door. If there is any damage of any kind, the appliance must not be used. -
Page 64: Simple Microwave Setting
• SIMPLE MICROWAVE SETTING 1. Open the door and place the food/drink to be warmed up/cooked, e.g. a cup of milk, in the middle of the turntable. Close the door properly. (For safety rea- sons, the microwave only works when the door is securely closed). 2. As soon as you press the "Start" button (10), the appliance switches on and au- tomatically warms up the contents for 1 minute in the microwave mode at 100% power. 3. Once the cooking time has elapsed, you will hear five beeps. You can now open the door and take the cup out. (When heating up liquids, please note our Spe- cial Safety Instructions: Caution - Delayed boiling). • SETTING THE TIME MANUALLY The time can also be set using the timer at 10 second increments, for a more pre- cise setting. Please note that the power can no longer be changed after the time has been set: 1. Place the food to be warmed up/cooked in the microwave and close the door. 2. Press the microwave button (4) until you see the power level you want on the display (provided this is less than 100%). Bear in mind the following informati- on: Press the microwave Display Meaning Uses button (4) P100 Power microwave 100% / 900W Quickly warm up P 70 Power microwave 70% / 675W To cook, e.g. fish P 50 Power microwave 50% / 450W Continue cooking P 30 Power microwave 30% / 270W Defrosting frozen food... -
Page 65: Most Commonly Used Settings
• MOST COMMONLY USED SETTINGS Drink / Food Approx. portion size Time Power Heat up drinks 150 ml 1 – 2 min. 100% / 900W Heat up soups + sauces 200 – 300 ml 3 – 4 min. 100% / 900W Heat up meal on a plate 1 plate 2 – 3 min. 70% / 675W Heat up casserole 1 portion 5 – 8 min. 30% / 270W Warm up flans or pizzas 1 slice 1 – 2 min. 100% / 900W Defrost meat Time spec. in min. per 450 g 6 – 11 min. 30% / 270W Defrost fish Time spec. in min. per 450 g 3 – 5 min. 30% / 270W Defrost bread large / small 5 – 7 / 6 – 8 min. 30% / 270W Defrost buns 1 bun 10 – 20 sec. -
Page 66: Grill
• GRILL The power of the grill can be set at two levels. G-1 = 85% power (approx. 160°C) and G-2 = 50% power (approx. 140°C). 1. Place the food to be grilled in the microwave on the grill rack and close the door. 2. Press the grill button (3) until the symbol you want appears on the display. 3. Use the time button (11) to select the cooking time you want. You can set it for up to 60 minutes. 4. Press the Start button (10). 5. After half of the grilling time has elapsed, the programme is interrupted and you will hear 2 beeps. -
Page 67: Auto Menu
• AUTO MENU With this programming button (7) you can set various pre-programmed "menus". The individual programmes are programmed according to product and weight. The following table lists how much weight can be set for the respective product. A-1 A-2 A-3 A-4 A-5 A-6 Heating up Potatoes Meat Pizza Fish Poultry 100 200 100 100 100 200 150 300 200 200 200 400 200 400 300 250 300 600 250 500 400 300 400 800 Weight 300... -
Page 68: Memory Function
• MEMORY FUNCTION This function allows you to store a function that is used particularly frequently. 1. Press the Memory button (5). A number "1" will flash on the display. 2. Enter the setting you want to store. To do this, follow the same procedures al- ready described in this manual. For example: You would like to set microwave power of 70% for a time of 1:30. Press the microwave button (4) until you see P 70. § Turn the timer knob (11) to the right until you see 1:30. § 3. Press the Memory button (5) and the setting is now stored. 4. The word "memory" will now appear in small font above the specified time. 5. Put the dish in the microwave. 6. Press the Memory button (5) and then the Start button (10). 7. The stored setting will activate automatically. To change the stored setting, follow the same steps described above. If the power supply is interrupted, the stored setting will be deleted. • COMBINATIONS C - 1 : Convection and Microwave You use this combination to roast and bake, etc. The appliance switches between microwave and convection mode (230°C convection + 40% microwave). Do not use any metal cookware. -
Page 69: C - 2: Grill And Convection
C - 2: Grill and Convection You use this combination for crispy roasting and baking etc. It is ideal for baking buns, small cheese quiches, ham croissants, etc. (note the cooking time specified on the packaging of the product). The appliance switches between grilling and convection mode (230°C convection + 50% grill). It is advantageous with this programme to pre-heat the appliance first. So when en- tering the time (Point 2) add an extra ¼ of an hour. 1. Press the Combi button (6) until the symbol (C-2) appears on the display. 2. Turn the timer knob (11) to the right until you see the cooking time you want (including any preheating time). You can set from a minimum of 10 seconds to a maximum of 60 minutes. 3. Press the Start button (10). 4. As soon as the pre-heating time has elapsed, you can interrupt the programme by opening the door. 5. Place the food to be cooked on the grill rack, close the door and then press the Start button (10) again. The programme continues. C - 3: Grill and Microwave You use this combination for quick crispy baking, etc. The appliance switches be- tween grill and microwave mode (45% grill + 55% microwave). Do not use any metal cookware. -
Page 70: Clock Display
• CLOCK DISPLAY The digital display can be set to show the actual time. 1. Press the Time button (8). The hour numbers will flash. 2. Turn the timer knob (11) until you get to the right hour. 3. Press the Time button (8) to confirm. Now the minute numbers will flash. 4. Turn the timer knob (11) until you get to the right minutes. 5. Press the Time button (8) to confirm. If the appliance is disconnected from the power supply, the time has to be reset. • TIMER Pre-programming: Using the timer function you can programme the appliance so that it turns on at a specific time and start the cooking process you want. Please note that to use this function properly, the time must be already set. -
Page 71: Cleaning
• CLEANING Disconnect the appliance from the mains. Clean the oven area after use with a slightly damp cloth. Clean the accessories in the usual way with soapy water. The frame of the door and its seal must be carefully cleaned along with all the adja- cent parts using a damp cloth. This appliance complies with the relevant CE directives and built in compliance with the latest safety regulations. We reserve the right to make technical changes. • PROBLEMS AND SOLUTIONS If you cannot rectify a problem yourself with the help of the following Troubleshooting Ta- ble, please contact a qualified technician. The appliance does not start Is the appliance connected to the mains? § Is the door closed properly? § Have you entered the cooking time? § Sparks Are you using the right kind of cookware? § Is the appliance empty? § Food cooked unevenly Are you using the right kind of cookware? § Are you using the turntable supplied? § Stir or turn the food! § Was the food completely thawed? § Food overcooked Did you use the function switches properly? § Food undercooked Are you using the right kind of cookware? §... -
Page 72: Disposal
Unevenly defrosted Are you using the right kind of cookware? § Are you using the turntable supplied? § Stir or turn the food! § Did you use the function switches properly? § Are all the vents free and unobstructed? § Open the door a little and wait for 10 to 15 minutes until the food has cooled § down. • DISPOSAL For proper disposal, the unit is to return to the dealer, the service agent or the company Rotel AG. Gebrauchsanweisung ○ Mode d’emploi ○ Istruzioni per l’uso ○ Instruction for use... -
Page 73: D / F / I / E
Eliminiamo tutti i difetti causati da difetti del materiale o di fabbrica. La prestazione di garanzia avviene con il ripristino o la sostituzione di pezzi difettosi a nostra discrezione. Una prestazione di garanzia decade nel caso di danni a pezzi soggetti a usura, di danni e difetti dovuti a trattamento o a manutenzione non corretti (in particolare calcificazione e utilizzo industriale). Viene concessa solo se la cartolina di garanzia munita della data d’acquisto, del timbro del rivenditore e della fir- ma o la ricevuta d’acquisto e l’apparecchio vengono inviati al rispettivo servizio di assistenza (vedi indirizzo in basso). L’invio deve avvenire nell’imballaggio originale. Le spese di trasporto sono a carico dell’acquirente. Non dimenticatevi p.f. di allegare all’invio il vostro indirizzo e, qualora il difetto non fosse chiaro, anche una spiegazione. Warranty commitment We commit ourselves to repair this device free of charge, should a failure occur within the period of warranty despite proper handling. We repair all defects caused by material or manufacturing faults. The guarantee will be fulfilled either by repairing the device or replacing the defective parts, according to our judgement. A warranty does not cover damages due to wearing parts, damages and defects caused by improper handling or maintenance (such as limescale and commercial use). It will only be granted if either the warranty card stating date of purchase, dealer's stamp and signature, or the purchase receipt is sent with the device to the relevant after-sales service (see address below). Devices shall be returned in their original packaging. Transport costs are to be borne by the purchaser. Remember to specify your address to your sending, as well as a short decla- ration about the failure, shall the defect not be obvious. Servicestation: Service après-vente: Rotel AG Servizio Assistenza: Parkstrasse 43 Telefon: 062 787 77 00 After-sales service: 5012 Schönenwerd E-mail: office@rotel.ch Gebrauchsanweisung ○ Mode d’emploi ○ Istruzioni per l’uso ○ Instruction for use...