
Manuels Connexes pour PAC DXT Série

Sommaire des Matières pour PAC DXT Série
- Page 1 Instructions for use Mode d’emploi Bedienungsanleitung Istruzioni per l’uso Gebruiksaanwijzing PAC REMOTE TRAINERS DXT SERIES Instrucciones de manejo...
- Page 2 électroniques de rappel. Son succès il le doit à sa haute technologie, sa fiabilité exceptionnelle et la qualité de son service après vente. Les colliers de rappel PAC ont été développés pour répondre au mieux à vos aspirations mais aussi au confort de votre chien.Votre nouveau collier de rappel PAC vous rendra d’appréciables services et vous apportera de remarquables résultats comme pourront vous le confirmer les nombreux heureux...
-
Page 3: Kit Contents
1. Operating Instructions 6. Dummy Collar (Optional) 2. Training Guide (Optional) 7. Antenna 3. Mains Power Adaptor 8. Transmitter Handset 4. Charging Dock 9. Neon Tester 5. Active Collar 10. Pointed Probes(see p.3) 1. Guide d’utilisation 6. Collier factice (optionnel) 2. - Page 4 a. Active Collar b. Dummy Colllar c. Installed Probes for short-haired breeds d. Long probes for hairy breeds a. Collier de dressage b. Collier factice c. Contacts courts pour chiens à poils courts d. Contacts longs pour chiens à poils longs a.
- Page 5 A. Active Collar: 1. Status Lamp 2. Positive Probe 3. Reset contact point 4. On/Off contact point 5. Negative Probe A. Caractéristiques du collier de dressage 1. Diode de fonctionnement 2. Contact positif 3. Réinitialisation 4. Marche / Arrêt 5. Contact négatif A.
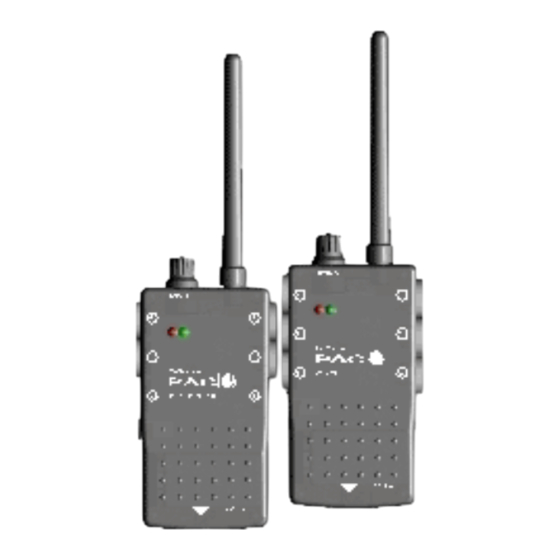
- Page 6 1 .Battery Indicator LEDs (red and green) 2. Intensity Control 3. Antenna 4. Triggers (DXT3/6) 5. Collar activator 6. Triggers on DXT4 and DXT6 only 7. Recharging socket 1. Diodes (verte – rouge) de fonctionnement 2. Contrôle de l’intensité 3. Antenne 4.
- Page 7 1. Plug Power Unit into Mains (3 pin version shipped for UK) 2. Plug DC jack into Charging Dock 3. Plug lead into Handset (if handset needs to be charged) 4. Plug Collar firmly into Charging Dock, with+ve probe to +ve socket Collar will not charge if plugged in wrong way round 5.
- Page 8 Match collar to handset trigger(s) using Reset operation 1. Bring the handset arrow into contact with the RESET arrow on the collar 2. Seperate again, and the collar LED will fast flash orange 3. Press handset trigger briefly and it will send a ‘matching’ signal to the collar 4.
- Page 9 Turn collar on by bringing arrrow at base of handset into close proximity with ON/OFF arrow on collar. A *beep* and green light will show status Do the same to turn OFF the unit. A red light and *beep* will indicate action. Pour mettre en marche le collier, posez le triangle de la télécommande sur le triangle «ON/OFF»...
- Page 10 1. Insert the collar probes inot the neon tester: press for stimulation: neon flashing proves stimulation.(NB neon does not flash during tone signals) 2. Red + green shows battery OK, red only shows battery low. 3. Battery status red/orange/yellow = low. 1.
- Page 11 The collar stimulus can be increased in 64 smooth steps from 75mW up 500mW to the collar maximum (i.e. up to 500 mW on AXC collars) The control can have a tone only zone also, explained later. Diagram shows Intensity Control in dedicated mode, i.e.non-basic.. 400mW Le bouton de variation d’intensité...
-
Page 12: Selecting Mode Of Operation
Depending on your handset model, choose the desired operating mode. Mode B: BASIC: Each trigger is multifunction and controls 1 dog -see page 12. Mode E/P: Enhanced/Professional Mode: Each trigger is dedicated to one function- see page 13 Identifiez d’abord le type de modèle DXT que vous possédez ensuite choisissez DXT1 le mode;... - Page 13 1. Suono ( a fianco e’ mostrara l’area di suono ) 2. Stimolazione momentanea ( continua in posizione Hi ) 3. Stimolazione continua Le pagg. 14 e 15 spiegano come impostare il radiocomando PAC per ottenere questi modi operativi. Elke knop kan 2 verschillende functies uitvoeren voor een individuele band.
- Page 14 a. DXT2, 3, 4 & 6 - Trigger(s) 1 / 4 tone warning b. DXT2, 3, 4 & 6 - Trigger(s) 2 /5 momentary or… b. DXT2 / 4 (only) – Trigger(s) 2/ 5 continuous c. DXT3 / 6 – Trigger(s)3 / 6 continuous a.
- Page 15 1. Undo screws to remove the cover and expose the Dip Switches. Each switch can turn on or off a function. 2. Use a small screwdriver/large needle to slide the switches, referring to guide on pages 15 and 16. 3. Shows the switch (#3) for disabling the handset confirmation buzzer. Other remaining switches concern collar unit functions.
- Page 16 Mode B assigns a trigger for each Training Collar depending on Intensity Control Settings. Collar Tone Warning: Momentary Stimulus: Continuous Stimulus: Le Mode B dédie à chaque bouton de commande un collier. Uniquement son impulsion momentanée impulsion continue In dieser Betriebsart können sie den Empfänger verschiedene Funktionen mit einem Drücker zuweisen.
- Page 17 Mode E/P&H: Dedicated Function per trigger Collar Tone Warning: Momentary Stimulus: Continuous Stimulus: Mode H: Hybrid function for DXT2 & DXT4 only Le Mode E/P dédie une fonction particulière Uniquement son Impulsion momentanée Impulsion continue Le Mode H (hybride) combine les fonction des boutons de commande entre les Mode B et Mode E/P.
- Page 18 1. Ensure collar is positioned correctly on narrowest part of neck. One finger should just be able to fit between each probe and the dog’s neck to ensure a snug fit. Skin Irritation-Inspect the dog daily during collar use. A loose collar is a common cause of mis-function. 2.
- Page 19 a. Temporary radio interference: Try later or try another location b. Metal fencing/buildings are shielding signal: try elsewhere c. Collar strap too loose: Tighten strap d. Antenna failure? Handset should still work 2-3 metres away. Confirm if handset is OK. Order a replacement antenna e.
- Page 20 1.Collar Appears OK (LED flashes green ) but no reaction from dog: a. Incorrect code?-Try RESET (p7). b. Intensity not high enough? Try gradual increase (p10) c. Collar too loose? Tighten (p17) 2.LED’s not illuminating on collar or transmitter? Possible Cause and solution: Batteries fully discharged. Full charge for 16 hours. 1.
-
Page 21: Handling And Storage
Although most circuitry is ruggedised, avoid dropping onto hard surfaces. Avoid using in rocky, fissured terrain Never leave collar or transmitter in very warm or sunny areas, or behind glass. Storage. 1. Charge fully. 2. Store in cool, dry place. 3. Recharge battery every 60 days Evitez de laisser tomber votre collier ou télécommande sur des surfaces trop dures. - Page 22 Het geeft ook advies over vele anverwante trainings problemen. Por favor, lea la guía de entrenaniento de su PAC Remote Trainer antes de su uso, le dará los conocimeintos básicos para entrenar a su perro de una manera efectíva en poco tiempo.
- Page 23 Co.Kilkenny Ireland Ireland UK Freephone 0800 028 4325 Tel Int.: 353 51423679 Fax Int.: 353 51423964 made in EU printed in EU www.pacdog.com © PAC Products Ltd. 2006 info@pacdog.com support@pacdog.com Instruction Manual for your PAC DXT design and layout: phelandesign.co.uk...