Publicité
Les langues disponibles
Les langues disponibles
Liens rapides
• Istruzioni per l'uso . . . . . . . . . . . .
• User manual
• Mode d'emploi et d'entretien . . . . .
• Betriebsanleitung . . . . . . . . . . . . .
• Gebruiksaanwijzing . . . . . . . . . . . . . .
• Instrucciones de uso . . . . . . . . . .
• Manual de instruções . . . . . . . . . .
•
√‰ËÁ›Â˜ ¯Ú‹Û˘ Î·È Û˘ÓÙ‹ÚËÛ˘ . . .
S 1 0 0 0
S 1 0 0 0
. . . . . . . . . . . . . . . .
pag. 6
page 20
pag. 34
pag. 48
pag. 62
pag. 76
pag. 90
ÛÂÏ.
104
Publicité

Manuels Connexes pour DeLonghi Pinguino S1000


Sommaire des Matières pour DeLonghi Pinguino S1000
- Page 1 S 1 0 0 0 S 1 0 0 0 • Istruzioni per l’uso ... . pag. 6 • User manual ....page 20 •...
- Page 2 entile Cliente, La ringraziamo per aver scelto un prodotto De’Longhi, il leader mondiale nella costruzione dei climatizzatori portatili. Anni di esperienza in tutto il mondo ci consentono di migliorare costantemente la qualità e le presta- zioni di Pinguino e SuperPinguino. Siamo certi che rimarrà subito soddi- sfatto del suo acquisto e che godrà...
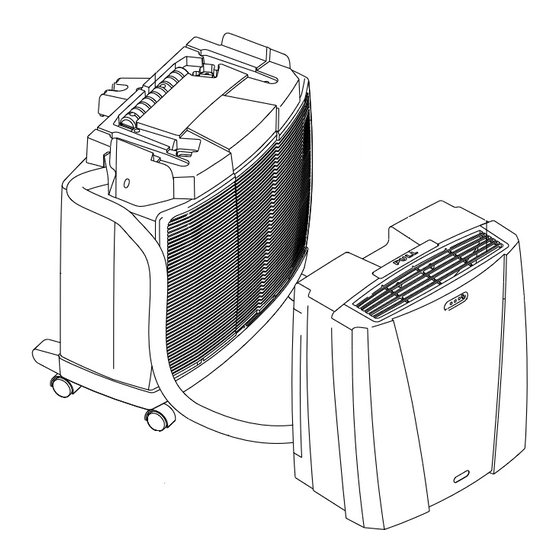
- Page 3 De s c r i z i o n e • De s c r i p t i o n • De s c r i p t i o n • B e s c h re i b u n g • B e s c h r i j v i n g •...
- Page 4 Av v e r t e n z e • Questo apparecchio è stato costruito per condizionare gli ambienti domestici e non deve essere adoperato per altri scopi. • É pericoloso modificare o alterare in qualsiasi modo le caratteristiche dell’apparecchio. •...
- Page 5 Cosa sono Pinguino e SuperPinguino ella stagione estiva, le condizioni di benessere sono raggiunte con una temperatura com- presa tra i 24 e i 27°C e con una umidità relativa attorno al 50%. Il climatizzatore è una macchina che sottrae umidità e calore dall’ambiente in cui è collocata. Rispetto ai modelli da installazione, i climatizzatori portatili hanno il vantaggio di poter essere spo- stati da una stanza all’altra di una casa, e di essere trasferibili da un edificio all’altro.
- Page 6 Pre d i s p o s i z i o n e a l l ’ u s o UTILIZZO DEI RACCORDI RAPIDI DISPOSIZIONE DELL’UNITA’ INTERNA In aggiunta ai metodi precedentemente Installare l’apparecchio all’interno del locale descritti, la guaina che collega l’unità esterna a da condizionare.
- Page 7 Pre d i s p o s i z i o n e a l l ’ u s o Evitare strozzature alla guaina di collega- fig. 7 mento. fig. 5 Bloccare sempre le 2 ruote più esterne con i fermaruote in dotazione.
- Page 8 Pulsanti ed indicatori dell’unita’ interna PULSANTI ED INDICATORI DELL’UNITÀ INTERNA PULSANTE SPIA SPIA SPIA FUNZIONAMENTO ROSSA GIALLA VERDE MANUALE RICEVITORE DI SEGNALE SPIE LUMINOSE Si accendono a seconda della funzione selezionata o segnalano eventuali anomalie. FUNZIONE SPIA ROSSA SPIA GIALLA SPIA VERDE SPENTO CONDIZIONAMENTO...
- Page 9 Il telecomando IL TELECOMANDO Inserimento batterie • Rimuovere il coperchio di protezione (vedi figura). • Inserire due batterie nuove del tipo non ricaricabili, facendo attenzione a posizio- narle nel verso giusto (+) e (-). • Reinserire il coperchio. Nota: Vi consigliamo l’utilizzo di batterie di tipo alcalino (LR03).
- Page 10 Descrizione del telecomando IL TELECOMANDO A. Pulsante MODE Utilizzato per selezionare la modalità di funzionamento (Condizionamento, Deu- midifica, Ventilazione). B. Pulsanti di IMPOSTAZIONE DELLA TEMPERA- TURA AMBIENTE Utilizzati per impostare la temperatura ambiente o per programmare il timer. C. Pulsante FAN Utilizzato per impostare la velocità...
- Page 11 Le funzioni FUNZIONE CONDIZIONAMENTO • Innanzitutto premere il tasto per l’accensione. • Un beep segnalerà l’avvio del condizionatore e sul display lam- peggerà il simbolo • Poi premere più volte il tasto MODE, finché apparirà sul display il simbolo condizionamento •...
- Page 12 Le funzioni FUNZIONE SMART Con la funzione SMART sarà il condizionatore stesso a decidere come funzionare per garantirvi le condizioni di benessere. • Premere il tasto per l’accensione. Un beep segnalerà l’avvio del condizionatore e sul display lampeggerà il simbolo •...
- Page 13 Le funzioni PROGRAMMAZIONE DEL TIMER Il timer vi permette di impostare l’accensione o lo spegnimento ritar- dato dell’apparecchio; questa impostazione eviterà sprechi di energia elettrica ottimizzando i periodi di funzionamento. Programmazione dello spegnimento • A condizionatore acceso, premere il tasto TIMER: il display visua- lizza le ore e il simbolo “h”...
- Page 14 C o n s i g l i COLLEGAMENTO ELETTRICO • Proteggere la stanza dalle esposizioni dirette del sole, in modo da avere un fun- Prima di collegare la spina alla presa di cor- zionamento estremamente economico, rente, bisogna verificare che: tirando le tende e/o abbassando parzial- •...
- Page 15 Pu l i z i a Prima di ogni operazione di pulizia o di manu- VERIFICHE DI INIZIO STAGIONE tenzione, spegnete l’apparecchio premendo Verificate che il cavo di alimentazione e la il tasto “OFF” sul telecomando e staccate presa siano perfettamente integri e assicura- sempre la spina dalla presa di corrente.
- Page 16 Se qualcosa non funziona… SE QUALCOSA NON FUNZIONA Se qualcosa non funziona, a volte si tratta di piccoli problemi che voi stessi potrete facilmente risolve- re. Verificare quindi con attenzione queste brevi indicazioni prima di rivolgervi al Centro di Assistenza Tecnica Autorizzato che opera nella vs.
- Page 17 Garanzia/caratteristiche tecniche GARANZIA E ASSISTENZA TECNICA CARATTERISTICHE TECNICHE Tensione di Condizioni di garanzia e assistenza tecnica alimentazione vedere targa caratteristiche sono riportate sul certificato medesimo corre- Potenza max. assorbita dato al vostro apparecchio. in condizionamento “ Potenza max. assorbita in deumidificazione “...
- Page 18 W a r n i n g s • This appliance is designed for home air conditioning and must not be used for other purposes. • It is dangerous to modify or alter the characteristics of the appliance in any way. •...
- Page 19 What are the Pi n gui n o and SuperPi n gui n o? uring the summer, you feel comfortable at a temperature of between 24 and 27°C with a relative humidity of about 50%. An air conditioning unit removes excess moisture and heat from the room where it is located. Compared with installed models, portable air conditioning units have the advantage that they can be moved from one room to another in the home or be transported from one building to another.
- Page 20 Pre p a r i n g f o r u s e USING THE QUICK COUPLINGS POSITIONING THE INDOOR UNIT As an alternative to the methods described Install the appliance inside the room being above, the sheath connecting the outdoor and air-conditioned.
- Page 21 Pre p a r i n g f o r u s e Avoid tight curves in the connection sheath. fig. 7 fig. 5 Always lock the 2 outer wheels using the castor locks supplied. RECONNECTING THE SHEATH De’Longhi is not liable for any damage to To reconnect the ends of the connecting people or things caused by the positioning of sheath to the indoor unit, repeat operations 1,...
- Page 22 Buttons and indicators on the indoor unit BUTTONS AND INDICATORS ON THE INDOOR UNIT MANUAL YELLOW GREEN OPERATION LIGHT LIGHT LIGHT BUTTON SIGNAL RECEIVER INDICATOR LIGHTS These turn on according to the function selected or indicate any operating anomalies. FUNCTION RED LIGHT YELLOW LIGHT GREEN LIGHT...
- Page 23 The remote control REMOTE CONTROL Inserting the batteries • Slide the cover as shown in figure. • Insert two new batteries (not rechargeable) making sure the (+) and (-) are in the correct positions. • Put the cover back on. Note: WE SUGGEST USING ALKALINE BAT- TERIES (LR03).
- Page 24 Description of the remote control THE REMOTE CONTROL A. MODE button Selects the operating mode (air conditio- ning, dehumidifying, fan). B. ROOM TEMPERATURE buttons Set room temperature or programme the timer. C. FAN button Sets fan speed to automatic, high, medium or low in sequence.
- Page 25 Functions AIR-CONDITIONING MODE • Press the button to turn the appliance on. • A beep indicates that the air-conditioning unit is on and the symbol flashes on the display • Press the MODE button a number of times until the air-conditioning symbol appears on the display.
- Page 26 Functions SMART MODE In SMART mode, the air-conditioning unit decides the best way to operate to guarantee maximum comfort. • Press the button to turn the appliance on. A beep indicates that the air-conditioning unit is on and the symbol flashes on the display. •...
- Page 27 Functions PROGRAMMING THE TIMER The timer can be used to delay appliance start up or shut down. This avoids wasting electricity by optimising operating periods Programming the turn-off function • With the air-conditioning unit on, press the TIMER button. The time is displayed and the "h"...
- Page 28 T i p s ELECTRICAL CONNECTIONS • Protect the room from direct exposure to the sun by partially closing curtains and/or Before plugging the appliance into the mains blinds to make the appliance much more socket, check that: economical to run; •...
- Page 29 C l e a n i n g Before cleaning or maintenance, turn the START OF SEASON CHECKS appliance off by pressing the “OFF” button on Make sure the power cable and plug are the remote control ON/OFF and always undamaged and the earth system is efficient.
- Page 30 Troubleshooting TROUBLESHOOTING If something is not working, the problem may at times be simple to resolve. Carefully check these brief instructions before contact your local Authorised Service Centre. PROBLEM CAUSE REMEDY The air-conditioner • no electricity • wait doesn’t work •...
- Page 31 Warranty/technical specifications WARRANTY AND TECHNICAL SERVICE TECHNICAL SPECIFICATIONS Power supply voltage see rating plate The conditions of the warranty and technical Max. power input during service are provided on the certificate sup- air conditioning “ plied with your appliance. Max. power input during dehumidifying “...
- Page 32 Av e r t i s s e m e n t s • Cet appareil a été conçu pour la climatisation des locaux domestiques et ne doit pas être destiné à d'autres usages. Il est dangereux de modifier ou d’altérer d’une quelconque façon les caractéristiques de l'ap- pareil.
- Page 33 Les climatiseurs Pinguino et SuperPinguino endant les mois d’été, les conditions de bien-être sont atteintes avec une température com- prise entre 24°C et 27°C et avec une humidité relative d’environ 50%. Le climatiseur est un appareil qui prélève l’humidité et la chaleur de la pièce dans laquelle il est placé.
- Page 34 Pr é p a ra t i o n à l ’ e m p l o i UTILISATION DES RACCORDS RAPIDES DISPOSITION DE L’UNITÉ INTÉRIEURE Outre les méthodes susmentionnées, la gaine Installez l’appareil dans la pièce à climatiser, qui raccorde l’unité extérieure à l’unité inté- généralement près d’une fenêtre ou d’une rieure peut passer par un trou de 9 cm envi- porte, en tout cas près d’un mur périmétrique.
- Page 35 Pr é p a ra t i o n à l ’ e m p l o i fig. 7 Évitez d’imposer des coudes à la gaine de raccordement. fig. 5 Utilisez les cale-roulettes fournies avec l’ap- pareil pour bloquer les 2 roulettes extérieures. De’Longhi ne répond pas des blessures cor- RACCORDEMENT DE LA GAINE porelles ni des dégâts matériels provoquées...
- Page 36 Boutons et voyants de l’unité intérieure BOUTONS ET VOYANTS DE L’UNITÉ INTÉRIEURE BOUTON VOYANT VOYANT VOYANT FONCTIONNEMENT ROUGE JAUNE VERT MANUEL RÉCEPTEUR DE SIGNAL VOYANTS Ils s’allument selon la fonction sélectionnée ou ils signalent d’éventuelles anomalies. FONCTION VOYANT ROUGE VOYANT JAUNE VOYANT VERT ÉTEINT CLIMATISATION...
- Page 37 La Télécommande LA TELECOMMANDE Mise en place des piles • Poussez vers l’avant le couvercle (voir fig.). • Mettre deux piles neuves non rechargeables, en veillant à les placer dans la bonne direction (+) et (-) • Remettez le couvercle. REMARQUE: NOUS VOUS CONSEILLONS D’UTI- LISER DE PREFERENCE DES PILES ALCALINES (LR03).
- Page 38 Description de la télécommande LA TÉLÉCOMMANDE A. Touche MODE Utilisée pour sélectionner le mode de fonctionnement (climatisation, déshumidi- fication, ventilation). B. Touches de PROGRAMMATION DE LA TEMPÉRATURE AMBIANTE Utilisées pour programmer la température ambiante ou pour programmer la minuterie. C. Touche FAN Utilisée pour programmer la vitesse du ventilateur sur, dans l'ordre, automatique, grande, moyenne, petite.
- Page 39 Les fonctions FONCTION CLIMATISATION • Appuyer sur la touche pour mettre l'appareil en marche. • un bip signale la mise en marche du climatiseur et le symbole clignote sur l'afficheur. • appuyer ensuite à plusieurs reprises sur la touche MODE, jusqu'à ce que le symbole climatisation s'affiche.
- Page 40 Les fonctions FONCTION SMART Avec la fonction SMART le climatiseur choisit lui-même comment fonc- tionner pour offrir un bien-être optimal. • appuyer sur la touche pour mettre l'appareil en marche. Un bip signale la mise en marche du climatiseur et le symbole clignote sur l'afficheur.
- Page 41 Les fonctions PROGRAMMATION DE LA MINUIERE La minuterie permet de régler la mise en marche et l’arrêt retardé de l’appareil. Ce réglage vous évitera de gaspiller de l’énergie électrique tout en optimisant les périodes de fonctionnement. PROGRAMMATION ARRET • Lorsque le climatiseur est en marche, appuyer sur la touche TIMER; l'afficheur affiche les heures et le symbole "h"...
- Page 42 C o n s e i l s RACCORDEMENT ÉLECTRIQUE • Pour garantir un fonctionnement extrême- ment économique de votre climatiseur, Avant de brancher la fiche sur la prise de cou- n’exposez pas la pièce aux rayons directs rant, vérifiez si: du soleil : fermez les rideaux et/ou baissez •...
- Page 43 N e t t o y a g e Avant toute opération de nettoyage ou d'en- CONTRÔLES AU DÉBUT DE LA SAISON tretien, arrêtez toujours l’appareil Vérifiez si le cordon d’alimentation et la prise appuyant sur la touche « OFF » de la télé- sont parfaitement intacts et assurez-vous que commande et débranchez-le.
- Page 44 Si quelche chose ne marche pas... SI QUELQUE CHOSE NE MARCHE PAS … Si quelque chose ne marche pas, il s’agit parfois de petits problèmes que vous pouvez très bien résou- dre vous-même. Suivez attentivement ces quelques indications avant de contacter le Centre de Servi- ce opérant dans votre zone.
- Page 45 Garantie/Caractéristiques techniques GARANTIE ET ASSISTANCE TECHNIQUE CARACTÉRISTIQUES TECHNIQUES Tension d’alimentation voir plaque signalétique Les conditions de garantie et d’assistance Puissance max. absorbée technique sont indiquées sur le certificat qui en climatisation “ accompagne votre appareil. Puissance max. absorbée en déshumidification “...
- Page 46 H i n w e i s e • Dieses Gerät wurde ausschließlich als Haushaltsgerät zum Kühlen von Wohnräumen entwickelt und darf nicht zweckentfremdet eingesetzt werden. • Eingriffe oder Änderungen, die die Betriebseigenschaften des Gerätes verändern, stellen eine Gefahrenquelle dar. •...
- Page 47 Eigenschaften der Klimageräte Pinguino und SuperPinguino m Sommer wird das Wohlbefinden bei einer Temperatur zwischen 24 und 27°C und einer relati- ven Feuchte von etwa 50 % erreicht. Das Klimagerät ist eine Maschine, die dem Raum, in dem sie aufgestellt ist, Feuchtigkeit und Wärme entzieht.
- Page 48 Vorbereitung für den Gebrauch GEBRAUCH DER SCHNELLANSCHLÜSSE AUFSTELLUNG DER INNENEINHEIT Zusätzlich zu den vorab beschriebenen Metho- Installieren Sie das Gerät in dem zu kühlenden den kann die ummantelte Anschlussleitung, die Raum, und zwar möglichst in der Nähe eines Außen- und Inneneinheit miteinander verbindet, Fenster oder einer Tür, und auf jeden Fall an auch durch eine etwa 9 cm breite Öffnung einer Außenwand.
- Page 49 Vorbereitung für den Gebrauch Vermeiden Sie zu starke Krümmungen der Abb. 7 ummantelten Anschlussleitung Abb. 5 Blockieren Sie stets die 2 äußeren Laufrollen mit der mitgelieferten Rollensicherung. Die Firma De’Longhi haftet nicht für Schäden WIEDERMONTAGE DER UMMANTELTEN an Personen oder Sachen, die auf eine nicht ANSCHLUSSLEITUNG mit den grundlegenden Sicherheitsvorschrif- Zur Wiedermontage der ummantelten, vorab...
- Page 50 Tasten und anzeigen der inneneinheit TASTEN UND ANZEIGEN DER INNENEINHEIT GELBE KONTROLLANZEIGE GRÜNE KONTROLLANZEIGE ROTE KONTROLLANZEIGE TASTE MANUELLBETRIEB SIGNALEMPFÄNGER KONTROLLANZEIGEN Sie leuchten je nach der gewählten Funktion auf oder signalisieren eventuelle Störungen. FUNKTION ROTE KONTROLLANZEIGE GELBE KONTROLLANZEIGE GRÜNE KONTROLLANZEIGE KÜHLUNG ENTFEUCHTEN BELÜFTUNG STÖRUNG...
- Page 51 Die Fernbedienung DIE FERNBEDIENUNG Einlegen der Batterien • Schieben Sie den Deckel nach vorne (siehe Abb.) • Legen Sie zwei neue Einwegbatterien ein, und achten Sie dabei auf die korrekte Einlege- richtung (+) und (-). • Bringen Sie den Deckel wieder an. HINWEIS: WIR EMPFEHLEN IHNEN DEN GEBRAUCH VON ALKALIBATTERIEN (LR03).
- Page 52 Beschreibung der Fernbedienung DIE FERNBEDIENUNG A. Taste MODE Dient zur Auswahl der Betriebsart (Kühlen, Entfeuchten, Belüften). B. Tasten zur EINSTELLUNG DER RAUMTEM- PERATUR Dienen zur Einstellung der Raumtemperatur oder zur Programmierung des Timers. C. Taste FAN Dient zur Einstellung der Geschwindigkeit des Gebläses in der Sequenz auf automatisch, hoch, mittel, niedrig.
- Page 53 Die Betriebsarten KÜHLBETRIEB • Drücken Sie zunächst die Taste , um das Gerät einzuschalten. • Ein Piepston wird den Start des Klimagerätes anzeigen und auf dem Display blinkt das Symbol auf. • Dann mehrmals die Taste MODE betätigen, bis auf dem Display das Symbol Kühlung erscheint.
- Page 54 Die Funktionen FUNKTION SMART Mit der Funktion SMART stellt das Gerät sich automatisch auf die Betrieb- sart, welche Ihnen Komfortbedingungen garantiert. • Drücken Sie die Taste , um das Gerät einzuschalten. Ein Piepston zeigt den Start des Klimagerätes an, und auf dem Display blinkt das Symbol auf.
- Page 55 Die Funktionen PROGRAMMIERUNG DES TIMERS Mit dem Timer können Sie das verzögerte Ein- und Ausschalten des Geräts einstellen. Somit werden die Betriebszeiten optimiert und demzufolge ein unnötiger Energieverbrauch vermieden. Programmierung der Ausschaltzeit • Bei eingeschaltetem Klimagerät, die Taste TIMER drücken: Das Display zeigt die Stunden an und das Symbol „h“...
- Page 56 R a t s c h l ä g e ELEKTRISCHER ANSCHLUSS • Damit Ihr Gerät energiesparend arbeitet, den Raum vor direkter Sonnenbestrahlung Bevor Sie den Netzstecker an der Steckdose schützen, indem Vorhänge anschließen, Folgendes überprüfen: zuziehen und/oder die Rollläden teilweise •...
- Page 57 R e i n i g u n g Bevor Sie mit Reinigungs- bzw. Wartungsar- ÜBERPRÜFUNGEN AM ANFANG DER SAISON beiten beginnen, schalten Sie das Gerät Prüfen Sie das Einspeisekabel und die Steck- durch Drücken der Taste „OFF“ auf der Fern- dose auf ihre Unversehrtheit und die Erdung bedienung aus und ziehen stets den Netz- auf ihre Effizienz.
- Page 58 Im falle eventueller betriebsstörungen IM FALLE EVENTUELLER BETRIEBSSTÖRUNGEN Bei den eventuell auftretenden Störungen, handelt es sich oft nur um kleine Probleme, für die Sie selbst leicht Abhilfe schaffen können. Überprüfen Sie daher genau die im Folgenden beschriebenen kurzen Anleitungen, bevor Sie sich an eine zugelassene Kundendienststelle in Ihrer Nähe wenden. PROBLEME URSACHEN ABHILFEN...
- Page 59 Garantie/Technische Eigenschaften GARANTIE UND TECHNISCHER TECHNISCHE EIGENSCHAFTEN Anschlussspannung KUNDENDIENST siehe Typenschild Garantiebedingungen Max. Leistungsaufnahme technische Kundendienst sind auf dem Ihrem bei Kühlung “ Gerät beigelegten Zertifikat aufgeführt. Max. Leistungsaufnahme bei Entfeuchtung “ Kühlleistung* “ Gebläsegeschwindigkeitsstufen Max Luftumwälzung 250-350 m Abmessungen Inneneinheit: •...
- Page 60 Kenwood Schumpf AG 6341 Baar, Lättichstrasse 6, Postfach 351 Telefon 041-766 87 27 / Fax 041-766 87 77 www.kenwood.ch...