Table des Matières
Publicité
Les langues disponibles
Les langues disponibles
Liens rapides
Publicité
Chapitres
Table des Matières

Manuels Connexes pour Atag Cook-light


Sommaire des Matières pour Atag Cook-light
- Page 1 G e b r a u c h s a n w e i s u n g Cook-light kookplaat Cook-light hob table de cuisson Cook-light Cook-light Kochmulde H L 2 . . B H L 2 . . L H L 2 .
-
Page 2: Woord Vooraf
Cook-light Ø 14,5 cm (1200 W) In deze handleiding vindt u informatie vis/wildpanzone over de installatie, veiligheid, Cook-light Ø 18/41,5 cm (1561/735/1561W) bediening en onderhoud van uw dubbele kookzone toestel. Cook-light Ø 14,5/21 cm (1000/2000 W) -
Page 3: Table Des Matières
Het veiligheidsvoorschriften Deutsch Seite DE 1 - DE 12 element verwarmt gelijkmatig en snel. inbouwmaten installatievoorschrift 4 - 5 Cook-light kookzones zijn binnen 3 seconden op bediening 6 - 7 volle temperatuur, maar verbruiken zeer weinig gebruik energie. onderhoud kooktabel... -
Page 4: Veiligheidsvoorschriften
veiligheidsvoorschriften inbouwmaten 1. Het toestel mag alleen door een elektro- technisch installateur aangesloten worden. 2. Tijdens en na het gebruik wordt het toestel warm. Met kleine kinderen is dit een punt waar u rekening mee moet houden. 3. Zorg ervoor dat er geen vocht in het toestel dringt. -
Page 5: Installatievoorschrift
installatievoorschrift installatievoorschrift (vervolg) elektrische aansluiting 3. Verwijder de beschermfolie van het 230 V - 50 Hz afdichtband en plak het band op het midden Aansluitwaarde: HL2..C 7257 W van de rand van de kookplaat. HL2..L 7200 W HL2..B 6300 W 4. -
Page 6: Bediening
bediening controlelampjes enkele kookzones aan/uit signalering U kunt de bedieningsknop zowel rechts- als Het controlelampje (A) onder de glasplaat licht linksom draaien. op zodra u een kookzone inschakelt. Op het bedieningspaneel staan drie standen restwarmte aangegeven. U kunt echter gerust op elke gewenste tussenstand instellen. -
Page 7: Onderhoud
onderhoud kooktabel dagelijks Stand – trekken van bouillon; Stand 2 - 3 – aanbraden van vlees; Maak de glasplaat na gebruik altijd schoon. – rood koken van stoofperen; – bakken van platvis, dunne Gebruik hiervoor bijvoorbeeld een sopje van – bereiden van stoofvlees. moten of filet;... -
Page 8: Storingen Zelf Verhelpen
storingen zelf verhelpen verpakking en toestel afvoeren storing oorzaak remedie De verpakking van het toestel is recyclebaar. Deze materialen op verantwoorde wijze en Gebruikt zijn: conform de bepalingen in uw gemeente Kookzones worden niet Stekker niet in het Stekker in het stopcontact –... -
Page 9: Wat Garandeert Atag
ATAG buiten de garantie vallen omvang van de garantie transportschade Op dit apparaat geeft ATAG u: Controleer uw nieuwe apparatuur voordat u – 5 jaar onderdelengarantie; deze in gebruik neemt. – 1 jaar gratis service. Als u beschadigingen aantreft, neem dan De garantie op ATAG keukenapparatuur is contact op met uw leverancier. -
Page 10: Description Of Appliance
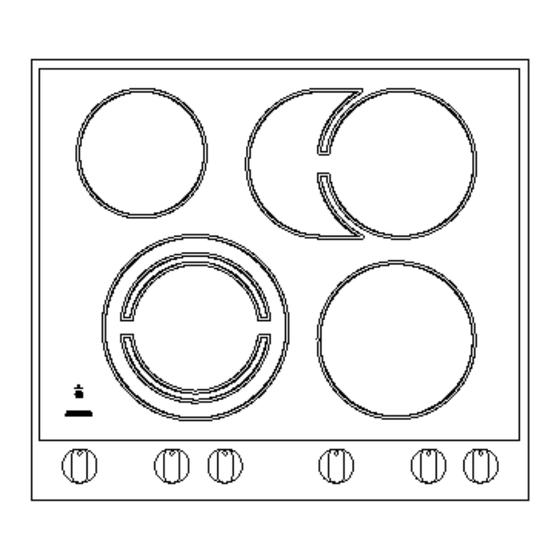
1 Cook-light cooking zone Ø 14.5 cm (1200 W) This instruction manual contains The "ATAG Cook-light" elements combine the introduction 2 Cook-light fish/game-pan cooking zone information about the installation, advantages of a halogen element and the where you can find ATAG Ø... -
Page 11: Safety Instructions
As soon as a crack is observed in the cooking surface, the appliance should immediately be disconnected from the power supply. In this situation, do not use the appliance any more and contact Atag's service department. model: HL2..C attention If the worktop has a raised edge, the hob should be installed behind this raised edge. -
Page 12: Installation Instructions
installation instructions installation instructions (continued) electrical connection 3. Remove the protective foil from the sealing 230 V - 50 Hz strip and attach the strip to the middle of the Connected load: HL2..C 7257 W edge of the hob. HL2..L 7200 W HL2..B 6300 W... -
Page 13: Operation
operation control lights single cooking zones on/off indication You can turn the control knob either to the right The control light (A) under the glass top comes or to the left. on as soon as you switch on a cooking zone. Three settings are marked on the control panel. -
Page 14: Maintenance
maintenance table of cooking times daily Setting – making stock; Setting 2 - 3 – searing meat; Always clean the glass top after use. For this, – stewing pears; – frying flat fish, thin steaks or use suds of a washing-up liquid, for example. –... -
Page 15: Solving Problems Yourself
solving problems yourself disposal of packaging and appliance problem cause remedy The packaging of the appliance is recyclable. It Please dispose of these materials in a is made up of: responsible way in accordance with the Cooking zones do not Plug not in the socket I n s e rt plug into socket –... -
Page 16: Atag's Guarantee
During the first year starting from the date the appliance. of delivery, ATAG also provides free service. Insufficient or improper maintenance may This means that in case of repairs, there will also result in discolouration of surfaces or be no charges for costs such as handling rapid ageing of rubber and plastic parts. -
Page 17: Introduction
1 Zone de cuisson Cook-light Ø 14,5 cm (1200 W) Vous trouverez dans cette notice Les éléments "ATAG Cook-light" allient les Introduction 2 Zone pour plat de poisson/gibier Cook-light d'utilisation des informations relatives avantages d'un élément halogène à... -
Page 18: Prescriptions De Sécurité
prescriptions de sécurité dimensions d'encastrement 1. Cet appareil ne peut être raccordé que par un monteur électrotechnique. 2. Pendant et après son utilisation l'appareil est chaud. Tenez en compte si vous avez des enfants en bas âge. 3. Veillez à ce qu'aucune humidité ne pénètre dans l'appareil. -
Page 19: Prescriptions D'installation
prescriptions d'installation prescriptions d'installation (suite) branchement électrique 3. Retirez la pellicule de protection de la 230 V - 50 Hz bande étanche et collez la bande au milieu Puissance du bord de la table de cuisson. de raccordement: HL2..C 7257 W HL2..L 7200 W 4. -
Page 20: Commande
commande témoins lumineux zones de cuisson simples témoin lumineux arrêt/marche Vous pouvez tourner le bouton aussi bien à Le témoin lumineux (A) qui se trouve sous la droite qu'à gauche. plaque en verre s'allume dès que vous mettez Le tableau de commande indique trois une zone de cuisson en marche. -
Page 21: Entretien
entretien tableau de cuisson chaque jour Position – bouillon mijoté Position 2 - 3 – viande à saisir Nettoyez toujours la plaque en verre après – poires à cuire – poisson plat, darnes minces l'emploi. Pour cela, utilisez une eau savonneuse. –... -
Page 22: Problèmes À Résoudre Soi-Même
problèmes à résoudre soi-même évacuation de l’emballage et d’appareils anciens problèmes causes possibles solutions L'emballage de l'appareil est recyclable. Débarrassez-vous de ces matériaux de façon Composition : justifiée conformément aux directives de votr e Les zones ne chauff e n t La prise n'est pas Branchez la prise –... -
Page 23: Garantie Atag
Ceci ne tombe pas non plus à qui vous adresser sous la garantie. Dans les pays où ATAG est représenté, vous l’usure ou le vieillissement pouvez vous adresser directement au préposé si vous désirez faire appel aux Ainsi, les ampoules usées, la décoloration... -
Page 24: Gerätebeschreibung
Zweikreis-Zone Cook-light Ø 17/26,5 cm Möglichkeiten des Gerätes Technische Daten (1400/2200 W) unterrichtet. Entsorgung von Verpackung und Gerät 10 Kochzone Cook-light Ø 18 cm (1800 W) Umfang der ATAG Garantieleistungen 11 Bedienungsknopf für Kochzone 9 Diese Gebrauchsanweisung sorgfältig Garantieausschluß 12 Bedienungsknopf für Kochzone 10 aufbewahren. -
Page 25: Sicherheitsvorschriften
Sicherheitsvorschriften Einbaumaße 1. Der Anschluß dieses Geräts ist ausschließlich von einem Elektroinstallateur durchzuführen. 2. Während des Gebrauchs und danach ist das Gerät heiß. Achten Sie deshalb auf kleine Kinder. 3. Achten Sie darauf, daß keine Feuchtigkeit in das Gerät eindringt. 4. -
Page 26: Installationsvorschrift
Installationsvorschrift Installationsvorschrift (Forts.) Elektrischer Anschluß 3. Entfernen Sie die Schutzfolie von dem 230 V - 50 Hz Dichtband und bringen Sie dieses Band in Anschlußwert: HL2..C 7257 W der Mitte des Randes der Kochmulde an. HL2..L 7200 W HL2..B 6300 W 4. -
Page 27: Bedienung
Bedienung Signalleuchten einzelne Kochzonen Ein-/Ausanzeige Der Bedienungsknopf kann sowohl rechts als Die Kontrolleuchte (a) unter der Glasplatte auch links gedreht werden. leuchtet auf, sobald eine Kochzone Die Markierung an der Bedienungsblende gibt eingeschaltet ist. drei Stellungen an. Sie können jedoch jede Restwärme-Anzeige gewünschte Zwischenstellung wählen. -
Page 28: Pflege
Pflege Stufentabelle Täglich Stufe – Bouillon ziehen lassen; Stufe 2 - 3 – Fleisch anbraten; Die Glasplatte nach jedem Gebrauch reinigen. – Backbirnen zubereiten; – Plattfisch, dünne Hierzu eignet sich normales Geschirrspülmittel. – Schmorfleisch zubereiten. Fischscheiben oder Filets braten; Die Glasplatte nach der Reinigung mit sauberem Stufe –... -
Page 29: Störungen Selbst Beheben
Störungen selbst beheben Entsorgen von Verpackung und Gerät Störung Ursache Behebung Die Verpackung des Gerätes ist re c y c e l b a r. Diese Materialien umweltgerecht und nach Benutzt wurd e n : den Vorschriften Ihrer Gemeinde entsorg e n . Kochzone wird nicht Stecker nicht in der Stecker in die Steckdose... -
Page 30: Von Der Garantie Ausgeschlossen Sind
G a r a n t i e l e i s t u n g e n sind Garantiebedingungen Transportschaden Auf dieses Gerät gibt ATAG Ihnen: Kontrollieren Sie das neue Gerät, bevor Sie – 5 Jahre Garantie auf die Einzelteile; es in Betrieb nehmen.