Table des Matières
Publicité
Les langues disponibles
Les langues disponibles
Liens rapides
Publicité
Chapitres
Table des Matières

Manuels Connexes pour Angelcare AC420


Sommaire des Matières pour Angelcare AC420
- Page 1 FOR YOUR PEACE OF MIND OWNER’S MANUAL SOUND MONITOR Model AC420...
-
Page 2: Table Des Matières
Keep small parts away from children when assembling. We, at Angelcare , stand behind all of our products. ® If you are not completely satisfied or have any questions, United States and Canada: please contact us at: angelcare@cdecinc.ca Other countries: please contact your local distributor. -
Page 3: Warnings
WARNINGS 1. THIS PRODUCT CANNOT REPL ACE 9. This product is NOT a toy. DO NOT allow RESPONSIB LE ADU LT SU PERVISION . children to play with it. This product is designed to aid in the monitoring of your child. When using 10. -
Page 4: Important Safety Instructions
13. IMPORTANT SAFETY INSTRUCTIONS the product. Use ONLY with a cart, stand, tripod, bracket or table recommended by the manufacturer or sold with the product. 13.1 Read these instructions - All the safety Any mounting of the product should follow instructions should be read before the the manufacturer’s instructions. - Page 5 13.20 WARNING Strangulation Hazard incineration of batteries must be avoided — C h i l d r e n h a v e to prevent one or more of the following S T R A N G L E D occurrences: release of toxic materials, cords.
-
Page 6: Fcc And Ic Regulations
WARNING (North America Only) 15.4 This device complies with part 15 of the 15.1 Modifications not authorized by the FCC Rules and the Industry Canada licence- manufacturer may void users authority to exempt RSS standard(s). Operation is subject operate this device. to the following two conditions: 15.2 NOTE: This equipment has been tested (1) This device may not cause harmful... -
Page 7: Setup Requirements
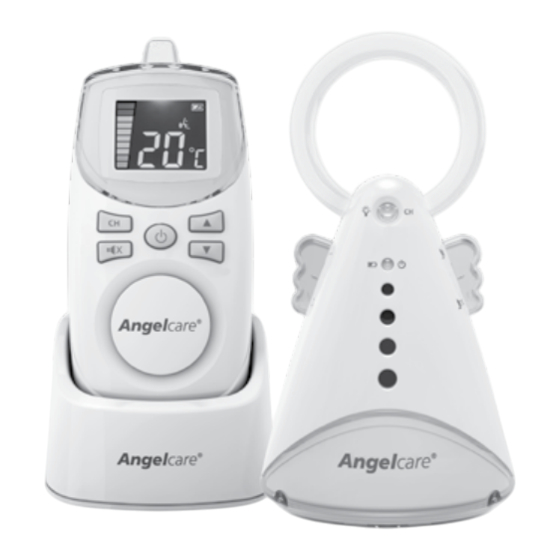
SOUND MONITOR SETUP REQUIREMENTS Model AC420 INCLUDED: Parent Unit Charging Cradle Nursery Unit 4 Rechargeable AAA Batteries 2 AC Adapters for Parent Unit WHAT YOU WILL NEED (NOT INCLUDED): 4 AAA Alkaline Miniature Philips Batteries Screwdriver for Nursery Unit IMPORTANT BABY’S ROOM:... -
Page 8: Step 1 - Charging The Parent Unit (15 Hours)
STEP 1 - CHARGING THE PARENT UNIT IMPORTANT Never use regular alkaline batteries in the Parent Unit; they may explode. 1) Remove the battery door and insert the Rechargeable Batteries (included). 2) Connect the AC Adapter to the Parent Unit and into an electrical outlet. 3) Charge the unit for 15 continuous hours (prior to first use). -
Page 9: Battery Alarm
BATTERY ALARM • Alarm activates when the batteries need to be recharged. • Parent Unit will emit a beep sound every 15 seconds. Battery Alarm icon will flash on screen. • HOW TO CHARGE THE BATTERIES IN THE PARENT UNIT: Leave the Parent Unit in the Charging Cradle to fully charge the unit. -
Page 10: Step 2 - Setting Up The Nursery Unit
STEP 2 - SETTING UP THE NURSERY UNIT 1) Remove the battery door and insert 4 AAA Alkaline Batteries (not included). 2) Place the Nursery Unit at a minimum of 1 meter away from the crib. 3) Connect the AC Adapter to the Nursery Unit and into an electrical outlet. -
Page 11: Step 3 - Turning On Your Monitor
STEP 3 - TURNING ON YOUR MONITOR 1) Press the Parent Unit ON/OFF button for 2 seconds. 2) Slide ON the Nursery Unit Power ON/OFF button. NOTE: The screen of the Parent Unit will show the channel of transmission (C1 to C8) and after 5 seconds the room temperature and function icons. -
Page 12: Step 4 - Testing And Getting To Know Your Monitor
IMPORTANT ICONS Nursery Unit: Channel Display: When this icon appears, batteries Indicates selected channel need to be replaced in the Nursery Unit. Sound Level Indicator: Indicates the sound level on the Parent Out-of-Range: Unit. Indicates the lost of connection between the Parent Unit and the Nursery Unit. - Page 13 Turn the Nursery Unit OFF Unit ON 4.2 - SOUND TRANSMISSION (VOX) Your Angelcare ® monitor is equipped with a voice-activated system. The Nursery Unit will be activated and transmit sounds to the Parent Unit only when it captures sounds.
- Page 14 SOUND LEVEL INDICATOR: Displays the sound level on the Parent Unit. There are 5 sound levels. ADJUST SOUND LEVEL PUT IN TEMPORARY MUTE MODE Press to mute the speaker. (See Step 4.3) Raise volume Lower volume Once you’ve chosen the desired level with the Up and Down keys, the bars will Sound disappear and will start moving according...
-
Page 15: Night Light
Press the Night Light button of Nursery Unit to turn night light ON or OFF. YOU ARE NOW READY TO USE YOUR MONITOR The Angelcare monitor can be used with the pre-program factory settings ® or you can also customise your settings to your preference. -
Page 16: Troubleshooting
TROUBLESHOOTING TAKING CARE OF YOUR RECHARGEABLE BATTERIES • Ensure that you fully charge your batteries for 15 hours before their first use. • To maintain maximum battery life it is recommended that you fully discharge your batteries periodically. Battery performance can be diminished by leaving the batteries constantly charging. -
Page 17: Limited Warranty
® , sound monitor (model AC420) is free from any material and workmanship defects, for a period of two (2) years from the date of the original purchase. If this monitoring system fails to function properly when used as directed under normal conditions within the two years period, Angelcare®... -
Page 18: Technical Specifications
220-240V AC/7.5V DC adapter for frequency (other). Charging Base for the Parent Unit. Hereby, Angelcare Monitors Inc, declares Caution: To reduce the risk of electric this baby monitor is in compliance with the shock, do not expose this product to rain essential requirements and other relevant or moisture. -
Page 19: Moniteur De Sons
POUR VOTRE TRANQUILLITÉ D’ESPRIT MANUEL DE L’UTILISATEUR MONITEUR DE SONS Modèle AC420... - Page 20 , nous endossons fièrement tous nos produits. ® Si vous n’êtes pas complètement satisfait ou si vous avez des questions : États-Unis et Canada : prière d’envoyer un courriel à : angelcare@cdecinc.ca Autres pays : prière de communiquer avec votre distributeur.
-
Page 21: Avertissements
AVERTISSEMENTS 1. CE PRODUIT NE REMPLACE PAS LA 9. Ce produit N’est PAS un jouet. NE SU PERV I SIO N RES PO N SABLE D ’U N permettez PAS aux enfants de jouer avec ADULTE. Ce produit est conçu pour aider ce produit. -
Page 22: Instructions Importantes De Sécurité
plat. Jetez au rebut de manière convenable chose; portez une attention particulière les piles déchargées. NE rechargez PAS les aux fils, fiches et prises de courant, et aux piles non rechargeables. Il faut recharger les endroits précis où ils sortent du produit. piles rechargeables UNIQUEMENT sous la 13.10 Accessoires –... -
Page 23: Instructions Importantes De Sécurité Concernant L'utilisation Des Piles
électrique. NE versez JAMAIS de liquide de 14.4 N’utilisez PAS ces adaptateurs avec quelque nature que ce soit sur le produit. d’autres appareils ou équipements. 13.18 Antenne – Il faut mettre en place 14.5 Lorsque vous débranchez l’adaptateur l’antenne utilisée pour cet émetteur à CA de l’unité... -
Page 24: Réglementation De La Fcc Et D'ic
déterminer en allumant (ON) et en éteignant rangez celui-ci pour au-delà de 30 jours, car (OFF) l’appareil, l’utilisateur devrait tenter les piles pourraient couler et endommager d’éliminer l’interférence en appliquant une le produit. ou plusieurs des mesures suivantes : 14.14 Jetez les piles à plat dès que possible, •... -
Page 25: Éléments Nécessaires (Non Inclus)
INSTRUCTIONS MONITEUR DE SONS D’INSTALLATION Modèle AC420 CE QUI EST INCLUS: Unité des parents Chargeur Unité du nourrisson 4 piles AAA rechargeables 2 adaptateurs CA pour l’unité des parents ÉLÉMENTS NÉCESSAIRES (NON INCLUS) : 4 piles AAA alcalines Tournevis miniature pour l’unité... -
Page 26: Étape 1 - Charge De L'unité Des Parents (15 Heures)
ÉTAPE 1 - CHARGE DE L’UNITÉ DES PARENTS IMPORTANT N’utilisez jamais de piles alcalines ordinaires dans l’unité des parents, elles pourraient exploser 1) Enlevez le couvercle du compartiment à piles et insérez les piles rechargeables (incluses). 2) Branchez l’adaptateur CA à l’unité des parents et dans une prise de courant. -
Page 27: Alarme De Piles Faibles De L'unité Des Parents
ALARME DE PILES FAIBLES DE L’UNITÉ DES PARENTS • Une alarme se fait entendre dès qu’il faut recharger les piles. • L’unité des parents émet alors un signal sonore toutes les 20 secondes. L’icône Charge vide des piles clignote sur l’unité des parents. •... -
Page 28: Étape 2 - Installation De L'unité Du Nourrisson
ÉTAPE 2 - INSTALLATION DE L’UNITÉ DU NOURRISSON 1) Enlevez le couvercle du compartiment à piles et insérez 4 piles alcalines AAA (non incluses). 2) Placez l’unité du nourrisson à une distance minimale de 1 mètre du lit. 3) Branchez l’adaptateur CA à l’unité du nourrisson et dans une prise de courant. -
Page 29: Étape 3 - Mise En Marche Du Moniteur
ÉTAPE 3 - MISE EN MARCHE DU MONITEUR 1) Appuyez sur le bouton Marche/Arrêt de l’unité des parents pendant 2 secondes. 2) Glissez le bouton Marche/Arrêt de l’unité du nourrisson à la position ON. NOTE: L’écran de l’unité des parents indiquera le canal de transmission (C1 à... -
Page 30: Icônes Importantes
ICÔNES IMPORTANTES Unité du nourrisson : Affichage du canal : Lorsque cette icône s’affiche, Indique le canal sélectionné. les piles de l’unité du nourrisson doivent être remplacées. Indicateur du niveau sonore : Indique le niveau sonore sur l’unité des Hors de portée : parents. -
Page 31: Transmission Du Son (Vox)
Allumez l’unité des parents du nourrisson 4.2 - TRANSMISSION DU SON (VOX) Ce moniteur Angelcare est muni d’un système d’activation par la voix. L’unité du ® nourrisson s’activera et transmettera des sons à l’unité des parents uniquement losqu’elle en captera. Le cadran de réglage de la sensibilité du microphone permet de régler le niveau sonore détecté... -
Page 32: Sourdine Temporaire
INDICATEUR DU NIVEAU SONORE : Affichage du niveau sonore sur l’unité des parents. Il y a 5 niveaux sonores. AJUSTER LE NIVEAU SONORE METTRE EN MODE SOURDINE TEMPORAIRE Appuyez pour mettre le haut-parleur en sourdine. (Voir l’Étape 4.3) Augmenter le volume Diminuer le volume Une fois le volume choisi en utilisant les touches de contrôle du volume vers le... -
Page 33: Vous Êtes Maintenant Prêt À Utiliser Votre Moniteur
ALLUMER ou ÉTEINDRE la veilleuse. VOUS ÊTES MAINTENANT PRÊT À UTILISER VOTRE MONITEUR Le moniteur Angelcare peut être utilisé avec les réglages en usine préprogrammés ou ® vous pouvez également personnaliser les réglages selon vos préférences. -
Page 34: Résolution De Problèmes
RÉSOLUTION DE PROBLÈMES SOIN DE VOS PILES RECHARGEABLES • Assurez-vous de charger entièrement vos piles pendant 15 heures avant d’utiliser l’unité pour la première fois. • Pour optimiser la durée de vie des piles, nous vous recommandons de décharger les piles complètement sur une base périodique. -
Page 35: Garantie Limitée
(modèle AC420) est exempt de tout défaut de fabrication pour une période de deux (2) ans à compter de la date d’achat initial. Si ce système de surveillance, lorsqu’utilisé selon les instructions dans des conditions normales, ne fonctionne pas convenablement au cours de cette période de deux ans, Angelcare... -
Page 36: Spécifications Techiniques
927 MHz (ailleurs). Attention : Afin de réduire le risque de Par la présente, Angelcare Monitors Inc. choc électrique, n’exposez pas ce produit déclare que ce moniteur pour bébés est à la pluie ou à l’humidité. - Page 40 www.angelcarebaby.com...