Table des Matières
Publicité
Les langues disponibles
Les langues disponibles
Liens rapides
MIAMI
IT - Cantinette refrigerate per l'esposizione delle bottiglie di vino
EN - Refrigerated wine bottle display cabinets
FR - Caves à vin réfrigérées pour l'exposition de bouteilles de vin
MIAMI B&R
IT - ISTRUZIONI PER L'INSTALLAZIONE, L'USO E LA MANUTENZIONE
Prima di installare e utilizzare l'apparecchio leggere con attenzione questo manuale e conservarlo unitamente all'apparecchio.
EN - INSTRUCTIONS FOR INSTALLATION, OPERATION AND MAINTENANCE
Read this manual carefully before installing and using the product. Keep this manual with the product for future reference.
FR - INSTRUCTIONS POUR L'INSTALLATION, L'UTILISATION ET L'ENTRETIEN
Avant d'installer et utiliser l'appareil, lisez attentivement ce manuel et conservez-le avec l'appareil.
International style
with Italian flavour
Cod.
MIAMI
MIAMI MEDIUM
IT
EN
FR
MIAMI MINI
Publicité
Chapitres
Table des Matières

Sommaire des Matières pour Enofrigo MIAMI B&R
- Page 1 MIAMI IT - Cantinette refrigerate per l'esposizione delle bottiglie di vino EN - Refrigerated wine bottle display cabinets FR - Caves à vin réfrigérées pour l’exposition de bouteilles de vin MIAMI B&R MIAMI MIAMI MEDIUM MIAMI MINI IT - ISTRUZIONI PER L'INSTALLAZIONE, L’USO E LA MANUTENZIONE Prima di installare e utilizzare l'apparecchio leggere con attenzione questo manuale e conservarlo unitamente all'apparecchio.
- Page 2 INTRODUZIONE Gentile Cliente, La ringraziamo per aver preferito un apparecchio Enofrigo . Il modello MIAMI , da Lei scelto, è un prodotto ad elevate prestazioni, di concezione e tecnologia avanzata, di elevata affidabilità e qualità costruttiva. Le suggeriamo di affidarne la gestione e la manutenzione a personale professionalmente qualificato di Sua fiducia, che utilizzi, quando necessario, solo ricambi originali.
-
Page 3: Table Des Matières
3.6.2 Spegnimento per lunghi periodi GARANZIA Il prodotto Enofrigo gode di una garanzia convenzionale , valida a partire dalla data di acquisto dell'apparecchio, le cui condizioni sono specificate nelle CONDIZIONI GENERALI DI VENDITA reperibili all'indirizzo www.enofrigo.com. PRESTARE CAUTELA – La garanzia decade qualora l'apparecchio sia stato utilizzato senza rispettare le indicazioni pre- senti in questo manuale. -
Page 4: Generalità
– Il presente manuale è proprietà di e ne è vietata la riproduzione o la cessione a terzi dei Enofrigo contenuti del presente documento. Tutti i diritti sono riservati. Esso è parte integrante del prodot- to; assicurarsi che sia sempre a corredo dell'apparecchio, anche in caso di vendita/trasferimento ad altro proprietario, affinché... -
Page 5: Divieti
Divieti È VIETATO – Apportare modifiche e/o tentativi di riparazione al prodotto. Qualsiasi riparazione deve essere effettuata da un tecnico qualificato. – Immagazzinare materiali infiammabili o sostanze esplosive (ad esempio confezioni aerosoliche con propellente infiammabile) all'interno o in prossimità dell'apparecchio. –... -
Page 6: Descrizione Dell'apparecchio
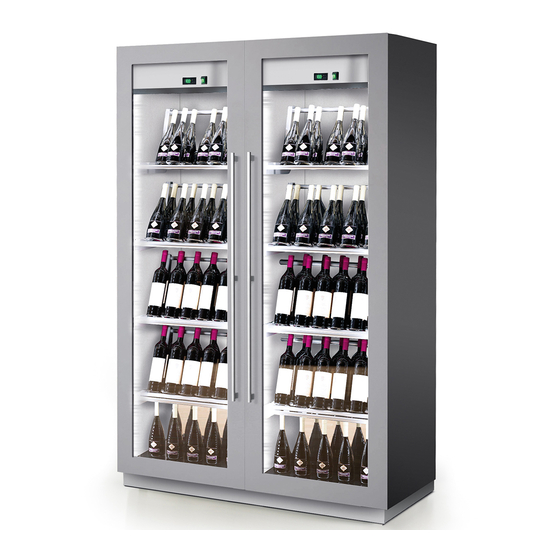
Descrizione dell'apparecchio Le cantinette refrigerate MIAMI sono apparecchi estremamente versatili, che esprimono un nuovo concetto di esposizione. La priorità viene data all’illuminazione per enfatizzare al massimo le bottiglie di vino contenute al suo interno. I led, unitamente agli interni, creano un effetto di profondità e dei giochi di luce che mettono in primo piano le bottiglie di vino. Il consumo energetico viene notevolmente diminuito grazie all’illuminazione a led e al sistema refrigerante a bassa rumorosità... -
Page 7: Struttura
Struttura 13 12 11 Porta Maniglia Serratura Vetro Zoccolo Illuminazione a led Fondo evaporatore Ripiani Struttura Carter protezione ventilatore Interruttore principale Pannello comandi Griglia di protezione zona ventilatore Serpentina condensatore MIAMI MIAMI MIAMI MIAMI Piedini regolabili B&R MEDIUM MINI Spina e cavo di alimentazione Vaschetta raccogli condensa Protezione zona motore Fig. -
Page 8: Dispositivi Di Sicurezza
Dispositivi di sicurezza Le cantinette refrigerate MIAMI sono dotate dei seguenti dispositivi di sicurezza: – Protezione zona motore – Protezione zona ventilatore – Piedini regolabili flangiati per il fissaggio a terra Pannello comandi TASTI FUNZIONALI DISPLAY S SET, Blocco/sblocco tastiera Compressore Se premuto permette di bloccare/sbloccare la tastie- ON: compressore acceso. -
Page 9: Installazione
2 INSTALLAZIONE Ricevimento del prodotto Gli apparecchi MIAMI vengono forniti in collo unico protetto da un imballo in cartone. Unitamente al prodotto, posizionato all’interno della vetrina frigo, viene for- nito il seguente materiale: – Manuale di installazione, uso e manutenzione –... -
Page 10: Locale Di Installazione
Locale di installazione Il locale di installazione deve sempre essere rispondente alle Norme Tecniche e Sanitarie ed alla Legislazione vigente. Posizionare l'apparecchio in un luogo asciutto e ben areato. In particolare: – evitare di posizionare l'apparecchio in prossimità di fonti di calore (caloriferi, forni, fornelli, ecc.) o di correnti d'aria. –... - Page 11 Situazioni CONCESSE ✓ Fig. 7 Descrizione MIAMI B&R MIAMI MIAMI MEDIUM MIAMI MINI A (mm) B (mm) C (mm) D (mm) 1075 1280 1075 1075...
-
Page 12: Installazione
Installazione 2.4.1 Movimentazione Una volta tolto l’imballo, la movimentazione dell'apparecchio si effettua come di seguito descritto: – posizionare l'apparecchio in prossimità del locale di installazione – solo per modelli MIAMI MEDIUM, MIAMI MINI e MIAMI B&R: sfilare la vaschetta (1), agendo dalla parte posteriore dell'appa- recchio, facendo attenzione a non danneggiare il cavo (2) –... -
Page 13: Uso
3 USO Operazioni preliminari 3.1.1 Verifiche Prima di mettere in funzione l'apparecchio verificare che: – l’impianto elettrico sia realizzato nel rispetto delle Norme specifiche e da personale professionalmente qualificato – il voltaggio dell'apparecchio, indicato nella Targa Tecnica, corrisponda alla tensione di linea presente nella presa di alimentazione –... -
Page 14: Messa In Funzione
Messa in funzione 3.2.2 Modifica SET POINT di temperatura Per modificare il SET POINT (default=4°C): Una volta completate le operazioni indicate al paragrafo "O- – premere S perazioni preliminari" sarà possibile mettere in servizio l'ap- – il led B inizia a lampeggiare parecchio. -
Page 15: Ripristino Alla Programmazione Di Fabbrica
3.2.4 Ripristino alla programmazione di fabbrica 3.2.7 On/Stand-by del controllore elettronico Per impostare i parametri ai valori di fabbrica (default) si deve Lo spegnimento (Stand-by) del controllore elettronico viene inizialmente accedere alla procedura: effettuato: – premere il tasto S per 4 secondi –... -
Page 16: Lista Dei Parametri E Possibilità Di Modifica
Lista dei parametri e possibilità di modifica Per impostare i parametri di configurazione: – premere il tasto S per 4 secondi – sul display comparirà “ PA ” – premere il tasto S – impostare (entro 15 secondi) il parametro “ PAS ” (password) tramite i pulsanti A e V. Il parametro impostato di fabbrica è -19 –... -
Page 17: Codici Allarmi E Ripristino
Codici allarmi e ripristino Allarme Significato Rimedi Conseguenze Allarme di temperatura Il dispositivo funzionerà nor- Verificare la temperatura ambiente tramite il parametro A1. minima. malmente. Allarme di temperatura Il dispositivo funzionerà nor- Verificare la temperatura ambiente tramite il parametro A4. massima. -
Page 18: Spegnimento
Spegnimento 3.6.1 Spegnimento temporaneo In caso di necessità temporanee di spegnere l'apparecchio (pulizia o manutenzione) operare nel seguente modo: – spegnere il controllore (1) premendo il tasto Q per 4 secondi – rimuovere la spina (2) dalla presa (3) e agire sull'interruttore omnipolare che la alimenta. Fig. -
Page 19: Manutenzione
4 MANUTENZIONE Regolamentazioni (periodicità) È buona norma pulire periodicamente sia le parti interne che quelle esterne dell'apparecchio. Questo ne garantisce il buon fun- zionamento e la durata nel tempo. Pulizia esterna La pulizia esterna e dell'interno porta, svolta quotidianamente, oltre a valorizzare il livello estetico dell'apparecchio, ne garantisce il buon stato di conservazione nel tempo. -
Page 20: Pulizia Del Vano Frigo
4.3.1 Pulizia del vano frigo Dopo aver spento l'apparecchio e rimosso tutto il contenuto del vano frigo: – pulire le superfici interne ed i ripiani utilizzando esclusivamente un panno imbevuto in acqua tiepida con l'aggiunta di deter- gente neutro – risciacquare e asciugare accuratamente con un panno morbido –... -
Page 21: Anomalie - Possibili Cause - Rimedi
Anomalie - Possibili cause - Rimedi Nella tabella sotto riportata sono indicate le anomalie più comuni con i possibili rimedi. Anomalia Possibile causa Rimedio La spina non è stata inserita correttamente nella presa Inserire correttamente la spina di corrente L'apparecchio non si Verificare lo stato del cavo. -
Page 22: Servizio Assistenza Tecnica E Parti Di Ricambio
Anomalia Possibile causa Rimedio Chiudere la porta e verificare che non vi sia qualche impedimento alla perfetta chiusura La porta non è chiusa ermeticamente Verificare lo stato della guarnizione. Nel caso sia usurata contattare il rivenditore autorizzato per la sostituzione Presenza eccessiva di La porta rimane troppo aperta Ridurre le aperture troppo frequenti... - Page 23 INTRODUCTION Dear Customer, Thank you for purchasing a product from Enofrigo . The MIAMI model you have purchased is a high performance product characterised by advanced design and technology and excellent reliability and quality. We recommend that you entrust its maintenance and servicing to a qualified professional of your choice and insist on the use of original spare parts, if required.
- Page 24 Switching off for extended periods WARRANTY This Enofrigo product benefits from a conventional warranty , valid from the date of purchase. The terms of this warranty are specified in the GENERAL CONDITIONS OF SALE published on the website www.enofrigo.com. CAUTION! –...
-
Page 25: General Warnings And Safety Precautions
– This manual is the intellectual property of . Copying its contents or transmitting them to Enofrigo others is strictly forbidden. All rights reserved. This manual is an integral part of the appliance. It must accompany the appliance at all times, even if the appliance is sold or transferred to another owner, so that it can be consulted by the user or person responsible for servicing and repair. -
Page 26: Forbidden Actions
Forbidden actions STOP! – Do not modify or attempt to repair the appliance yourself. All repairs must be referred to a quali- fied technician. – Store flammable or explosive materials (e.g. aerosol cans containing flammable propellants) in or near the appliance. –... -
Page 27: Description Of The Appliance
Description of the appliance MIAMI refrigerated cabinets are extremely versatile units that represent the latest development in wine display. Excellent internal illumination focuses attention on the bottles of wine stored inside. LED light units and a cleverly designed interior create an im- pression of depth and produce reflections of light that enhance the presentation of bottles of wine. -
Page 28: Structure
Structure 13 12 11 Door Handle Lock Glass Plinth LED light Evaporator panel Shelves Structure Fan cover Main switch Control panel Fan protection grille Condenser coil MIAMI MIAMI MIAMI MIAMI Adjustable feet B&R MEDIUM MINI Power cable and plug Condensate collection tank Motor protection grille Fig. -
Page 29: Safety Devices
Safety devices MIAMI refrigerated display cabinets are equipped with the following safety devices: – Motor protection grille – Fan protection grille – Flanged feet for fixing to the floor Control panel FUNCTION KEYS DISPLAY S SET, Lock/Unlock keypad Compressor Press to lock/unlock the keypad and access the de- ON: compressor on. -
Page 30: Installation
2 INSTALLATION Receiving the product MIAMI appliances are delivered in a single pack, inside a cardboard box. The following material is also supplied, inside the cabinet: – Installation, operation and maintenance manual – Door handle and fixing screws – Keys for the door lock –... -
Page 31: Place Of Installation
Place of installation The place of installation must conform to all applicable technical and health standards. Position the appliance in a dry, well ven- tilated place. In particular: – Do not position the appliance near sources of heat (radiators, ovens, cookers, etc.) or in draughts. –... - Page 32 PERMITTED positions ✓ Fig. 7 Description MIAMI B&R MIAMI MIAMI MEDIUM MIAMI MINI A (mm) B (mm) C (mm) D (mm) 1075 1280 1075 1075...
-
Page 33: Installation
Installation 2.4.1 Moving Once the appliance has been removed from its packing, proceed as follows to move it into position: – Move the appliance near the place of installation – only for models MIAMI MEDIUM, MIAMI MINI e MIAMI B&R: Pull out the drip tray (1) from the rear of the appliance, taking care not to damage the cable (2) –... -
Page 34: Operation
3 OPERATION Preliminary steps 3.1.1 Checks Before switching the appliance on, perform the following checks: – Check that the electrical power supply has been installed by a qualified electrician in conformity to applicable standards – Check that the voltage of the appliance, as stated on the nameplate, corresponds to the voltage of the power socket –... -
Page 35: Putting Into Service
Putting into service 3.2.2 Changing the temperature SETPOINT To change the SETPOINT (default=4°C): Once you have completed the operations listed in the section – press S "Preliminary steps", the appliance can be put into service. – the B LED starts to flash Proceed as follows: –... -
Page 36: Restoring Default Settings
3.2.4 Restoring default settings 3.2.7 Electronic controller On/Stand-by To restore parameters to their default (factory) settings, first Proceed as follows to turn the electronic controller off (Stand- access the procedure: by mode): – press the S key for 4 seconds –... -
Page 37: List Of Parameters And Possible Modifications
List of parameters and possible modifications Proceed as follows to set the configuration parameters: – press the S key for 4 seconds – the display reads out “ PA ” – press the S key – within 15 seconds, enter the parameter “ PAS ” (password) using the A and V keys. The default value is -19 –... -
Page 38: Alarm Codes And Resetting
Alarm codes and resetting Alarm Meaning Solutions Consequences The device will function Minimum temperature alarm. Check ambient temperature from parameter A1. normally. The device will function Maximum temperature alarm. Check ambient temperature from parameter A4. normally. The device will function Condenser overheating alarm. -
Page 39: Switching Off
Switching off 3.6.1 Switching off temporarily To switch the appliance off for a short time (e.g. for cleaning or maintenance) proceed as follows: – Switch the controller (1) off by pressing the Q key for 4 seconds – pull the plug (2) out of the power socket (3) and turn the supply off at the double pole switch. Fig. -
Page 40: Maintenance
4 MAINTENANCE Good practice It is good practice to clean the outside and inside surfaces of the cabinet at regular intervals. This guarantees correct functioning and an extended working life. External cleaning Clean the outside of the cabinet and the inside of the door every day. Apart from keeping the cabinet looking attractive, this also helps to ensure an extended working life. -
Page 41: Cleaning The Interior Of The Cabinet
4.3.1 Cleaning the interior of the cabinet Switch off the refrigerated cabinet and remove all contents, then: – Clean all internal surfaces using only a cloth damped in a solution of warm water and neutral detergent – Rinse and dry thoroughly with a soft cloth –... -
Page 42: Problems - Possible Causes - Solutions
Problems - Possible causes - Solutions The following table lists the most common problems and solutions. Problem Possible cause Solution The plug has not been correctly inserted in the power Insert the plug correctly socket Check the condition of the power cable. If the cable The appliance does not The power cable is damaged is damaged, contact a qualified electrician to have it... -
Page 43: Technical Assistance And Spare Parts
Problem Possible cause Solution Close the door and check that nothing is preventing it from closing tightly The door is not hermetically closed Check the condition of the door seal. If it is worn, con- tact an authorised dealer to have it replaced Too much ice on the panel The door is being kept open for too long Reduce unnecessary door openings... - Page 44 INTRODUCTION Cher client, Nous vous remercions de la préférence que vous nous avez accordée en choisissant un appareil Enofrigo . Le modèle MIAMI que vous avez choisi est un produit à prestations élevées, bénéficiant d’une conception et d’une technologie de pointe, ainsi que d’une fiabilité et d’une qualité de construction excellentes.
- Page 45 Arrêt pour de longues périodes GARANTIE Le produit Enofrigo bénéficie d’une garantie conventionnelle , valable à partir de la date d’achat de l’appareil, dont les conditions sont indiquées dans les CONDITIONS GÉNÉRALES DE VENTE se trouvant à l’adresse www.enofrigo.com. SOYEZ PRUDENTS –...
-
Page 46: Généralités
– Ce manuel est la propriété du groupe et sa reproduction ou la cession du contenu de Enofrigo ce document à des tiers est interdite. Tous les droits sont réservés. Celui-ci fait partie intégrante du produit ; assurez-vous qu'il accompagne toujours l’appareil, même en cas de vente/transfert à... -
Page 47: Interdictions
Interdictions INTERDICTION – D’apporter des modifications au produit et/ou tenter de le réparer. Toute réparation doit être effectuée par un technicien qualifié. – Stocker des matières inflammables ou des substances explosives (par exemple des produits aérosols contenant un propulseur inflammable) à l'intérieur ou à proximité de l'appareil. –... -
Page 48: Description De L'appareil
Description de l’appareil Les caves à vin réfrigérées MIAMI sont des appareils extrêmement polyvalents, qui introduisent un nouveau concept d’exposition. La priorité accordée à l'éclairage permet de mettre en lumière les bouteilles de vin contenues à l'intérieur. Les LED et les intérieurs créent un effet de profondeur ainsi que des jeux de lumière qui participent à... -
Page 49: Structure
Structure 13 12 11 Porte Poignée Serrure Verre Socle Éclairages à LED Fond évaporateur Étagères Structure Carter de protection ventilateur Interrupteur principal Panneau de commandes Grille de protection zone ventilateur Serpentin condensateur MIAMI MIAMI MIAMI MIAMI Pieds réglables B&R MEDIUM MINI Fiche et câble d’alimentation Bac de récupération des condensats... -
Page 50: Dispositifs De Sécurité
Dispositifs de sécurité Les caves à vins réfrigérées MIAMI sont équipées des dispositifs de sécurité suivants : – Protection zone moteur – Protection zone ventilateur – Pieds réglables à brides pour la fixation au sol Panneau de commandes TOUCHES DE FONCTION AFFICHEUR S SET, Bloquer/débloquer les touches Compresseur... -
Page 51: Installation
2 INSTALLATION Réception du produit Les appareils MIAMI sont fournis en un seul colis protégé par un emballage en carton. Avec le produit est fourni le matériel suivant, placé à l’intérieur de la vitrine réfrigérée : – Manuel d’installation, utilisation et entretien –... -
Page 52: Lieu D'installation
Lieu d’installation Le lieu d’installation doit toujours répondre aux normes techniques et sanitaires ainsi qu’à la législation en vigueur. Placez l’appareil dans un lieu sec et bien aéré. En particulier : – évitez de placer l’appareil à proximité de sources de chaleur (radiateurs, fours, fourneaux, etc.) ou de courants d’air. –... - Page 53 Positions ADMISES ✓ Fig. 7 Description MIAMI B&R MIAMI MIAMI MEDIUM MIAMI MINI A (mm) B (mm) C (mm) D (mm) 1075 1280 1075 1075...
-
Page 54: Installation
Installation 2.4.1 Manutention Après avoir retiré l’emballage, la manipulation de l’appareil s’effectue comme suit :: – placez l’appareil à proximité du lieu d'installation – uniquement pour modèles MIAMI MEDIUM, MIAMI MINI e MIAMI B&R: dégagez le bac (1), à l’arrière de l’appareil, en veillant à... -
Page 55: Utilisation
3 UTILISATION Opérations préliminaires 3.1.1 Vérifications Avant de mettre l’appareil en fonction, vérifiez que : – l’installation électrique est réalisée dans le respect des normes spécifiques et par du personnel professionnel qualifié – la tension de l’appareil indiquée sur la plaque technique correspond à la tension de ligne présente dans la prise de courant –... -
Page 56: Mise En Fonction
Mise en fonction 3.2.2 Modification du POINT DE CONSIGNE de tem- pérature Une fois terminées les opérations indiquées au paragraphe « Opérations préliminaires » l’appareil pourra être mis en Pour modifier le POINT DE CONSIGNE (défaut=4 °C): – appuyez S service. -
Page 57: Réinitialisation À La Programmation D'usine
3.2.4 Réinitialisation à la programmation d’usine 3.2.7 On/Stand-by du contrôleur électronique Pour régler les paramètres aux valeurs d’usine (par défaut), Le contrôleur électronique s’éteint (Stand-by) comme suit: – en appuyant sur la touche Q pendant 4 secondes vous devez d’abord accéder à la procédure: –... -
Page 58: Liste Des Paramètres Et Possibilités De Modification
Liste des paramètres et possibilités de modification Pour régler les paramètres de configuration: – appuyez sur la touche S pendant 4 secondes – l’afficheur indique « PA » – appuyez sur la touche S – réglez (dans les 15 secondes) le paramètre « PAS » (mot de passe) à l’aide des touches A et V. Le paramètre réglé en usine est -19 –... -
Page 59: Codes D'alarmes Et Réinitialisation
Codes d’alarmes et réinitialisation Alarme Signification Solutions Conséquences Alarme de température Le dispositif fonctionnera Vérifiez la température ambiante à l’aide du paramètre A1. minimale. normalement. Alarme de température ma- Le dispositif fonctionnera Vérifiez la température ambiante à l’aide du paramètre A4. ximale. -
Page 60: Arrêt
Arrêt 3.6.1 Arrêt temporaire Au cas où vous auriez besoin d’éteindre l’appareil de façon temporaire (nettoyage ou maintenance), procédez comme suit : – Éteignez le contrôleur (1) en appuyant sur la touche Q pendant 4 secondes – débranchez la fiche (2) de la prise (3) et actionnez l’interrupteur omnipolaire qui l’alimente. Fig. -
Page 61: Entretien
4 ENTRETIEN Règles (périodicité) Il est de bonne règle de nettoyer périodiquement à la fois l’intérieur et l’extérieur de l’appareil. Ceci garantit son bon fonctionne- ment et sa durée dans le temps. Nettoyage extérieur Le nettoyage extérieur et intérieur de la porte, s’il est fait quotidiennement, non seulement valorise l’esthétique de l’appareil, mais il est aussi le gage d’un bon état de conservation dans le temps. -
Page 62: Nettoyage Du Compartiment Réfrigéré
4.3.1 Nettoyage du compartiment réfrigéré Après avoir éteint l'appareil et retiré la totalité du contenu du compartiment réfrigéré : – nettoyez les surfaces internes et les étagères avec un chiffon imbibé d'eau tiède additionnée de détergent neutre – rincez et séchez soigneusement avec un chiffon doux –... -
Page 63: Anomalies - Causes Possibles - Solutions
Anomalies - Causes possibles - Solutions Dans le tableau ci-dessous sont indiquées les anomalies les plus fréquentes, avec les solutions possibles. Anomalie Cause possible Solution La fiche n’a pas été insérée correctement dans la prise Insérez la fiche correctement de courant Vérifiez l’état du câble. -
Page 64: Service D'assistance Technique Et Pièces De Rechange
Anomalie Cause possible Solution Fermez la porte et vérifiez que rien n’empêche de la fermer parfaitement La porte n’est pas fermée hermétiquement Vérifiez l’état du joint. Au cas où il serait usé, contactez le revendeur agréé pour le remplacer Présence excessive de gla- La porte reste trop ouverte Réduisez les ouvertures trop fréquentes ce sur la paroi du fond du... -
Page 65: Appendices
5 ALLEGATI - APPENDICES - ANNEXES Schema elettrico funzionale - Functional electrical diagram - Schéma électrique fonctionnel MIAMI RF... - Page 66 MIAMI VT RF...
- Page 67 MIAMI BR RF...
- Page 68 MIAMI BR VT RF...
-
Page 69: Declaration Of Conformity
Dichiarazione di conformità - Declaration of conformity - Déclaration de conformité DICHIARAZIONE DI CONFORMITAʼ GELIJKVORMIGHEIDS VERKLARING DECLARATION OF CONFORMITY OVERENSSTEMMELSESERKLÆRING KONFORMITÄTSERKLÄRUNG FÖRSÄKRAN OM ÖVERENSSTÄMMELSE DÉCLARATION DE CONFORMITÉ YHDENMUKAISUUSVAKUUTUS DECLARACION DE CONFORMIDAD Δ Δ Δ Δ Η Η Η Η Λ Λ Λ Λ Ω Ω Ω Ω Σ Σ Σ Σ Η Η Η Η Σ Σ Σ Σ Υ Υ Υ Υ Μ Μ Μ Μ Μ Μ Μ Μ Ο Ο Ο Ο Ρ Ρ Ρ Ρ Φ Φ Φ Φ Ω Ω Ω Ω Σ Σ Σ Σ Η Η Η Η Σ Σ Σ Σ DECLARACÃO DE CONFORMIDADE Rev 05 03/17 ... - Page 72 Enofrigo se réserve le droit de modifier ses produits à tout moment et sans préavis afin de les améliorer sans altérer leurs caractéristiques de base. Toutes les illustrations graphiques et/ou photos de ce document peuvent...